前端表格复制

我们可能会遇到表格复制的需求,也就是表格填写的时候,不是增加一行数据,而是增加一个表格。
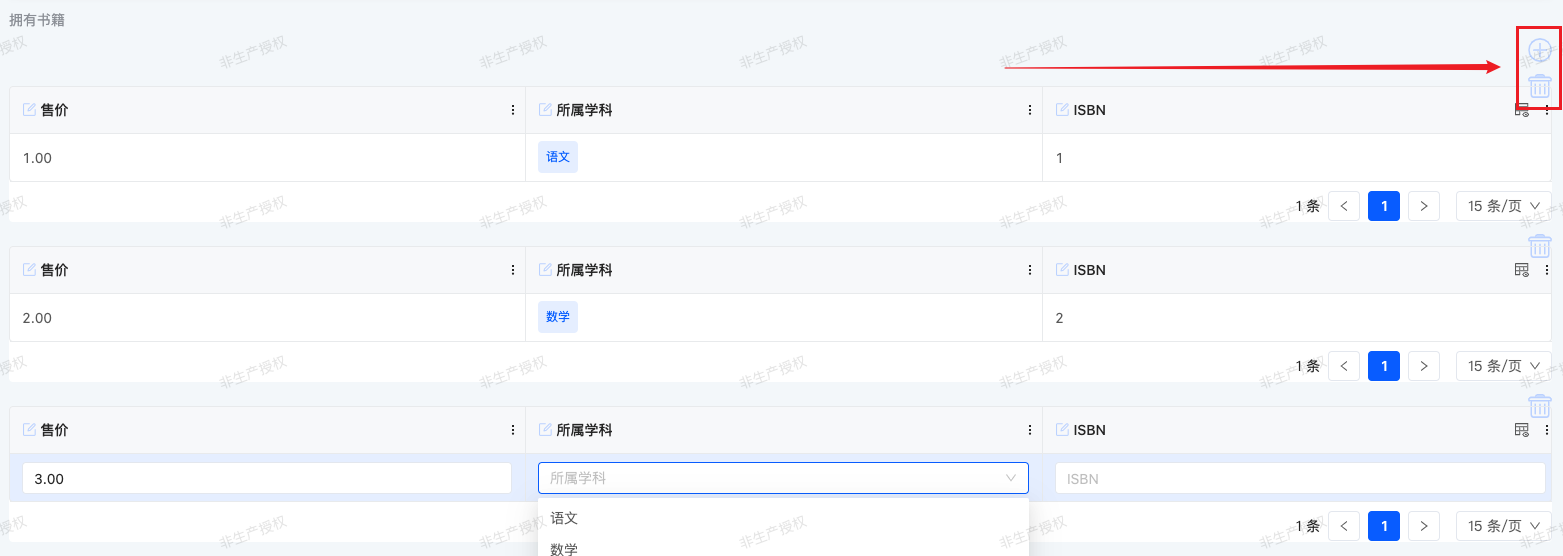
前端表格复制
以下是代码实现和原理分析。

代码实现

boot 工程的 main.ts 中加入以下代码

import {
  registerDesignerFieldWidgetCreator,
  selectorDesignerFieldWidgetCreator
} from '@oinone/kunlun-ui-designer-dependencies';

// 注册无代码组件,将表头分组的无代码组件,注册成字段表格组件
registerDesignerFieldWidgetCreator(
  { widget: 'DynamicCreateTable' },
  selectorDesignerFieldWidgetCreator({ widget: TABLE_WIDGET })!
);

DynamicCreateTableWidget 动态添加表格 ts 组件

import {
  FormO2MTableFieldWidget,
  Widget,
  DslDefinition,
  RuntimeView,
  SubmitValue,
  BaseFieldWidget,
  ModelFieldType,
  SPI,
  ViewType,
  ActiveRecord,
  uniqueKeyGenerator
} from '@oinone/kunlun-dependencies';
import { MyMetadataViewWidget } from './MyMetadataViewWidget';
import DynamicCreateTable from './DynamicCreateTable.vue';

@SPI.ClassFactory(
  BaseFieldWidget.Token({
    viewType: ViewType.Form,
    ttype: ModelFieldType.OneToMany,
    widget: 'DynamicCreateTable'
  })
)
export class DynamicCreateTableWidget extends FormO2MTableFieldWidget {
  public myMetadataViewWidget: MyMetadataViewWidget[] = [];

  @Widget.Reactive()
  public myMetadataViewWidgetLength = 0;

  @Widget.Reactive()
  public myMetadataViewWidgetKeys: string[] = [];

  protected props: Record<string, unknown> = {};

  public initialize(props) {
    super.initialize(props);
    this.props = props;
    this.setComponent(DynamicCreateTable);
    return this;
  }

  // region 创建动态表格

  @Widget.Method()
  public async createTableWidget(record: ActiveRecord) {
    const index = this.myMetadataViewWidget.length;
    const handle = uniqueKeyGenerator();
    const slotKey = `MyMetadataViewWidget_${handle}`;
    const widget = this.createWidget(
      new MyMetadataViewWidget(handle),
      slotKey, // 插槽名称
      {
        subIndex: index,
        metadataHandle: this.metadataHandle,
        rootHandle: this.rootHandle,
        automatic: true,
        internal: true,
        inline: true
      }
    );
    this.initDynamicSubview(this.props, widget);
    widget.setData(record);

    this.myMetadataViewWidgetLength++;
    this.myMetadataViewWidgetKeys.push(slotKey);
    this.myMetadataViewWidget.push(widget);
  }

  protected initDynamicSubview(props: Record<string, unknown>, widget: MyMetadataViewWidget) {
    const { currentViewDsl } = this;
    let viewDsl = currentViewDsl;
    if (!viewDsl) {
      viewDsl = this.getViewDsl(props) as DslDefinition | undefined;
      this.currentViewDsl = viewDsl;
    }
    const runtimeSubview = this.generatorRuntimeSubview(props);
    this.initRuntimeContext(widget, runtimeSubview as RuntimeView);
    this.initSubviewAfterProperties(props);
  }

  // mountedProcess 里数据已经回填,根据值动态创建表格
  protected async mountedProcess() {
    await super.mountedProcess();
    if (Array.isArray(this.value) && this.value.length > 0) {
      this.value.forEach((item) => {
        this.createTableWidget(item);
      });
    } else {
      this.createTableWidget({});
    }
  }

  // region 删除动态表格

  @Widget.Method()
  public async deleteTableWidget(index) {
    this.myMetadataViewWidget.splice(index, 1);
    this.myMetadataViewWidgetKeys.splice(index, 1);
    this.myMetadataViewWidgetLength--;
  }

  // region 数据提交

  public async submit(submitValue: SubmitValue) {
    // 拿到所有子表格的数据
    const records = this.myMetadataViewWidget.map((widget) => widget.dataSource?.[0]).filter((record) => !!record);
    const returnValue = {};
    returnValue[this.itemName] = records;
    return returnValue;
  }
}

DynamicCreateTable.vue 动态添加表格 vue 组件

<template>
  <div class="dynamic-create-table" v-bind="basicProps">
    <div class="dynamic-create-table-container">
      <oio-icon icon="oinone-tianjia2" size="24" @click="createTableWidget({})" />
    </div>
    <template v-for="(key, index) in myMetadataViewWidgetKeys" :key="key">
      <div class="dynamic-delete-table-container">
        <oio-icon icon="oinone-shanchu" size="24" @click="deleteTableWidget(index)" />
        <slot :name="key" />
      </div>
    </template>
  </div>
</template>

<script lang="ts">
import { OioIcon, PropRecordHelper } from '@oinone/kunlun-dependencies';
import { computed, defineComponent, PropType } from 'vue';

export default defineComponent({
  name: 'DynamicCreateTable',
  inheritAttrs: false,
  components: { OioIcon },
  props: {
    myMetadataViewWidgetLength: {
      type: Number
    },
    myMetadataViewWidgetKeys: {
      type: Array as PropType<string[]>
    },
    createTableWidget: {
      type: Function,
      default: () => {}
    },
    deleteTableWidget: {
      type: Function,
      default: () => {}
    }
  },
  setup(props, context) {
    const basicProps = computed(() => {
      return PropRecordHelper.collectionBasicProps(context.attrs, [`inline-table`]);
    });

    return {
      basicProps
    };
  }
});
</script>
<style lang="scss">
.dynamic-create-table {
  display: flex;
  flex-direction: column;
  gap: 24px;

  > .dynamic-create-table-container {
    display: flex;
    justify-content: flex-end;

    > .oio-icon {
      cursor: pointer;
    }
  }

  > .dynamic-delete-table-container {
    position: relative;

    > .oio-icon {
      position: absolute;
      z-index: 1;
      right: 0;
      top: -12px;
      cursor: pointer;
    }
  }

  &.inline-table .oio-default-table-view {
    min-height: unset;
  }
}
</style>

MyMetadataViewWidget 数据隔离组件

import { ActiveRecord, ActiveRecords, CallChaining, MetadataViewWidget, Widget } from '@oinone/kunlun-dependencies';

export class MyMetadataViewWidget extends MetadataViewWidget {
  @Widget.Provide()
  public mountedCallChaining: CallChaining | undefined;

  @Widget.Provide()
  @Widget.Reactive()
  public dataSource: ActiveRecord[] = [];

  @Widget.Method()
  @Widget.Provide()
  public reloadDataSource(records: ActiveRecords | undefined) {
    if (Array.isArray(records)) {
      this.dataSource = records;
    } else {
      this.dataSource = [records || {}];
    }
  }

  @Widget.Provide()
  @Widget.Reactive()
  public activeRecords: ActiveRecord[] = [];

  @Widget.Method()
  @Widget.Provide()
  public reloadActiveRecords(records: ActiveRecords | undefined) {
    if (Array.isArray(records)) {
      this.activeRecords = records;
    } else {
      this.activeRecords = [records || {}];
    }
  }

  @Widget.Reactive()
  @Widget.Provide()
  public rootData: ActiveRecord[] | undefined;

  @Widget.Method()
  @Widget.Provide()
  public reloadRootData(records: ActiveRecords | undefined) {
    if (Array.isArray(records)) {
      this.rootData = records;
    } else {
      this.rootData = [records || {}];
    }
  }

  public initialize(props): this {
    this.mountedCallChaining = props.mountedCallChaining;
    this.subIndex = props.subIndex;
    super.initialize(props);
    return this;
  }

  protected mounted() {
    this.mountedCallChaining?.syncCall();
  }

  public getFormData() {
    return this.activeRecords?.[0];
  }

  public setData(data: Record<string, unknown>) {
    if (data) {
      this.reloadDataSource(data);
      this.reloadActiveRecords(data);
      this.reloadRootData(data);
    }
  }

  /**
   * 当前子路径索引
   */
  @Widget.Reactive()
  protected subIndex: string | number | undefined;

  /**
   * 上级路径
   */
  @Widget.Reactive()
  @Widget.Inject('path')
  protected parentPath: string | undefined;

  /**
   * 完整路径
   */
  @Widget.Reactive()
  @Widget.Provide()
  public get path() {
    const { parentPath, subIndex } = this;
    let path = parentPath || '';
    return `${path}.metadata[${subIndex || ''}]`;
  }
}

原理分析

参考 https://doc.oinone.top/frontend/view-api/21426.html

Oinone社区 作者:银时原创文章,如若转载,请注明出处:https://doc.oinone.top/frontend/components/21429.html

访问Oinone官网:https://www.oinone.top获取数式Oinone低代码应用平台体验

(0)
银时的头像银时数式员工
上一篇 2025年7月21日 am11:18
下一篇 2025年7月21日 pm5:49

相关推荐

  • 前端自定义组件之多页面步骤条

    本文将讲解如何通过自定义,实现多页面的步骤条组件。其中每个步骤的元素里都对应界面设计器的一个页面。以下是代码实现和原理分析。 代码实现 NextStepWidget 多页面步骤条 ts 组件 import { CallChaining, createRuntimeContextByView, customMutation, customQuery, RuntimeView, SPI, ViewCache, Widget, DefaultTabsWidget, BasePackWidget } from '@oinone/kunlun-dependencies'; import { isEmpty } from 'lodash-es'; import { MyMetadataViewWidget } from './MyMetadataViewWidget'; import NextStep from './NextStep.vue'; import { IStepConfig, StepDirection } from './type'; @SPI.ClassFactory(BasePackWidget.Token({ widget: 'NextStep' })) export class NextStepWidget extends DefaultTabsWidget { public initialize(props) { this.titles = props.template?.widgets?.map((item) => item.title) || []; props.template && (props.template.widgets = []); super.initialize(props); this.setComponent(NextStep); return this; } @Widget.Reactive() public get invisible() { return false; } // 配置的每一步名称 @Widget.Reactive() public titles = []; // region 上一步下一步配置 // 步骤配置,切换的顺序就是数组的顺序,模型没有限制 @Widget.Reactive() public get stepJsonConfig() { let data = JSON.parse( this.getDsl().stepJsonConfig || '[{"model":"resource.ResourceCountry","viewName":"国家form"},{"model":"resource.ResourceProvince","viewName":"省form"},{"model":"resource.ResourceCity","viewName":"市form"}]' ); return data as IStepConfig[]; } // 切换上一步下一步 @Widget.Method() public async onStepChange(stepDirection: StepDirection) { // 没有激活的,说明是初始化,取第一步 if (!this.activeStepKey) { const step = this.stepJsonConfig[0]; if (step) { this.activeStepKey = `${step.model}_${step.viewName}`; await this.initStepView(step); } return; } // 获取当前步骤的索引 if (this.currentActiveKeyIndex > -1) { await this.onSave(); // 获取下一步索引 const nextStepIndex = stepDirection === StepDirection.NEXT ? this.currentActiveKeyIndex + 1 : this.currentActiveKeyIndex – 1; // 在索引范围内,则渲染视图 if (nextStepIndex >= 0 && nextStepIndex < this.stepJsonConfig.length) { const nextStep = this.stepJsonConfig[nextStepIndex];…

    2025年7月21日
    31000
  • oio-cascader 级联选择

    级联选择框。 何时使用 需要从一组相关联的数据集合进行选择,例如省市区,公司层级,事物分类等。 从一个较大的数据集合中进行选择时,用多级分类进行分隔,方便选择。 比起 Select 组件,可以在同一个浮层中完成选择,有较好的体验。 API <oio-cascader :options="options" v-model:value="value" /> 参数 说明 类型 默认值 Version allowClear 是否支持清除 boolean true autofocus 自动获取焦点 boolean false changeOnSelect (单选时生效)当此项为 true 时,点选每级菜单选项值都会发生变化,具体见上面的演示 boolean false disabled 禁用 boolean false displayRender 选择后展示的渲染函数,可使用 #displayRender="{labels, selectedOptions}" ({labels, selectedOptions}) => VNode labels => labels.join(' / ') dropdownClassName 自定义浮层类名 string – getTriggerContainer 菜单渲染父节点。默认渲染到 body 上,如果你遇到菜单滚动定位问题,试试修改为滚动的区域,并相对其定位。 Function(triggerNode) () => document.body loadData 用于动态加载选项,无法与 showSearch 一起使用 (selectedOptions) => void – maxTagCount 最多显示多少个 tag,响应式模式会对性能产生损耗 number | responsive – maxTagPlaceholder 隐藏 tag 时显示的内容 v-slot | function(omittedValues) – multiple 支持多选节点 boolean – options 可选项数据源 – placeholder 输入框占位文本 string ‘请选择’ searchValue 设置搜索的值,需要与 showSearch 配合使用 string – showSearch 在选择框中显示搜索框 boolean false tagRender 自定义 tag 内容,多选时生效 slot – value(v-model:value) 指定选中项 string[] | number[] – showSearch showSearch 为对象时,其中的字段: 参数 说明 类型 默认值 filterOption 接收 inputValue path 两个参数,当 path 符合筛选条件时,应返回 true,反之则返回 false。 function(inputValue, path): boolean 事件 事件名称 说明 回调参数 版本 change 选择完成后的回调 (value, selectedOptions) => void – search 监听搜索,返回输入的值 (value) => void – Option interface Option { value: string | number; label?: any; disabled?: boolean; children?: Option[]; // 标记是否为叶子节点,设置了 `loadData` 时有效 // 设为 `false` 时会强制标记为父节点,即使当前节点没有 children,也会显示展开图标 isLeaf?: boolean; }

    2023年12月18日
    64700
  • 前端自定义组件之左右滑动

    本文将讲解如何通过自定义,实现容器内的左右两个元素,通过左右拖拽分隔线,灵活调整宽度。其中左右元素里的内容都是界面设计器拖出来的。 实现路径 1. 界面设计器拖出页面 我们界面设计器拖个布局容器,然后在左右容器里拖拽任意元素。完成后点击右上角九宫格,选中布局容器,填入组件 api 名称,作用是把布局容器切换成我们自定义的左右滑动组件,这里的 api 名称和自定义组件的 widget 对应。最后发布页面,并绑定菜单。 2. 组件实现 widget 组件重写了布局容器,核心函数 renderLeft、renderRight,通过 DslRender.render 方法渲染界面设计器拖拽的元素。 import { BasePackWidget, DefaultContainersWidget, DslDefinition, DslRender, SPI, Widget } from '@oinone/kunlun-dependencies'; import LeftRightSlide from './LeftRightSlide.vue'; // 拿到界面设计器配置的子容器元素 function fetchContainerChildren(widgets?: DslDefinition[], level = 3): DslDefinition[] { if (!widgets) { return []; } const children: DslDefinition[] = []; for (const widget of widgets) { if (widget.widget === 'container') { children.push(widget); } else if (level >= 1) { fetchContainerChildren(widget.widgets, level – 1).forEach((child) => children.push(child)); } } return children; } @SPI.ClassFactory(BasePackWidget.Token({ widget: 'LeftRightSlide' })) export class LeftRightSlideWidget extends DefaultContainersWidget { public initialize(props) { super.initialize(props); this.setComponent(LeftRightSlide); return this; } // 获取容器的子元素 public get containerChildren(): DslDefinition[] { return fetchContainerChildren(this.template?.widgets); } // 初始宽度配置 @Widget.Reactive() public get initialLeftWidth() { return this.getDsl().initialLeftWidth || 400; } // 最小左宽度配置 @Widget.Reactive() public get minLeftWidth() { return this.getDsl().minLeftWidth || 200; } // 最小右宽度配置 @Widget.Reactive() public get minRightWidth() { return this.getDsl().minRightWidth || 200; } // 根据容器子元素渲染左侧 @Widget.Method() public renderLeft() { // 把容器的第一个元素作为左侧 const containerLeft = this.containerChildren[0]; if (containerLeft) { return DslRender.render(containerLeft); } } // 根据容器子元素渲染右侧 @Widget.Method() public renderRight() { // 把容器的第二个元素作为右侧 const containerRight = this.containerChildren[1]; if…

    2025年7月8日
    37000
  • oio-switch 开关

    API 参数 说明 类型 默认值 版本 autofocus 组件自动获取焦点 boolean false checked(v-model: checked ) 指定当前是否选中 checkedValue | unCheckedValue false checkedChildren 选中时的内容 slot checkedValue 选中时的值 boolean | string | number true disabled 是否禁用 boolean false loading 加载中的开关 boolean false unCheckedChildren 非选中时的内容 slot unCheckedValue 非选中时的值 boolean | string | number false 事件 事件名称 说明 回调参数 change 变化时回调函数 Function(checked: boolean | string | number, event: Event)

    2023年12月18日
    57800
  • oio-modal 对话框

    API 参数 说明 类型 默认值 版本 cancelText 取消按钮文字 string| slot 取消 closable 是否显示右上角的关闭按钮 boolean true closeIcon 自定义关闭图标 VNode | slot – confirmLoading 确定按钮 loading boolean 无 destroyOnClose 关闭时销毁 Modal 里的子元素 boolean false footer 底部内容,当不需要默认底部按钮时,可以设为 :footerInvisible="true" slot 确定取消按钮 getTriggerContainer 指定 Modal 挂载的 HTML 节点 (instance): HTMLElement () => document.body keyboard 是否支持键盘 esc 关闭 boolean true mask 是否展示遮罩 boolean true maskClosable 点击蒙层是否允许关闭 boolean true enterText 确认按钮文字 string 确定 title 标题 string|slot 无 visible(v-model:visible) 对话框是否可见 boolean 无 width 宽度 string|number 520 wrapClassName 对话框外层容器的类名 string – zIndex 设置 Modal 的 z-index number 1000 cancelCallback 点击遮罩层或右上角叉或取消按钮的回调, return true则关闭弹窗 function(e) enterCallback 点击确定回调 function(e)

    2023年12月18日
    59300

Leave a Reply

登录后才能评论