6.4 国际化之多语言

多语言是国际化中大家最常面对的问题,我们需要对应用的页面结构元素进行翻译,也需要对系统内容进行翻译比如:菜单、数据字典等,甚至还会业务数据进行翻译。但不管什么翻译需求,我们在实现上基本可以归类为前端翻译和后端翻译。前端翻译顾名思义是在前端根据用户选择语言对内容进行翻译,反之就是后端翻译。本文会带着大家了解oinone的前端翻译与后端翻译

准备工作

pamirs-demo-boot的pom文件中引入pamirs-translate包依赖

<dependency>
    <groupId>pro.shushi.pamirs.core</groupId>
    <artifactId>pamirs-translate</artifactId>
</dependency>

pamirs-demo-boot的application-dev.yml文件中增加配置pamirs.boot.modules增加translate,即在启动模块中增加translate模块

pamirs:
    boot:
    modules:
        - translate

后端翻译(使用)

这里通过对菜单的翻译来带大家了解翻译模块

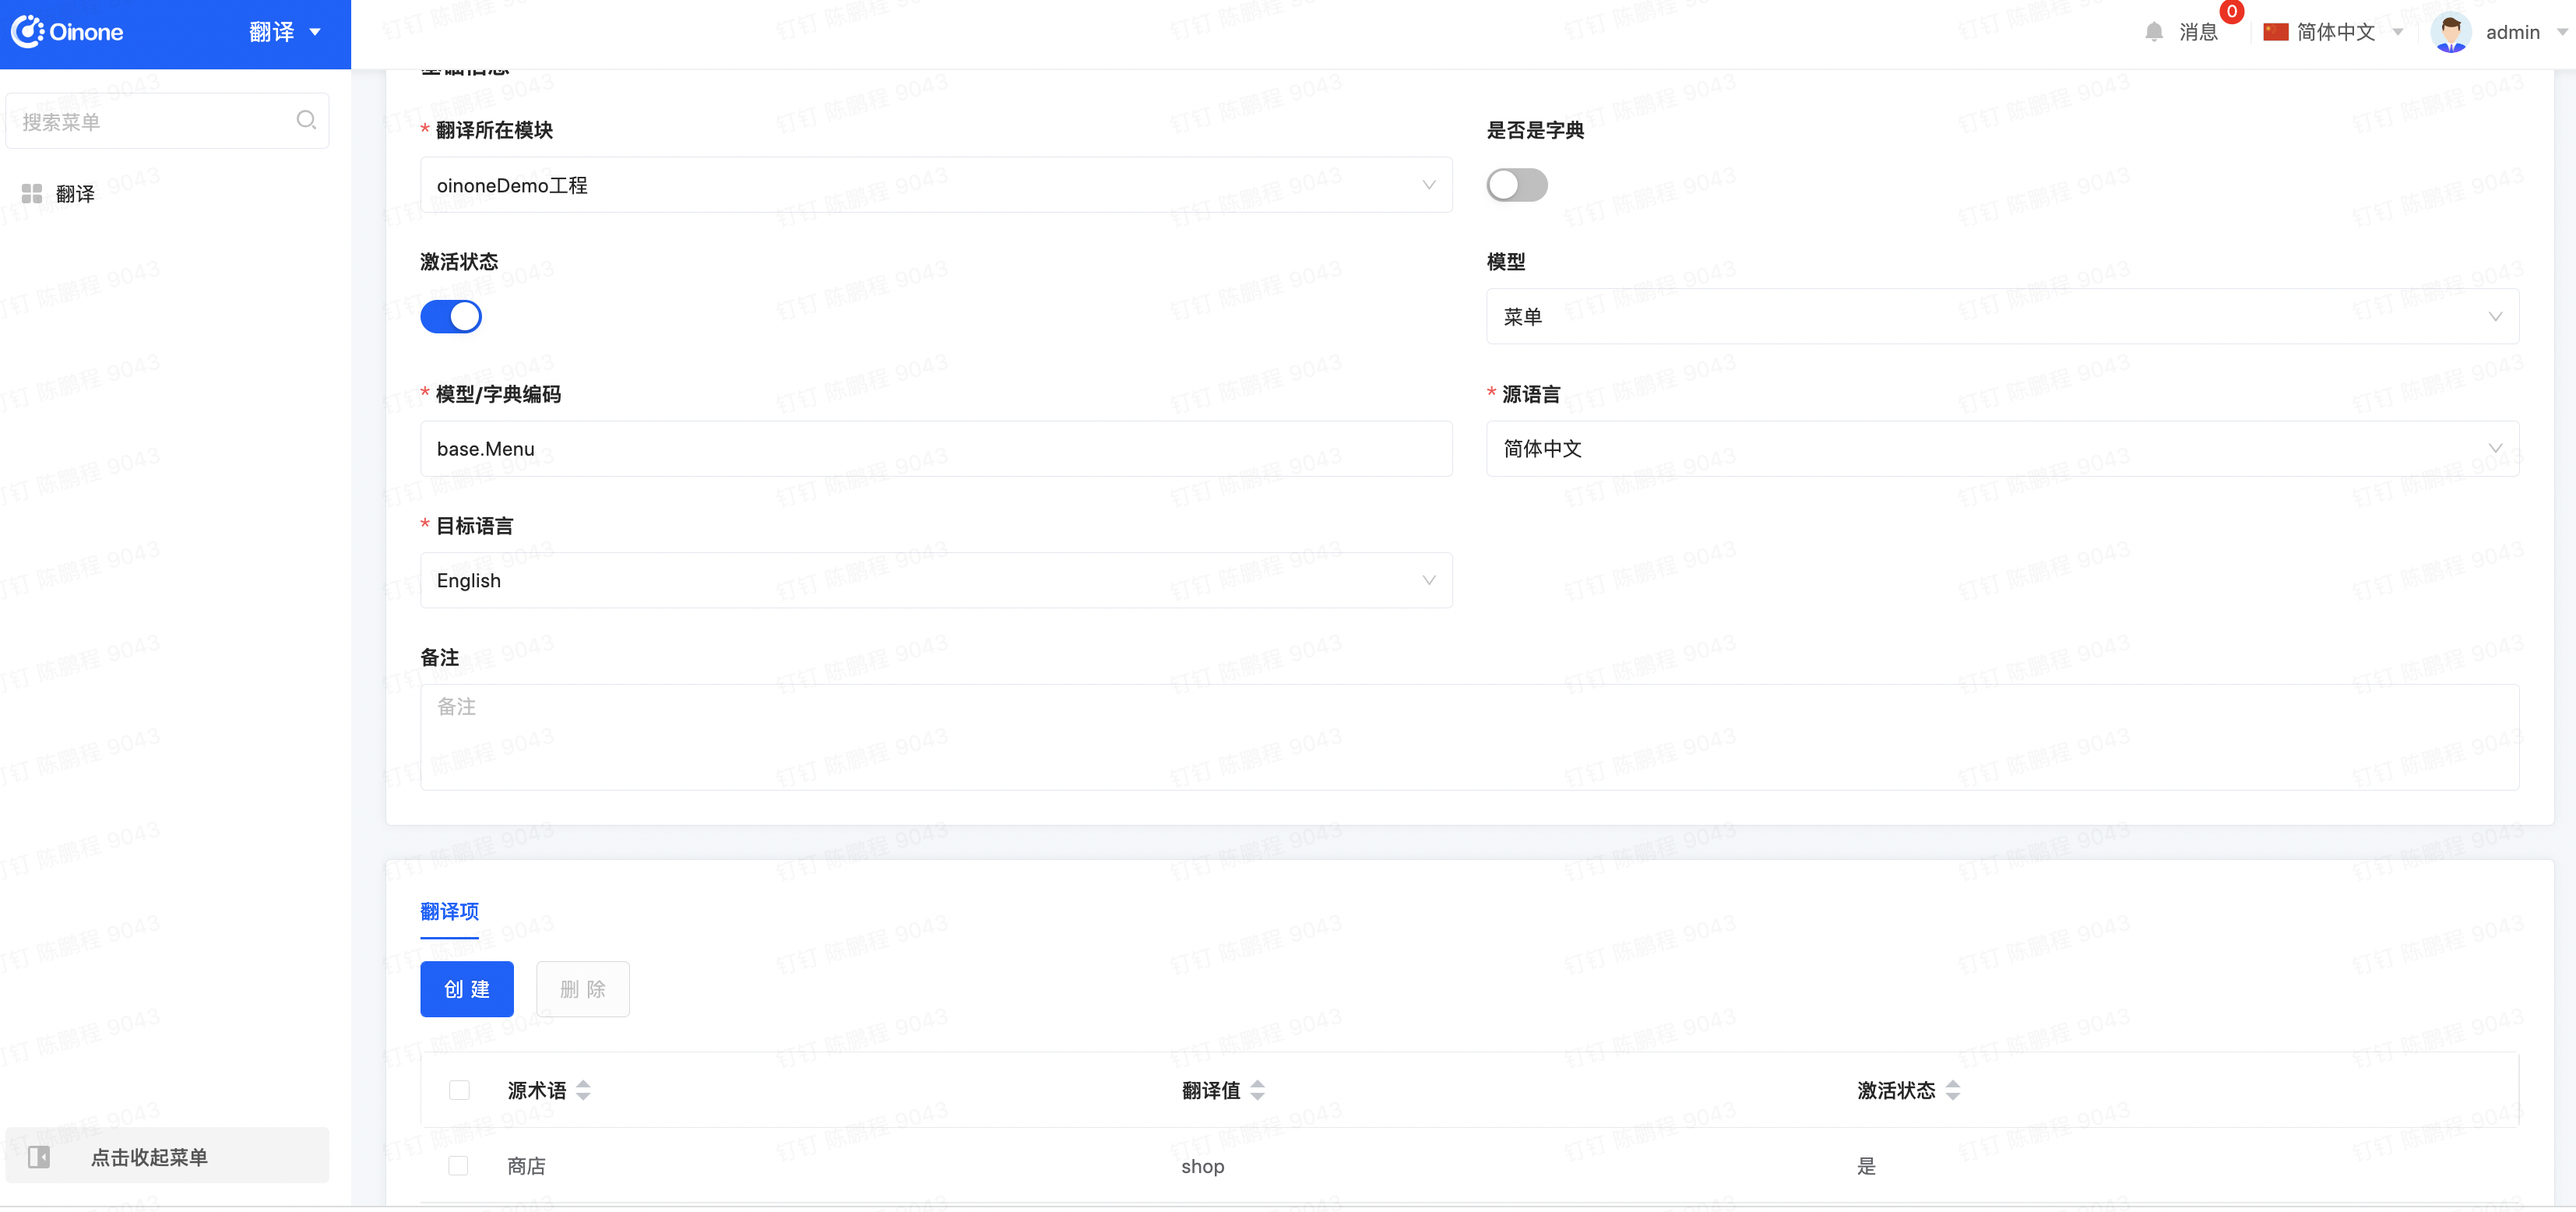
Step1 新增翻译记录

切换应用到translate模块,点击新增翻译。

  1. 选择新增翻译生效模块

  2. 选择翻译的模型为:菜单模型

  3. 源语言选择中文,目标选择English

  4. 添加翻译项目:

    1. 源术语为:商店

    2. 翻译值为:shop

    3. 状态为:激活

image.png

Step2 查看效果

应用切换到Demo模块,在右上角切换语言至英语

image.png

后端翻译(自定义模型的翻译)

在前面菜单的翻译中,似乎我们什么都没做就可以正常通过翻译模块完成多语言的切换了。是不是真如我们想象的一样,当然不是。是因为Menu模型的displayName字段加上@Field(translate = true)注解。

Step1 为PetType模型的name字段增加翻译注解

package pro.shushi.pamirs.demo.api.model;

import pro.shushi.pamirs.meta.annotation.Field;
import pro.shushi.pamirs.meta.annotation.Model;
import pro.shushi.pamirs.meta.base.IdModel;

@Model.MultiTable(typeField = "kind")
@Model.model(PetType.MODEL_MODEL)
@Model(displayName="品种",labelFields = {"name"})
public class PetType extends IdModel {

    public static final String MODEL_MODEL="demo.PetType";

    @Field(displayName = "品种名" , translate = true)
    private String name;

    @Field(displayName = "宠物分类")
    private String kind;
}

Step2 重启应用查看效果

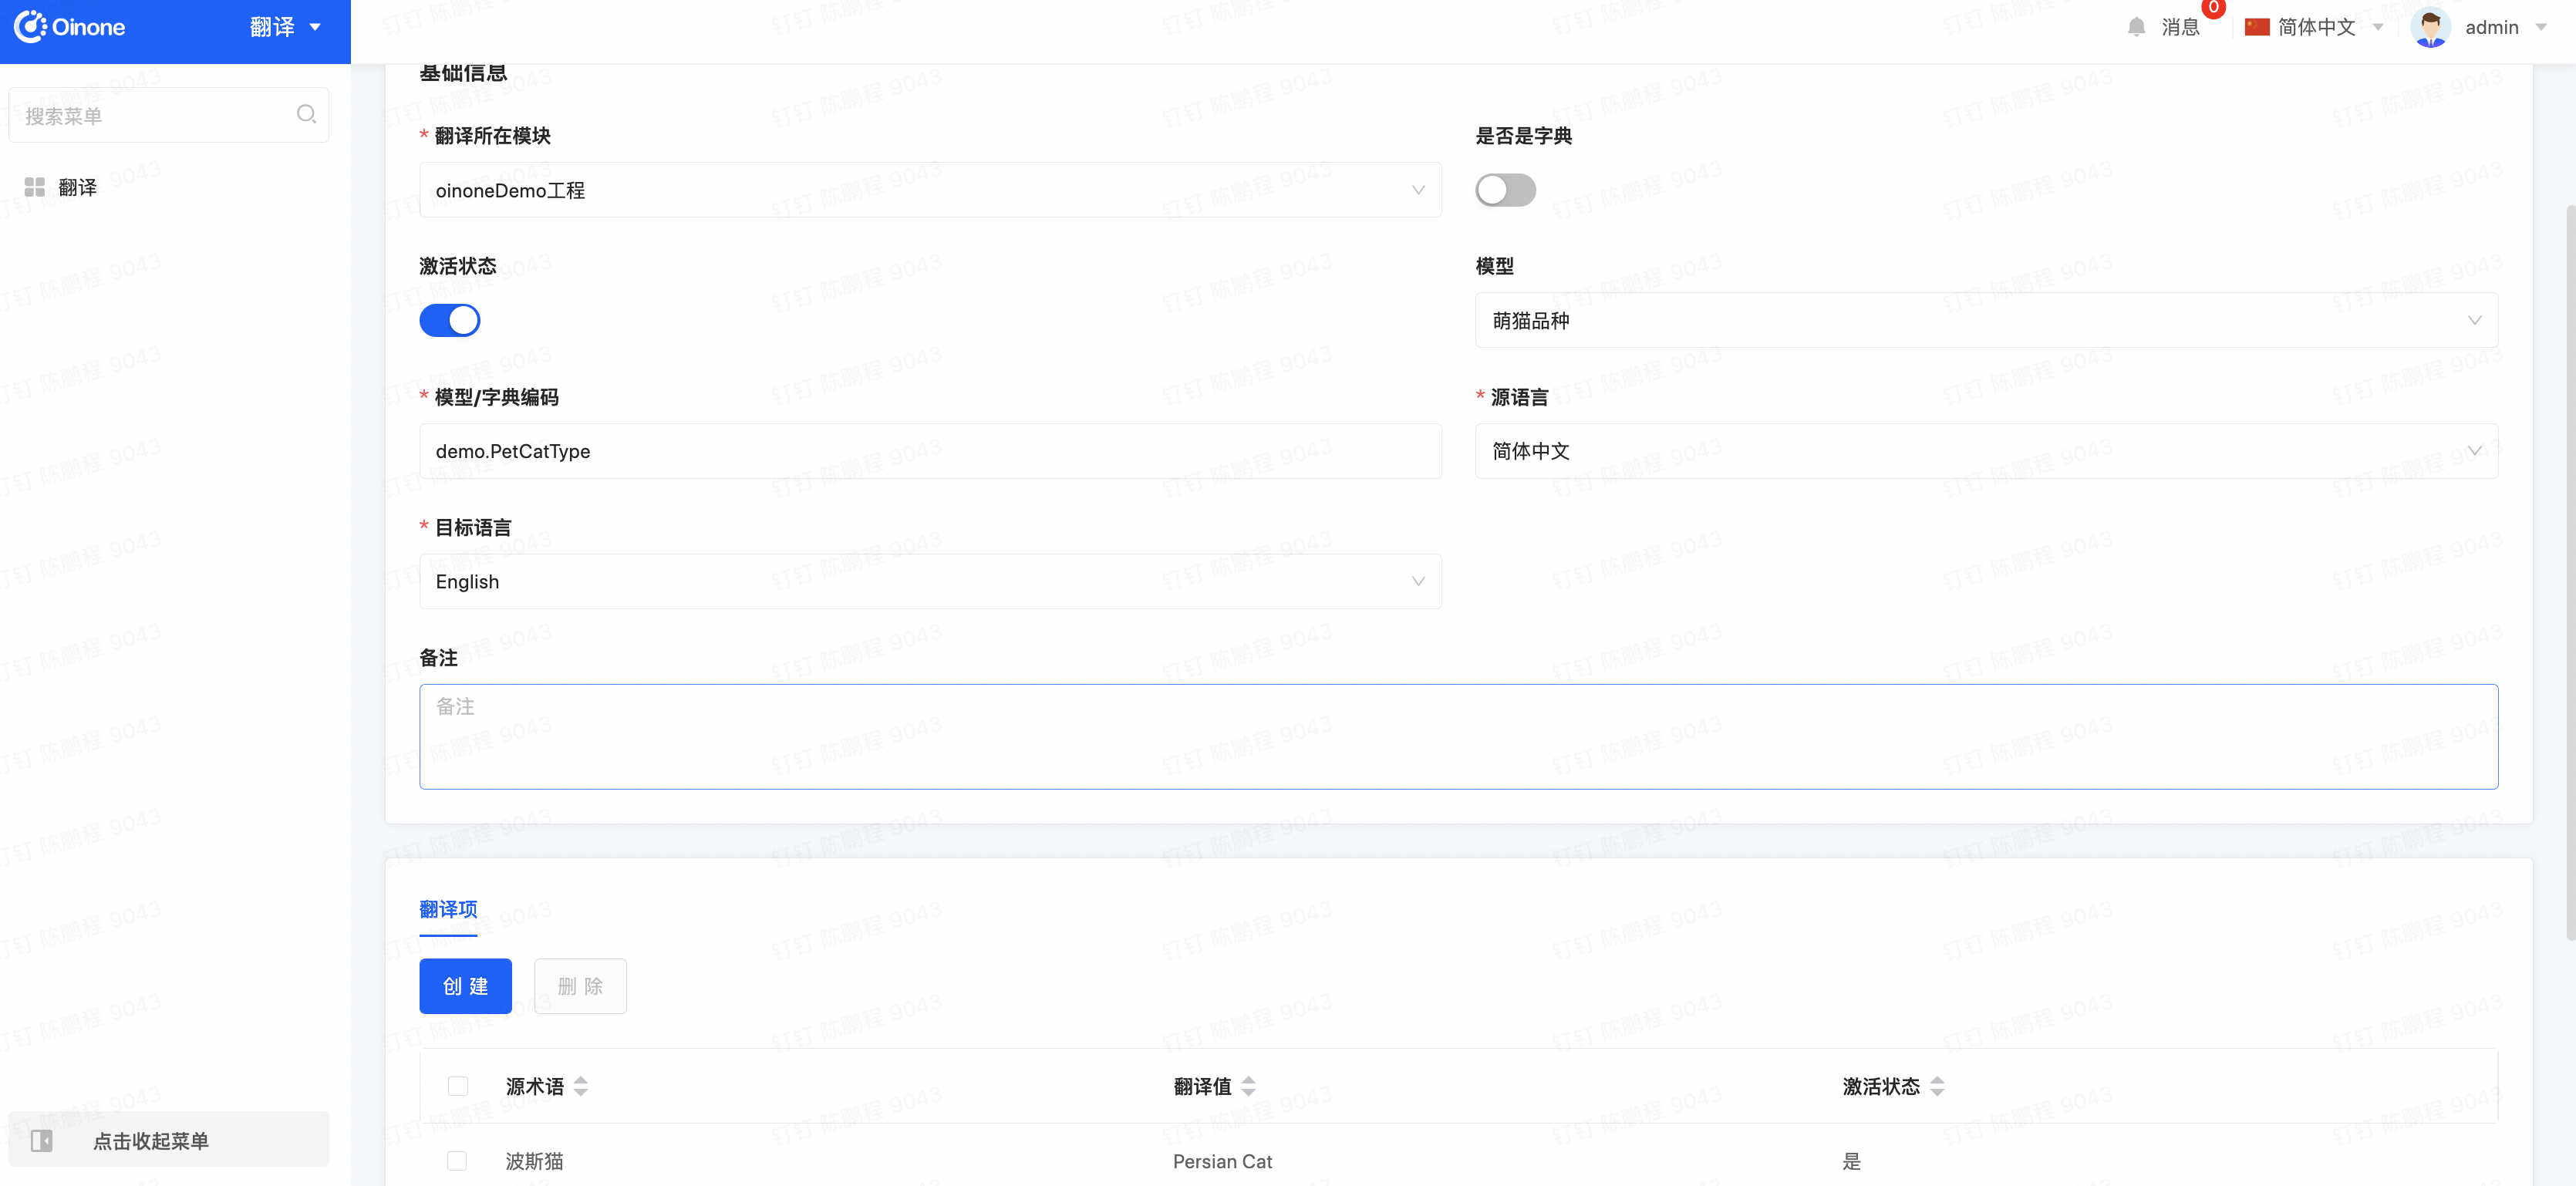
  1. 切换应用到translate模块,点击新增翻译

image.png

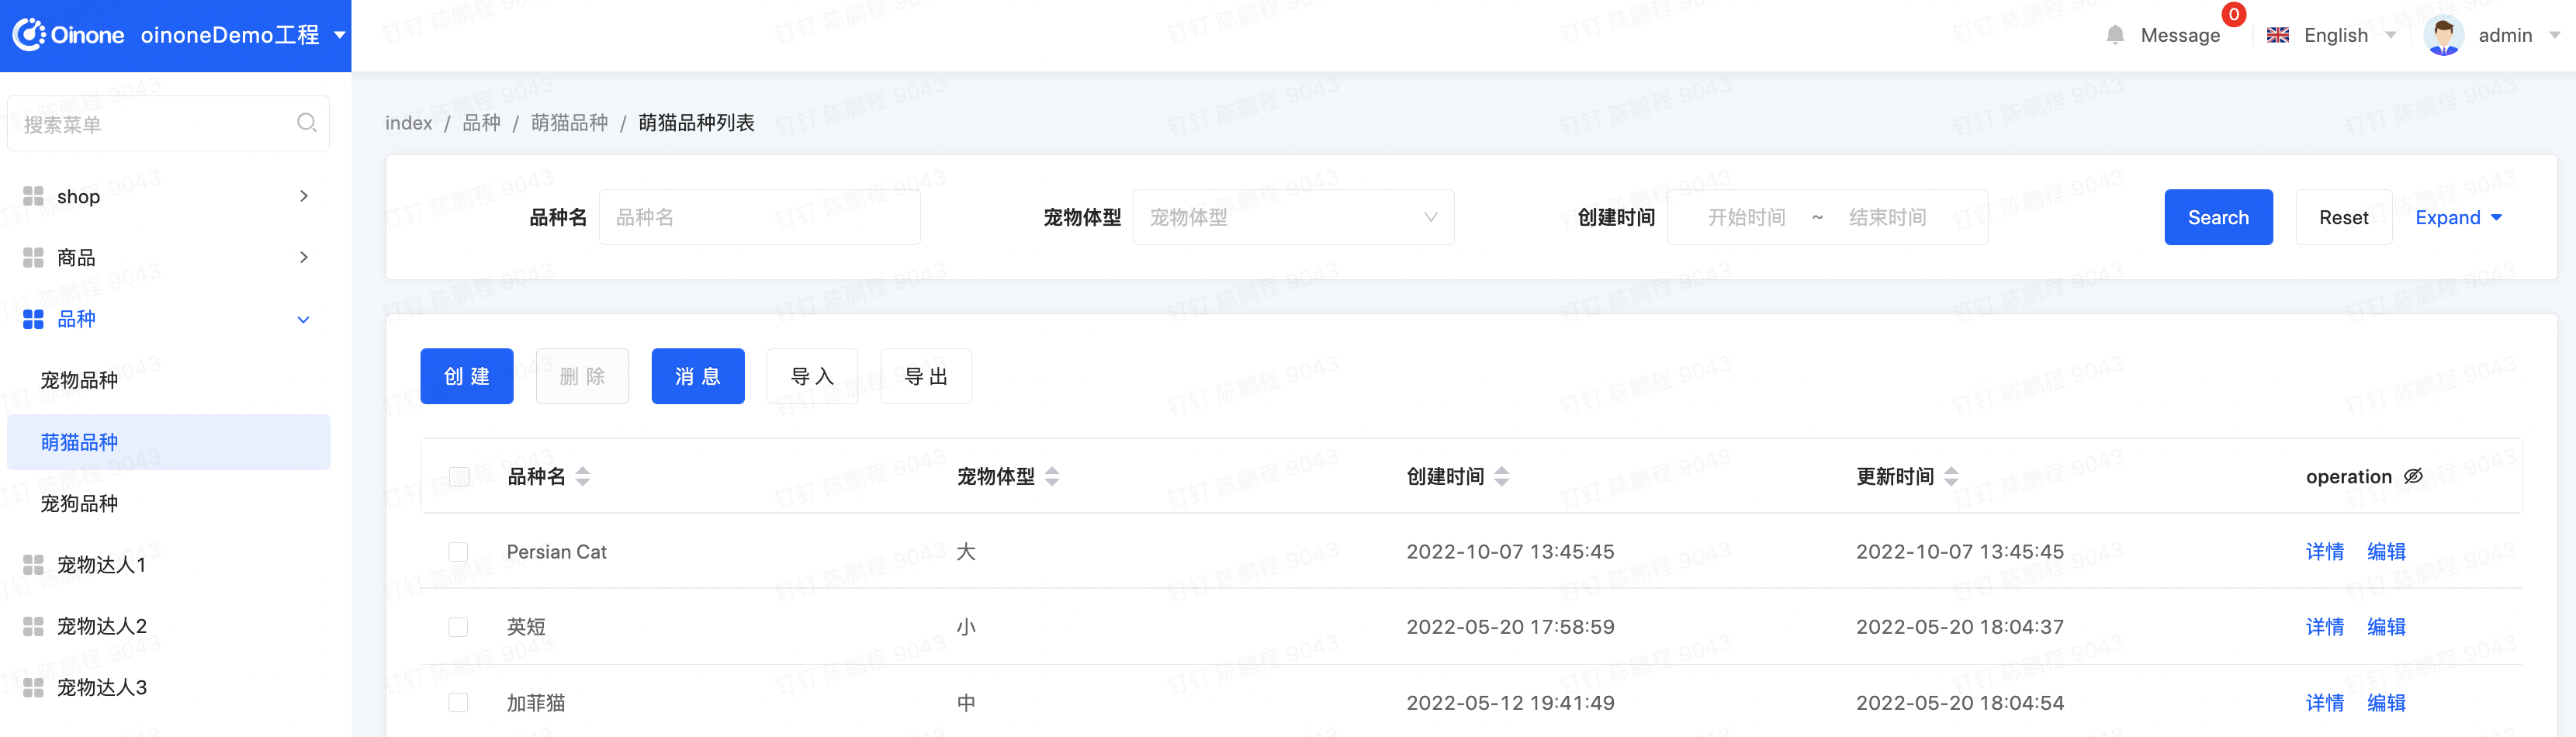
  1. 切换应用到Demo模块,切换中英文,查看效果

image.png

前端翻译

还记得我们前端第一个自定义动作吗?会弹出“oinone第一个自定义Action,啥也没干”,我们要对它进行翻译。

Step1 修改前端DoNothingActionWidget.ts

  1. import translateValueByKey

  2. 提示语用translateValueByKey加上翻译 const confirmRs = executeConfirm(translateValueByKey(\'oinone第一个自定义Action,啥也没干\')||\'oinone第一个自定义Action,啥也没干\');

    前端更多翻译工具请见前端高级特性-框架之翻译工具

import {
  Action,
  ActionContextType,
  ActionWidget,
  executeConfirm,
  IClientAction,
  SPI,
  ViewType,
  Widget,
  translateValueByKey
} from '@kunlun/dependencies';

@SPI.ClassFactory(ActionWidget.Token({ name: 'demo.doNothing' }))
export class DoNothingActionWidget extends ActionWidget {
  @Widget.Method()
  public async clickAction() {
        const confirmRs =  executeConfirm(translateValueByKey('oinone第一个自定义Action,啥也没干')||'oinone第一个自定义Action,啥也没干');
    }
}

//定义动作元数据
Action.registerAction('*', {
  displayName: '啥也没干',
  name: 'demo.doNothing',
  id: 'demo.doNothing',
  contextType: ActionContextType.ContextFree,
  bindingType: [ViewType.Table]
} as IClientAction);

Step2 新增翻译记录

前端翻译的翻译记录对应的模型可以随意找一个放。但要注意几点:

  1. 不要找有字读配置translate = true的模型,因为会影响后端翻译性能。

  2. 最好统一到一个模型中,便于后续管理。这里大家可以自定义一个无有业务访问且本身无需要翻译的模型来挂载,避免性能损失
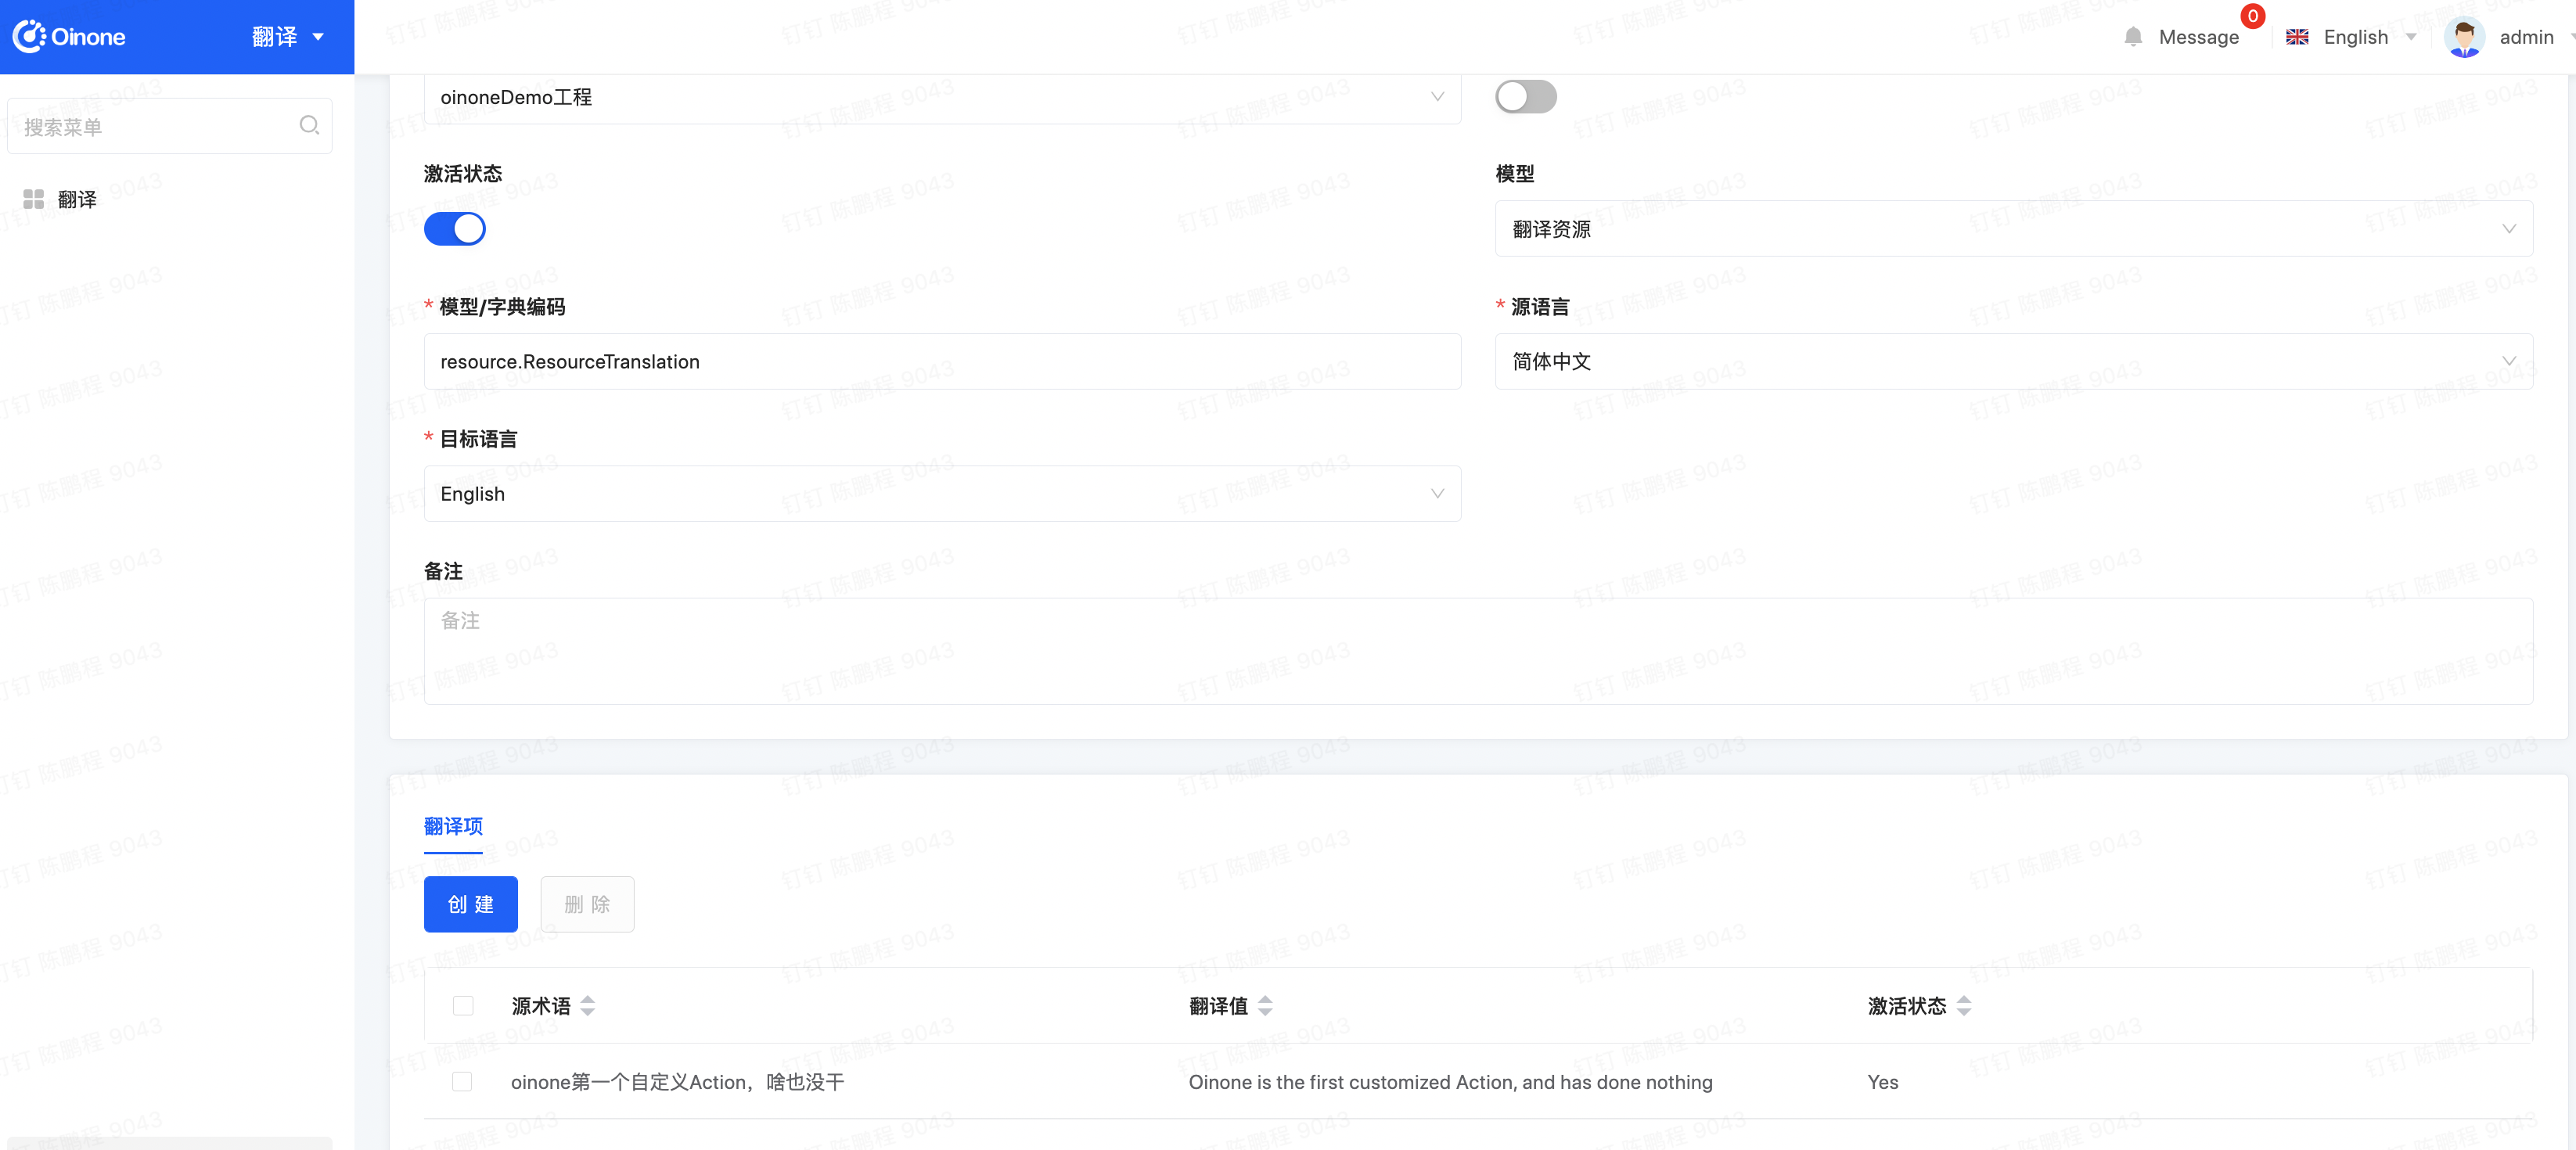
image.png

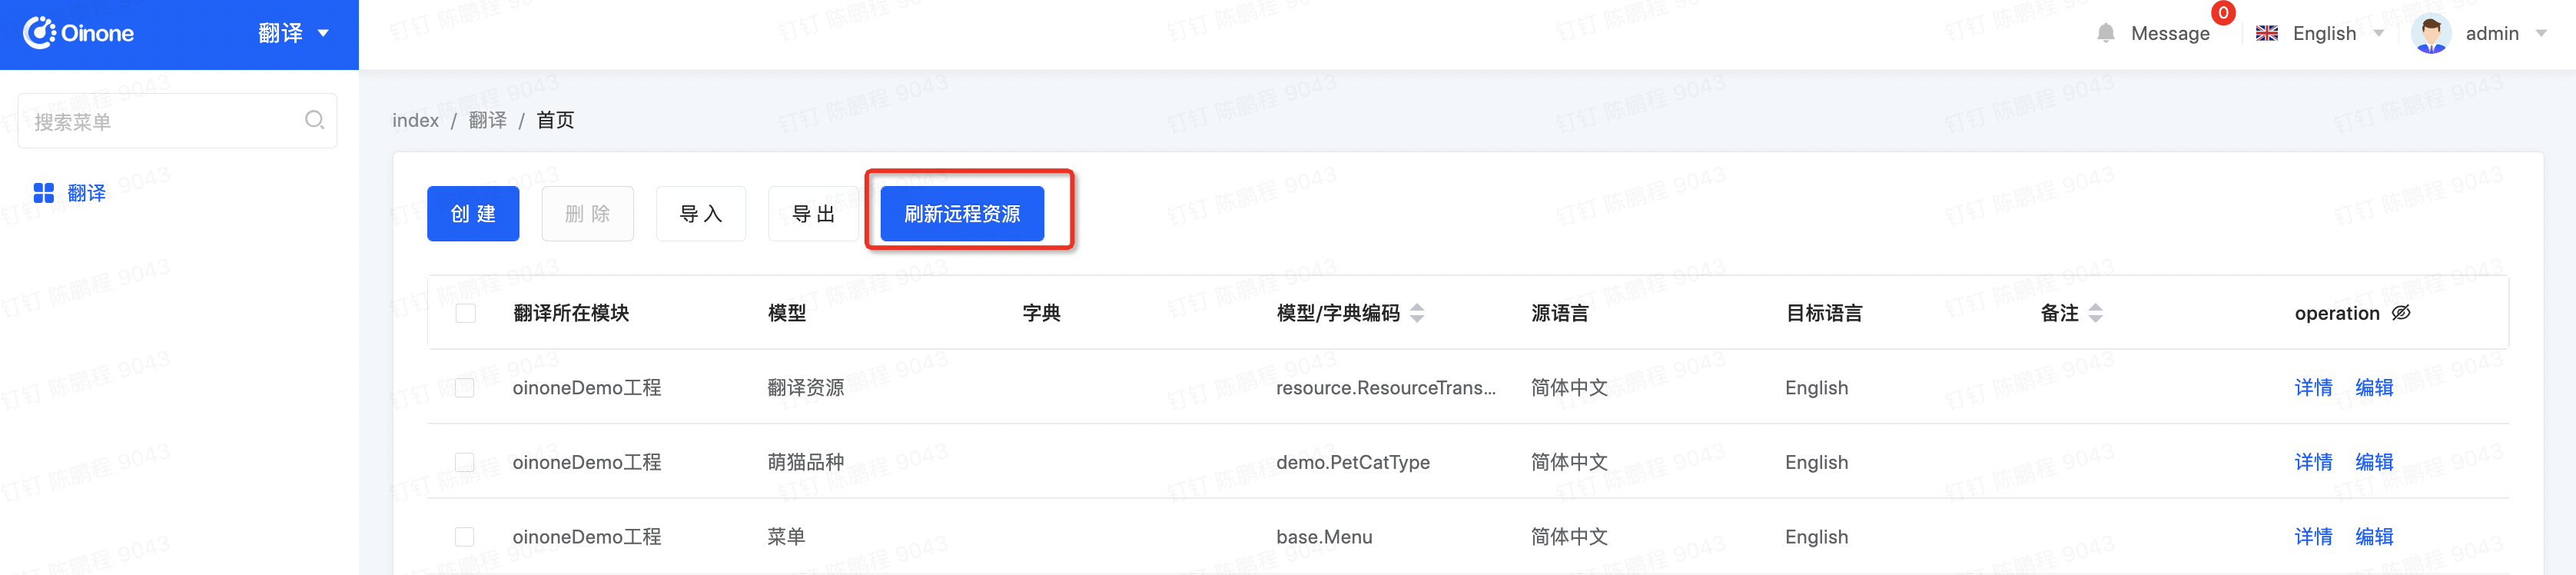
Step3 刷新远程资源生成前端语言文件

image.png

Step4 新增或修改.env

前端在项目根目录下新增或修改.env,可以参考.env.example文件。通过.env文件为前端配置oss文件路径,针对I18N_OSS_URL配置项。真实前端访问翻译语言文件的路径规则为:http://bucket.downloadUrl/mainDir/租户/translate/模块/语言文件

  1. yaml文件中oss配置的文件路径:http://pamirs.oss-cn-hangzhou.aliyuncs.com/upload/demo/

  2. 租户/translate/模块/语言文件 前端会自动根据上下文组织

# 后端api配置
# API_BASE_URL=http://127.0.0.1:8090
# 下面是国际化语言的cdn配置,默认用当前请求链接下的路径: /pamirs/translate/${module}/i18n_${lang}.js
I18N_OSS_URL=http://pamirs.oss-cn-hangzhou.aliyuncs.com/upload/demo

Step5 重启前端应用看效果

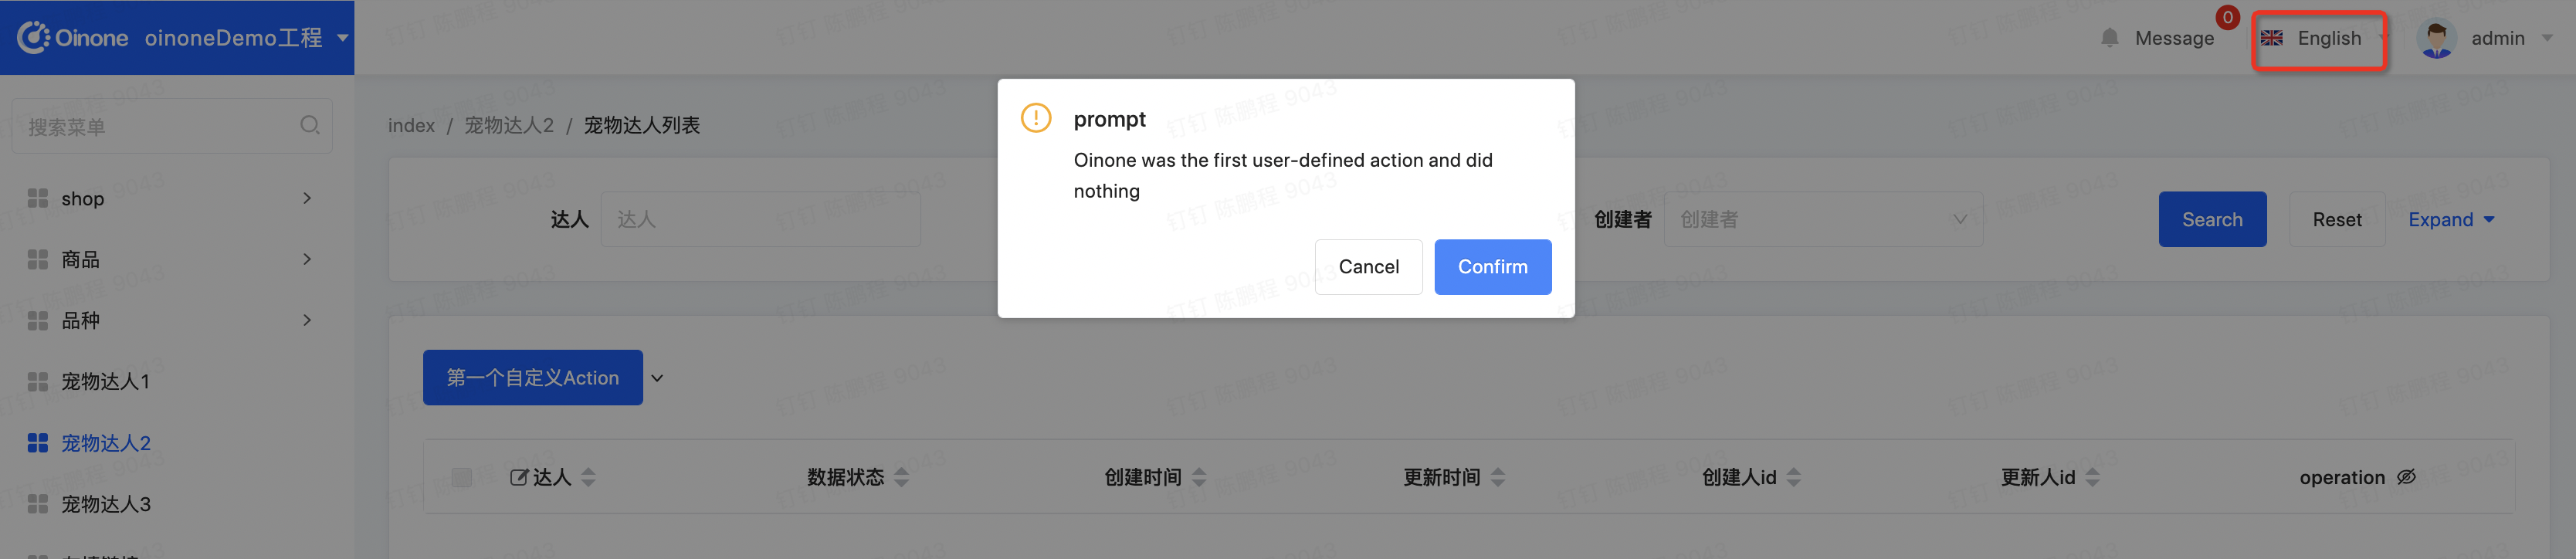
对语言进行中英文切换,进入宠狗达人页面,点击【第一个自定义Action】,查看前端翻译效果
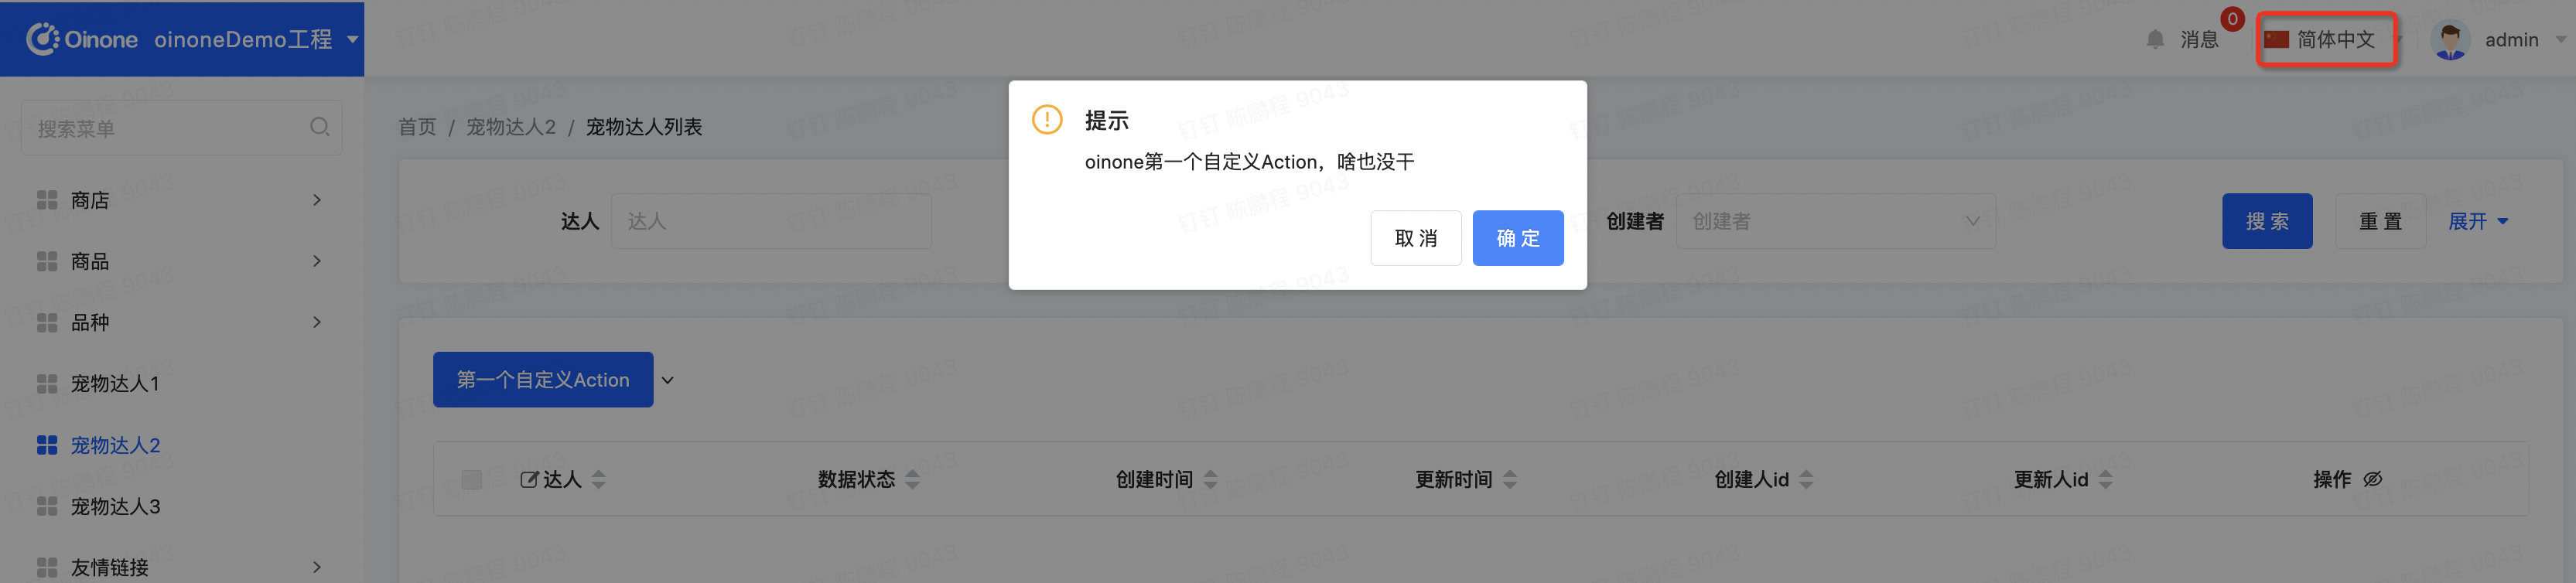
image.png

image.png

Oinone社区 作者:史, 昂原创文章,如若转载,请注明出处:https://doc.oinone.top/oio4/9328.html

访问Oinone官网:https://www.oinone.top获取数式Oinone低代码应用平台体验

Like (0)
史, 昂's avatar史, 昂数式管理员
Previous 2024年5月23日 am8:10
Next 2024年5月23日 am8:12

相关推荐

  • 4.2.7 框架之翻译工具

    一、说明 Oinone目前的默认文案是中文,如果需要使用其他语言,Oinone也提供一系列的翻译能力。 二、定义语言文件 在src/local下新增一个名为zh_cn.ts文件: 图4-2-7-1 语言文件 编辑zh_cn.ts文件,增加以下内容: const zhCN = { demo: { test: '这是测试' } } export default zhCN 图4-2-7-2 语言内容格式示意 在mian.ts注册语言资源: import { LanguageType, registryLanguage} from '@kunlun/dependencies'; import Zh_cn from './local/zh_cn' registryLanguage(LanguageType['zh-CN'], Zh_cn); 图4-2-7-3 注册语言 三、Vue模板使用 <template> <div class="petFormWrapper"> <form :model="formState" @finish="onFinish"> <a-form-item :label="translate('demo.test')" id="name" name="kind" :rules="[{ required: true, message: '请输入品种种类!', trigger: 'focus' }]"> <a-input v-model:value="formState.kind" @input="(e) => onNameChange(e, 'kind')" /> <span style="color: red">{{ getServiceError('kind') }}</span> </a-form-item> <a-form-item label="品种名" id="name" name="name" :rules="[{ required: true, message: '请输入品种名!', trigger: 'focus' }]"> <a-input v-model:value="formState.name" @input="(e) => onNameChange(e, 'name')" /> <span style="color: red">{{ getServiceError('name') }}</span> </a-form-item> </form> </div> </template> <script lang="ts"> import { defineComponent, reactive } from 'vue'; import { Form } from 'ant-design-vue'; export default defineComponent({ // 引入translate props: ['onChange', 'reloadData', 'serviceErrors', 'translate'], components: { Form }, setup(props) { const formState = reactive({ kind: '', name: '', }); const onFinish = () => { console.log(formState); }; const onNameChange = (event, name) => { props.onChange(name, event.target.value); }; const reloadData = async () => { await props.reloadData(); }; const getServiceError = (name: string) => { const error = props.serviceErrors.find(error => error.name === name);…

    2024年5月23日
    1.7K00
  • 5.4 基础支撑之商业关系域

    PamirsPartner作为商业关系与商业行为的主体,那么PamirsPartner间的关系如何描述,本文将介绍两种常见的设计思路,从思维和实现两方面进行对比,给出oinone为啥选择关系设计模式的原因。 一、两种设计模式对比 设计模式思路介绍 角色设计模式思路介绍 从产品角度枚举所有商业角色,每个商业角色对应一个派生的商业主体,并把主体间的关系类型进行整理。 图5-4-1 角色设计模式 关系设计模式思路介绍 从产品角度枚举所有商业角色,每个商业角色对应一个派生的主体间商业关系 图5-4-2 关系设计模式 设计模式对应实现介绍 角色设计模式实现介绍 不单商业主体需要扩展,关系也要额外维护,可以是字段或是关系表。一般M2O和O2M字段维护,M2M关系表维护。 创建合同场景中甲方选择【商业主体A】,乙方必须是【商业主体A】有关联的经销商、分销商、零售商、供应商等,则在角色设计模式下就非常麻烦,因为关系都是独立维护的 图5-4-3 角色设计模式实现介绍 关系设计模式实现介绍 只需维护商业关系扩展 同时在设计上收敛了商业关系,统一管理应对不同场景都比较从容 图5-4-4 关系设计模式实现介绍 二、oinone商业关系的默认实现 首先oinone的商业关系选择关系设计模式 其次模型上采用多表继承模式,父模型上维护核心字段,子模型维护个性化字段。

    2024年5月23日
    2.2K00
  • 3.5.4 Ux注解详解

    我们默认视图已经基本可以用了,但实际业务中还是会有一些不大不小的自定义需求,写自定义视图又太麻烦,今天我们来学习一种更加轻量的模式即:后端研发可以通过注解来配置视觉交互。该系列注解以Ux开头,例如@UxHomepage、@UxMenu、@UxAction、@UxView、@UxWidget等等。 视图XML的配置优先级大于在代码上的注解,也就是代码上的注解影响的是默认展示逻辑。 一、Ux家族图谱 我们先简单通过家族图谱做个简单了解,脑海里有一个影响当有需要的时候知道能不能做,深入了解还需要大家多多动手去尝试 图3-5-4-1 Ux家族图谱 二、默认视图后端配置举例 在下面的代码片段中UxTable、UxForm、UxDetail、UxTableSearch都有涉及,几个特殊点做些解释其他的留大家自行测试 Group分组的配置逻辑:为了不让一个分组内的字段不断的写Group,所以采取了第一个字段写了Group,到下一个出现的group之间的字段都自动归为一个Group 搜素整体不展示可以用“@UxTable(enableSearch = false)”配置在模型的类上。 字段搜索用“UxTableSearch”配置在模型的字段上,其特殊逻辑是只要你配了一个字段,系统就不自动补充了,例子中表格页的搜索栏只会留下店铺名称和店铺编码 ……其他代码 //@UxTable(enableSearch = false),整体不支持搜索 public class PetShop extends AbstractDemoIdModel { public static final String MODEL_MODEL="demo.PetShop"; @Field(displayName = "店铺编码") @UxForm.FieldWidget(@UxWidget(group = "Form基础数据"))//Form分组 @UxTableSearch.FieldWidget(@UxWidget())//支持搜索 private String code; @Field(displayName = "店铺编码2") @Field.Sequence(sequence = "DATE_ORDERLY_SEQ",prefix = "C",size=6,step=1,initial = 10000,format = "yyyyMMdd") private String codeTwo; @UxTableSearch.FieldWidget(@UxWidget())//支持搜索 @UxTable.FieldWidget(@UxWidget(invisible = "true"))//表格中不展示支持搜索 @Field(displayName = "店铺名称",required = true,immutable=true) private String shopName; @Field(displayName = "一年内新店") @UxForm.FieldWidget(@UxWidget(widget = "Switch",group = "Form基础数据"))//Switch,Checkbox可以切换着看,字段可选widget参考【字段的配置】一文 private Boolean oneYear; @Field(displayName = "开店时间",required = true) @UxDetail.FieldWidget(@UxWidget(invisible = "true"))//详情不展示 private Time openTime; @Field(displayName = "闭店时间",required = true) @UxDetail.FieldWidget(@UxWidget(invisible = "true"))//详情不展示 private Time closeTime; …… 其他代码 } 图3-5-4-2 默认视图后端配置举例

    2024年5月23日
    1.9K00
  • 【附件一】下载说明

    章节说明 下载内容 下载地址 备注 3.1.1环境准备>环境准备(Mac版) 安装 jdk 1.8 https://www.oracle.com/java/technologies/downloads/#java8 安装 mysql 8.0.26 https://dev.mysql.com/downloads/mysql/ 安装 idea社区版2020.2.4 https://www.jetbrains.com/idea/download/other.html 安装idea插件 请移至Oinone官网https://www.oinone.top/对应页面下载或联系Oinone官方客服 根据各自Idea版本下载对应插件,下载文件后去除.txt后缀 安装 git 2.2.0 https://sourceforge.net/projects/git-osx-installer/files/git-2.15.0-intel-universal-mavericks.dmg/download?use_mirror=nchc 安装 GraphQL的客户端工具 Insomnia 请移至Oinone官网https://www.oinone.top/对应页面下载或联系Oinone官方客服 下载文件后修改文件名去除.txt后缀 安装 maven https://archive.apache.org/dist/maven/maven-3/3.8.1/binaries/ 安装脚本zk https://archive.apache.org/dist/zookeeper/zookeeper-3.5.8/apache-zookeeper-3.5.8-bin.tar.gz 安装脚本rocketmq https://archive.apache.org/dist/rocketmq/4.7.1/rocketmq-all-4.7.1-bin-release.zip 安装脚本redis https://download.redis.io/releases/redis-5.0.2.tar.gz 安装nvm https://github.com/nvm-sh/nvm/blob/master/README.md 3.1.1环境搭建>环境准备(Windows版) 安装JDK 1.8 https://www.oracle.com/java/technologies/downloads/#java8 安装 Apache Maven 3.8+ https://maven.apache.org/download.cgi 下载settings-develop.xml 请移至Oinone官网https://www.oinone.top/对应页面下载或联系Oinone官方客服 下载到 C:\Users\你的用户名.m2 目录中并重命名为settings.xml 安装 Jetbrains IDEA 2020.2.4 https://www.jetbrains.com/idea/download/other.html 安装 Jetbrains IDEA 2020.2.4需下载插件 https://pan.baidu.com/share/init?surl=HNzSxxH0KncvglkfITUrsA 提取密码: mdji 安装idea插件 请移至Oinone官网https://www.oinone.top/对应页面下载或联系Oinone官方客服 根据各自Idea版本下载对应插件,下载文件后去除.txt后缀 安装MySQL 8 https://dev.mysql.com/downloads/mysql/ 安装Git https://git-scm.com/download/win 安装GraphQL测试工具Insomnia https://github.com/Kong/insomnia/releases 安装RocketMQ https://rocketmq.apache.org/download/ 安装ElasticSearch 版本 8.4.1 https://www.elastic.co/cn/downloads/past-releases/elasticsearch-7-6-1 安装Redis https://download.redis.io/releases/ Zookeeper安装 https://dlcdn.apache.org/zookeeper/zookeeper-3.8.0/apache-zookeeper-3.8.0-bin.tar.gz 安装nodejs 版本12.12.0 https://nodejs.org/dist/v12.12.0/node-v12.12.0-win-x64.zip 安装cnpm https://www.npmjs.com/package/cnpm 3.2.1Oinone一模块为组织>构建第一个Module 安装archetype-project-generate.sh脚本 请移至Oinone官网https://www.oinone.top/对应页面下载或联系Oinone官方客服 3.5.5Oinone以交互为外在>设计器的结合 安装Docker https://www.docker.com/get-started/ 下载结构包:Oinone-op-ds.zip 请移至Oinone官网https://www.oinone.top/对应页面下载或联系Oinone官方客服 4.1.10后端高级特性>函数之触发与定时 下载canal中间件:pamirs-middleware-canal-deployer-3.0.1.zi 请移至Oinone官网https://www.oinone.top/对应页面下载或联系Oinone官方客服 4.1.11后端高级特性>函数之异步执行 下载tbSchedule的控制台jar包:pamirs-middleware-schedule-console-3.0.1.jar.txt 请移至Oinone官网https://www.oinone.top/对应页面下载或联系Oinone官方客服 下载schedule.json 请移至Oinone官网https://www.oinone.top/对应页面下载或联系Oinone官方客服 下载以下文件放在pamirs-demo-boot的src/main/resources/init目录下 4.1.25后端高级特性>框架之搜索引擎 ES安装 方式一:官方下载安装包:https://www.elastic.co/cn/downloads/past-releases/elasticsearch-8-4-1 下载后去除后缀.txt,然后解压文件 方式二:请移至Oinone官网https://www.oinone.top/对应页面下载或联系Oinone官方客服

    Oinone 7天入门到精通 2024年5月23日
    2.2K00

Leave a Reply

Please Login to Comment

Comments(2)

  • xiao3's avatar
    xiao3 2024年11月25日 am10:43

    只支持英语吗?如何添加其他语种?

    • shao's avatar
      shao 2024年11月25日 pm5:24

      @xiao3支持其他的国家的语言,需要在资源里面创建,如果有其他的疑问,也可以群内联系我们哈