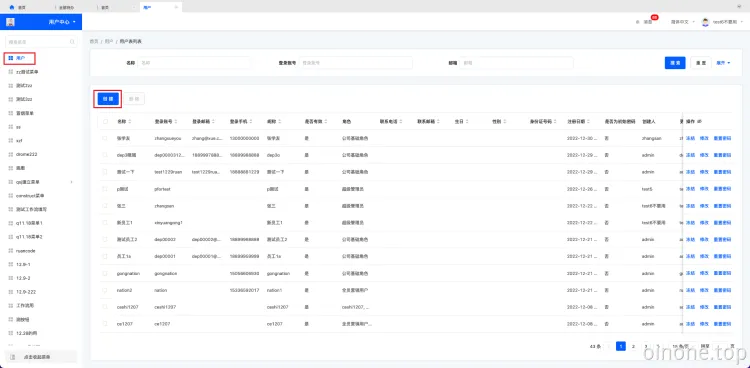
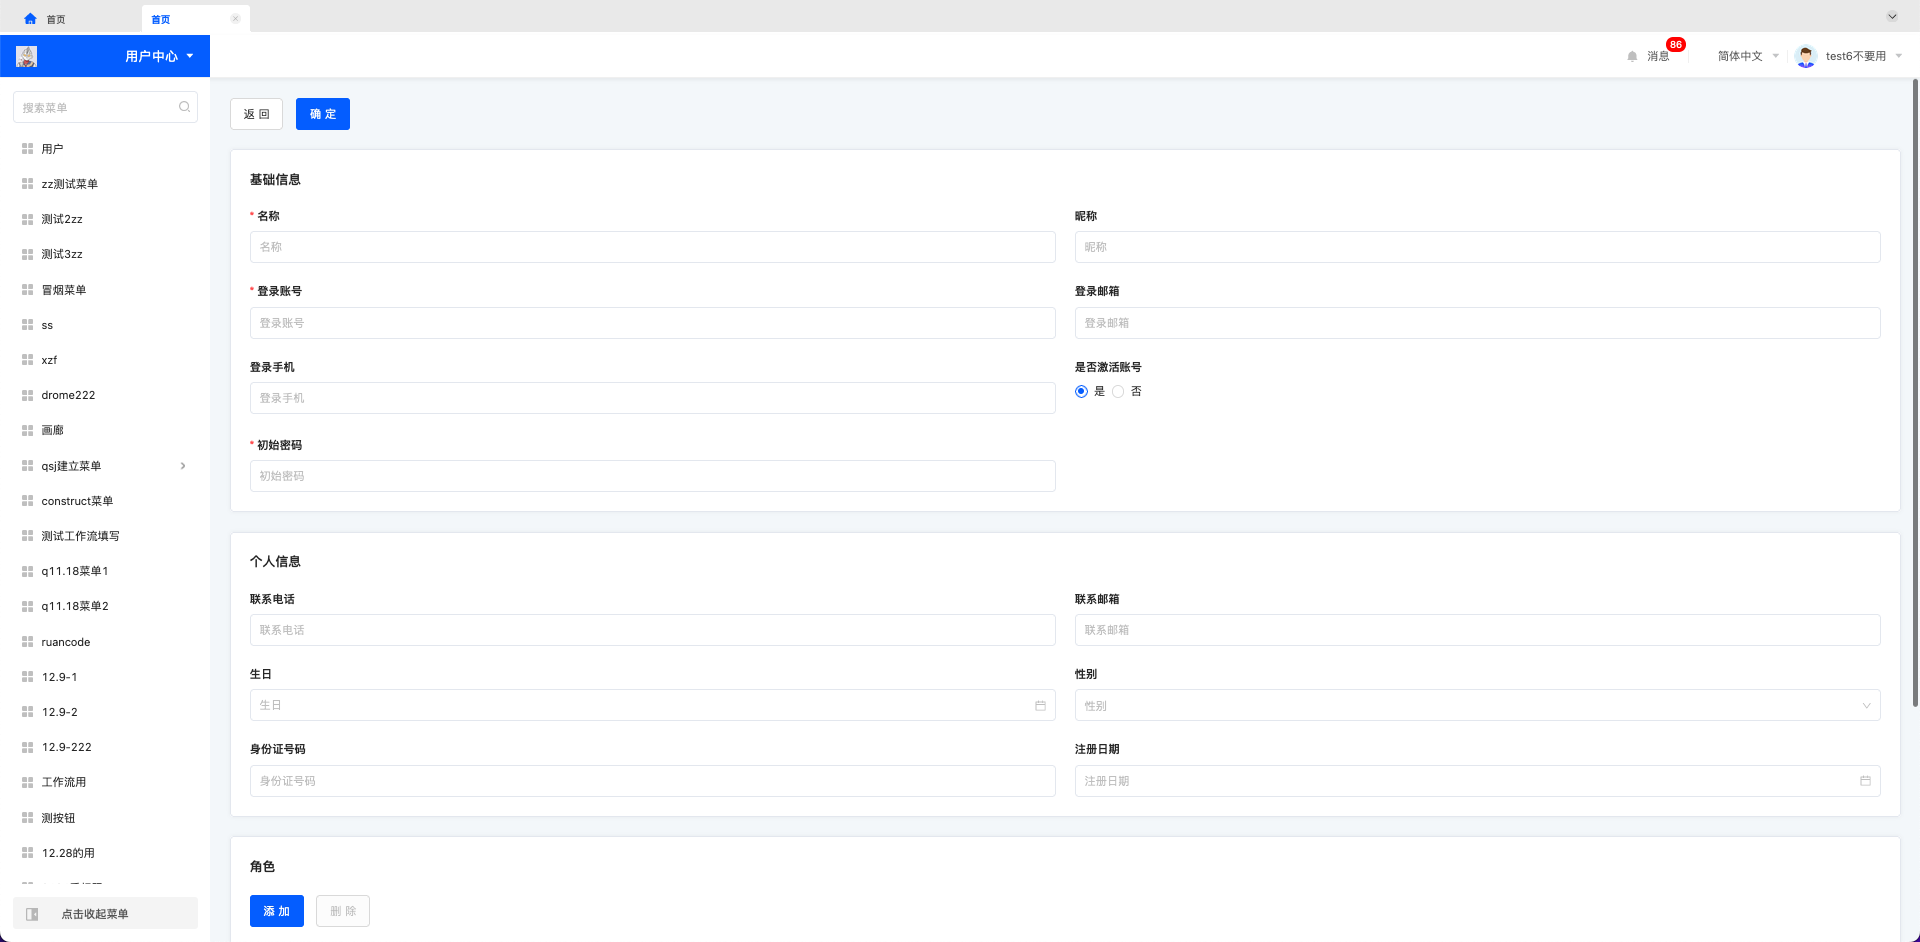
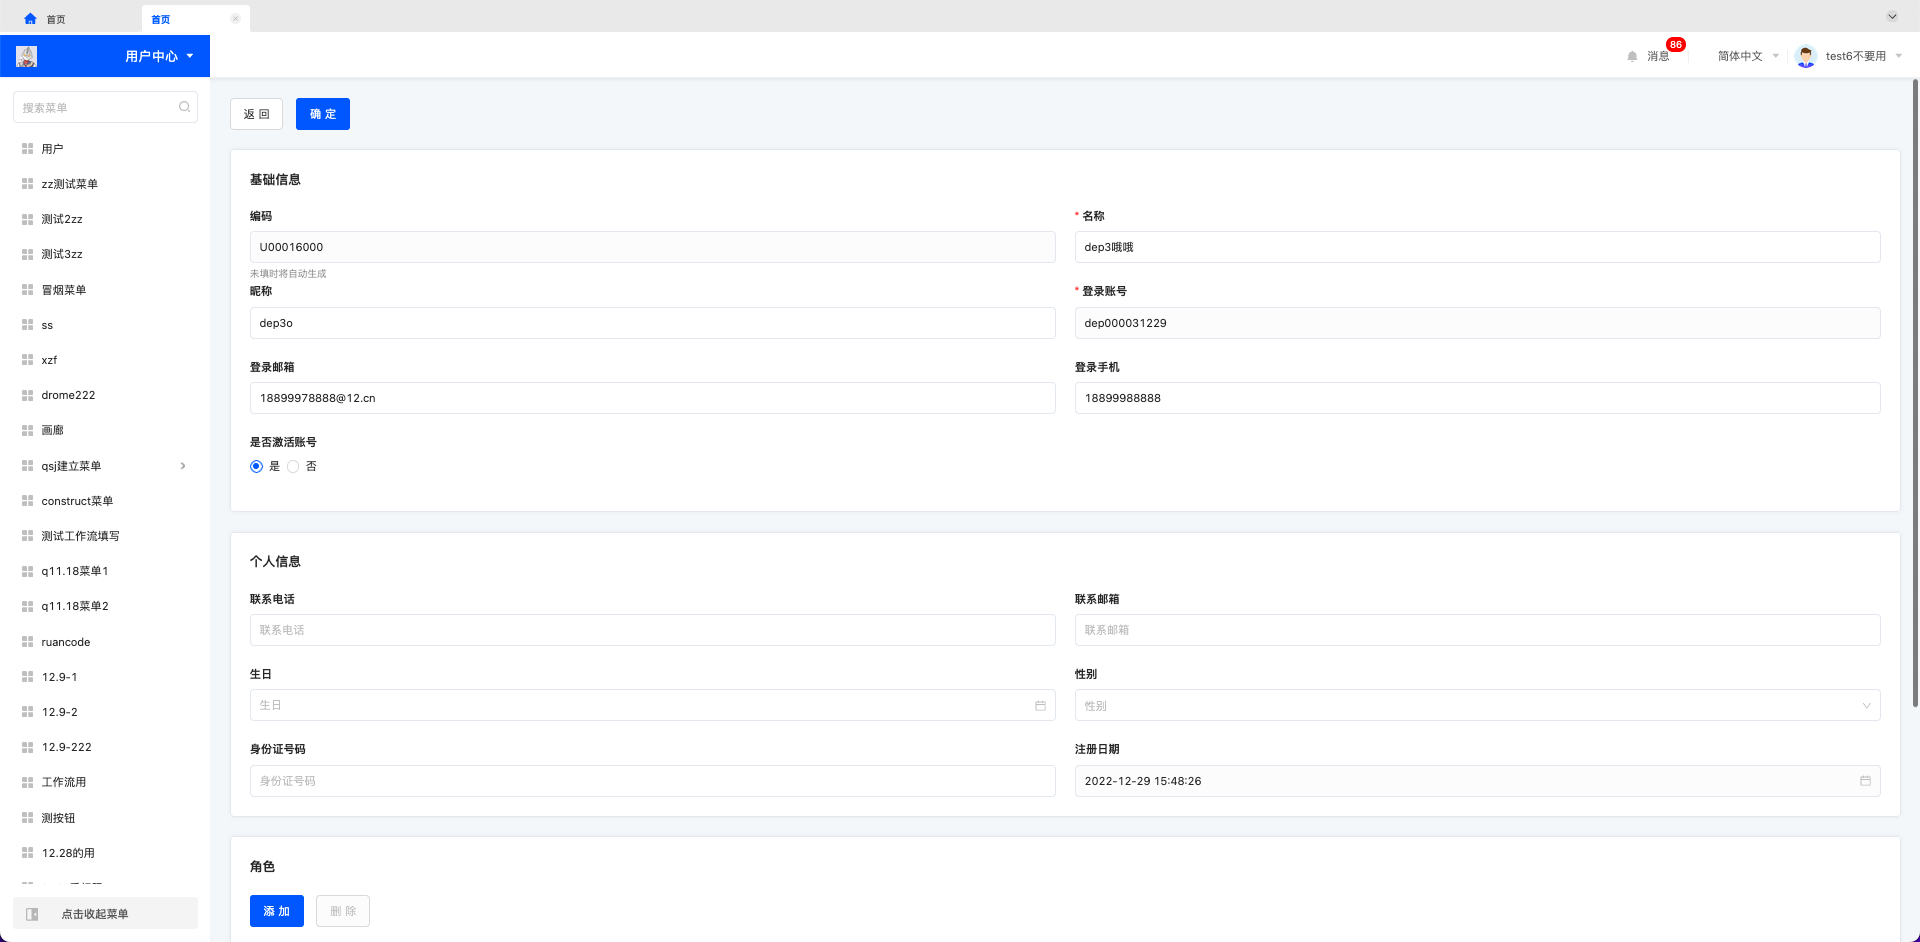
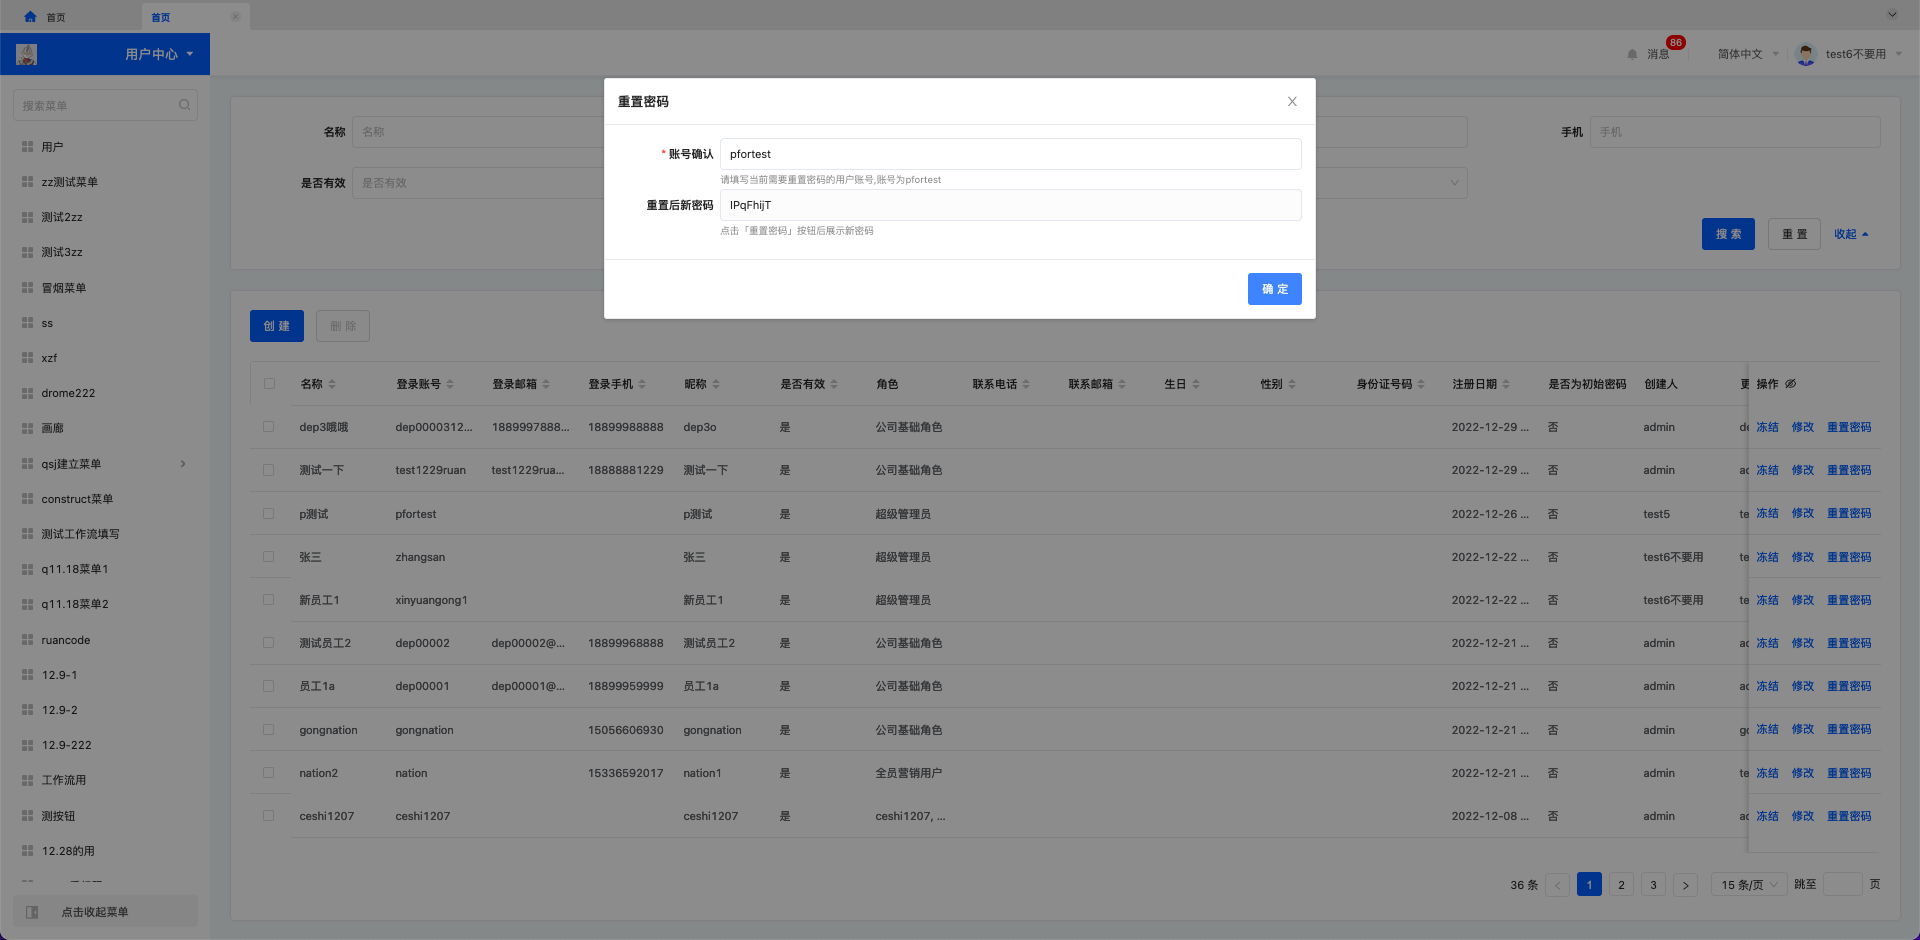
用户中心

1. 创建用户

  1. 进入用户中心应用,在用户列表中点击创建。

image.png

  1. 填写表单中的必填信息。

    1. 若未设置昵称,则右上角头像右侧展示名称。若设置了昵称,则右上角头像右侧展示昵称。

    2. 是否激活账号选择是,选择否时用户登录会显示“未找到首页”。

    3. 角色分组中,选择创建的用户的角色,默认选择了超级管理员(包含所有权限)。

image.png

  1. 点击确定,用户创建完成。

  2. 用户登录时可用登录账号/邮箱/手机号登录。

2. 用户相关操作

  1. 表格页中包含常规的搜索、批量删除功能。

  2. 冻结:当将“是否有效”状态为“是”时展示,将用户“是否有效”修改为“否”。

  3. 解冻:当将“是否有效”状态为“否”时展示,将用户“是否有效”修改为“是”。

  4. 修改:进入用户信息修改页面,“编码、登录账号、注册时间”只读。

image.png

  1. 重置密码:点击后在弹窗“账号确认”中输入账号,点击重置密码后,展示新密码。

image.png

Oinone社区 作者:史, 昂原创文章,如若转载,请注明出处:https://doc.oinone.top/oio4/9390.html

访问Oinone官网:https://www.oinone.top获取数式Oinone低代码应用平台体验

Like (0)
史, 昂's avatar史, 昂数式管理员
Previous 2024年6月20日 am9:48
Next 2024年6月20日 am9:48

相关推荐

  • 4.2.2 框架之MessageHub

    一、MessageHub 请求出现异常时,提供”点对点“的通讯能力 二、何时使用 错误提示是用户体验中特别重要的组成部分,大部分的错误体现在整页级别,字段级别,按钮级别。友好的错误提示应该是怎么样的呢?我们假设他是这样的 与用户操作精密契合 当字段输入异常时,错误展示在错误框底部 按钮触发服务时异常,错误展示在按钮底部 区分不同的类型 错误 成功 警告 提示 调试 简洁易懂的错误信息 在oinone平台中,我们怎么做到友好的错误提示呢?接下来介绍我们的MessageHub,它为自定义错误提示提供无限的可能。 三、如何使用 订阅 import { useMessageHub, ILevel } from "@kunlun/dependencies" const messageHub = useMessageHub('当前视图的唯一标识'); /* 订阅错误信息 */ messageHub.subscribe((errorResult) => { console.log(errorResult) }) /* 订阅成功信息 */ messageHub.subscribe((errorResult) => { console.log(errorResult) }, ILevel.SUCCESS) 图4-2-2-1 订阅的示例代码 销毁 /** * 在适当的时机销毁它 * 如果页面逻辑运行时都不需要销毁,在页面destroyed是一定要销毁,重要!!! */ messageHub.unsubscribe() 图4-2-2-2 销毁的示例代码 四、实战 让我们把3.5.7.5【自定义视图-表单】一文中的自定义表单进行改造,加入我们的messageHub,模拟在表单提交时,后端报错信息在字段下方给予提示。 Step1 (后端)重写PetType的创建函数 重写PetType的创建函数,在创建逻辑中通过MessageHub返回错误信息,返回错误信息的同时要设置paths信息方便前端处理 @Action.Advanced(name = FunctionConstants.create, managed = true) @Action(displayName = "确定", summary = "创建", bindingType = ViewTypeEnum.FORM) @Function(name = FunctionConstants.create) @Function.fun(FunctionConstants.create) public PetType create(PetType data){ List<Object> paths = new ArrayList<>(); paths.add("demo.PetType"); paths.add("kind"); PamirsSession.getMessageHub().msg(new Message().msg("kind error").setPath(paths).setLevel(InformationLevelEnum.ERROR).setErrorType(ErrorTypeEnum.BIZ_ERROR)); List<Object> paths2 = new ArrayList<>(); paths2.add("demo.PetType"); paths2.add("name"); PamirsSession.getMessageHub().msg(new Message().msg("name error").setPath(paths2).setLevel(InformationLevelEnum.ERROR).setErrorType(ErrorTypeEnum.BIZ_ERROR)); // data.create(); return data; } 图4-2-2-3 (后端)重写PetType的创建函数 Step 2 修改PetForm.vue <template> <div class="petFormWrapper"> <form :model="formState" @finish="onFinish"> <a-form-item label="品种种类" id="name" name="kind" :rules="[{ required: true, message: '请输入品种种类!', trigger: 'focus' }]"> <a-input v-model:value="formState.kind" @input="(e) => onNameChange(e, 'kind')" /> <span style="color: red">{{ getServiceError('kind') }}</span> </a-form-item> <a-form-item label="品种名" id="name" name="name" :rules="[{ required: true, message: '请输入品种名!', trigger: 'focus' }]"> <a-input v-model:value="formState.name" @input="(e) => onNameChange(e, 'name')" /> <span style="color: red">{{ getServiceError('name') }}</span> </a-form-item> </form> </div> </template>- <script lang="ts"> import { defineComponent, reactive…

    2024年5月23日
    1.6K00
  • 6.3 数据审计(改)

    在业务应用中我们经常需要为一些核心数据的变更做审计追踪,记录字段的前后变化、操作IP、操作人、操作地址等等。数据审计模块为此提供了支撑和统一管理。它在成熟的企业的核心业务系统中,需求是比较旺盛的。接下来我们开始学习下数据审计模块 准备工作 pamirs-demo-core的pom文件中引入pamirs-data-audit-api包依赖 <dependency> <groupId>pro.shushi.pamirs.core</groupId> <artifactId>pamirs-data-audit-api</artifactId> </dependency> pamirs-demo-boot的pom文件中引入pamirs-data-audit-core和pamirs-third-party-map-core包依赖,数据审计会记录操作人的地址信息,所以也依赖了pamirs-third-party-map-core <dependency> <groupId>pro.shushi.pamirs.core</groupId> <artifactId>pamirs-data-audit-core</artifactId> </dependency> <dependency> <groupId>pro.shushi.pamirs.core.map</groupId> <artifactId>pamirs-third-party-map-core</artifactId> </dependency> pamirs-demo-boot的application-dev.yml文件中增加配置pamirs.boot.modules增加data_audit 和third_party_map,即在启动模块中增加data_audit和third_party_map模块 pamirs: boot: modules: – data_audit – tp_map 为third_party_map模块增加高德接口api,下面e439dda234467b07709f28b57f0a9bd5换成自己的key pamirs: eip: map: gd: key: e439dda234467b07709f28b57f0a9bd5 数据审计 注解式(举例) Step1 新增PetTalentDataAudit数据审计定义类 package pro.shushi.pamirs.demo.core.init.audit; import pro.shushi.pamirs.data.audit.api.annotation.DataAudit; import pro.shushi.pamirs.demo.api.model.PetTalent; @DataAudit( model = PetTalent.MODEL_MODEL,//需要审计的模型 modelName = "宠物达人" ,//模型名称,默认模型对应的displayName //操作名称 optTypes = {PetTalentDataAudit.PETTALENT_CREATE,PetTalentDataAudit.PETTALENT_UDPATE}, fields={"nick","picList.id","picList.url","petShops.id","petShops.shopName"}//需要审计的字段,关系字段用"."连结 ) public class PetTalentDataAudit { public static final String PETTALENT_CREATE ="宠物达人创建"; public static final String PETTALENT_UDPATE ="宠物达人修改"; Step2 修改PetTalentAction的update方法 做审计日志埋点:手工调用 OperationLogBuilder.newInstance().record()方法。需要注意的是这里需要把原有记录的数据值先查出来做对比 @Function.Advanced(type= FunctionTypeEnum.UPDATE) @Function.fun(FunctionConstants.update) @Function(openLevel = {FunctionOpenEnum.API}) public PetTalent update(PetTalent data){ //记录日志 OperationLogBuilder.newInstance(PetTalent.MODEL_MODEL, PetTalentDataAudit.PETTALENT_UDPATE).record(data.queryById().fieldQuery(PetTalent::getPicList).fieldQuery(PetTalent::getPetShops),data); PetTalent existPetTalent = new PetTalent().queryById(data.getId()); if(existPetTalent !=null){ existPetTalent.fieldQuery(PetTalent::getPicList); existPetTalent.fieldQuery(PetTalent::getPetShops); existPetTalent.relationDelete(PetTalent::getPicList); existPetTalent.relationDelete(PetTalent::getPetShops); } data.updateById(); data.fieldSave(PetTalent::getPicList); data.fieldSave(PetTalent::getPetShops); return data; } Step3 重启看效果 修改宠物达人记录对应的字段,然后进入审计模块查看日志

    2024年5月23日
    1.3K00
  • 【附件一】下载说明

    章节说明 下载内容 下载地址 备注 3.1.1环境准备>环境准备(Mac版) 安装 jdk 1.8 https://www.oracle.com/java/technologies/downloads/#java8 安装 mysql 8.0.26 https://dev.mysql.com/downloads/mysql/ 安装 idea社区版2020.2.4 https://www.jetbrains.com/idea/download/other.html 安装idea插件 请移至Oinone官网https://www.oinone.top/对应页面下载或联系Oinone官方客服 根据各自Idea版本下载对应插件,下载文件后去除.txt后缀 安装 git 2.2.0 https://sourceforge.net/projects/git-osx-installer/files/git-2.15.0-intel-universal-mavericks.dmg/download?use_mirror=nchc 安装 GraphQL的客户端工具 Insomnia 请移至Oinone官网https://www.oinone.top/对应页面下载或联系Oinone官方客服 下载文件后修改文件名去除.txt后缀 安装 maven https://archive.apache.org/dist/maven/maven-3/3.8.1/binaries/ 安装脚本zk https://archive.apache.org/dist/zookeeper/zookeeper-3.5.8/apache-zookeeper-3.5.8-bin.tar.gz 安装脚本rocketmq https://archive.apache.org/dist/rocketmq/4.7.1/rocketmq-all-4.7.1-bin-release.zip 安装脚本redis https://download.redis.io/releases/redis-5.0.2.tar.gz 安装nvm https://github.com/nvm-sh/nvm/blob/master/README.md 3.1.1环境搭建>环境准备(Windows版) 安装JDK 1.8 https://www.oracle.com/java/technologies/downloads/#java8 安装 Apache Maven 3.8+ https://maven.apache.org/download.cgi 下载settings-develop.xml 请移至Oinone官网https://www.oinone.top/对应页面下载或联系Oinone官方客服 下载到 C:\Users\你的用户名.m2 目录中并重命名为settings.xml 安装 Jetbrains IDEA 2020.2.4 https://www.jetbrains.com/idea/download/other.html 安装 Jetbrains IDEA 2020.2.4需下载插件 https://pan.baidu.com/share/init?surl=HNzSxxH0KncvglkfITUrsA 提取密码: mdji 安装idea插件 请移至Oinone官网https://www.oinone.top/对应页面下载或联系Oinone官方客服 根据各自Idea版本下载对应插件,下载文件后去除.txt后缀 安装MySQL 8 https://dev.mysql.com/downloads/mysql/ 安装Git https://git-scm.com/download/win 安装GraphQL测试工具Insomnia https://github.com/Kong/insomnia/releases 安装RocketMQ https://rocketmq.apache.org/download/ 安装ElasticSearch 版本 8.4.1 https://www.elastic.co/cn/downloads/past-releases/elasticsearch-7-6-1 安装Redis https://download.redis.io/releases/ Zookeeper安装 https://dlcdn.apache.org/zookeeper/zookeeper-3.8.0/apache-zookeeper-3.8.0-bin.tar.gz 安装nodejs 版本12.12.0 https://nodejs.org/dist/v12.12.0/node-v12.12.0-win-x64.zip 安装cnpm https://www.npmjs.com/package/cnpm 3.2.1Oinone一模块为组织>构建第一个Module 安装archetype-project-generate.sh脚本 请移至Oinone官网https://www.oinone.top/对应页面下载或联系Oinone官方客服 3.5.5Oinone以交互为外在>设计器的结合 安装Docker https://www.docker.com/get-started/ 下载结构包:Oinone-op-ds.zip 请移至Oinone官网https://www.oinone.top/对应页面下载或联系Oinone官方客服 4.1.10后端高级特性>函数之触发与定时 下载canal中间件:pamirs-middleware-canal-deployer-3.0.1.zi 请移至Oinone官网https://www.oinone.top/对应页面下载或联系Oinone官方客服 4.1.11后端高级特性>函数之异步执行 下载tbSchedule的控制台jar包:pamirs-middleware-schedule-console-3.0.1.jar.txt 请移至Oinone官网https://www.oinone.top/对应页面下载或联系Oinone官方客服 下载schedule.json 请移至Oinone官网https://www.oinone.top/对应页面下载或联系Oinone官方客服 下载以下文件放在pamirs-demo-boot的src/main/resources/init目录下 4.1.25后端高级特性>框架之搜索引擎 ES安装 方式一:官方下载安装包:https://www.elastic.co/cn/downloads/past-releases/elasticsearch-8-4-1 下载后去除后缀.txt,然后解压文件 方式二:请移至Oinone官网https://www.oinone.top/对应页面下载或联系Oinone官方客服

    Oinone 7天入门到精通 2024年5月23日
    1.8K00
  • 4.1.17 框架之网关协议-GraphQL协议

    GraphQL 是一个用于 API 的查询语言,是一个使用基于类型系统来执行查询的服务端运行时(类型系统由你的数据定义)。GraphQL 并没有和任何特定数据库或者存储引擎绑定,而是依靠你现有的代码和数据支撑。 一个 GraphQL 服务是通过定义类型和类型上的字段来创建的,然后给每个类型上的每个字段提供解析函数。例如,一个 GraphQL 服务告诉我们当前登录用户是 me,这个用户的名称可能像这样: type Query { me: User } type User { id: ID name: String } 图4-1-17-1 GraphQL定义类型和字段示意 一并的还有每个类型上字段的解析函数: function Query_me(request) { return request.auth.user; } function User_name(user) { return user.getName(); } 图4-1-17-2 每个类型上字段的解析函数示意 一旦一个 GraphQL 服务运行起来(通常在 web 服务的一个 URL 上),它就能接收 GraphQL 查询,并验证和执行。接收到的查询首先会被检查确保它只引用了已定义的类型和字段,然后运行指定的解析函数来生成结果。 例如这个查询: { me { name } } 图4-1-17-3 GraphQL查询请求示意 会产生这样的JSON结果: { "me": { "name": "Luke Skywalker" } } 图4-1-17-4 GraphQL查询结果示意 了解更多 https://graphql.cn/learn/

    Oinone 7天入门到精通 2024年5月23日
    1.2K00
  • 4.1.22 框架之分布式缓存

    分布式缓存Oinone平台主要用到了Redis,为了让业务研发时可以无感使用RedisTemplate和StringRedisTemplate,已经提前注册好了redisTemplate和stringRedisTemplate,而且内部会自动处理相关特殊逻辑以应对多租户环境,小伙伴不能自己重新定义Redis的相关bean。 使用说明 配置说明 spring: redis: database: 0 host: 127.0.0.1 port: 6379 timeout: 2000 # cluster: # nodes: # – 127.0.0.1:6379 # timeout: 2000 # max-redirects: 7 jedis: pool: # 连接池中的最大空闲连接 默认8 max-idle: 8 # 连接池中的最小空闲连接 默认0 min-idle: 0 # 连接池最大连接数 默认8 ,负数表示没有限制 max-active: 8 # 连接池最大阻塞等待时间(使用负值表示没有限制) 默认-1 max-wait: -1 图4-1-22-1 分布式缓存配置说明 代码示例 package pro.shushi.pamirs.demo.core.service; import org.springframework.stereotype.Component; import org.springframework.beans.factory.annotation.Autowired; import org.springframework.data.redis.core.RedisTemplate; import org.springframework.data.redis.core.StringRedisTemplate; @Component public class Test { @Autowired private RedisTemplate redisTemplate; @Autowired private StringRedisTemplate stringRedisTemplate } 图4-1-22-2 代码示例

    Oinone 7天入门到精通 2024年5月23日
    1.6K00

Leave a Reply

Please Login to Comment