
扩展点结合拦截器的设计,oinone可以点、线、面一体化管理Function
扩展点用于扩展函数逻辑。扩展点类似于SPI机制(Service Provider Interface),是一种服务发现机制。这一机制为函数逻辑的扩展提供了可能。
一、构建第一个扩展点
自定义扩展点(举例)
在我们日常开发中,随着对业务理解的深入,往往还在一些逻辑中会预留扩展点,以便日后应对不同需求时可以灵活替换某一小块逻辑。
在3.3.4【模型的继承】一文中的PetCatItemQueryService,是独立新增函数只作公共逻辑单元。现在我们给它的实现类增加一个扩展点。在PetCatItemQueryServiceImpl的queryPage方法中原本会先查询PetCatType列表,我们这里假设这个逻辑随着业务发展未来会发生变化,我们可以预先预留【查询萌猫类型扩展点】
Step1 新增扩展点定义PetCatItemQueryCatTypeExtpoint
-
扩展点命名空间:在接口上用@Ext声明扩展点命名空间。会优先在本类查找@Ext,若为空则往接口向上做遍历查找,返回第一个查找到的@Ext.value注解值,使用该值再获取函数的命名空间;如果未找到,则返回扩展点全限定类名。所以我们这里扩展点命名空间为:pro.shushi.pamirs.demo.api.extpoint.PetCatItemQueryCatTypeExtpoint
-
扩展点技术名称:先取@ExtPoint.name,若为空则取扩展点接口方法名。所以我们这里技术名为queryCatType
package pro.shushi.pamirs.demo.api.extpoint;

import pro.shushi.pamirs.demo.api.model.PetCatType;
import pro.shushi.pamirs.meta.annotation.Ext;
import pro.shushi.pamirs.meta.annotation.ExtPoint;

import java.util.List;

@Ext
public interface PetCatItemQueryCatTypeExtpoint {

    @ExtPoint(displayName = "查询萌猫类型扩展点")
    List<PetCatType> queryCatType();

}
图3-4-3-11 新增扩展点定义PetCatItemQueryCatTypeExtpoint
Step2 修改PetCatItemQueryServiceImpl(用Ext.run模式调用)
修改queryPage,增加扩展点的使用代码。扩展点的使用有两种方式
方法一,使用命名空间和扩展点名称调用Ext.run(namespace, fun, 参数);
方法二,使用函数式接口调用Ext.run(函数式接口, 参数);
我们这里用了第二种方式
-
用PetCatItemQueryCatTypeExtpoint的全限定类名作为扩展点的命名空间(namespace)
-
用queryCatType的方法名作为扩展点的技术名称(name)
-
根据namespace+name去找到匹配扩展点实现,并根据规则是否匹配,以及优先级唯一确定一个扩展点实现去执行逻辑
package pro.shushi.pamirs.demo.core.service;

……省略依赖包

@Model.model(PetCatItem.MODEL_MODEL)
@Component
public class PetCatItemAction extends DataStatusBehavior<PetCatItem> {

    @Override
    protected PetCatItem fetchData(PetCatItem data) {
        return data.queryById();
    }
    @Action(displayName = "启用")
    public PetCatItem dataStatusEnable(PetCatItem data){
        data = super.dataStatusEnable(data);
        data.updateById();
        return data;
    }

    @Function.Advanced(displayName = "查询模型数据的默认过滤条件", type = FunctionTypeEnum.QUERY, managed = true)
    @Function(openLevel = {LOCAL})
    public String queryFilters() {
        StringBuilder sqlWhereCondition = new StringBuilder();
//        List<PetCatType> typeList = new PetCatType().queryList();
        List<PetCatType> typeList = Ext.run(PetCatItemQueryCatTypeExtpoint::queryCatType, new Object[]{});
        if(!CollectionUtils.isEmpty(typeList)){
//          sqlWhereCondition.append("type_id");
            sqlWhereCondition.append(PStringUtils.fieldName2Column(LambdaUtil.fetchFieldName(PetCatItem::getTypeId)));
            sqlWhereCondition.append(StringUtils.SPACE).append(SqlConstants.IN).append(CharacterConstants.LEFT_BRACKET);
            for(PetCatType petCatType: typeList){
                sqlWhereCondition.append(petCatType.getId()).append(CharacterConstants.SEPARATOR_COMMA);
            }
            sqlWhereCondition.deleteCharAt(sqlWhereCondition.lastIndexOf(CharacterConstants.SEPARATOR_COMMA));
            sqlWhereCondition.append(StringUtils.SPACE).append(CharacterConstants.RIGHT_BRACKET);
        }
        return sqlWhereCondition.toString();
    }

    ……省略其他函数
}
图3-4-3-12 修改PetCatItemQueryServiceImpl
Step3 新增扩展点实现PetCatItemQueryCatTypeExtpointOne
-
扩展点命名空间要与扩展点定义一致,用@Ext(PetCatItemQueryCatTypeExtpoint.class)
-
@ExtPoint.Implement声明这是在@Ext声明的命名空间下,且技术名为queryCatType的扩展点实现
package pro.shushi.pamirs.demo.core.extpoint;

import pro.shushi.pamirs.demo.api.extpoint.PetCatItemQueryCatTypeExtpoint;
import pro.shushi.pamirs.demo.api.model.PetCatType;
import pro.shushi.pamirs.meta.annotation.Ext;
import pro.shushi.pamirs.meta.annotation.ExtPoint;
import pro.shushi.pamirs.meta.api.session.PamirsSession;

import java.util.List;

@Ext(PetCatItemQueryCatTypeExtpoint.class)
public class PetCatItemQueryCatTypeExtpointOne implements PetCatItemQueryCatTypeExtpoint {

    @Override
    @ExtPoint.Implement(displayName = "查询萌猫类型扩展点的默认实现")
    public List<PetCatType> queryCatType() {
        PamirsSession.getMessageHub().info("走的是第一个扩展点");
        List<PetCatType> typeList = new PetCatType().queryList();
        return typeList;
    }
}
图3-4-3-13 新增扩展点实现PetCatItemQueryCatTypeExtpointOne
Step4 重启看效果
- 萌猫商品-列表页面的逻辑没有变化正常,说明typeList从扩展点中是取到了


图3-4-3-14 示例效果
- 用Insomnia直接发起GraphQL请求,返回结果里可以明确知道这是扩展点实现【PetCatItemQueryCatTypeExtpointOne】执行的结果

图3-4-3-15 示例效果
Step5 自行测试扩展点的优先级
附上第二个扩展点实现的代码,快去试试吧
package pro.shushi.pamirs.demo.core.extpoint;

import pro.shushi.pamirs.demo.api.extpoint.PetCatItemQueryCatTypeExtpoint;
import pro.shushi.pamirs.demo.api.model.PetCatType;
import pro.shushi.pamirs.meta.annotation.Ext;
import pro.shushi.pamirs.meta.annotation.ExtPoint;
import pro.shushi.pamirs.meta.api.session.PamirsSession;

import java.util.List;

@Ext(PetCatItemQueryCatTypeExtpoint.class)
public class PetCatItemQueryCatTypeExtpointTwo implements PetCatItemQueryCatTypeExtpoint {

    @Override
    @ExtPoint.Implement(priority = 95,displayName = "查询萌猫类型扩展点的实现,优先级取胜")
    public List<PetCatType> queryCatType() {
        PamirsSession.getMessageHub().info("走的是第二个扩展点");
        List<PetCatType> typeList = new PetCatType().queryList();
        return typeList;
    }
}
图3-4-3-16 测试扩展点的优先级(第二个扩展点实现代码)
默认扩展点(举例)
由前端直接发起调用oinone后端Function(能被前端直接发起的Function前提是namespace挂在模型上),当前端通过GraphQL发起对函数的请求是,oinone都会默认执行三个内置扩展点分别是前置扩展点、覆盖扩展点和后置扩展点。
默认扩展点与函数的关联关系
扩展点扩展的函数与扩展点通过扩展点的命名空间和技术名称关联。扩展点与所扩展函数的命名空间一致。前置扩展点、重载扩展点和后置扩展点的技术名称的规则是所扩展函数的函数编码fun加上“Before”、“Override”和“After”后缀;方法体内调用扩展点直接使用接口调用,所以技术名称可以任意定义,只需要在同一命名空间下唯一即可。
我们在3.3.4【模型继承】一文中关于多表继承的内容有提到过通过实现扩展点来保证子模型与父模型数据同步。此次列子中我们来替换下PetShop的sayHello函数
Step1 新增扩展点定义PetShopSayhelloOverrideExtpoint
package pro.shushi.pamirs.demo.api.extpoint;

import pro.shushi.pamirs.demo.api.model.PetShop;
import pro.shushi.pamirs.meta.annotation.Ext;
import pro.shushi.pamirs.meta.annotation.ExtPoint;

@Ext(PetShop.class)
public interface PetShopSayhelloOverrideExtpoint {

    @ExtPoint(displayName = "覆盖PetShop的sayHello执行逻辑")
    public PetShop sayHelloOverride(PetShop shop);

}
图3-4-3-17 新增扩展点定义PetShopSayhelloOverrideExtpoint
Step2 新增扩展点实现PetShopSayhelloOverrideExtpointImpl
package pro.shushi.pamirs.demo.core.extpoint;

import pro.shushi.pamirs.demo.api.extpoint.PetShopSayhelloOverrideExtpoint;
import pro.shushi.pamirs.demo.api.model.PetShop;
import pro.shushi.pamirs.meta.annotation.Ext;
import pro.shushi.pamirs.meta.annotation.ExtPoint;
import pro.shushi.pamirs.meta.api.session.PamirsSession;

@Ext(PetShop.class)
public class PetShopSayhelloOverrideExtpointImpl implements PetShopSayhelloOverrideExtpoint {

    @ExtPoint.Implement(displayName = "覆盖PetShop的sayHello执行逻辑")
    public PetShop sayHelloOverride(PetShop shop){
        PamirsSession.getMessageHub().info("OverrideExtpoint Hello:"+shop.getShopName());
        return shop;
    }
}
图3-4-3-18 新增扩展点实现PetShopSayhelloOverrideExtpointImp
Step3 确保PetShop的sayHello函数存在
详见3.4.1【构建第一个Function】一文
Step4 重启查看效果
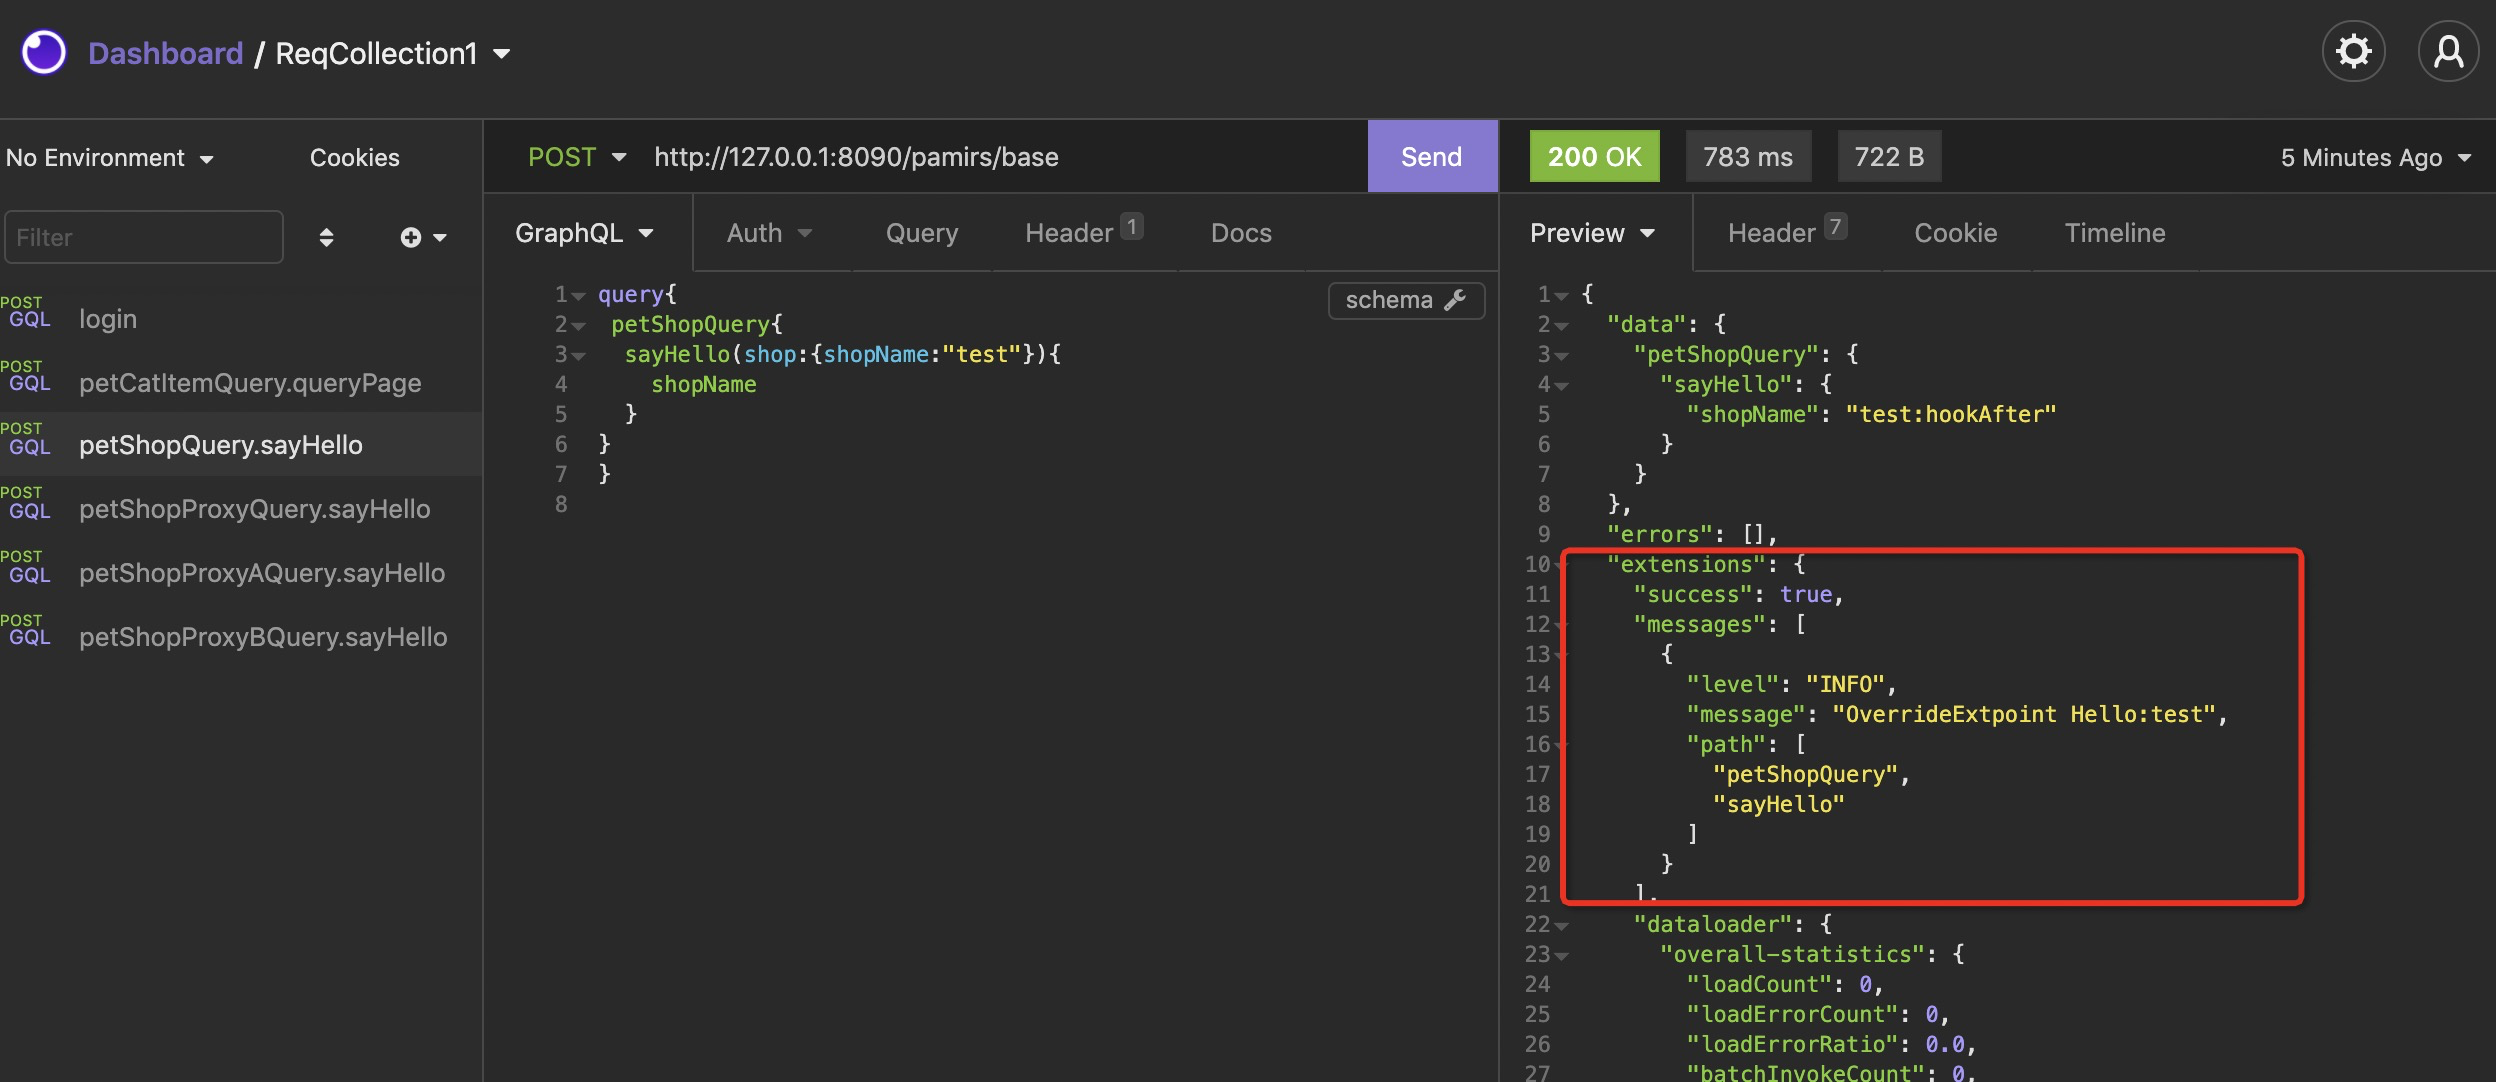
图3-4-3-19 示例效果
二、总结
oinone用默认扩展点为Function提供三种默认扩展点,并通过自定义扩展点在Function逻辑内部任意插入扩展点,让Function作为oinone的逻辑管理单元的可管理性大大提升。同时结合拦截器的设计,oinone可以点、线、面一体化管理Function
注:默认扩展点,不是由前端发起而是后端编程调用,默认不会生效,如果要生效请参考4.1.9【函数之元位指令】的一文
Oinone社区 作者:史, 昂原创文章,如若转载,请注明出处:https://doc.oinone.top/oio4/9248.html
访问Oinone官网:https://www.oinone.top获取数式Oinone低代码应用平台体验