4.1.19 框架之网关协议-后端占位符

在我们日常开发中会有碰到一些特殊场景,需要由前端来传一些如“当前用户Id”、“当前用户code”诸如此类只有后端才知道值的参数,那么后端占位符就是来解决类似问题的。如前端传${currentUserId},后端会自动替换为当前用户Id。

Step1 后端定义占位符

我们新建一个UserPlaceHolder继承AbstractPlaceHolderParser,用namespace来定义一个“currentUserId”的占位符,其对应值由value()决定为“PamirsSession.getUserId().toString()”,active要为真才有效,priority为优先级

package pro.shushi.pamirs.demo.core.placeholder;

import org.springframework.stereotype.Component;
import pro.shushi.pamirs.meta.api.session.PamirsSession;
import pro.shushi.pamirs.user.api.AbstractPlaceHolderParser;

@Component
public class UserPlaceHolder extends AbstractPlaceHolderParser {
    @Override
    protected String value() {
        return PamirsSession.getUserId().toString();
    }

    @Override
    public Integer priority() {
        return 10;
    }

    @Override
    public Boolean active() {
        return Boolean.TRUE;
    }

    @Override
    public String namespace() {
        return "currentUserId";
    }
}

图4-1-19-1 后端定义占位符

Step2 前端使用后端占位符

我们经常在o2m和m2m中会设置domain来过滤数据,这里案例就是在field中设置来过滤条件,domain="createUid == $#{currentUserId}",注意这里用的是$#{currentUserId} 而不是${currentUserId},这是前端为了区分真正变量和后端占位符,提交的时候会把#过滤掉提交。修改宠物达人表格视图的Template中search部分

<template slot="search"  cols="4">
    <field data="name" label="达人"/>
    <field data="petTalentSex" multi="true" label="达人性别"/>
    <field data="creater" />
<!--        <field data="petShops" label="宠物商店" domain="createUid == ${activeRecord.creater.id}"/>-->
    <field data="petShops" label="宠物商店" domain="createUid == $#{currentUserId}"/>
    <field data="dataStatus" label="数据状态" multi="true">
        <options>
            <option name="DRAFT" displayName="草稿" value="DRAFT" state="ACTIVE"/>
            <option name="NOT_ENABLED" displayName="未启用" value="NOT_ENABLED" state="ACTIVE"/>
            <option name="ENABLED" displayName="已启用" value="ENABLED" state="ACTIVE"/>
            <option name="DISABLED" displayName="已禁用" value="DISABLED" state="ACTIVE"/>
        </options>
    </field>
    <field data="createDate" label="创建时间"/>
    <field data="unStore" />
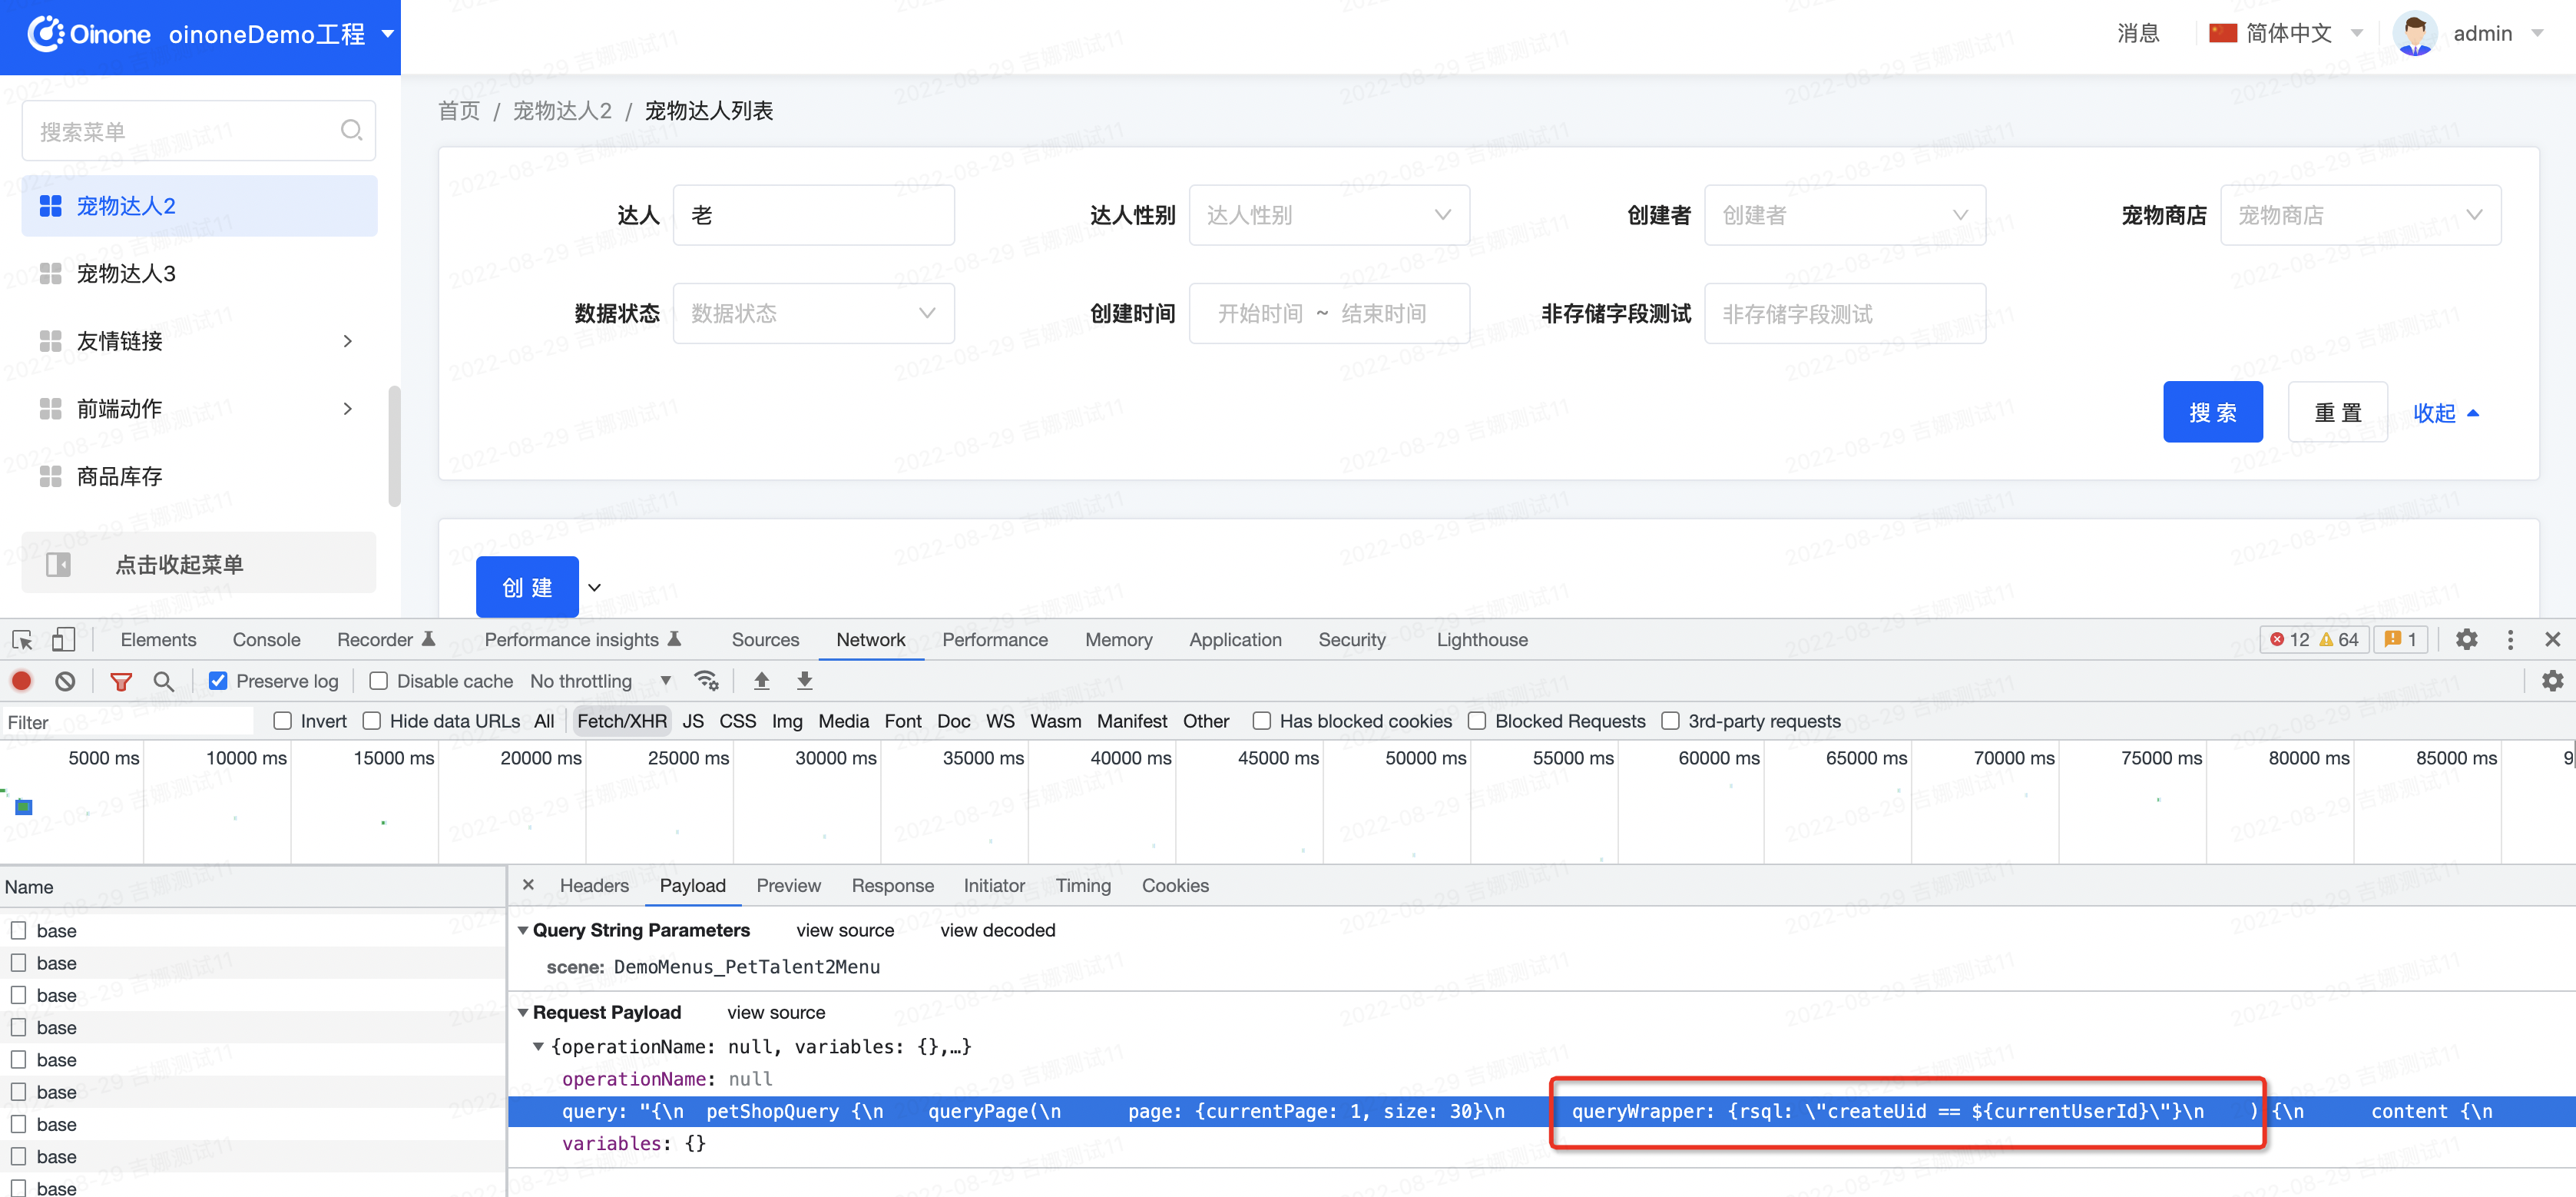
</template>

图4-1-19-2 前端使用后端占位符

Step3 重启看效果

请求上都带上了createUid==${currentUserId}

image.png

图4-1-19-3 示例效果

Oinone社区 作者:史, 昂原创文章,如若转载,请注明出处:https://doc.oinone.top/oio4/9294.html

访问Oinone官网:https://www.oinone.top获取数式Oinone低代码应用平台体验

(0)
史, 昂的头像史, 昂数式管理员
上一篇 2024年5月23日 am8:44
下一篇 2024年5月23日 am8:46

相关推荐

  • 3.4.1 构建第一个Function

    Function做为oinone的可管理的执行逻辑单元,是无处不在的 在3.3.3【模型的数据管理器】和3.3.2【模型类型】一文中的代理模型部分,涉及到包括在Action中自定义函数(action背后都对应一个Function)、重写queryPage的函数、以及独立抽取的公共逻辑函数,Function做为oinone的可管理的执行逻辑单元,是无处不在的。这也是为什么说oinone以函数为内在的原因。 一、构建第一个Function 因为数据管理器和数据构造器是oinone为模型自动赋予的Function,是内在数据管理能力。模型其他Function都需要用以下四种方式主动定义 伴随模型新增函数(举例) 它是跟模型的java类定义在一起,复用模型的命名空间。 Step1 为PetShop增加一个名为sayHello的Function package pro.shushi.pamirs.demo.api.model; …… //import @Model.model(PetShop.MODEL_MODEL) @Model(displayName = "宠物店铺",summary="宠物店铺",labelFields ={"shopName"} ) @Model.Code(sequence = "DATE_ORDERLY_SEQ",prefix = "P",size=6,step=1,initial = 10000,format = "yyyyMMdd") public class PetShop extends AbstractDemoIdModel { public static final String MODEL_MODEL="demo.PetShop"; …… //省略其他代码 @Function(openLevel = FunctionOpenEnum.API) @Function.Advanced(type=FunctionTypeEnum.QUERY) public PetShop sayHello(PetShop shop){ PamirsSession.getMessageHub().info("Hello:"+shop.getShopName()); return shop; } } 图3-4-1-1 代码示例 Step2 重启看效果 用graphQL工具Insomnia查看效果 用Insomnia模拟登陆 a. 创建一个login请求,用于保存login请求,为后续模拟登陆保留快捷方式 图3-4-1-2 创建一个login请求 b. 下面为登陆请求的GraphQL,请在post输入框中输入。如果请求输入框提示错误可以,可以点击schema 的Refresh Schema来刷新文档 mutation { pamirsUserTransientMutation { login(user: {login: "admin", password: "admin"}) { broken errorMsg errorCode errorField } } } 图3-4-1-3 登陆请求的GraphQL c. 点击Send按钮,我们可以看到登陆成功的反馈信息 图3-4-1-4 登陆成功的反馈信息 用Insomnia模拟访问PetShop的sayHello方法,gql的返回中,我们可以看到两个核心返回 a. 一是方法正常返回的shopName b. 二是“PamirsSession.getMessageHub().info("Hello:"+shop.getShopName())”代码执行的结果,在messages中有一个消息返回,更多消息机制详见4.1.23【框架之信息传递】 query{ petShopQuery{ sayHello(shop:{shopName:"cpc"}){ shopName } } } 图3-4-1-5 用Insomnia模拟访问PetShop的sayHello 图3-4-1-6 代码执行结果 用Insomnia模拟访问PetShopProxy的sayHello方法 效果同用Insomnia模拟访问PetShop的sayHello方法,体现Function的继承特性。 独立新增函数绑定到模型(举例) 独立方法定义类,并采用Model.model或Fun注解,但是value都必须是模型的编码,如@Model.model(PetShop.MODEL_MODEL)或@Fun(PetShop.MODEL_MODEL) Step1 提取PetShop的sayHello方法独立到PetShopService中 注释掉PetShop的sayHello方法 package pro.shushi.pamirs.demo.api.model; …… //import @Model.model(PetShop.MODEL_MODEL) @Model(displayName = "宠物店铺",summary="宠物店铺",labelFields ={"shopName"} ) @Model.Code(sequence = "DATE_ORDERLY_SEQ",prefix = "P",size=6,step=1,initial = 10000,format = "yyyyMMdd") public class PetShop extends AbstractDemoIdModel { public static final String MODEL_MODEL="demo.PetShop"; …… //省略其他代码 // @Function(openLevel = FunctionOpenEnum.API) // @Function.Advanced(type=FunctionTypeEnum.QUERY) // public PetShop sayHello(PetShop shop){ // PamirsSession.getMessageHub().info("Hello:"+shop.getShopName()); // return shop; // } } 图3-4-1-7 注释掉PetShop的sayHello 新增PetShopService接口类 接口的方法上要加上@Function注解,这样另模块依赖api包的时候,会自动注册远程服务的消费者 package pro.shushi.pamirs.demo.api.service; import pro.shushi.pamirs.demo.api.model.PetShop; import pro.shushi.pamirs.meta.annotation.Fun; import pro.shushi.pamirs.meta.annotation.Function; @Fun(PetShop.MODEL_MODEL) //@Model.model(PetShop.MODEL_MODEL) public interface…

    2024年5月23日
    1.3K00
  • 6.4 国际化之多语言

    多语言是国际化中大家最常面对的问题,我们需要对应用的页面结构元素进行翻译,也需要对系统内容进行翻译比如:菜单、数据字典等,甚至还会业务数据进行翻译。但不管什么翻译需求,我们在实现上基本可以归类为前端翻译和后端翻译。前端翻译顾名思义是在前端根据用户选择语言对内容进行翻译,反之就是后端翻译。本文会带着大家了解oinone的前端翻译与后端翻译 准备工作 pamirs-demo-boot的pom文件中引入pamirs-translate包依赖 <dependency> <groupId>pro.shushi.pamirs.core</groupId> <artifactId>pamirs-translate</artifactId> </dependency> pamirs-demo-boot的application-dev.yml文件中增加配置pamirs.boot.modules增加translate,即在启动模块中增加translate模块 pamirs: boot: modules: – translate 后端翻译(使用) 这里通过对菜单的翻译来带大家了解翻译模块 Step1 新增翻译记录 切换应用到translate模块,点击新增翻译。 选择新增翻译生效模块 选择翻译的模型为:菜单模型 源语言选择中文,目标选择English 添加翻译项目: 源术语为:商店 翻译值为:shop 状态为:激活 Step2 查看效果 应用切换到Demo模块,在右上角切换语言至英语 后端翻译(自定义模型的翻译) 在前面菜单的翻译中,似乎我们什么都没做就可以正常通过翻译模块完成多语言的切换了。是不是真如我们想象的一样,当然不是。是因为Menu模型的displayName字段加上@Field(translate = true)注解。 Step1 为PetType模型的name字段增加翻译注解 package pro.shushi.pamirs.demo.api.model; import pro.shushi.pamirs.meta.annotation.Field; import pro.shushi.pamirs.meta.annotation.Model; import pro.shushi.pamirs.meta.base.IdModel; @Model.MultiTable(typeField = "kind") @Model.model(PetType.MODEL_MODEL) @Model(displayName="品种",labelFields = {"name"}) public class PetType extends IdModel { public static final String MODEL_MODEL="demo.PetType"; @Field(displayName = "品种名" , translate = true) private String name; @Field(displayName = "宠物分类") private String kind; } Step2 重启应用查看效果 切换应用到translate模块,点击新增翻译 切换应用到Demo模块,切换中英文,查看效果 前端翻译 还记得我们前端第一个自定义动作吗?会弹出“oinone第一个自定义Action,啥也没干”,我们要对它进行翻译。 Step1 修改前端DoNothingActionWidget.ts import translateValueByKey 提示语用translateValueByKey加上翻译 const confirmRs = executeConfirm(translateValueByKey(\’oinone第一个自定义Action,啥也没干\’)||\’oinone第一个自定义Action,啥也没干\’); 前端更多翻译工具请见前端高级特性-框架之翻译工具 import { Action, ActionContextType, ActionWidget, executeConfirm, IClientAction, SPI, ViewType, Widget, translateValueByKey } from '@kunlun/dependencies'; @SPI.ClassFactory(ActionWidget.Token({ name: 'demo.doNothing' })) export class DoNothingActionWidget extends ActionWidget { @Widget.Method() public async clickAction() { const confirmRs = executeConfirm(translateValueByKey('oinone第一个自定义Action,啥也没干')||'oinone第一个自定义Action,啥也没干'); } } //定义动作元数据 Action.registerAction('*', { displayName: '啥也没干', name: 'demo.doNothing', id: 'demo.doNothing', contextType: ActionContextType.ContextFree, bindingType: [ViewType.Table] } as IClientAction); Step2 新增翻译记录 前端翻译的翻译记录对应的模型可以随意找一个放。但要注意几点: 不要找有字读配置translate = true的模型,因为会影响后端翻译性能。 最好统一到一个模型中,便于后续管理。这里大家可以自定义一个无有业务访问且本身无需要翻译的模型来挂载,避免性能损失 Step3 刷新远程资源生成前端语言文件 Step4 新增或修改.env 前端在项目根目录下新增或修改.env,可以参考.env.example文件。通过.env文件为前端配置oss文件路径,针对I18N_OSS_URL配置项。真实前端访问翻译语言文件的路径规则为:http://bucket.downloadUrl/mainDir/租户/translate/模块/语言文件。 yaml文件中oss配置的文件路径:http://pamirs.oss-cn-hangzhou.aliyuncs.com/upload/demo/ 租户/translate/模块/语言文件 前端会自动根据上下文组织 # 后端api配置 # API_BASE_URL=http://127.0.0.1:8090 # 下面是国际化语言的cdn配置,默认用当前请求链接下的路径: /pamirs/translate/${module}/i18n_${lang}.js I18N_OSS_URL=http://pamirs.oss-cn-hangzhou.aliyuncs.com/upload/demo Step5 重启前端应用看效果 对语言进行中英文切换,进入宠狗达人页面,点击【第一个自定义Action】,查看前端翻译效果

    2024年5月23日
    1.3K20
  • 4.2.4 框架之网络请求-HttpClient

    oinone提供统一的网络请求底座,基于graphql二次封装 一、初始化 import { HttpClient } from '@kunlun/dependencies'; const http = HttpClient.getInstance(); http.setMiddleware() // 必须设置,请求回调。具体查看文章https://shushi.yuque.com/yqitvf/oinone/vwo80g http.setBaseURL() // 必须设置,后端请求的路径 图4-2-4-1 初始化代码示例 二、HttpClient详细介绍 获取实例 import { HttpClient } from '@kunlun/dependencies'; const http = HttpClient.getInstance(); 图4-2-4-2 获取实例 接口地址 import { HttpClient } from '@kunlun/dependencies'; const http = HttpClient.getInstance(); http.setBaseURL('接口地址'); http.getBaseURL(); // 获取接口地址 图4-2-4-3 接口地址 请求头 import { HttpClient } from '@kunlun/dependencies'; const http = HttpClient.getInstance(); http.setHeader({key: value}); 图4-2-4-4 请求头 variables import { HttpClient } from '@kunlun/dependencies'; const http = HttpClient.getInstance(); http.setExtendVariables((moduleName: string) => { return customFuntion(); }); 图4-2-4-5 variables 回调 import { HttpClient } from '@kunlun/dependencies'; const http = HttpClient.getInstance(); http.setMiddleware([middleware]); 图4-2-4-6 回调 业务使用-query private http = HttpClient.getInstance(); private getTestQuery = async () => { const query = `gql str`; const result = await this.http.query('module name', query); console.log(result) return result.data[`xx`]['xx']; // 返回的接口,打印出result对象层次返回 }; 图4-2-4-7 业务使用-query 业务使用-mutate private http = HttpClient.getInstance(); private getTestMutate = async () => { const mutation = `gql str`; const result = await this.http.mutate('module name', mutation); console.log(result) return result.data[`xx`]['xx']; // 返回的接口,打印出result对象层次返回 }; 图4-2-4-8 业务使用-mutate 三、如何使用HttpClient 初始化 在项目目录src/main.ts下初始化httpClient 初始化必须要做的事: 设置服务接口链接 设置接口请求回调 业务实战 前文说到自定义新增宠物表单,让我们在这个基础上加入我们的httpClient; 第一步新增service.ts 图4-2-4-8 新增service.ts service.ts import { HttpClient }…

    2024年5月23日
    1.1K00
  • 4.1.25 框架之搜索引擎

    一、使用场景 在碰到大数据量并且需要全文检索的场景,我们在分布式架构中基本会架设ElasticSearch来作为一个常规解决方案。在oinone体系中增强模型就是应对这类场景,其背后也是整合了ElasticSearch。 二、整体介绍 oinone与es整合设计图 图4-1-25-1 Oinone与es整合设计图 基础环境安装 Canal安装 详见4.1.10【函数之触发与定时】一文 修改Canal配置并重启 新增Canal的实例【destinaion: pamirs】,监听分表模型的binlog【filter: demo.demo_core_sharding_model……】用于增量同步 pamirs: middleware: data-source: jdbc-url: jdbc:mysql://localhost:3306/canal_tsdb?useUnicode=true&characterEncoding=utf-8&verifyServerCertificate=false&useSSL=false&requireSSL=false driver-class-name: com.mysql.cj.jdbc.Driver username: root password: oinone canal: ip: 127.0.0.1 port: 1111 metricsPort: 1112 zkClusters: – 127.0.0.1:2181 destinations: – destinaion: pamirschangedata name: pamirschangedata desc: pamirschangedata slaveId: 1235 filter: demo\.demo_core_pet_talent dbUserName: root dbPassword: oinone memoryStorageBufferSize: 65536 topic: CHANGE_DATA_EVENT_TOPIC dynamicTopic: false dbs: – { address: 127.0.0.1, port: 3306 } – destinaion: pamirs id: 1234 name: pamirs desc: pamirs slaveId: 1234 filter: demo\.demo_core_sharding_model_0,demo\.demo_core_sharding_model_1,demo\.demo_core_sharding_model_2,demo\.demo_core_sharding_model_3,demo\.demo_core_sharding_model_4,demo\.demo_core_sharding_model_5,demo\.demo_core_sharding_model_6,demo\.demo_core_sharding_model_7 dbUserName: root dbPassword: oinone memoryStorageBufferSize: 65536 topic: BINLOG_EVENT_TOPIC dynamicTopic: false dbs: – { address: 127.0.0.1, port: 3306 } tsdb: enable: true jdbcUrl: "jdbc:mysql://127.0.0.1:3306/canal_tsdb" userName: root password: oinone mq: rocketmq rocketmq: namesrv: 127.0.0.1:9876 retryTimesWhenSendFailed: 5 dubbo: application: name: canal-server version: 1.0.0 registry: address: zookeeper://127.0.0.1:2181 protocol: name: dubbo port: 20881 scan: base-packages: pro.shushi server: address: 0.0.0.0 port: 10010 sessionTimeout: 3600 图4-1-25-2 修改Canal配置并重启 ES安装 下载安装包官方下载地址,也可以直接下载elasticsearch-8.4.1-darwin-x86_64.tar.gz.txt(361.7 MB),下载后去除后缀.txt,然后解压文件 替换安装目录/config下的[elasticsearch.yml](elasticsearch)(1 KB),主要是文件中追加了三个配置 xpack.security.enabled: false xpack.security.http.ssl.enabled: false xpack.security.transport.ssl.enabled: false 图4-1-25-3 elasticsearc.yml追加三个配置 启动 a. 导入环境变量(ES运行时需要JDK18及以上版本JDK运行环境, ES安装包中包含了一个JDK18版本) # export JAVA_HOME=/Users/oinone/Documents/oinone/es/elasticsearch-8.4.1/jdk.app/Contents/Home/ export JAVA_HOME=ES解压安装目录/jdk.app/Contents/Home/ 图4-1-25-4 导入环境变量 b. 运行ES ## nohup /Users/oinone/Documents/oinone/es/elasticsearch-8.4.1/bin/elasticsearch >> $TMPDIR/elastic.log 2>&1 & nohup ES安装目录/bin/elasticsearch >> $TMPDIR/elastic.log 2>&1 & 图4-1-25-5 运行ES 停止ES lsof…

    2024年5月23日
    1.1K00

Leave a Reply

登录后才能评论