业务域

1. 业务域介绍

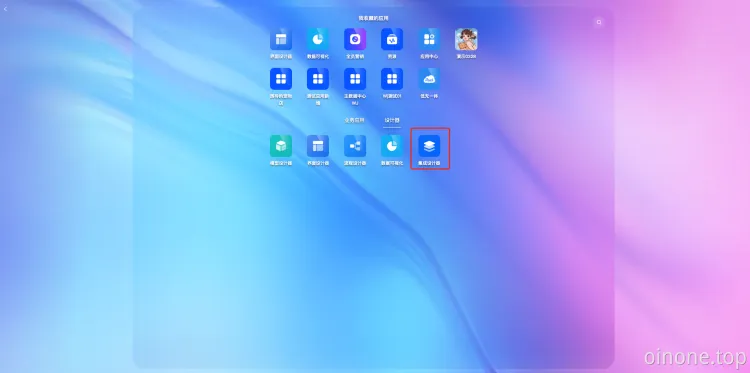
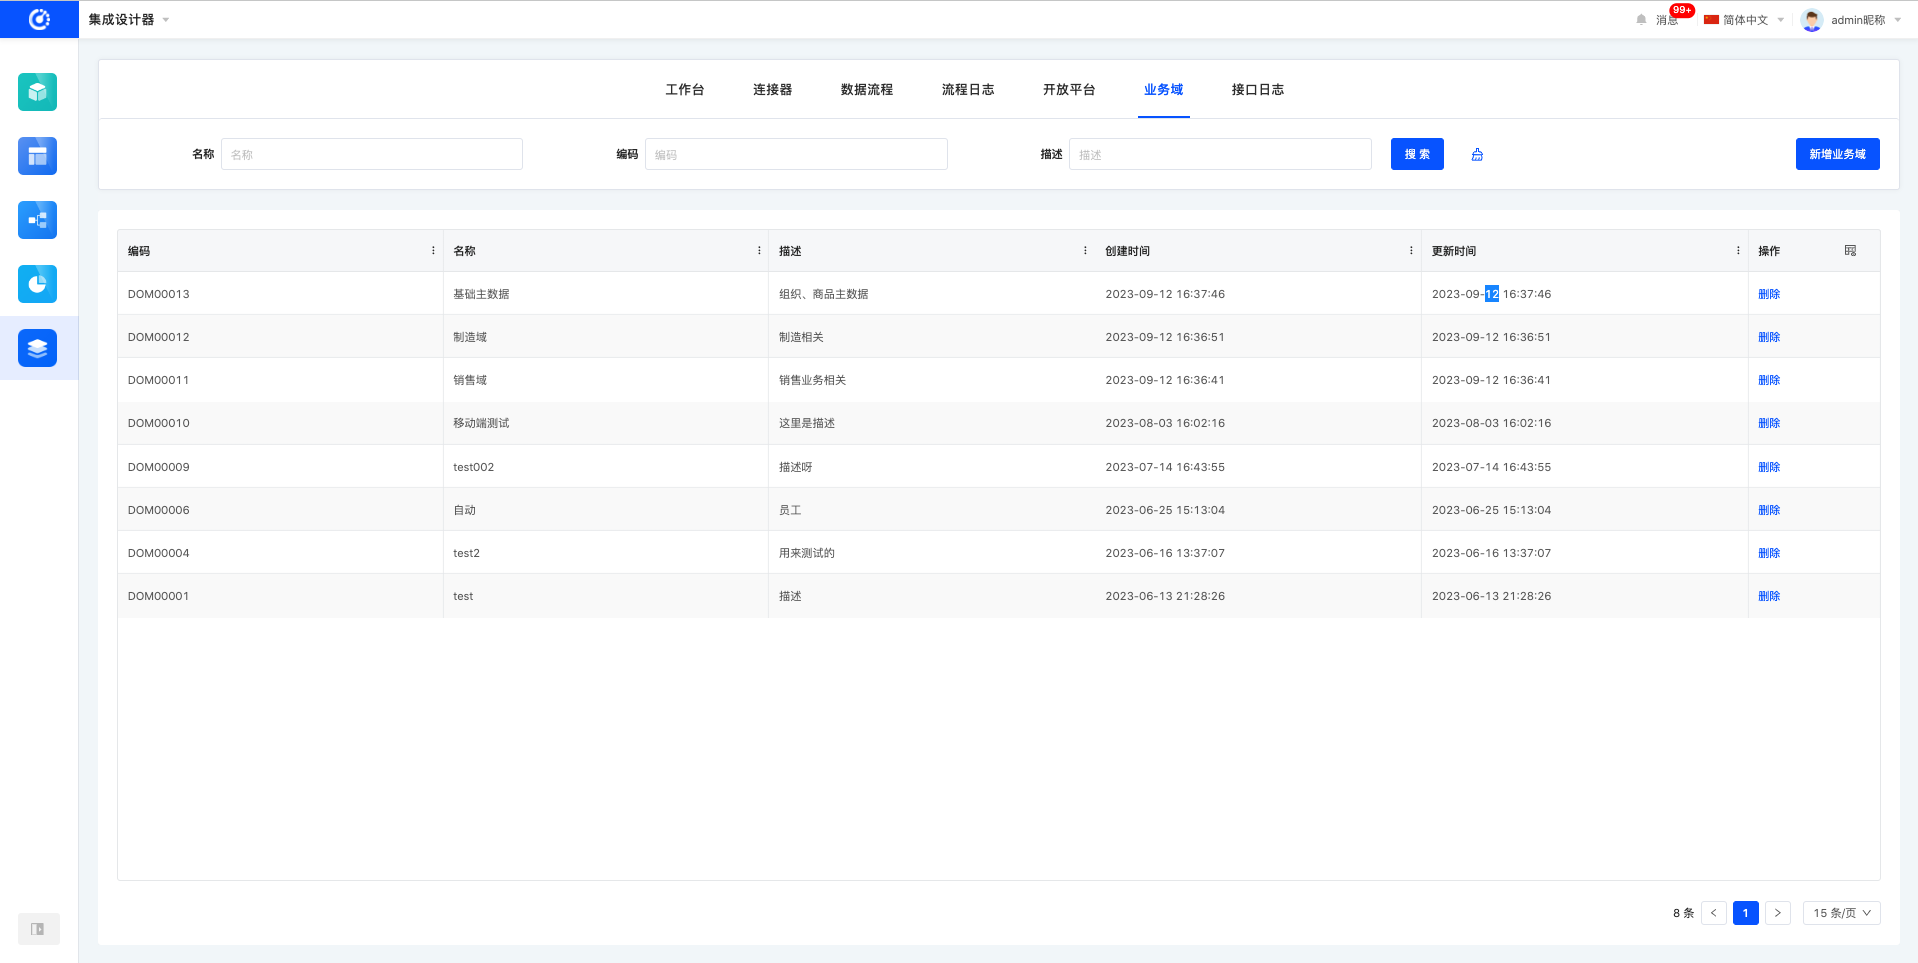
业务域是根据业务域对集成应用、开放接口进行归类管理。在创建集成应用、开发接口时,可选择归属的业务域。

操作入口:集成设计器——业务域。

image.png

image.png

2. 业务域管理

业务域管理提供新增、删除、搜索操作。

2.1 业务域列表

支持按照编码、名称、描述搜索业务域。

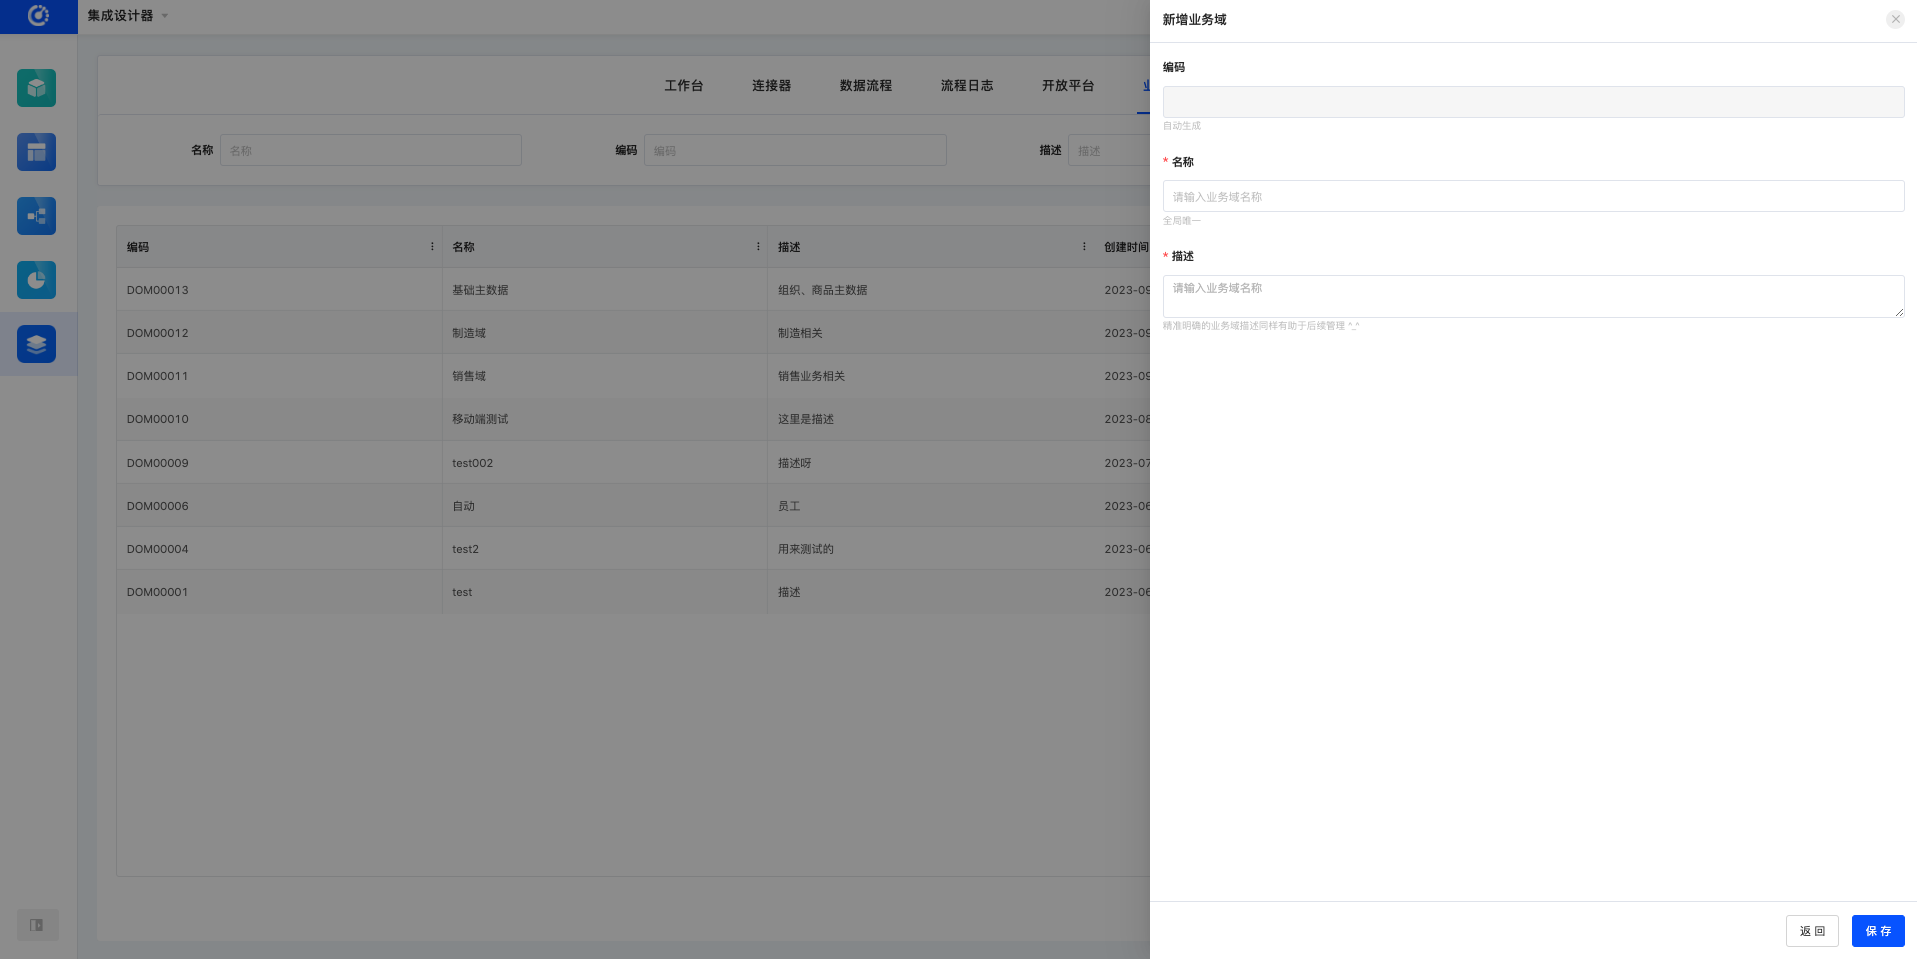
2.2 新增业务域

新增业务域:输入业务域名称、描述新增。

image.png

2.3 删除业务域

当前业务域未被其他数据记录引用时,可删除成功,反之如果被引用了,不允许删除。

Oinone社区 作者:史, 昂原创文章,如若转载,请注明出处:https://doc.oinone.top/oio4/9427.html

访问Oinone官网:https://www.oinone.top获取数式Oinone低代码应用平台体验

Like (0)
史, 昂's avatar史, 昂数式管理员
Previous 2024年6月20日 am9:49
Next 2024年6月20日 am9:49

相关推荐

  • 4.2.5 框架之网络请求-Request

    在中后台业务场景中,大部分的请求时候是可以被枚举的,比如创建、删除、更新、查询。在上文中,我们讲了httpClient如何自定义请求,来实现自己的业务诉求。本文中讲到的Request是离业务更近一步的封装,他提供了开箱即用的API,比如insertOne、updateOne,它是基于HttpClient做的二次封装,当你熟悉Request时,在中后台的业务场景中,所有的业务接口自定义将事半功倍。 一、Request详细介绍 元数据-model 获取模型实例 import { getModel } from '@kunlun/dependencies' getModel('modelName'); 图4-2-5-1 获取模型实例 清除所有缓存的模型 import { cleanModelCache } from '@kunlun/dependencies' cleanModelCache(); 图4-2-5-2 清除所有缓存的模型 元数据-module 获取应用实例,包含应用入口和菜单 import { queryModuleByName } from '@kunlun/dependencies' queryModuleByName('moduleName') 图4-2-5-3 获取应用实例 查询当前用户所有的应用 import { loadModules } from '@kunlun/dependencies' loadModules() 图4-2-5-4 查询当前用户所有的应用 query 分页查询 import { queryPage } from '@kunlun/dependencies' queryPage(modelName, { pageSize: 15, // 一次查询几条 currentPage, 1, // 当前页码 condition?: '' // 查询条件 maxDepth?: 1, // 查几层模型出来,如果有2,会把所有查询字段的关系字段都查出来 sort?: []; // 排序规则 }, fields, variables, context) 图4-2-5-5 分页查询 自定义分页查询-可自定义后端接口查询数据 import { customQueryPage } from '@kunlun/dependencies' customQueryPage(modelName, methodName, { pageSize: 15, // 一次查询几条 currentPage, 1, // 当前页码 condition?: '' // 查询条件 maxDepth?: 1, // 查几层模型出来,如果有2,会把所有查询字段的关系字段都查出来 sort?: []; // 排序规则 }, fields, variables, context) 图4-2-5-6 自定义分页查询 查询一条-根据params匹配出一条数据 import { queryOne } from '@kunlun/dependencies' customQueryPage(modelName, params, fields, variables, context) 图4-2-5-7 根据params匹配出一条数据 自定义查询 import { customQuery } from '@kunlun/dependencies' customQuery(methodName, modelName, record, fields, variables, context) 图4-2-5-8 自定义查询 update import { updateOne } from '@kunlun/dependencies' updateOne(modelName, record, fields, variables, context) 图4-2-5-9 update insert import { insertOne } from '@kunlun/dependencies' insertOne(modelName, record, fields, variables, context) 图4-2-5-10 insert delete import { deleteOne } from '@kunlun/dependencies'…

    2024年5月23日
    1.7K00
  • 3.5.6.3 布局的配置

    布局是将页面拆分成一个一个的小单元,按照上下中左右进行排列。 前沿 在前端领域中,布局可以分为三大块「Float、Flex、Grid 」,Float可以说的上是上古时期的布局了,如今市面还是很少见的,除了一些古老的网站。 目前,平台主要支持通过配置XML上面的cols和span来进行布局。平台也同样支持自由布局,合理的使用row、col、containers和container四个布局容器相关组件,将可以实现各种类型的布局样式,换句话说,平台实现的自由布局功能是Flex和Grid的结合体。 这里主要是讲解Flex和Grid布局,以及目前新的模板布局实现的思路。 Flex布局 Flex布局采用的是一维布局,那么什么是一维布局呢,所谓的一维布局就是只有一个方向、没有体积、面积,比如一条直线。它适合做局部布局,就像我们原来的顶部菜单、面包屑导航,以及现在的主视图字段配置。 图3-5-6-19 Flex布局示意 图3-5-6-20 Flex布局示意 图3-5-6-21 Flex布局示意 从上图可以看看出,Flex布局只能在X、Y轴进行转换,它无法对上下左右四个方向同时处理,因为它没“面积”的概念。所以它最适合做局部布局。 优点 图3-5-6-22 Flex兼容性 Flex的兼容性,可以看得出来,目前主流的浏览器都支持该属性。所以Flex兼容性强,如果你想对局部做布局处理,Flex是最好选择。 缺陷 刚刚也提到了,用户想要的布局是千奇百怪的,如果他想要的布局在现有的功能中无法实现怎么办?让用户放弃?还是说服他使用现在的布局。 Grid布局 Grid布局系统采用的是二维布局,二维布局有四个方向:上、下、左、右,它只有面积没有体积,比如一张纸、网格。 Grid布局 <div id="grid-container-one"> <div class="one-1">Grid Item 1</div> <div>Grid Item 2</div> <div>Grid Item 3</div> <div>Grid Item 4</div> <div>Grid Item 5</div> <div class="one-6">Grid Item 6</div> </div> <div id="grid-container-two"> <div class="tow-1">Grid Item 1</div> <div class="tow-2">Grid Item 2</div> <div>Grid Item 3</div> <div>Grid Item 4</div> <div>Grid Item 5</div> <div>Grid Item 6</div> </div> <div id="grid-container-three"> <div>Grid Item 1</div> <div>Grid Item 2</div> <div class="grid">Grid Item 3</div> <div class="grid-column">Grid Item 4</div> <div>Grid Item 5</div> <div>Grid Item 6</div> <div>Grid Item 7</div> <div class="grid-column">Grid Item 8</div> </div> HTML CSSResult Skip Results Iframe EDIT ON * { box-sizing: border-box; padding: 0; margin: 0; line-height: 1.5; font-weight: bold; text-align: center; } #grid-container-one{ background-color: black; display: grid; grid-template-columns: repeat(3, 1fr); grid-template-rows: repeat(2, 50px); gap: 10px; border: solid black 2px; margin-bottom: 20px; color: salmon; } #grid-container-one div { border: solid white 2px; padding: 10px; } #grid-container-one .one-1 { grid-area: span 1/span 3; text-aligin: center } #grid-container-one .one-6 { grid-column: 3 /4; } #grid-container-two{ background-color: CADETBLUE; display: grid; grid-template-columns: 15% repeat(2, 1fr);…

    2024年5月23日
    1.6K00
  • 企业个性化配置

    平台除了帮助企业快速解决业务需求外,还提供了企业文化、风格个性化能力,本章节详细介绍个性化配置。包括:登陆页配置、企业形象配置、系统风格配置。 系统配置 配置入口 配置入口:右上角登陆账号——系统配置——全局配置——登陆页配置、企业形象配置、系统风格配置。 登陆页配置 用户自定义登陆页的主题,一共有六个主题可选择,分别为: 图一:左侧是图片,右侧是登录输入框,Logo在左上角; 图二:右左侧是图片,右侧是登录输入框,Logo在左上角; 图三:底图是图片,登录输入框浮在页面左侧,Logo在左上角; 图四:底图是图片,登录输入框浮在页面中间,Logo在左上角; 图五:底图是图片,登录输入框浮在页面右侧,Logo在左上角; 图六:底图是图片,登录输入框浮在页面中间,Logo在登录框上方。 页面背景 上传登录页背景,支持上传jpg、png格式的图片或mp4、mov、avi格式视频。尺寸建议为1920*1080px,文件大小不超过50MB。 登录页logo:指配置登录页左上角的logo图标。 预览:配置后可在右侧电脑中点击全屏预览效果。 配置示例 企业形象配置 企业形象配置:可设置企业信息、业务应用导航栏logo、浏览器logo,设置完成之后,点击发布之后设置生效。 系统风格配置 系统风格配置,可设置主题(浅色、深色)、尺寸(大、中、小),配置后可全屏预览,发布后即可更换成对应的风格。 下载代码可进行自定义风格。

    2024年6月20日
    1.6K00
  • 3.4.3.3 SPI机制-扩展点

    扩展点结合拦截器的设计,oinone可以点、线、面一体化管理Function 扩展点用于扩展函数逻辑。扩展点类似于SPI机制(Service Provider Interface),是一种服务发现机制。这一机制为函数逻辑的扩展提供了可能。 一、构建第一个扩展点 自定义扩展点(举例) 在我们日常开发中,随着对业务理解的深入,往往还在一些逻辑中会预留扩展点,以便日后应对不同需求时可以灵活替换某一小块逻辑。 在3.3.4【模型的继承】一文中的PetCatItemQueryService,是独立新增函数只作公共逻辑单元。现在我们给它的实现类增加一个扩展点。在PetCatItemQueryServiceImpl的queryPage方法中原本会先查询PetCatType列表,我们这里假设这个逻辑随着业务发展未来会发生变化,我们可以预先预留【查询萌猫类型扩展点】 Step1 新增扩展点定义PetCatItemQueryCatTypeExtpoint 扩展点命名空间:在接口上用@Ext声明扩展点命名空间。会优先在本类查找@Ext,若为空则往接口向上做遍历查找,返回第一个查找到的@Ext.value注解值,使用该值再获取函数的命名空间;如果未找到,则返回扩展点全限定类名。所以我们这里扩展点命名空间为:pro.shushi.pamirs.demo.api.extpoint.PetCatItemQueryCatTypeExtpoint 扩展点技术名称:先取@ExtPoint.name,若为空则取扩展点接口方法名。所以我们这里技术名为queryCatType package pro.shushi.pamirs.demo.api.extpoint; import pro.shushi.pamirs.demo.api.model.PetCatType; import pro.shushi.pamirs.meta.annotation.Ext; import pro.shushi.pamirs.meta.annotation.ExtPoint; import java.util.List; @Ext public interface PetCatItemQueryCatTypeExtpoint { @ExtPoint(displayName = "查询萌猫类型扩展点") List<PetCatType> queryCatType(); } 图3-4-3-11 新增扩展点定义PetCatItemQueryCatTypeExtpoint Step2 修改PetCatItemQueryServiceImpl(用Ext.run模式调用) 修改queryPage,增加扩展点的使用代码。扩展点的使用有两种方式 方法一,使用命名空间和扩展点名称调用Ext.run(namespace, fun, 参数); 方法二,使用函数式接口调用Ext.run(函数式接口, 参数); 我们这里用了第二种方式 用PetCatItemQueryCatTypeExtpoint的全限定类名作为扩展点的命名空间(namespace) 用queryCatType的方法名作为扩展点的技术名称(name) 根据namespace+name去找到匹配扩展点实现,并根据规则是否匹配,以及优先级唯一确定一个扩展点实现去执行逻辑 package pro.shushi.pamirs.demo.core.service; ……省略依赖包 @Model.model(PetCatItem.MODEL_MODEL) @Component public class PetCatItemAction extends DataStatusBehavior<PetCatItem> { @Override protected PetCatItem fetchData(PetCatItem data) { return data.queryById(); } @Action(displayName = "启用") public PetCatItem dataStatusEnable(PetCatItem data){ data = super.dataStatusEnable(data); data.updateById(); return data; } @Function.Advanced(displayName = "查询模型数据的默认过滤条件", type = FunctionTypeEnum.QUERY, managed = true) @Function(openLevel = {LOCAL}) public String queryFilters() { StringBuilder sqlWhereCondition = new StringBuilder(); // List<PetCatType> typeList = new PetCatType().queryList(); List<PetCatType> typeList = Ext.run(PetCatItemQueryCatTypeExtpoint::queryCatType, new Object[]{}); if(!CollectionUtils.isEmpty(typeList)){ // sqlWhereCondition.append("type_id"); sqlWhereCondition.append(PStringUtils.fieldName2Column(LambdaUtil.fetchFieldName(PetCatItem::getTypeId))); sqlWhereCondition.append(StringUtils.SPACE).append(SqlConstants.IN).append(CharacterConstants.LEFT_BRACKET); for(PetCatType petCatType: typeList){ sqlWhereCondition.append(petCatType.getId()).append(CharacterConstants.SEPARATOR_COMMA); } sqlWhereCondition.deleteCharAt(sqlWhereCondition.lastIndexOf(CharacterConstants.SEPARATOR_COMMA)); sqlWhereCondition.append(StringUtils.SPACE).append(CharacterConstants.RIGHT_BRACKET); } return sqlWhereCondition.toString(); } ……省略其他函数 } 图3-4-3-12 修改PetCatItemQueryServiceImpl Step3 新增扩展点实现PetCatItemQueryCatTypeExtpointOne 扩展点命名空间要与扩展点定义一致,用@Ext(PetCatItemQueryCatTypeExtpoint.class) @ExtPoint.Implement声明这是在@Ext声明的命名空间下,且技术名为queryCatType的扩展点实现 package pro.shushi.pamirs.demo.core.extpoint; import pro.shushi.pamirs.demo.api.extpoint.PetCatItemQueryCatTypeExtpoint; import pro.shushi.pamirs.demo.api.model.PetCatType; import pro.shushi.pamirs.meta.annotation.Ext; import pro.shushi.pamirs.meta.annotation.ExtPoint; import pro.shushi.pamirs.meta.api.session.PamirsSession; import java.util.List; @Ext(PetCatItemQueryCatTypeExtpoint.class) public class PetCatItemQueryCatTypeExtpointOne implements PetCatItemQueryCatTypeExtpoint { @Override @ExtPoint.Implement(displayName = "查询萌猫类型扩展点的默认实现") public List<PetCatType> queryCatType() { PamirsSession.getMessageHub().info("走的是第一个扩展点"); List<PetCatType> typeList = new PetCatType().queryList(); return typeList; } } 图3-4-3-13 新增扩展点实现PetCatItemQueryCatTypeExtpointOne Step4…

    2024年5月23日
    1.7K00

Leave a Reply

Please Login to Comment