
3.5.7.9 自定义多Tab

在业务中,可能会遇到需要对多tab的交互或UI做全新设计的需求,这个时候可以自定义多tab组件支持。

首先继承平台的MultiTabsWidget组件,将自己vue文件设置到component处

import { MultiTabsWidget, SPI, ViewWidget } from '@kunlun/dependencies';
import Component from './CustomMultiTabs.vue';

@SPI.ClassFactory(
  ViewWidget.Token({
    // 这里的tagName跟平台的组件一样,这样才能覆盖平台的组件
    tagName: ['multi-tabs', 'MultiTabs']
  })
)
export class CustomMultiTabsWidget extends MultiTabsWidget{

  public initialize(props) {
    super.initialize(props);
    // 设置自定义的vue组件
    this.setComponent(Component);
    return this;
  }
}

vue文件中继承平台的props,编写自定义页面代码

export const MultiTabsProps = {
  /**
   * 组件是否可见
   */
  invisible: {
    type: Boolean
  },
  /**
   * tab列表数据
   */
  tabs: {
    type: Array as PropType<MultiTab[]>
  },
  /**
   * 当前激活的tab
   */
  activeTab: {
    type: Object as PropType<MultiTab>
  },
  /**
   * 鼠标悬浮所在的tab
   */
  hoverTab: {
    type: Object as PropType<MultiTab>
  },
  /**
   * 鼠标经过tab事件回调
   */
  onMouseenterTab: {
    type: Function as PropType<(tab: MultiTab) => void>
  },
  /**
   * 鼠标离开tab事件回调
   */
  onMouseleaveTab: {
    type: Function as PropType<(tab: MultiTab) => void>
  },
  /**
   * 点击tab
   */
  onClickTab: {
    type: Function as PropType<(tab: MultiTab) => void>
  },
  /**
   * 刷新当前tab
   */
  onRefreshCurrentTab: {
    type: Function as PropType<(tab: MultiTab) => void>
  },
  /**
   * 关闭当前tab
   */
  onCloseCurrentTab: {
    type: Function as PropType<(tab: MultiTab) => void>
  },
  /**
   * 关闭除当前tab外的其他所有tab
   */
  onCloseOtherTabs: {
    type: Function as PropType<(tab: MultiTab) => void>
  },
  /**
   * 关闭当前tab左侧的所有tab
   */
  onCloseLeftTabs: {
    type: Function as PropType<(tab: MultiTab) => void>
  },
  /**
   * 关闭当前tab右侧的所有tab
   */
  onCloseRightTabs: {
    type: Function as PropType<(tab: MultiTab) => void>
  },
  /**
   * 新窗口打开当前tab
   */
  onOpenCurrentTabOnNewWindow: {
    type: Function as PropType<(tab: MultiTab) => void>
  }
};
<template>
  <div class="k-layout-multi-tabs-main-area" v-if="tabs && tabs.length && !invisible">
    <div id="k-layout-multi-tabs" class="k-layout-multi-tabs oio-scrollbar">
      <div
        v-for="(tab, index) in tabs"
        :key="tab.key"
        :id="`k-layout-multi-tabs-tab-${index}`"
        class="k-layout-multi-tabs-tab"
        :class="{
          'k-layout-multi-tabs-tab-active': activeTab && tab.key === activeTab.key,
          'active-left-hover': activeTabLeftHoverTab,
          'k-layout-multi-tabs-tab-closable': allowClosable
        }"
        @click="onClickTab(tab)"
        @mouseenter="onMouseenterTab(tab)"
        @mouseleave="onMouseleaveTab(tab)"
      >
        <div class="first-tab-icon" v-if="index === 0">
          <oio-icon icon="oinone-shouye1" />
        </div>
        <div class="k-layout-multi-tabs-tab-title" :title="tab.title">{{ tab.title }}</div>
        <div class="close-button-area" :class="[index === 0 && 'k-layout-multi-tabs-tab-close-btn']">
          <oio-button type="link" @click.stop.prevent="onCloseCurrentTab">
            <oio-icon icon="oinone-guanbi" size="16px" />
          </oio-button>
        </div>
        <div class="split-area" v-if="!isInvisibleSplit(index)"></div>
      </div>
    </div>
    <div class="k-layout-multi-tabs-tools">
      <oio-dropdown trigger="click" overlay-class-name="top-bar-common-dropdown">
        <oio-icon icon="oinone-xiala2" size="16px" />
        <template #overlay>
          <div class="multi-tab-tool-overlay">
            <span
              v-for="item in TabToolItems"
              :key="item.key"
              :class="['multi-tab-tool-overlay-item', isTabToolItemDisable(item) && 'disabled']"
              @click="onTabToolItemClick(item)"
            >
              {{ item.title }}
            </span>
          </div>
        </template>
      </oio-dropdown>
    </div>
  </div>
</template>
<script lang="ts">
import { computed, defineComponent, watch } from 'vue';
import { MultiTabsProps, OioIcon, TabToolItems } from '@kunlun/dependencies';
import { OioButton, OioDropdown } from '@kunlun/vue-ui-antd';

export default defineComponent({
  name: 'MyMultiTabs',
  inheritAttrs: false,
  components: { OioButton, OioDropdown, OioIcon },
  props: {
    ...MultiTabsProps
  },
  setup(props) {
    const activeTabLeftHoverTab = computed(() => {
      return (
        props.activeTab &&
        props.hoverTab &&
        props.activeTab.currentIndex !== undefined &&
        props.hoverTab.currentIndex !== undefined &&
        props.activeTab.currentIndex + 1 === props.hoverTab.currentIndex
      );
    });

    watch(
      () => props.activeTab,
      () => {
        setTimeout(() => {
          if (props.activeTab && props.activeTab.currentIndex) {
            const tabDoc = document.getElementById(`k-layout-multi-tabs-tab-${props.activeTab.currentIndex}`);
            if (tabDoc) {
              tabDoc.scrollIntoView(false);
            }
          }
        }, 10);
      }
    );

    const allowClosable = computed(() => (props.tabs?.length || 0) >= 2);

    function isInvisibleSplit(index: number) {
      if (
        props.hoverTab &&
        props.hoverTab.currentIndex !== undefined &&
        (props.hoverTab.currentIndex === index || props.hoverTab.currentIndex - 1 === index)
      ) {
        return true;
      }
      if (props.activeTab && props.activeTab.currentIndex !== undefined && props.activeTab.currentIndex >= 0) {
        return props.activeTab.currentIndex === index || props.activeTab.currentIndex - 1 === index;
      }
      return false;
    }

    function isTabToolItemDisable(tabToolItem) {
      return tabToolItem.disabled(props.tabs?.length || 0, props.activeTab ? props.activeTab.currentIndex : -1);
    }

    function onTabToolItemClick(tabToolItem) {
      if (isTabToolItemDisable(tabToolItem)) {
        return null;
      }
      props.activeTab && props[tabToolItem.key]?.(props.activeTab);
    }

    return {
      activeTabLeftHoverTab,
      allowClosable,
      TabToolItems,
      isInvisibleSplit,
      isTabToolItemDisable,
      onTabToolItemClick
    };
  }
});
</script>

文件目录结构如下图
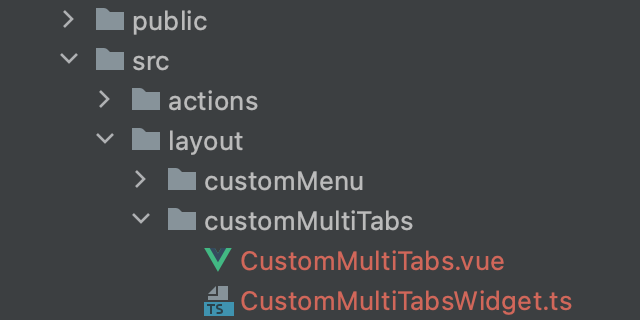
image.png

最后再到运行路径中导入该组件

这里以启动工程的 main.ts 举例,如果运行时未看到该组件的效果,请检查是否正确导入到运行时的路径中

image.png

Oinone社区 作者:史, 昂原创文章,如若转载,请注明出处:https://doc.oinone.top/oio4/9272.html

访问Oinone官网:https://www.oinone.top获取数式Oinone低代码应用平台体验

Like (0)
史, 昂's avatar史, 昂数式管理员
Previous 2024年5月23日 am9:06
Next 2024年5月23日 am9:08

相关推荐

  • 3.5.7.5 自定义动作

    动作是什么 动作(action)描述了终端用户的各种操作。这些操作可以涉及多个层面,包括但不限于: 页面间的跳转:用户可以通过动作从一个页面跳转到另一个页面。 业务交互:动作可以触发与后端服务的交互,例如提交表单、请求数据等。 界面操作:动作可以用于打开模态对话框、抽屉(侧边栏)等界面元素。 作用场景 Oinone 平台内置了一系列的基础动作,默认实现了常见的功能,如页面跳转、业务交互和界面操作等。这些内置动作旨在满足大多数标准应用场景的需求,简化开发过程,提高开发效率。以下是一些常见的内置动作示例: 页面跳转:允许用户在不同页面间导航。 业务交互:支持与后端服务的数据交互,如提交表单。 界面操作:提供动态返回上一页、校验表单、关闭弹窗等。 自定义动作的需求场景 尽管内置动作覆盖了许多常规需求,但在某些复杂或特定的业务场景中,可能需要更加个性化的处理。这些场景可能包括: 特殊的业务逻辑:需要执行不同于标准流程的特定业务操作。 个性化的用户界面:标准的 UI 组件无法满足特定的设计要求。 高级交互功能:需要实现复杂的用户交互和数据处理。 扩展和定制动作 为了满足这些特定需求,Oinone 平台支持通过继承和扩展来自定义动作。开发者可以通过以下步骤实现自定义动作: 继承基类:从平台提供的动作基类继承,这为自定义动作提供了基础框架和必要的接口。 实现业务逻辑:在继承的基础上,添加特定的业务逻辑实现。 自定义界面:根据需要调整或完全重写界面组件,以符合特定的UI设计。 集成测试:确保自定义动作在各种情况下的稳定性和性能。 最佳实践 明确需求:在进行扩展之前,清楚地定义业务需求和目标。 重用现有功能:尽可能利用平台的内置功能和组件。 保持一致性:确保自定义动作与平台的整体风格和标准保持一致。 充分测试:进行全面的测试,确保新动作的稳定性和可靠性。 案例分析 假设有一个场景,需要一个特殊的数据提交流程,该流程不仅包括标准的表单提交,还涉及复杂的数据验证和后续处理。在这种情况下,可以创建一个自定义动作,继承基础动作类并实现特定的业务逻辑和用户界面。 自定义动作 自定义跳转动作 示例工程目录 以下是需关注的工程目录示例,main.ts更新导入./action,action/index.ts更新导出./custom-viewactioin: 图3-5-7-24 自定义跳转动作工程目录示例 步骤 1: 创建自定义动作类 首先,您创建了一个名为 CustomViewAction 的类,这个类继承自 RouterViewActionWidget。这意味着自定义动作是基于路由视图动作的,这通常涉及页面跳转或导航。 import {ActionWidget, RouterViewActionWidget, SPI} from '@kunlun/dependencies'; import CustomViewActionVue from './CustomViewAction.vue'; @SPI.ClassFactory( ActionWidget.Token({ model: 'resource.ResourceCity', name: 'redirectCreatePage' }) ) export class CustomViewAction extends RouterViewActionWidget { public initialize(props) { super.initialize(props); this.setComponent(CustomViewActionVue); return this; } } 图3-5-7-24 自定义跳转动作组件(TS)代码示例 @SPI.ClassFactory: 这是一个装饰器,用于向平台注册这个新的动作。 ActionWidget.Token: 通过这个Token,指定了这个动作与特定模型 (resource.ResourceCity) 关联,并给这个动作命名 (redirectCreatePage). 步骤 2: 初始化和设置组件 在 initialize 方法中,调用了父类的初始化方法,并设置了自定义的 Vue 组件。 public initialize(props) { super.initialize(props); this.setComponent(CustomViewActionVue); return this; } 图3-5-7-24 初始化和设置组件 步骤 3: 定义 Vue 组件 在 CustomViewAction.vue 文件中,定义了自定义动作的视觉表示。 <template> <div class="view-action-wrapper"> 自定义挑战跳转动作 </div> </template> <script lang="ts"> import { defineComponent } from 'vue' export default defineComponent({ inheritAttrs: false, name: 'ViewActionComponent' }) </script> <style lang="scss"> .view-action-wrapper { } </style> 图3-5-7-24 自定义跳转动作组件(Vue)代码示例 步骤 4: 效果如下 图3-5-7-24 自定义跳转动作效果示例 自定义服务器动作 示例工程目录 以下是需关注的工程目录示例,action/index.ts更新导出./custom-serveraction: 图3-5-7-24 自定义服务器动作工程目录示例 步骤 1: 创建自定义动作类 首先, 创建了一个名为 CustomServerAction 的类,这个类继承自 ServerActionWidget。这表明您的自定义动作主要关注服务器端的逻辑。 import {ActionWidget, ServerActionWidget, SPI, Widget} from '@kunlun/dependencies'; import CustomServerActionVue from './CustomServerAction.vue'; @SPI.ClassFactory( ActionWidget.Token({ model: 'resource.ResourceCity', name: 'delete' })…

    2024年5月23日
    1.5K00
  • 3.5.3 Action的类型

    各类动作我们都碰到过,但都没有展开讲过。这篇文章我们来系统介绍下oinone涉及到的所有Action类型。 一、动作类型 服务器动作ServerAction 类似于Spring MVC的控制器Controller,通过模型编码和动作名称路由,定义存储模型或代理模型将为该模型自动生成动作名称为consturct,queryOne,queryPage,create,update,delete,deleteWithFieldBatch的服务器动作。定义传输模型将为该模型自动生成动作名称为consturct的服务器动作 窗口动作ViewAction 站内跳转,通过模型编码和动作名称路由。系统将为存储模型和代理模型自动生成动作名称为redirectDetailPage的跳转详情页窗口动作,动作名称为redirectListPage的跳转列表页窗口动作,动作名称为redirectCreatePage的跳转新增页窗口动作,动作名称为redirectUpdatePage的跳转更新页窗口动作。 跳转动作UrlAction 外链跳转 客户端动作ClientAction 调用客户端函数 二、默认动作 如果在UI层级,有开放新增语义函数,则会默认生成新增的窗口动作ViewAction,跳转到新增页面 如果在UI层级,有开放更新语义函数,则会默认生成修改的窗口动作ViewAction,跳转到更新页面 如果在UI层级,有开放删除语义函数,则会默认生成删除的客户端动作ClientAction,弹出删除确认对话框 三、第一个服务器动作ServerAction 回顾第一个ServerAction 第一个ServerAction是在3.3.2【模型的类型】一文中的“代理模型”部分出现的,再来看下当时的定义代码 package pro.shushi.pamirs.demo.core.action; ……引用类 @Model.model(PetShopProxy.MODEL_MODEL) @Component public class PetShopProxyAction extends DataStatusBehavior<PetShopProxy> { @Override protected PetShopProxy fetchData(PetShopProxy data) { return data.queryById(); } @Action(displayName = "启用") public PetShopProxy dataStatusEnable(PetShopProxy data){ data = super.dataStatusEnable(data); data.updateById(); return data; } ……其他代码 } 图3-5-3-1 回顾第一个ServerAction @Action注解将创建服务器动作,并@Model.model绑定 自定义ServerAction请勿使用get、set、unset开头命名方法或toString命名方法。 ServerAction之校验(举例) Step1 为动作配置校验表达式 使用@Validation注解为PetShopProxyAction的dataStatusEnable服务端动作进行校验表达式配置 package pro.shushi.pamirs.demo.core.action; ……引用类 @Model.model(PetShopProxy.MODEL_MODEL) @Component public class PetShopProxyAction extends DataStatusBehavior<PetShopProxy> { @Override protected PetShopProxy fetchData(PetShopProxy data) { return data.queryById(); } @Validation(ruleWithTips = { @Validation.Rule(value = "!IS_BLANK(data.code)", error = "编码为必填项"), @Validation.Rule(value = "LEN(data.shopName) < 128", error = "名称过长,不能超过128位"), }) @Action(displayName = "启用") public PetShopProxy dataStatusEnable(PetShopProxy data){ data = super.dataStatusEnable(data); data.updateById(); return data; } ……其他代码 } 图3-5-3-2 为动作配置校验表达式 注: ruleWithTips可以声明多个校验规则及错误提示; IS_BLANK和LEN为内置文本函数,更多内置函数详见4.1.12【函数之内置函数与表达式】一文; 当内置函数不满足时参考4.1.13【Action之校验】一文。 Step2 重启看效果 在商店管理页面点击【启用】得到了预期返回错误信息,显示"编码为必填项" 图3-5-3-3 在商店管理页面点击启用得到了预期返回错误信息 ServerAction之前端展示规则(举例) 既然后端对ServerAction发起提交做了校验,那能不能在前端就不展示呢?当然可以,我们现在就来试下。 Step1 配置PetShopProxyAction的dataStatusEnable的前端出现规则 用注解@Action.Advanced(invisible="!(activeRecord.code !== undefined && !IS_BLANK(activeRecord.code))")来表示,注意这里配对invisible是给前端识别的,所以写法上跟后端的校验有些不一样,但如内置函数IS_BLANK这些是前后端一致实现的,activeRecord在前端用于表示当前记录。 package pro.shushi.pamirs.demo.core.action; ……引用类 @Model.model(PetShopProxy.MODEL_MODEL) @Component public class PetShopProxyAction extends DataStatusBehavior<PetShopProxy> { @Override protected PetShopProxy fetchData(PetShopProxy data) { return data.queryById(); } @Validation(ruleWithTips = { @Validation.Rule(value = "!IS_BLANK(data.code)", error = "编码为必填项"), @Validation.Rule(value = "LEN(data.name) < 128", error = "名称过长,不能超过128位"), }) @Action(displayName = "启用") @Action.Advanced(invisible="!(activeRecord.code !== undefined…

    2024年5月23日
    1.7K00
  • 3.4.3.3 SPI机制-扩展点

    扩展点结合拦截器的设计,oinone可以点、线、面一体化管理Function 扩展点用于扩展函数逻辑。扩展点类似于SPI机制(Service Provider Interface),是一种服务发现机制。这一机制为函数逻辑的扩展提供了可能。 一、构建第一个扩展点 自定义扩展点(举例) 在我们日常开发中,随着对业务理解的深入,往往还在一些逻辑中会预留扩展点,以便日后应对不同需求时可以灵活替换某一小块逻辑。 在3.3.4【模型的继承】一文中的PetCatItemQueryService,是独立新增函数只作公共逻辑单元。现在我们给它的实现类增加一个扩展点。在PetCatItemQueryServiceImpl的queryPage方法中原本会先查询PetCatType列表,我们这里假设这个逻辑随着业务发展未来会发生变化,我们可以预先预留【查询萌猫类型扩展点】 Step1 新增扩展点定义PetCatItemQueryCatTypeExtpoint 扩展点命名空间:在接口上用@Ext声明扩展点命名空间。会优先在本类查找@Ext,若为空则往接口向上做遍历查找,返回第一个查找到的@Ext.value注解值,使用该值再获取函数的命名空间;如果未找到,则返回扩展点全限定类名。所以我们这里扩展点命名空间为:pro.shushi.pamirs.demo.api.extpoint.PetCatItemQueryCatTypeExtpoint 扩展点技术名称:先取@ExtPoint.name,若为空则取扩展点接口方法名。所以我们这里技术名为queryCatType package pro.shushi.pamirs.demo.api.extpoint; import pro.shushi.pamirs.demo.api.model.PetCatType; import pro.shushi.pamirs.meta.annotation.Ext; import pro.shushi.pamirs.meta.annotation.ExtPoint; import java.util.List; @Ext public interface PetCatItemQueryCatTypeExtpoint { @ExtPoint(displayName = "查询萌猫类型扩展点") List<PetCatType> queryCatType(); } 图3-4-3-11 新增扩展点定义PetCatItemQueryCatTypeExtpoint Step2 修改PetCatItemQueryServiceImpl(用Ext.run模式调用) 修改queryPage,增加扩展点的使用代码。扩展点的使用有两种方式 方法一,使用命名空间和扩展点名称调用Ext.run(namespace, fun, 参数); 方法二,使用函数式接口调用Ext.run(函数式接口, 参数); 我们这里用了第二种方式 用PetCatItemQueryCatTypeExtpoint的全限定类名作为扩展点的命名空间(namespace) 用queryCatType的方法名作为扩展点的技术名称(name) 根据namespace+name去找到匹配扩展点实现,并根据规则是否匹配,以及优先级唯一确定一个扩展点实现去执行逻辑 package pro.shushi.pamirs.demo.core.service; ……省略依赖包 @Model.model(PetCatItem.MODEL_MODEL) @Component public class PetCatItemAction extends DataStatusBehavior<PetCatItem> { @Override protected PetCatItem fetchData(PetCatItem data) { return data.queryById(); } @Action(displayName = "启用") public PetCatItem dataStatusEnable(PetCatItem data){ data = super.dataStatusEnable(data); data.updateById(); return data; } @Function.Advanced(displayName = "查询模型数据的默认过滤条件", type = FunctionTypeEnum.QUERY, managed = true) @Function(openLevel = {LOCAL}) public String queryFilters() { StringBuilder sqlWhereCondition = new StringBuilder(); // List<PetCatType> typeList = new PetCatType().queryList(); List<PetCatType> typeList = Ext.run(PetCatItemQueryCatTypeExtpoint::queryCatType, new Object[]{}); if(!CollectionUtils.isEmpty(typeList)){ // sqlWhereCondition.append("type_id"); sqlWhereCondition.append(PStringUtils.fieldName2Column(LambdaUtil.fetchFieldName(PetCatItem::getTypeId))); sqlWhereCondition.append(StringUtils.SPACE).append(SqlConstants.IN).append(CharacterConstants.LEFT_BRACKET); for(PetCatType petCatType: typeList){ sqlWhereCondition.append(petCatType.getId()).append(CharacterConstants.SEPARATOR_COMMA); } sqlWhereCondition.deleteCharAt(sqlWhereCondition.lastIndexOf(CharacterConstants.SEPARATOR_COMMA)); sqlWhereCondition.append(StringUtils.SPACE).append(CharacterConstants.RIGHT_BRACKET); } return sqlWhereCondition.toString(); } ……省略其他函数 } 图3-4-3-12 修改PetCatItemQueryServiceImpl Step3 新增扩展点实现PetCatItemQueryCatTypeExtpointOne 扩展点命名空间要与扩展点定义一致,用@Ext(PetCatItemQueryCatTypeExtpoint.class) @ExtPoint.Implement声明这是在@Ext声明的命名空间下,且技术名为queryCatType的扩展点实现 package pro.shushi.pamirs.demo.core.extpoint; import pro.shushi.pamirs.demo.api.extpoint.PetCatItemQueryCatTypeExtpoint; import pro.shushi.pamirs.demo.api.model.PetCatType; import pro.shushi.pamirs.meta.annotation.Ext; import pro.shushi.pamirs.meta.annotation.ExtPoint; import pro.shushi.pamirs.meta.api.session.PamirsSession; import java.util.List; @Ext(PetCatItemQueryCatTypeExtpoint.class) public class PetCatItemQueryCatTypeExtpointOne implements PetCatItemQueryCatTypeExtpoint { @Override @ExtPoint.Implement(displayName = "查询萌猫类型扩展点的默认实现") public List<PetCatType> queryCatType() { PamirsSession.getMessageHub().info("走的是第一个扩展点"); List<PetCatType> typeList = new PetCatType().queryList(); return typeList; } } 图3-4-3-13 新增扩展点实现PetCatItemQueryCatTypeExtpointOne Step4…

    2024年5月23日
    1.9K00
  • 数据类

    1.数据类 1.1 新增数据 新增数据节点可以为任意模型通过表达式新增数据,包含两种模式,「节点执行完即增加业务数据」功能下新增的数据也可以同步触发流程,相反「节点执行完不增加业务数据」则不会触发新增业务数据关联的流程,数据仅可用于后续流程使用。 流程增加的数据在节点执行时就生效。 1.2 更新数据 更新数据节点可以为任意模型通过表达式更新数据。 1.3 获取数据 当流程需要调用触发模型之外的模型中的数据时就需要使用获取数据的功能。 需要选择获取单条/多条数据,选择一个获取数据的模型,可以设置一些筛选项减少不必要的数据。最后需要设置未获取到数据时的执行方式。 继续执行:跳过本次数据获取,继续执行流程。 向模型中新增数据后继续执行:新增数据来供后续节点使用,新增数据同时存入数据库中。 终止流程:终止流程将结束该流程,不管之后是否还有流程节点。 1.4 删除数据 删除数据节点可以将流程节点上面的模型数据从数据库中删除。 1.5 更新流程参数 可以将「流程配置」中的「流程参数」进行修改,仅有变更过的流程参数才能其他节点选中。 1.6 引用逻辑 可以在流程中使用模块自带的逻辑或使用低代码设计的逻辑。

    2024年5月23日
    2.1K00

Leave a Reply

Please Login to Comment