应用中心

在App Finder 中点击应用中心可以进入Oinone的应用中心,可以看到Oinone平台所有应用列表、应用大屏、以及技术可视化。

1. App Finder

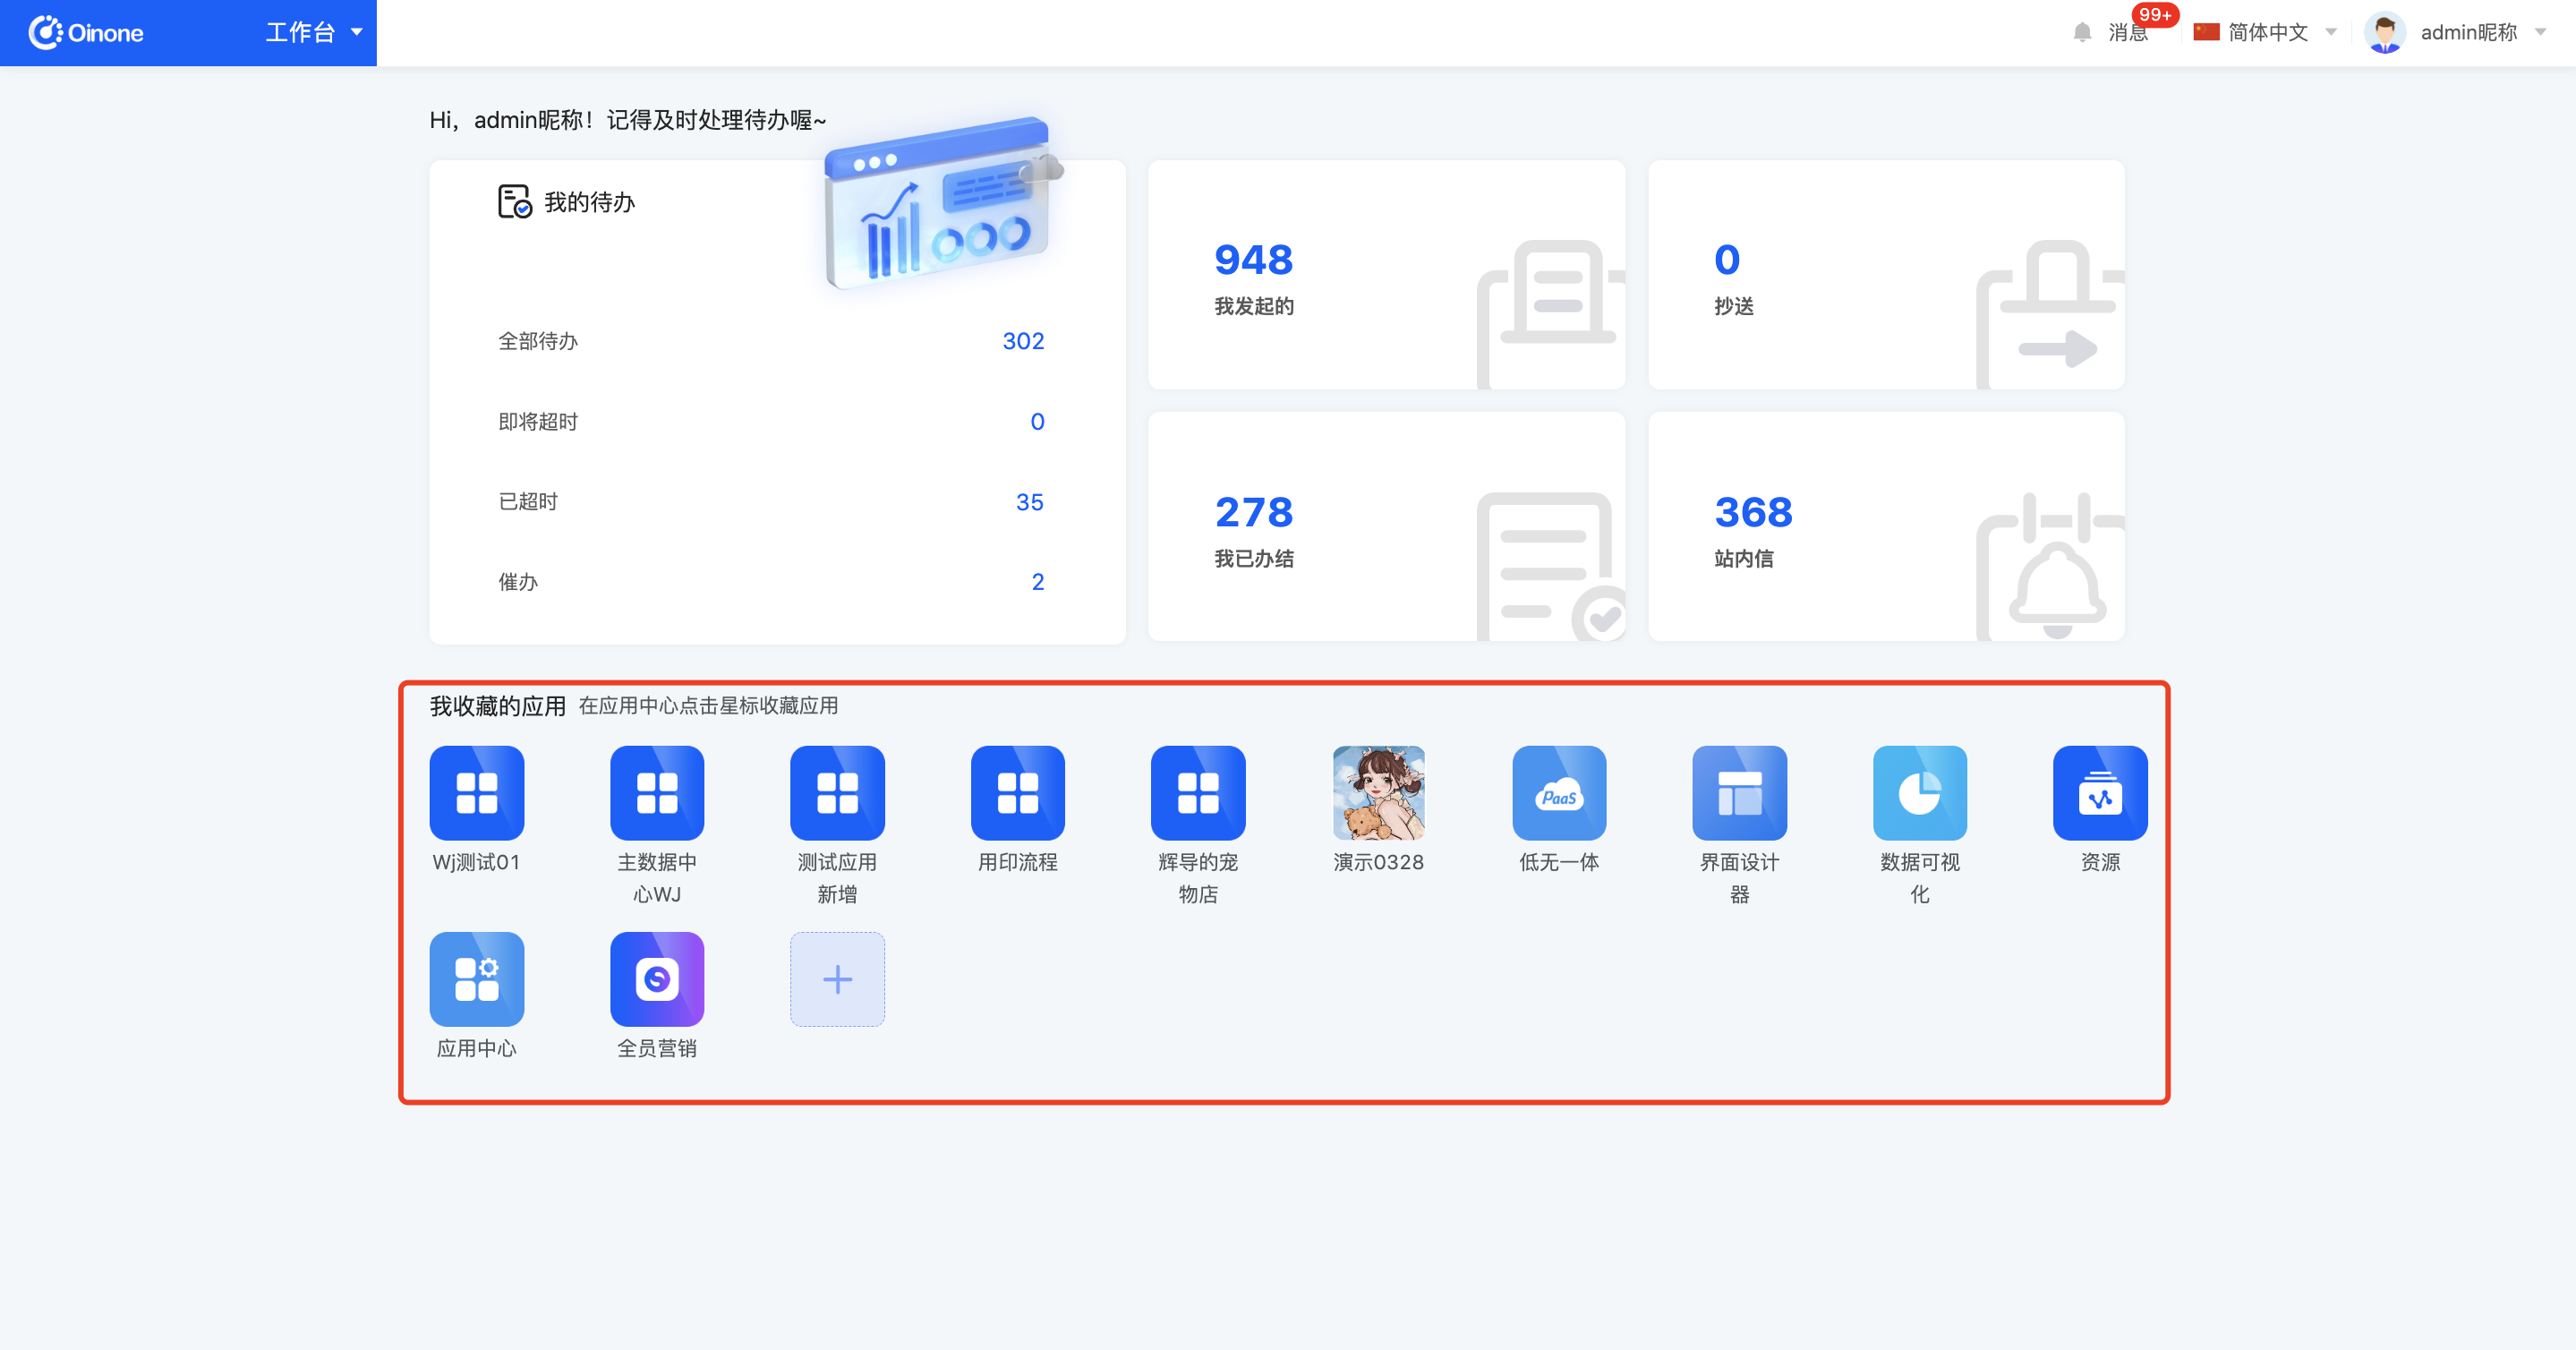
平台提供App Finder搜索查找已安装的应用、点击进入应用;

我收藏的应用:在应用中心收藏后会呈现在“我收藏的应用”;

业务应用:与业务相关、用户可操作的应用;

设计器:平台提供五大设计器设计应用,即平台的无代码能力,包括:模型设计器、界面设计器、流程设计器、数据可视化、集成设计器。
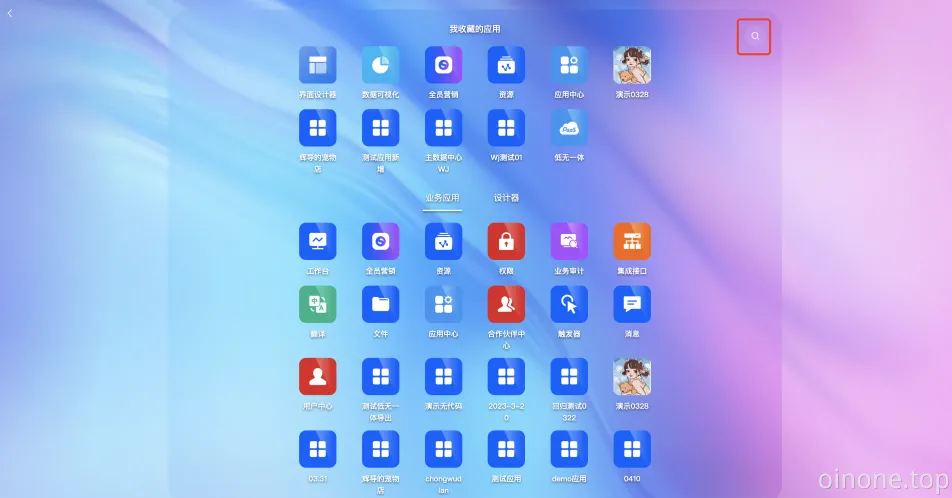
image.png

2. 应用列表

应用列表管理平台中所有应用,管理应用的生命周期,如安装、升级、卸载,提供搜索、创建、编辑、卸载、收藏、设置首页等功能。

在介绍应用具体操作前,我们先来了解以下概念:

应用类型:分为应用与模块两种类型,两者区别在于在于应用有前台页面,可以在前台页面操作数据,模块没有前台页面、服务于其他应用或模块,大家在创建应用时可根据业务需求创建应用或模块。

依赖:创建新应用时,可依赖已有应用或模块,依赖后使用依赖应用/模块的能力,比如依赖文件应用可使用导入、导出能力,依赖资源应用可使用地址、语言等能力。
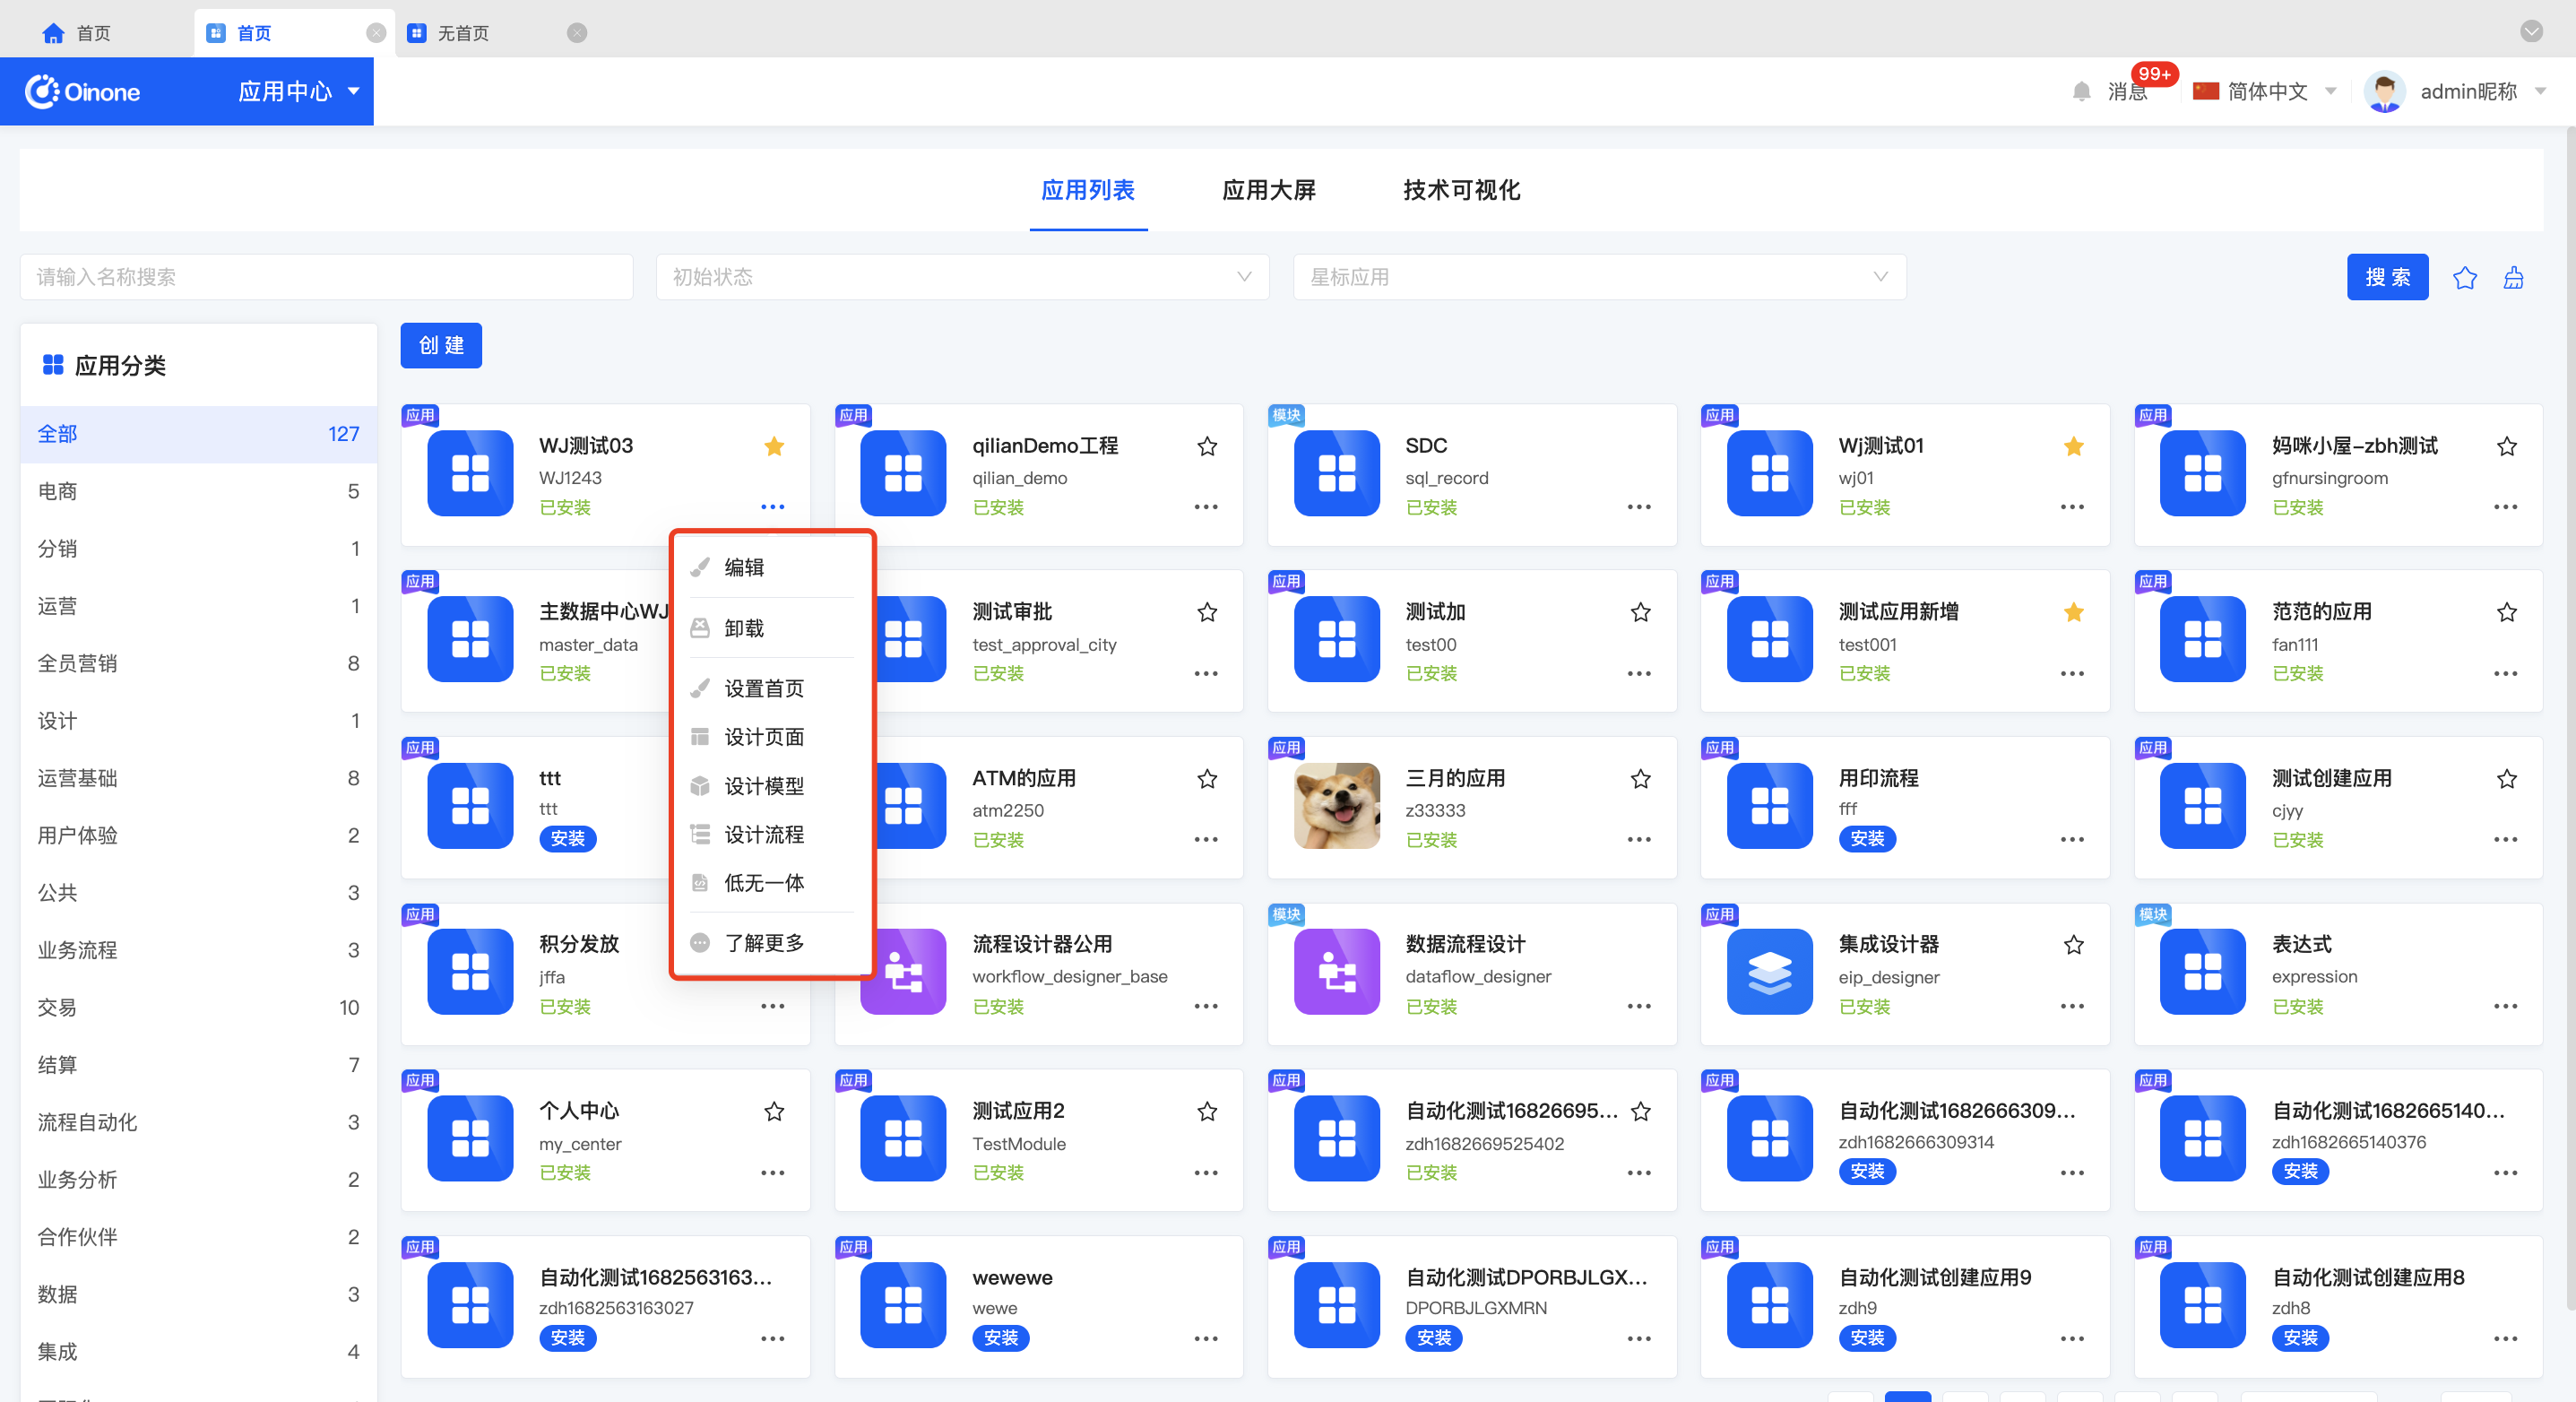
image.png

图3-2-35 Oinone的应用列表

2.1 创建

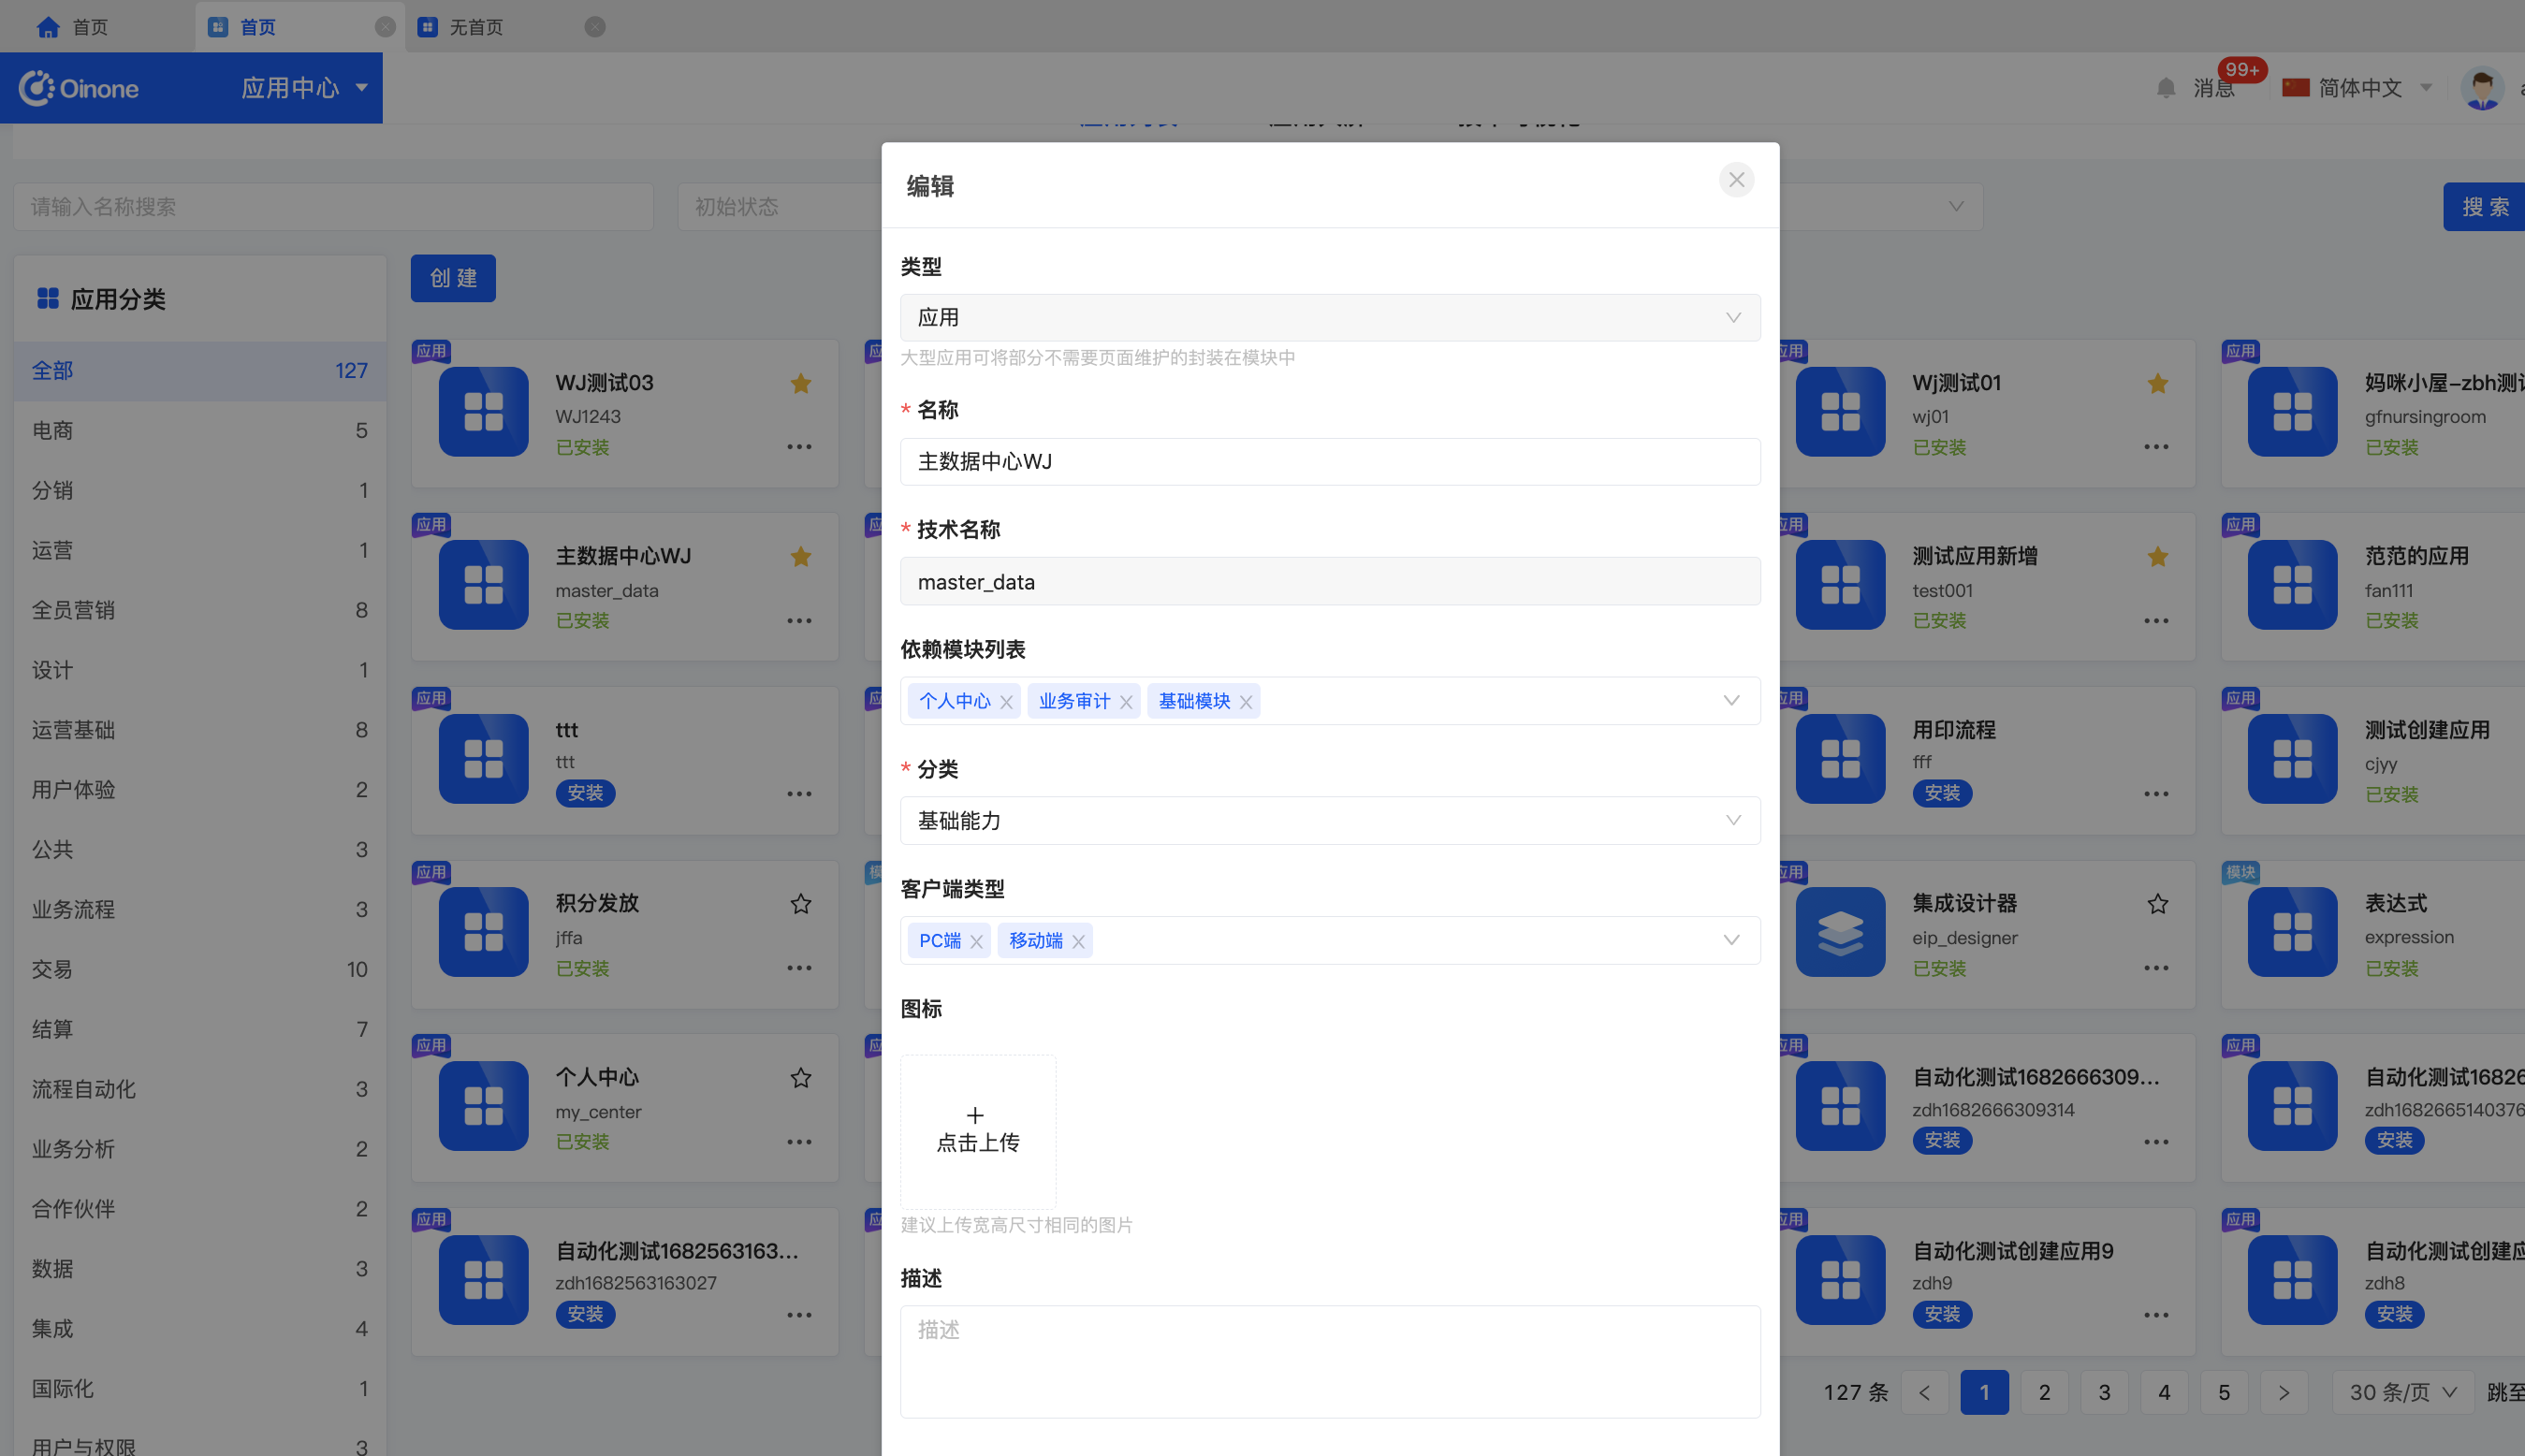
  • 创建应用时,需要选择类型、定义应用名称、技术名称,选择依赖模块、所属分类、客户端类型。
  • 每个应用大多数都需要依赖一些基础模块:文件、资源、
  • 应用分类是按照应用所属业务域进行的分类管理,目前是平台提供的分类,后续会开放给用户自行管理。
  • 客户端类型是指应用适用于PC端、移动端,如果只选择PC端,则应用不可在移动端使用。
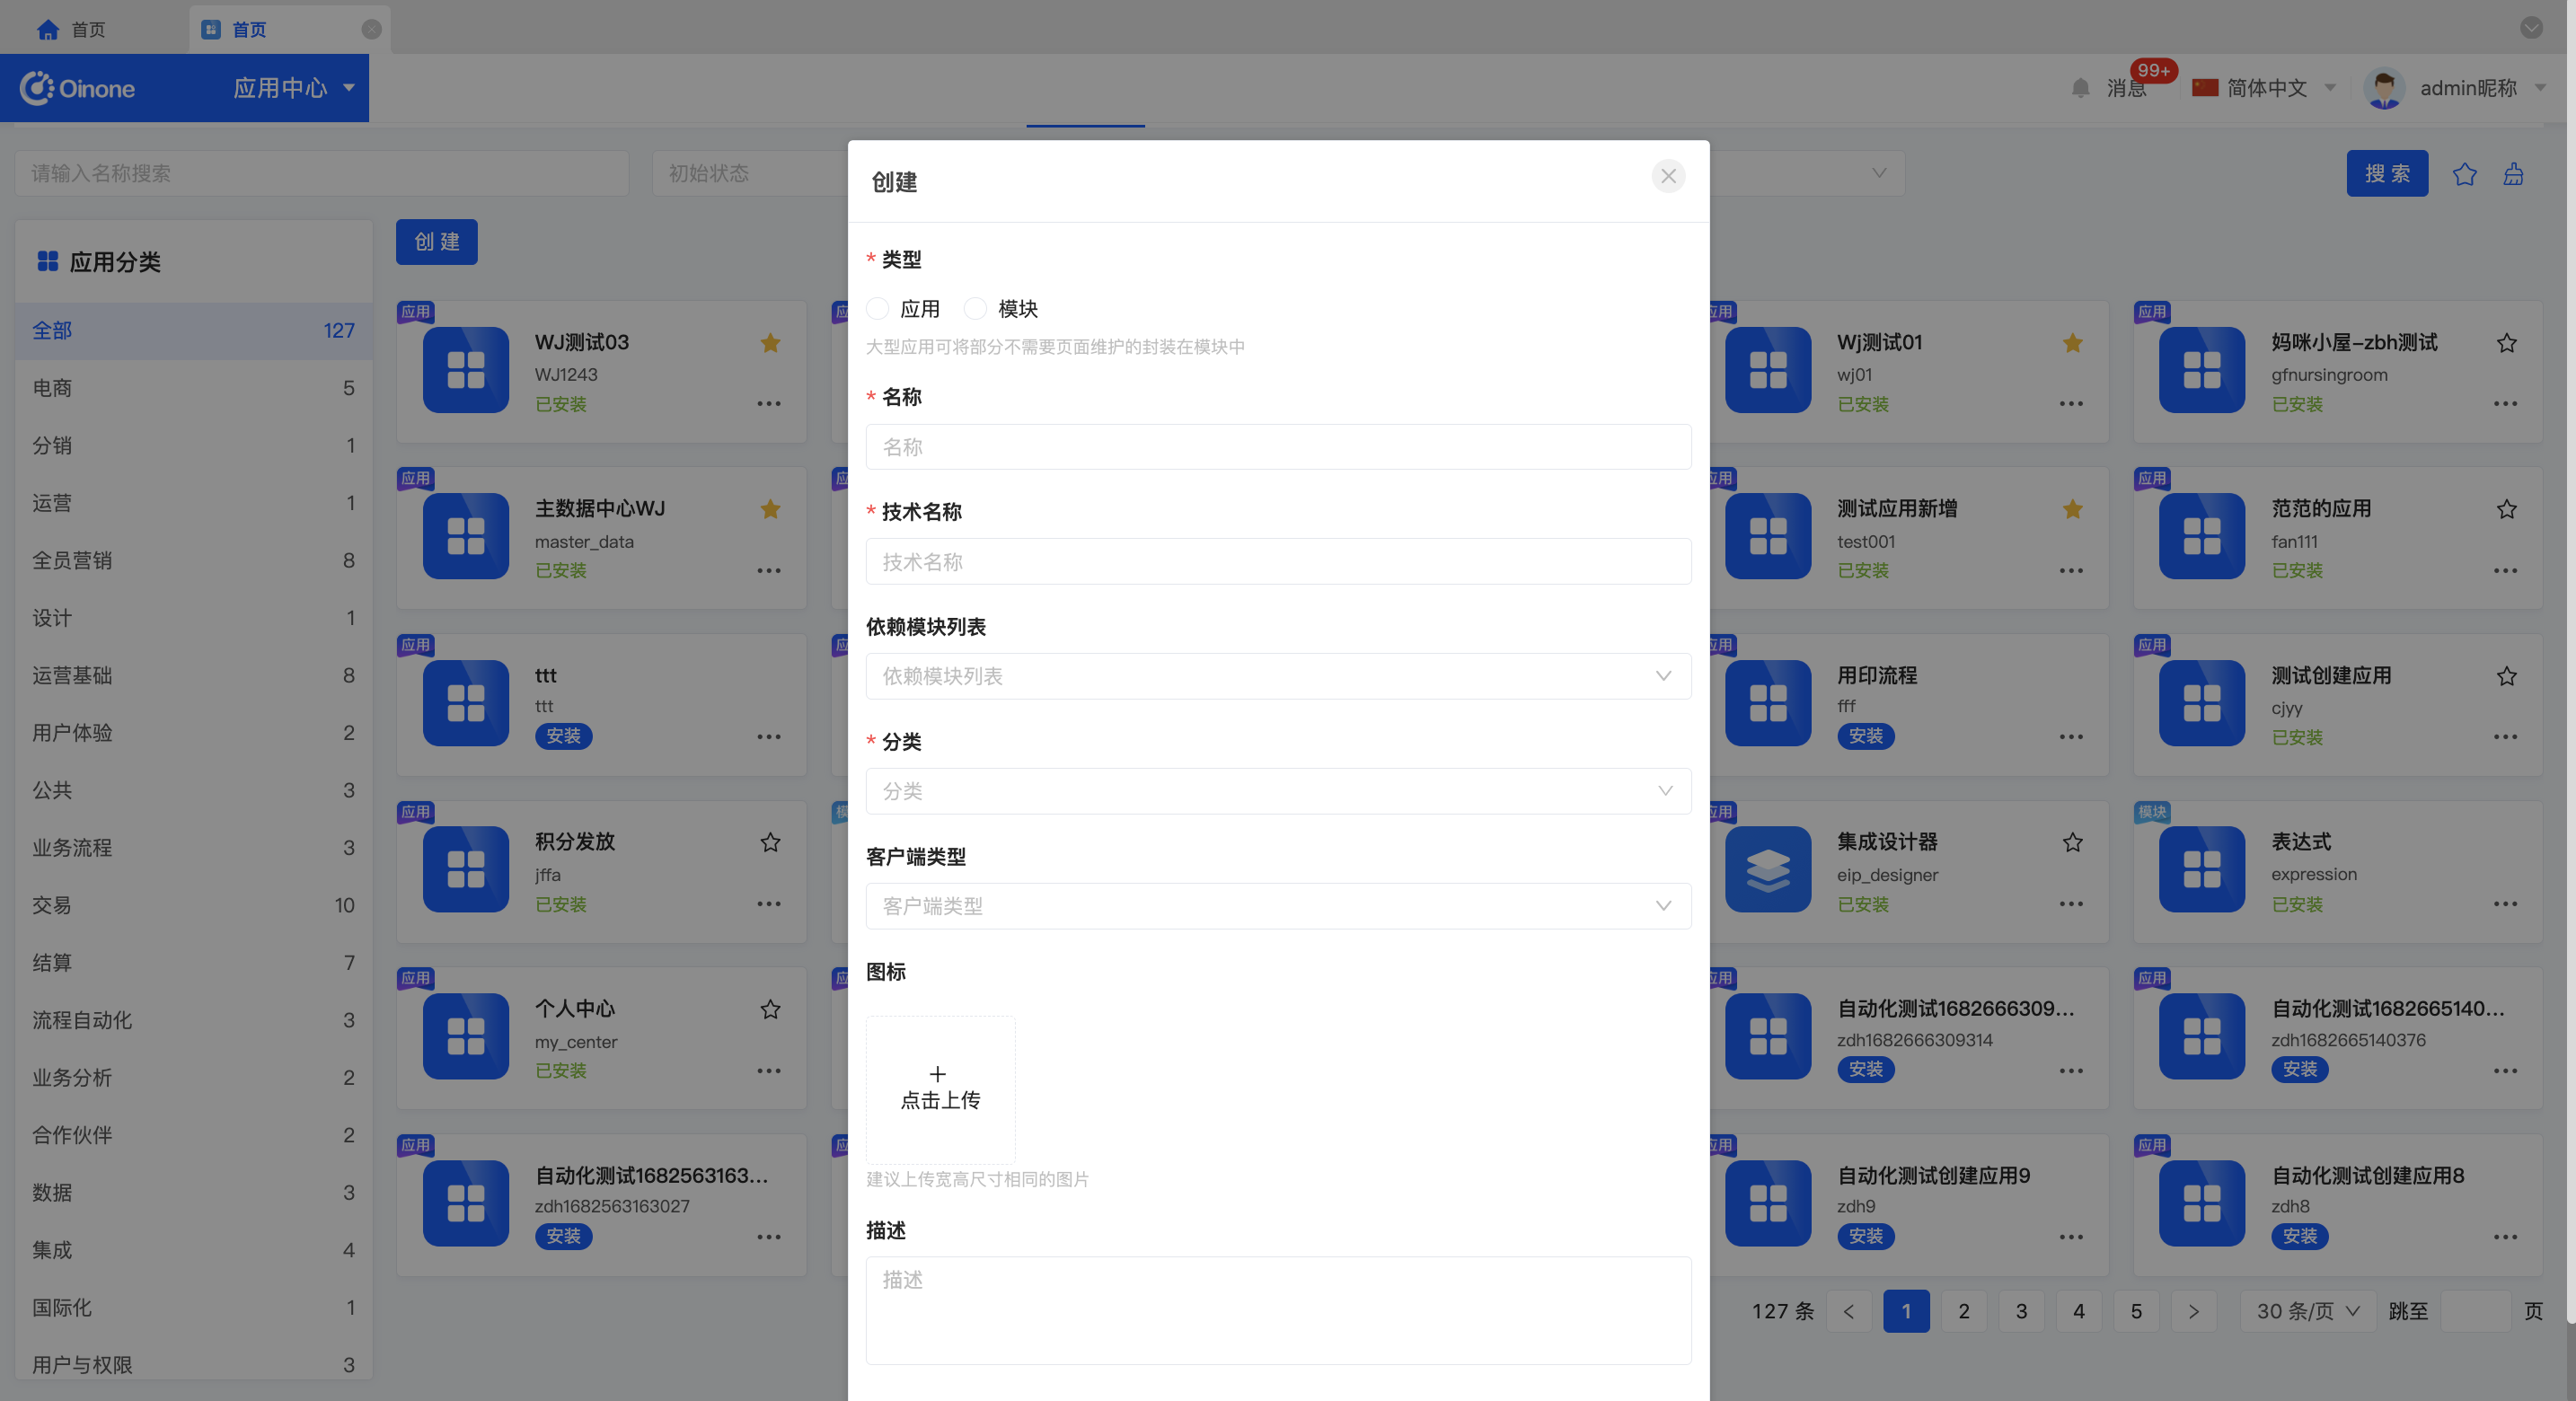
image.png

2.2 编辑

编辑时,不允许编辑类型,技术名称,需要在创建时定义正确。

image.png

2.3 安装与卸载

卸载后,应用就不会呈现在App Finder中,不可进入应用、使用应用,可重新安装,安装后继续使用。
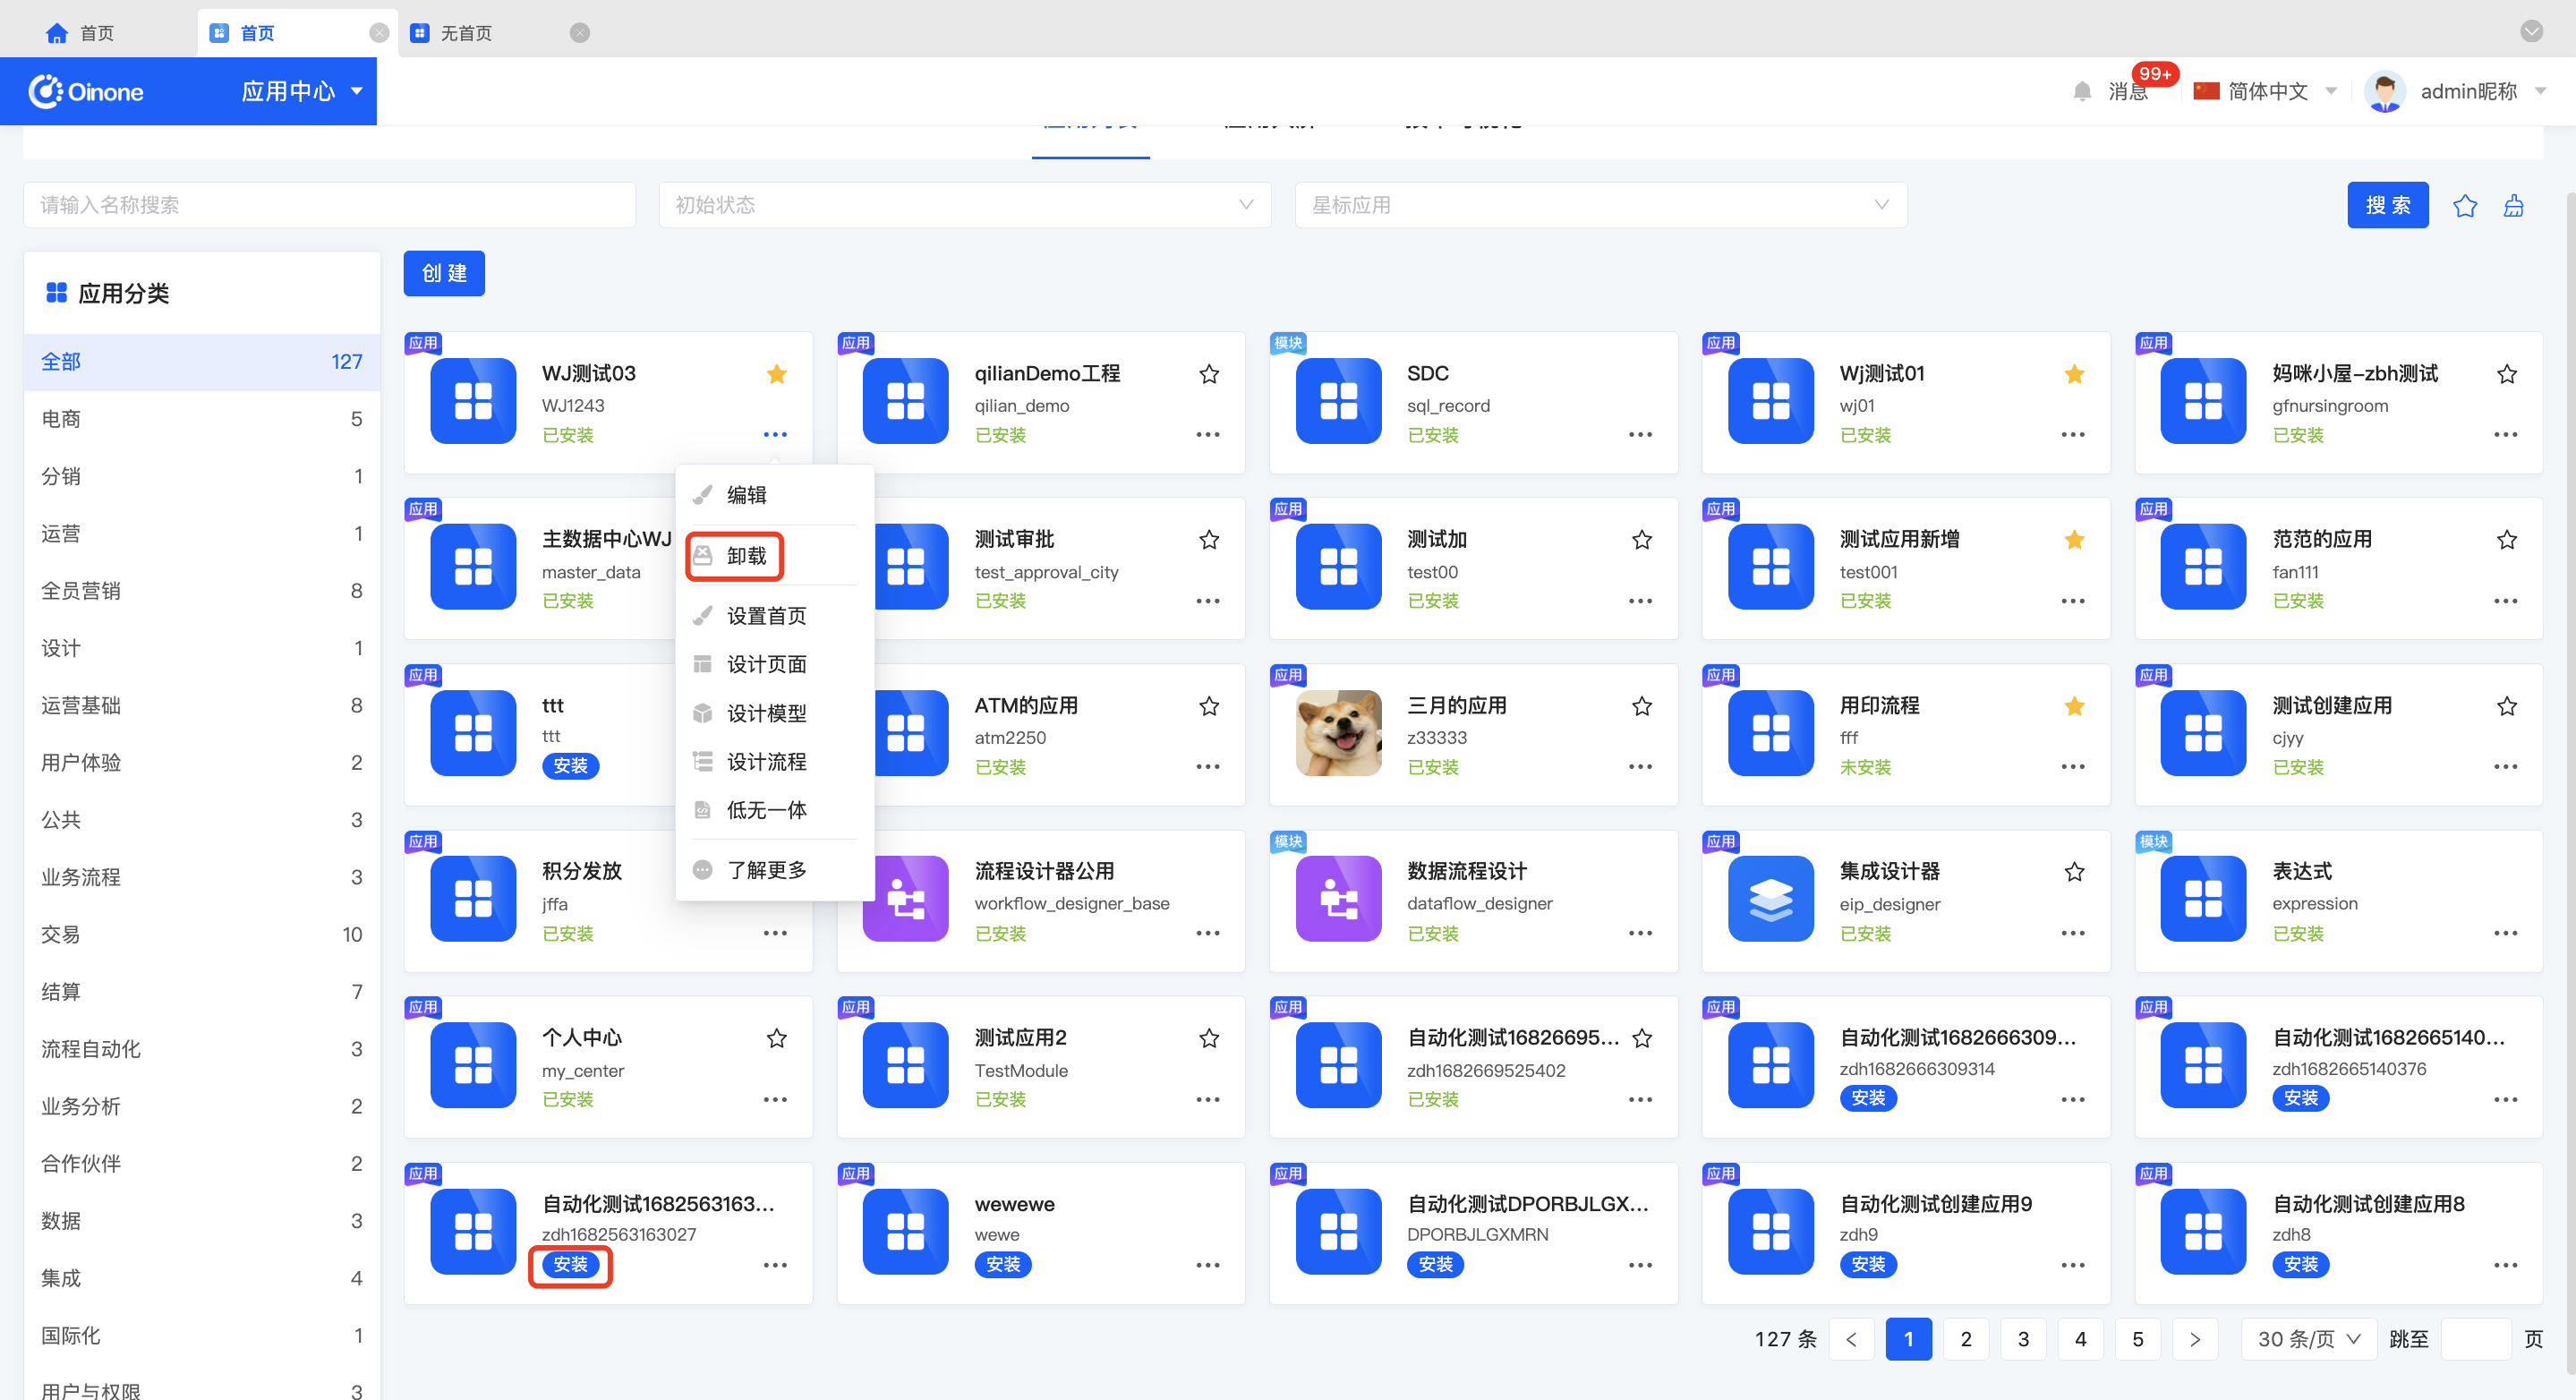
image.png

2.4 收藏应用

点击应用卡片右上角的星标可收藏、取消收藏应用,收藏的应用在App Finder和工作台中展示在收藏位置,可快捷进入。
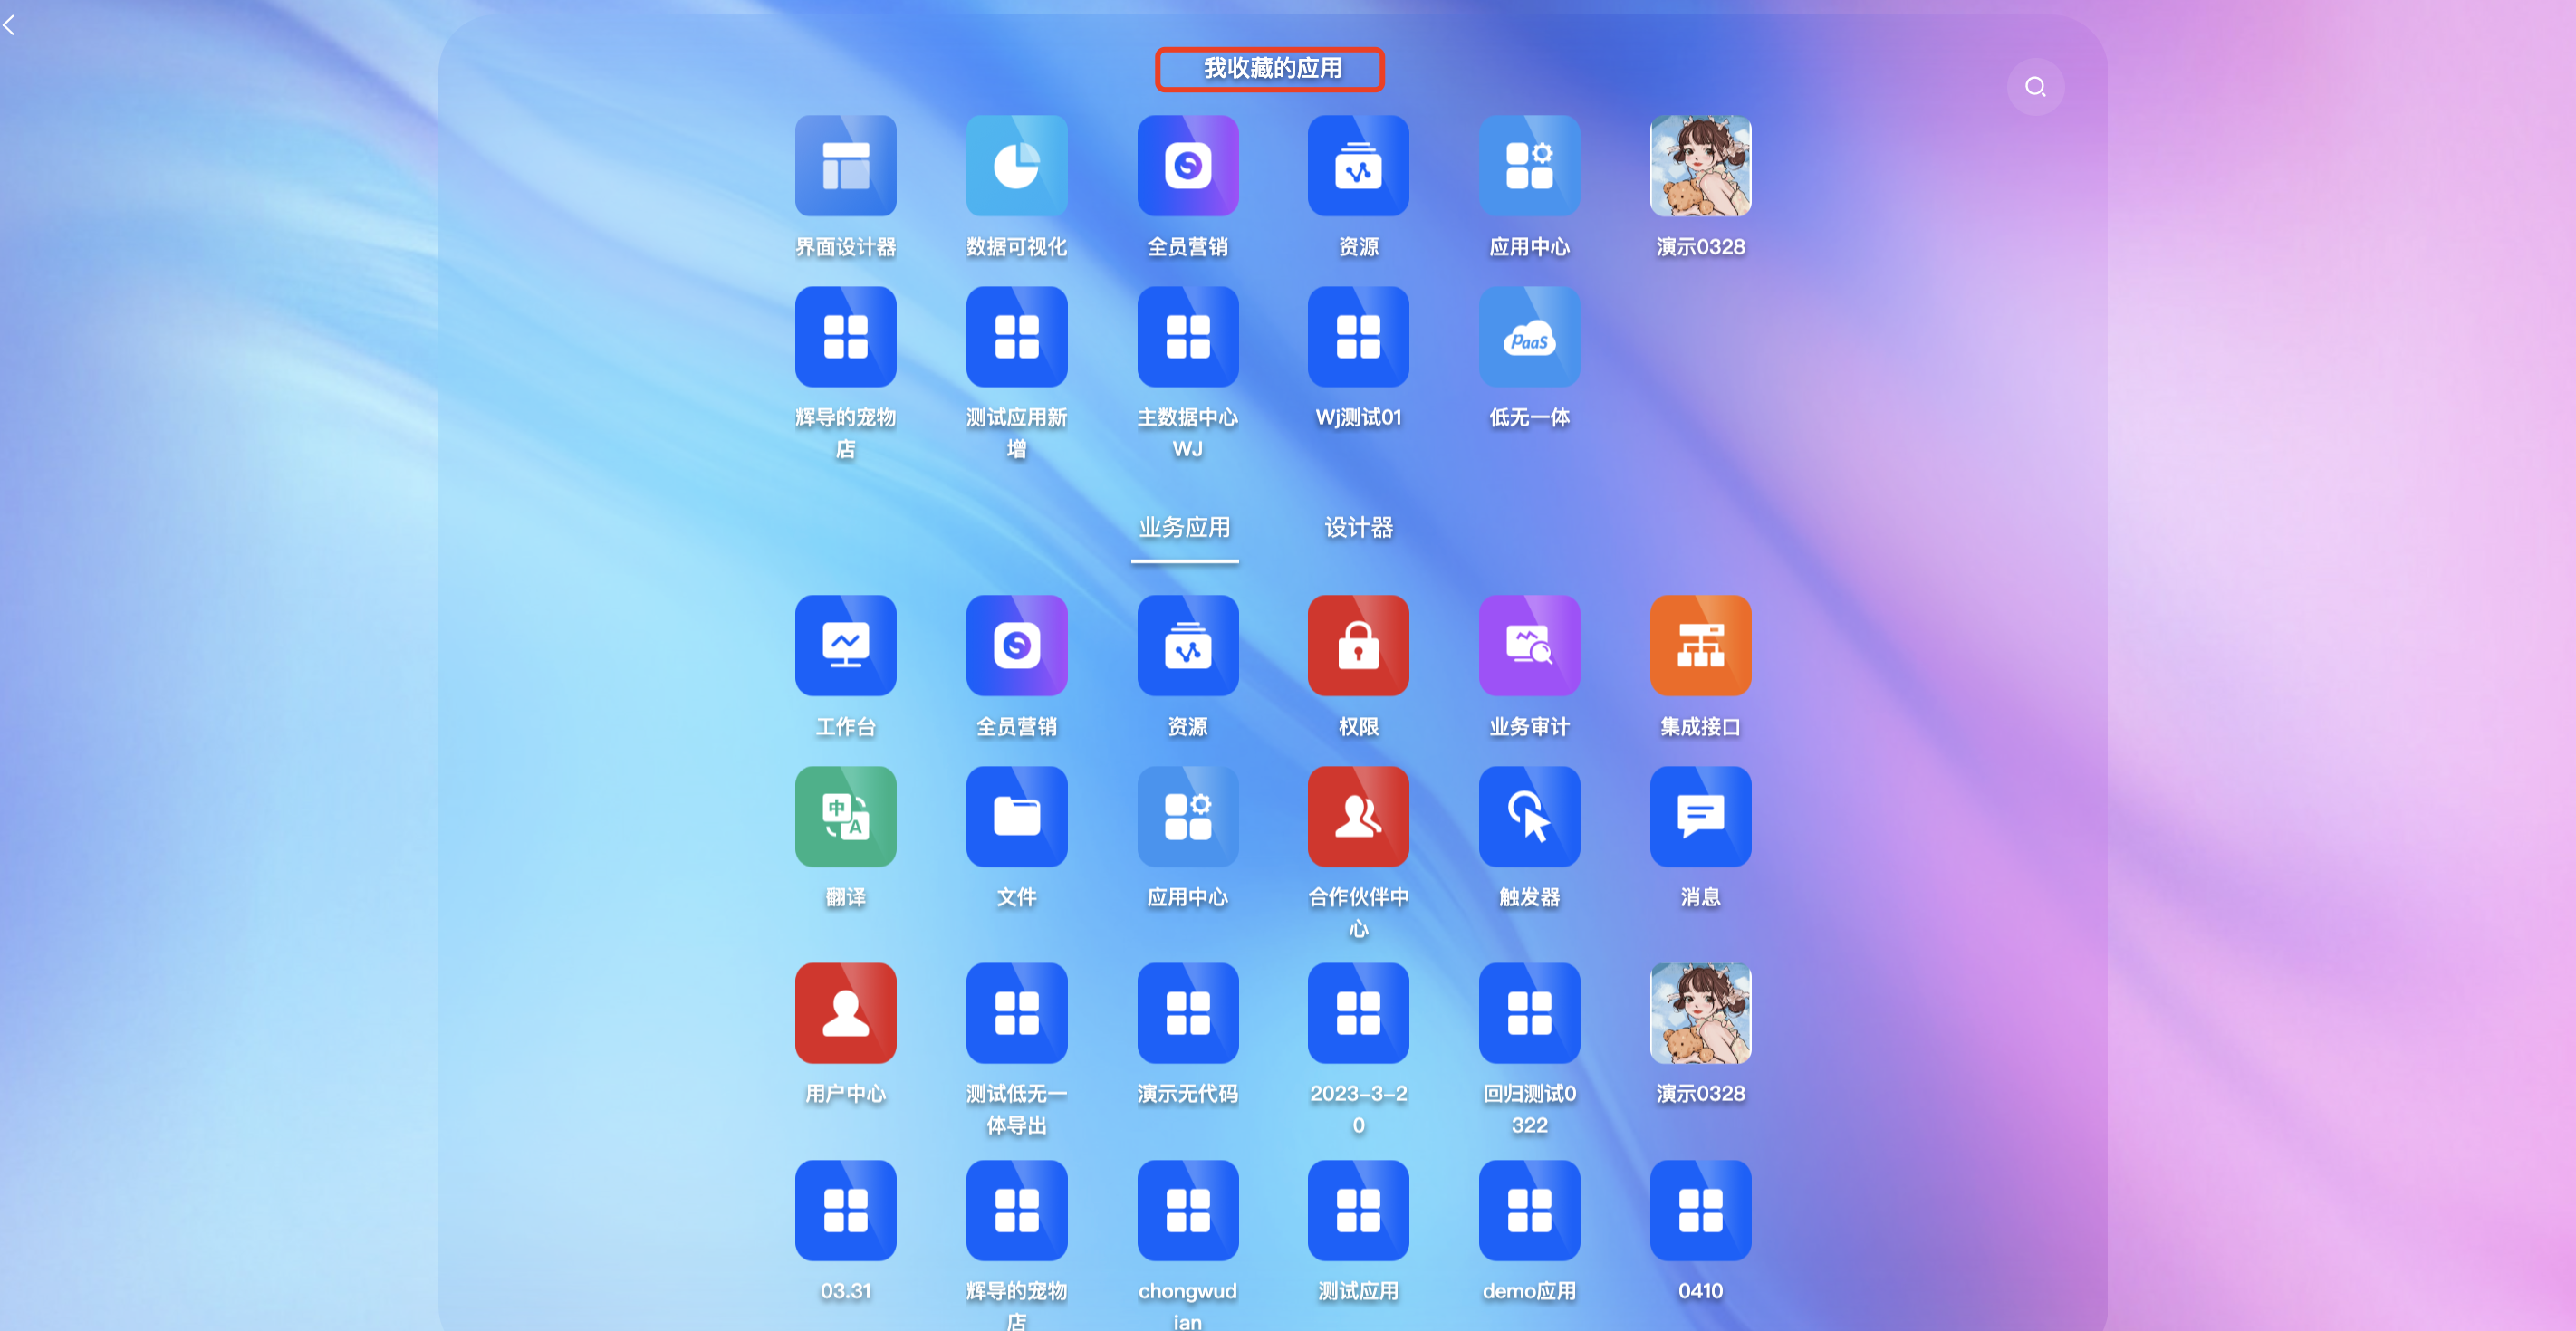
image.png

image.png

2.5 设置首页

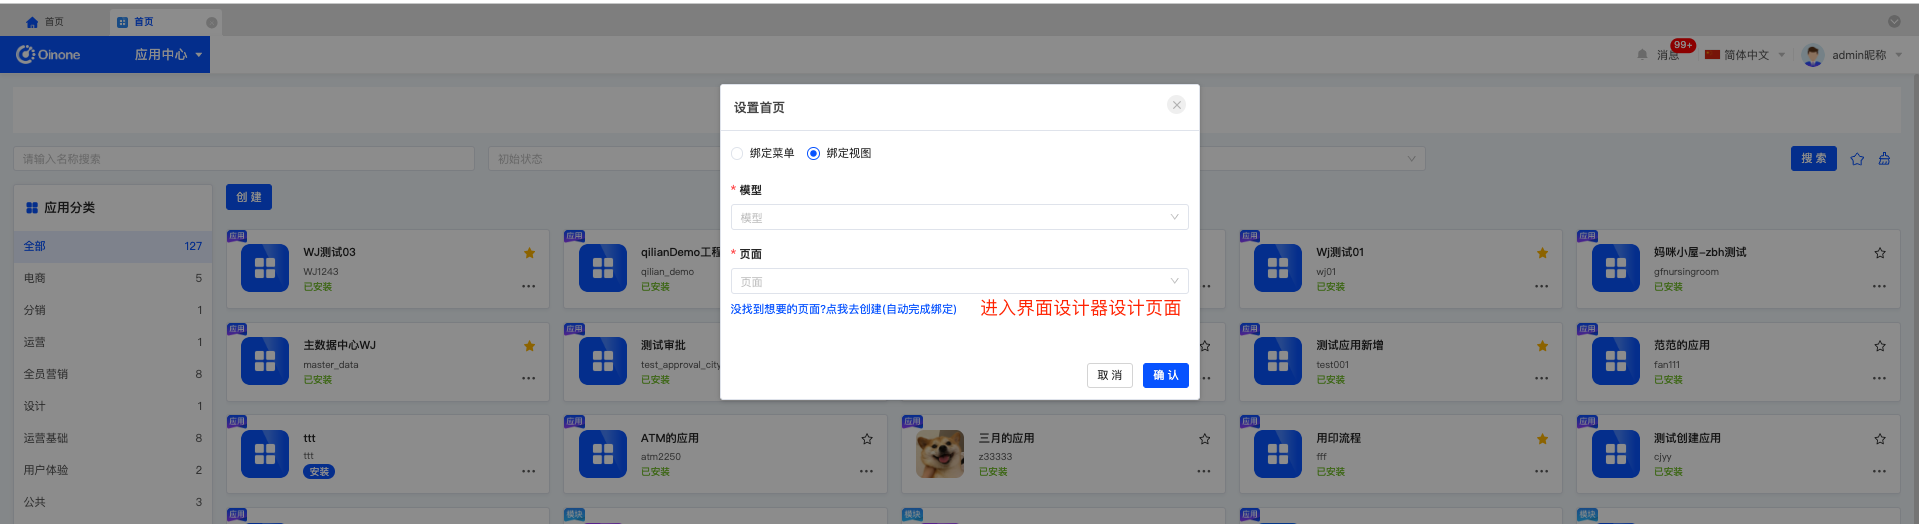
定义每个应用的首页,有两种方式:

a. 通过绑定菜单,进入绑定菜单的页面;

b. 直接绑定视图,选择模型、找到模型下的视图,如果可作为首页的视图不存在,也可以进入设计器创建。
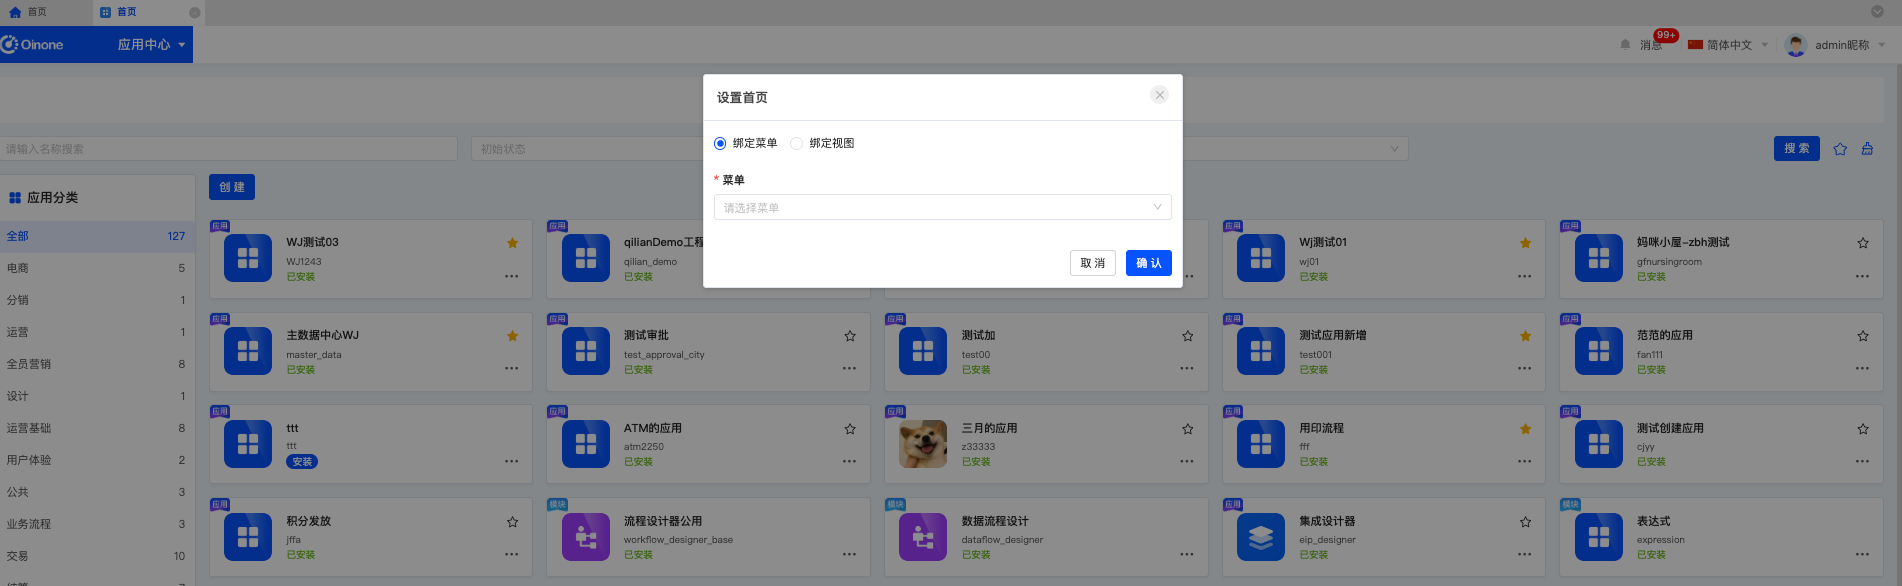
image.png

image.png

2.6 应用详情

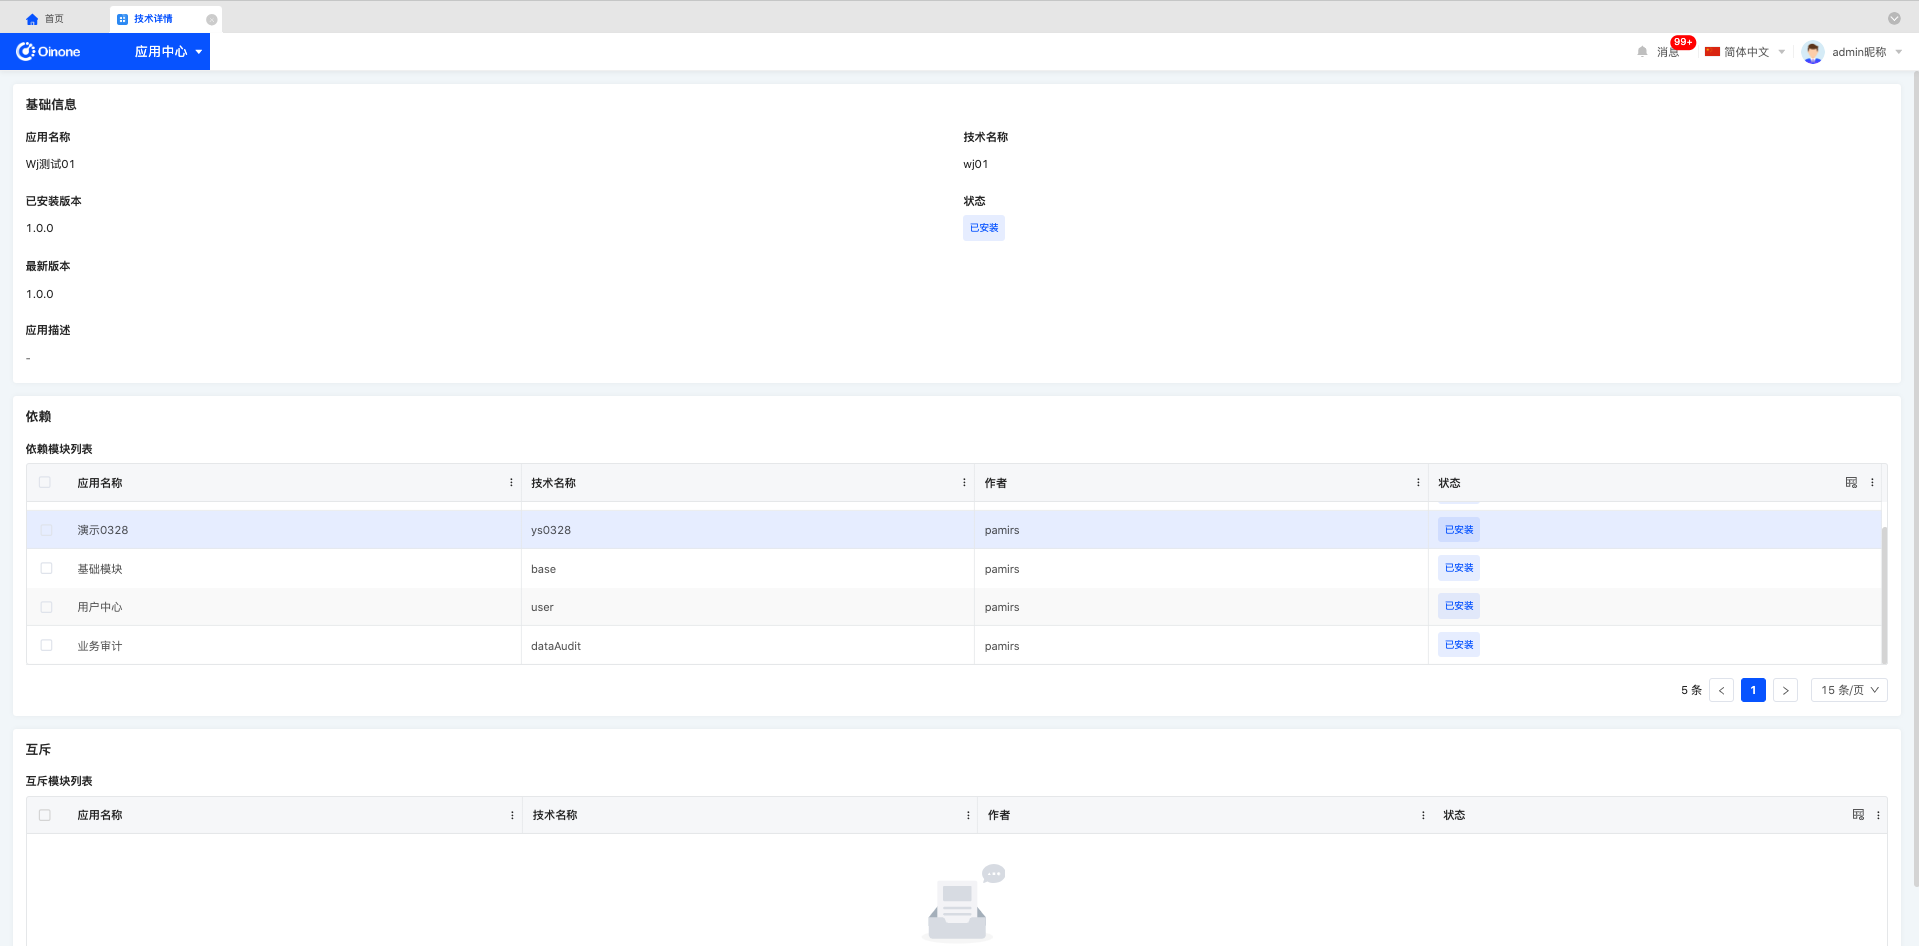
点击了解更多,可进入应用详情,查看应用基础信息。

image.png

2.7 设计器快捷入口

设计页面:进入界面设计器;

设计模型:进入模型设计器;

设计流程:进入流程设计器;

3. 应用大屏

应用大屏按照分类展示应用,未设置应用分类的应用,无法在应用大屏中呈现。
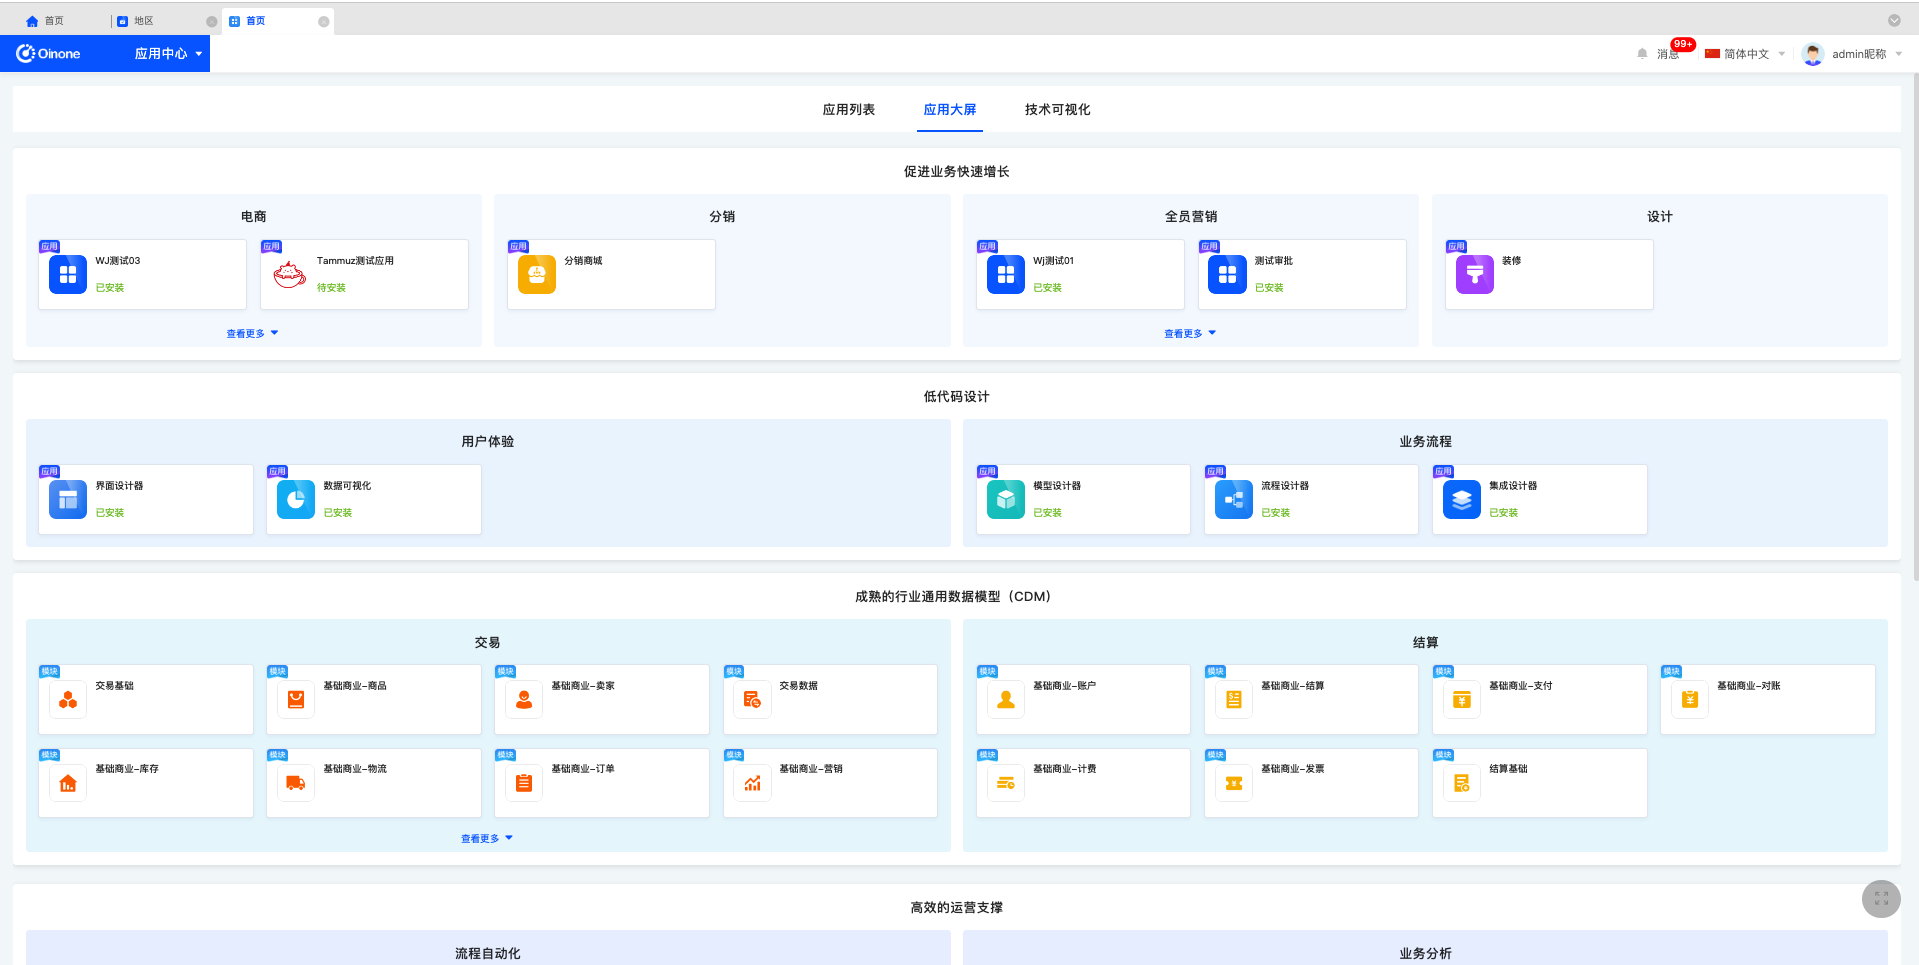
image.png

图3-2-37 未设置应用类目则无法在应用大屏中呈现。

4. 技术可视化

在技术可视化页面,出展示已经安装模块的元数据,并进行分类呈现。
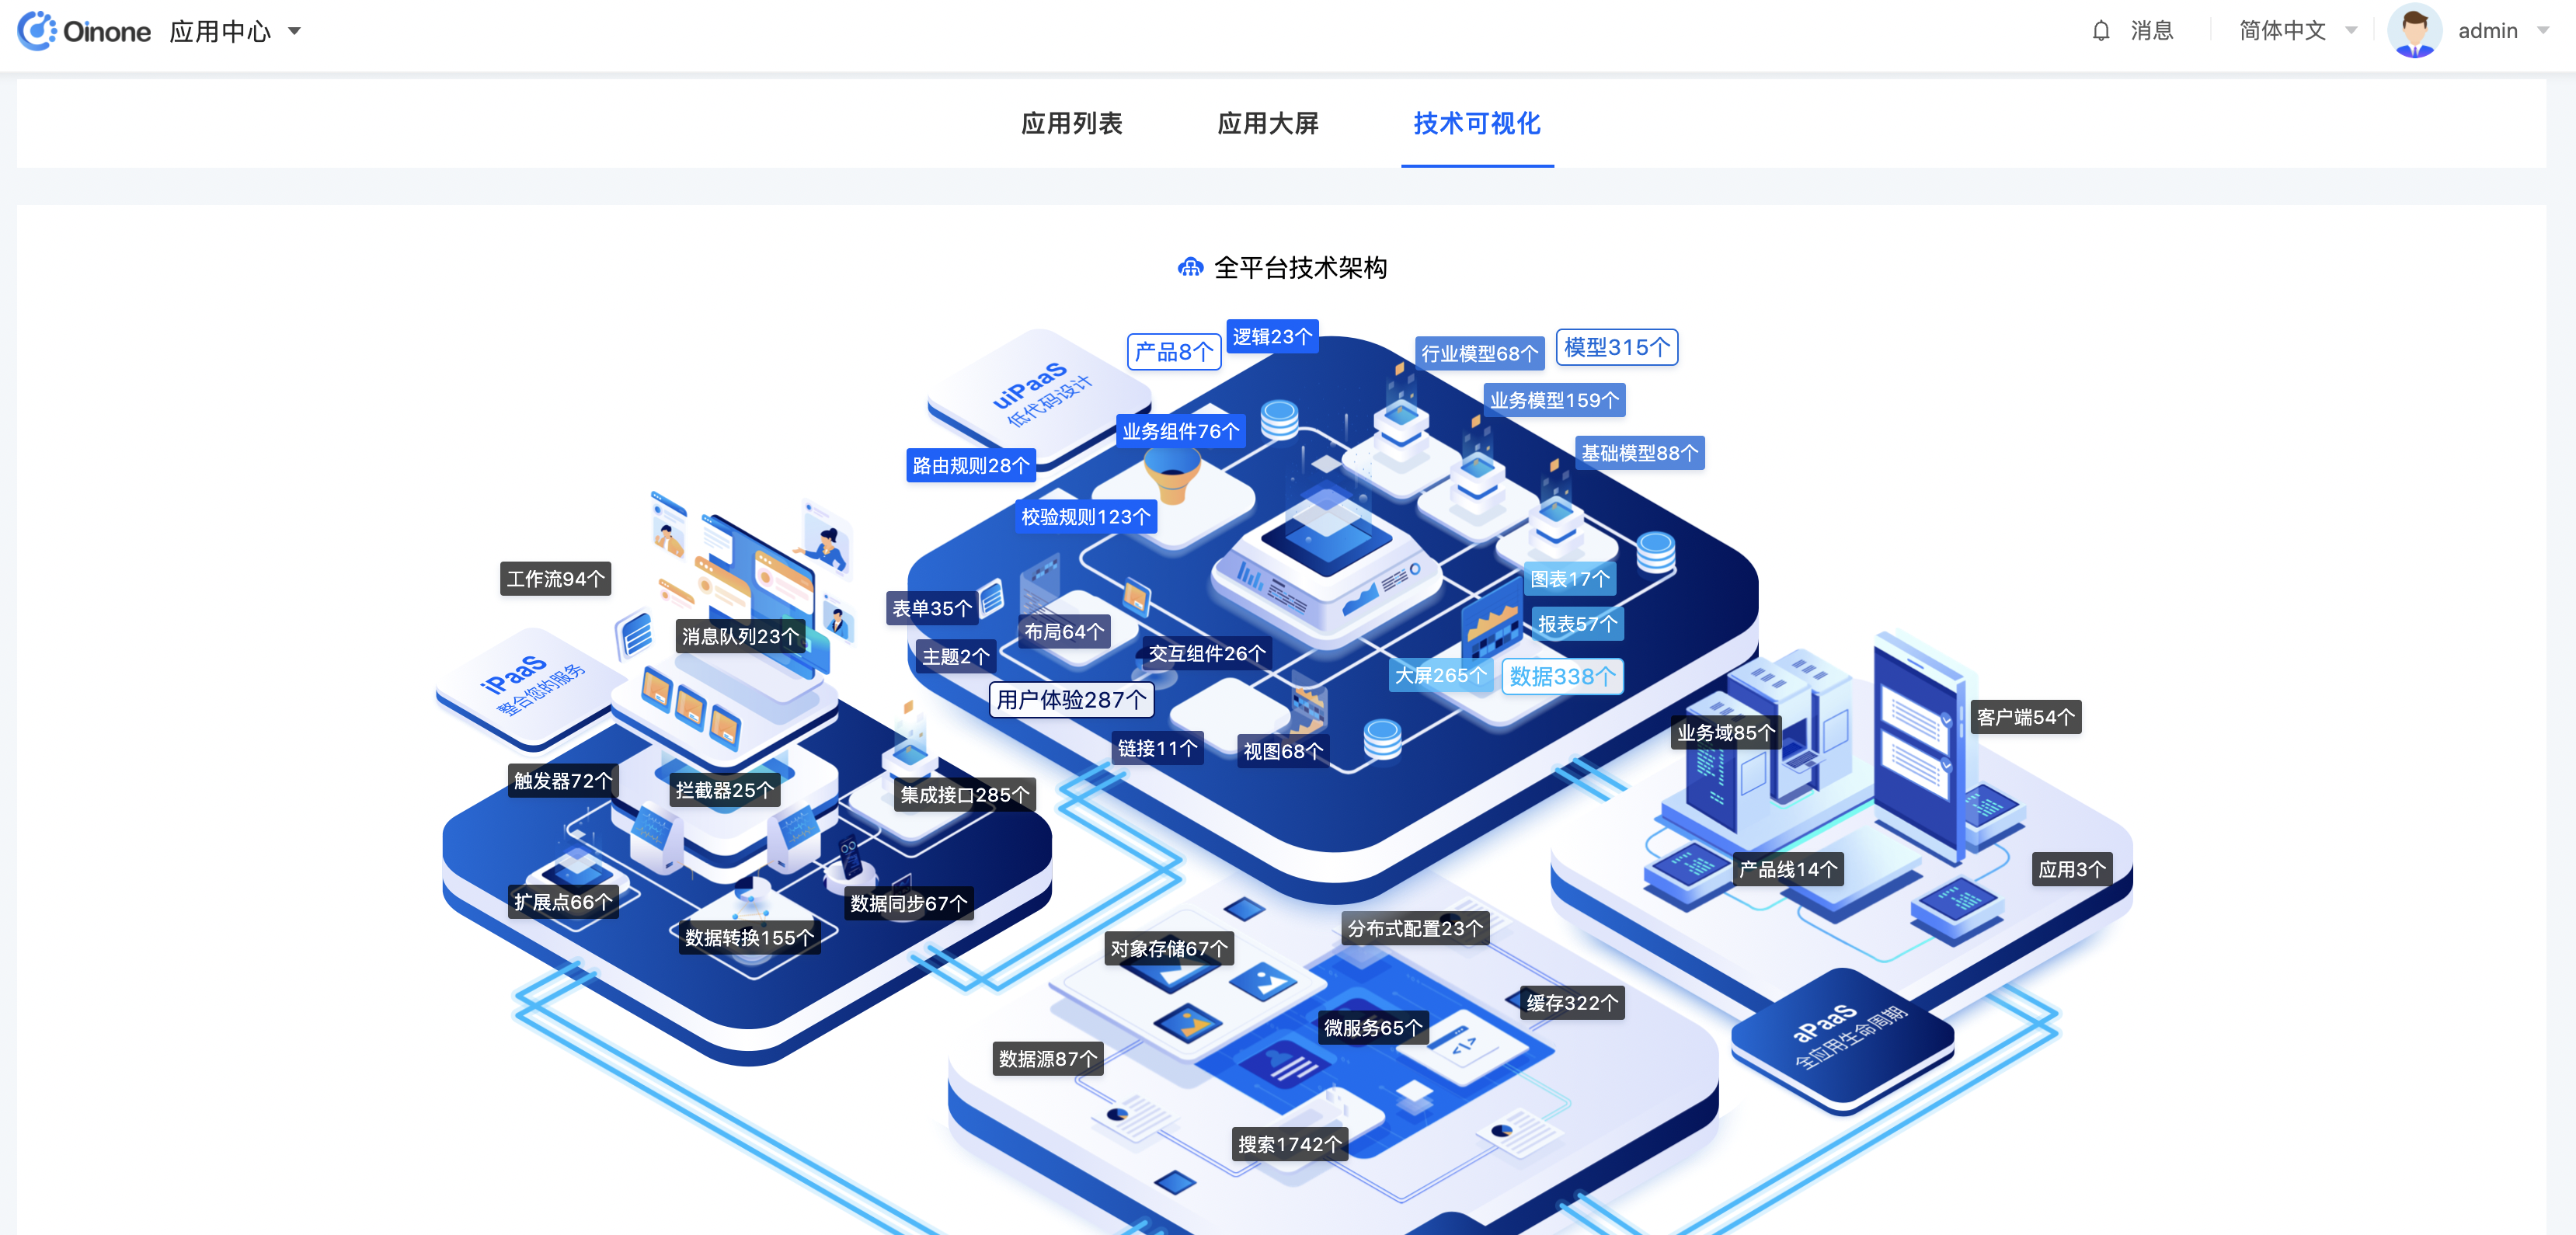
image.png

图3-2-38 云数据分类呈现

Oinone社区 作者:史, 昂原创文章,如若转载,请注明出处:https://doc.oinone.top/oio4/9386.html

访问Oinone官网:https://www.oinone.top获取数式Oinone低代码应用平台体验

Like (0)
史, 昂's avatar史, 昂数式管理员
Previous 2024年5月23日
Next 2024年5月23日

相关推荐

  • 4.1.4 模块之元数据详解

    介绍Module相关元数据,以及对应代码注解方式。大家还是可以通读下,以备不时之需 如您还不了解Module的定义,可以先看下2.3【oinone独特之源,元数据与设计原则】一文对Module的描述,本节主要带大家了解Module元数据构成,能让小伙伴非常清楚oinone从哪些维度来描述Module, 一、元数据说明 ModuleDefinition 元素数据构成 含义 对应注解 备注 displayName 显示名称 @Module( displayName=””, name=””, version=””, category=””, summary=””, dependencies={“”,””}, exclusions={“”,””}, priority=1L ) name 技术名称 latestVersion 安装版本 category 分类编码 summary 描述摘要 moduleDependencies 依赖模块编码列表 moduleExclusions 互斥模块编码列表 priority 排序 module 模块编码 @Module.module(“”) dsKey 逻辑数据源名 @Module.Ds(“”) excludeHooks 排除拦截器列表 @Module.Hook(excludes={“”,””}) website 站点 @Module.Advanced( website=”http://www.oinone.top”, author=”oinone”, description=”oinone”, application=false, demo=false, web=false, toBuy=false, selfBuilt=true, license=SoftwareLicenseEnum.PEEL1, maintainer=”oinone”, contributors=”oinone”, url=”http://git.com” ) author module的作者 description 描述 application 是否应用 demo 是否演示应用 web 是否web应用 toBuy 是否需要跳转到website去购买 selfBuilt 自建应用 license 许可证 默认PEEL1 可选范围: GPL2 GPL2ORLATER GPL3 GPL3ORLATER AGPL3 LGPL3 ORTHEROSI PEEL1 PPL1 ORTHERPROPRIETARY maintainer 维护者 contributors 贡献者列表 url 代码库的地址 boot 是否自动安装的引导启动项 @Boot 加上该注解代表: 启动时会自动安装,不管yml文件的modules是否配置 moduleClazz 模块定义所在类 只有用代码编写的模块才有 packagePrefix 包路径,用于扫描该模块下的其他元数据 dependentPackagePrefix 依赖模块列对应的扫描路径 state 状态 系统自动计算,无需配置 metaSource 元数据来源 publishCount 发布总次数 platformVersion 最新平台版本 本地与中心平台的版本对应。做远程更新时会用到 publishedVersion 最新发布版本 表4-1-4-1 ModuleDefinition UeModule 是对ModuleDefinition的继承,并扩展了跟前端交互相关的元数据 元素数据构成 含义 对应注解 备注 homePage Model 跳转模型编码 @UxHomepage(@UxRoute() 对应一个ViewAction,如果UxRoute只配置了模型,则默认到该模型的列表页 homePage Name 视图动作或者链接动作名称 logo 图标 @UxAppLogo(logo=””) 表4-1-4-2 UeModule 二、元数据,代码注解方式 Module Module ├── displayName 显示名称 ├── name 技术名称 ├── version 安装版本 ├── category 分类编码 ├── summary 描述摘要 ├── dependencies 依赖模块编码列表 ├── exclusions 互斥模块编码列表 ├── priority 排序 ├── module 模块编码 │ └── value ├── Ds 逻辑数据源名 │ └── value ├── Hook 排除拦截器列表…

    Oinone 7天入门到精通 2024年5月23日
    1.9K00
  • 6.4 国际化之多语言

    多语言是国际化中大家最常面对的问题,我们需要对应用的页面结构元素进行翻译,也需要对系统内容进行翻译比如:菜单、数据字典等,甚至还会业务数据进行翻译。但不管什么翻译需求,我们在实现上基本可以归类为前端翻译和后端翻译。前端翻译顾名思义是在前端根据用户选择语言对内容进行翻译,反之就是后端翻译。本文会带着大家了解oinone的前端翻译与后端翻译 准备工作 pamirs-demo-boot的pom文件中引入pamirs-translate包依赖 <dependency> <groupId>pro.shushi.pamirs.core</groupId> <artifactId>pamirs-translate</artifactId> </dependency> pamirs-demo-boot的application-dev.yml文件中增加配置pamirs.boot.modules增加translate,即在启动模块中增加translate模块 pamirs: boot: modules: – translate 后端翻译(使用) 这里通过对菜单的翻译来带大家了解翻译模块 Step1 新增翻译记录 切换应用到translate模块,点击新增翻译。 选择新增翻译生效模块 选择翻译的模型为:菜单模型 源语言选择中文,目标选择English 添加翻译项目: 源术语为:商店 翻译值为:shop 状态为:激活 Step2 查看效果 应用切换到Demo模块,在右上角切换语言至英语 后端翻译(自定义模型的翻译) 在前面菜单的翻译中,似乎我们什么都没做就可以正常通过翻译模块完成多语言的切换了。是不是真如我们想象的一样,当然不是。是因为Menu模型的displayName字段加上@Field(translate = true)注解。 Step1 为PetType模型的name字段增加翻译注解 package pro.shushi.pamirs.demo.api.model; import pro.shushi.pamirs.meta.annotation.Field; import pro.shushi.pamirs.meta.annotation.Model; import pro.shushi.pamirs.meta.base.IdModel; @Model.MultiTable(typeField = "kind") @Model.model(PetType.MODEL_MODEL) @Model(displayName="品种",labelFields = {"name"}) public class PetType extends IdModel { public static final String MODEL_MODEL="demo.PetType"; @Field(displayName = "品种名" , translate = true) private String name; @Field(displayName = "宠物分类") private String kind; } Step2 重启应用查看效果 切换应用到translate模块,点击新增翻译 切换应用到Demo模块,切换中英文,查看效果 前端翻译 还记得我们前端第一个自定义动作吗?会弹出“oinone第一个自定义Action,啥也没干”,我们要对它进行翻译。 Step1 修改前端DoNothingActionWidget.ts import translateValueByKey 提示语用translateValueByKey加上翻译 const confirmRs = executeConfirm(translateValueByKey(\’oinone第一个自定义Action,啥也没干\’)||\’oinone第一个自定义Action,啥也没干\’); 前端更多翻译工具请见前端高级特性-框架之翻译工具 import { Action, ActionContextType, ActionWidget, executeConfirm, IClientAction, SPI, ViewType, Widget, translateValueByKey } from '@kunlun/dependencies'; @SPI.ClassFactory(ActionWidget.Token({ name: 'demo.doNothing' })) export class DoNothingActionWidget extends ActionWidget { @Widget.Method() public async clickAction() { const confirmRs = executeConfirm(translateValueByKey('oinone第一个自定义Action,啥也没干')||'oinone第一个自定义Action,啥也没干'); } } //定义动作元数据 Action.registerAction('*', { displayName: '啥也没干', name: 'demo.doNothing', id: 'demo.doNothing', contextType: ActionContextType.ContextFree, bindingType: [ViewType.Table] } as IClientAction); Step2 新增翻译记录 前端翻译的翻译记录对应的模型可以随意找一个放。但要注意几点: 不要找有字读配置translate = true的模型,因为会影响后端翻译性能。 最好统一到一个模型中,便于后续管理。这里大家可以自定义一个无有业务访问且本身无需要翻译的模型来挂载,避免性能损失 Step3 刷新远程资源生成前端语言文件 Step4 新增或修改.env 前端在项目根目录下新增或修改.env,可以参考.env.example文件。通过.env文件为前端配置oss文件路径,针对I18N_OSS_URL配置项。真实前端访问翻译语言文件的路径规则为:http://bucket.downloadUrl/mainDir/租户/translate/模块/语言文件。 yaml文件中oss配置的文件路径:http://pamirs.oss-cn-hangzhou.aliyuncs.com/upload/demo/ 租户/translate/模块/语言文件 前端会自动根据上下文组织 # 后端api配置 # API_BASE_URL=http://127.0.0.1:8090 # 下面是国际化语言的cdn配置,默认用当前请求链接下的路径: /pamirs/translate/${module}/i18n_${lang}.js I18N_OSS_URL=http://pamirs.oss-cn-hangzhou.aliyuncs.com/upload/demo Step5 重启前端应用看效果 对语言进行中英文切换,进入宠狗达人页面,点击【第一个自定义Action】,查看前端翻译效果

    2024年5月23日
    2.8K20
  • 3.5.1 构建第一个Menu

    在前面章节中我们也涉及到菜单,因为菜单我们模块就是地图、导航,没有地图、导航就无法畅游模块并进行相关业务操作。在3.3.4【模块的继承】一文关于多表继承的内容就有涉及到菜单的初始化,本文将展开介绍初始化Menu的两种方式分别是:注解式、数据初始化式。 注解式(举例) Step1 分析现有菜单注解 用@UxMenus声明DemoMenus为菜单初始化入口,同时该类在DemoModule配置扫描路径中,那么通过DemoMenus初始化的菜单都挂在demo_core这个模块上。 如果采用这种模式,建议同一个模块的菜单都只配置在一处 package pro.shushi.pamirs.demo.core.init; import pro.shushi.pamirs.boot.base.constants.ViewActionConstants; import pro.shushi.pamirs.boot.base.ux.annotation.action.UxRoute; import pro.shushi.pamirs.boot.base.ux.annotation.navigator.UxMenu; import pro.shushi.pamirs.boot.base.ux.annotation.navigator.UxMenus; import pro.shushi.pamirs.demo.api.model.*; import pro.shushi.pamirs.demo.api.proxy.PetShopProxy; import pro.shushi.pamirs.demo.api.proxy.PetShopProxyA; import pro.shushi.pamirs.demo.api.proxy.PetShopProxyB; @UxMenus public class DemoMenus implements ViewActionConstants { @UxMenu("商店管理")@UxRoute(PetShopProxy.MODEL_MODEL) class PetShopProxyMenu{} @UxMenu("商店管理A")@UxRoute(PetShopProxyA.MODEL_MODEL) class PetShopProxyAMenu{} @UxMenu("商店管理B")@UxRoute(PetShopProxyB.MODEL_MODEL) class PetShopProxyBMenu{} @UxMenu("商品管理")@UxRoute(PetItem.MODEL_MODEL) class ItemMenu{} @UxMenu("宠狗商品")@UxRoute(PetDogItem.MODEL_MODEL) class DogItemMenu{} @UxMenu("萌猫商品")@UxRoute(PetCatItem.MODEL_MODEL) class CatItemMenu{} @UxMenu("宠物品种")@UxRoute(PetType.MODEL_MODEL) class PetTypeMenu{} @UxMenu("萌猫品种")@UxRoute(PetCatType.MODEL_MODEL) class CatTypeMenu{} @UxMenu("宠狗品种")@UxRoute(PetDogType.MODEL_MODEL) class DogTypeMenu{} @UxMenu("宠物达人")@UxRoute(PetTalent.MODEL_MODEL) class PetTalentMenu{} } 图3-5-1-1 菜单注解 Step2 改造现有菜单注解 菜单的层级关系通过@UxMenu的嵌套进行描述 菜单点击效果有三种分别对应不同的Action的类型,关于Action的类型详见3.5.3【Action的类型】一文。 通过@UxRoute定义一个与菜单绑定的viewAction,@UxMenu("创建商店")@UxRoute(value = PetShop.MODEL_MODEL,viewName = "redirectCreatePage",viewType = ViewTypeEnum.FORM),其中viewName代表视图的name(其默认值为redirectListPage,也就是跳转到列表也),value代码视图所属模型的编码,viewType代表view类型(其默认值为ViewTypeEnum.TABLE) @UxServer定义一个与菜单绑定的serverAction,@UxMenu("UxServer")@UxServer(model = PetCatItem.MODEL_MODEL,name = "uxServer") ,其中name代表serverAction的name,model或value代码serverAction所属模型的编码 @UxLink定义一个与菜单绑定的UrlAction,@UxMenu("Oinone官网")@UxLink(value = "http://www.oinone.top”,openType= ActionTargetEnum.OPEN_WINDOW) ,其中value为跳转url,openType为打开方式默认为ActionTargetEnum.ROUTER,打开方式有以下几种 ROUTER("router", "页面路由", "页面路由") DIALOG("dialog", "页面弹窗", "页面弹窗") DRAWER("drawer", "打开抽屉", "打开抽屉") OPEN_WINDOW("openWindow", "打开新窗口", "打开新窗口") 配合菜单演示,PetCatItemAction增加一个uxServer的ServerAction package pro.shushi.pamirs.demo.core.action; ……包引用 @Model.model(PetCatItem.MODEL_MODEL) @Component public class PetCatItemAction extends DataStatusBehavior<PetCatItem> { ……省略其他代码 @Action(displayName = "uxServer") public PetCatItem uxServer(PetCatItem data){ PamirsSession.getMessageHub().info("uxServer"); return data; } } 图3-5-1-2 示例代码 新的菜单初始化代码如下 package pro.shushi.pamirs.demo.core.init; import pro.shushi.pamirs.boot.base.constants.ViewActionConstants; import pro.shushi.pamirs.boot.base.enmu.ActionTargetEnum; import pro.shushi.pamirs.boot.base.ux.annotation.action.UxLink; import pro.shushi.pamirs.boot.base.ux.annotation.action.UxRoute; import pro.shushi.pamirs.boot.base.ux.annotation.action.UxServer; import pro.shushi.pamirs.boot.base.ux.annotation.navigator.UxMenu; import pro.shushi.pamirs.boot.base.ux.annotation.navigator.UxMenus; import pro.shushi.pamirs.demo.api.model.*; import pro.shushi.pamirs.demo.api.proxy.PetShopProxy; import pro.shushi.pamirs.demo.api.proxy.PetShopProxyA; import pro.shushi.pamirs.demo.api.proxy.PetShopProxyB; import pro.shushi.pamirs.meta.enmu.ViewTypeEnum; @UxMenus public class DemoMenus implements ViewActionConstants { @UxMenu("商店") class ShopMenu{ @UxMenu("UxServer")@UxServer(model = PetCatItem.MODEL_MODEL,name = "uxServer") class ShopSayHelloMenu{ } @UxMenu("创建商店")@UxRoute(value = PetShop.MODEL_MODEL,viewName = "redirectCreatePage",viewType = ViewTypeEnum.FORM) class ShopCreateMenu{ }…

    2024年5月23日
    2.0K00
  • 3.4.3.3 SPI机制-扩展点

    扩展点结合拦截器的设计,oinone可以点、线、面一体化管理Function 扩展点用于扩展函数逻辑。扩展点类似于SPI机制(Service Provider Interface),是一种服务发现机制。这一机制为函数逻辑的扩展提供了可能。 一、构建第一个扩展点 自定义扩展点(举例) 在我们日常开发中,随着对业务理解的深入,往往还在一些逻辑中会预留扩展点,以便日后应对不同需求时可以灵活替换某一小块逻辑。 在3.3.4【模型的继承】一文中的PetCatItemQueryService,是独立新增函数只作公共逻辑单元。现在我们给它的实现类增加一个扩展点。在PetCatItemQueryServiceImpl的queryPage方法中原本会先查询PetCatType列表,我们这里假设这个逻辑随着业务发展未来会发生变化,我们可以预先预留【查询萌猫类型扩展点】 Step1 新增扩展点定义PetCatItemQueryCatTypeExtpoint 扩展点命名空间:在接口上用@Ext声明扩展点命名空间。会优先在本类查找@Ext,若为空则往接口向上做遍历查找,返回第一个查找到的@Ext.value注解值,使用该值再获取函数的命名空间;如果未找到,则返回扩展点全限定类名。所以我们这里扩展点命名空间为:pro.shushi.pamirs.demo.api.extpoint.PetCatItemQueryCatTypeExtpoint 扩展点技术名称:先取@ExtPoint.name,若为空则取扩展点接口方法名。所以我们这里技术名为queryCatType package pro.shushi.pamirs.demo.api.extpoint; import pro.shushi.pamirs.demo.api.model.PetCatType; import pro.shushi.pamirs.meta.annotation.Ext; import pro.shushi.pamirs.meta.annotation.ExtPoint; import java.util.List; @Ext public interface PetCatItemQueryCatTypeExtpoint { @ExtPoint(displayName = "查询萌猫类型扩展点") List<PetCatType> queryCatType(); } 图3-4-3-11 新增扩展点定义PetCatItemQueryCatTypeExtpoint Step2 修改PetCatItemQueryServiceImpl(用Ext.run模式调用) 修改queryPage,增加扩展点的使用代码。扩展点的使用有两种方式 方法一,使用命名空间和扩展点名称调用Ext.run(namespace, fun, 参数); 方法二,使用函数式接口调用Ext.run(函数式接口, 参数); 我们这里用了第二种方式 用PetCatItemQueryCatTypeExtpoint的全限定类名作为扩展点的命名空间(namespace) 用queryCatType的方法名作为扩展点的技术名称(name) 根据namespace+name去找到匹配扩展点实现,并根据规则是否匹配,以及优先级唯一确定一个扩展点实现去执行逻辑 package pro.shushi.pamirs.demo.core.service; ……省略依赖包 @Model.model(PetCatItem.MODEL_MODEL) @Component public class PetCatItemAction extends DataStatusBehavior<PetCatItem> { @Override protected PetCatItem fetchData(PetCatItem data) { return data.queryById(); } @Action(displayName = "启用") public PetCatItem dataStatusEnable(PetCatItem data){ data = super.dataStatusEnable(data); data.updateById(); return data; } @Function.Advanced(displayName = "查询模型数据的默认过滤条件", type = FunctionTypeEnum.QUERY, managed = true) @Function(openLevel = {LOCAL}) public String queryFilters() { StringBuilder sqlWhereCondition = new StringBuilder(); // List<PetCatType> typeList = new PetCatType().queryList(); List<PetCatType> typeList = Ext.run(PetCatItemQueryCatTypeExtpoint::queryCatType, new Object[]{}); if(!CollectionUtils.isEmpty(typeList)){ // sqlWhereCondition.append("type_id"); sqlWhereCondition.append(PStringUtils.fieldName2Column(LambdaUtil.fetchFieldName(PetCatItem::getTypeId))); sqlWhereCondition.append(StringUtils.SPACE).append(SqlConstants.IN).append(CharacterConstants.LEFT_BRACKET); for(PetCatType petCatType: typeList){ sqlWhereCondition.append(petCatType.getId()).append(CharacterConstants.SEPARATOR_COMMA); } sqlWhereCondition.deleteCharAt(sqlWhereCondition.lastIndexOf(CharacterConstants.SEPARATOR_COMMA)); sqlWhereCondition.append(StringUtils.SPACE).append(CharacterConstants.RIGHT_BRACKET); } return sqlWhereCondition.toString(); } ……省略其他函数 } 图3-4-3-12 修改PetCatItemQueryServiceImpl Step3 新增扩展点实现PetCatItemQueryCatTypeExtpointOne 扩展点命名空间要与扩展点定义一致,用@Ext(PetCatItemQueryCatTypeExtpoint.class) @ExtPoint.Implement声明这是在@Ext声明的命名空间下,且技术名为queryCatType的扩展点实现 package pro.shushi.pamirs.demo.core.extpoint; import pro.shushi.pamirs.demo.api.extpoint.PetCatItemQueryCatTypeExtpoint; import pro.shushi.pamirs.demo.api.model.PetCatType; import pro.shushi.pamirs.meta.annotation.Ext; import pro.shushi.pamirs.meta.annotation.ExtPoint; import pro.shushi.pamirs.meta.api.session.PamirsSession; import java.util.List; @Ext(PetCatItemQueryCatTypeExtpoint.class) public class PetCatItemQueryCatTypeExtpointOne implements PetCatItemQueryCatTypeExtpoint { @Override @ExtPoint.Implement(displayName = "查询萌猫类型扩展点的默认实现") public List<PetCatType> queryCatType() { PamirsSession.getMessageHub().info("走的是第一个扩展点"); List<PetCatType> typeList = new PetCatType().queryList(); return typeList; } } 图3-4-3-13 新增扩展点实现PetCatItemQueryCatTypeExtpointOne Step4…

    2024年5月23日
    2.0K00
  • 4.5.2 研发辅助之SQL优化

    Oinone体系中是不需要针对模型写SQL的,默认提供了通用的数据管理器。在带来便利的情况下,也导致传统的sql审查就没办法开展。但是我们可以以技术的手段收集慢SQL和限制问题SQL执行。 慢SQL搜集目的:去发现非原则性问题的慢SQL,并进行整改 限制问题SQL执行:对应一些不规范的SQL系统上直接做限制,如果有特殊情况手动放开 一、发现慢SQL 这个功能并没有直接加入到oinone的版本中,需要业务自行写插件,插件代码如下。大家可以根据实际情况进行改造比如: 堆栈入口,例子中只是放了pamirs,可以根据实际情况改成业务包路径 对慢SQL的定义是5s还是3s,根据实际情况变 package pro.shushi.pamirs.demo.core.plugin; import org.apache.ibatis.executor.Executor; import org.apache.ibatis.mapping.MappedStatement; import org.apache.ibatis.plugin.*; import org.apache.ibatis.session.ResultHandler; import org.apache.ibatis.session.RowBounds; import org.springframework.stereotype.Component; import pro.shushi.pamirs.meta.annotation.fun.extern.Slf4j; @Intercepts({ @Signature(type = Executor.class,method = "query",args = {MappedStatement.class,Object.class, RowBounds.class, ResultHandler.class}) }) @Component @Slf4j public class SlowSQLAnalysisInterceptor implements Interceptor { @Override public Object intercept(Invocation invocation) throws Throwable { long start = System.currentTimeMillis(); Object result = invocation.proceed(); long end = System.currentTimeMillis(); if (end – start > 10000) {//大于10秒 try { StackTraceElement[] stackTraceElements = Thread.currentThread().getStackTrace(); StringBuffer slowLog = new StringBuffer(); slowLog.append(System.lineSeparator()); for (StackTraceElement element : stackTraceElements) { if (element.getClassName().indexOf("pamirs") > 0) { slowLog.append(element.getClassName()).append(":").append(element.getMethodName()).append(":").append(element.getLineNumber()).append(System.lineSeparator()); } } Object parameter = null; if (invocation.getArgs().length > 1) { parameter = invocation.getArgs()[1]; } MappedStatement mappedStatement = (MappedStatement) invocation.getArgs()[0]; BoundSql boundSql = mappedStatement.getBoundSql(parameter); Configuration configuration = mappedStatement.getConfiguration(); String originalSql = showSql(configuration, boundSql); originalSql = originalSql.replaceAll("\'", "").replace("\"", ""); log.warn("检测到的慢SQL为:" + originalSql); log.warn("业务慢SQL入口为:" + slowLog.toString()); } catch (Throwable e1) { //忽略 } } return result; } public String showSql(Configuration configuration, BoundSql boundSql) { Object parameterObject = boundSql.getParameterObject(); List<ParameterMapping> parameterMappings = boundSql.getParameterMappings(); String sql = boundSql.getSql().replaceAll("[\\s]+", " "); if (parameterMappings.size() > 0 && parameterObject != null) { TypeHandlerRegistry typeHandlerRegistry…

    Oinone 7天入门到精通 2024年5月23日
    2.0K00

Leave a Reply

Please Login to Comment