5.4 基础支撑之商业关系域

PamirsPartner作为商业关系与商业行为的主体,那么PamirsPartner间的关系如何描述,本文将介绍两种常见的设计思路,从思维和实现两方面进行对比,给出oinone为啥选择关系设计模式的原因。

一、两种设计模式对比

设计模式思路介绍

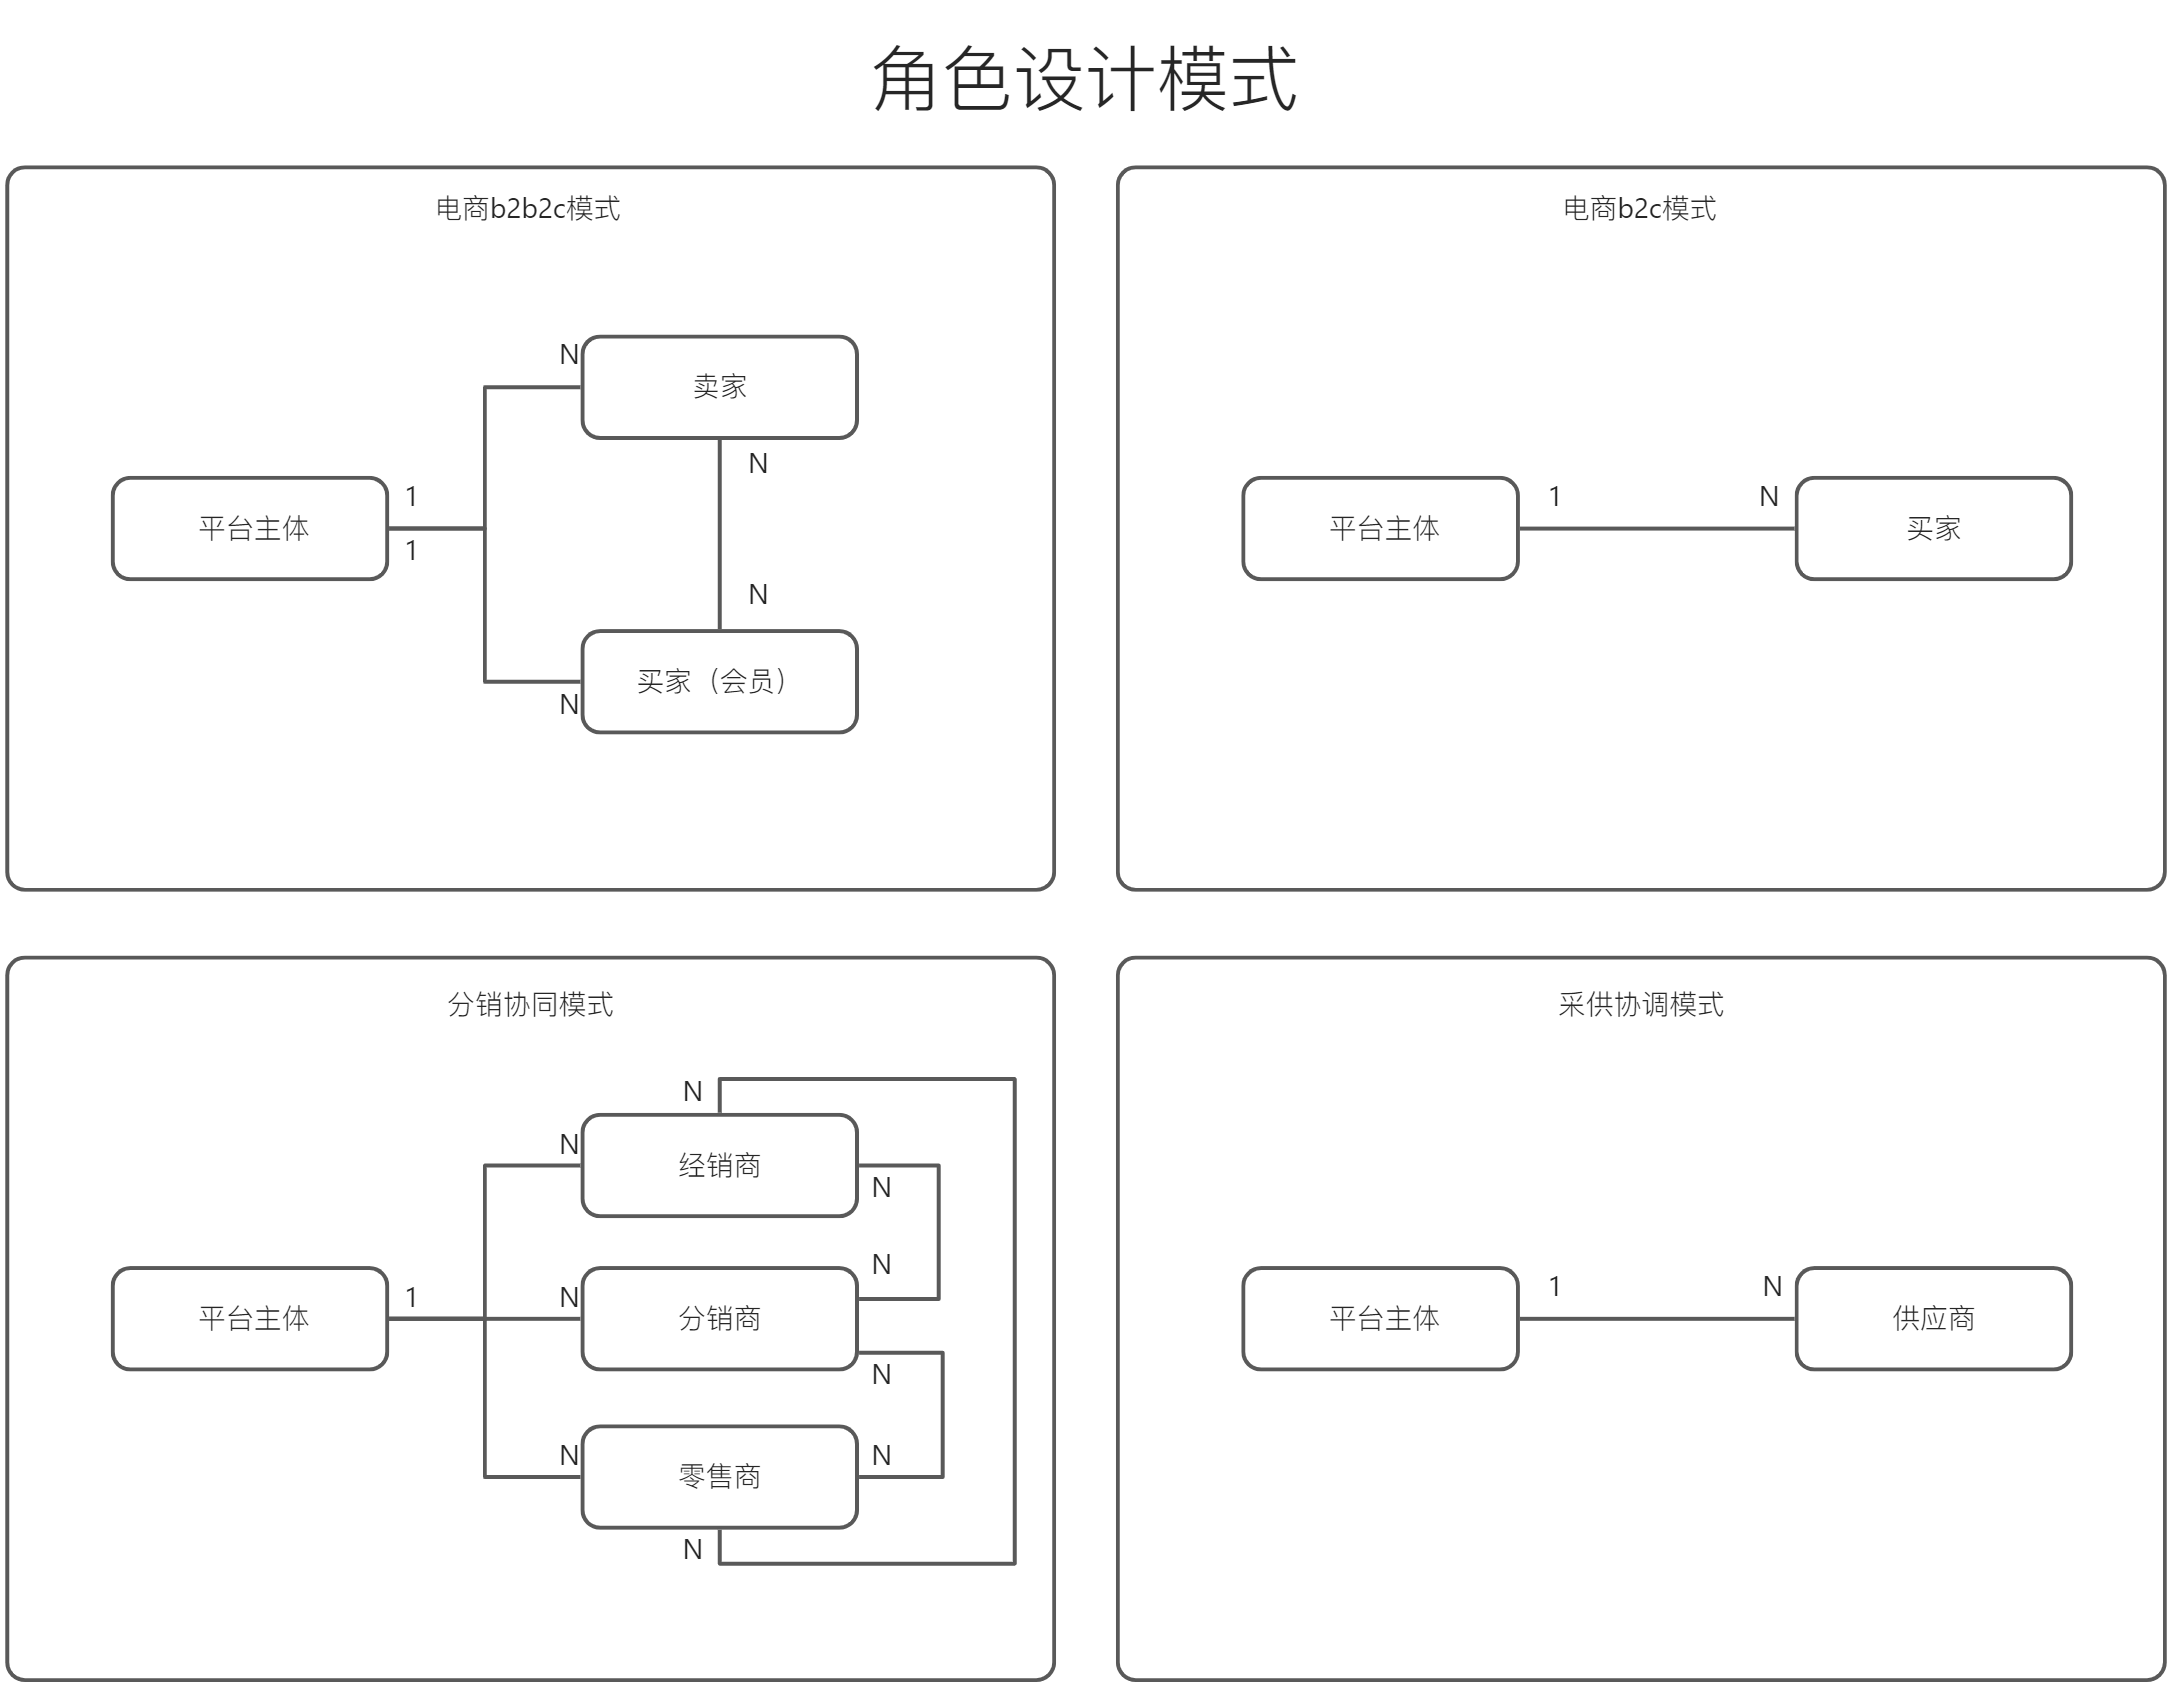
角色设计模式思路介绍

从产品角度枚举所有商业角色,每个商业角色对应一个派生的商业主体,并把主体间的关系类型进行整理。

5.4 基础支撑之商业关系域

图5-4-1 角色设计模式

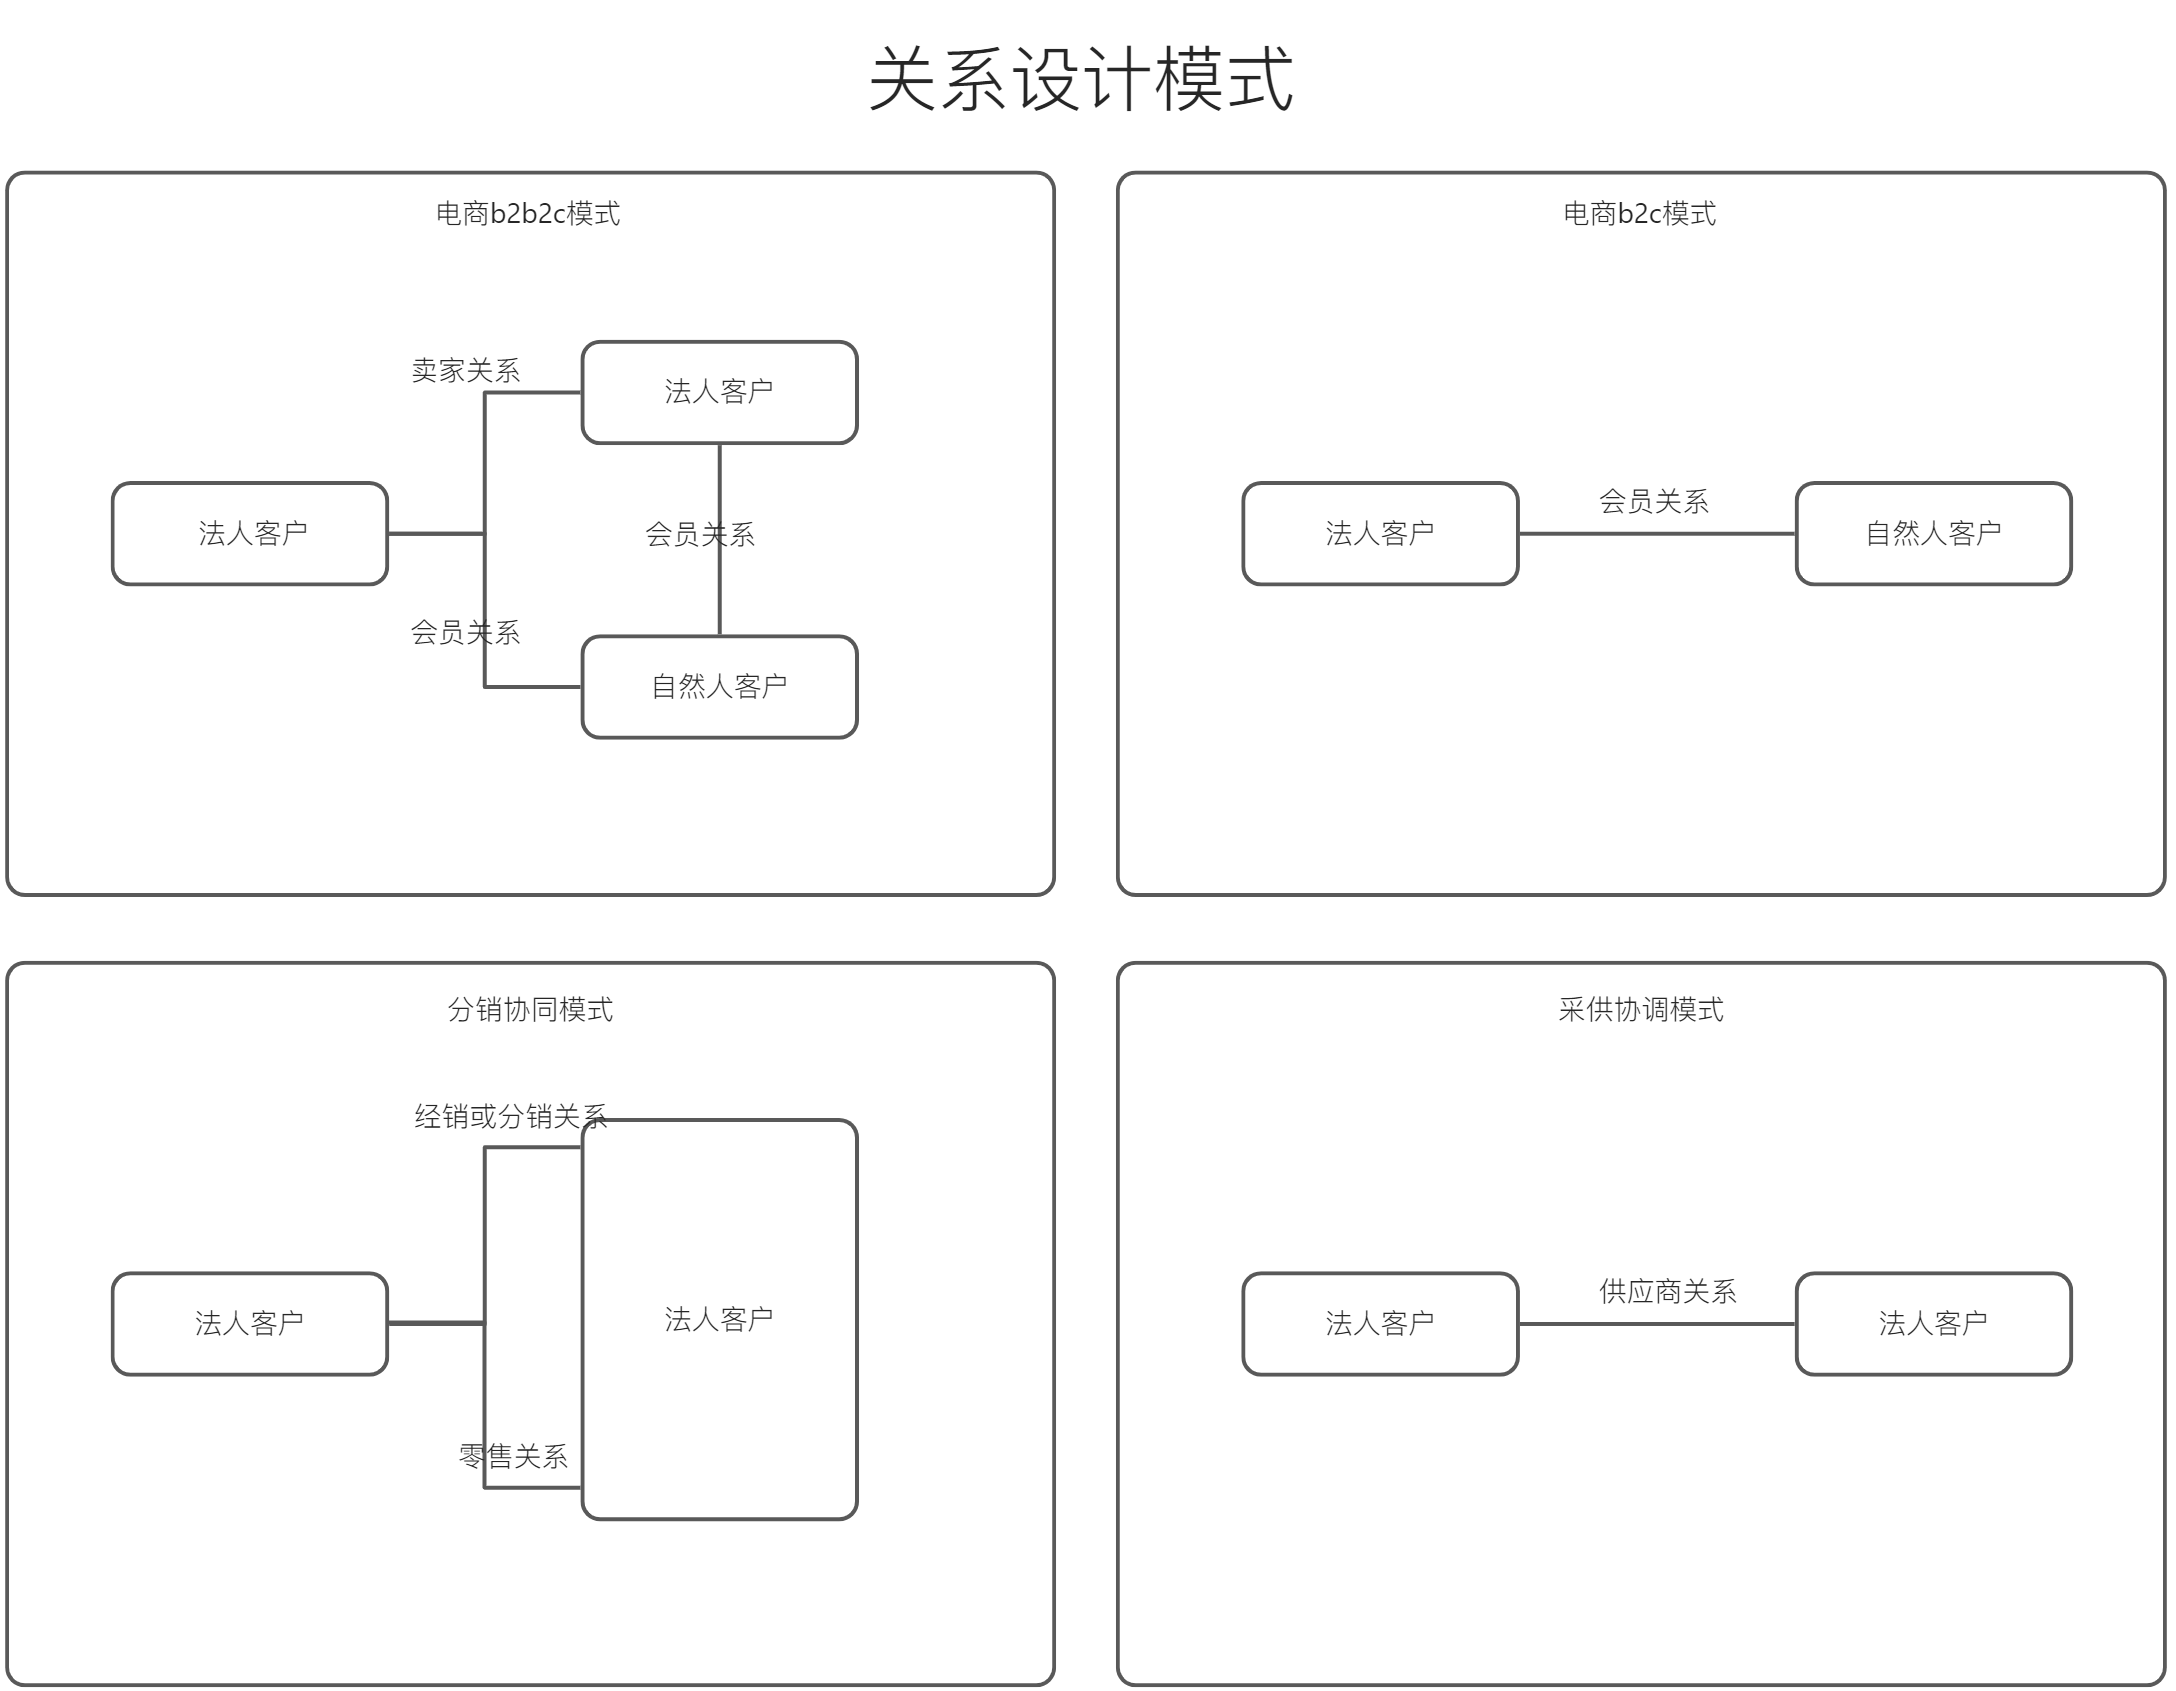
关系设计模式思路介绍

从产品角度枚举所有商业角色,每个商业角色对应一个派生的主体间商业关系

5.4 基础支撑之商业关系域

图5-4-2 关系设计模式

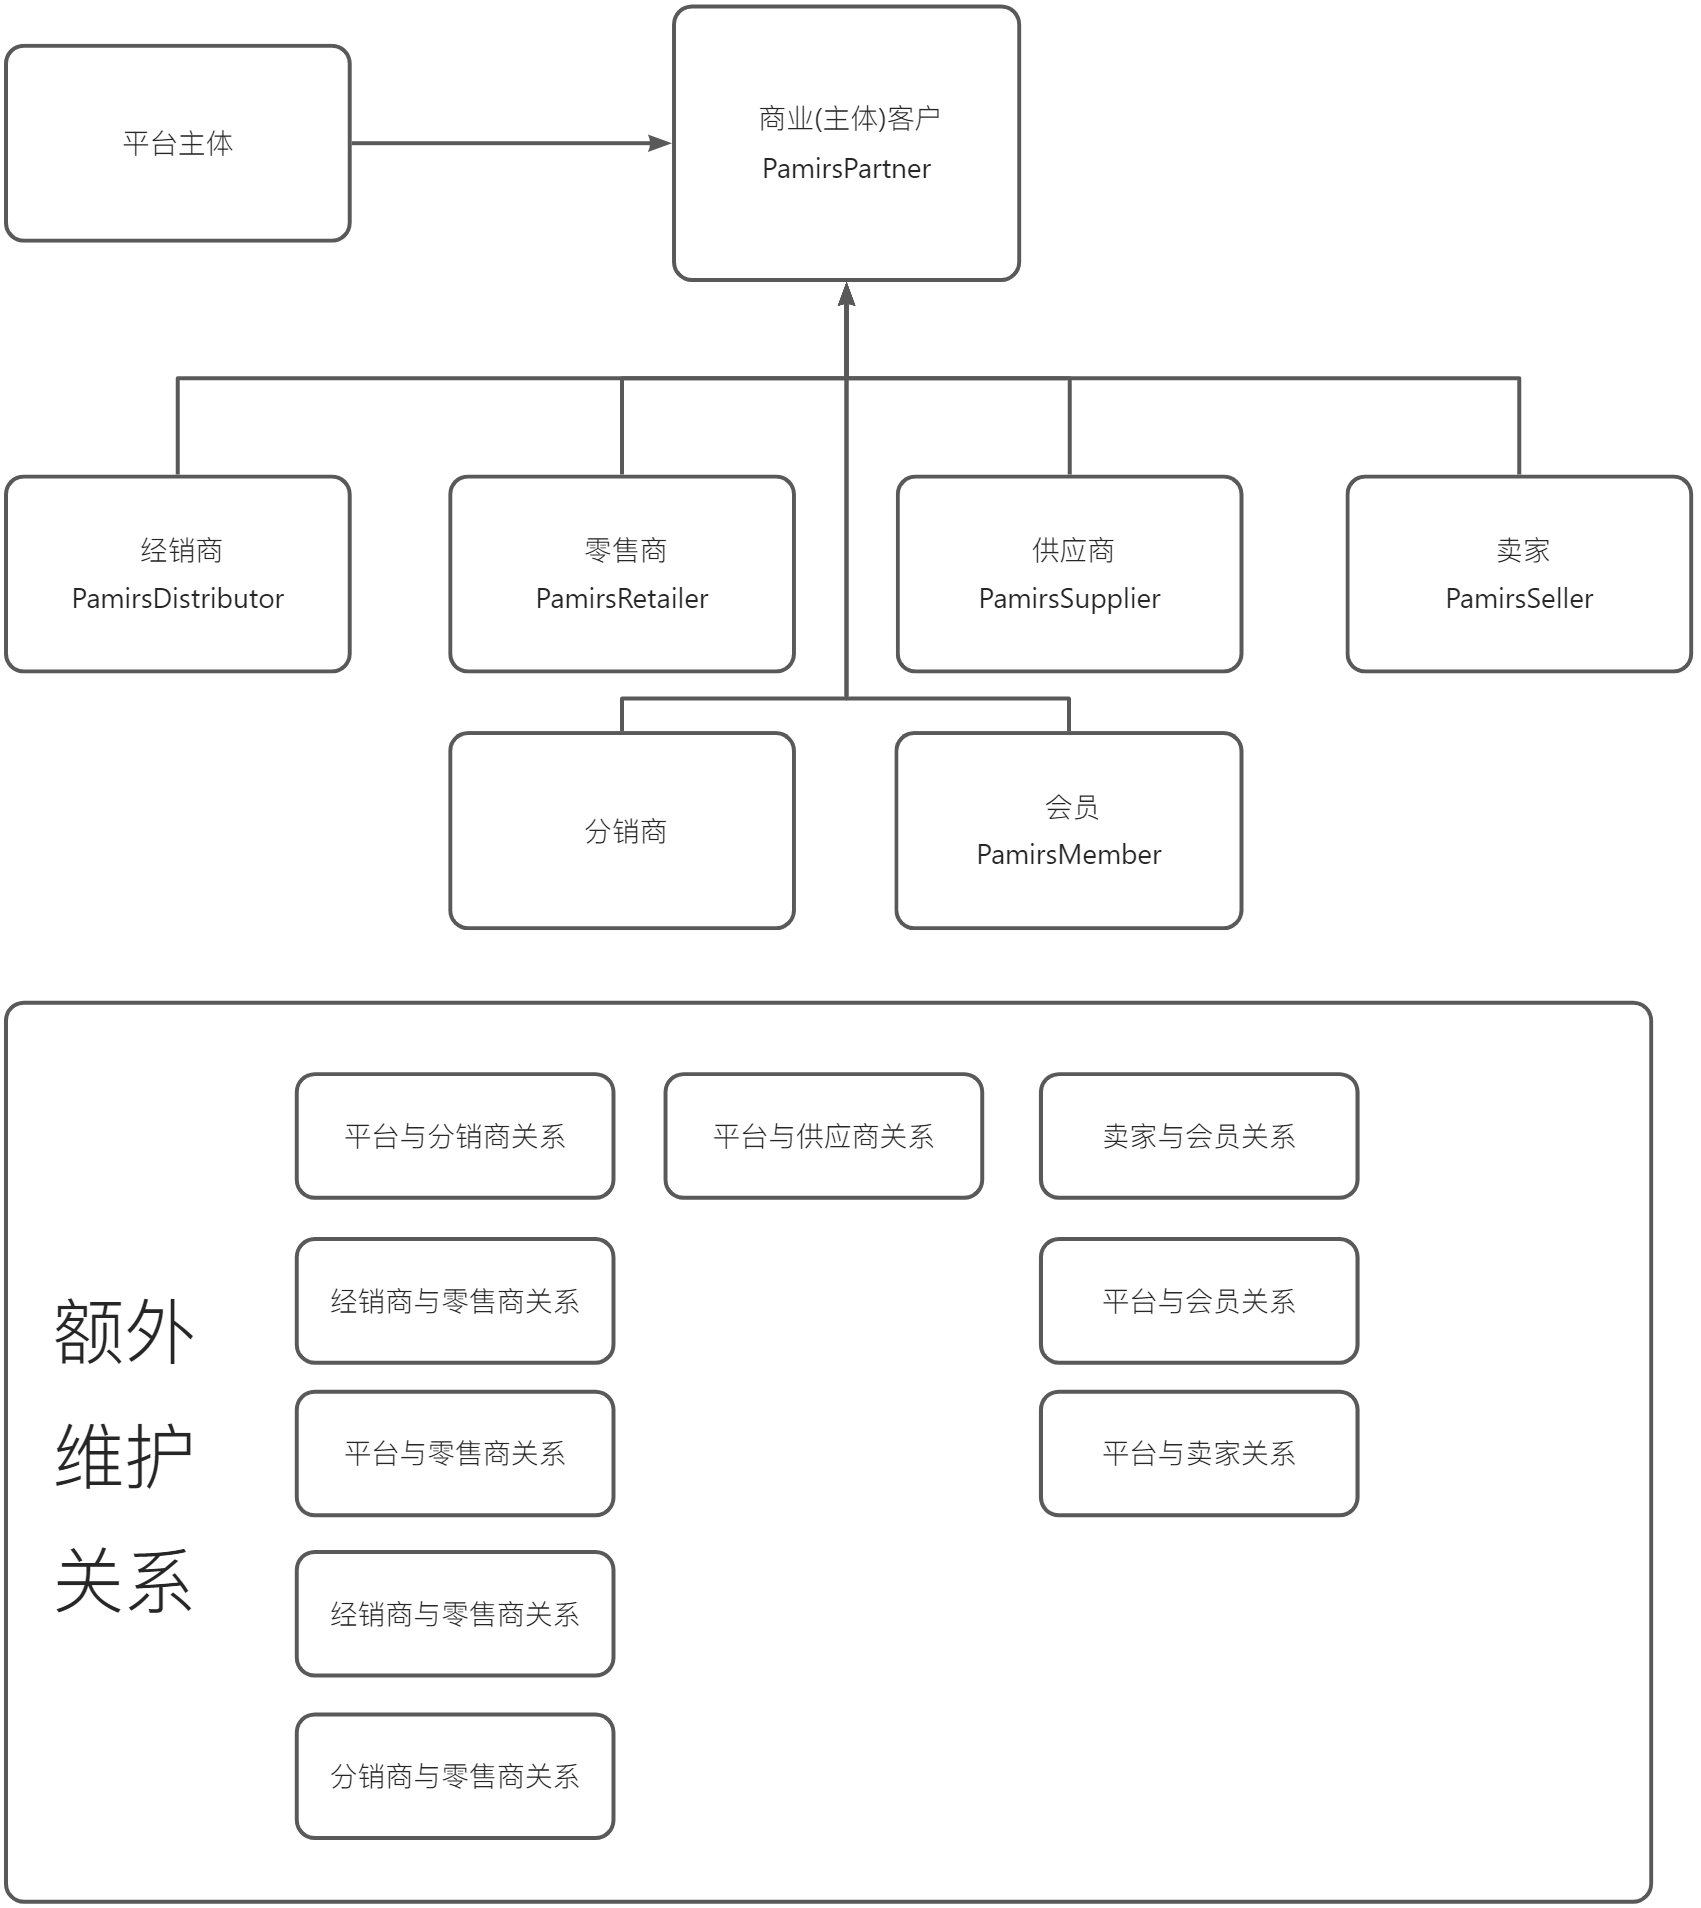
设计模式对应实现介绍

角色设计模式实现介绍

  1. 不单商业主体需要扩展,关系也要额外维护,可以是字段或是关系表。一般M2O和O2M字段维护,M2M关系表维护。

  2. 创建合同场景中甲方选择【商业主体A】,乙方必须是【商业主体A】有关联的经销商、分销商、零售商、供应商等,则在角色设计模式下就非常麻烦,因为关系都是独立维护的

5.4 基础支撑之商业关系域

图5-4-3 角色设计模式实现介绍

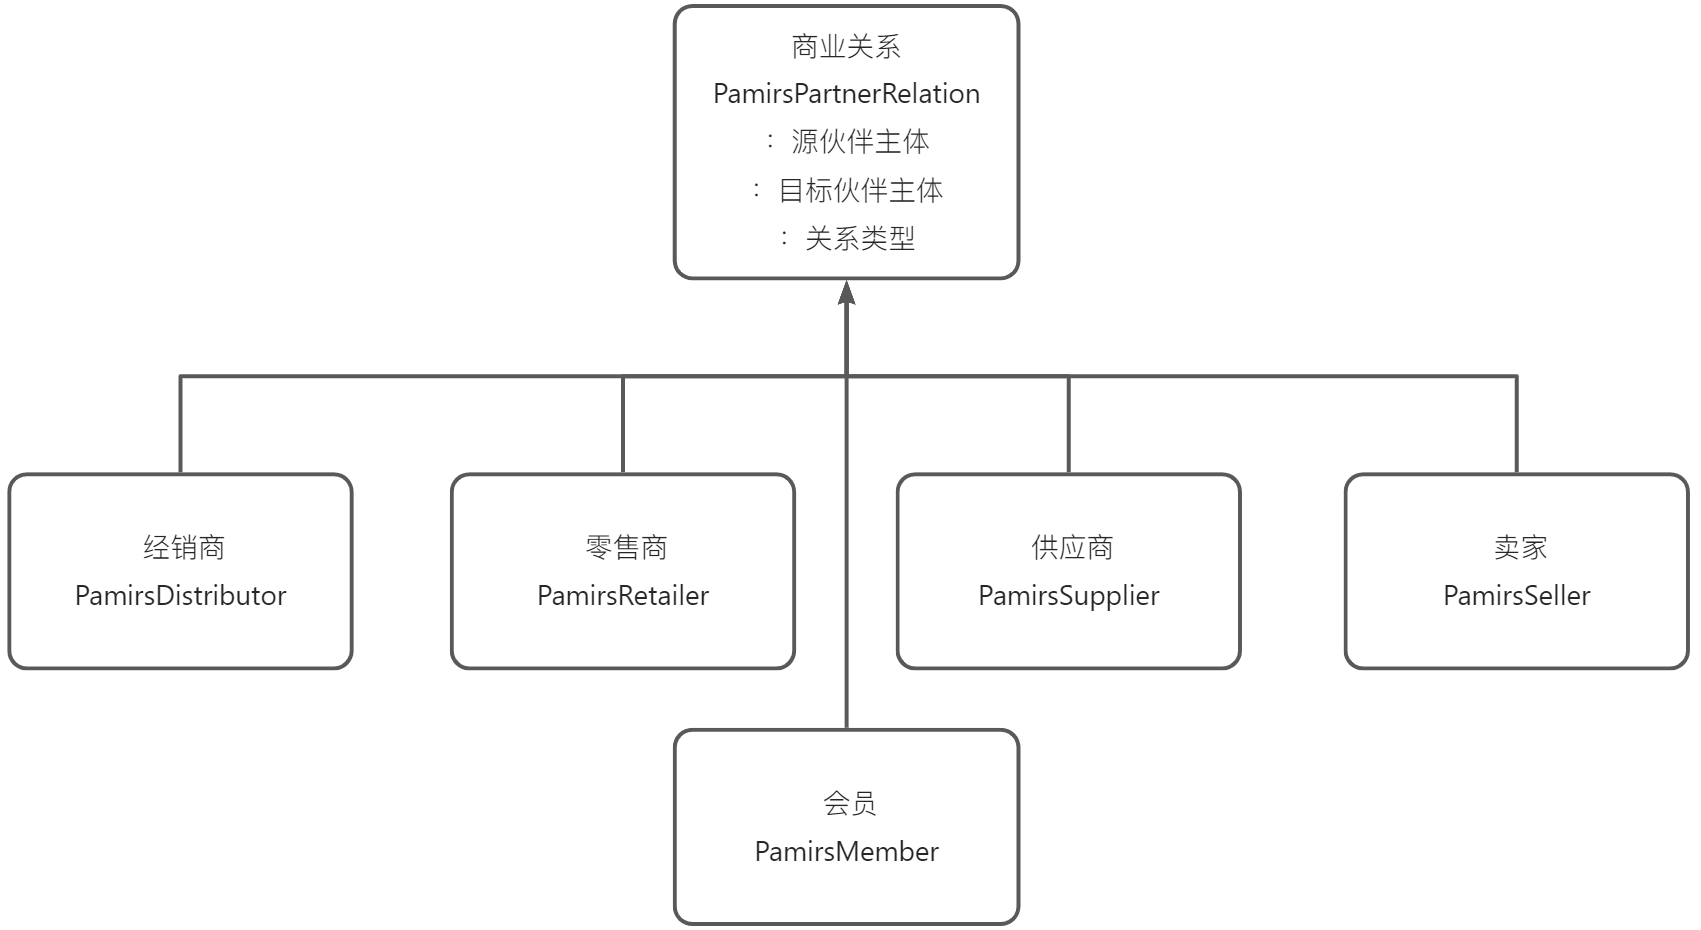
关系设计模式实现介绍

  1. 只需维护商业关系扩展

  2. 同时在设计上收敛了商业关系,统一管理应对不同场景都比较从容

5.4 基础支撑之商业关系域

图5-4-4 关系设计模式实现介绍

二、oinone商业关系的默认实现

首先oinone的商业关系选择关系设计模式

其次模型上采用多表继承模式,父模型上维护核心字段,子模型维护个性化字段。

Oinone社区 作者:史, 昂原创文章,如若转载,请注明出处:https://doc.oinone.top/oio4/9319.html

访问Oinone官网:https://www.oinone.top获取数式Oinone低代码应用平台体验

Like (0)
史, 昂's avatar史, 昂数式管理员
Previous 2024年5月23日 am8:19
Next 2024年5月23日 am8:21

相关推荐

  • 3.5.7.8 自定义菜单栏

    在业务中,可能会遇到需要对菜单栏的交互或UI做全新设计的需求,这个时候可以自定义菜单栏组件支持。 首先继承平台的CustomMenuWidget 组件,将自己vue文件设置到component处 import { NavMenu, SPI, ViewWidget } from '@kunlun/dependencies'; import Component from './CustomMenu.vue'; @SPI.ClassFactory( ViewWidget.Token({ // 这里的widget跟平台的组件一样,这样才能覆盖平台的组件 widget: 'nav-menu' }) ) export class CustomMenuWidget extends NavMenu { public initialize(props) { super.initialize(props); this.setComponent(Component); return this; } } vue文件中继承平台的props,编写自定义页面代码 export const NavMenuProps = { /** * 当前模块 */ module: { type: Object as PropType<IModule | null> }, /** * 树结构的菜单 */ menus: { type: Array as PropType<IResolvedMenu[]>, default: () => [] }, /** * 菜单类型,现在支持垂直、水平、和内嵌模式三种 */ mode: { type: String as PropType<'vertical' | 'horizontal' | 'inline'>, default: 'inline' }, /** * 菜单栏是否折叠收起 */ collapsed: { type: Boolean, default: false }, /** * 当前展开的 SubMenu 菜单项 key 数组 */ openKeys: { type: Array as PropType<string[]>, default: () => [] }, /** * 当前选中的菜单项 key 数组 */ selectKeys: { type: Array as PropType<string[]>, default: () => [] }, /** * 菜单搜索下拉选中菜单项 */ selectMenuBySearch: { type: Function as PropType<(menuName: String) => void> }, /** * 选中菜单项 */ selectMenu: { type: Function as PropType<(menuName: String) => Promise<void>> }, /** * SubMenu 展开/关闭的回调 */ openChange: { type: Function as PropType<(openKeys: string[]) => void> }, /**…

    2024年5月23日
    2.4K00
  • 3.3.7 字段之序列化方式

    本文核心是带大家全面了解oinone的序列方式,包括支持的序列化类型、注意点、如果新增客户化序列化方式以及字段默认值的反序列化。 一、数据存储的序列化 (举例) 使用@Field注解的serialize属性来配置非字符串类型属性的序列化与反序列化方式,最终会以序列化后的字符串持久化到存储中。 ### Step1 新建PetItemDetail模型、并为PetItem添加两个字段 PetItemDetail继承TransientModel,增加两个字段,分别为备注和备注人 package pro.shushi.pamirs.demo.api.tmodel; import pro.shushi.pamirs.meta.annotation.Field; import pro.shushi.pamirs.meta.annotation.Model; import pro.shushi.pamirs.meta.base.TransientModel; import pro.shushi.pamirs.user.api.model.PamirsUser; @Model.model(PetItemDetail.MODEL_MODEL) @Model(displayName = "商品详情",summary = "商品详情",labelFields = {"remark"}) public class PetItemDetail extends TransientModel { public static final String MODEL_MODEL="demo.PetItemDetail"; @Field.String(min = "2",max = "20") @Field(displayName = "备注",required = true) private String remark; @Field(displayName = "备注人",required = true) private PamirsUser user; } 图3-3-7-1 PetItemDetail继承TransientModel 修改PetItem,增加两个字段petItemDetails类型为List和tags类型为List,并设置为不同的序列化方式,petItemDetails为JSON(缺省就是JSON,可不配),tags为COMMA。同时设置 @Field.Advanced(columnDefinition = varchar(1024)),防止序列化后存储过长 package pro.shushi.pamirs.demo.api.model; import pro.shushi.pamirs.demo.api.tmodel.PetItemDetail; import pro.shushi.pamirs.meta.annotation.Field; import pro.shushi.pamirs.meta.annotation.Model; import pro.shushi.pamirs.meta.enmu.NullableBoolEnum; import java.math.BigDecimal; import java.util.List; @Model.model(PetItem.MODEL_MODEL) @Model(displayName = "宠物商品",summary="宠物商品",labelFields = {"itemName"}) public class PetItem extends AbstractDemoCodeModel{ public static final String MODEL_MODEL="demo.PetItem"; @Field(displayName = "商品名称",required = true) private String itemName; @Field(displayName = "商品价格",required = true) private BigDecimal price; @Field(displayName = "店铺",required = true) @Field.Relation(relationFields = {"shopId"},referenceFields = {"id"}) private PetShop shop; @Field(displayName = "店铺Id",invisible = true) private Long shopId; @Field(displayName = "品种") @Field.many2one @Field.Relation(relationFields = {"typeId"},referenceFields = {"id"}) private PetType type; @Field(displayName = "品种类型",invisible = true) private Long typeId; @Field(displayName = "详情", serialize = Field.serialize.JSON, store = NullableBoolEnum.TRUE) @Field.Advanced(columnDefinition = "varchar(1024)") private List<PetItemDetail> petItemDetails; @Field(displayName = "商品标签",serialize = Field.serialize.COMMA,store = NullableBoolEnum.TRUE,multi = true) @Field.Advanced(columnDefinition = "varchar(1024)") private…

    2024年5月23日
    1.7K00
  • 【附件一】下载说明

    章节说明 下载内容 下载地址 备注 3.1.1环境准备>环境准备(Mac版) 安装 jdk 1.8 https://www.oracle.com/java/technologies/downloads/#java8 安装 mysql 8.0.26 https://dev.mysql.com/downloads/mysql/ 安装 idea社区版2020.2.4 https://www.jetbrains.com/idea/download/other.html 安装idea插件 请移至Oinone官网https://www.oinone.top/对应页面下载或联系Oinone官方客服 根据各自Idea版本下载对应插件,下载文件后去除.txt后缀 安装 git 2.2.0 https://sourceforge.net/projects/git-osx-installer/files/git-2.15.0-intel-universal-mavericks.dmg/download?use_mirror=nchc 安装 GraphQL的客户端工具 Insomnia 请移至Oinone官网https://www.oinone.top/对应页面下载或联系Oinone官方客服 下载文件后修改文件名去除.txt后缀 安装 maven https://archive.apache.org/dist/maven/maven-3/3.8.1/binaries/ 安装脚本zk https://archive.apache.org/dist/zookeeper/zookeeper-3.5.8/apache-zookeeper-3.5.8-bin.tar.gz 安装脚本rocketmq https://archive.apache.org/dist/rocketmq/4.7.1/rocketmq-all-4.7.1-bin-release.zip 安装脚本redis https://download.redis.io/releases/redis-5.0.2.tar.gz 安装nvm https://github.com/nvm-sh/nvm/blob/master/README.md 3.1.1环境搭建>环境准备(Windows版) 安装JDK 1.8 https://www.oracle.com/java/technologies/downloads/#java8 安装 Apache Maven 3.8+ https://maven.apache.org/download.cgi 下载settings-develop.xml 请移至Oinone官网https://www.oinone.top/对应页面下载或联系Oinone官方客服 下载到 C:\Users\你的用户名.m2 目录中并重命名为settings.xml 安装 Jetbrains IDEA 2020.2.4 https://www.jetbrains.com/idea/download/other.html 安装 Jetbrains IDEA 2020.2.4需下载插件 https://pan.baidu.com/share/init?surl=HNzSxxH0KncvglkfITUrsA 提取密码: mdji 安装idea插件 请移至Oinone官网https://www.oinone.top/对应页面下载或联系Oinone官方客服 根据各自Idea版本下载对应插件,下载文件后去除.txt后缀 安装MySQL 8 https://dev.mysql.com/downloads/mysql/ 安装Git https://git-scm.com/download/win 安装GraphQL测试工具Insomnia https://github.com/Kong/insomnia/releases 安装RocketMQ https://rocketmq.apache.org/download/ 安装ElasticSearch 版本 8.4.1 https://www.elastic.co/cn/downloads/past-releases/elasticsearch-7-6-1 安装Redis https://download.redis.io/releases/ Zookeeper安装 https://dlcdn.apache.org/zookeeper/zookeeper-3.8.0/apache-zookeeper-3.8.0-bin.tar.gz 安装nodejs 版本12.12.0 https://nodejs.org/dist/v12.12.0/node-v12.12.0-win-x64.zip 安装cnpm https://www.npmjs.com/package/cnpm 3.2.1Oinone一模块为组织>构建第一个Module 安装archetype-project-generate.sh脚本 请移至Oinone官网https://www.oinone.top/对应页面下载或联系Oinone官方客服 3.5.5Oinone以交互为外在>设计器的结合 安装Docker https://www.docker.com/get-started/ 下载结构包:Oinone-op-ds.zip 请移至Oinone官网https://www.oinone.top/对应页面下载或联系Oinone官方客服 4.1.10后端高级特性>函数之触发与定时 下载canal中间件:pamirs-middleware-canal-deployer-3.0.1.zi 请移至Oinone官网https://www.oinone.top/对应页面下载或联系Oinone官方客服 4.1.11后端高级特性>函数之异步执行 下载tbSchedule的控制台jar包:pamirs-middleware-schedule-console-3.0.1.jar.txt 请移至Oinone官网https://www.oinone.top/对应页面下载或联系Oinone官方客服 下载schedule.json 请移至Oinone官网https://www.oinone.top/对应页面下载或联系Oinone官方客服 下载以下文件放在pamirs-demo-boot的src/main/resources/init目录下 4.1.25后端高级特性>框架之搜索引擎 ES安装 方式一:官方下载安装包:https://www.elastic.co/cn/downloads/past-releases/elasticsearch-8-4-1 下载后去除后缀.txt,然后解压文件 方式二:请移至Oinone官网https://www.oinone.top/对应页面下载或联系Oinone官方客服

    Oinone 7天入门到精通 2024年5月23日
    2.4K00
  • 3.4.3 函数的相关特性

    本小章会从oinone的函数拥有三方面特性,展开介绍 面向对象,继承与多态 面向切面编程,拦截器 SPI机制,扩展点

    Oinone 7天入门到精通 2024年5月23日
    1.5K00
  • 4.1.23 框架之信息传递

    在4.1.13【Action之校验】、3.4.1【构建第一个Function】等文章中,都用到PamirsSession.getMessageHub()来设置返回消息,基本上都是在传递后端逻辑判断的异常信息,而且在系统报错时也会通过它来返回错误信息,前端接收到错误信息则会以提示框的方式进行错误提示。其实后端除了可以返回错误信息以外,还可以返回调试、告警、成功、信息等级别的信息给前端。但是默认情况下前端只提示错误信息,可以通过前端的统一配置放开提示级别,有点类似后端的日志级别。 一、不同信息类型的举例 Step1 新建PetTypeAction 借用PetType模型的表格页做为信息传递的测试入口,为PetType模型新增一个ServerAction,在代码中对信息的所有类型进行模拟 package pro.shushi.pamirs.demo.core.action; import org.springframework.stereotype.Component; import pro.shushi.pamirs.demo.api.model.PetCatItem; import pro.shushi.pamirs.demo.api.model.PetType; import pro.shushi.pamirs.meta.annotation.Action; import pro.shushi.pamirs.meta.annotation.Model; import pro.shushi.pamirs.meta.api.dto.common.Message; import pro.shushi.pamirs.meta.api.session.PamirsSession; import pro.shushi.pamirs.meta.enmu.ActionContextTypeEnum; import pro.shushi.pamirs.meta.enmu.InformationLevelEnum; import pro.shushi.pamirs.meta.enmu.ViewTypeEnum; @Model.model(PetType.MODEL_MODEL) @Component public class PetTypeAction { @Action(displayName = "消息",bindingType = ViewTypeEnum.TABLE,contextType = ActionContextTypeEnum.CONTEXT_FREE) public PetType message(PetType data){ PamirsSession.getMessageHub().info("info1"); PamirsSession.getMessageHub().info("info2"); PamirsSession.getMessageHub().error("error1"); PamirsSession.getMessageHub().error("error2"); PamirsSession.getMessageHub().msg(new Message().msg("success1").setLevel(InformationLevelEnum.SUCCESS)); PamirsSession.getMessageHub().msg(new Message().msg("success2").setLevel(InformationLevelEnum.SUCCESS)); PamirsSession.getMessageHub().msg(new Message().msg("debug1").setLevel(InformationLevelEnum.DEBUG)); PamirsSession.getMessageHub().msg(new Message().msg("debug2").setLevel(InformationLevelEnum.DEBUG)); PamirsSession.getMessageHub().msg(new Message().msg("warn1").setLevel(InformationLevelEnum.WARN)); PamirsSession.getMessageHub().msg(new Message().msg("warn2").setLevel(InformationLevelEnum.WARN)); return data; } } 图4-1-23-1 为PetType模型新增一个ServerAction Step2 (前端)修改提示级别 在项目初始化时使用CLI构建初始化前端工程,在src/middleware有拦截器的默认实现,修改信息提示的默认级别为【ILevel.SUCCESS】 图4-1-23-2(前端)修改提示级别 const DEFAULT_MESSAGE_LEVEL = ILevel.SUCCESS; 图4-1-23-3(前端)修改提示级别 Step3 重启系统看效果 从页面效果中看到已经不在是只提示错误信息。从协议端看错误级别的信息是在errors下,其他级别的信息是在extensions下。 图4-1-23-4 示例效果 图4-1-23-5 系统提示的返回结果 二、MessageHub的其他说明 是实现上看MessageHub是基于GQL协议,前后端都有配套实现。同时前端还提供了订阅MessageHub的信息功能,以满足前端更多交互要求,前端MessageHub提供的订阅能力使用教程详见4.2.2前端高级特性之【框架之MessageHub】一文。

    2024年5月23日
    2.1K00

Leave a Reply

Please Login to Comment