
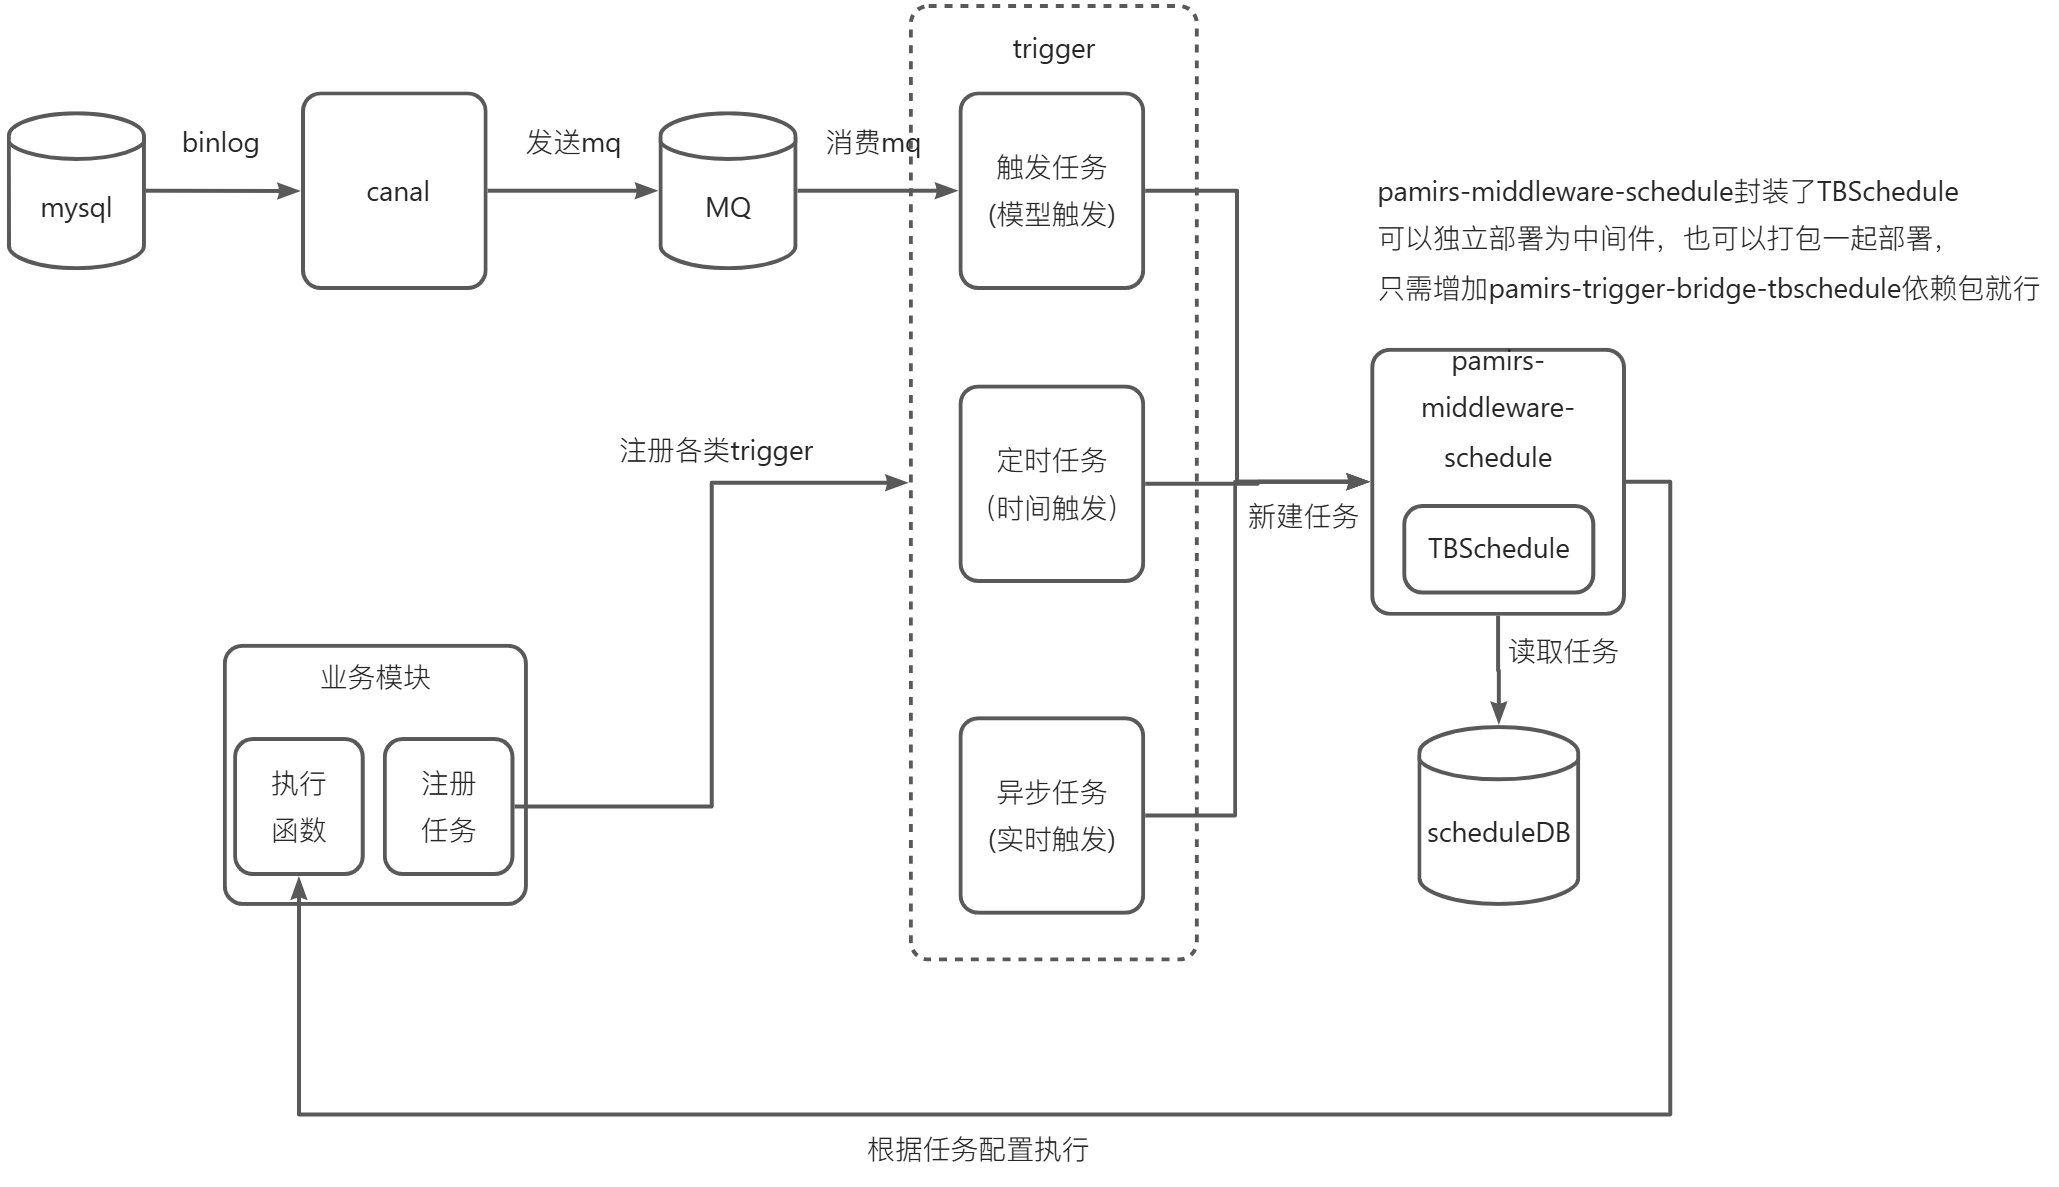
函数的触发和定时在很多场景中会用到,也是一个oinone的基础能力。比如我们的流程产品中在定义流程触发时就会让用户选择模型触发还是时间触发,就是用到了函数的触发与定时能力。
整体链路示意图(如下图4-1-10-1 所示),本文只讲trigger里的两类任务,一个是触发任务,一个是定时任务,异步任务放在4.1.11【函数之异步执行】一文中单独去介绍。

一、触发任务TriggerTaskAction(举例)
触发任务的创建,使用pamirs-middleware-canal监听mysql的binlog事件,通过rocketmq发送变更数据消息,收到MQ消息后,创建TriggerAutoTask。
触发任务的执行,使用TBSchedule拉取触发任务后,执行相应函数。
注意:pamirs-middleware-canal监听的数据库表必须包含触发模型的数据库表。
Step1 下载canal中间件
下载pamirs-middleware-canal-deployer-3.0.1.zip,去.txt后缀为pamirs-middleware-canal-deployer-3.0.1.zip,解压文件如下:

Step2 引入依赖pamirs-core-trigger模块
- pamirs-demo-api增加pamirs-trigger-api
<dependency>
        <groupId>pro.shushi.pamirs.core</groupId>
        <artifactId>pamirs-trigger-api</artifactId>
</dependency>- DemoModule在模块依赖定义中增加@Module(dependencies={TriggerModule.MODULE_MODULE})
@Component
@Module(
        name = DemoModule.MODULE_NAME,
        displayName = "oinoneDemo工程",
        version = "1.0.0",
        dependencies = {ModuleConstants.MODULE_BASE, CommonModule.MODULE_MODULE, UserModule.MODULE_MODULE, TriggerModule.MODULE_MODULE}
)
@Module.module(DemoModule.MODULE_MODULE)
@Module.Advanced(selfBuilt = true, application = true)
@UxHomepage(PetShopProxy.MODEL_MODEL)
public class DemoModule implements PamirsModule {
    ……其他代码
}- pamirs-demo-boot 增加pamirs-trigger-core和pamirs-trigger-bridge-tbschedule的依赖
<dependency>
        <groupId>pro.shushi.pamirs.core</groupId>
        <artifactId>pamirs-trigger-core</artifactId>
</dependency>
<dependency>
        <groupId>pro.shushi.pamirs.core</groupId>
        <artifactId>pamirs-trigger-bridge-tbschedule</artifactId>
</dependency>
图4-1-10-5 增加pamirs-trigger-core和pamirs-trigger-bridge-tbschedule的依赖
-
修改pamirs-demo-boot的applcation-dev.yml
-
修改pamris.event.enabled和pamris.event.schedule.enabled为true
-
pamirs_boot_modules增加启动模块:trigger
-
pamirs:
  event:
    enabled: true
    schedule:
      enabled: true
    rocket-mq:
      namesrv-addr: 127.0.0.1:9876
  boot:
    init: true
    sync: true
    modules:
      - base
      - common
      - sequence
      - resource
      - user
      - auth
      - message
      - international
      - business
      - trigger
      - demo_core
Step3 启动canal中间件
- canal的库表需要手工建
create schema canal_tsdb collate utf8mb4_binCREATE TABLE IF NOT EXISTS `meta_snapshot` (
`id` bigint(20) unsigned NOT NULL AUTO_INCREMENT COMMENT '主键',
`gmt_create` datetime NOT NULL COMMENT '创建时间',
`gmt_modified` datetime NOT NULL COMMENT '修改时间',
`destination` varchar(128) DEFAULT NULL COMMENT '通道名称',
`binlog_file` varchar(64) DEFAULT NULL COMMENT 'binlog文件名',
`binlog_offest` bigint(20) DEFAULT NULL COMMENT 'binlog偏移量',
`binlog_master_id` varchar(64) DEFAULT NULL COMMENT 'binlog节点id',
`binlog_timestamp` bigint(20) DEFAULT NULL COMMENT 'binlog应用的时间戳',
`data` longtext DEFAULT NULL COMMENT '表结构数据',
`extra` text DEFAULT NULL COMMENT '额外的扩展信息',
PRIMARY KEY (`id`),
UNIQUE KEY binlog_file_offest(`destination`,`binlog_master_id`,`binlog_file`,`binlog_offest`),
KEY `destination` (`destination`),
KEY `destination_timestamp` (`destination`,`binlog_timestamp`),
KEY `gmt_modified` (`gmt_modified`)
) ENGINE=InnoDB AUTO_INCREMENT=1 DEFAULT CHARSET=utf8mb4 COMMENT='表结构记录表快照表';
CREATE TABLE IF NOT EXISTS `meta_history` (
`id` bigint(20) unsigned NOT NULL AUTO_INCREMENT COMMENT '主键',
`gmt_create` datetime NOT NULL COMMENT '创建时间',
`gmt_modified` datetime NOT NULL COMMENT '修改时间',
`destination` varchar(128) DEFAULT NULL COMMENT '通道名称',
`binlog_file` varchar(64) DEFAULT NULL COMMENT 'binlog文件名',
`binlog_offest` bigint(20) DEFAULT NULL COMMENT 'binlog偏移量',
`binlog_master_id` varchar(64) DEFAULT NULL COMMENT 'binlog节点id',
`binlog_timestamp` bigint(20) DEFAULT NULL COMMENT 'binlog应用的时间戳',
`use_schema` varchar(1024) DEFAULT NULL COMMENT '执行sql时对应的schema',
`sql_schema` varchar(1024) DEFAULT NULL COMMENT '对应的schema',
`sql_table` varchar(1024) DEFAULT NULL COMMENT '对应的table',
`sql_text` longtext DEFAULT NULL COMMENT '执行的sql',
`sql_type` varchar(256) DEFAULT NULL COMMENT 'sql类型',
`extra` text DEFAULT NULL COMMENT '额外的扩展信息',
PRIMARY KEY (`id`),
UNIQUE KEY binlog_file_offest(`destination`,`binlog_master_id`,`binlog_file`,`binlog_offest`),
KEY `destination` (`destination`),
KEY `destination_timestamp` (`destination`,`binlog_timestamp`),
KEY `gmt_modified` (`gmt_modified`)
) ENGINE=InnoDB AUTO_INCREMENT=1 DEFAULT CHARSET=utf8mb4 COMMENT='表结构变化明细表';
CREATE TABLE IF NOT EXISTS `canal_filter` (
`id` bigint(20) unsigned NOT NULL AUTO_INCREMENT COMMENT '主键',
`destination` varchar(128) NOT NULL COMMENT '通道名称',
`filter` text NOT NULL COMMENT '过滤表达式',
`create_date` timestamp NOT NULL DEFAULT CURRENT_TIMESTAMP COMMENT '创建时间',
`write_date` timestamp NOT NULL DEFAULT CURRENT_TIMESTAMP ON UPDATE CURRENT_TIMESTAMP COMMENT '修改时间',
PRIMARY KEY (`id`),
UNIQUE KEY destination(`destination`)
) ENGINE=InnoDB AUTO_INCREMENT=1 DEFAULT CHARSET=utf8mb4 COMMENT='通道过滤';
CREATE TABLE IF NOT EXISTS `canal_destination` (
`id` bigint unsigned NOT NULL AUTO_INCREMENT COMMENT '主键',
`destination` varchar(128) NOT NULL COMMENT '通道名称',
`content` text NOT NULL COMMENT '通道配置内容',
`create_date` timestamp NOT NULL DEFAULT CURRENT_TIMESTAMP COMMENT '创建时间',
`write_date` timestamp NOT NULL DEFAULT CURRENT_TIMESTAMP ON UPDATE CURRENT_TIMESTAMP COMMENT '修改时间',
PRIMARY KEY (`id`),
UNIQUE KEY `destination` (`destination`)
) ENGINE=InnoDB AUTO_INCREMENT=2 DEFAULT CHARSET=utf8mb4 COLLATE=utf8mb4_0900_ai_ci COMMENT='通道配置'-
修改canal的启动配置
-
canal_tsdb就是上面建库,用户名和密码换成本机的
-
配置filter: demo.demo_core_pet_talent,监听PetTalent模型数据变化,filter为canal第一次启动默认监听的表。如果数据库中canal_filter表有数据这个修改无效
-
filter目前需要手工配置,在下个版本中已经去掉了手工配置,而且文中的canal中间件已经是2.2.2版本了,兼容当前教程的版本
-
pamirs:
  middleware:
    data-source:
      jdbc-url: jdbc:mysql://localhost:3306/canal_tsdb?useUnicode=true&characterEncoding=utf-8&verifyServerCertificate=false&useSSL=false&requireSSL=false
      driver-class-name: com.mysql.cj.jdbc.Driver
      username: root
      password: oinone
  canal:
    ip: 127.0.0.1
    port: 1111
    metricsPort: 1112
    zkClusters:
      - 127.0.0.1:2181
    destinations:
      - destinaion: pamirschangedata
        name: pamirschangedata
        desc: pamirschangedata
        slaveId: 1235
        filter: demo\.demo_core_pet_talent
        dbUserName: root
        dbPassword: oinone
        memoryStorageBufferSize: 65536
        topic: CHANGE_DATA_EVENT_TOPIC
        dynamicTopic: false
        dbs:
          - { address: 127.0.0.1, port: 3306 }
    tsdb:
      enable: true
      jdbcUrl: "jdbc:mysql://127.0.0.1:3306/canal_tsdb"
      userName: root
      password: oinone
    mq: rocketmq
    rocketmq:
      namesrv: 127.0.0.1:9876
      retryTimesWhenSendFailed: 5
dubbo:
  application:
    name: canal-server
    version: 1.0.0
  registry:
    address: zookeeper://127.0.0.1:2181
  protocol:
    name: dubbo
    port: 20881
  scan:
    base-packages: pro.shushi
server:
  address: 0.0.0.0
  port: 10010
sessionTimeout: 3600pamirs.canal相关配置说明
canal.ip: 运行时ip
canal.port: 运行时端口
canal.zkClusters: 连接zookeeper集群地址
canal.destinations: 运行时Canal的所有实例
canal.destinations.destinaion: Canal的单个实例配置值为所有实例唯一
canal.destinations.destinaion.id: 与canal.destinations.destinaion.slaveId配置一致
canal.destinations.destinaion.slaveId: 为Canal的实例ID
canal.destinations.destinaion.filter: 为Canal监听过滤正则
canal.destinations.destinaion.dbUserName: 为Canal监听的MySQL的用户名
canal.destinations.destinaion.dbPassword: 为Canal监听的MySQL的用户密码
canal.destinations.destinaion.topic: 为监听到数据后往RocketMQ的指定Topic发送消息
canal.destinations.destinaion.dbs: 为连接的MySQL实例的ip和端口,如果为主从配置且主从都开启了Binlog同步功能则可以配置两个地址
canal.destinations.destinaion.memoryStorageBufferSize与canal.destinations.destinaion.dynamicTopic为固定值不需要更改
canal.tsdb: 用来保存canal运行时的元数据,配置为canal_tsdb库相关的连接信息
-
启动canal中间件
-
进入canal中间件解压目录执行下面命令就可以启动
-
--spring.config.location请配置绝对路径,换成自己本机的就可以
-
java -jar pamirs-middleware-canal-deployer-3.0.1-SNAPSHOT.jar --spring.config.location=/Users/oinone/Documents/oinone/canel/pamirs-middleware-canal-deployer-3.0.1/canal-config/application-dev.yml --spring.profiles.active=devStep4 新建触发任务
新建PetTalentTrigger类,当PetTalent模型的数据记录被新建时触发系统做一些事情
package pro.shushi.pamirs.demo.core.trigger;

import pro.shushi.pamirs.demo.api.model.PetTalent;
import pro.shushi.pamirs.meta.annotation.Fun;
import pro.shushi.pamirs.meta.annotation.Function;
import pro.shushi.pamirs.meta.annotation.fun.extern.Slf4j;
import pro.shushi.pamirs.trigger.annotation.Trigger;
import pro.shushi.pamirs.trigger.enmu.TriggerConditionEnum;

@Fun(PetTalent.MODEL_MODEL)
@Slf4j
public class PetTalentTrigger {
    @Function
    @Trigger(displayName = "PetTalent创建时触发",name = "PetTalent#Trigger#onCreate",condition = TriggerConditionEnum.ON_CREATE)
    public PetTalent onCreate(PetTalent data){
        log.info(data.getName() + ",被创建");
        //可以增加逻辑
        return data;
    }
}Step5 重启应用看效果
- 解决启动是dubbo报错
启动过程中会报如下错误,虽然不影响结果,但是还是要把它消灭掉。修改bootstarp.yml文件关闭SpringCloud的自动注册就好了
spring:
  profiles:
    active: dev
  application:
    name: pamirs-demo
  cloud:
    service-registry:
        auto-registration:
        enabled: false
pamirs:
  default:
    environment-check: true
    tenant-check: true

---
spring:
  profiles: dev
  cloud:
    config:
      enabled: false
      uri: http://127.0.0.1:7001
      label: master
      profile: dev
    nacos:
      server-addr: http://127.0.0.1:8848
      discovery:
        enabled: false
        namespace:
        prefix: application
        file-extension: yml
      config:
        enabled: false
        namespace:
        prefix: application
        file-extension: yml

dubbo:
  application:
    name: pamirs-demo
    version: 1.0.0
  registry:
    address: zookeeper://127.0.0.1:2181
  protocol:
    name: dubbo
    port: -1
  #    serialization: pamirs
  scan:
    base-packages: pro.shushi
  cloud:
    subscribed-services:

---
spring:
  profiles: test
  cloud:
    config:
      enabled: false
      uri: http://127.0.0.1:7001
      label: master
      profile: test
    nacos:
      server-addr: http://127.0.0.1:8848
      discovery:
        enabled: false
        namespace:
        prefix: application
        file-extension: yml
      config:
        enabled: false
        namespace:
        prefix: application
        file-extension: yml

dubbo:
  application:
    name: pamirs-demo
    version: 1.0.0
  registry:
    address: zookeeper://127.0.0.1:2181
  protocol:
    name: dubbo
    port: -1
  #    serialization: pamirs
  scan:
    base-packages: pro.shushi
  cloud:
    subscribed-services:
- 再次重启查看效果
前端新增一个宠物达人,在后台Console搜索“被创建”,我们就看到对应由触发器打印出来的日志


Step6 修改canal的Topic
在分布式环境下可以通过修改canal的topic(canal.destinations.destinaion.topic)来个隔离多个应用的触发消息。
-
新建DemoNotifyTopicEdit利用Topic修改api,增加后缀【"_"+ DemoModule.MODULE_MODULE】
-
canal的配置canal.destinations.destinaion.topic改为:CHANGE_DATA_EVENT_TOPIC_demo_core
-
小伙伴自行测试
package pro.shushi.pamirs.demo.core.mq;

import org.springframework.stereotype.Component;
import pro.shushi.pamirs.demo.api.DemoModule;
import pro.shushi.pamirs.framework.connectors.event.spi.NotifyTopicEditorApi;
import pro.shushi.pamirs.trigger.constant.NotifyConstant;

@Component
public class DemoNotifyTopicEdit  implements NotifyTopicEditorApi {
    @Override
    public String handlerTopic(String topic) {
        if(NotifyConstant.AUTO_TRIGGER_TOPIC.equals(topic)){
            return NotifyConstant.AUTO_TRIGGER_TOPIC +"_"+ DemoModule.MODULE_MODULE;
        }
        return topic;
    }
}
pamirs:
  middleware:
    data-source:
      jdbc-url: jdbc:mysql://localhost:3306/canal_tsdb?useUnicode=true&characterEncoding=utf-8&verifyServerCertificate=false&useSSL=false&requireSSL=false
      driver-class-name: com.mysql.cj.jdbc.Driver
      username: root
      password: oinone
  canal:
    ip: 127.0.0.1
    port: 1111
    metricsPort: 1112
    zkClusters:
      - 127.0.0.1:2181
    destinations:
      - destinaion: pamirschangedata
        name: pamirschangedata
        desc: pamirschangedata
        slaveId: 1235
        filter: demo\.demo_core_pet_talent
        dbUserName: root
        dbPassword: oinone
        memoryStorageBufferSize: 65536
        topic: CHANGE_DATA_EVENT_TOPIC_demo_core
        dynamicTopic: false
        dbs:
          - { address: 127.0.0.1, port: 3306 }
    tsdb:
      enable: true
      jdbcUrl: "jdbc:mysql://127.0.0.1:3306/canal_tsdb"
      userName: root
      password: oinone
    mq: rocketmq
    rocketmq:
      namesrv: 127.0.0.1:9876
      retryTimesWhenSendFailed: 5
dubbo:
  application:
    name: canal-server
    version: 1.0.0
  registry:
    address: zookeeper://127.0.0.1:2181
  protocol:
    name: dubbo
    port: 20881
  scan:
    base-packages: pro.shushi
server:
  address: 0.0.0.0
  port: 10010
sessionTimeout: 3600二、定时任务
定时任务是一种非常常见的模式,这里就不介绍概念了,直接进入示例环节
Step1 新建PetTalentAutoTask实现ScheduleAction
注:
-
getInterfaceName()需要跟taskAction.setExecuteNamespace定义保持一致,都是函数的命名空间
-
taskAction.setExecuteFun("execute");跟执行函数名“execute”一致
-
TaskType需配置为CYCLE_SCHEDULE_NO_TRANSACTION_TASK,把定时任务的schedule线程分开,要不然有一个时间长的任务会导致普通异步或触发任务全部延时
package pro.shushi.pamirs.demo.core.task;

import org.springframework.beans.factory.annotation.Autowired;
import org.springframework.stereotype.Component;
import pro.shushi.pamirs.core.common.enmu.TimeUnitEnum;
import pro.shushi.pamirs.demo.api.model.PetTalent;
import pro.shushi.pamirs.meta.annotation.Fun;
import pro.shushi.pamirs.meta.annotation.Function;
import pro.shushi.pamirs.meta.annotation.fun.extern.Slf4j;
import pro.shushi.pamirs.meta.domain.fun.FunctionDefinition;
import pro.shushi.pamirs.middleware.schedule.api.ScheduleAction;
import pro.shushi.pamirs.middleware.schedule.common.Result;
import pro.shushi.pamirs.middleware.schedule.domain.ScheduleItem;
import pro.shushi.pamirs.middleware.schedule.eunmeration.TaskType;
import pro.shushi.pamirs.trigger.enmu.TriggerTimeAnchorEnum;
import pro.shushi.pamirs.trigger.model.ScheduleTaskAction;
import pro.shushi.pamirs.trigger.service.ScheduleTaskActionService;

@Slf4j
@Component
@Fun(PetTalent.MODEL_MODEL)
public class PetTalentAutoTask implements ScheduleAction {

    @Autowired
    private ScheduleTaskActionService scheduleTaskActionService;

    public void initTask(){
        ScheduleTaskAction taskAction = new ScheduleTaskAction();
        taskAction.setDisplayName("定时任务测试"); //定时任务描述
        taskAction.setDescription("定时任务测试");
        taskAction.setTechnicalName(PetTalent.MODEL_MODEL+"#"+PetTalentAutoTask.class.getSimpleName()+"#"+"testAutoTask");       //设置定时任务技术名
        taskAction.setLimitExecuteNumber(-1);   //设置执行次数
        taskAction.setPeriodTimeValue(1);       //设置执行周期规则
        taskAction.setPeriodTimeUnit(TimeUnitEnum.MINUTE);
        taskAction.setPeriodTimeAnchor(TriggerTimeAnchorEnum.START);
        taskAction.setLimitRetryNumber(1);      //设置失败重试规则
        taskAction.setNextRetryTimeValue(1);
        taskAction.setNextRetryTimeUnit(TimeUnitEnum.MINUTE);
        taskAction.setExecuteNamespace(PetTalent.MODEL_MODEL);
        taskAction.setExecuteFun("execute");
        taskAction.setExecuteFunction(new FunctionDefinition().setTimeout(5000));
        taskAction.setTaskType(TaskType.CYCLE_SCHEDULE_NO_TRANSACTION_TASK.getValue()); //设置定时任务,执行任务类型
        taskAction.setContext(null);            //用户传递上下文参数
        taskAction.setActive(true);             //定时任务是否生效
        taskAction.setFirstExecuteTime(System.currentTimeMillis());
        scheduleTaskActionService.submit(taskAction);//初始化任务,幂等可重复执行
    }

    @Override
    public String getInterfaceName() {return PetTalent.MODEL_MODEL;}

    @Override
    @Function
    public Result<Void> execute(ScheduleItem item) {
        log.info("testAutoTask,上次执行时间"+item.getLastExecuteTime());
        return new Result<>();
    }
}Step2 修改DemoModuleBizInit,进行定时任务初始化
模块更新的时候调用
petTalentAutoTask.initTask(),initTask本身是幂等的所以多掉几次没有关系。在4.1.3【模块之生命周期】一文介绍过InstallDataInit、UpgradeDataInit、ReloadDataInit,您有兴趣可以去回顾下。
package pro.shushi.pamirs.demo.core.init;

import org.springframework.beans.factory.annotation.Autowired;
import org.springframework.stereotype.Component;
import pro.shushi.pamirs.boot.common.api.command.AppLifecycleCommand;
import pro.shushi.pamirs.boot.common.api.init.InstallDataInit;
import pro.shushi.pamirs.boot.common.api.init.ReloadDataInit;
import pro.shushi.pamirs.boot.common.api.init.UpgradeDataInit;
import pro.shushi.pamirs.demo.api.DemoModule;
import pro.shushi.pamirs.demo.api.enumeration.DemoExpEnumerate;
import pro.shushi.pamirs.demo.core.task.PetTalentAutoTask;
import pro.shushi.pamirs.meta.common.exception.PamirsException;

import java.util.Collections;
import java.util.List;

@Component
public class DemoModuleBizInit implements InstallDataInit,
    UpgradeDataInit, ReloadDataInit {

    @Autowired
    private PetTalentAutoTask petTalentAutoTask;

    @Override
    public boolean upgrade(AppLifecycleCommand command, String version,
                           String existVersion) {
        petTalentAutoTask.initTask(); //初始化petTalent的定时任务
        return Boolean.TRUE;
    }

    @Override
    public List<String> modules() {
        return Collections.singletonList(DemoModule.MODULE_MODULE);
    }

    @Override
    public int priority() {return 0;}
}
Step3 重启看效果

Oinone社区 作者:史, 昂原创文章,如若转载,请注明出处:https://doc.oinone.top/oio4/9285.html
访问Oinone官网:https://www.oinone.top获取数式Oinone低代码应用平台体验