4.1.14 Search之非存储字段条件

search默认查询的是模型的queryPage函数,但我们有时候需要替换调用的函数,这个特性会在下个版本支持。其核心场景为当搜索条件中有非存储字段,如果直接用queryPage函数的rsql拼接就会报错,所以非存储字段不会增加在rsql中。本文介绍一个比较友好的临时替代方案。

非存储字段条件(举例)

Step1 为PetTalent新增一个非存储字段unStore

 @Field(displayName = "非存储字段测试",store = NullableBoolEnum.FALSE)
 private String unStore;

图4-1-14-1 为PetTalent新增一个非存储字段unStore

Step2 修改PetTalent的Table视图的Template

标签内增加一个查询条件

<field data="unStore" />

图4-1-14-2 修改PetTalent的Table视图的Template

Step3 重启看效果

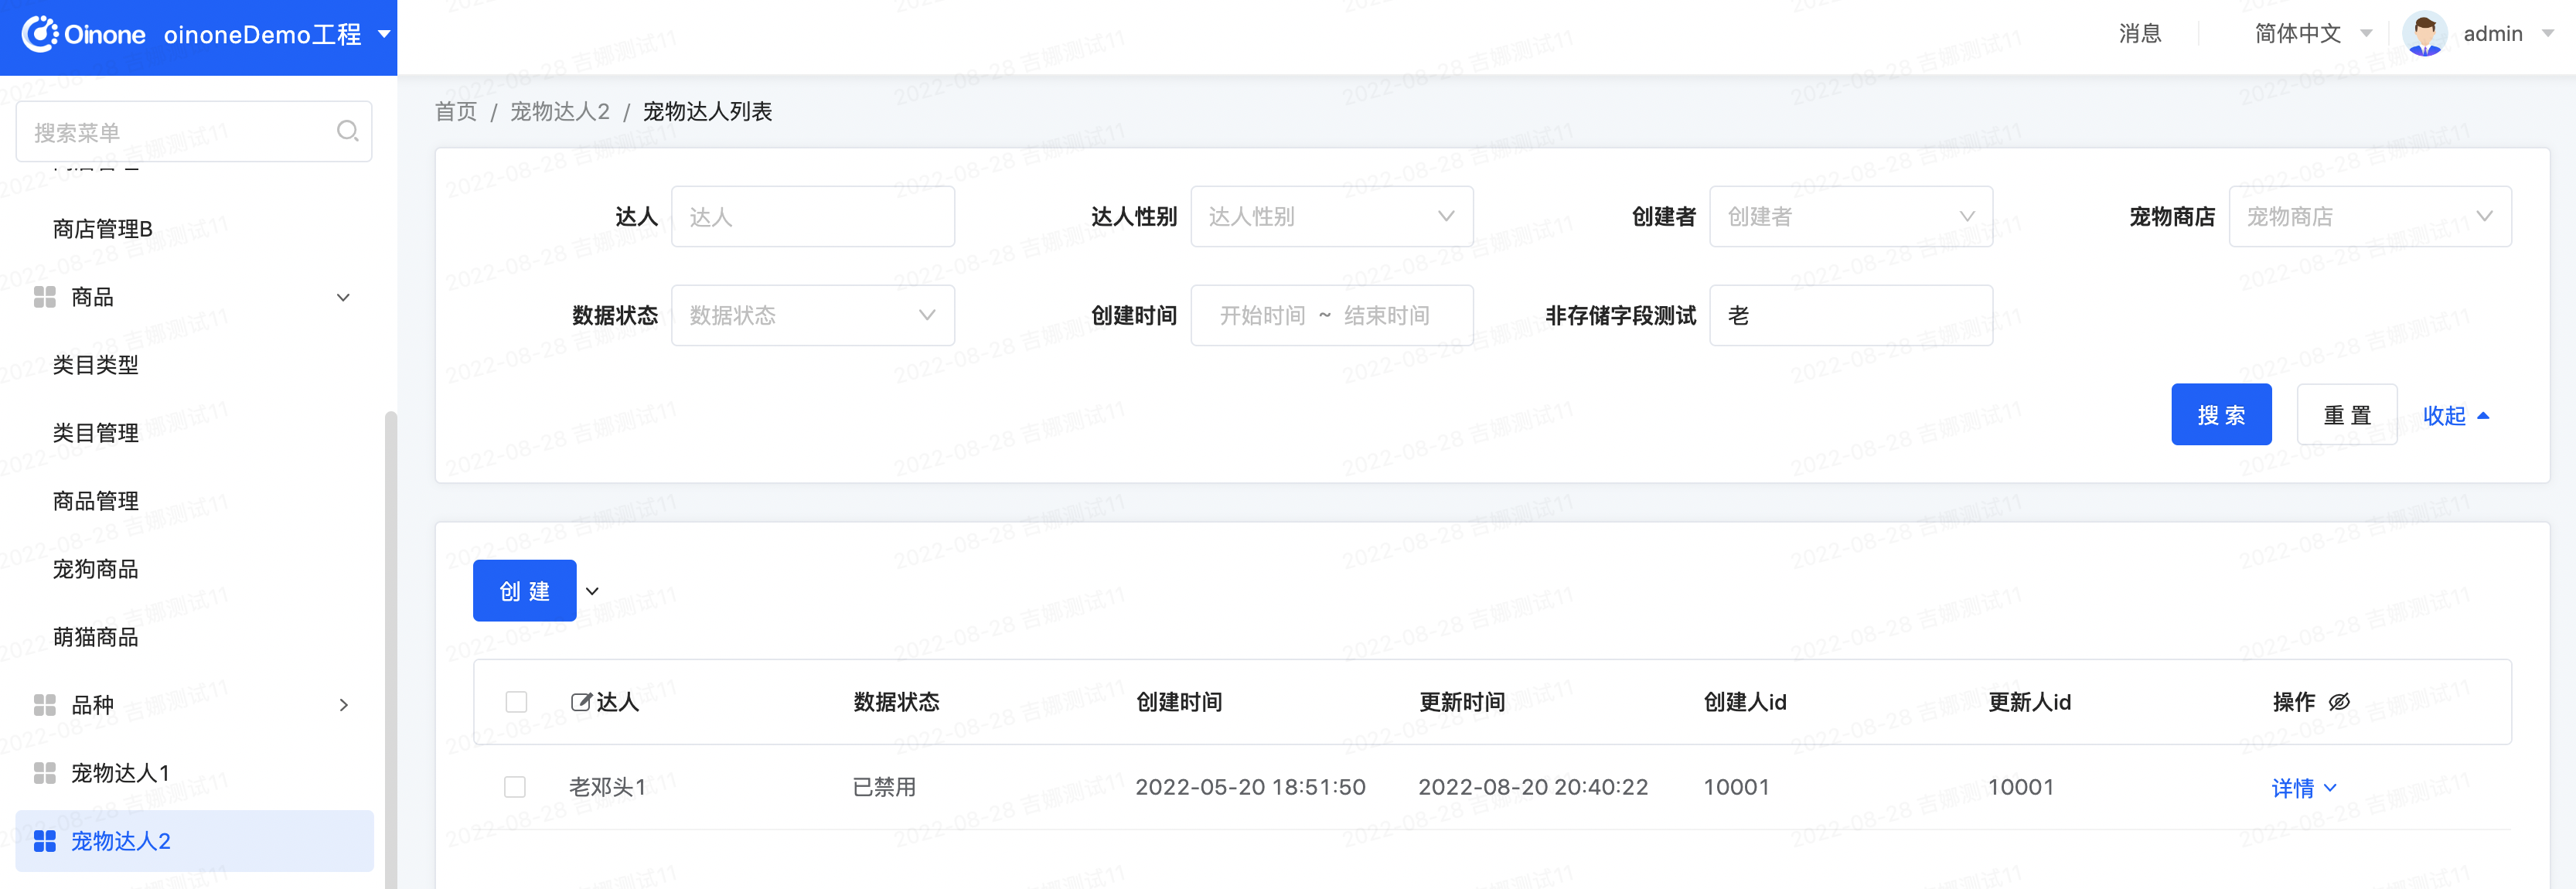
进入宠物达人列表页,在搜索框【非存储字段测试】输入查询内容,点击搜索跟无条件一致

Step4 修改PetTalentAction的queryPage方法

package pro.shushi.pamirs.demo.core.action;
…… 引入依赖类
@Model.model(PetTalent.MODEL_MODEL)
@Component
public class PetTalentAction {
 ……其他代码
 @Function.Advanced(type= FunctionTypeEnum.QUERY)
 @Function.fun(FunctionConstants.queryPage)
 @Function(openLevel = {FunctionOpenEnum.API})
 public Pagination<PetTalent> queryPage(Pagination<PetTalent> page, IWrapper<PetTalent> queryWrapper){
 QueryWrapper<PetTalent> queryWrapper1 = (QueryWrapper<PetTalent>) queryWrapper;
 Map<String, Object> queryData = queryWrapper.getQueryData();
 String unStore = (String) queryData.get(LambdaUtil.fetchFieldName(PetTalent::getUnStore));
 if (StringUtils.isNotEmpty(unStore)) {
 //转换查询条件
 queryWrapper1.like(

图4-1-14-3 修改PetTalentAction的queryPage方法

Step5 重启看效果

在搜索框【非存储字段测试】输入查询内容,跟通过【达人】字段搜索的效果是一致的

image.png

图4-1-14-4 示例效果

Oinone社区 作者:史, 昂原创文章,如若转载,请注明出处:https://doc.oinone.top/oio4/9289.html

访问Oinone官网:https://www.oinone.top获取数式Oinone低代码应用平台体验

(0)
史, 昂的头像史, 昂数式管理员
上一篇 2024年5月23日
下一篇 2024年5月23日

相关推荐

  • 4.1.10 函数之触发与定时(改)

    函数的触发和定时在很多场景中会用到,也是一个oinone的基础能力。比如我们的流程产品中在定义流程触发时就会让用户选择模型触发还是时间触发,就是用到了函数的触发与定时能力。 整体链路示意图(如下图4-1-10-1 所示),本文只讲trigger里的两类任务,一个是触发任务,一个是定时任务,异步任务放在4.1.11【函数之异步执行】一文中单独去介绍。 图4-1-10-1 整体链路示意图 一、触发任务TriggerTaskAction(举例) 触发任务的创建,使用pamirs-middleware-canal监听mysql的binlog事件,通过rocketmq发送变更数据消息,收到MQ消息后,创建TriggerAutoTask。 触发任务的执行,使用TBSchedule拉取触发任务后,执行相应函数。 注意:pamirs-middleware-canal监听的数据库表必须包含触发模型的数据库表。 Step1 下载canal中间件 下载pamirs-middleware-canal-deployer-3.0.1.zip,去.txt后缀为pamirs-middleware-canal-deployer-3.0.1.zip,解压文件如下: 图4-1-10-2 下载canal中间件 Step2 引入依赖pamirs-core-trigger模块 pamirs-demo-api增加pamirs-trigger-api <dependency> <groupId>pro.shushi.pamirs.core</groupId> <artifactId>pamirs-trigger-api</artifactId> </dependency> 图4-1-10-3 pamirs-trigger-api依赖包 DemoModule在模块依赖定义中增加@Module(dependencies={TriggerModule.MODULE_MODULE}) @Component @Module( name = DemoModule.MODULE_NAME, displayName = "oinoneDemo工程", version = "1.0.0", dependencies = {ModuleConstants.MODULE_BASE, CommonModule.MODULE_MODULE, UserModule.MODULE_MODULE, TriggerModule.MODULE_MODULE} ) @Module.module(DemoModule.MODULE_MODULE) @Module.Advanced(selfBuilt = true, application = true) @UxHomepage(PetShopProxy.MODEL_MODEL) public class DemoModule implements PamirsModule { ……其他代码 } 图4-1-10-4 模块依赖中增加Trigger模块 pamirs-demo-boot 增加pamirs-trigger-core和pamirs-trigger-bridge-tbschedule的依赖 <dependency> <groupId>pro.shushi.pamirs.core</groupId> <artifactId>pamirs-trigger-core</artifactId> </dependency> <dependency> <groupId>pro.shushi.pamirs.core</groupId> <artifactId>pamirs-trigger-bridge-tbschedule</artifactId> </dependency> 图4-1-10-5 增加pamirs-trigger-core和pamirs-trigger-bridge-tbschedule的依赖 修改pamirs-demo-boot的applcation-dev.yml 修改pamris.event.enabled和pamris.event.schedule.enabled为true pamirs_boot_modules增加启动模块:trigger pamirs: event: enabled: true schedule: enabled: true rocket-mq: namesrv-addr: 127.0.0.1:9876 boot: init: true sync: true modules: – base – common – sequence – resource – user – auth – message – international – business – trigger – demo_core 图4-1-10-6 启动模块中增加trigger模块 Step3 启动canal中间件 canal的库表需要手工建 create schema canal_tsdb collate utf8mb4_bin 图4-1-10-7 canal的建库语句 CREATE TABLE IF NOT EXISTS `meta_snapshot` ( `id` bigint(20) unsigned NOT NULL AUTO_INCREMENT COMMENT '主键', `gmt_create` datetime NOT NULL COMMENT '创建时间', `gmt_modified` datetime NOT NULL COMMENT '修改时间', `destination` varchar(128) DEFAULT NULL COMMENT '通道名称', `binlog_file` varchar(64) DEFAULT NULL COMMENT 'binlog文件名', `binlog_offest` bigint(20) DEFAULT NULL COMMENT 'binlog偏移量', `binlog_master_id` varchar(64) DEFAULT NULL COMMENT 'binlog节点id', `binlog_timestamp` bigint(20) DEFAULT NULL…

    2024年5月23日
    1.4K00
  • 4.1.18 框架之网关协议-Variables变量

    我们在应用开发过程有一种特殊情况在后端逻辑编写的时候需要知道请求的发起入口,平台利用GQL协议中的Variables属性来传递信息,本文就介绍如何获取。 一、前端附带额外变量 属性名 类型 说明 scene String 菜单入口 表4-1-18-1 前端附带额外变量 图4-1-18-1 variables信息中的scene 二、后端如何接收variables信息 通过PamirsSession.getRequestVariables()可以得到PamirsRequestVariables对象。 三、第一个variable(举例) Step1 修改PetTalentAction,获取得到前端传递的Variables package pro.shushi.pamirs.demo.core.action; ……类引用 @Model.model(PetTalent.MODEL_MODEL) @Component public class PetTalentAction { ……其他代码 @Function.Advanced(type= FunctionTypeEnum.QUERY) @Function.fun(FunctionConstants.queryPage) @Function(openLevel = {FunctionOpenEnum.API}) public Pagination<PetTalent> queryPage(Pagination<PetTalent> page, IWrapper<PetTalent> queryWrapper){ String scene = (String)PamirsSession.getRequestVariables().getVariables().get("scene"); System.out.println("scene: "+ scene); ……其他代码 } ……其他代码 } 图4-1-18-2 修改PetTalentAction Step2 重启验证 点击宠物达人不同菜单入口,查看效果 图4-1-18-3 示例效果(一) 图4-1-18-4 示例效果(二)

    2024年5月23日
    1.1K00
  • 3.5.7.3 自定义布局

    布局是什么 在系统中,布局决定了母版内的页面元素,一个页面可以由多个组件进行组装,布局可以根据视图类型来替换。 默认布局范围: 图3-5-7-36 默认布局范围 作用场景 系统内置了多个布局组件,这些组件适用于全局、某个应用或某个页面,提供了灵活的布局定制选项。这些组件根据不同类型的视图进行了默认的组装,这也是选择了视图类型后,页面能够呈现的原因。当然,这些默认的组装是可以被覆盖、新增和添加新组件的。 使用registerLayout进行自定义布局 开发者在使用这些布局组件时,应该遵循公司的规范进行统一的调整。自定义布局组件的使用可通过 registerLayout 实现。registerLayout 的第一个参数是代表布局的 XML,第二个参数是不同的选项维度,默认包含以下维度: viewType: 视图类型 module: 视图模型所在模块 moduleName: 视图模型所在模块名称 model: 视图模型编码 modelName: 视图模型名称 viewName: 视图名称 actionName: 动作名称 inline: 是否内嵌视图(子视图特有) ttype: 模型字段类型(子视图特有) relatedTtype: 关联模型字段类型(子视图特有) field: 字段(子视图特有) 需要注意的是,动作可以是A模块下的a模型,这个动作可以打开B模块下的b模型的视图,module、moduleName、model、modelName应该填b模型对应的值,只不过大部分场景我们都是本模型的动作打开本模型的视图,所以这些场景拿动作所在模型填这些值也可以这些纬度也可以通过查看TS的定义查看 全局 在系统中,我们可以通过指定视图类型来决定某一类视图的全局布局。以表格为例,当第二个入参为 { viewType: ViewType.Table } 时,代表了替换了系统内所有表格的布局样式。 示例工程目录 以下是需关注的工程目录示例,main.ts更新导入./layout,layout/index.ts更新导出./tableLayout: 图3-5-7-37 全局纬度注册布局工程目录示例 示例代码 import {registerLayout, ViewType} from '@kunlun/dependencies' /** * 把系统内所有表格类型视图的全局动作放入搜索区域 * * 移动actionBar布局至外层 * <element widget="actionBar" slot="actionBar" slotSupport="action"> * <xslot name="actions" slotSupport="action" /> * </element> * */ const registerGlobalTableLayout = () => { return registerLayout(`<view type="TABLE"> <element widget="actionBar" slot="actionBar" slotSupport="action"> <xslot name="actions" slotSupport="action" /> </element> <pack widget="group"> <view type="SEARCH"> <element widget="search" slot="search" slotSupport="field" /> </view> </pack> <pack widget="group" slot="tableGroup"> <element widget="table" slot="table" slotSupport="field"> <element widget="expandColumn" slot="expandRow" /> <xslot name="fields" slotSupport="field" /> <element widget="rowActions" slot="rowActions" slotSupport="action" /> </element> </pack> </view>`, { viewType: ViewType.Table }) } registerGlobalTableLayout() 图3-5-7-38 全局纬度注册布局代码示例 效果 图3-5-7-39 全局纬度注册布局效果示例 应用 在系统中,我们可以通过指定视图类型和模块名称来替换某一类视图在特定模块下的全局布局。以表格为例,当第二个入参为 { viewType: ViewType.Table, moduleName: ‘resource’ } 时,代表了替换了资源应用下所有表格的布局样式,而其他应用仍使用默认布局 import {registerLayout, ViewType} from '@kunlun/dependencies' const registerModuleTableLayout = () => { return registerLayout(`<view type="TABLE"> <element widget="actionBar" slot="actionBar" slotSupport="action"> <xslot name="actions" slotSupport="action" /> </element> <pack widget="group"> <view type="SEARCH"> <element widget="search" slot="search" slotSupport="field" /> </view> </pack> <pack…

    2024年5月23日
    1.2K00
  • 3.5.2.3 构建View的Layout

    在日常需求中也经常需要调整Layout的情况,如出现树表结构(左树右表、级联),我们则需要通过修改View的Layout来完成。今天就带您学习下Layout的自定义 第一个表格Layout 如果我们想去除表格视图区域的搜索区、ActionBar(操作区),就可以为视图自定义一个简单的Layout就行啦 Step1 新建一个表格的Layout 在views/demo_core/layout路径下增加一个名为sample_table_layout.xml文件,name设置为sampleTableLayout <view type="TABLE" name="sampleTableLayout"> <!– <view type="SEARCH">–> <!– <pack widget="fieldset">–> <!– <element widget="search" slot="search" slotSupport="field"/>–> <!– </pack>–> <!– </view>–> <pack widget="fieldset" style="height: 100%" wrapperStyle="height: 100%"> <pack widget="row" style="height: 100%; flex-direction: column"> <!– <pack widget="col" mode="full" style="flex: 0 0 auto">–> <!– <element widget="actionBar" slot="actionBar" slotSupport="action">–> <!– <xslot name="actions" slotSupport="action" />–> <!– </element>–> <!– </pack>–> <pack widget="col" mode="full" style="min-height: 234px"> <element widget="table" slot="table" slotSupport="field"> <xslot name="fields" slotSupport="field" /> <element widget="rowAction" slot="rowActions" slotSupport="action"/> </element> </pack> </pack> </pack> </view> 图3-5-2-27 新建一个表格的Layout Step2 修改宠物达人自定义表格Template 在view标签上增加layout属性值为"sampleTableLayout" <view name="tableView" model="demo.PetTalent" cols="1" type="TABLE" enableSequence="true" layout="sampleTableLayout"> ……省略其他 </view> 图3-5-2-28 修改宠物达人自定义表格Template Step3 重启看效果 图3-5-2-29 示例效果 Step4 修改宠物达人自定义表格Template 去除在view标签上的layout属性配置,让其回复正常 第一个树表Layout 本节以“给商品管理页面以树表的方式增加商品类目过滤”为例 Step1 增加商品类目模型 增加PetItemCategory模型继承CodeModel,新增两个字段定义name和parent,其中parent字段M2O关联自身模型,非必填字段(如字段值为空即为一级类目): package pro.shushi.pamirs.demo.api.model; import pro.shushi.pamirs.meta.annotation.Field; import pro.shushi.pamirs.meta.annotation.Model; import pro.shushi.pamirs.meta.base.common.CodeModel; @Model.model(PetItemCategory.MODEL_MODEL) @Model(displayName = "宠物商品类目",summary="宠物商品类目",labelFields={"name"}) public class PetItemCategory extends CodeModel { public static final String MODEL_MODEL="demo.PetItemCategory"; @Field(displayName = "类目名称",required = true) private String name; @Field(displayName = "父类目") @Field.many2one private PetItemCategory parent; } 图3-5-2-30 增加商品类目模型 Step2 修改自定义商品模型 为商品模型PetItem增加一个category字段m2o关联PetItemCategory @Field(displayName = "类目") @Field.many2one private PetItemCategory category; 图3-5-2-31 修改宠物商品模型 Step3 新增名为treeTableLayout的Layout 在views/demo_core/layout路径下增加一个名为tree_table_layout.xml文件,name设置为treeTableLayout 图3-5-2-32 新增名为treeTableLayout的Layout <view type="TABLE" name="treeTableLayout"> <view type="SEARCH"> <pack widget="fieldset"> <element widget="search" slot="search" slotSupport="field"/> </pack> </view> <pack…

    2024年5月23日
    1.0K00

Leave a Reply

登录后才能评论