
我们在很多时候需要自定义模型的管理页面,而不是直接使用默认页面,比如字段的展示与隐藏,Action是否在这个页面上出现,搜索条件自定义等等,那么本章节带您一起学习如何自定义View的Template。
自定义View的Template
在使用默认layout的情况下,我们来做几个自定义视图Template,并把文件放到指定目录下。


第一个Tabel
Step1 自定义PetTalent的列表
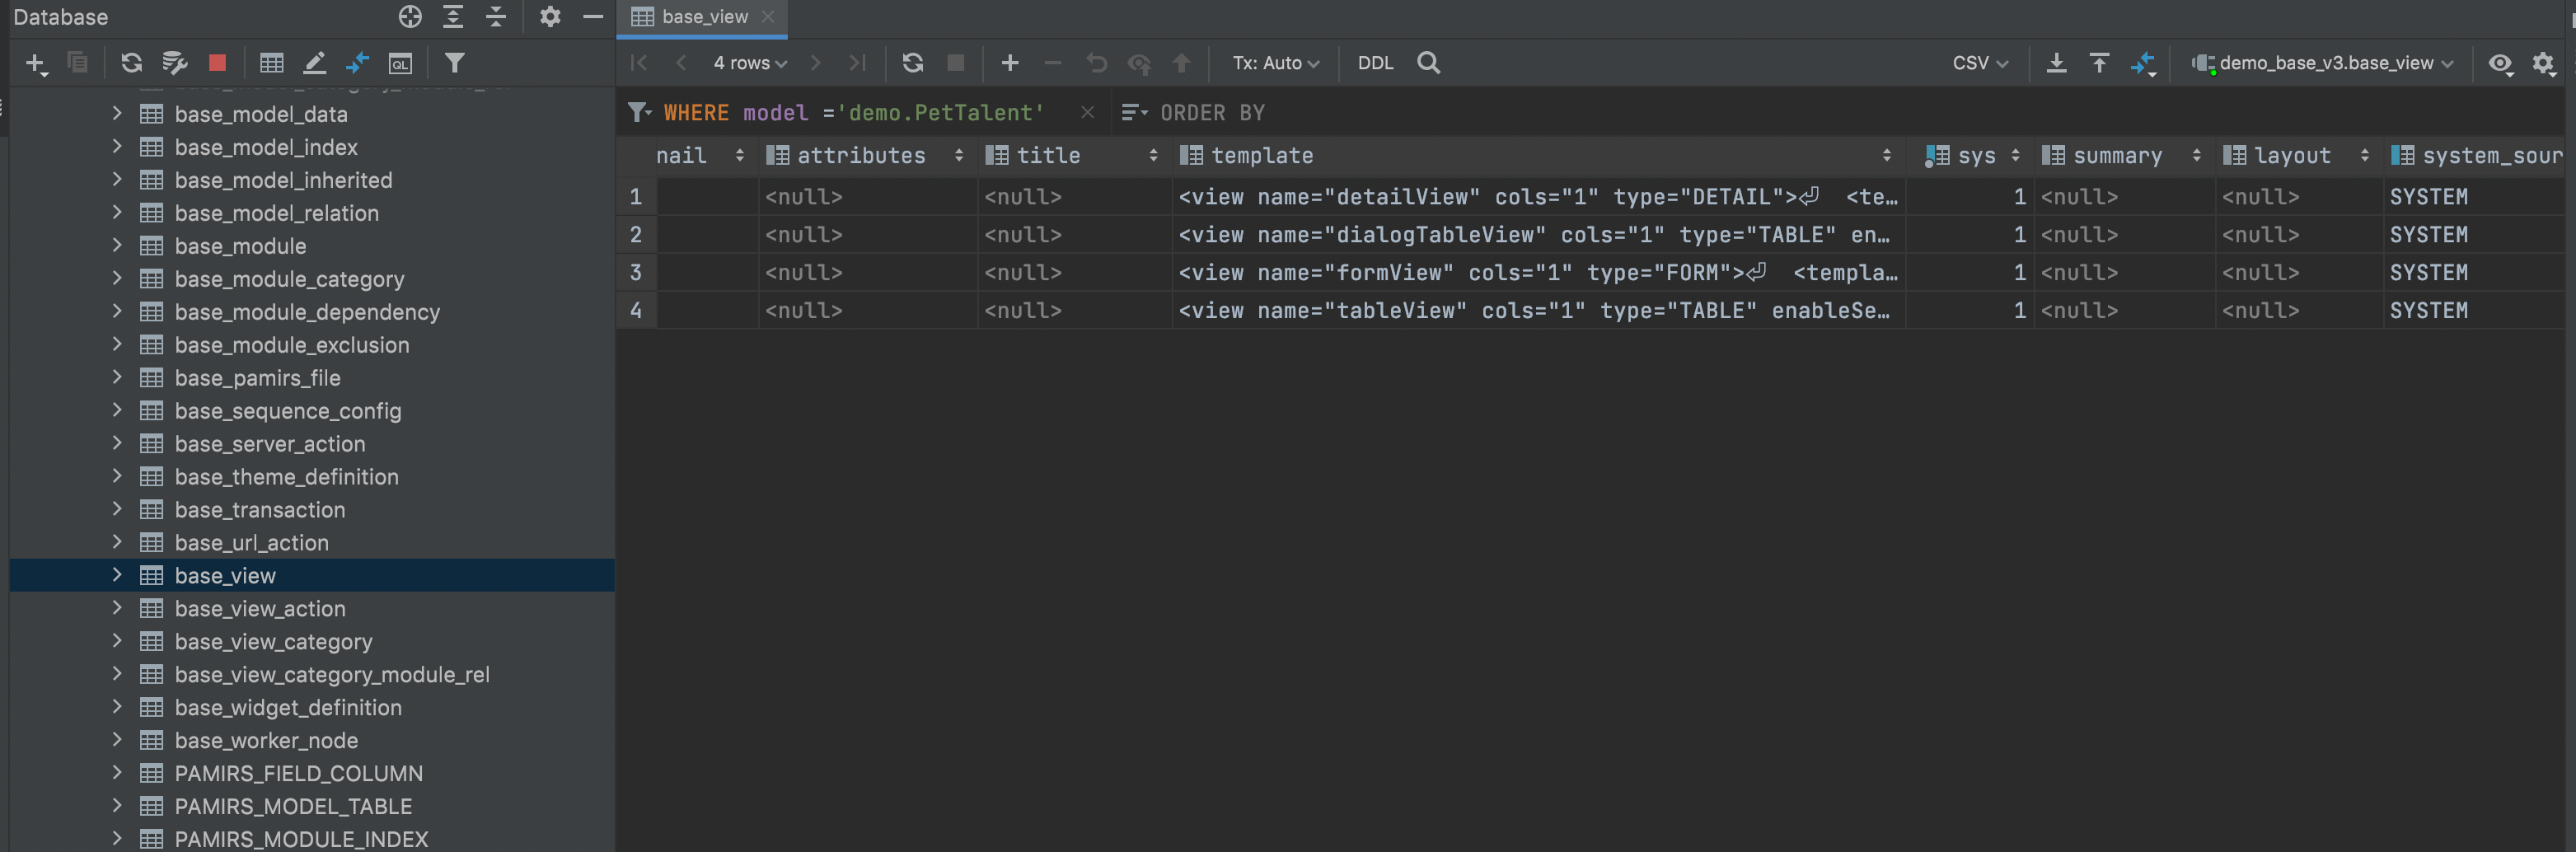
- 我们先通过数据库查看默认页面定义,找到base_view表,过滤条件设置为model =\'demo.PetTalent\',我们就看到该模型下对应的所有view,这些是系统根据该模型的ViewAction对应生成的默认视图,找到类型为【表格(type = TABLE)】的记录,查看template字段。
<view name="tableView" cols="1" type="TABLE" enableSequence="false">
<template slot="actions" autoFill="true"/>
<template slot="rowActions" autoFill="true"/>
<template slot="fields">
<field invisible="true" data="id" label="ID" readonly="true"/>
<field data="name" label="达人"/>
<field data="dataStatus" label="数据状态">
<options>
<option name="DRAFT" displayName="草稿" value="DRAFT" state="ACTIVE"/>
<option name="NOT_ENABLED" displayName="未启用" value="NOT_ENABLED" state="ACTIVE"/>
<option name="ENABLED" displayName="已启用" value="ENABLED" state="ACTIVE"/>
<option name="DISABLED" displayName="已禁用" value="DISABLED" state="ACTIVE"/>
</options>
</field>
<field data="createDate" label="创建时间" readonly="true"/>
<field data="writeDate" label="更新时间" readonly="true"/>
<field data="createUid" label="创建人id"/>
<field data="writeUid" label="更新人id"/>
</template>
<template slot="search" autoFill="true" cols="4"/>
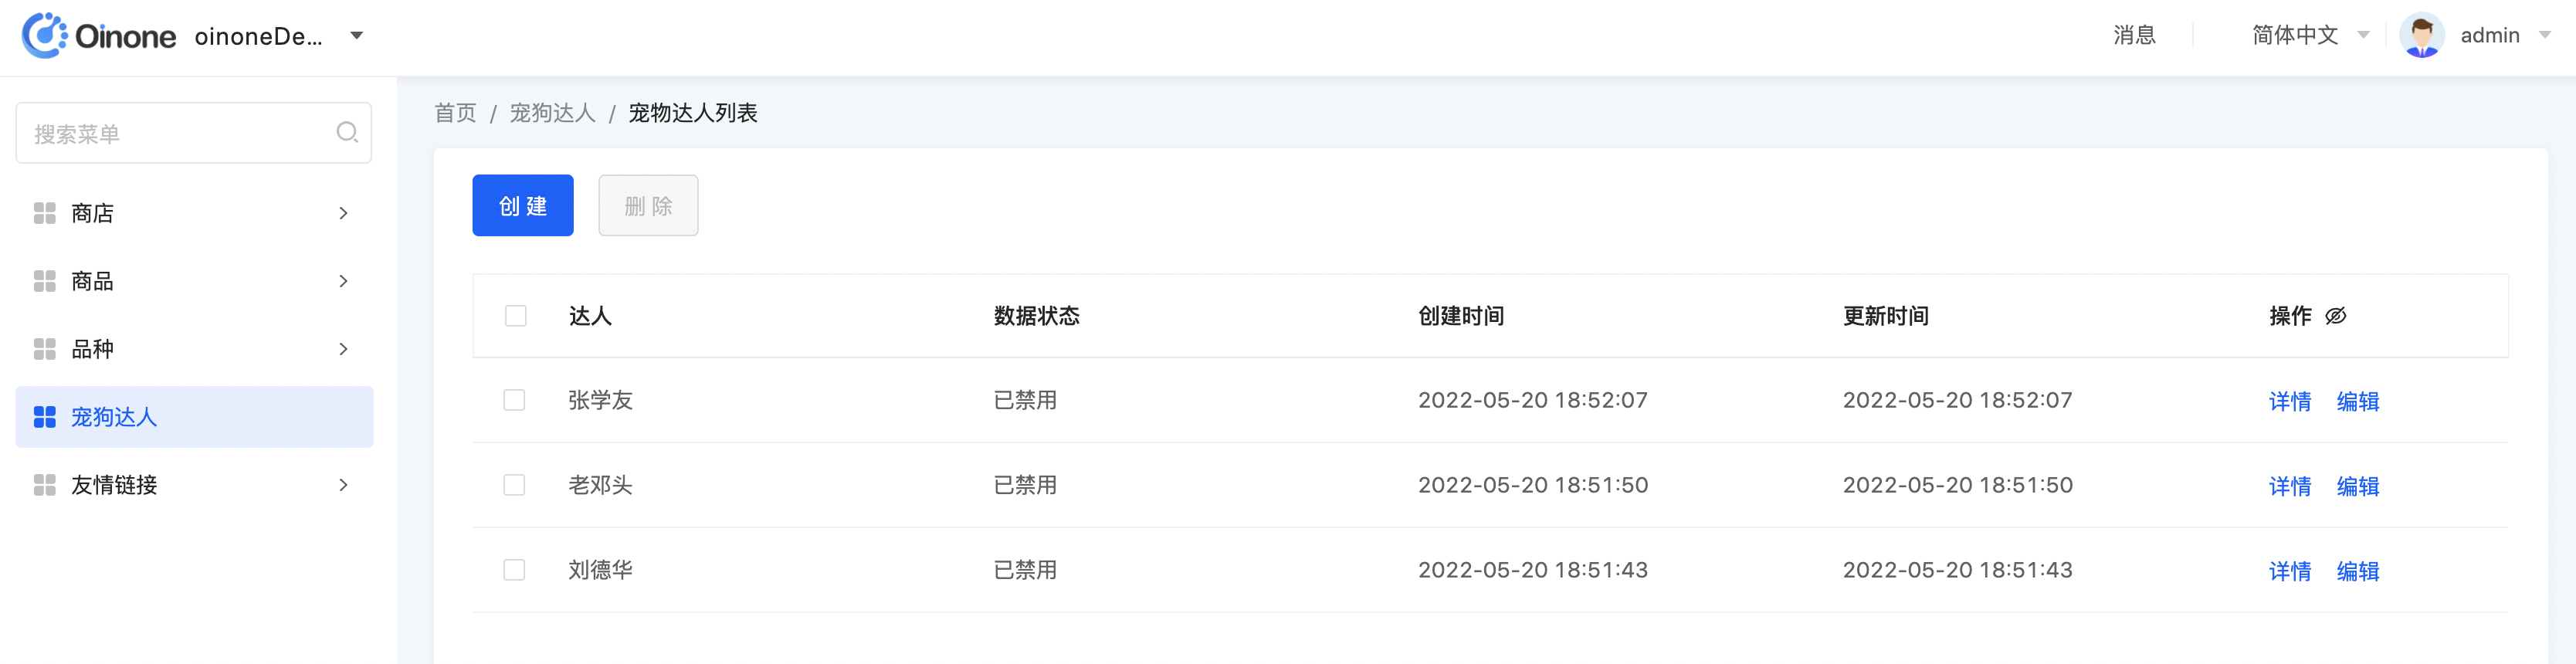
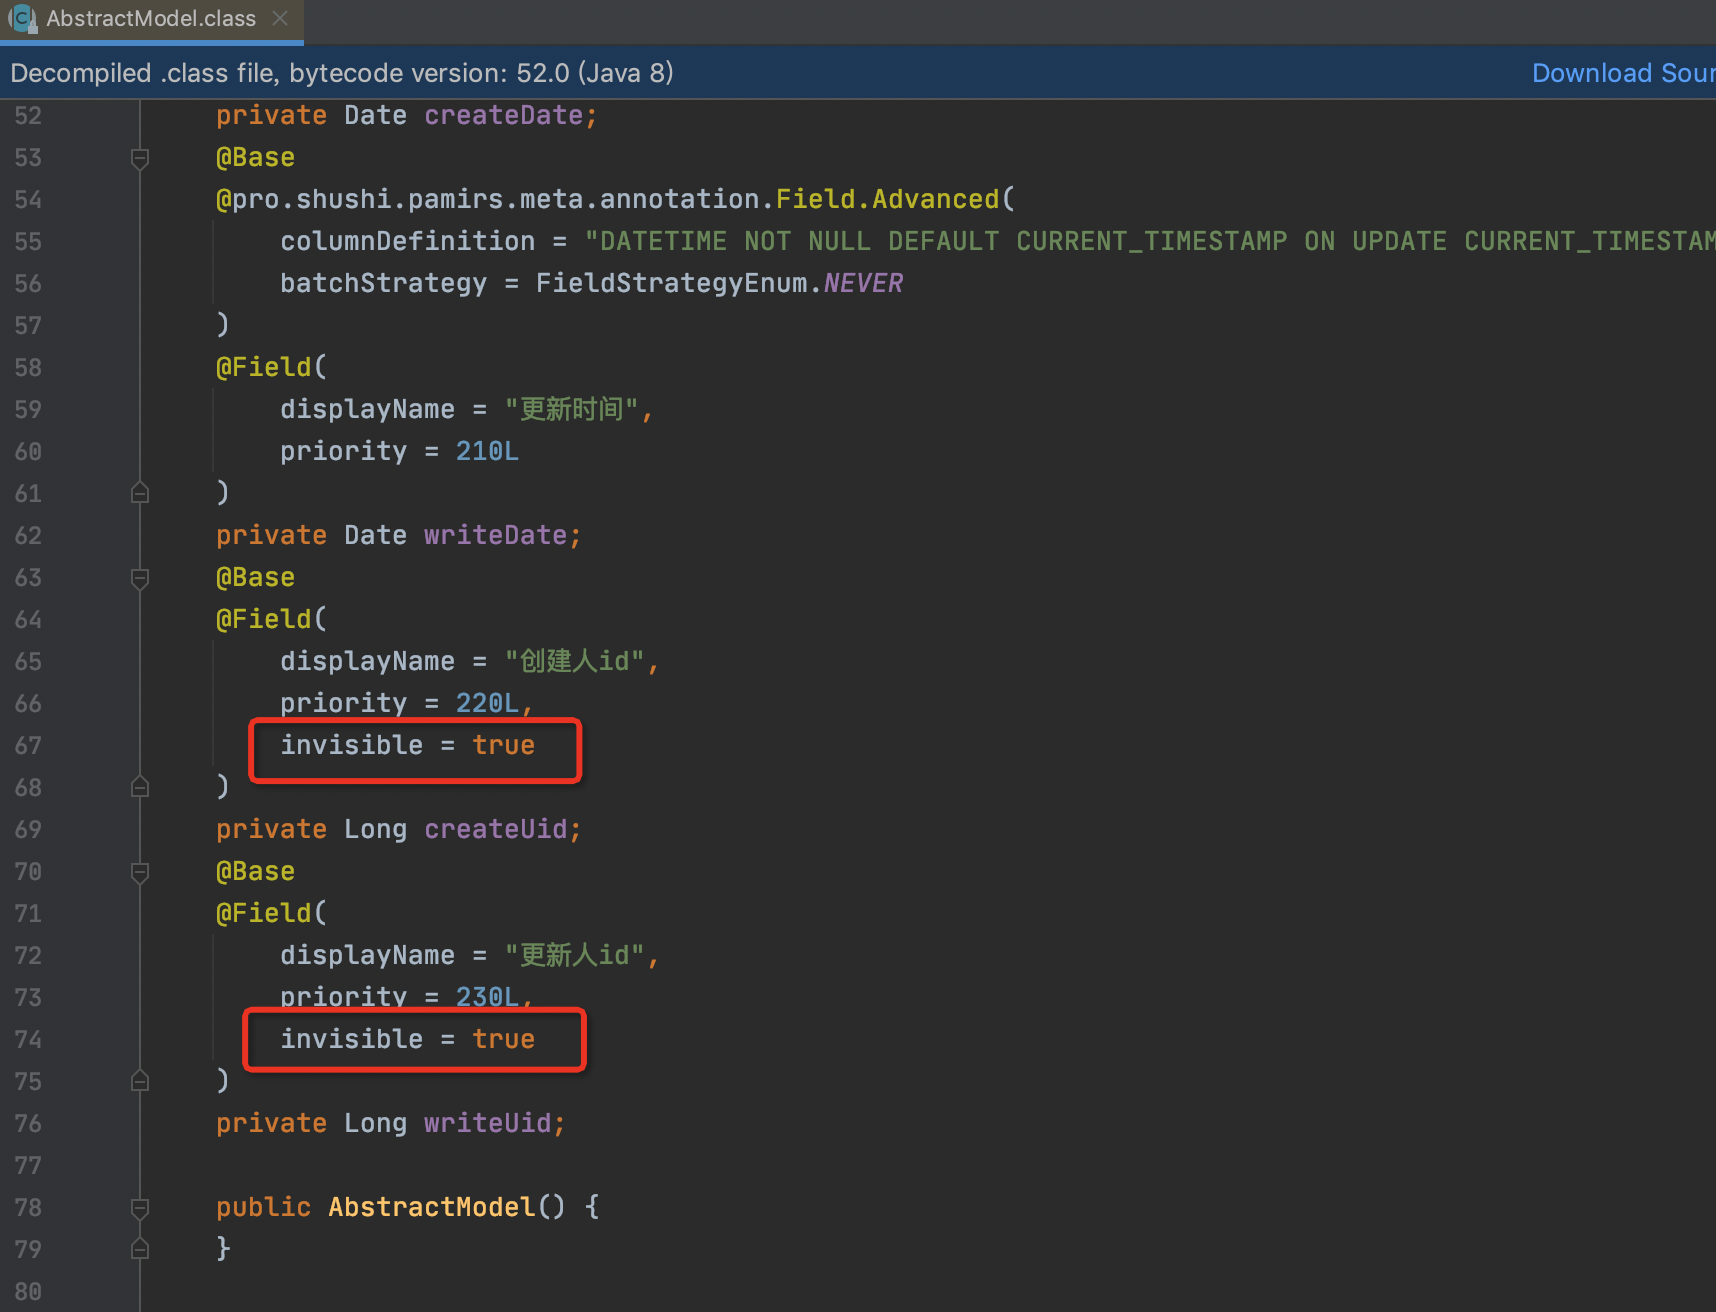
</view>- 对比view的template定义与页面差异,从页面上看跟view的定义少了,创建人id和更新人id。因为这两个字段元数据定义里invisible属性。
a. 当XML里面没有配置,则用元数据覆盖了。
b. 当XML里面配置了,则不会用元数据覆盖了。
在下一步中我们只要view的DSL中给这两个字段加上invisible="false"就可以展示出来了
- 新建pet_talent_table.xml文件放到对应的pamirs/views/demo_core/template目录下,内容如下
a. 对比默认视图,在自定义视图时需要额外增加属性model="demo.PetTalent"
b. name设置为"tableView",系统重启后会替换掉base_view表中model为"demo.PetTalent",name为"tableView",type为"TABLE"的数据记录。
ⅰ. name不同的但type相同,且viewAction没有指定时,根据优先级priority进行选择。小伙伴可以尝试修改name="tableView1",并设置priority为1,默认生成的优先级为10,越小越优先。
ccreateUid和writeUid字段,增加invisible="false"的属性定义
<view name="tableView" model="demo.PetTalent" cols="1" type="TABLE" enableSequence="false">
  <template slot="actions" autoFill="true"/>
  <template slot="rowActions" autoFill="true"/>
  <template slot="fields">
    <field invisible="true" data="id" label="ID" readonly="true"/>
    <field data="name" label="达人"/>
    <field data="dataStatus" label="数据状态">
      <options>
        <option name="DRAFT" displayName="草稿" value="DRAFT" state="ACTIVE"/>
        <option name="NOT_ENABLED" displayName="未启用" value="NOT_ENABLED" state="ACTIVE"/>
        <option name="ENABLED" displayName="已启用" value="ENABLED" state="ACTIVE"/>
        <option name="DISABLED" displayName="已禁用" value="DISABLED" state="ACTIVE"/>
      </options>
    </field>
    <field data="createDate" label="创建时间" readonly="true"/>
    <field data="writeDate" label="更新时间" readonly="true"/>
    <field data="createUid" label="创建人id" invisible="false"/>
    <field data="writeUid" label="更新人id" invisible="false"/>
  </template>
  <template slot="search" autoFill="true" cols="4"/>
</view>Step2 重启应用看效果

第一个Form
Step1 自定义PetTalent的编辑页
-
我们先通过数据库查看默认页面定义,找到base_view表,过滤条件设置为model =\'demo.PetTalent\',我们就看到该模型下对应的所有view,这些是系统根据该模型的ViewAction对应生成的默认视图,找到类型为【表单(type = FORM)】的记录,查看template字段。
-
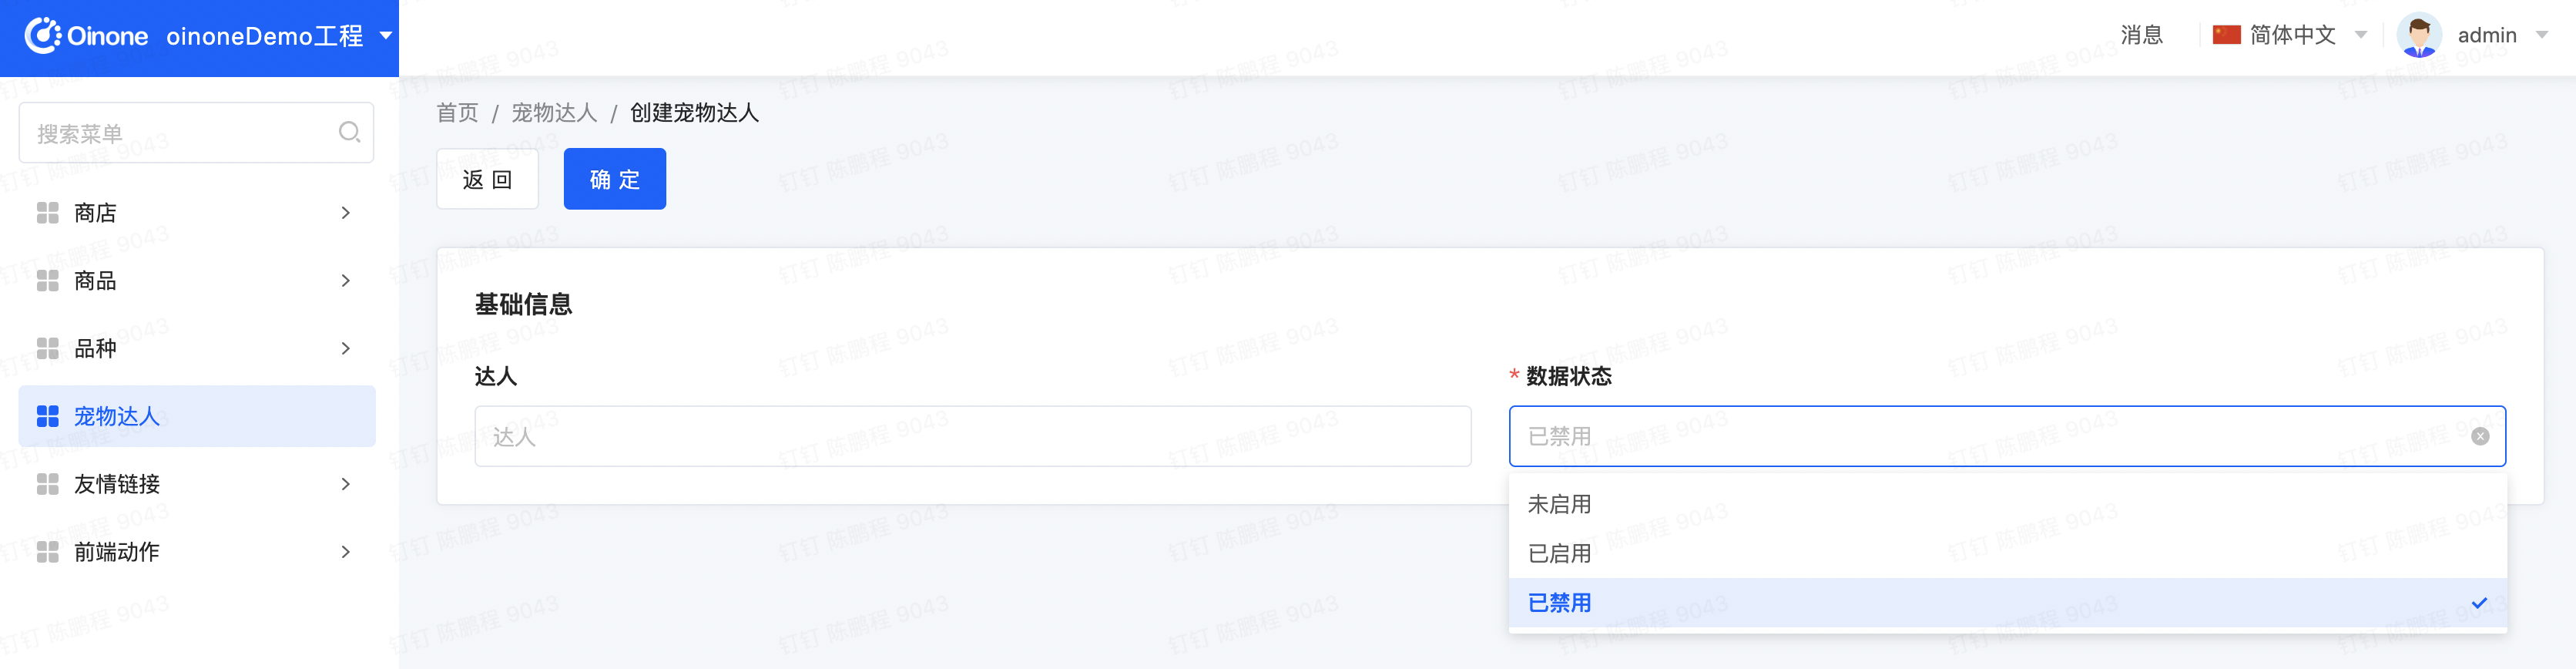
新建一个pet_talent_form.xml文件放在对应的pamirs/views/demo_core/template目录下,把数据状态下拉选项去除一个【草稿】选项
a. 对比默认视图,在自定义视图时需要额外增加属性model="demo.PetTalent" bname设置为"formView1",系统重启后会在base_view表中新增一个model为"demo.PetTalent",name为"formView1",type为"FORM",并设置priority为1 的数据记录。
ⅰ. name不同的但type相同,且viewAction没有指定时,根据优先级priority进行选择,默认生成的优先级为10,越小越优先。所以在此打开新增或编辑页面默认会路由到我们新配置的view上
<view name="formView1" model="demo.PetTalent" cols="2" type="FORM" priority="1">
  <template slot="actions" autoFill="true"/>
  <template slot="fields">
    <pack widget="group" title="基础信息">
      <field invisible="true" data="id" label="ID" readonly="true"/>
      <field data="name" label="达人"/>
      <field data="dataStatus" label="数据状态">
        <options>
          <!-- option name="DRAFT" displayName="草稿" value="DRAFT" state="ACTIVE"/ -->
          <option name="NOT_ENABLED" displayName="未启用" value="NOT_ENABLED" state="ACTIVE"/>
          <option name="ENABLED" displayName="已启用" value="ENABLED" state="ACTIVE"/>
          <option name="DISABLED" displayName="已禁用" value="DISABLED" state="ACTIVE"/>
        </options>
      </field>
      <field invisible="true" data="createDate" label="创建时间" readonly="true"/>
      <field invisible="true" data="writeDate" label="更新时间" readonly="true"/>
      <field data="createUid" label="创建人id"/>
      <field data="writeUid" label="更新人id"/>
    </pack>
  </template>
</view>Step2 重启看效果
第一个Detail
Step1 自定义PetTalent的详情页
-
我们先通过数据库查看默认页面定义,找到base_view表,过滤条件设置为model =\'demo.PetTalent\',我们就看到该模型下对应的所有view,这些是系统根据该模型的ViewAction对应生成的默认视图,找到类型为【表单(type = DETAIL)】的记录,查看template字段。
-
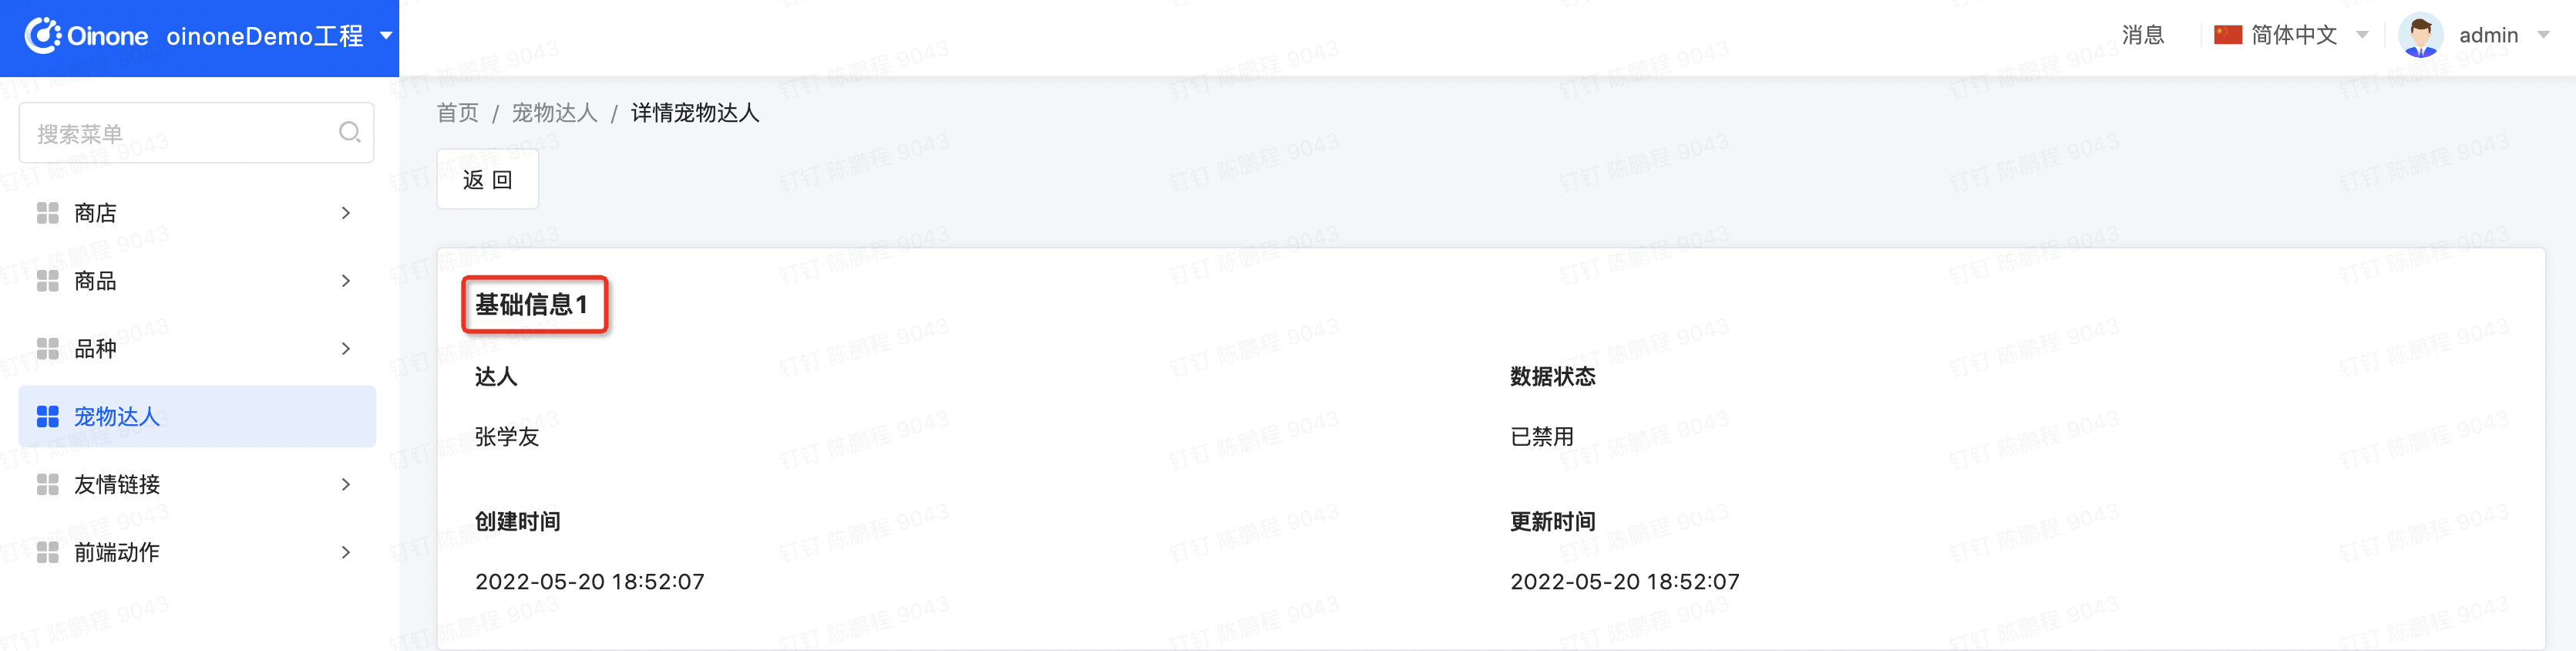
新建一个pet_talent_detail.xml文件放在pamirs-demo-core的pamirs/views/demo_core/template目录下
a. 对比默认视图,在自定义视图时需要额外增加属性model="demo.PetTalent"
b. 把分组的title从【基础信息】改成【基础信息1】
<view name="detailView" cols="2" type="DETAIL" model="demo.PetTalent">
  <template slot="actions" autoFill="true"/>
  <template slot="fields">
    <pack widget="group" title="基础信息1">
      <field invisible="true" data="id" label="ID" readonly="true"/>
      <field data="name" label="达人"/>
      <field data="dataStatus" label="数据状态">
        <options>
          <option name="DRAFT" displayName="草稿" value="DRAFT" state="ACTIVE"/>
          <option name="NOT_ENABLED" displayName="未启用" value="NOT_ENABLED" state="ACTIVE"/>
          <option name="ENABLED" displayName="已启用" value="ENABLED" state="ACTIVE"/>
          <option name="DISABLED" displayName="已禁用" value="DISABLED" state="ACTIVE"/>
        </options>
      </field>
      <field data="createDate" label="创建时间" readonly="true"/>
      <field data="writeDate" label="更新时间" readonly="true"/>
      <field data="createUid" label="创建人id"/>
      <field data="writeUid" label="更新人id"/>
    </pack>
  </template>
</view>Step2 重启看效果
第一个Search
Step1 自定义PetTalent的列表页的搜索项
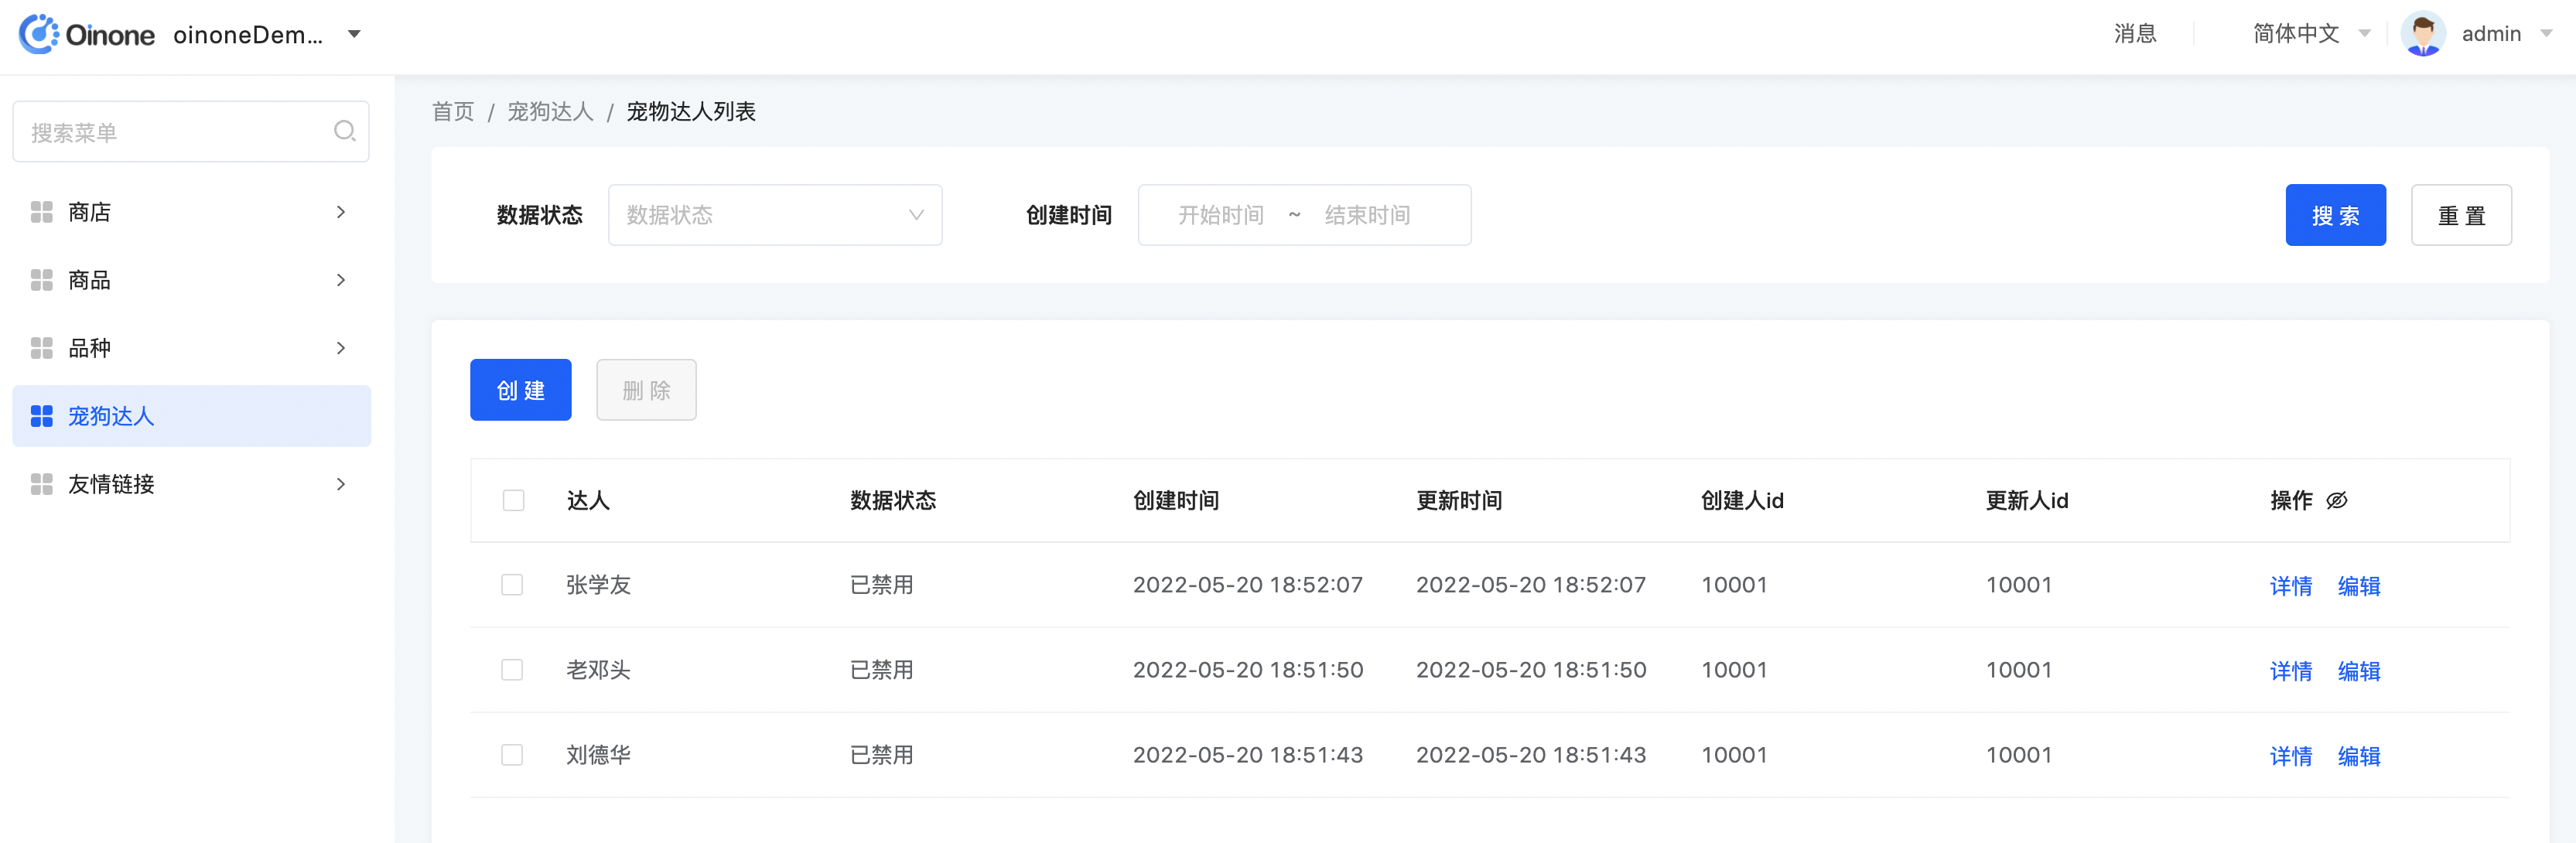
修改pet_talent_table.xml文件,默认情况下代表着跟表格的字段自动填充搜索字段,我们搜索条件只保留【数据状态】和【创建时间】
<view name="tableView" model="demo.PetTalent" cols="1" type="TABLE" enableSequence="true" baseLayoutName="">
    <template slot="actions" autoFill="true"/>
    <template slot="rowActions" autoFill="true"/>
    <template slot="fields">
        <field invisible="true" data="id" label="ID" readonly="true"/>
        <field data="name" label="达人"/>
        <field data="dataStatus" label="数据状态">
            <options>
                <option name="DRAFT" displayName="草稿" value="DRAFT" state="ACTIVE"/>
                <option name="NOT_ENABLED" displayName="未启用" value="NOT_ENABLED" state="ACTIVE"/>
                <option name="ENABLED" displayName="已启用" value="ENABLED" state="ACTIVE"/>
                <option name="DISABLED" displayName="已禁用" value="DISABLED" state="ACTIVE"/>
            </options>
        </field>
        <field data="createDate" label="创建时间" readonly="true"/>
        <field data="writeDate" label="更新时间" readonly="true"/>
        <field data="createUid" label="创建人id" invisible="false"/>
        <field data="writeUid" label="更新人id" invisible="false"/>
    </template>
    <template slot="search"  cols="4">
        <field data="dataStatus" label="数据状态">
            <options>
                <option name="DRAFT" displayName="草稿" value="DRAFT" state="ACTIVE"/>
                <option name="NOT_ENABLED" displayName="未启用" value="NOT_ENABLED" state="ACTIVE"/>
                <option name="ENABLED" displayName="已启用" value="ENABLED" state="ACTIVE"/>
                <option name="DISABLED" displayName="已禁用" value="DISABLED" state="ACTIVE"/>
            </options>
        </field>
        <field data="createDate" label="创建时间"/>
    </template>
</view>Step2 重启看效果
其他
search默认查询的是模型的queryPage函数,但我们有时候需要替换调用的函数,下个版本支持。其核心场景为当搜索条件中有非存储字段,如果直接用queryPage函数的rsql拼接就会报错。本版本临时替代方案见4.1.14【Search之非存储字段条件】一文。
Oinone社区 作者:史, 昂原创文章,如若转载,请注明出处:https://doc.oinone.top/oio4/9253.html
访问Oinone官网:https://www.oinone.top获取数式Oinone低代码应用平台体验