4.1.11 函数之异步执行

异步任务是非常常见的一种开发模式,它在分布式的开发模式中有很多应用场景如:

  1. 高并发场景中,我们一般采用把长流程切短,用异步方式去掉可以异步的非关键功能,缩小主流程响应时间,提升用户体验

  2. 异构系统的集成调用,通过异步任务完成解耦与自动重试

  3. 分布式系统最终一致性的可选方案

今天我们了解oinone是如何结合Spring+TbSchedule来完成异步任务

一、TbSchedule介绍

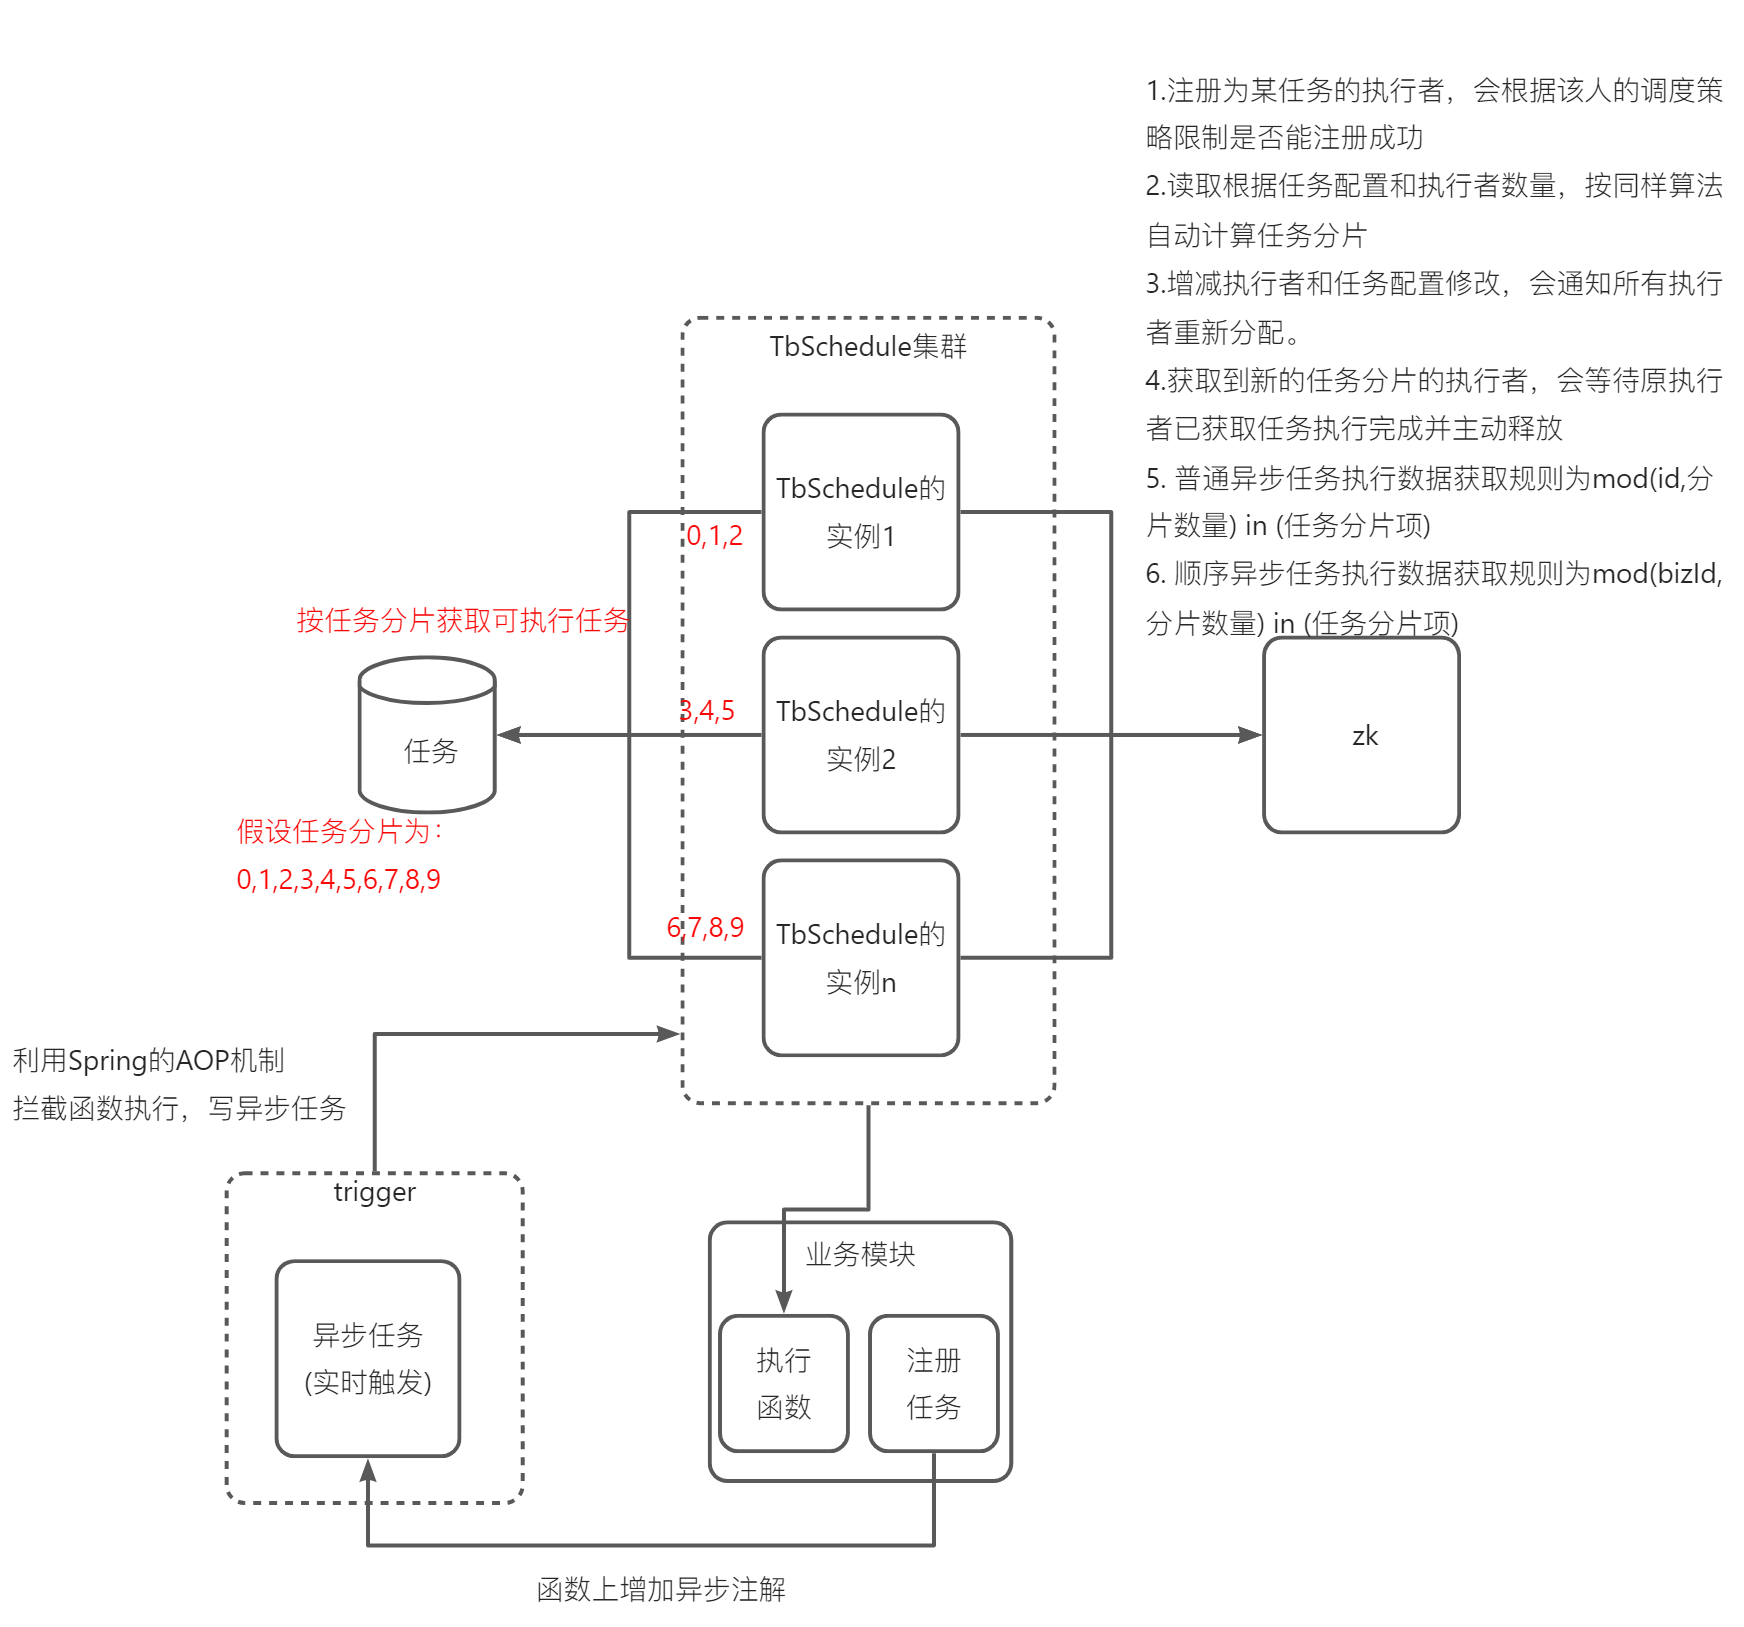
它是一个支持分布式的调度框架,让批量任务或者不断变化的任务能够被动态的分配到多个主机的JVM中,在不同的线程组中并行执行,所有的任务能够被不重复,不遗漏的快速处理。基于ZooKeeper的纯Java实现,由Alibaba开源。在互联网和电商领域TBSchedule的使用非常广泛,目前被应用于阿里巴巴、淘宝、支付宝、京东、聚美、汽车之家、国美等很多互联网企业的流程调度系统。也是笔者早期在阿里参与设计的一款产品。

oinone的异步任务执行原理(如下图4-1-11-1所示),先做一个大致了解:

4.1.11 函数之异步执行

图4-1-11-1 Oinone的异步任务执行原理图

基础管理工具

下载tbSchedule的控制台jar包去除文件后缀.txt(详见本书籍【附件一】)pamirs-middleware-schedule-console-3.0.1.jar.txt(31.2 MB)

启动控制台


java -jar pamirs-middleware-schedule-console-3.0.1.jar 

图4-1-11-2 控制台启动方式

访问地址


http://127.0.0.1:10014/schedule/index.jsp?manager=true
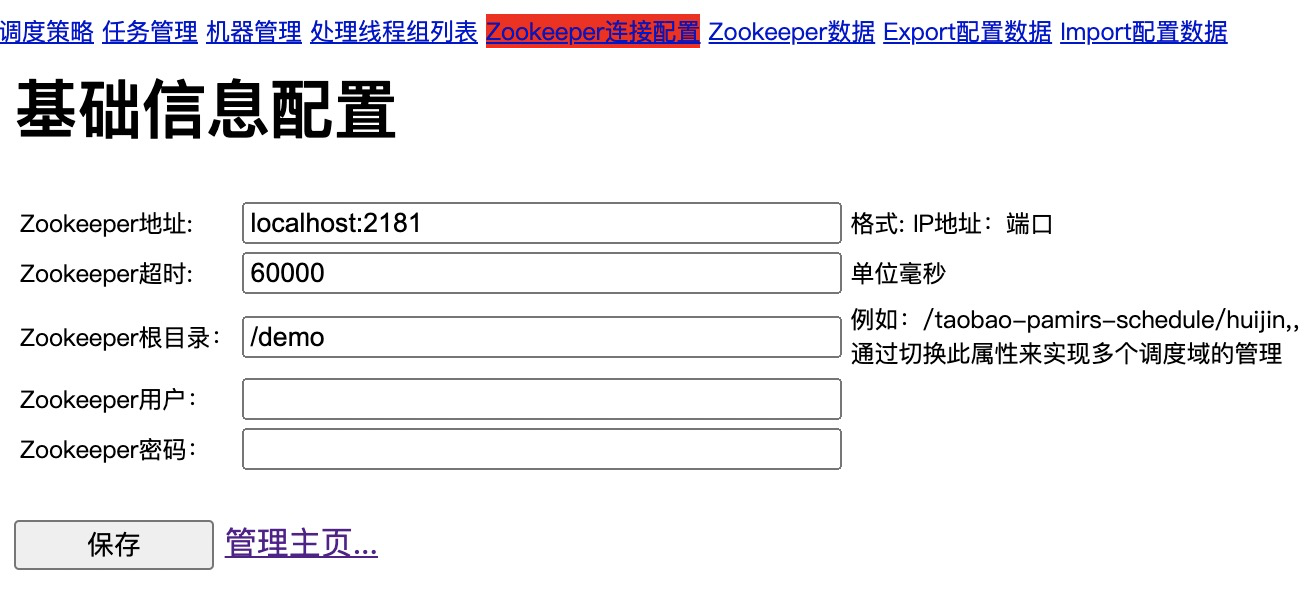
图4-1-11-3 访问地址

配置zk连接参数

image.png

图4-1-11-4 配置zk连接参数

oinone默认实现任务类型

image.png

图4-1-11-5 Oinone默认实现任务类型

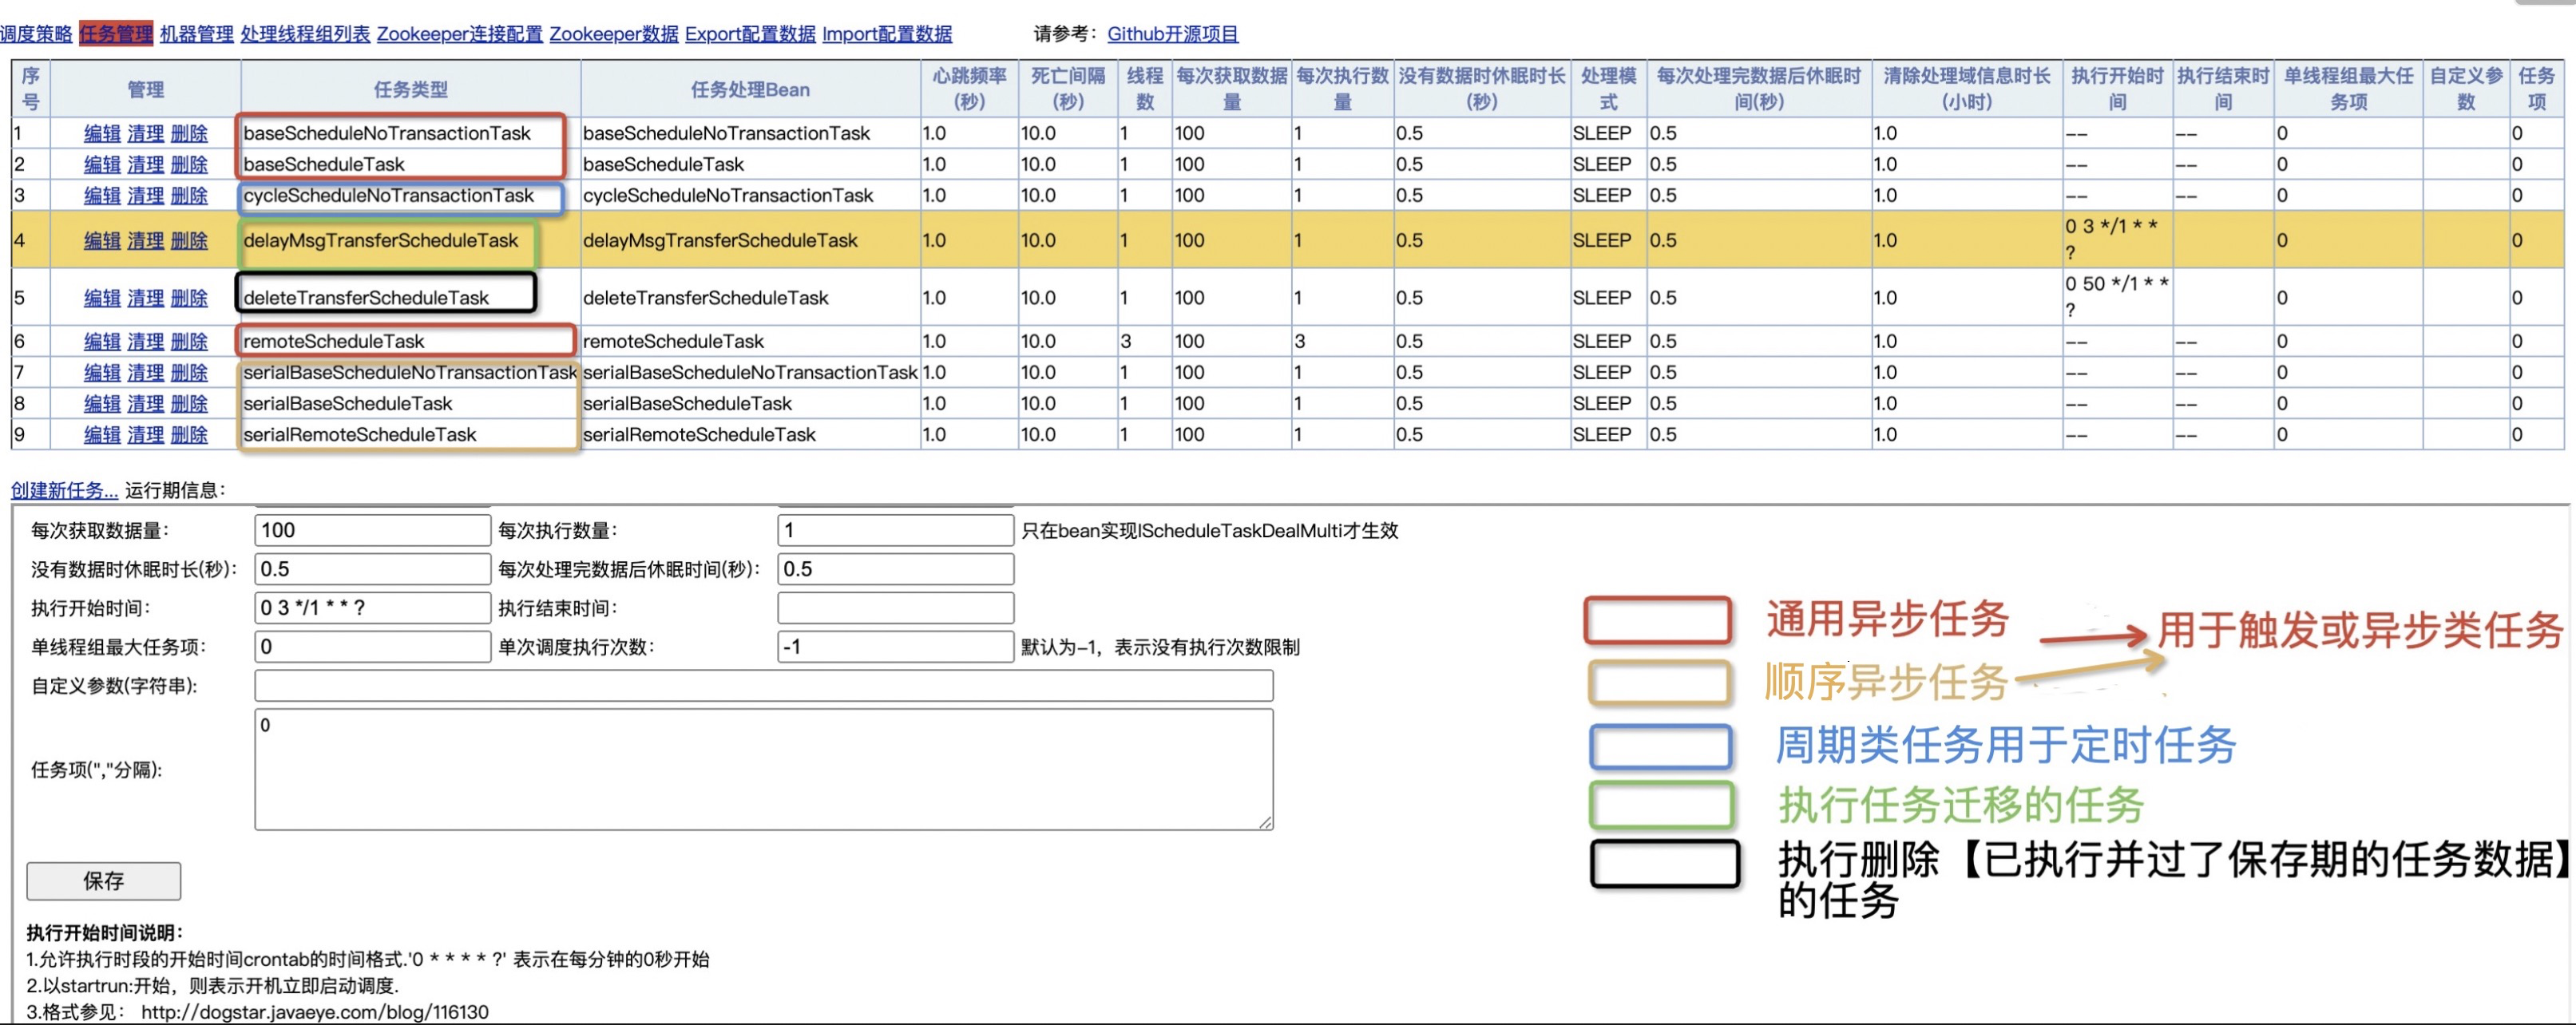
  • baseScheduleNoTransactionTask
  • baseScheduleTask
  • remoteScheduleTask --- 适用于pamirs-middleware-schedule独立部署场景
  • serialBaseScheduleNoTransactionTask
  • serialBaseScheduleTask
  • serialRemoteScheduleTask --- 适用于pamirs-middleware-schedule独立部署场景
  • cycleScheduleNoTransactionTask
  • delayMsgTransferScheduleTask
  • deleteTransferScheduleTask

注:

a. 默认情况下:所有任务的任务项都只配置了一个任务项0,只有一台机器能分配任务。

1. 如果要修改配置可以在启动项目中放置schedule.json,来修改配置

2. 人工进入控制修改任务对应任务项的配置

b. 如果想为某一个核心任务配置的独立调度器,不受其他任务执行影响。那么见独立调度的异步任务
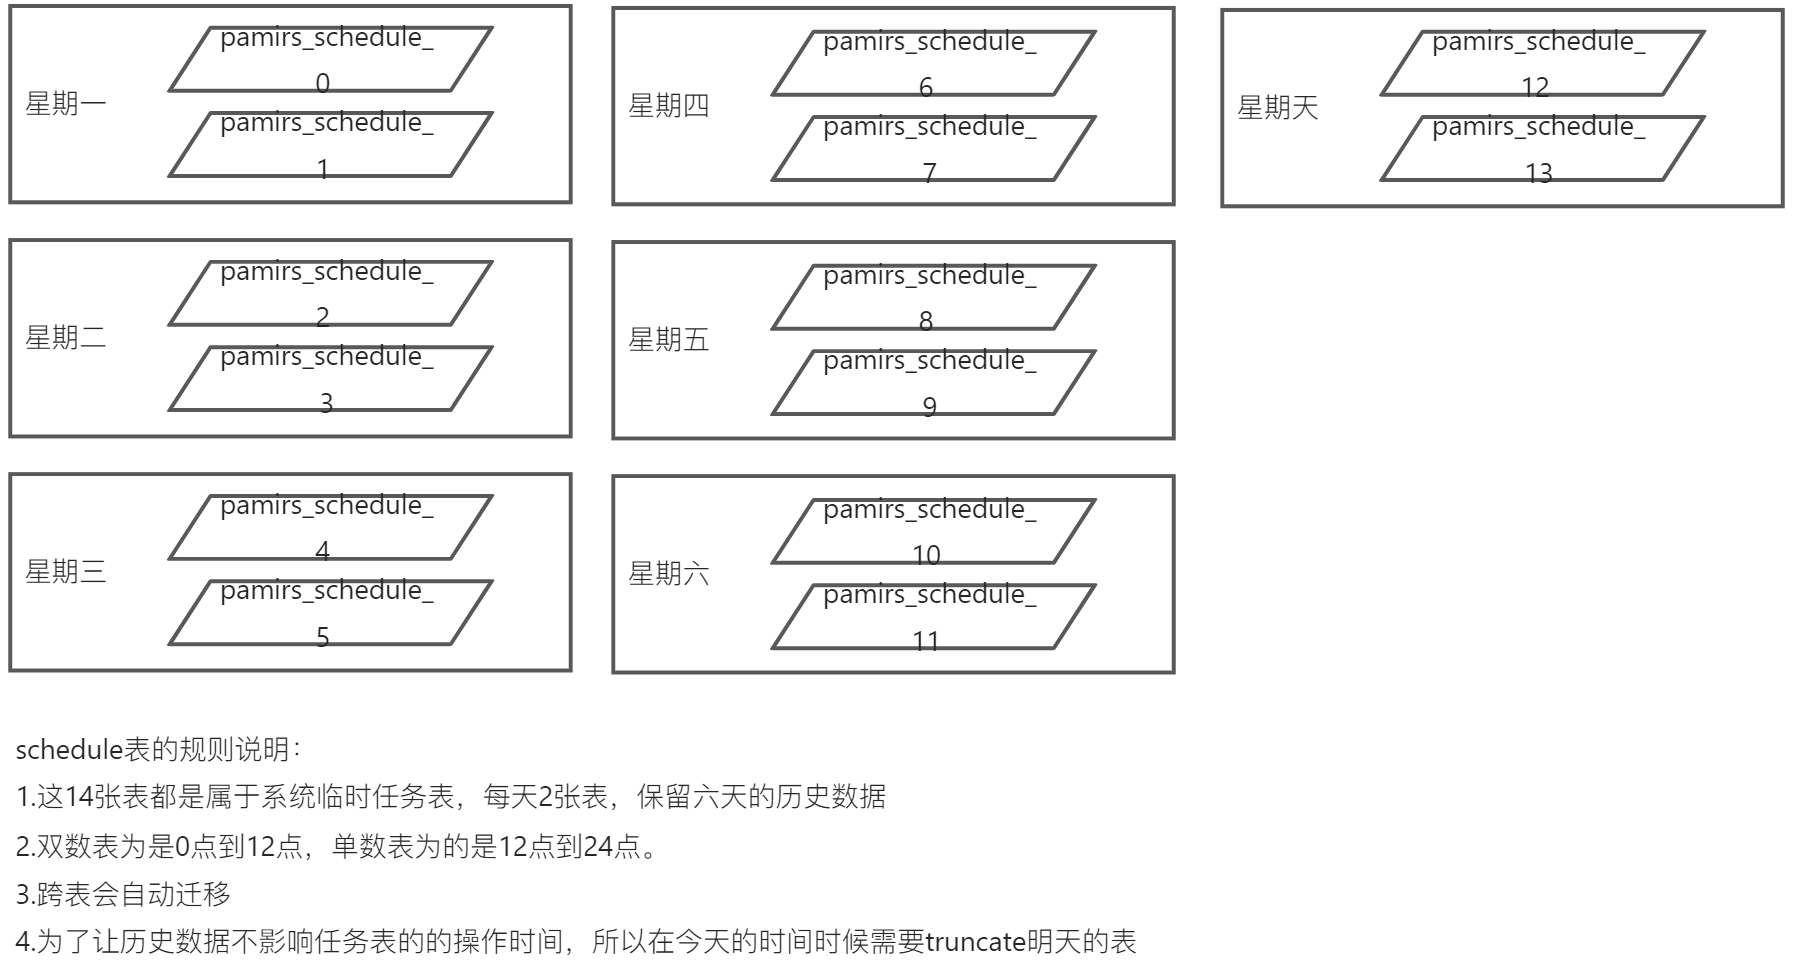
任务表相关说明

4.1.11 函数之异步执行

图4-1-11-6 任务表相关说明

二、构建第一个异步任务(举例)

Step1 新建PetShopService和PetShopServiceImpl

1 新建PetShopService定义updatePetShops方法

package pro.shushi.pamirs.demo.api.service;

import pro.shushi.pamirs.demo.api.model.PetShop;
import pro.shushi.pamirs.meta.annotation.Fun;
import pro.shushi.pamirs.meta.annotation.Function;

import java.util.List;

@Fun(PetShopService.FUN_NAMESPACE)
public interface PetShopService {
    String FUN_NAMESPACE = "demo.PetShop.PetShopService";
    @Function
    void updatePetShops(List<PetShop> petShops);

}

图4-1-11-7 新建PetShopService定义updatePetShops方法

  1. PetShopServiceImpl实现PetShopService接口并在updatePetShops增加@XAsync注解

    1. displayName = "异步批量更新宠物商店",定义异步任务展示名称

    2. limitRetryNumber = 3,定义任务失败重试次数,,默认:-1不断重试

    3. nextRetryTimeValue = 60,定义任务失败重试的时间数,默认:3

    4. nextRetryTimeUnit,定义任务失败重试的时间单位,默认:TimeUnitEnum.SECOND

    5. delayTime,定义任务延迟执行的时间数,默认:0

    6. delayTimeUnit,定义任务延迟执行的时间单位,默认:TimeUnitEnum.SECOND

package pro.shushi.pamirs.demo.core.service;

import org.springframework.stereotype.Component;
import pro.shushi.pamirs.demo.api.model.PetShop;
import pro.shushi.pamirs.demo.api.service.PetShopService;
import pro.shushi.pamirs.meta.annotation.Fun;
import pro.shushi.pamirs.meta.annotation.Function;
import pro.shushi.pamirs.trigger.annotation.XAsync;

import java.util.List;

@Fun(PetShopService.FUN_NAMESPACE)
@Component
public class PetShopServiceImpl implements PetShopService {

    @Override
    @Function
    @XAsync(displayName = "异步批量更新宠物商店",limitRetryNumber = 3,nextRetryTimeValue = 60)
    public void updatePetShops(List<PetShop> petShops) {
        new PetShop().updateBatch(petShops);
    }
}

图4-1-11-8 实现PetShopService接口并在updatePetShops增加@XAsync注解

Step2 修改PetShopBatchUpdateAction的conform方法

  1. 引入PetShopService

  2. 修改conform方法

    1. 利用ArgUtils进行参数转化,ArgUtils会经常用到。

    2. 调用petShopService.updatePetShops方法

package pro.shushi.pamirs.demo.core.action;
…… 引依赖类
@Model.model(PetShopBatchUpdate.MODEL_MODEL)
@Component
public class PetShopBatchUpdateAction {

    @Autowired
    private PetShopService petShopService;
    ……其他代码
    @Action(displayName = "确定",bindingType = ViewTypeEnum.FORM,contextType = ActionContextTypeEnum.SINGLE)
    public PetShopBatchUpdate conform(PetShopBatchUpdate data){
        if(data.getPetShopList() == null || data.getPetShopList().size()==0){
            throw  PamirsException.construct(DemoExpEnumerate.PET_SHOP_BATCH_UPDATE_SHOPLIST_IS_NULL).errThrow();
        }
        List<PetShopProxy> proxyList = data.getPetShopList();
        for(PetShopProxy petShopProxy:proxyList){
            petShopProxy.setDataStatus(data.getDataStatus());
        }
        Tx.build(new TxConfig().setPropagation(Propagation.REQUIRED.value())).executeWithoutResult(status -> {
            new PetShopProxy().updateBatch(proxyList);
            //利用ArgUtils进行参数转化
            List<PetShop> shops = ArgUtils.convert(PetShopProxy.MODEL_MODEL, PetShop.MODEL_MODEL,proxyList);
            petShopService.updatePetShops(shops);
//            throw PamirsException.construct(DemoExpEnumerate.SYSTEM_ERROR).errThrow();
        });
        return data;
    }

}

图4-1-11-9 修改PetShopBatchUpdateAction的conform方法

Step3 重启看效果

异步会有一定的延迟,我们按以下步骤测试下异步执行效果

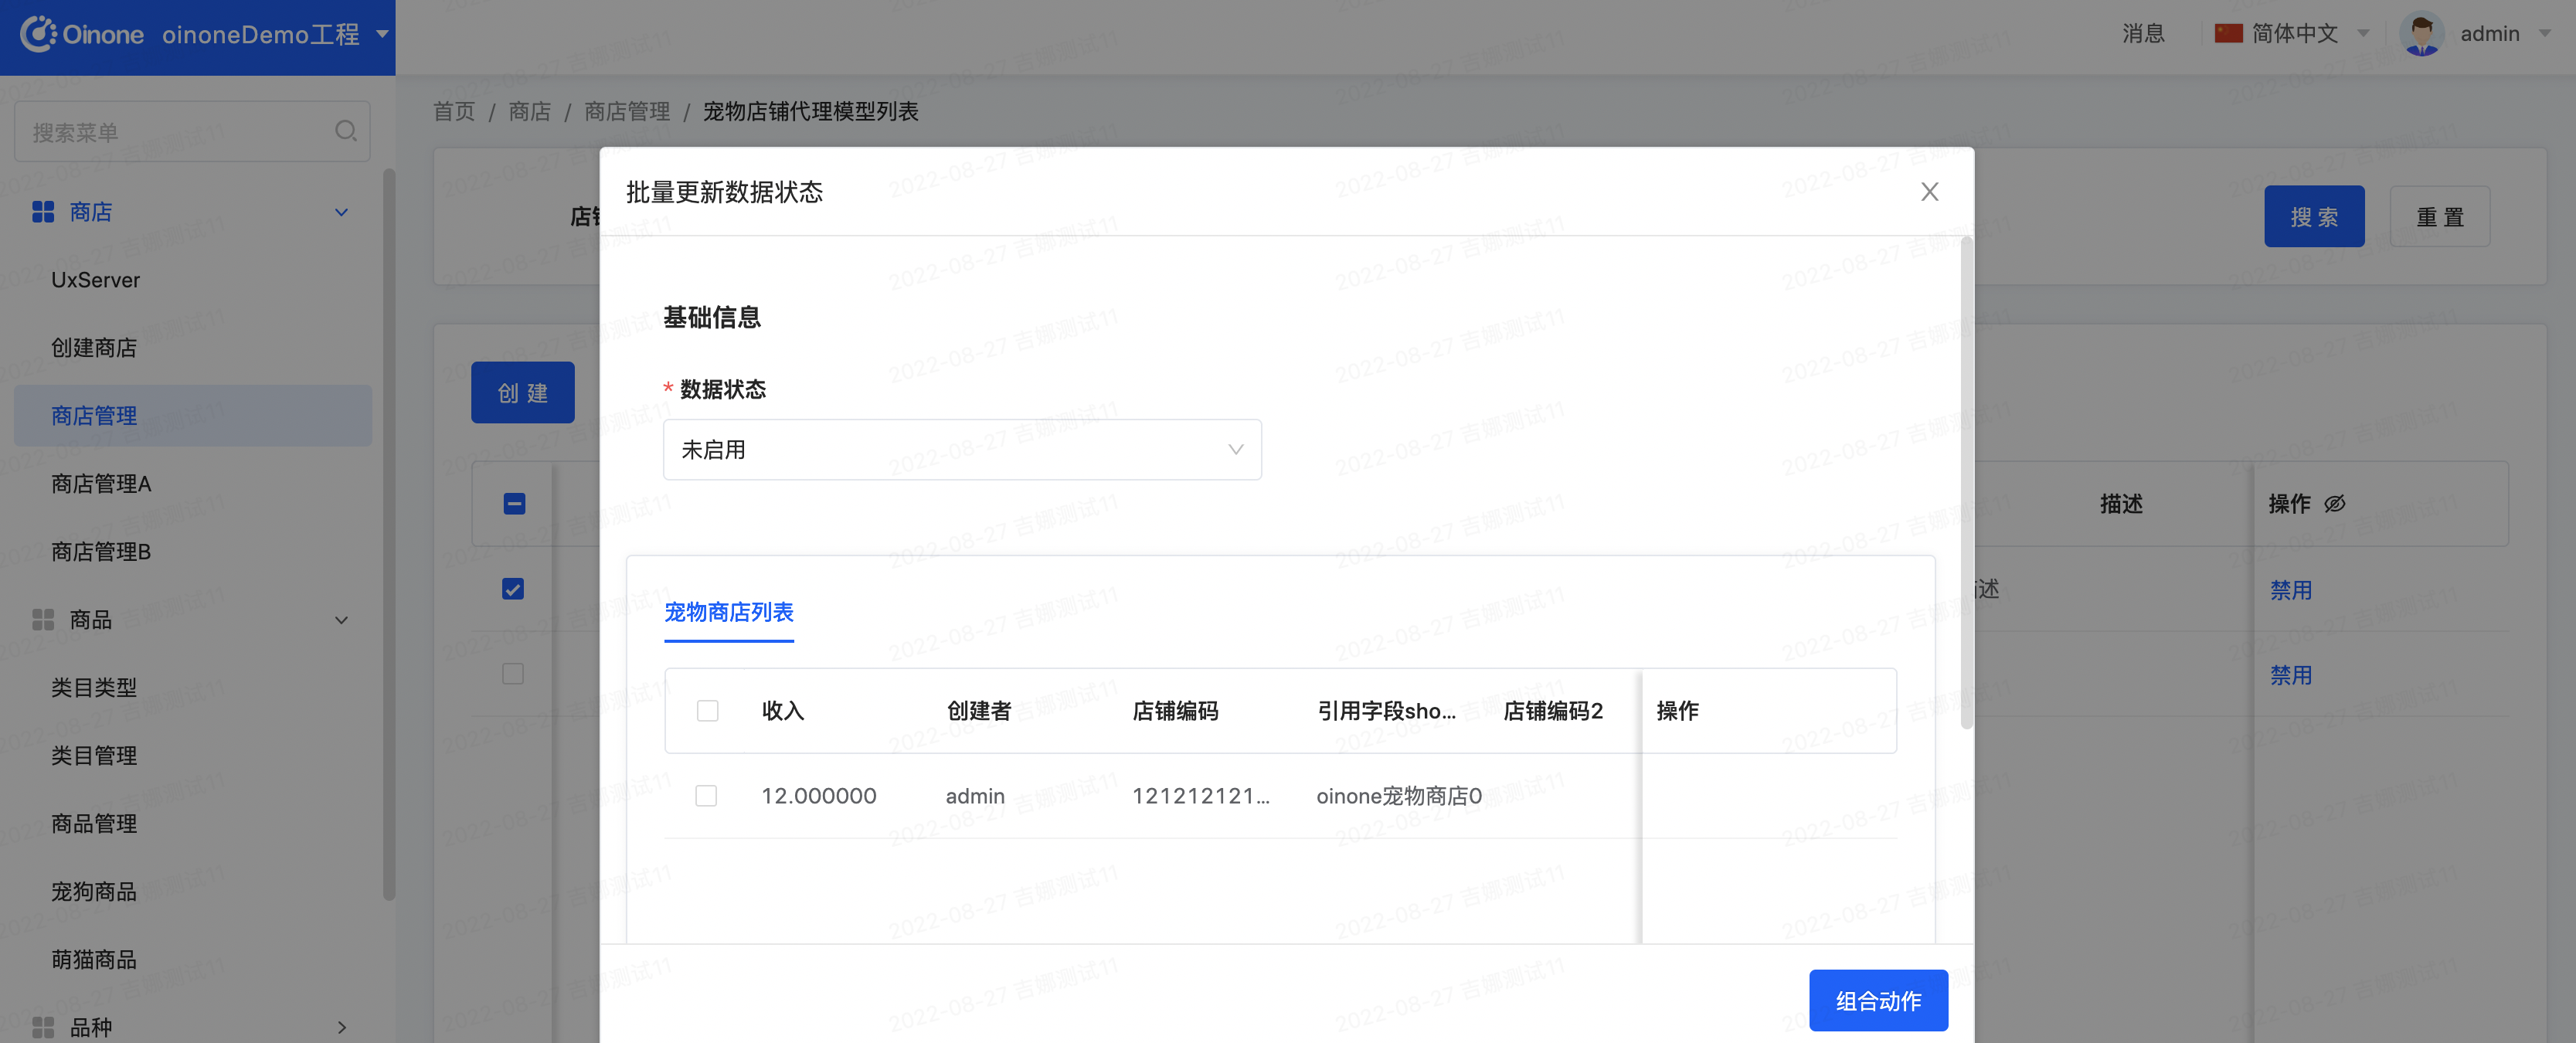
  1. 进入商店管理列表页,选择中一行数据点击批量更新数据状态按钮进入批量修改宠物商店数据状态页面:

image.png

图4-1-11-10 进入批量修改宠物商店数据状态页面

  1. 在批量修改宠物商店数据状态页面,数据状态设置为未启用,点击组合动作按钮回到商店管理列表页:

image.png

图4-1-11-11 点击组合动作按钮回到商店管理列表页

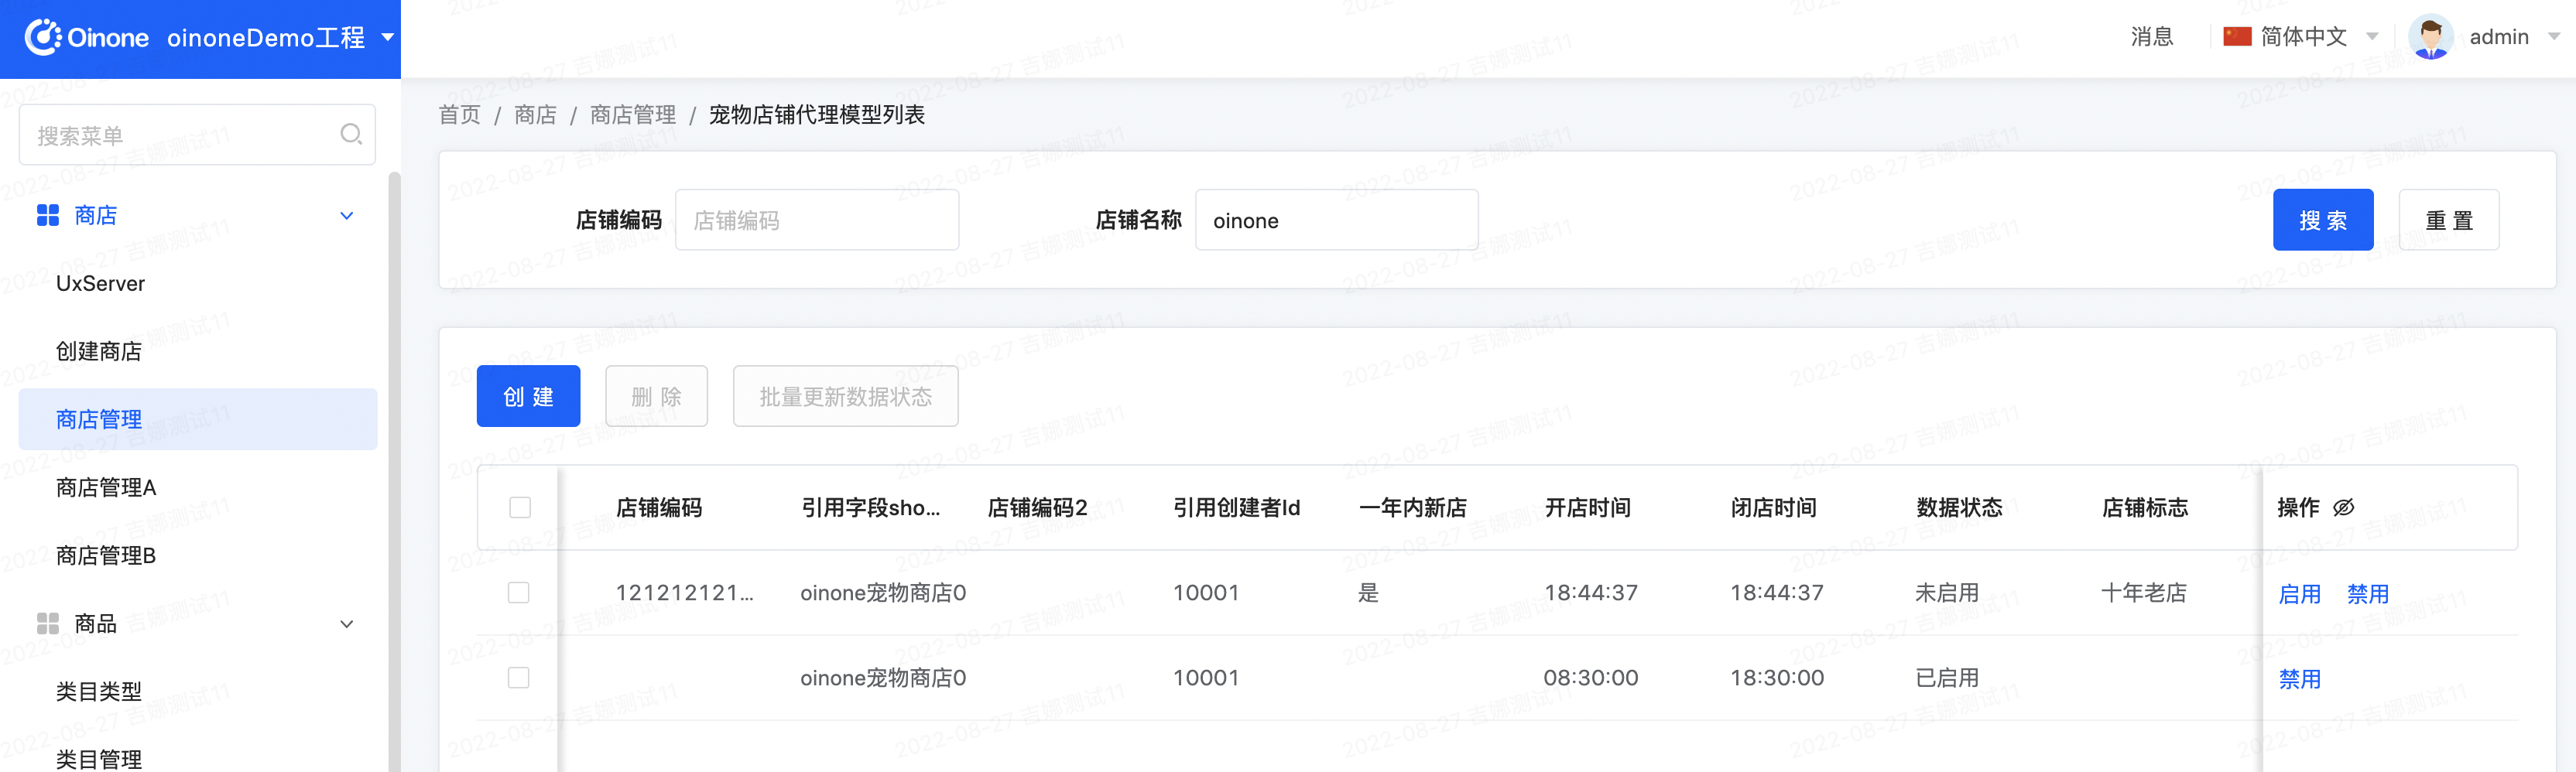
  1. 查看商店管理列表页的数据记录的数据状态字段是否修改成功,此时可能未修改成功,也可能已经修改成功,因为本身就是毫秒级的速度,点击搜索刷新数据,发现数据记录的数据状态字段修改成功:

image.png

图4-1-11-12 发现数据记录的数据状态字段修改成功

  1. 查看任务表,根据任务表与日期的对照关系查询指定表

image.png

图4-1-11-13 根据任务表与日期的对照关系查询指定表

三、异步任务高级玩法

顺序异步任务(举例)

这里的顺序任务是指把任务按一定规则分组以后按时间顺序串行执行,不同分组间的任务不相互影响。有点类似mq的顺序消息

eg:订单的状态变更的异步任务需要根据任务产生时间顺序执行。那么分组规则是按订单id分组,执行顺序按任务产生顺序执行

Step1 PetShopService和PetShopServiceImpl

  1. 修改PetShopService新增定义asyncSerialUpdatePetShops方法
package pro.shushi.pamirs.demo.api.service;

import pro.shushi.pamirs.demo.api.model.PetShop;
import pro.shushi.pamirs.meta.annotation.Fun;
import pro.shushi.pamirs.meta.annotation.Function;

import java.util.List;

@Fun(PetShopService.FUN_NAMESPACE)
public interface PetShopService {
    String FUN_NAMESPACE = "demo.PetShop.PetShopService";
    @Function
    void updatePetShops(List<PetShop> petShops);
    @Function
    void asyncSerialUpdatePetShops(List<PetShop> petShops);

}

图4-1-11-14 修改PetShopService新增定义asyncSerialUpdatePetShops方法

  1. 修改PetShopServiceImpl实现ScheduleAction接口,并增加asyncSerialUpdatePetShops方法

    1. 引入executeTaskActionService用于提交异步串行任务ExecuteTaskAction

      1.setExecuteNamespace(getInterfaceName()),确保跟getInterfaceName()一致

      2.setExecuteFun("execute");跟执行函数名“execute”一致

      3.setTaskType(TaskType.SERIAL_BASE_SCHEDULE_NO_TRANSACTION_TASK.getValue()),必须用SERIAL_BASE_SCHEDULE_NO_TRANSACTION_TASK,其为顺序执行任务类型

      4.setBizId(petShop.getCreateUid())//根据创建人Id分组,根据实际业务情况决定

    2. getInterfaceName()跟函数的命名空间保持一致

package pro.shushi.pamirs.demo.core.service;

import org.springframework.beans.factory.annotation.Autowired;
import org.springframework.stereotype.Component;
import pro.shushi.pamirs.core.common.enmu.TimeUnitEnum;
import pro.shushi.pamirs.demo.api.model.PetShop;
import pro.shushi.pamirs.demo.api.service.PetShopService;
import pro.shushi.pamirs.framework.connectors.data.tx.interceptor.PamirsTransactional;
import pro.shushi.pamirs.meta.annotation.Fun;
import pro.shushi.pamirs.meta.annotation.Function;
import pro.shushi.pamirs.meta.util.JsonUtils;
import pro.shushi.pamirs.middleware.schedule.api.ScheduleAction;
import pro.shushi.pamirs.middleware.schedule.common.Result;
import pro.shushi.pamirs.middleware.schedule.domain.ScheduleItem;
import pro.shushi.pamirs.middleware.schedule.eunmeration.TaskType;
import pro.shushi.pamirs.trigger.annotation.XAsync;
import pro.shushi.pamirs.trigger.model.ExecuteTaskAction;
import pro.shushi.pamirs.trigger.service.ExecuteTaskActionService;

import java.util.List;

@Fun(PetShopService.FUN_NAMESPACE)
@Component
public class PetShopServiceImpl implements PetShopService, ScheduleAction {

    @Autowired
    private ExecuteTaskActionService executeTaskActionService;

    @Override
    @Function
    @XAsync(displayName = "异步批量更新宠物商店",limitRetryNumber = 3,nextRetryTimeValue = 60)
    public void updatePetShops(List<PetShop> petShops) {
        new PetShop().updateBatch(petShops);
    }

    @PamirsTransactional
    @Override
    @Function
    public void asyncSerialUpdatePetShops(List<PetShop> petShops){
        for(PetShop petShop:petShops) {
            executeTaskActionService.submit((ExecuteTaskAction) new ExecuteTaskAction()
                    .setBizId(petShop.getCreateUid())//根据创建人Id分组,根据实际业务情况决定
                    .setTaskType(TaskType.SERIAL_BASE_SCHEDULE_NO_TRANSACTION_TASK.getValue())
                    .setNextRetryTimeUnit(TimeUnitEnum.SECOND)//失败重试时间单位
                    .setNextRetryTimeValue(10)//失败重试时间数
                    .setLimitRetryNumber(6)//最多重试次数
                    .setDisplayName("异步顺序任务-更新宠物商店,以createUid分组")
                    .setExecuteNamespace(getInterfaceName())
                    .setExecuteFun("execute")
                    .setContext(JsonUtils.toJSONString(petShop)));
        }
    }

    @Override
    public String getInterfaceName() {
        return PetShopService.FUN_NAMESPACE;
    }

    @Override
    @Function
    public Result<Void> execute(ScheduleItem scheduleItem) {
        Result<Void> result = new Result<>();
        PetShop petShop = JsonUtils.parseObject(scheduleItem.getContext(),PetShop.class);
        petShop.updateById();
        return result;
    }
}

图4-1-11-15 代码示例

Step2 修改PetShopBatchUpdateAction的conform方法

改调用异步顺序方法,petShopService.asyncSerialUpdatePetShops(shops)

package pro.shushi.pamirs.demo.core.action;
…… 引依赖类
@Model.model(PetShopBatchUpdate.MODEL_MODEL)
@Component
public class PetShopBatchUpdateAction {

    @Autowired
    private PetShopService petShopService;
    ……其他代码
    @Action(displayName = "确定",bindingType = ViewTypeEnum.FORM,contextType = ActionContextTypeEnum.SINGLE)
    public PetShopBatchUpdate conform(PetShopBatchUpdate data){
        if(data.getDataStatus() == null){
            throw  PamirsException.construct(DemoExpEnumerate.PET_SHOP_BATCH_UPDATE_DATASTATUS_IS_NULL).errThrow();
        }
        List<PetShopProxy> proxyList = data.getPetShopList();
        for(PetShopProxy petShopProxy:proxyList){
            petShopProxy.setDataStatus(data.getDataStatus());
        }
        Tx.build(new TxConfig().setPropagation(Propagation.REQUIRED.value())).executeWithoutResult(status -> {
            //利用ArgUtils进行参数转化
            List<PetShop> shops = ArgUtils.convert(PetShopProxy.MODEL_MODEL, PetShop.MODEL_MODEL,proxyList);
//            petShopService.updatePetShops(shops);
            petShopService.asyncSerialUpdatePetShops(shops);
//            throw PamirsException.construct(DemoExpEnumerate.SYSTEM_ERROR).errThrow();
        });
        return data;
    }

}

图4-1-11-16 修改PetShopBatchUpdateAction的conform方法

Step3 重启看效果

页面效果跟构建第一个异步任务一样,但任务生产和执行逻辑不一样。会根据biz_id分配任务项与分组确保执行顺序

  1. 分配任务项,相同任务项一定会分配给同一个schedule的执行者

  2. 分组,任务在同一个schedule的执行者,相同分组Id一定会分配给同一个线程执行

页面操作完以后查看数据任务表

image.png

图4-1-11-17 根据biz_id分配任务项与分组确保执行顺序

独立调度的异步任务(举例)

如果把所有任务都放在同一个任务类型下,复用同一套任务策略、任务配置、任务执行器。那么当某些不重要的异步任务大量失败会影响其他任务的执行,所以我们在一些高并发大任务量的场景下会独立给一些核心异步任务配置独立调度策略。

Step1 修改pamirs-demo-core的pom

增加对pamirs-middleware-schedule-core依赖,为了复用oinone默认实现任务类型的基础逻辑,在例子中我们自定义的异步任务继承SerialBaseScheduleNoTransactionTask的基础逻辑

        <dependency>
            <groupId>pro.shushi.pamirs.middleware.schedule</groupId>
            <artifactId>pamirs-middleware-schedule-core</artifactId>
        </dependency>

图4-1-11-18 增加pamirs-middleware-schedule-core依赖

Step2 新建PetShopUpdateCustomAsyncTask

package pro.shushi.pamirs.demo.core.task;

import org.springframework.stereotype.Component;
import pro.shushi.pamirs.middleware.schedule.core.tasks.SerialBaseScheduleNoTransactionTask;

@Component
public class PetShopUpdateCustomAsyncTask extends SerialBaseScheduleNoTransactionTask {

    public static final String TASK_TYPE = PetShopUpdateCustomAsyncTask.class.getSimpleName();

    @Override
    public String getTaskType() {
        return TASK_TYPE;
    }

}

图4-1-11-19 新建PetShopUpdateCustomAsyncTask

Step3 修改PetShopServiceImpl的asyncSerialUpdatePetShops方法

修改TaskType为PetShopUpdateCustomAsyncTask.TASK_TYPE

    @PamirsTransactional
    @Override
    @Function
    public void asyncSerialUpdatePetShops(List<PetShop> petShops){
        for(PetShop petShop:petShops) {
            executeTaskActionService.submit((ExecuteTaskAction) new ExecuteTaskAction()
                    .setBizId(petShop.getCreateUid())//根据创建人Id分组,根据实际业务情况决定
//                    .setTaskType(TaskType.SERIAL_BASE_SCHEDULE_NO_TRANSACTION_TASK.getValue())
                    .setTaskType(PetShopUpdateCustomAsyncTask.TASK_TYPE)
                    .setNextRetryTimeUnit(TimeUnitEnum.SECOND)//失败重试时间单位
                    .setNextRetryTimeValue(10)//失败重试时间数
                    .setLimitRetryNumber(6)//最多重试次数
                    .setDisplayName("异步顺序任务-更新宠物商店,以createUid分组")
                    .setExecuteNamespace(getInterfaceName())
                    .setExecuteFun("execute")
                    .setContext(JsonUtils.toJSONString(petShop)));
        }
    }

图4-1-11-20 修改TaskType为PetShopUpdateCustomAsyncTask.TASK_TYPE

Step4 初始化数据

下载以下文件放在pamirs-demo-boot的src/main/resources/init目录下

schedule.json.txt(8 KB)

我们在系统原有提供的schedule.json,中增入任务类型为petShopUpdateCustomAsyncTask的配置,配置项"taskType": "CUSTOM",标志为客户自定义。实际注册到TbSchedule会按beanNames转化为taskType,其他参数含义见TbSchedule的管理控制台有对应中文说明


  {
    "taskType": "CUSTOM",
    "beanNames": "petShopUpdateCustomAsyncTask",
    "values": {
      "heartBeatRate": 1000, 
      "judgeDeadInterval": 10000,
      "sleepTimeNoData": 500,
      "sleepTimeInterval": 500,
      "fetchDataNumber": 500,
      "executeNumber": 1,
      "threadNumber": 8,
      "processorType": "SLEEP",
      "expireOwnSignInterval": 1.0,
      "taskParameter": "",
      "taskKind": "static",
      "taskItems": [
        0,1,2,3,4,5,6,7
      ],
      "maxTaskItemsOfOneThreadGroup": 0,
      "version": 0,
      "sts": "resume",
      "fetchDataCountEachSchedule": -1
    },
    "strategy": {
      "IPList": [
        "127.0.0.1"
      ],
      "numOfSingleServer": 1,
      "assignNum": 4,
      "kind": "Schedule",
      "taskParameter": "",
      "sts": "resume"
    }
  }

图4-1-11-21 增加任务类型为petShopUpdateCustomAsyncTask的配置

Step5 重启看效果

页面效果跟构建第一个异步任务一样,但任务生产和执行逻辑不一样。会根据biz_id分配任务项与分组确保执行顺序,同时会有独立的调度器以及规则配置

  1. 在tbSchedule的管理控制台,可以看见多了一个“petShopUpdateCustomAsyncTask”的任务类型,点编辑就可以看到我们配置任务类型对应的参数
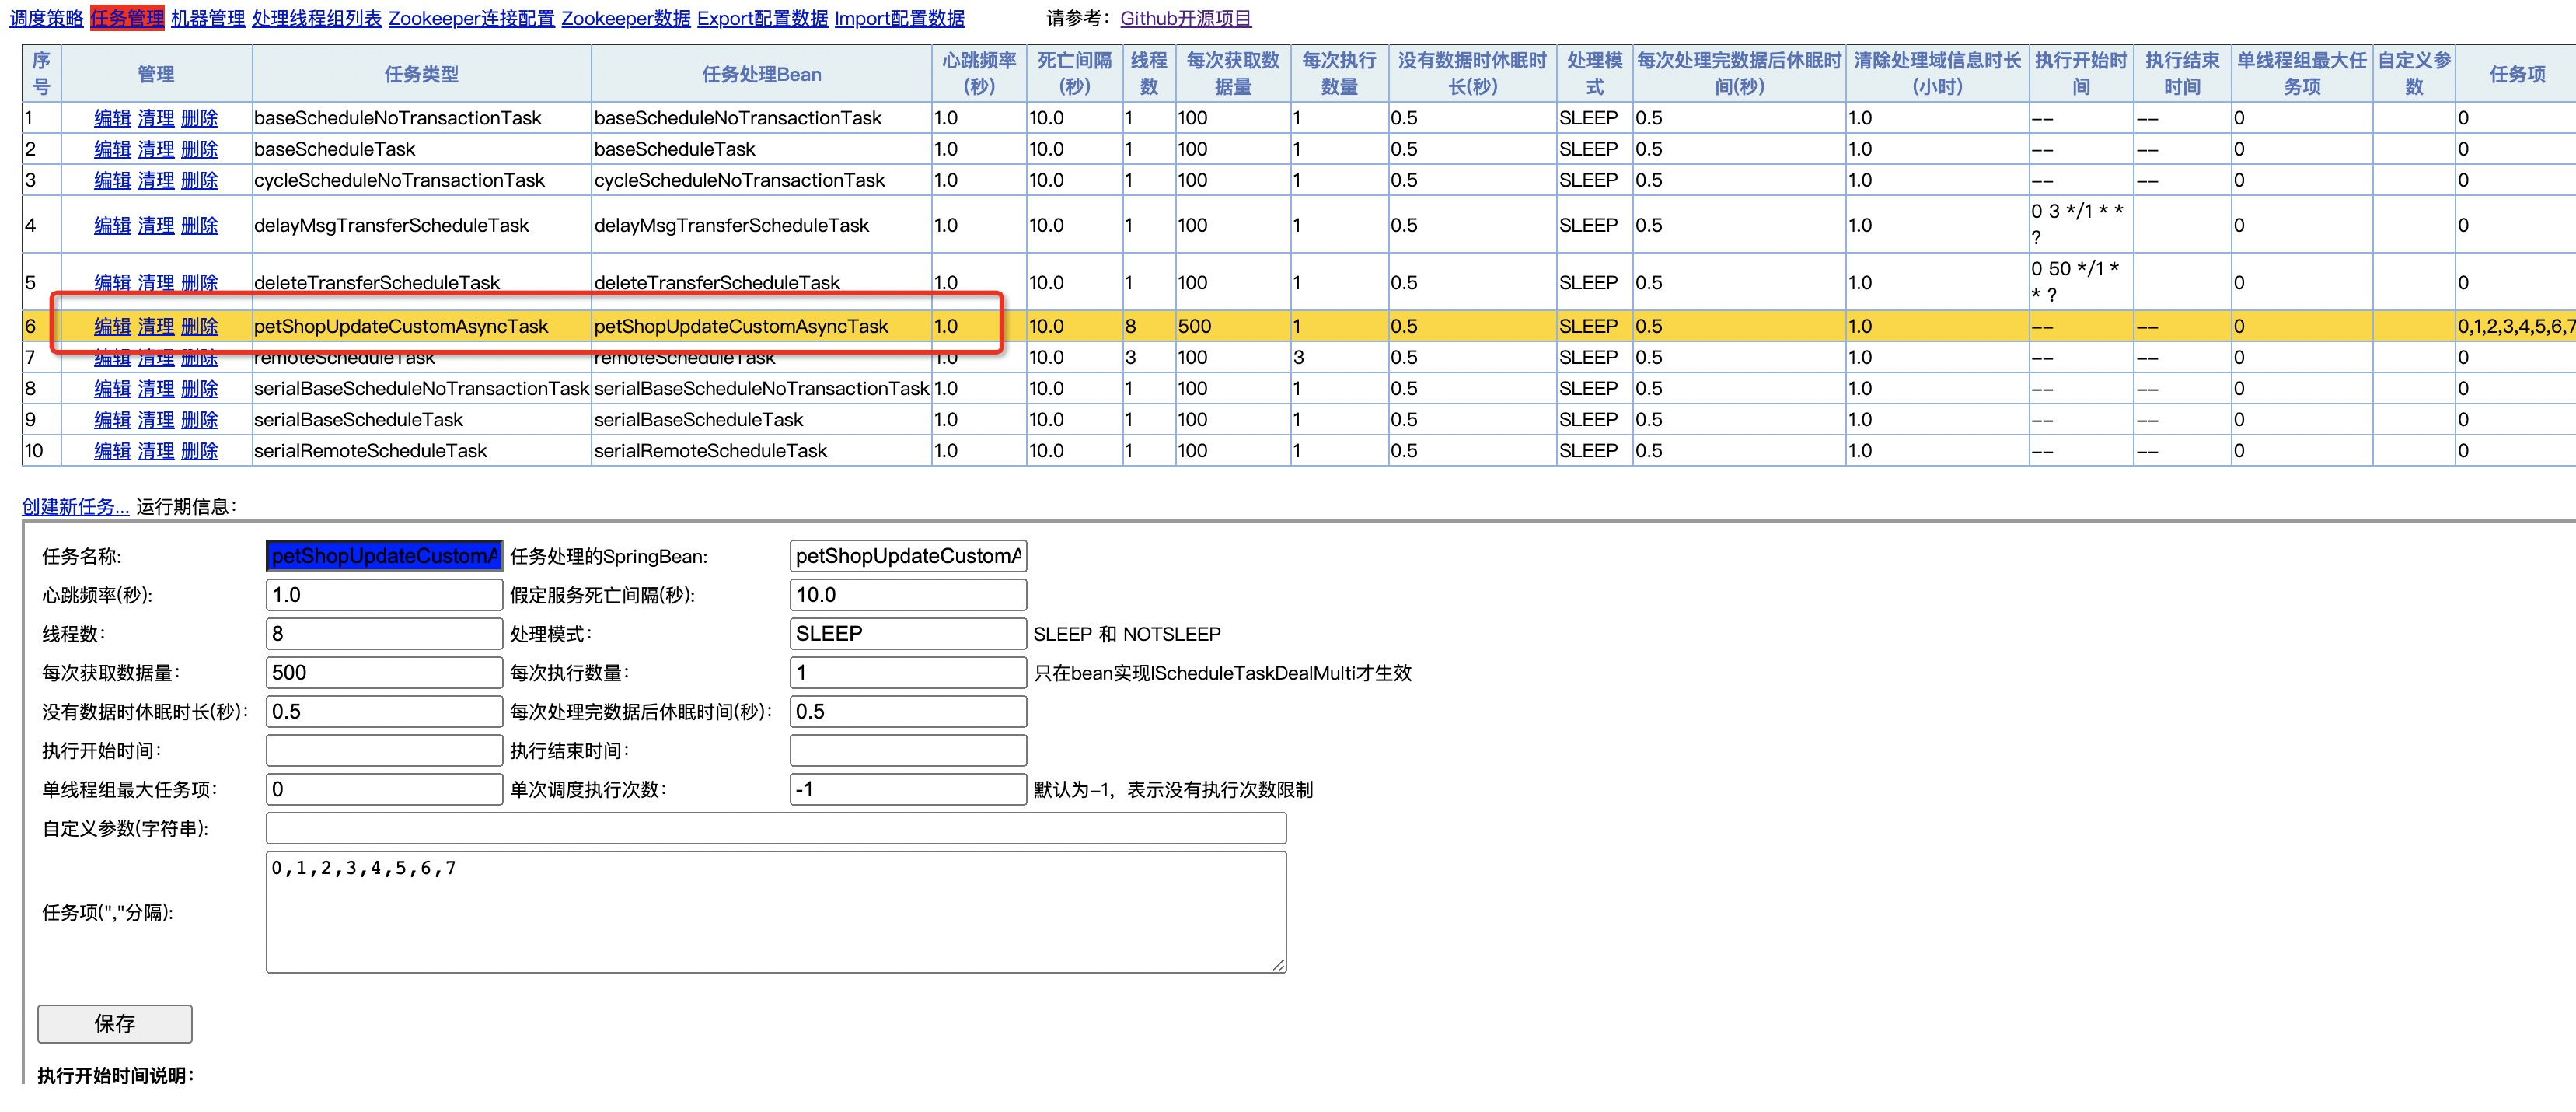
image.png

图4-1-11-22 tbSchedule管理控制台

  1. 页面操作完以后查看对应数据任务表

image.png

图4-1-11-23 查看对应数据任务表

四、不同应用如何隔离执行单元

在schedule跟模块部署一起的时候,多模块独立boot的情况下,需要做必要的配置。如果schedule独立部署则没有必要,因为全部走远程,不存在类找不到的问题

  1. 通过配置pamirs.zookeeper.rootPath,确保两组机器都能覆盖所有任务分片,这样不会漏数据

  2. 通过pamirs.event.schedule.ownSign来隔离。确保两组机器只取各自产生的数据,这样不会重复执行数据

pamirs:
    zookeeper:
    zkConnectString: 127.0.0.1:2181
    zkSessionTimeout: 60000
    rootPath: /demo
    event:
    enabled: true
    schedule:
      enabled: true
      ownSign: demo
    rocket-mq:
      namesrv-addr: 127.0.0.1:9876

图4-1-11-24 配置pamirs.zookeeper.rootPath

Oinone社区 作者:史, 昂原创文章,如若转载,请注明出处:https://doc.oinone.top/oio4/9286.html

访问Oinone官网:https://www.oinone.top获取数式Oinone低代码应用平台体验

(0)
史, 昂的头像史, 昂数式管理员
上一篇 2024年5月23日
下一篇 2024年5月23日

相关推荐

  • 4.1.18 框架之网关协议-Variables变量

    我们在应用开发过程有一种特殊情况在后端逻辑编写的时候需要知道请求的发起入口,平台利用GQL协议中的Variables属性来传递信息,本文就介绍如何获取。 一、前端附带额外变量 属性名 类型 说明 scene String 菜单入口 表4-1-18-1 前端附带额外变量 图4-1-18-1 variables信息中的scene 二、后端如何接收variables信息 通过PamirsSession.getRequestVariables()可以得到PamirsRequestVariables对象。 三、第一个variable(举例) Step1 修改PetTalentAction,获取得到前端传递的Variables package pro.shushi.pamirs.demo.core.action; ……类引用 @Model.model(PetTalent.MODEL_MODEL) @Component public class PetTalentAction { ……其他代码 @Function.Advanced(type= FunctionTypeEnum.QUERY) @Function.fun(FunctionConstants.queryPage) @Function(openLevel = {FunctionOpenEnum.API}) public Pagination<PetTalent> queryPage(Pagination<PetTalent> page, IWrapper<PetTalent> queryWrapper){ String scene = (String)PamirsSession.getRequestVariables().getVariables().get("scene"); System.out.println("scene: "+ scene); ……其他代码 } ……其他代码 } 图4-1-18-2 修改PetTalentAction Step2 重启验证 点击宠物达人不同菜单入口,查看效果 图4-1-18-3 示例效果(一) 图4-1-18-4 示例效果(二)

    2024年5月23日
    77900
  • 4.2.1 组件之生命周期

    组件生命周期的意义所在:比如动态创建了「视图、字段」,等它们初始化完成或者发生了修改后要执行业务逻辑,这个时候只能去自定义当前字段或者视图,体验极差,平台应该提供一些列的生命周期,允许其他人调用生命周期的api去执行对应的逻辑。 一、实现原理 图4-2-1-1 实现原理 当用户通过内部API去监听某个生命周期的时候,内部会动态的去创建该生命周期,每个生命周期都有「唯一标识」,内部会根据「唯一标识」去创建对应的「Effect」,Effect会根据生命周期的「唯一标识」实例化一个「lifeCycle」,「lifeCycle」创建完成后,会被存放到「Heart」中,「Heart」是整个生命周期的心脏,当心脏每次跳动的时候(生命周期被监听触发)都会触发对应的生命周期 二、生命周期API API 描述 返回值 View LifeCycle onViewBeforeCreated 视图创建前 ViewWidget onViewCreated 视图创建后 ViewWidget onViewBeforeMount 视图挂载前 ViewWidget onViewMounted 视图挂载后 ViewWidget onViewBeforeUpdate 视图数据发生修改前 ViewWidget onViewUpdated 视图数据修改后 ViewWidget onViewBeforeUnmount 视图销毁前 ViewWidget onViewUnmounted 视图销毁 ViewWidget onViewSubmit 提交数据 ViewWidget onViewSubmitStart 数据开始提交 ViewWidget onViewSubmitSuccess 数据提交成功 ViewWidget onViewSubmitFailed 数据提交失败 ViewWidget onViewSubmitEnd 数据提交结束 ViewWidget onViewValidateStart 视图字段校验 ViewWidget onViewValidateSuccess 校验成功 ViewWidget onViewValidateFailed 校验失败 ViewWidget onViewValidateEnd 校验结束 ViewWidget Field LifeCycle onFieldBeforeCreated 字段创建前 FieldWidget onFieldCreated 字段创建后 FieldWidget onFieldBeforeMount 字段挂载前 FieldWidget onFieldMounted 字段挂载后 FieldWidget onFieldBeforeUpdate 字段数据发生修改前 FieldWidget onFieldUpdated 字段数据修改后 FieldWidget onFieldBeforeUnmount 字段销毁前 FieldWidget onFieldUnmounted 字段销毁 FieldWidget onFieldFocus 字段聚焦 FieldWidget onFieldChange 字段的值发生了变化 FieldWidget onFieldBlur 字段失焦 FieldWidget onFieldValidateStart 字段开始校验 FieldWidget onFieldValidateSuccess 校验成功 FieldWidget onFieldValidateFailed 校验失败 FieldWidget onFieldValidateEnd 校验结束 FieldWidget 表4-2-1-1 生命周期API 上面列出的分别是「视图、字段」的生命周期,目前Action的生命周期还没有,后续再补充。 三、第一个View组件生命周期的监听(举例) Step1 新建registryLifeCycle.ts 新建registryLifeCycle.ts,监听宠物达人的列表页。’宠物达人table_demo_core’为视图名,您需要找后端配合 import { onViewCreated } from '@kunlun/dependencies' function registryLifeCycle(){ onViewCreated('宠物达人table_demo_core', (viewWidget) => { console.log('宠物达人table_demo_core'); console.log(viewWidget); }); } export {registryLifeCycle} 图4-2-1-2 新建registryLifeCycle.ts Step2 修改main.ts 全局注册lifeCycle import { registryLifeCycle } from './registryLifeCycle'; registryLifeCycle(); 图4-2-1-3 修改main.ts Step3 看效果 图4-2-1-4 示例效果 四、第一个Filed组件生命周期的监听(举例) Step1 修改registryLifeCycle.ts 通过onFieldValueChange增加宠物达人搜索视图的name(达人)字段的值变化进行监听。 宠物达人search:name 代表 视图名:字段名 import { onViewCreated , onFieldValueChange} from '@kunlun/dependencies' function registryLifeCycle(){ onViewCreated('宠物达人table_demo_core', (viewWidget) => { console.log('宠物达人table_demo_core'); console.log(viewWidget); }); onFieldValueChange('宠物达人search:name', (filedWidget) => { console.log('宠物达人search:name');…

  • 6.3 数据审计(改)

    在业务应用中我们经常需要为一些核心数据的变更做审计追踪,记录字段的前后变化、操作IP、操作人、操作地址等等。数据审计模块为此提供了支撑和统一管理。它在成熟的企业的核心业务系统中,需求是比较旺盛的。接下来我们开始学习下数据审计模块 准备工作 pamirs-demo-core的pom文件中引入pamirs-data-audit-api包依赖 <dependency> <groupId>pro.shushi.pamirs.core</groupId> <artifactId>pamirs-data-audit-api</artifactId> </dependency> pamirs-demo-boot的pom文件中引入pamirs-data-audit-core和pamirs-third-party-map-core包依赖,数据审计会记录操作人的地址信息,所以也依赖了pamirs-third-party-map-core <dependency> <groupId>pro.shushi.pamirs.core</groupId> <artifactId>pamirs-data-audit-core</artifactId> </dependency> <dependency> <groupId>pro.shushi.pamirs.core.map</groupId> <artifactId>pamirs-third-party-map-core</artifactId> </dependency> pamirs-demo-boot的application-dev.yml文件中增加配置pamirs.boot.modules增加data_audit 和third_party_map,即在启动模块中增加data_audit和third_party_map模块 pamirs: boot: modules: – data_audit – tp_map 为third_party_map模块增加高德接口api,下面e439dda234467b07709f28b57f0a9bd5换成自己的key pamirs: eip: map: gd: key: e439dda234467b07709f28b57f0a9bd5 数据审计 注解式(举例) Step1 新增PetTalentDataAudit数据审计定义类 package pro.shushi.pamirs.demo.core.init.audit; import pro.shushi.pamirs.data.audit.api.annotation.DataAudit; import pro.shushi.pamirs.demo.api.model.PetTalent; @DataAudit( model = PetTalent.MODEL_MODEL,//需要审计的模型 modelName = "宠物达人" ,//模型名称,默认模型对应的displayName //操作名称 optTypes = {PetTalentDataAudit.PETTALENT_CREATE,PetTalentDataAudit.PETTALENT_UDPATE}, fields={"nick","picList.id","picList.url","petShops.id","petShops.shopName"}//需要审计的字段,关系字段用"."连结 ) public class PetTalentDataAudit { public static final String PETTALENT_CREATE ="宠物达人创建"; public static final String PETTALENT_UDPATE ="宠物达人修改"; Step2 修改PetTalentAction的update方法 做审计日志埋点:手工调用 OperationLogBuilder.newInstance().record()方法。需要注意的是这里需要把原有记录的数据值先查出来做对比 @Function.Advanced(type= FunctionTypeEnum.UPDATE) @Function.fun(FunctionConstants.update) @Function(openLevel = {FunctionOpenEnum.API}) public PetTalent update(PetTalent data){ //记录日志 OperationLogBuilder.newInstance(PetTalent.MODEL_MODEL, PetTalentDataAudit.PETTALENT_UDPATE).record(data.queryById().fieldQuery(PetTalent::getPicList).fieldQuery(PetTalent::getPetShops),data); PetTalent existPetTalent = new PetTalent().queryById(data.getId()); if(existPetTalent !=null){ existPetTalent.fieldQuery(PetTalent::getPicList); existPetTalent.fieldQuery(PetTalent::getPetShops); existPetTalent.relationDelete(PetTalent::getPicList); existPetTalent.relationDelete(PetTalent::getPetShops); } data.updateById(); data.fieldSave(PetTalent::getPicList); data.fieldSave(PetTalent::getPetShops); return data; } Step3 重启看效果 修改宠物达人记录对应的字段,然后进入审计模块查看日志

    2024年5月23日
    69500
  • 3.4.3.3 SPI机制-扩展点

    扩展点结合拦截器的设计,oinone可以点、线、面一体化管理Function 扩展点用于扩展函数逻辑。扩展点类似于SPI机制(Service Provider Interface),是一种服务发现机制。这一机制为函数逻辑的扩展提供了可能。 一、构建第一个扩展点 自定义扩展点(举例) 在我们日常开发中,随着对业务理解的深入,往往还在一些逻辑中会预留扩展点,以便日后应对不同需求时可以灵活替换某一小块逻辑。 在3.3.4【模型的继承】一文中的PetCatItemQueryService,是独立新增函数只作公共逻辑单元。现在我们给它的实现类增加一个扩展点。在PetCatItemQueryServiceImpl的queryPage方法中原本会先查询PetCatType列表,我们这里假设这个逻辑随着业务发展未来会发生变化,我们可以预先预留【查询萌猫类型扩展点】 Step1 新增扩展点定义PetCatItemQueryCatTypeExtpoint 扩展点命名空间:在接口上用@Ext声明扩展点命名空间。会优先在本类查找@Ext,若为空则往接口向上做遍历查找,返回第一个查找到的@Ext.value注解值,使用该值再获取函数的命名空间;如果未找到,则返回扩展点全限定类名。所以我们这里扩展点命名空间为:pro.shushi.pamirs.demo.api.extpoint.PetCatItemQueryCatTypeExtpoint 扩展点技术名称:先取@ExtPoint.name,若为空则取扩展点接口方法名。所以我们这里技术名为queryCatType package pro.shushi.pamirs.demo.api.extpoint; import pro.shushi.pamirs.demo.api.model.PetCatType; import pro.shushi.pamirs.meta.annotation.Ext; import pro.shushi.pamirs.meta.annotation.ExtPoint; import java.util.List; @Ext public interface PetCatItemQueryCatTypeExtpoint { @ExtPoint(displayName = "查询萌猫类型扩展点") List<PetCatType> queryCatType(); } 图3-4-3-11 新增扩展点定义PetCatItemQueryCatTypeExtpoint Step2 修改PetCatItemQueryServiceImpl(用Ext.run模式调用) 修改queryPage,增加扩展点的使用代码。扩展点的使用有两种方式 方法一,使用命名空间和扩展点名称调用Ext.run(namespace, fun, 参数); 方法二,使用函数式接口调用Ext.run(函数式接口, 参数); 我们这里用了第二种方式 用PetCatItemQueryCatTypeExtpoint的全限定类名作为扩展点的命名空间(namespace) 用queryCatType的方法名作为扩展点的技术名称(name) 根据namespace+name去找到匹配扩展点实现,并根据规则是否匹配,以及优先级唯一确定一个扩展点实现去执行逻辑 package pro.shushi.pamirs.demo.core.service; ……省略依赖包 @Model.model(PetCatItem.MODEL_MODEL) @Component public class PetCatItemAction extends DataStatusBehavior<PetCatItem> { @Override protected PetCatItem fetchData(PetCatItem data) { return data.queryById(); } @Action(displayName = "启用") public PetCatItem dataStatusEnable(PetCatItem data){ data = super.dataStatusEnable(data); data.updateById(); return data; } @Function.Advanced(displayName = "查询模型数据的默认过滤条件", type = FunctionTypeEnum.QUERY, managed = true) @Function(openLevel = {LOCAL}) public String queryFilters() { StringBuilder sqlWhereCondition = new StringBuilder(); // List<PetCatType> typeList = new PetCatType().queryList(); List<PetCatType> typeList = Ext.run(PetCatItemQueryCatTypeExtpoint::queryCatType, new Object[]{}); if(!CollectionUtils.isEmpty(typeList)){ // sqlWhereCondition.append("type_id"); sqlWhereCondition.append(PStringUtils.fieldName2Column(LambdaUtil.fetchFieldName(PetCatItem::getTypeId))); sqlWhereCondition.append(StringUtils.SPACE).append(SqlConstants.IN).append(CharacterConstants.LEFT_BRACKET); for(PetCatType petCatType: typeList){ sqlWhereCondition.append(petCatType.getId()).append(CharacterConstants.SEPARATOR_COMMA); } sqlWhereCondition.deleteCharAt(sqlWhereCondition.lastIndexOf(CharacterConstants.SEPARATOR_COMMA)); sqlWhereCondition.append(StringUtils.SPACE).append(CharacterConstants.RIGHT_BRACKET); } return sqlWhereCondition.toString(); } ……省略其他函数 } 图3-4-3-12 修改PetCatItemQueryServiceImpl Step3 新增扩展点实现PetCatItemQueryCatTypeExtpointOne 扩展点命名空间要与扩展点定义一致,用@Ext(PetCatItemQueryCatTypeExtpoint.class) @ExtPoint.Implement声明这是在@Ext声明的命名空间下,且技术名为queryCatType的扩展点实现 package pro.shushi.pamirs.demo.core.extpoint; import pro.shushi.pamirs.demo.api.extpoint.PetCatItemQueryCatTypeExtpoint; import pro.shushi.pamirs.demo.api.model.PetCatType; import pro.shushi.pamirs.meta.annotation.Ext; import pro.shushi.pamirs.meta.annotation.ExtPoint; import pro.shushi.pamirs.meta.api.session.PamirsSession; import java.util.List; @Ext(PetCatItemQueryCatTypeExtpoint.class) public class PetCatItemQueryCatTypeExtpointOne implements PetCatItemQueryCatTypeExtpoint { @Override @ExtPoint.Implement(displayName = "查询萌猫类型扩展点的默认实现") public List<PetCatType> queryCatType() { PamirsSession.getMessageHub().info("走的是第一个扩展点"); List<PetCatType> typeList = new PetCatType().queryList(); return typeList; } } 图3-4-3-13 新增扩展点实现PetCatItemQueryCatTypeExtpointOne Step4…

    2024年5月23日
    1.1K00
  • 3.4.3 函数的相关特性

    本小章会从oinone的函数拥有三方面特性,展开介绍 面向对象,继承与多态 面向切面编程,拦截器 SPI机制,扩展点

Leave a Reply

登录后才能评论