4.2.6 框架之网络请求-拦截器

在整个http的链路中,异常错误对前端来说尤为重要,他作用在很多不同的场景,通用的比如500, 502等; 一个好的软件通常需要在不同的错误场景中做不同的事情。当用户cookie失效时,希望能自动跳转到登录页;当用户权限发生变更时,希望能跳转到一个友好的提示页;那么如何满足这些个性化的诉求呢?接下来让我们一起了解oinone前端网络请求-拦截器。

一、入口

在src目录下main.ts中可以看到VueOioProvider,这是系统功能提供者的注册入口

image.png

图4-2-6-1 VueOioProvider

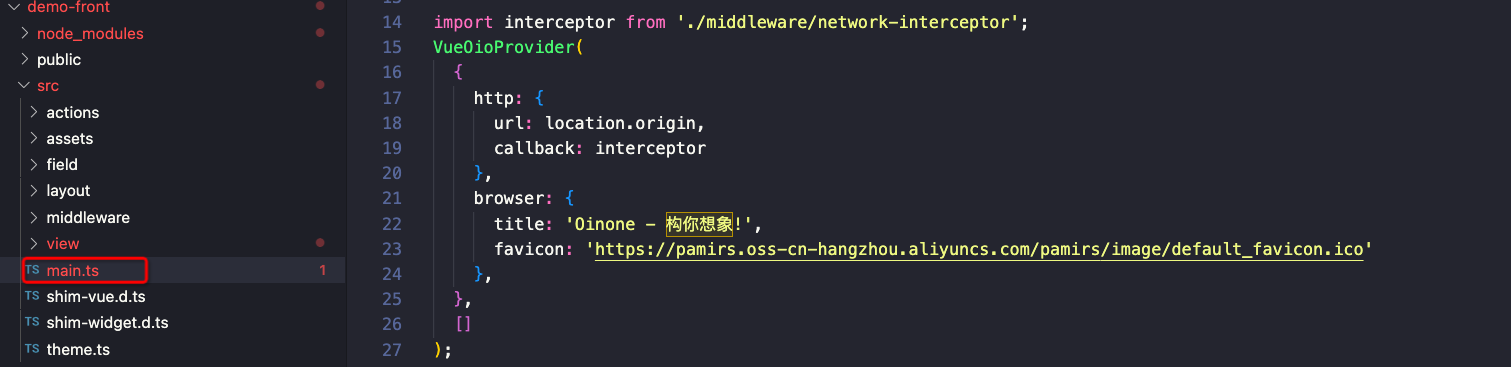
import interceptor from './middleware/network-interceptor';
VueOioProvider(
  {
    http: {
      callback: interceptor
    }
  },
  []
);

图4-2-6-2 拦截器的申明入口

二、middleware

在项目初始化时使用CLI构建初始化前端工程,在src/middleware有拦截器的默认实现:

image.png

图4-2-6-3 在src/middleware有拦截器的默认实现

三、interceptor

interceptor在请求返回后触发,interceptor有两个回调函数,error和next

error参数

  • graphQLErrors 处理业务异常

  • networkError 处理网络异常

next

  • extensions 后端返回扩展参数
const interceptor: RequestHandler = (operation, forward) => {
  return forward(operation).subscribe({
    error: ({ graphQLErrors, networkError }) => {
            console.log(graphQLErrors, networkError);
      // 默认实现 => interceptor error 
    },
    next: ({ extensions }) => {
            console.log(extensions);
      // 默认实现 => interceptor next 
    },
  });
};

图4-2-6-4 后端返回扩展参数

四、interceptor error

// 定义错误提示等级
const DEFAULT_MESSAGE_LEVEL = ILevel.ERROR;
// 错误提示等级 对应提示的报错
const MESSAGE_LEVEL_MAP = {
  [ILevel.ERROR]: [ILevel.ERROR],
  [ILevel.WARN]: [ILevel.ERROR, ILevel.WARN],
  [ILevel.INFO]: [ILevel.ERROR, ILevel.WARN, ILevel.INFO],
  [ILevel.SUCCESS]: [ILevel.ERROR, ILevel.WARN, ILevel.INFO, ILevel.SUCCESS],
  [ILevel.DEBUG]: [ILevel.ERROR, ILevel.WARN, ILevel.INFO, ILevel.SUCCESS, ILevel.DEBUG]
};
// 错误提示通用函数
const notificationMsg = (type: string = 'error', tip: string = '错误', desc: string = '') => {
  notification[type]({
    message: tip,
    description: desc
  });
};
// 根据错误等级 返回错误提示和类型
const getMsgInfoByLevel = (level: ILevel) => {
  let notificationType = 'info';
  let notificationText = translate('kunlun.common.info');
  switch (level) {
    case ILevel.DEBUG:
      notificationType = 'info';
      notificationText = translate('kunlun.common.debug');
      break;
    case ILevel.INFO:
      notificationType = 'info';
      notificationText = translate('kunlun.common.info');
      break;
    case ILevel.SUCCESS:
      notificationType = 'success';
      notificationText = translate('kunlun.common.success');
      break;
    case ILevel.WARN:
      notificationType = 'warning';
      notificationText = translate('kunlun.common.warning');
      break;
  }
  return {
    notificationType,
    notificationText
  };
};

error: ({ graphQLErrors, networkError }) => {
      if (graphQLErrors) {
        graphQLErrors.forEach(async ({ message, locations, path, extensions }) => {
          let { errorCode, errorMessage, messages } = extensions || {};
          // FIXME: extensions.errorCode
          if (errorCode == null) {
            const codeArr = /code: (\d+),/.exec(message);
            if (codeArr) {
              errorCode = Number(codeArr[1]);
            }
          }
          if (errorMessage == null) {
            const messageArr = /msg: (.*),/.exec(message);
            if (messageArr) {
              errorMessage = messageArr[1];
            }
          }
          // 错误通用提示
          if (messages && messages.length) {
            messages.forEach((m) => {
              notificationMsg('error', translate('kunlun.common.error'), m.message || '');
            });
          } else {
            notificationMsg('error', translate('kunlun.common.error'), errorMessage || message);
          }
            // 提示扩展信息 根据错误等级来提示对应级别的报错
          const extMessage = getValue(response, 'extensions.messages');
          if (extMessage && extMessage.length) {
            const messageLevelArr = MESSAGE_LEVEL_MAP[DEFAULT_MESSAGE_LEVEL];
            extMessage.forEach((m) => {
              if (messageLevelArr.includes(m.level)) {
                const { notificationType, notificationText } = getMsgInfoByLevel(m.level);
                notificationMsg(notificationType, notificationText, m.message || '');
              }
            });
          }

          // 消息模块的用户未登录错误码
          const MAIL_USER_NOT_LOGIN = 20080002;
          // 基础模块的用户未登录错误码
          const BASE_USER_NOT_LOGIN_ERROR = 11500001;
          if (
            [MAIL_USER_NOT_LOGIN, BASE_USER_NOT_LOGIN_ERROR].includes(Number(errorCode)) &&
            location.pathname !== '/auth/login'
          ) {
            const redirect_url = location.pathname;
            location.href = `/login?redirect_url=${redirect_url}`;
          }
          /**
           * 应用配置异常跳转至通用的教程页面
           */
          // 模块参数配置未完成
          const BASE_SYSTEM_CONFIG_IS_NOT_COMPLETED_ERROR = 11500004;
          if ([BASE_SYSTEM_CONFIG_IS_NOT_COMPLETED_ERROR].includes(Number(errorCode))) {
            const action = getValue(response, 'extensions.extra.action');
            if (action) {
              Action.registerAction(action.model, action);
              const searchParams: string[] = [];
              searchParams.push(`module=${action.module}`);
              searchParams.push(`model=${action.model}`);
              searchParams.push(`viewType=${action.viewType}`);
              searchParams.push(`actionId=${action.id}`);
              const href = `${origin}/page;${searchParams.join(';')}`;
              location.href = href;
            }
          }
        });
      }
      if (networkError) {
        const { name, result } = networkError;
        const errMsg = (result && result.message) || `${networkError}`;
        if (name && result && result.message) {
          notification.error({
            message: translate('kunlun.common.error'),
            description: `[${name}]: ${errMsg}`,
          });
        }
      }
    }

图4-2-6-5 interceptor error

四、interceptor next

next: ({ extensions }) => {
  if (extensions) {
    const messages = extensions.messages as {
      level: 'SUCCESS';
      message: string;
    }[];
    if (messages)
      messages.forEach((msg) => {
        notification.success({
          message: '操作成功',
          description: msg.message,
        });
      });
  }
}

图4-2-6-6 interceptor next

六、完整代码

import { NextLink, Operation } from 'apollo-link';
import { notification } from 'ant-design-vue';
import getValue from 'lodash/get';
import { Action, ILevel, translate } from '@kunlun/dependencies';

interface RequestHandler {
  (operation: Operation, forward: NextLink): Promise<any> | any;
}

const DEFAULT_MESSAGE_LEVEL = ILevel.ERROR;
const MESSAGE_LEVEL_MAP = {
  [ILevel.ERROR]: [ILevel.ERROR],
  [ILevel.WARN]: [ILevel.ERROR, ILevel.WARN],
  [ILevel.INFO]: [ILevel.ERROR, ILevel.WARN, ILevel.INFO],
  [ILevel.SUCCESS]: [ILevel.ERROR, ILevel.WARN, ILevel.INFO, ILevel.SUCCESS],
  [ILevel.DEBUG]: [ILevel.ERROR, ILevel.WARN, ILevel.INFO, ILevel.SUCCESS, ILevel.DEBUG]
};

const notificationMsg = (type: string = 'error', tip: string = '错误', desc: string = '') => {
  notification[type]({
    message: tip,
    description: desc
  });
};

const getMsgInfoByLevel = (level: ILevel) => {
  let notificationType = 'info';
  let notificationText = translate('kunlun.common.info');
  switch (level) {
    case ILevel.DEBUG:
      notificationType = 'info';
      notificationText = translate('kunlun.common.debug');
      break;
    case ILevel.INFO:
      notificationType = 'info';
      notificationText = translate('kunlun.common.info');
      break;
    case ILevel.SUCCESS:
      notificationType = 'success';
      notificationText = translate('kunlun.common.success');
      break;
    case ILevel.WARN:
      notificationType = 'warning';
      notificationText = translate('kunlun.common.warning');
      break;
  }
  return {
    notificationType,
    notificationText
  };
};

const interceptor: RequestHandler = (operation, forward) => {
  return forward(operation).subscribe({
    error: ({ graphQLErrors, networkError, response }) => {
      if (graphQLErrors) {
        graphQLErrors.forEach(async ({ message, locations, path, extensions }) => {
          let { errorCode, errorMessage, messages } = extensions || {};
          // FIXME: extensions.errorCode
          if (errorCode == null) {
            const codeArr = /code: (\d+),/.exec(message);
            if (codeArr) {
              errorCode = Number(codeArr[1]);
            }
          }
          if (errorMessage == null) {
            const messageArr = /msg: (.*),/.exec(message);
            if (messageArr) {
              errorMessage = messageArr[1];
            }
          }
          if (messages && messages.length) {
            messages.forEach((m) => {
              notificationMsg('error', translate('kunlun.common.error') || '', m.message || '');
            });
          } else {
            notificationMsg('error', translate('kunlun.common.error') || '', errorMessage || message);
          }

          const extMessage = getValue(response, 'extensions.messages');
          if (extMessage && extMessage.length) {
            const messageLevelArr = MESSAGE_LEVEL_MAP[DEFAULT_MESSAGE_LEVEL];
            extMessage.forEach((m) => {
              if (messageLevelArr.includes(m.level)) {
                const { notificationType, notificationText } = getMsgInfoByLevel(m.level);
                notificationMsg(notificationType, notificationText, m.message || '');
              }
            });
          }
          console.log(extMessage);

          // 消息模块的用户未登录错误码
          const MAIL_USER_NOT_LOGIN = 20080002;
          // 基础模块的用户未登录错误码
          const BASE_USER_NOT_LOGIN_ERROR = 11500001;
          if (
            [MAIL_USER_NOT_LOGIN, BASE_USER_NOT_LOGIN_ERROR].includes(Number(errorCode)) &&
            location.pathname !== '/auth/login'
          ) {
            const redirect_url = location.pathname;
            location.href = `/login?redirect_url=${redirect_url}`;
          }
          /**
           * 应用配置异常跳转至通用的教程页面
           */
          // 模块参数配置未完成
          const BASE_SYSTEM_CONFIG_IS_NOT_COMPLETED_ERROR = 11500004;
          if ([BASE_SYSTEM_CONFIG_IS_NOT_COMPLETED_ERROR].includes(Number(errorCode))) {
            const action = getValue(response, 'extensions.extra.action');
            if (action) {
              Action.registerAction(action.model, action);
              const searchParams: string[] = [];
              searchParams.push(`module=${action.module}`);
              searchParams.push(`model=${action.model}`);
              searchParams.push(`viewType=${action.viewType}`);
              searchParams.push(`actionId=${action.id}`);
              const href = `${origin}/page;${searchParams.join(';')}`;
              location.href = href;
            }
          }
        });
      }
      if (networkError) {
        const { name, result } = networkError;
        const errMsg = (result && result.message) || `${networkError}`;
        if (name && result && result.message) {
          notification.error({
            message: translate('kunlun.common.error') || '',
            description: `[${name}]: ${errMsg}`
          });
        }
      }
    }
  });
};

export default interceptor;

图4-2-6-7 完整代码

Oinone社区 作者:史, 昂原创文章,如若转载,请注明出处:https://doc.oinone.top/oio4/9307.html

访问Oinone官网:https://www.oinone.top获取数式Oinone低代码应用平台体验

(0)
史, 昂的头像史, 昂数式管理员
上一篇 2024年5月23日 am8:31
下一篇 2024年5月23日 am8:33

相关推荐

  • 自定义组件

    1. 定义组件介绍 平台提供了大多数的通用组件,面对企业个性话需求、复杂的业务场景,我们也提供了自定义组件的能力,帮助企业更快实施业务需求。 自定义组件包含“组件画廊”“组件排序”“元件画廊”“元件属性设计”四个页面。 1.1 组件与元件 在介绍如何自定义组件前,需要先了解以下概念: 组件:页面设计的组件库中看到的是组件。每个组件都有自己的属性面板,通过属性、字段决定组件逻辑,而自定义组件就是需要构建出组件自身的属性信息,再结合业务配置组件的属性、使用组件。 一个组件在不同的业务类型、视图类型、单值/多值,其属性面板是不同的,不同业务类型、视图类型、单值/多值的组合我们成为元件,多种组合即为多个元件,所以一个组件包括多个元件。 元件:一个组件可以对应多个元件。在创建时明确元件所适用的字段业务类型、单/多值、视图类型,在画布中切换元件时,会结合当前组件的字段业务类型、单/多值、所在视图类型确定可以使用哪一个元件。 此处切换的也是元件。 示例:创建一个“下拉选”的组件,其中可以包含“下拉单选”“下拉多选”两个元件。“下拉选”组件从组件库中拖入时,设置单值时使用“下拉单选”元件,设置多值时使用“下拉多选”元件。 2. 组件管理 2.1 组件创建 在组件画廊页面,点击添加组件,在弹窗中完善信息创建组件。 2.2 组件操作 自定义组件支持“搜索、删除、作废、查看引用关系、管理元件、编辑、低无一体、排序”的操作。 搜索:默认搜索可见组件,可切换“全部、可用、废弃”搜索组件,也可使用组件名称搜索。 删除:若组件未被引用,则可以直接删除。 作废:组件作废后,不可在画布中展示,不可在组件切换时使用,但已使用的数据不影响。 查看引用关系:可以查看存在引用关系的页面,支持点击跳转到对应页面的设计页面。仅当组件无引用关系时才支持删除。 管理元件:点击进入元件的管理页面。 编辑:可修改组件名称、组件图表、组件描述。 低无一体:比较复杂,在第5章中单独讲解。 排序:进入排序页,可拖动排序自定义组件。自定义组件会插在系统组件之后。可以点击“查看排序结果”选项页查看最终排序结果。排序同样会更新画布中的组件库顺序。 3. 元件管理 3.1 元件创建 在元件画廊页面,点击添加元件,在弹窗中完善信息创建一个元件。 3.2 元件操作 元件支持“删除、作废、查看引用关系、编辑、设计元件属性”的操作。 删除:若元件未被引用,则可以直接删除。 作废:元件作废后,不影响原来已使用的元件,无法新添加、使用该元件。 查看引用关系:可以查看存在引用关系的页面,支持点击跳转到对应页面的设计页面。仅当元件无引用关系时才支持删除。此处的引用关系数量会小于等于组件引用关系的数量。 编辑:可修改元件名称、支持视图类型、元件描述。 设计元件属性:比较复杂,将在第4章中单独讲解。 4. 设计元件属性 元件属性设计页面主要操作集中在这三部分,分别是①视图切换②属性面板设计区③复制功能 视图切换:元件创建时选择的支持视图类型,在①区域平铺可切换对应视图的属性面板进行设计。 属性面板设计区:可将组件拖入属性面板设计区进行设计,设计的是自定义组件的属性面板,左侧组件库和页面设计的组件库相同,仍然支持创建字段或使用模型字段,右侧进行元数据面板、属性面板设置。 复制功能:可将已设置好的属性面板复制到其他视图,提高设计效率。 5. 低无一体 低无一体简单讲就是组件代码上传,通过载入代码使组件在设计页面和实现页面可见和交互。 系统内置的属性不满足需求时,要用低无一体写代码,定制属性,比如从模型中拖拽设计就是内置的属性,从组件库中设置,就要配合低无一体,否则无效。 首次进入组件设计或组件中的元件变更时需要生成SDK。 生成结束后展示SDK生成时间,并且“下载模版工程”按钮可用。 点击下载模版工程,会自动下载模板工程。 在模版工程中编写前端代码。 根据实际需求上传JS、CSS文件后提交即可。

    2024年6月20日
    1.0K00
  • 4.1.15 框架之网关协议

    一、多端协议 协议内容格式 请求头 头信息 headerMap "sec-fetch-mode" -> "cors" "content-length" -> "482" "sec-fetch-site" -> "none" "accept-language" -> "zh-CN,zh;q=0.9" "cookie" -> "pamirs_uc_session_id=241af6a1dbba41a4b35afc96ddf15915" "origin" -> "chrome-extension://flnheeellpciglgpaodhkhmapeljopja" "accept" -> "application/json" "host" -> "127.0.0.1:8090" "connection" -> "keep-alive" "content-type" -> "application/json" "accept-encoding" -> "gzip, deflate, br" "user-agent" -> "Mozilla/5.0 (Macintosh; Intel Mac OS X 10_15_7) AppleWebKit/537.36 (KHTML, like Gecko) Chrome/88.0.4324.192 Safari/537.36" "sec-fetch-dest" -> "empty" 图4-1-15-1 头信息 headerMap 请求地址 requestUrl 例如 http://127.0.0.1:8090/pamirs/DemoCore?scene=redirectListPage HTTP参数键值对 parameterMap url中queryString在服务端最终会转化为参数键值对。 请求体格式 请求体格式采用GraphQL协议。请求体格式分为API请求和上下文变量。以商品的test接口为例,请求格式如下。 API请求格式 query{ petShopProxyQuery { queryPage(page: {currentPage: 1, size: 1}, queryWrapper: {rsql: "(1==1)"}) { content { income id code creater { id nickname } relatedShopName shopName petTalents { id name } items { id itemName } } size totalPages totalElements } } } 图4-1-15-2 API请求格式 上下文变量 variables 请求策略requestStrategy 名称 类型 说明 checkStrategy CheckStrategyEnum 校验策略:RETURN_WHEN_COMPLETED -?全部校验完成再返回结果RETURN_WHEN_ERROR -?校验错误即返回结果 msgLevel InformationLevelEnum 消息级别:DEBUG("debug", "调试", "调试"),INFO("info", "信息", "信息"),WARN("warn", "警告", "警告"),SUCCESS("success", "成功", "成功"),ERROR("error", "错误", "错误")不设置,则只返回错误消息;上方消息级别清单,越往下级别越高。只有消息的级别高于或等于该设定级别才返回,否则会被过滤。 onlyValidate Boolean 只校验不提交数据 表4-1-15-1 请求策略requestStrategy 上下文变量式例如下。 { "requestStrategy": { "checkStrategy": "RETURN_WHEN_COMPLETED", "msgLevel":"INFO" } } 图4-1-15-3 上下文变量式例 响应体格式 协议响应内容包括data、extensions和errors三部分,extensions和errors是可缺省的。data部分为业务数据返回值。应用业务层可以在extensions中添加API返回值之外的扩展信息。extensions中包含success、messages和extra三部分,success标识请求是否成功。如果业务正确处理并返回,则errors部分为空;如果业务处理返回失败,则将错误信息添加到errors中。 正确响应格式示例如下。 { "data": { "petShopProxyQuery": { "queryPage": { "content": [ { "id": "246675081504233477", "creater": { "id": "10001" }, "relatedShopName": "oinone宠物店铺001", "shopName": "oinone宠物店铺001", "petTalents": […

  • 3.3.3 模型的数据管理器

    数据管理器和数据构造器是Oinone为模型自动赋予的Function是内在数据管理能力,数据管理器针对存储模型是方便在大家编程模式下可以利用数据管理器Function快速达到相关数据操作的目的。数据构造器则主要用于模型进行初始化时字段默认值计算和页面交互 数据管理器 只有存储模型才有数据管理器。如果@Model.Advanced注解设置了dataManager属性为false,则表示在UI层不开放默认数据管理器。开放级别为API则表示UI层可以通过HTTP请求利用4.1.15【Pamirs标准网关协议】进行数据交互。 模型默认数据读管理器 函数编码 描述 开放级别 queryByPk 根据主键查询单条记录,会进行主键值检查 Local、Remote queryByEntity 根据实体查询单条记录 Local、Remote、Api queryByWrapper 根据查询类查询单条记录 Local、Remote queryListByEntity 根据实体查询返回记录列表 Local、Remote queryListByWrapper 根据查询类查询记录列表 Local、Remote queryListByPage 根据实体分页查询返回记录列表 Local、Remote queryListByPageAndWrapper 根据查询类分页查询记录列表 Local、Remote queryPage 分页查询返回分页对象,分页对象中包含记录列表 Local、Remote、Api countByEntity 按实体条件获取记录数量 Local、Remote countByWrapper 按查询类条件获取记录数量 Local、Remote 表3-3-3-1 模型默认数据读管理器 模型默认数据写管理器 函数编码 描述 开放级别 createOne 提交新增单条记录 Local、Remote createOrUpdate 新增或更新,需要为模型设置唯一索引,如果数据库检测到索引冲突,会更新数据,若未冲突则新增数据 Local、Remote updateByPk 根据主键更新单条记录,会进行主键值检查 Local、Remote updateByUniqueField 条件更新,条件中必须包含唯一索引字段 Local、Remote updateByEntity 按实体条件更新记录 Local、Remote、Api updateByWrapper 按查询类条件更新记录 Local、Remote createBatch 批量新增记录 Local、Remote createOrUpdateBatch 批量新增或更新记录 Local、Remote updateBatch 根据主键批量更新记录,会进行主键值检查 Local、Remote deleteByPk 根据主键删除单条记录,会进行主键值检查 Local、Remote deleteByPks 根据主键批量删除,会进行主键值检查 Local、Remote deleteByUniqueField 按条件删除记录,条件中必须包含唯一索引字段 Local、Remote deleteByEntity 根据实体条件删除 Local、Remote、Api deleteByWrapper 根据查询类条件删除 Local、Remote createWithField 新增实体记录并更新实体字段记录 Local、Remote、Api updateWithField 更新实体记录并更新实体字段记录 Local、Remote、Api deleteWithFieldBatch 批量删除实体记录并删除关联关系 Local、Remote、Api 表3-3-3-2 模型默认数据写管理器 如果模型继承IdModel,模型会自动设置主键设置为id,则会继承queryById、updateById和deleteById函数。 queryById(详情,根据ID查询单条记录,开放级别为Remote) updateById(提交更新单条记录,根据ID更新单条记录,开放级别为Remote) deleteById(提交删除单条记录,根据ID删除单条记录,开放级别为Remote) 如果模型继承CodeModel,模型也会继承IdModel的数据管理器,编码字段code为唯一索引字段。在新增数据时会根据编码生成规则自动设置编码字段code的值,继承queryByCode、updateByCode和deleteByCode函数。 queryByCode(详情,根据code查询单条记录,开放级别为Remote) updateByCode(提交更新单条记录,根据code更新单条记录,开放级别为Remote) deleteByCode(提交删除单条记录,根据code删除单条记录,开放级别为Remote) 没有主键或唯一索引的模型,在UI层不会开放默认数据写管理器。 #### 使用场景 图3-3-3-1 数据管理器使用场景 数据构造器 模型数据构造器 construct:供前端新开页面构造默认数据使用。所有模型都拥有construct构造器,默认会将字段上配置的默认值返回给前端,另外可以在子类中覆盖construct方法。数据构造器 construct函数的开放级别为API,函数类型为QUERY查询函数,系统将识别模型中的以construct命名的函数强制设置为API开放级别和QUERY查询类型。 可以使用@Field的defaultValue属性配置字段的默认值。注意,枚举的默认值为枚举的name。

    2024年5月23日
    1.3K10
  • 开发者

    1.开发者 1.1 Webhook 通过webhook流程节点可以向第三方系统发送请求。 1.1.1 请求方式 支持GET、POST两种请求方式。 1.1.2 URL 在Webhook URL中填写发送请求的HTTP地址。 1.1.3 Headers&Body Headers的value支持通过表达式配置变量 Body的数据类型支持KEY_VALUE和APPLICATION_JSON两种。

    2024年6月20日
    1.0K00
  • 3.3.7 字段之序列化方式

    本文核心是带大家全面了解oinone的序列方式,包括支持的序列化类型、注意点、如果新增客户化序列化方式以及字段默认值的反序列化。 一、数据存储的序列化 (举例) 使用@Field注解的serialize属性来配置非字符串类型属性的序列化与反序列化方式,最终会以序列化后的字符串持久化到存储中。 ### Step1 新建PetItemDetail模型、并为PetItem添加两个字段 PetItemDetail继承TransientModel,增加两个字段,分别为备注和备注人 package pro.shushi.pamirs.demo.api.tmodel; import pro.shushi.pamirs.meta.annotation.Field; import pro.shushi.pamirs.meta.annotation.Model; import pro.shushi.pamirs.meta.base.TransientModel; import pro.shushi.pamirs.user.api.model.PamirsUser; @Model.model(PetItemDetail.MODEL_MODEL) @Model(displayName = "商品详情",summary = "商品详情",labelFields = {"remark"}) public class PetItemDetail extends TransientModel { public static final String MODEL_MODEL="demo.PetItemDetail"; @Field.String(min = "2",max = "20") @Field(displayName = "备注",required = true) private String remark; @Field(displayName = "备注人",required = true) private PamirsUser user; } 图3-3-7-1 PetItemDetail继承TransientModel 修改PetItem,增加两个字段petItemDetails类型为List和tags类型为List,并设置为不同的序列化方式,petItemDetails为JSON(缺省就是JSON,可不配),tags为COMMA。同时设置 @Field.Advanced(columnDefinition = varchar(1024)),防止序列化后存储过长 package pro.shushi.pamirs.demo.api.model; import pro.shushi.pamirs.demo.api.tmodel.PetItemDetail; import pro.shushi.pamirs.meta.annotation.Field; import pro.shushi.pamirs.meta.annotation.Model; import pro.shushi.pamirs.meta.enmu.NullableBoolEnum; import java.math.BigDecimal; import java.util.List; @Model.model(PetItem.MODEL_MODEL) @Model(displayName = "宠物商品",summary="宠物商品",labelFields = {"itemName"}) public class PetItem extends AbstractDemoCodeModel{ public static final String MODEL_MODEL="demo.PetItem"; @Field(displayName = "商品名称",required = true) private String itemName; @Field(displayName = "商品价格",required = true) private BigDecimal price; @Field(displayName = "店铺",required = true) @Field.Relation(relationFields = {"shopId"},referenceFields = {"id"}) private PetShop shop; @Field(displayName = "店铺Id",invisible = true) private Long shopId; @Field(displayName = "品种") @Field.many2one @Field.Relation(relationFields = {"typeId"},referenceFields = {"id"}) private PetType type; @Field(displayName = "品种类型",invisible = true) private Long typeId; @Field(displayName = "详情", serialize = Field.serialize.JSON, store = NullableBoolEnum.TRUE) @Field.Advanced(columnDefinition = "varchar(1024)") private List<PetItemDetail> petItemDetails; @Field(displayName = "商品标签",serialize = Field.serialize.COMMA,store = NullableBoolEnum.TRUE,multi = true) @Field.Advanced(columnDefinition = "varchar(1024)") private…

    2024年5月23日
    1.1K00

Leave a Reply

登录后才能评论