4.1.20 框架之Session

在日常开发中,我们经常需要把一些通用的信息放入程序执行的上下文中,以便业务开发人员快速获取。那么oinone的PamirsSession就是来解决此类问题的。

一、PamirsSession介绍

在oinone的体系中PamirsSession是执行上下文的承载,您能从中获取业务基础信息、指令信息、元数据信息、环境信息、请求参数,以及前后端MessageHub等。在前面的学习过程中我们已经多次接触到了如何使用PamirsSession:

  1. 在4.1.19【框架之网关协议-后端占位符】一文中,使用PamirsSession.getUserId()来获取当前登入用户Id,诸如此类的业务基础信息;

  2. 在4.1.18【框架之网关协议-variables变量】一文中,使用PamirsSession.getRequestVariables()得到PamirsRequestVariables对象,进而获取前端请求的相关信息;

  3. 在4.1.5【模型之持久层配置】一文中,使用PamirsSession.directive(),来操作元位指令系统,进而影响执行策略;

  4. 在4.1.13【Action之校验】、3.4.1【构建第一个Function】等文章中,都用到PamirsSession.getMessageHub()来设置返回消息。

二、构建模块自身Session(举例)

不同的应用场景对PamirsSession的诉求是不一样的,这个时候我们就可以去扩展PamirsSession来达到我们的目的

构建模块自身Session的步骤

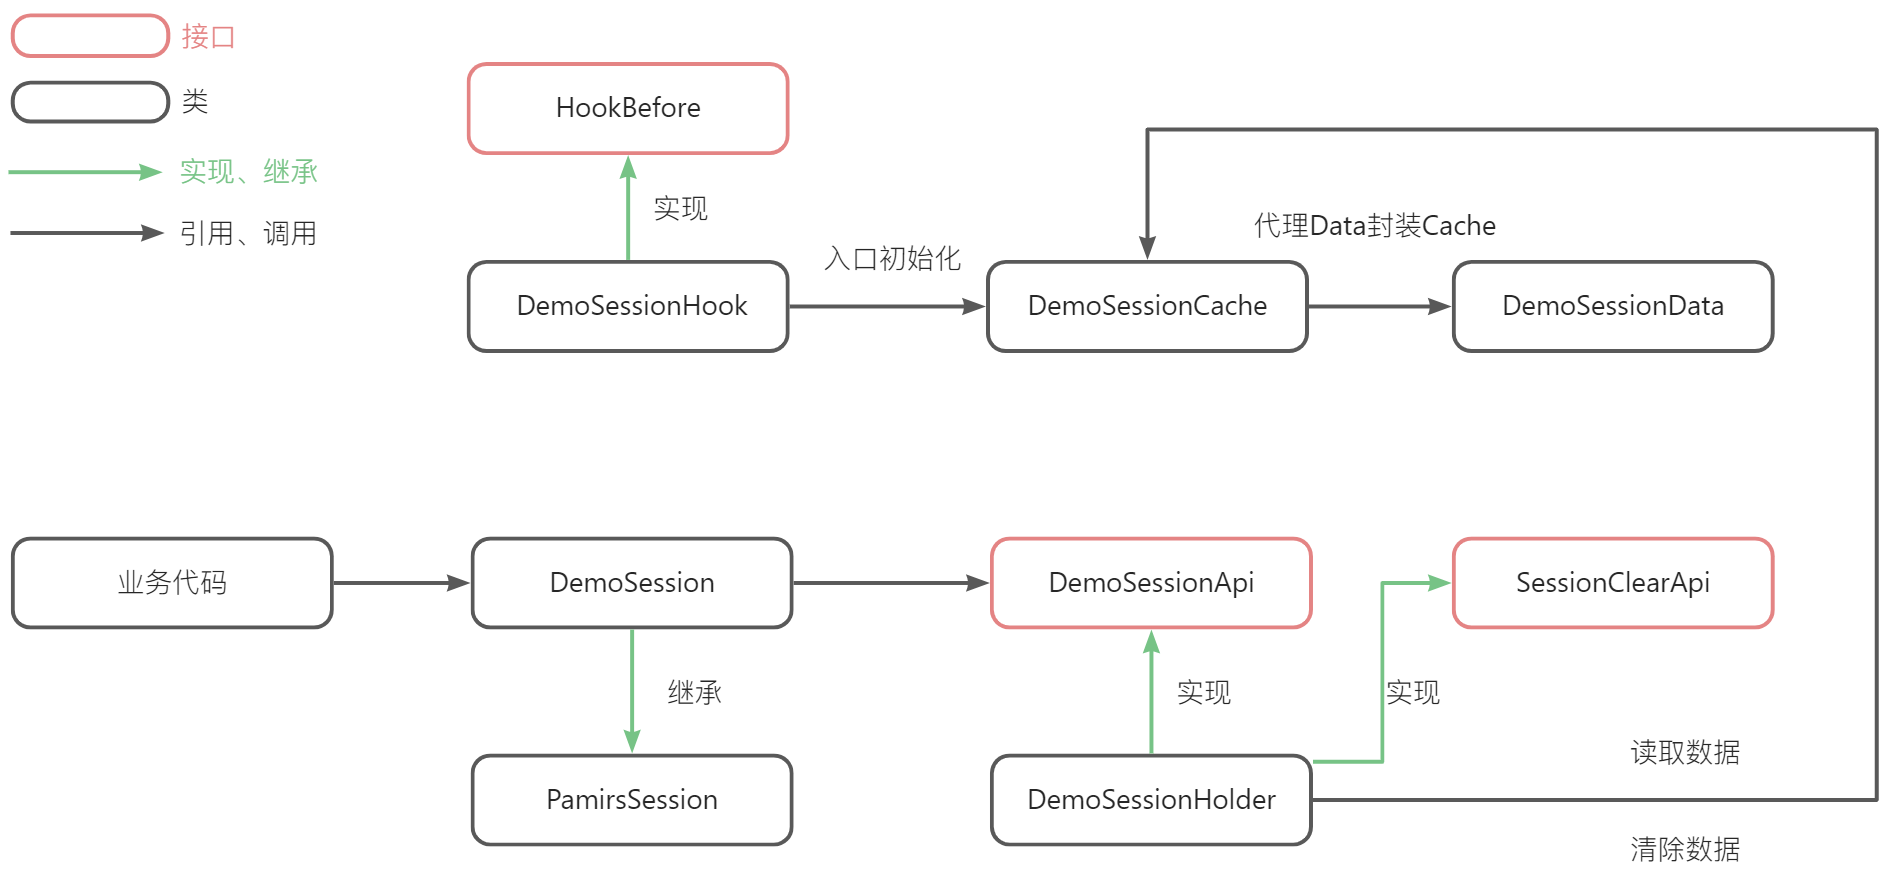
  1. 构建自身特有的数据结构XSessionData

  2. 对XSessionData进行线程级缓存封装

  3. 利用Hook机制初始化XSessionData并放到ThreadLocal中

  4. 定义自身XSessionApi

  5. 实现XSessionApi接口、SessionClearApi。在请求结束时会调用SessionClearApi的clear方法

  6. 定义XSession继承PamirsSession

扩展PamirsSession的经典案例设计图
4.1.20 框架之Session

图4-1-20-1 扩展PamirsSession的经典案例设计图

构建Demo应用自身Session

下面的例子为给Session放入当前登陆用户

Step1 新建DemoSessionData类

构建自身特有的数据结构DemoSessionData,增加一个模型为PamirsUser的字段user,DemoSessionData用Data注解,注意要用Oinone平台提供的@Data

package pro.shushi.pamirs.demo.core.session;

import pro.shushi.pamirs.meta.annotation.fun.Data;
import pro.shushi.pamirs.user.api.model.PamirsUser;

@Data
public class DemoSessionData {

    private PamirsUser user;

}

图4-1-20-2 新建DemoSessionData类

Step2 新建DemoSessionCache

对DemoSessionData进行线程级缓存封装

package pro.shushi.pamirs.demo.core.session;

import pro.shushi.pamirs.meta.api.CommonApiFactory;
import pro.shushi.pamirs.meta.api.session.PamirsSession;
import pro.shushi.pamirs.user.api.model.PamirsUser;
import pro.shushi.pamirs.user.api.service.UserService;

public class DemoSessionCache {
    private static final ThreadLocal<DemoSessionData> BIZ_DATA_THREAD_LOCAL = new ThreadLocal<>();
    public static PamirsUser getUser(){
        return BIZ_DATA_THREAD_LOCAL.get()==null?null:BIZ_DATA_THREAD_LOCAL.get().getUser();
    }
    public static void init(){
        if(getUser()!=null){
            return ;
        }
        Long uid = PamirsSession.getUserId();
        if(uid == null){
            return;
        }
        PamirsUser user = CommonApiFactory.getApi(UserService.class).queryById(uid);
        if(user!=null){
            DemoSessionData demoSessionData = new DemoSessionData();
            demoSessionData.setUser(user);
            BIZ_DATA_THREAD_LOCAL.set(demoSessionData);
        }
    }
    public static void clear(){
        BIZ_DATA_THREAD_LOCAL.remove();
    }
}

图4-1-20-3 对DemoSessionData进行线程级缓存封装

Step3 新建DemoSessionHook

利用Hook机制,调用DemoSessionCache的init方法初始化DemoSessionData并放到ThreadLocal中。

@Hook(module= DemoModule.MODULE_MODULE), 规定只有增对DemoModule模块访问的请求该拦截器才会生效,不然其他模块的请求都会被DemoSessionHook拦截。

package pro.shushi.pamirs.demo.core.hook;

import org.springframework.stereotype.Component;
import pro.shushi.pamirs.demo.api.DemoModule;
import pro.shushi.pamirs.demo.core.session.DemoSessionCache;
import pro.shushi.pamirs.meta.annotation.Hook;
import pro.shushi.pamirs.meta.api.core.faas.HookBefore;
import pro.shushi.pamirs.meta.api.dto.fun.Function;

@Component
public class DemoSessionHook implements HookBefore {
    @Override
    @Hook(priority = 1,module = DemoModule.MODULE_MODULE)
    public Object run(Function function, Object... args) {
        DemoSessionCache.init();
        return function;
    }
}

图4-1-20-4 新建DemoSessionHook

Step4 新建DemoSessionApi

package pro.shushi.pamirs.demo.core.session;

import pro.shushi.pamirs.meta.api.CommonApi;
import pro.shushi.pamirs.user.api.model.PamirsUser;

public interface DemoSessionApi extends  CommonApi {
    PamirsUser getUser();
}

图4-1-20-5 新建DemoSessionApi

Step5 新建DemoSessionHolder

  1. 实现DemoSessionApi接口

  2. 实现SessionClearApi接口,在请求结束时会调用SessionClearApi的clear方法

package pro.shushi.pamirs.demo.core.session;

import org.springframework.stereotype.Component;
import pro.shushi.pamirs.meta.api.core.session.SessionClearApi;
import pro.shushi.pamirs.user.api.model.PamirsUser;

@Component
public class DemoSessionHolder implements DemoSessionApi, SessionClearApi {
    @Override
    public PamirsUser getUser() {
        return DemoSessionCache.getUser();
    }

    @Override
    public void clear() {
        DemoSessionCache.clear();
    }
}

图4-1-20-6 新建DemoSessionHolder

Step6 新建DemoSession

package pro.shushi.pamirs.demo.core.session;

import pro.shushi.pamirs.meta.api.CommonApiFactory;
import pro.shushi.pamirs.meta.api.session.PamirsSession;
import pro.shushi.pamirs.user.api.model.PamirsUser;

public class DemoSession extends PamirsSession {
    public static PamirsUser getUser(){
        return CommonApiFactory.getApi(DemoSessionApi.class).getUser();
    }
}

图4-1-20-7 新建DemoSession

Step7 修改UserPlaceHolder

使用DemoSession.getUser().getId()替代PamirsSession.getUserId()

package pro.shushi.pamirs.demo.core.placeholder;

import org.springframework.stereotype.Component;
import pro.shushi.pamirs.demo.core.session.DemoSession;
import pro.shushi.pamirs.user.api.AbstractPlaceHolderParser;

@Component
public class UserPlaceHolder extends AbstractPlaceHolderParser {
    @Override
    protected String value() {
        return DemoSession.getUser().getId().toString();
    }

    @Override
    public Integer priority() {
        return 10;
    }

    @Override
    public Boolean active() {
        return Boolean.TRUE;
    }

    @Override
    public String namespace() {
        return "currentUserId";
    }
}

图4-1-20-8 修改UserPlaceHolder

Step8 重启看效果

效果跟4.1.19【框架之网关协议-后端占位符】一文中的例子一样

Oinone社区 作者:史, 昂原创文章,如若转载,请注明出处:https://doc.oinone.top/oio4/9295.html

访问Oinone官网:https://www.oinone.top获取数式Oinone低代码应用平台体验

Like (0)
史, 昂's avatar史, 昂数式管理员
Previous 2024年5月23日 am8:43
Next 2024年5月23日 am8:45

相关推荐

  • 工作台

    有工作台权限的用户,默认登录页为工作台,也可以通过APP Finder进入工作台。 1. 快捷处理 右上角消息中会气泡展示未处理或未读的操作,点击展开后可以点过去进行快捷处理。 2. 查看、处理流程 2.1 流程查看 流程管理页面共同点: 1包含选项分类筛选 2包含标签筛选 3包含应用下拉选筛选 4包含根据流程名称搜素 流程管理页面名词解释: 待办:当前登录用户未处理的流程节点 我发起的:当前登录用户人为触发的流程(模型触发) 抄送:抄送给当前登录用户的节点(审批/填写) 我已办结:由当前登录用户完成人工/自动同意、人工拒绝或人工填写的节点 无需办理:当前登录用户转交的任务/被退回、被撤销、被或签、被其他分支任务拒绝的还未办理的任务 站内信:当前登录用户收到的站内信 2.2 流程处理 每条流程数据下方有动作,点击进入流程处理页面,大致分为详情页和操作页。 待办中点击“审批/填写”会进入流程操作页。审批操作页可能包含“同意、拒绝、退回、加签、转交、返回”,填写操作页可能包含“提交、暂存”,审批操作页包含哪些动作由流程设计决定。 我发起的、抄送、我已办结、无需处理点击“查看”会进入流程详情页。 3. 应用快捷入口 应用中心中星标的收藏应用会展示在此处,点击可快捷进入应用。 应用中心中已安装的应用点击星标即可收藏。

    2024年6月20日
    2.3K00
  • 3.5.3 Action的类型

    各类动作我们都碰到过,但都没有展开讲过。这篇文章我们来系统介绍下oinone涉及到的所有Action类型。 一、动作类型 服务器动作ServerAction 类似于Spring MVC的控制器Controller,通过模型编码和动作名称路由,定义存储模型或代理模型将为该模型自动生成动作名称为consturct,queryOne,queryPage,create,update,delete,deleteWithFieldBatch的服务器动作。定义传输模型将为该模型自动生成动作名称为consturct的服务器动作 窗口动作ViewAction 站内跳转,通过模型编码和动作名称路由。系统将为存储模型和代理模型自动生成动作名称为redirectDetailPage的跳转详情页窗口动作,动作名称为redirectListPage的跳转列表页窗口动作,动作名称为redirectCreatePage的跳转新增页窗口动作,动作名称为redirectUpdatePage的跳转更新页窗口动作。 跳转动作UrlAction 外链跳转 客户端动作ClientAction 调用客户端函数 二、默认动作 如果在UI层级,有开放新增语义函数,则会默认生成新增的窗口动作ViewAction,跳转到新增页面 如果在UI层级,有开放更新语义函数,则会默认生成修改的窗口动作ViewAction,跳转到更新页面 如果在UI层级,有开放删除语义函数,则会默认生成删除的客户端动作ClientAction,弹出删除确认对话框 三、第一个服务器动作ServerAction 回顾第一个ServerAction 第一个ServerAction是在3.3.2【模型的类型】一文中的“代理模型”部分出现的,再来看下当时的定义代码 package pro.shushi.pamirs.demo.core.action; ……引用类 @Model.model(PetShopProxy.MODEL_MODEL) @Component public class PetShopProxyAction extends DataStatusBehavior<PetShopProxy> { @Override protected PetShopProxy fetchData(PetShopProxy data) { return data.queryById(); } @Action(displayName = "启用") public PetShopProxy dataStatusEnable(PetShopProxy data){ data = super.dataStatusEnable(data); data.updateById(); return data; } ……其他代码 } 图3-5-3-1 回顾第一个ServerAction @Action注解将创建服务器动作,并@Model.model绑定 自定义ServerAction请勿使用get、set、unset开头命名方法或toString命名方法。 ServerAction之校验(举例) Step1 为动作配置校验表达式 使用@Validation注解为PetShopProxyAction的dataStatusEnable服务端动作进行校验表达式配置 package pro.shushi.pamirs.demo.core.action; ……引用类 @Model.model(PetShopProxy.MODEL_MODEL) @Component public class PetShopProxyAction extends DataStatusBehavior<PetShopProxy> { @Override protected PetShopProxy fetchData(PetShopProxy data) { return data.queryById(); } @Validation(ruleWithTips = { @Validation.Rule(value = "!IS_BLANK(data.code)", error = "编码为必填项"), @Validation.Rule(value = "LEN(data.shopName) < 128", error = "名称过长,不能超过128位"), }) @Action(displayName = "启用") public PetShopProxy dataStatusEnable(PetShopProxy data){ data = super.dataStatusEnable(data); data.updateById(); return data; } ……其他代码 } 图3-5-3-2 为动作配置校验表达式 注: ruleWithTips可以声明多个校验规则及错误提示; IS_BLANK和LEN为内置文本函数,更多内置函数详见4.1.12【函数之内置函数与表达式】一文; 当内置函数不满足时参考4.1.13【Action之校验】一文。 Step2 重启看效果 在商店管理页面点击【启用】得到了预期返回错误信息,显示"编码为必填项" 图3-5-3-3 在商店管理页面点击启用得到了预期返回错误信息 ServerAction之前端展示规则(举例) 既然后端对ServerAction发起提交做了校验,那能不能在前端就不展示呢?当然可以,我们现在就来试下。 Step1 配置PetShopProxyAction的dataStatusEnable的前端出现规则 用注解@Action.Advanced(invisible="!(activeRecord.code !== undefined && !IS_BLANK(activeRecord.code))")来表示,注意这里配对invisible是给前端识别的,所以写法上跟后端的校验有些不一样,但如内置函数IS_BLANK这些是前后端一致实现的,activeRecord在前端用于表示当前记录。 package pro.shushi.pamirs.demo.core.action; ……引用类 @Model.model(PetShopProxy.MODEL_MODEL) @Component public class PetShopProxyAction extends DataStatusBehavior<PetShopProxy> { @Override protected PetShopProxy fetchData(PetShopProxy data) { return data.queryById(); } @Validation(ruleWithTips = { @Validation.Rule(value = "!IS_BLANK(data.code)", error = "编码为必填项"), @Validation.Rule(value = "LEN(data.name) < 128", error = "名称过长,不能超过128位"), }) @Action(displayName = "启用") @Action.Advanced(invisible="!(activeRecord.code !== undefined…

    2024年5月23日
    1.8K00
  • 4.2.6 框架之网络请求-拦截器

    在整个http的链路中,异常错误对前端来说尤为重要,他作用在很多不同的场景,通用的比如500, 502等; 一个好的软件通常需要在不同的错误场景中做不同的事情。当用户cookie失效时,希望能自动跳转到登录页;当用户权限发生变更时,希望能跳转到一个友好的提示页;那么如何满足这些个性化的诉求呢?接下来让我们一起了解oinone前端网络请求-拦截器。 一、入口 在src目录下main.ts中可以看到VueOioProvider,这是系统功能提供者的注册入口 图4-2-6-1 VueOioProvider import interceptor from './middleware/network-interceptor'; VueOioProvider( { http: { callback: interceptor } }, [] ); 图4-2-6-2 拦截器的申明入口 二、middleware 在项目初始化时使用CLI构建初始化前端工程,在src/middleware有拦截器的默认实现: 图4-2-6-3 在src/middleware有拦截器的默认实现 三、interceptor interceptor在请求返回后触发,interceptor有两个回调函数,error和next error参数 graphQLErrors 处理业务异常 networkError 处理网络异常 next extensions 后端返回扩展参数 const interceptor: RequestHandler = (operation, forward) => { return forward(operation).subscribe({ error: ({ graphQLErrors, networkError }) => { console.log(graphQLErrors, networkError); // 默认实现 => interceptor error }, next: ({ extensions }) => { console.log(extensions); // 默认实现 => interceptor next }, }); }; 图4-2-6-4 后端返回扩展参数 四、interceptor error // 定义错误提示等级 const DEFAULT_MESSAGE_LEVEL = ILevel.ERROR; // 错误提示等级 对应提示的报错 const MESSAGE_LEVEL_MAP = { [ILevel.ERROR]: [ILevel.ERROR], [ILevel.WARN]: [ILevel.ERROR, ILevel.WARN], [ILevel.INFO]: [ILevel.ERROR, ILevel.WARN, ILevel.INFO], [ILevel.SUCCESS]: [ILevel.ERROR, ILevel.WARN, ILevel.INFO, ILevel.SUCCESS], [ILevel.DEBUG]: [ILevel.ERROR, ILevel.WARN, ILevel.INFO, ILevel.SUCCESS, ILevel.DEBUG] }; // 错误提示通用函数 const notificationMsg = (type: string = 'error', tip: string = '错误', desc: string = '') => { notification[type]({ message: tip, description: desc }); }; // 根据错误等级 返回错误提示和类型 const getMsgInfoByLevel = (level: ILevel) => { let notificationType = 'info'; let notificationText = translate('kunlun.common.info'); switch (level) { case ILevel.DEBUG: notificationType = 'info'; notificationText = translate('kunlun.common.debug'); break; case ILevel.INFO: notificationType = 'info'; notificationText = translate('kunlun.common.info'); break;…

    2024年5月23日
    1.9K00
  • 4.1.10 函数之触发与定时(改)

    函数的触发和定时在很多场景中会用到,也是一个oinone的基础能力。比如我们的流程产品中在定义流程触发时就会让用户选择模型触发还是时间触发,就是用到了函数的触发与定时能力。 整体链路示意图(如下图4-1-10-1 所示),本文只讲trigger里的两类任务,一个是触发任务,一个是定时任务,异步任务放在4.1.11【函数之异步执行】一文中单独去介绍。 图4-1-10-1 整体链路示意图 一、触发任务TriggerTaskAction(举例) 触发任务的创建,使用pamirs-middleware-canal监听mysql的binlog事件,通过rocketmq发送变更数据消息,收到MQ消息后,创建TriggerAutoTask。 触发任务的执行,使用TBSchedule拉取触发任务后,执行相应函数。 注意:pamirs-middleware-canal监听的数据库表必须包含触发模型的数据库表。 Step1 下载canal中间件 下载pamirs-middleware-canal-deployer-3.0.1.zip,去.txt后缀为pamirs-middleware-canal-deployer-3.0.1.zip,解压文件如下: 图4-1-10-2 下载canal中间件 Step2 引入依赖pamirs-core-trigger模块 pamirs-demo-api增加pamirs-trigger-api <dependency> <groupId>pro.shushi.pamirs.core</groupId> <artifactId>pamirs-trigger-api</artifactId> </dependency> 图4-1-10-3 pamirs-trigger-api依赖包 DemoModule在模块依赖定义中增加@Module(dependencies={TriggerModule.MODULE_MODULE}) @Component @Module( name = DemoModule.MODULE_NAME, displayName = "oinoneDemo工程", version = "1.0.0", dependencies = {ModuleConstants.MODULE_BASE, CommonModule.MODULE_MODULE, UserModule.MODULE_MODULE, TriggerModule.MODULE_MODULE} ) @Module.module(DemoModule.MODULE_MODULE) @Module.Advanced(selfBuilt = true, application = true) @UxHomepage(PetShopProxy.MODEL_MODEL) public class DemoModule implements PamirsModule { ……其他代码 } 图4-1-10-4 模块依赖中增加Trigger模块 pamirs-demo-boot 增加pamirs-trigger-core和pamirs-trigger-bridge-tbschedule的依赖 <dependency> <groupId>pro.shushi.pamirs.core</groupId> <artifactId>pamirs-trigger-core</artifactId> </dependency> <dependency> <groupId>pro.shushi.pamirs.core</groupId> <artifactId>pamirs-trigger-bridge-tbschedule</artifactId> </dependency> 图4-1-10-5 增加pamirs-trigger-core和pamirs-trigger-bridge-tbschedule的依赖 修改pamirs-demo-boot的applcation-dev.yml 修改pamris.event.enabled和pamris.event.schedule.enabled为true pamirs_boot_modules增加启动模块:trigger pamirs: event: enabled: true schedule: enabled: true rocket-mq: namesrv-addr: 127.0.0.1:9876 boot: init: true sync: true modules: – base – common – sequence – resource – user – auth – message – international – business – trigger – demo_core 图4-1-10-6 启动模块中增加trigger模块 Step3 启动canal中间件 canal的库表需要手工建 create schema canal_tsdb collate utf8mb4_bin 图4-1-10-7 canal的建库语句 CREATE TABLE IF NOT EXISTS `meta_snapshot` ( `id` bigint(20) unsigned NOT NULL AUTO_INCREMENT COMMENT '主键', `gmt_create` datetime NOT NULL COMMENT '创建时间', `gmt_modified` datetime NOT NULL COMMENT '修改时间', `destination` varchar(128) DEFAULT NULL COMMENT '通道名称', `binlog_file` varchar(64) DEFAULT NULL COMMENT 'binlog文件名', `binlog_offest` bigint(20) DEFAULT NULL COMMENT 'binlog偏移量', `binlog_master_id` varchar(64) DEFAULT NULL COMMENT 'binlog节点id', `binlog_timestamp` bigint(20) DEFAULT NULL…

    2024年5月23日
    1.9K00

Leave a Reply

Please Login to Comment