
企业在数字化转型过程中内外部集成是一个必然需求、也是趋势
集成的诉求主要来自两个方面:1.企业的数字化改造是由外而内逐步进行的(内部异构集成)、2.企业数字化方向是朝越来越开放的方向发展(外部平台、工具集成)。总的来说企业在数字化转型过程中内外部集成是一个必然需求、也是趋势。所以我们不能简单地去理解做个API对接就结束了,而是要统一规划构建成企业的集成门户对API定义,安全、控制、记录等做全方位管理。oinone在下个版本规则中也纳入了基于集成平台之上做产品化配置的需求
概述
pamirs-eip为平台提供企业集成门户的相关功能,如请求外部接口使用的【集成接口】和对外开放被其他系统请求调用的【开放接口】功能。在请求外部接口时,还支持了多个接口调用(路由定义)、分页控制(paging)、增量控制(incremental)等功能。
准备工作
Step1 POM与模块依赖
pamirs-demo-api 和 pamirs-second-api 的pom文件中引入pamirs-eip2-api包依赖
<dependency>
    <groupId>pro.shushi.pamirs.core</groupId>
    <artifactId>pamirs-eip2-api</artifactId>
</dependency>
DemoModule和SecondModule 增加对EipModule的依赖
@Module(dependencies = {EipModule.MODULE_MODULE})pamirs-demo-boot和pamirs-second-boot工程的pom文件中引入pamirs-eip2-core包依赖
<dependency>
    <groupId>pro.shushi.pamirs.core</groupId>
    <artifactId>pamirs-eip2-core</artifactId>
</dependency>
Step2 yaml配置文件参考
pamirs-demo-boot和pamirs-second-boot工程的application-dev.yml文件中增加配置pamirs.boot.modules增加eip,即在启动模块中增加eip模块
pamirs:
    boot:
    modules:
        - eip
pamirs-demo-boot和pamirs-second-boot工程的application-dev.yml文件中增加eip模块的数据源与路由配置
pamirs:
    framework:
    data:
        ds-map:
        eip: eip
    datasource:
    eip:
      driverClassName: com.mysql.cj.jdbc.Driver
      type: com.alibaba.druid.pool.DruidDataSource
      url: jdbc:mysql://127.0.0.1:3306/eip_v3?useSSL=false&allowPublicKeyRetrieval=true&useServerPrepStmts=true&cachePrepStmts=true&useUnicode=true&characterEncoding=utf8&serverTimezone=Asia/Shanghai&autoReconnect=true&allowMultiQueries=true
      username: root
      password: oinone
      initialSize: 5
      maxActive: 200
      minIdle: 5
      maxWait: 60000
      timeBetweenEvictionRunsMillis: 60000
      testWhileIdle: true
      testOnBorrow: false
      testOnReturn: false
      poolPreparedStatements: true
      asyncInit: true
pamirs-demo-boot工程的application-dev.yml文件中修改eip的配置
pamirs:
    eip:
    open-api:
      enabled: false
pamirs-second-boot工程的application-dev.yml文件中修改eip的配置
pamirs:
  eip:
    enabled: true
    open-api:
      enabled: true
      route:
        host: 127.0.0.1
        port: 8094
        aes-key: Nj5Thnxz4rV8Yy1FLGA2hUym3RepB8MKgafEaYC4GKo=
注:
hosts配置在远程调用时不能使用127.0.0.1,可配置为0.0.0.0进行自动识别。若自动识别仍无法访问,请准确配置其他已知的可访问IP地址。
aes-key:用下面代码生成
附录:AES Key生成
pro.shushi.pamirs.core.common.EncryptHelper加解密帮助类,默认支持AES、RSA类型的数据加解密方法,也可自定义其他类型的加解密方法。
System.out.println(EncryptHelper.getKey(EncryptHelper.getAESKey()));Step3 在pamirs-second-api新建一个SessionTenantApi实现类
只要在我们公共的jar包中构建类似DemoSessionTenant类就可以了,之所以要构建SessionTenantApi实现类是因为EIP是以租户信息做路由的。所以这里我们写死返回一个“pamirs”租户就好了。
记得要重新mvn install second工程,再刷新demo工程
package pro.shushi.pamirs.second.api.tenant;

import org.springframework.core.annotation.Order;
import org.springframework.stereotype.Component;
import pro.shushi.pamirs.framework.session.tenant.api.SessionTenantApi;
import pro.shushi.pamirs.meta.api.core.session.SessionClearApi;
import pro.shushi.pamirs.meta.common.spi.SPI;

@Order(99)
@Component
@SPI.Service
public class DemoSessionTenant implements SessionTenantApi, SessionClearApi {
    public String getTenant() {
        return "pamirs";
    }

    public void setTenant(String tenant) {
    }

    public void clear() {
    }
}
开放接口(举例)
Step1 用于演示的模型定义
package pro.shushi.pamirs.second.api.model;

import pro.shushi.pamirs.meta.annotation.Field;
import pro.shushi.pamirs.meta.annotation.Model;
import pro.shushi.pamirs.meta.base.IdModel;

@Model.model(TestOpenApiModel.MODEL_MODEL)
@Model(displayName = "演示开放接口模型")
public class TestOpenApiModel extends IdModel {

    public static final String MODEL_MODEL = "demo.second.TestOpenApiModel";

    @Field.String
    @Field(displayName = "名称")
    private String name;

    @Field.Integer
    @Field(displayName = "年龄")
    private Integer age;
}
package pro.shushi.pamirs.second.api.tmodel;

import pro.shushi.pamirs.meta.annotation.fun.Data;

import java.io.Serializable;

@Data
public class TestOpenApiResponse implements Serializable {

    private Long id;
    private String name;
    private Integer age;

}
Step2 用于演示的接口定义
-
TestOpenApiModelService接口定义了内部访问函数queryById
-
TestOpenApiModelServiceImpl 实现TestOpenApiModelService接口,并定义了两个开放接口
a. queryById4Open函数用@Open进行注解,请求路径是:openapi/pamirs/方法名?tenant=pamirs,返回对象结构为函数返回值类型的JSON格式
b. queryById4OpenError函数用@Open(config = TestEipConfig.class,path = "error")进行注解,请求路径为:openapi/pamirs/error?tenant=pamirs,返回对象结构为函数返回值类型的JSON格式
c. config = TestEipConfig.class 设置通用配置类,可以在TestEipConfig增加@Open.Advanced。优先级低于方法上的注解。TestEipConfig见集成接口举例的集成配置模型定义。配置模型在开放接口定义中非必须的,在集成接口定义中时是必须。
d更多注解配置见Eip注解说明
package pro.shushi.pamirs.second.api.service;

import pro.shushi.pamirs.meta.annotation.Fun;
import pro.shushi.pamirs.meta.annotation.Function;
import pro.shushi.pamirs.second.api.model.TestOpenApiModel;

@Fun(TestOpenApiModelService.FUN_NAMESPACE)
public interface TestOpenApiModelService {

    String FUN_NAMESPACE ="demo.second.TestOpenApiModelService";
    @Function
    TestOpenApiModel queryById(Long id);

}
package pro.shushi.pamirs.second.core.service;
import org.apache.camel.ExtendedExchange;
import org.springframework.stereotype.Component;
import pro.shushi.pamirs.core.common.SuperMap;
import pro.shushi.pamirs.eip.api.IEipContext;
import pro.shushi.pamirs.eip.api.annotation.Open;
import pro.shushi.pamirs.eip.api.enmu.EipExpEnumerate;
import pro.shushi.pamirs.eip.api.entity.openapi.OpenEipResult;
import pro.shushi.pamirs.meta.annotation.Fun;
import pro.shushi.pamirs.meta.annotation.Function;
import pro.shushi.pamirs.meta.common.exception.PamirsException;
import pro.shushi.pamirs.second.api.model.TestOpenApiModel;
import pro.shushi.pamirs.second.api.service.TestOpenApiModelService;
import pro.shushi.pamirs.second.api.tmodel.TestOpenApiResponse;
import java.util.Optional;
@Fun(TestOpenApiModelService.FUN_NAMESPACE)
@Component
public class TestOpenApiModelServiceImpl implements TestOpenApiModelService {
@Override
@Function
public TestOpenApiModel queryById(Long id) {
return new TestOpenApiModel().queryById(id);
}
@Function
@Open
public OpenEipResult<TestOpenApiResponse> queryById4Open(IEipContext<SuperMap> context , ExtendedExchange exchange) {
String id = Optional.ofNullable(String.valueOf(context.getInterfaceContext().getIteration("id"))).orElse("");
TestOpenApiModel temp = queryById(Long.valueOf(id));
TestOpenApiResponse response = new TestOpenApiResponse();
if(temp != null ) {
response.setAge(temp.getAge());
response.setId(temp.getId());
response.setName(temp.getName());
}else{
response.setAge(1);
response.setId(1L);
response.setName("oinone eip test");
}
OpenEipResult<TestOpenApiResponse> result = new OpenEipResult<TestOpenApiResponse>(response);
return result;
}
@Function
// @Open(config = TestEipConfig.class,path = "error")
@Open(path = "error")
@Open.Advanced(
httpMethod = "post"
)
public OpenEipResult<TestOpenApiResponse> queryById4OpenError(IEipContext<SuperMap> context , ExtendedExchange exchange) {
throw PamirsException.construct(EipExpEnumerate.SYSTEM_ERROR).appendMsg("测试异常").errThrow();
}
}
Step3 用于演示的请求协议
请求方法:POST
{
  "id":111
}
请求参数格式:
{
  "success":true,
  "errorCode":0,
  "result":{
    "age":1,
    "id":1,
    "name":"oinone eip test"
  }
}
成功响应格式:
{
  "success":true,
  "errorCode":0,
  "result":{
    "age":1,
    "id":1,
    "name":"oinone eip test"
  }
}
异常响应格式:
{
  "success":false,
    "errorCode":"20140000",
  "errorMsg":"系统异常, 测试异常"
}
Step4 初始化EIP
构建SecondModuleBizInit 实现InstallDataInit, UpgradeDataInit, ReloadDataInit接口,调用Eip注解模式的初始化方法:EipResolver.resolver(SecondModule.MODULE_MODULE,null)
package pro.shushi.pamirs.second.core.init;

import org.springframework.stereotype.Component;
import pro.shushi.pamirs.boot.common.api.command.AppLifecycleCommand;
import pro.shushi.pamirs.boot.common.api.init.InstallDataInit;
import pro.shushi.pamirs.boot.common.api.init.ReloadDataInit;
import pro.shushi.pamirs.boot.common.api.init.UpgradeDataInit;
import pro.shushi.pamirs.eip.api.annotation.EipResolver;
import pro.shushi.pamirs.second.api.SecondModule;

import java.util.Collections;
import java.util.List;

@Component
public class SecondModuleBizInit implements InstallDataInit, UpgradeDataInit, ReloadDataInit {

    @Override
    public boolean init(AppLifecycleCommand command, String version) {
        initEip();
        return Boolean.TRUE;
    }

    @Override
    public boolean reload(AppLifecycleCommand command, String version) {
        initEip();
        return Boolean.TRUE;
    }

    @Override
    public boolean upgrade(AppLifecycleCommand command, String version, String existVersion) {
        initEip();
        return Boolean.TRUE;
    }

    @Override
    public List<String> modules() {
        return Collections.singletonList(SecondModule.MODULE_MODULE);
    }

    @Override
    public int priority() {
        return 0;
    }

    private void initEip() {
        EipResolver.resolver(SecondModule.MODULE_MODULE,null);
    }
}
Step5 重启看效果
Second模块重新 mvn install
重启pamris-second-boot工程
请求地址一:http://localhost:8094/openapi/pamirs/queryById4Open?tenant=pamirs
curl --location --request POST 'http://localhost:8094/openapi/pamirs/queryById4Open?tenant=pamirs' \
--header 'Content-Type: application/json' \
--data-raw '{
    "id": "111",
}'
返回结果:
{"errorCode":0,"result":{"age":1,"id":1,"name":"oinone eip test"},"success":true}请求地址二:http://localhost:8094/openapi/pamirs/error?tenant=pamirs
curl --location --request POST 'http://localhost:8094/openapi/pamirs/error?tenant=pamirs' \
--header 'Content-Type: application/json' \
--data-raw '{
    "id": "111",
}'
返回结果:
{"success":false,"errorCode":"20140000","errorMsg":"系统异常, 测试异常"}集成接口(举例)
下面的例子我们将用集成接口调用开放接口,集成接口配置在Demo模块
Step1 用于演示的集成配置模型定义
-
配置模型必须继承IEipAnnotationSingletonConfig接口
-
自定义construct函数,达到修改配置时可以自动刷新对应的集成接口和开放接口
-
host为服务端:域名+端口,如www.oinone.top:80
-
shcema为请求协议:http或https
-
类上可以增加@Open.Advanced 和 @Integrate.Advanced 配置达到通用配置的作用,优先级低于方法上的注解
package pro.shushi.pamirs.demo.api.model;

import pro.shushi.pamirs.eip.api.annotation.IEipAnnotationSingletonConfig;
import pro.shushi.pamirs.meta.annotation.Field;
import pro.shushi.pamirs.meta.annotation.Function;
import pro.shushi.pamirs.meta.annotation.Model;
import pro.shushi.pamirs.meta.base.IdModel;
import pro.shushi.pamirs.meta.enmu.FunctionOpenEnum;
import pro.shushi.pamirs.meta.enmu.FunctionTypeEnum;

@Model.model(TestEipConfig.MODEL_MODEL)
@Model(displayName = "演示集成接口配置模型")
public class TestEipConfig extends IdModel implements IEipAnnotationSingletonConfig<TestEipConfig> {

    public static final String MODEL_MODEL = "demo.TestEipConfig";

    @Field(displayName = "服务端域名")
    private String host;
    @Field(displayName = "请求协议Http或Https")
    private String schema;

    @Function(openLevel = FunctionOpenEnum.API,summary = "演示集成接口配置模型")
    @Function.Advanced(type = FunctionTypeEnum.QUERY)
    public TestEipConfig construct(TestEipConfig config){
        TestEipConfig config1 = config.singletonModel();
        if(config1!=null){
            return config1;
        }
        return config.construct();
    }
}
Step2 用于演示的接口定义
-
TestIntegrateService接口定义了内部访问函数callQueryById、callQueryByData、callQueryByIdError
-
TestIntegrateServiceImpl 实现TestIntegrateService接口,并把方法定义为集成接口
a. config = TestEipConfig.class 设置通用配置类,可以在TestEipConfig增加@Integrate.Advanced。优先级低于方法上的注解。它在集成接口定义中时是必须。
b. @Integrate.Advanced(path=""),集成接口最终请求地址:TestEipConfig.schema+"://"+TestEipConfig.host+path
c. 方法体返回空就可以,实际执行时候该方法被拦截并不会执行
d. @Integrate.ConvertParam
ⅰ. 请求从方法入参数会以参数名为key放在上下文中,@Integrate.ConvertParam(inParam="data.id",outParam="id")代表把参数名为data的id属性值,放到上下文key为id上。
ⅱ. url和head的参数转化参见paramConverter的特殊转换
e. finalResultKey是指最终的请求参数key,会从上下文中找对应的key值作为请求参数
f. 更多注解配置见Eip注解说明
package pro.shushi.pamirs.demo.api.service;

import pro.shushi.pamirs.core.common.SuperMap;
import pro.shushi.pamirs.eip.api.entity.EipResult;
import pro.shushi.pamirs.meta.annotation.Fun;
import pro.shushi.pamirs.meta.annotation.Function;
import pro.shushi.pamirs.second.api.model.TestOpenApiModel;

@Fun(TestIntegrateService.FUN_NAMESPACE)
public interface TestIntegrateService {
    String FUN_NAMESPACE ="demo.TestIntegrateService";
    @Function
    EipResult<SuperMap> callQueryById(String id);
    @Function
    EipResult<SuperMap> callQueryByData(TestOpenApiModel data);
    @Function
    EipResult<SuperMap> callQueryByIdError(TestOpenApiModel data);

}
package pro.shushi.pamirs.demo.core.service;

import org.springframework.stereotype.Component;
import pro.shushi.pamirs.core.common.SuperMap;
import pro.shushi.pamirs.demo.api.model.TestEipConfig;
import pro.shushi.pamirs.demo.api.service.TestIntegrateService;
import pro.shushi.pamirs.eip.api.annotation.Integrate;
import pro.shushi.pamirs.eip.api.entity.EipResult;
import pro.shushi.pamirs.meta.annotation.Fun;
import pro.shushi.pamirs.meta.annotation.Function;
import pro.shushi.pamirs.second.api.model.TestOpenApiModel;

@Fun(TestIntegrateService.FUN_NAMESPACE)
@Component
public class TestIntegrateServiceImpl implements TestIntegrateService {

    @Override
    @Function
    @Integrate(config = TestEipConfig.class)
    @Integrate.Advanced(path = "/openapi/pamirs/queryById4Open?tenant=pamirs")
    public EipResult<SuperMap> callQueryById(String id) {
        return null;
    }

    @Override
    @Function
    @Integrate(config = TestEipConfig.class)
    @Integrate.Advanced(path = "/openapi/pamirs/queryById4Open?tenant=pamirs")
    @Integrate.RequestProcessor(
            convertParams={
                    @Integrate.ConvertParam(inParam="data.id",outParam="id")
            }
    )
    public EipResult<SuperMap> callQueryByData(TestOpenApiModel data) {
        return null;
    }

    @Function
    @Integrate(config = TestEipConfig.class)
    @Integrate.Advanced(path = "/openapi/pamirs/error?tenant=pamirs")
    @Integrate.RequestProcessor(
            finalResultKey = "out",
            convertParams={
                    @Integrate.ConvertParam(inParam="data.id",outParam="out.id")
            }
    )
    public EipResult<SuperMap> callQueryByIdError(TestOpenApiModel data) {
        return null;
    }

}
Step3 新建TestEipAction
package pro.shushi.pamirs.demo.core.action;

import org.springframework.beans.factory.annotation.Autowired;
import org.springframework.stereotype.Component;
import pro.shushi.pamirs.core.common.SuperMap;
import pro.shushi.pamirs.demo.api.model.TestEipConfig;
import pro.shushi.pamirs.demo.api.service.TestIntegrateService;
import pro.shushi.pamirs.eip.api.entity.EipResult;
import pro.shushi.pamirs.meta.annotation.Action;
import pro.shushi.pamirs.meta.annotation.Model;
import pro.shushi.pamirs.meta.annotation.fun.extern.Slf4j;
import pro.shushi.pamirs.meta.api.session.PamirsSession;
import pro.shushi.pamirs.meta.enmu.ActionContextTypeEnum;
import pro.shushi.pamirs.meta.util.JsonUtils;
import pro.shushi.pamirs.second.api.model.TestOpenApiModel;

@Model.model(TestEipConfig.MODEL_MODEL)
@Component
@Slf4j
public class TestEipAction {

    @Autowired
    private TestIntegrateService testIntegrateService;

    @Action(displayName = "调用集成接口callQueryById",contextType = ActionContextTypeEnum.CONTEXT_FREE)
    public TestEipConfig callQueryById(TestEipConfig data){
        EipResult<SuperMap> eipResult = testIntegrateService.callQueryById("111");
        PamirsSession.getMessageHub().error(JsonUtils.toJSONString(eipResult));
        return data;
    }

    @Action(displayName = "调用集成接口callQueryByIdError",contextType = ActionContextTypeEnum.CONTEXT_FREE)
    public TestEipConfig callQueryByIdError(TestEipConfig data){
        EipResult<SuperMap> eipResult = testIntegrateService.callQueryByIdError((TestOpenApiModel)new TestOpenApiModel().setId(111L));
        PamirsSession.getMessageHub().error(JsonUtils.toJSONString(eipResult));
        return data;
    }

    @Action(displayName = "调用集成接口callQueryByData",contextType = ActionContextTypeEnum.CONTEXT_FREE)
    public TestEipConfig callQueryByIdSuccess(TestEipConfig data){
        EipResult<SuperMap> eipResult = testIntegrateService.callQueryByData((TestOpenApiModel)new TestOpenApiModel().setId(111L));
        PamirsSession.getMessageHub().error(JsonUtils.toJSONString(eipResult));
        return data;
    }
}
Step4 构建测试入口
@UxMenu("集成测试")@UxRoute(TestEipConfig.MODEL_MODEL) class TestEipConfigMenu{}Step5 初始化Eip
在DemoModuleBizInit 类中增加私有方法initEip,并在init 、reload 、upgrade 中调用该私有化
private void initEip() {
    EipResolver.resolver(DemoModule.MODULE_MODULE,null);
}
Step6 重启看效果
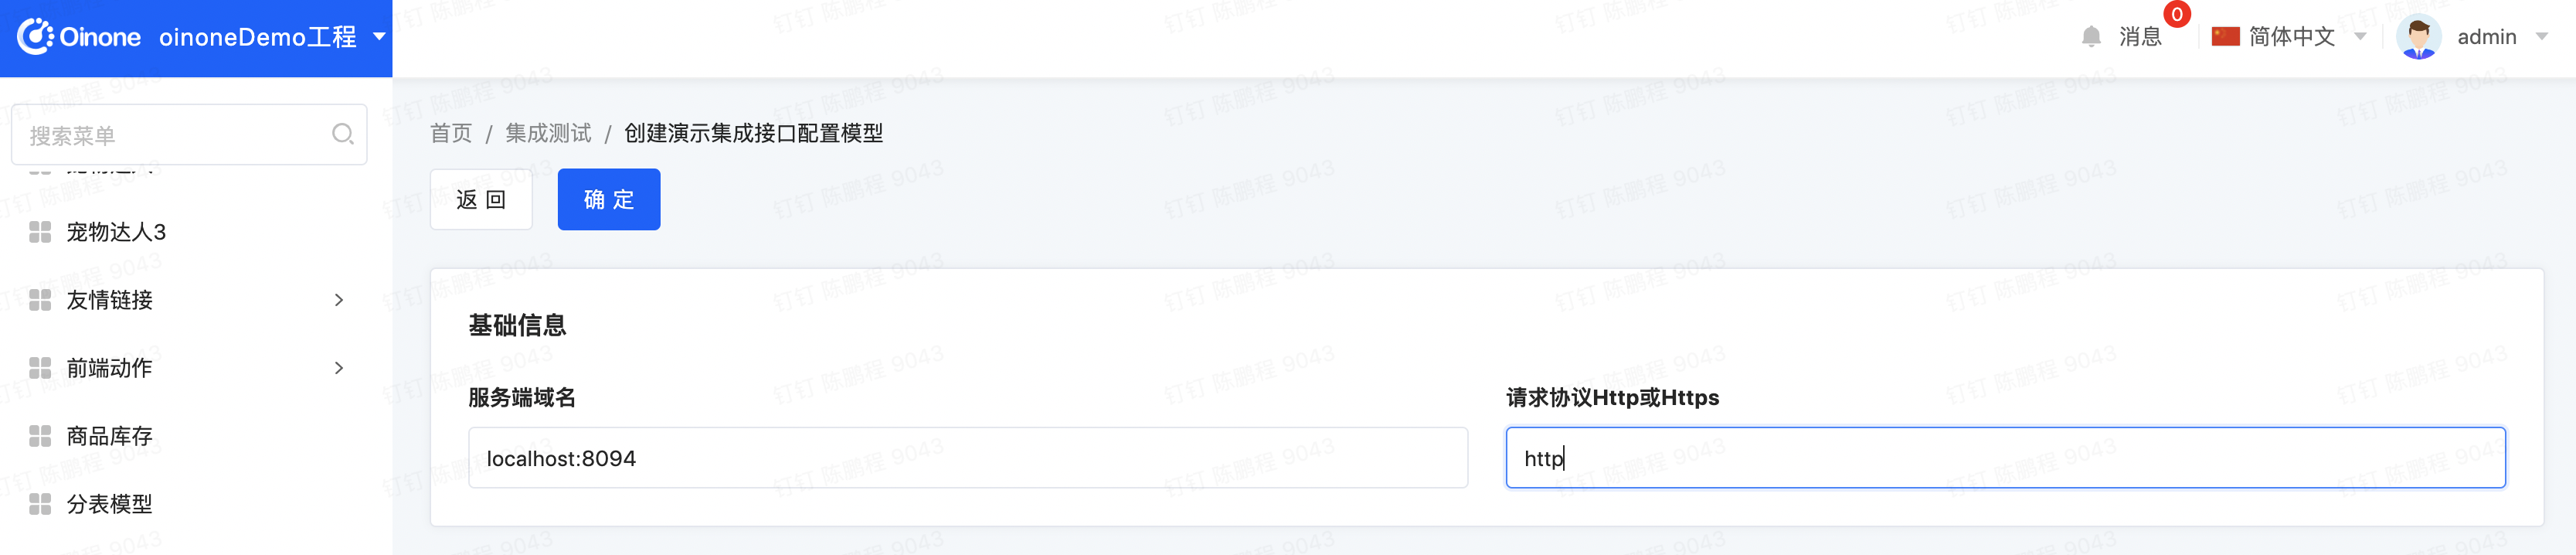
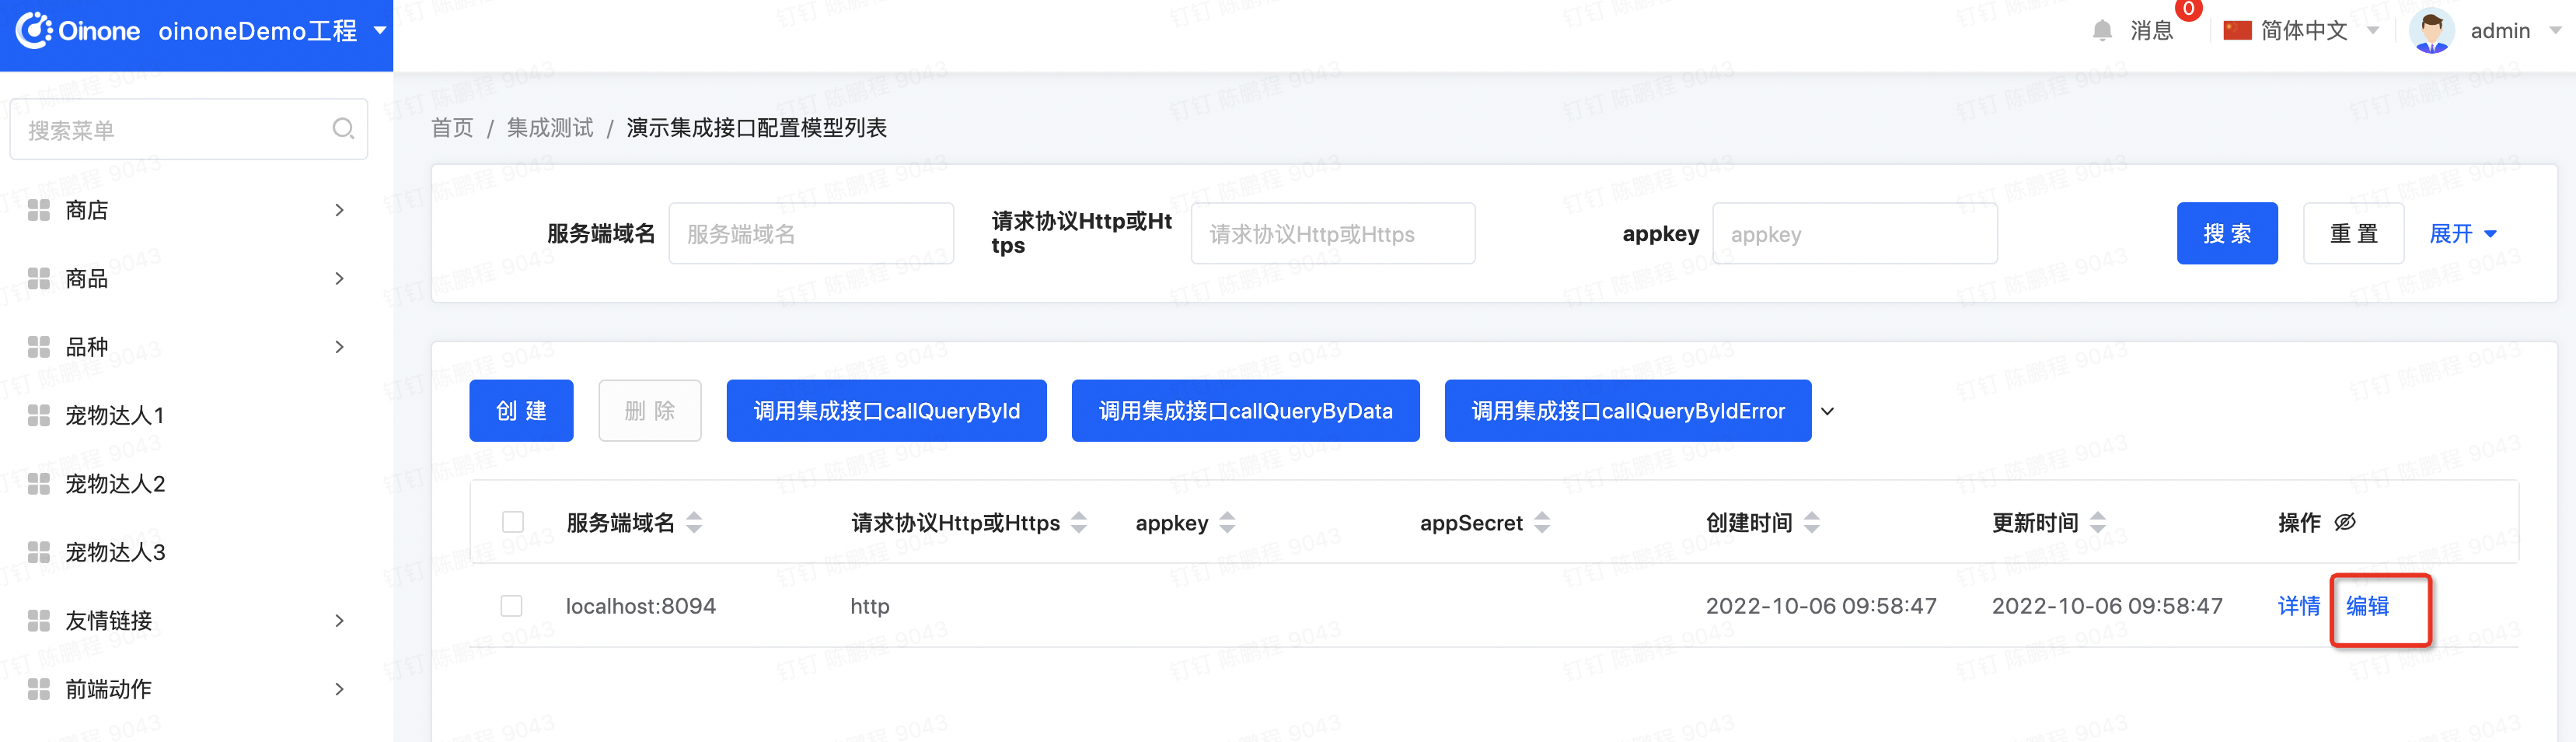
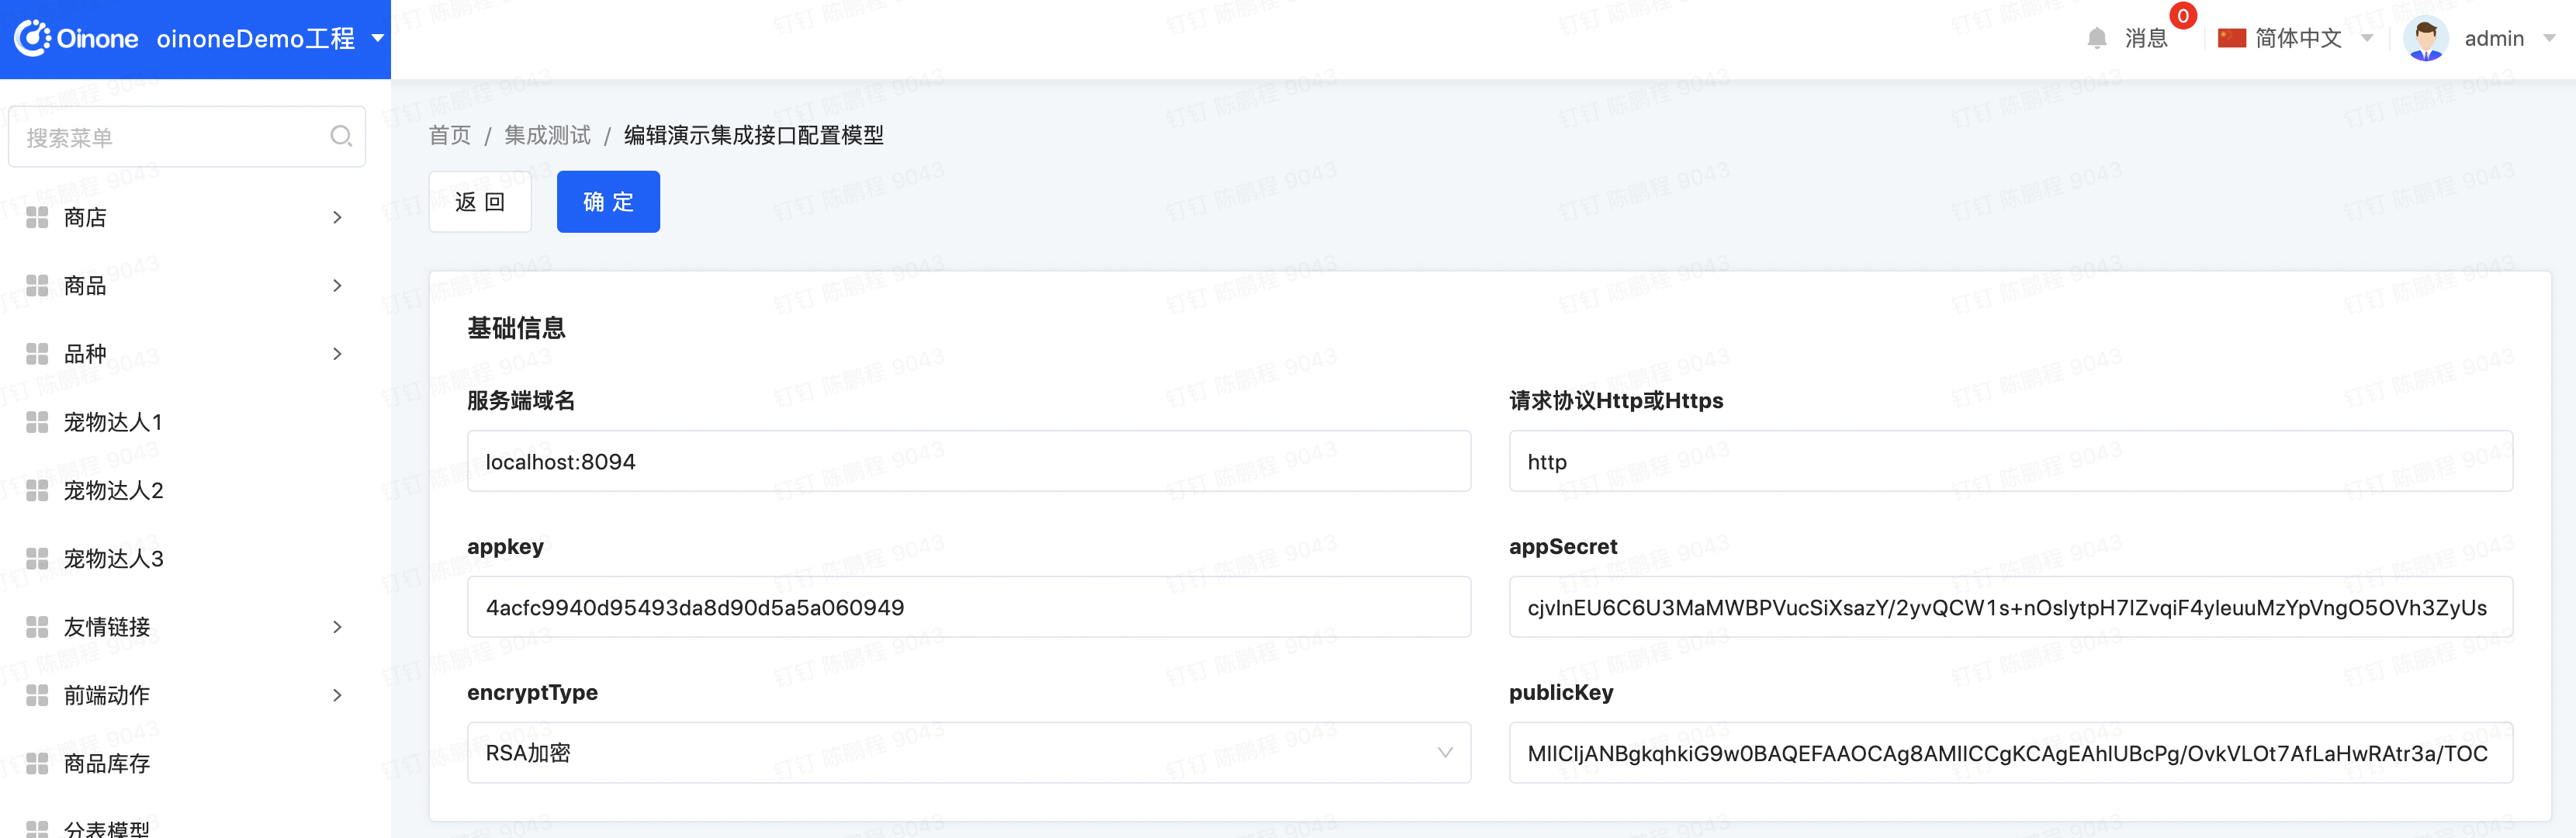
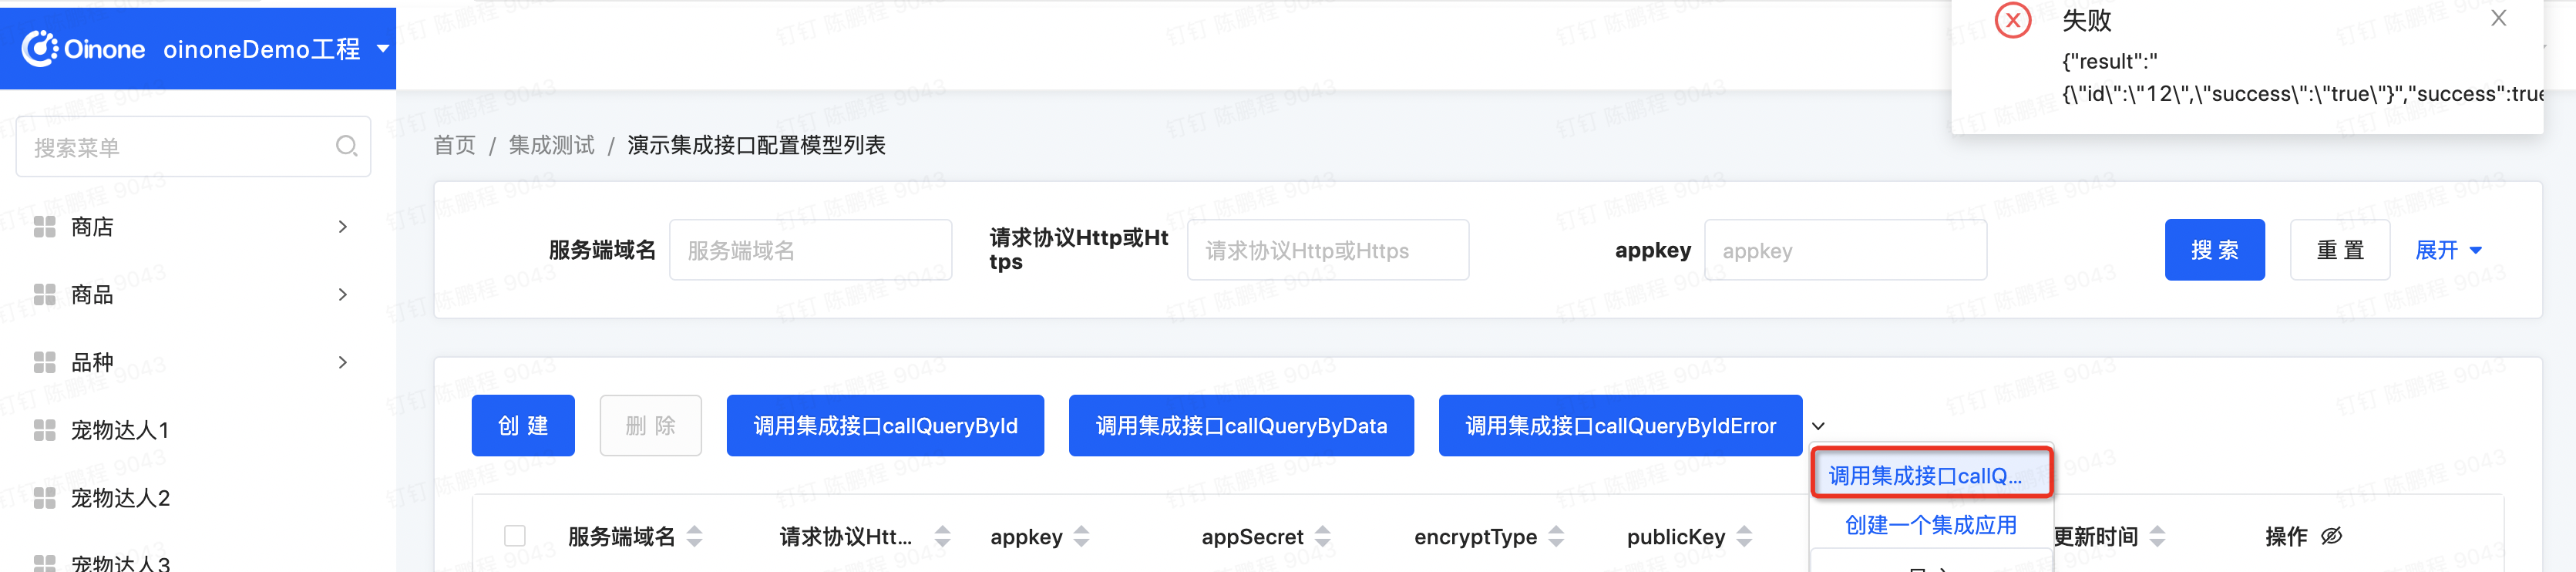
- 点击【集成测试】菜单,点击【新增】按钮,配置集成接口信息

- 点击【集成测试】菜单,依次点击三个方法
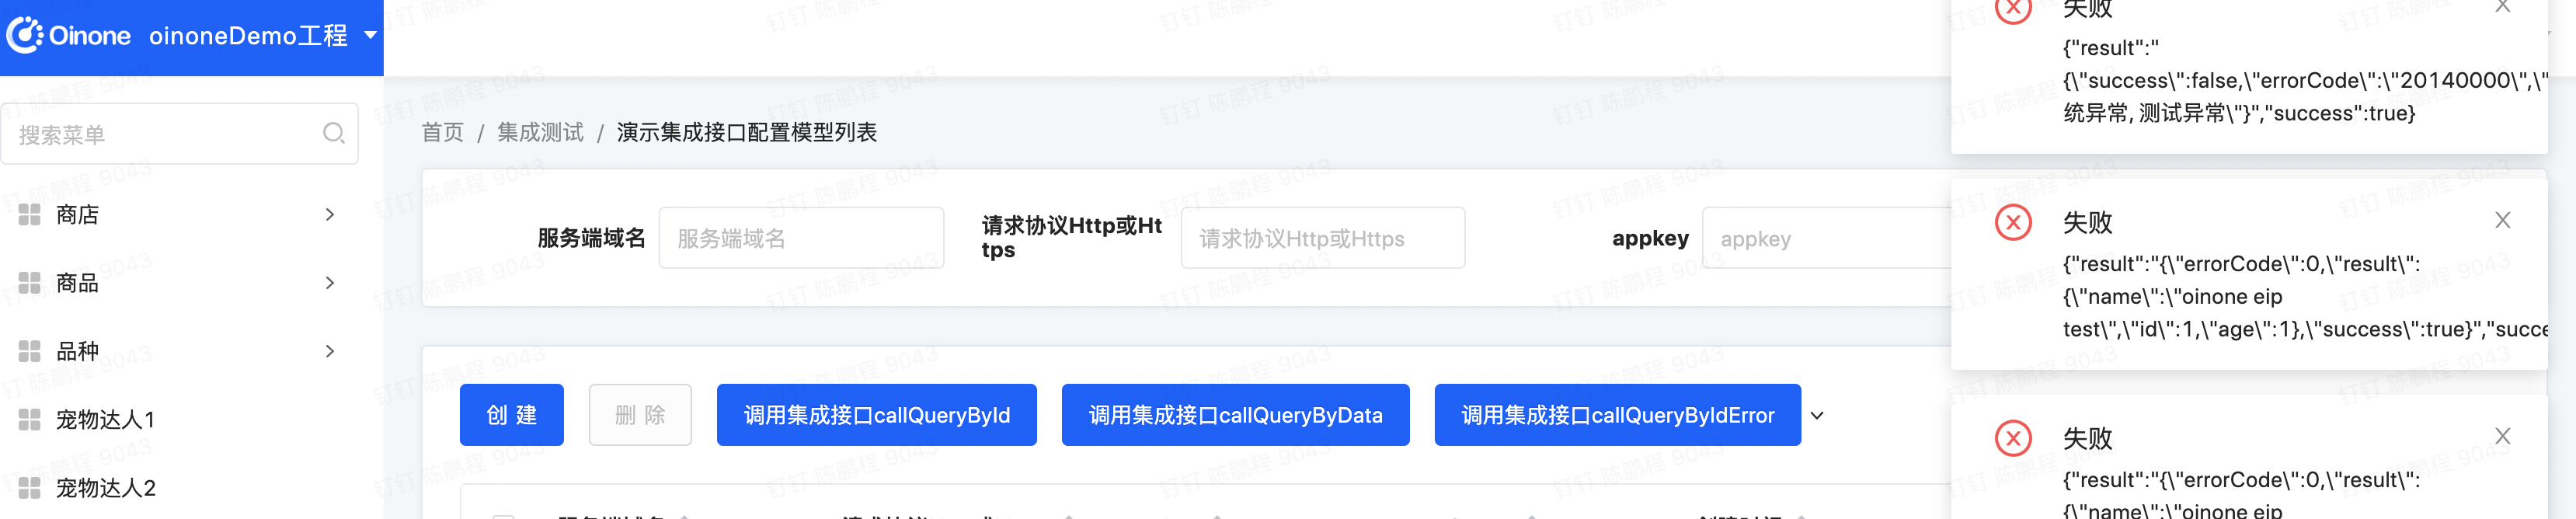
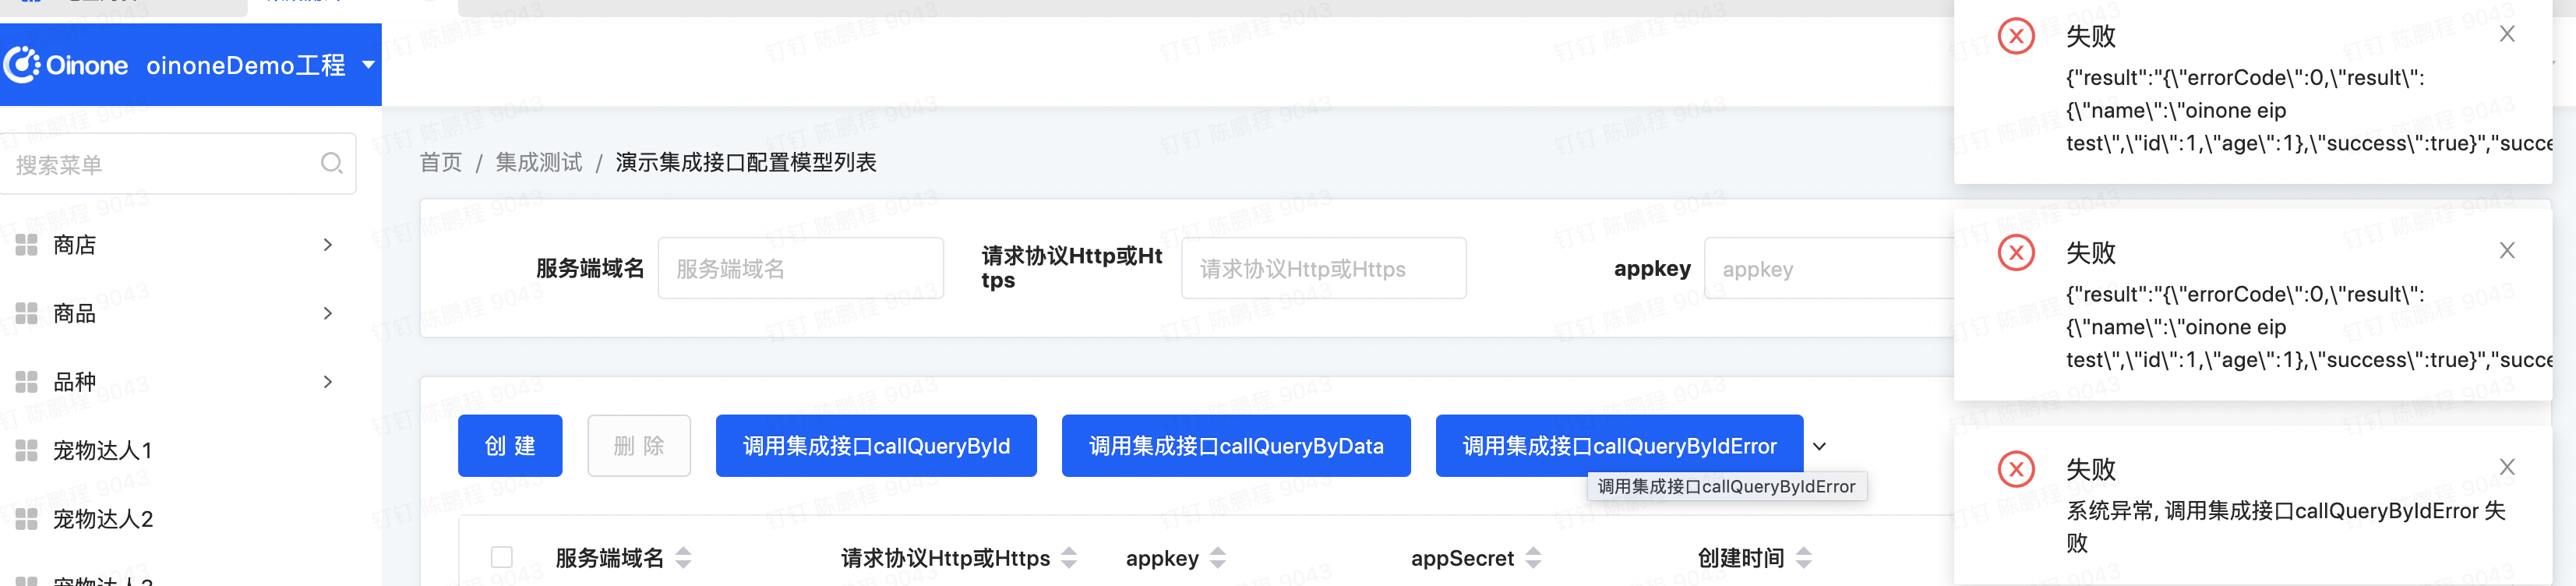
- 模块切换进入【集成接口】,点击【日志】菜单。比对请求不同点
a. 设置finalResultKey的表达从接口上下文中取最终对应的value作为请求参数,不然会传全部接口上下文过去
b. callQueryByIdError,集成接口和对应的开放接口对结果认知差别
ⅰ. 开放接口返回异常信息
ⅱ. 集成接口没有对返回信息作判定,直接当成功。集成接口如何判定对方返还的是错误,请见自定义异常判定
自定义异常判定(举例)
Step1 新建异常判定函数
新建异常判定处理类TestExceptionPredictFunction,实现IEipExceptionPredict接口。从context.getInterfaceContextValue(DEFAULT_ERROR_CODE_KEY)中获取成功与否的值,并进行判断
package pro.shushi.pamirs.demo.core.service;

import pro.shushi.pamirs.core.common.StringHelper;
import pro.shushi.pamirs.core.common.SuperMap;
import pro.shushi.pamirs.eip.api.IEipContext;
import pro.shushi.pamirs.eip.api.IEipExceptionPredict;
import pro.shushi.pamirs.meta.annotation.Fun;
import pro.shushi.pamirs.meta.annotation.Function;

import static pro.shushi.pamirs.eip.api.IEipContext.DEFAULT_ERROR_CODE_KEY;

@Fun(TestExceptionPredictFunction.FUN_NAMESPACE)
public class TestExceptionPredictFunction implements IEipExceptionPredict<SuperMap> {

    public static final String FUN_NAMESPACE ="demo.TestExceptionPredictFunction";
    public static final String FUN ="testFunction";

    @Override
    public boolean test(IEipContext<SuperMap> context) {
        return !Boolean.TRUE.toString().equals(StringHelper.valueOf(context.getExecutorContextValue(DEFAULT_ERROR_CODE_KEY)));
    }

    @Function
    @Function.fun(FUN)
    public Boolean testFunction(IEipContext<SuperMap> context) {
        return test(context);
    }
}
Step2 修改TestIntegrateServiceImpl类
修改TestIntegrateServiceImpl的callQueryByIdError函数的注解,增加@Integrate.ExceptionProcessor注解
-
errorCode ="success", 从返回结果中拿键值为“success”的值,作为接口上下文对应键值为IEipContext.DEFAULT_ERROR_CODE_KEY的值
-
exceptionPredictFun 指定函数名
-
exceptionPredictNamespace 指定函数命名空间
…… 依赖类引用
@Fun(TestIntegrateService.FUN_NAMESPACE)
@Component
public class TestIntegrateServiceImpl implements TestIntegrateService {
……其他代码
@Function
@Integrate(config = TestEipConfig.class)
@Integrate.Advanced(path = "/openapi/pamirs/error?tenant=pamirs")
@Integrate.RequestProcessor(
        finalResultKey = "out",
        convertParams={
                @Integrate.ConvertParam(inParam="data.id",outParam="out.id")
        }
)
@Integrate.ExceptionProcessor(
        errorCode ="success",
        exceptionPredictFun = TestExceptionPredictFunction.FUN,
        exceptionPredictNamespace = TestExceptionPredictFunction.FUN_NAMESPACE
)
public EipResult<SuperMap> callQueryByIdError(TestOpenApiModel data) {
    return null;
}
}
### Step3 重启看效果
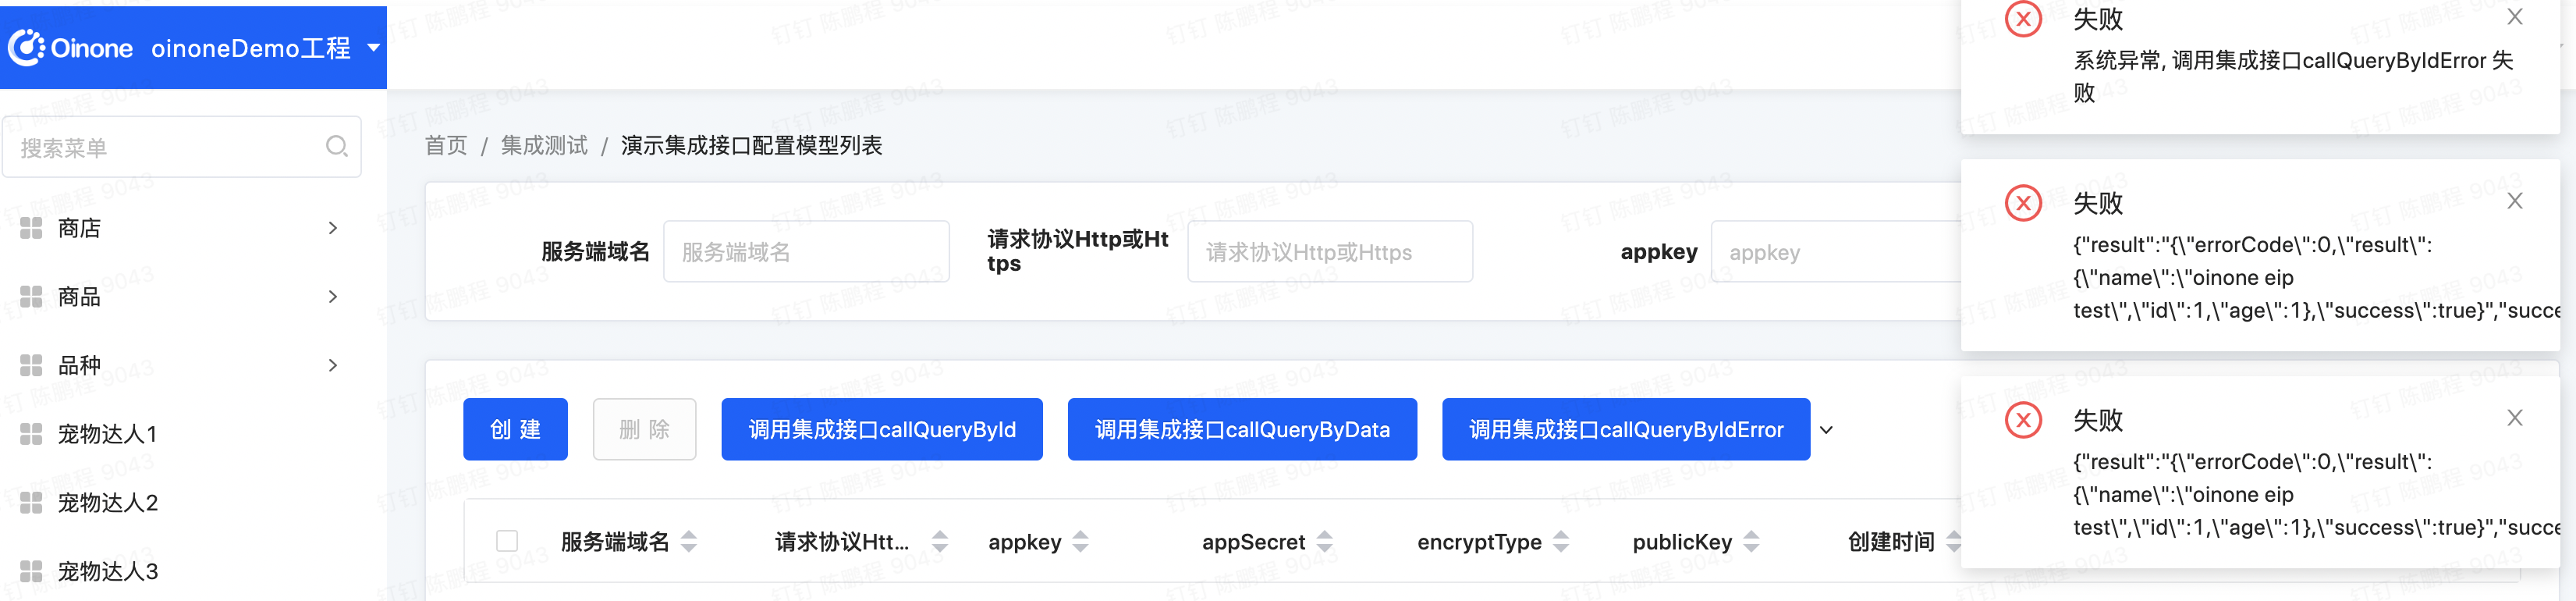
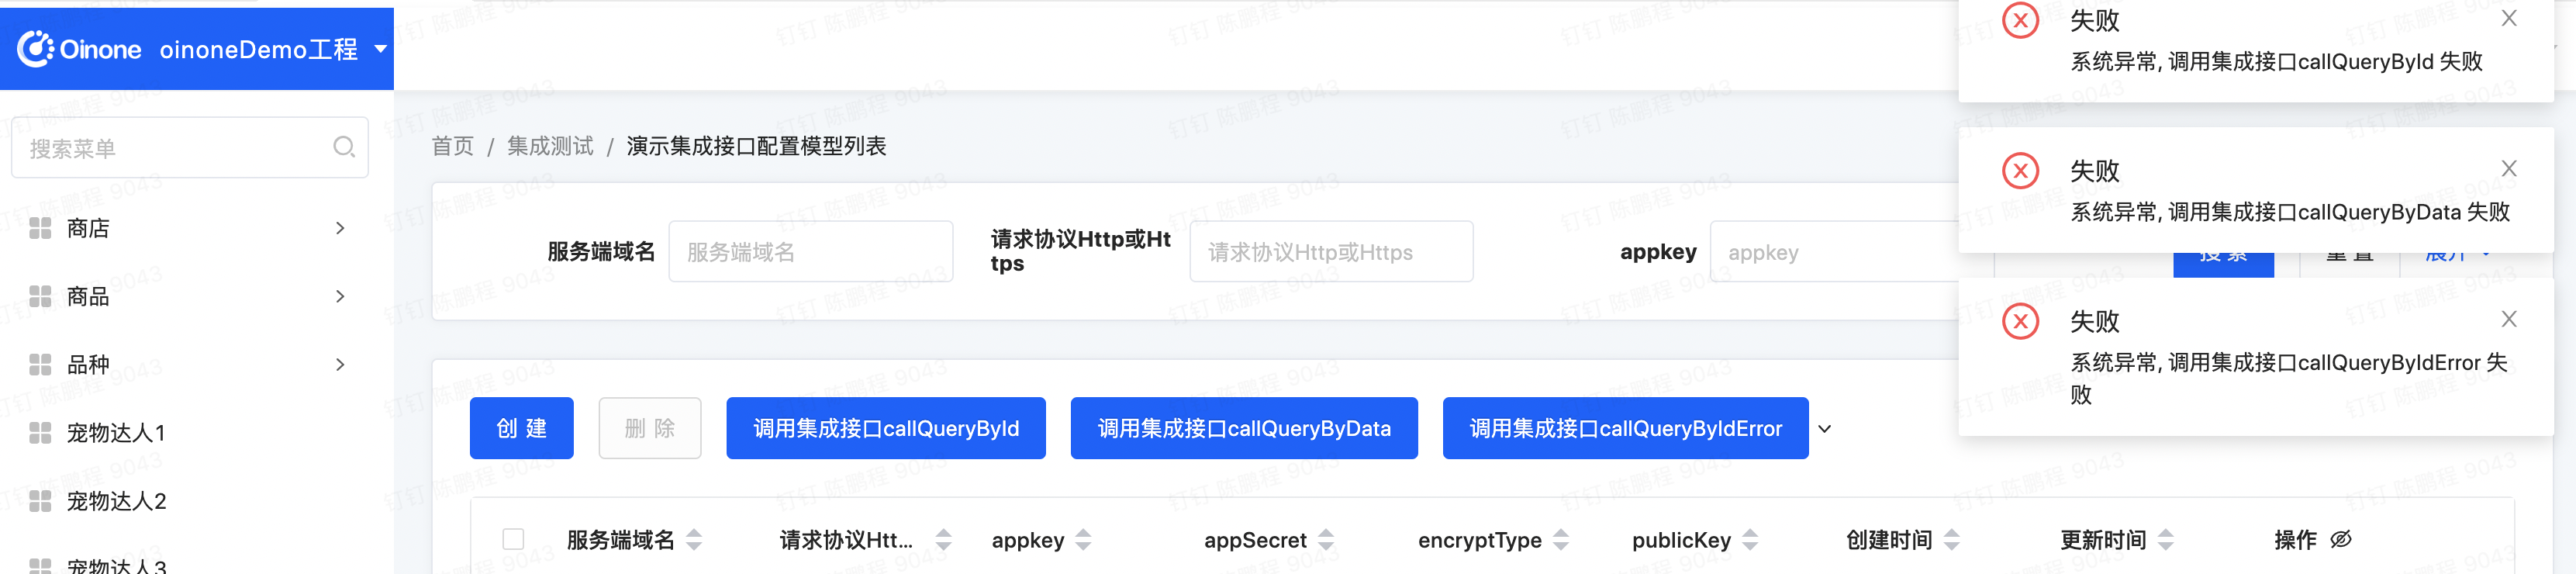
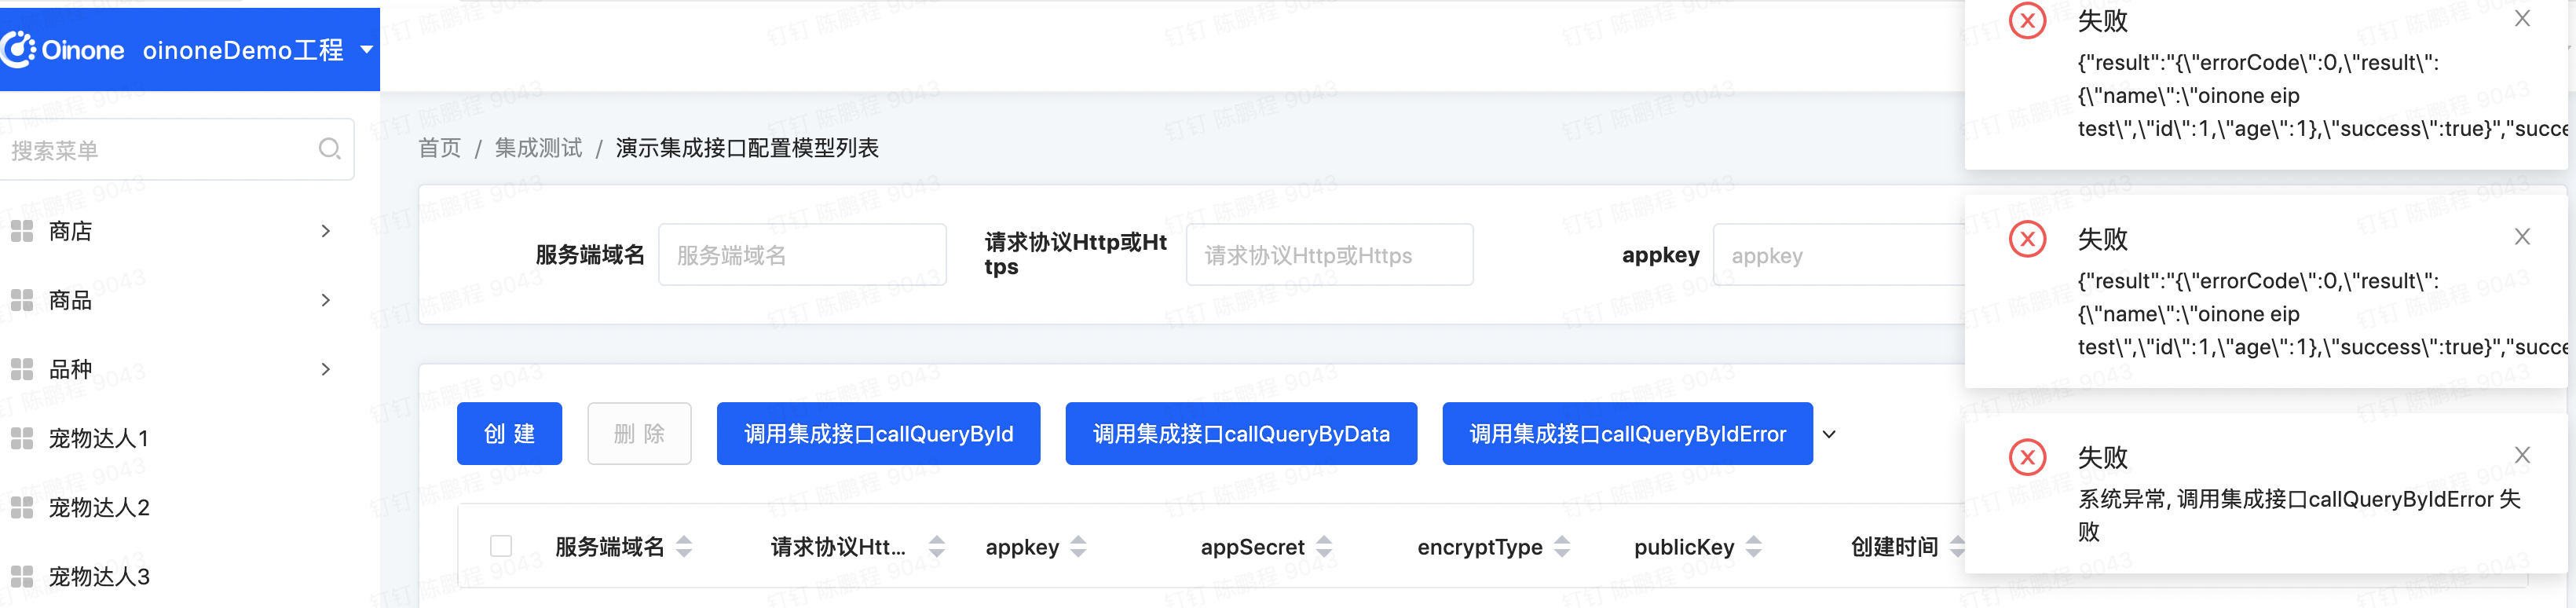
1. 点击【集成测试】菜单,点击【调用集成接口callQueryByIdError 】
2. 模块切换进入【集成接口】,点击【日志】菜单。集成接口是否成功调用判定为false

## 自定义安全策略(AccessToken)
开发接口提供默认三种实现方式,例子采用DEFAULT_NO_ENCRYPT_AUTHENTICATION_PROCESSOR_FUN
认证模式,最简单的安全模式:是有accessToken
1. DEFAULT_AUTHENTICATION_PROCESSOR_FUN:根据EipApplication配置的加密类型进行加解密处理的认证
2. DEFAULT_NO_ENCRYPT_AUTHENTICATION_PROCESSOR_FUN:不进行加解密处理的认证。
3. DEFAULT_MD5_SIGNATURE_AUTHENTICATION_PROCESSOR_FUN:使用MD5简单验签的认证。
### Step1 给开放接口加上认证处理配置
```java
……依赖类引用
@Fun(TestOpenApiModelService.FUN_NAMESPACE)
@Component
public class TestOpenApiModelServiceImpl implements TestOpenApiModelService {
@Override
@Function
public TestOpenApiModel queryById(Long id) {
return new TestOpenApiModel().queryById(id);
}
@Function
@Open
@Open.Advanced(
authenticationProcessorFun= EipFunctionConstant.DEFAULT_NO_ENCRYPT_AUTHENTICATION_PROCESSOR_FUN,
authenticationProcessorNamespace = EipFunctionConstant.FUNCTION_NAMESPACE
)
public OpenEipResult<TestOpenApiResponse> queryById4Open(IEipContext<SuperMap> context , ExtendedExchange exchange) {
String id = Optional.ofNullable(String.valueOf(context.getInterfaceContext().getIteration("id"))).orElse("");
TestOpenApiModel temp = queryById(Long.valueOf(id));
TestOpenApiResponse response = new TestOpenApiResponse();
if(temp != null ) {
response.setAge(temp.getAge());
response.setId(temp.getId());
response.setName(temp.getName());
}else{
response.setAge(1);
response.setId(1L);
response.setName("oinone eip test");
}
OpenEipResult<TestOpenApiResponse> result = new OpenEipResult<TestOpenApiResponse>(response);
return result;
}
@Function
@Open(path = "error")
@Open.Advanced(
httpMethod = "post",
authenticationProcessorFun= EipFunctionConstant.DEFAULT_NO_ENCRYPT_AUTHENTICATION_PROCESSOR_FUN,
authenticationProcessorNamespace = EipFunctionConstant.FUNCTION_NAMESPACE
)
public OpenEipResult<TestOpenApiResponse> queryById4OpenError(IEipContext<SuperMap> context , ExtendedExchange exchange) {
throw PamirsException.construct(EipExpEnumerate.SYSTEM_ERROR).appendMsg("测试异常").errThrow();
}
}
</code></pre>
<h3>Step2 修改TestEipAction,增加返回结果判断</h3>
<pre><code class="language-java">@Model.model(TestEipConfig.MODEL_MODEL)
@Component
@Slf4j
public class TestEipAction {
@Autowired
private TestIntegrateService testIntegrateService;
@Action(displayName = "调用集成接口callQueryById",contextType = ActionContextTypeEnum.CONTEXT_FREE)
public TestEipConfig callQueryById(TestEipConfig data){
EipResult<SuperMap> eipResult = testIntegrateService.callQueryById("111");
if(!eipResult.getSuccess()){
throw PamirsException.construct(EipExpEnumerate.SYSTEM_ERROR).appendMsg("调用集成接口callQueryById 失败").errThrow();
}
PamirsSession.getMessageHub().error(JsonUtils.toJSONString(eipResult));-
return data;
}
@Action(displayName = "调用集成接口callQueryByIdError",contextType = ActionContextTypeEnum.CONTEXT_FREE)
public TestEipConfig callQueryByIdError(TestEipConfig data){
EipResult<SuperMap> eipResult = testIntegrateService.callQueryByIdError((TestOpenApiModel)new TestOpenApiModel().setId(111L));
if(!eipResult.getSuccess()){
throw PamirsException.construct(EipExpEnumerate.SYSTEM_ERROR).appendMsg("调用集成接口callQueryByIdError 失败").errThrow();
}
PamirsSession.getMessageHub().error(JsonUtils.toJSONString(eipResult));
return data;
}
@Action(displayName = "调用集成接口callQueryByData",contextType = ActionContextTypeEnum.CONTEXT_FREE)
public TestEipConfig callQueryByIdSuccess(TestEipConfig data){
EipResult<SuperMap> eipResult = testIntegrateService.callQueryByData((TestOpenApiModel)new TestOpenApiModel().setId(111L));
if(!eipResult.getSuccess()){
throw PamirsException.construct(EipExpEnumerate.SYSTEM_ERROR).appendMsg("调用集成接口callQueryByData 失败").errThrow();
}
PamirsSession.getMessageHub().error(JsonUtils.toJSONString(eipResult));
return data;
}
}</code></pre>
<h3>Step3 重启看效果</h3>
<p>期待效果,因为开放接口增加了安全相关校验,集成接口这边并没有调整,所以都会抛错</p>
<p><img src="https://doc.oinone.top/wp-content/uploads/2024/05/1665028192254-4f96bda0-d2c2-4b23-a7be-268c84a920f1.png" alt="image.png" /></p>
<h3>Step4 为集成接口定义auth处理类</h3>
<h3>Step4_1 修改 TestEipConfig</h3>
<p>增加了appkey和appSecret两个字段,用于存储开放接口的appkey和appSecret。大家注意我们是用集成接口去访问开放接口,大家可以要想象成两个应用。</p>
<p>站在开放接口角度,但凡需要访问开放接口,就需要先申请appkey和appSecret,并通过appkey和appSecret来换取accessToken,再用accessToken来请求。</p>
<p>站在集成接口角度,我们需要访问对方的接口,必须遵循对方接口安全规范。</p>
<pre><code class="language-java">package pro.shushi.pamirs.demo.api.model;
import pro.shushi.pamirs.eip.api.annotation.IEipAnnotationSingletonConfig;
import pro.shushi.pamirs.eip.api.annotation.Integrate;
import pro.shushi.pamirs.meta.annotation.Field;
import pro.shushi.pamirs.meta.annotation.Function;
import pro.shushi.pamirs.meta.annotation.Model;
import pro.shushi.pamirs.meta.base.IdModel;
import pro.shushi.pamirs.meta.enmu.FunctionOpenEnum;
import pro.shushi.pamirs.meta.enmu.FunctionTypeEnum;
@Model.model(TestEipConfig.MODEL_MODEL)
@Model(displayName = "演示集成接口配置模型")
@Integrate.ExceptionProcessor(
errorCode ="success",
exceptionPredictFun = "testFunction",
exceptionPredictNamespace = "demo.TestExceptionPredictFunction"
)
public class TestEipConfig extends IdModel implements IEipAnnotationSingletonConfig<TestEipConfig> {
public static final String MODEL_MODEL = "demo.TestEipConfig";
@Field(displayName = "服务端域名")
private String host;
@Field(displayName = "请求协议Http或Https")
private String schema;
@Field(displayName = "appkey")
private String appKey;
@Field(displayName = "appSecret")
@Field.String(size = 4096)
private String appSecret;
@Function(openLevel = FunctionOpenEnum.API,summary = "演示集成接口配置模型")
@Function.Advanced(type = FunctionTypeEnum.QUERY)
public TestEipConfig construct(TestEipConfig config){
TestEipConfig config1 = config.singletonModel();
if(config1!=null){
return config1;
}
return config.construct();
}
}
</code></pre>
<h3>Step4_2 修改TestIntegrateService和TestIntegrateServiceImpl</h3>
<ol>
<li>
<p>定义和实现fetchOinoneAccessToken</p>
</li>
<li>
<p>修改集成注解增加auth处理器</p>
</li>
</ol>
<h3>Step4_3 新建TestAuthFunction</h3>
<ol>
<li>
<p>获取TestEipConfig的配置信息</p>
</li>
<li>
<p>先从缓存中拿accessToken</p>
<pre><code class="language-java">
@Function
EipResult<SuperMap> fetchOinoneAccessToken(String appkey,String appSecret) ;</code></pre>
</li>
</ol>
<pre><code>
```java
@Override
@Function
@Integrate(config = TestEipConfig.class)
@Integrate.Advanced(path = "/openapi/pamirs/queryById4Open?tenant=pamirs")
@Integrate.RequestProcessor(
finalResultKey = "out",
convertParams={
@Integrate.ConvertParam(inParam="id",outParam="out.id")
},
authenticationProcessorNamespace = TestAuthFunction.FUN_NAMESPACE,
authenticationProcessorFun = TestAuthFunction.FUN
)
public EipResult<SuperMap> callQueryById(String id) {
return null;
}
@Override
@Function
@Integrate(config = TestEipConfig.class)
@Integrate.Advanced(path = "/openapi/pamirs/queryById4Open?tenant=pamirs")
@Integrate.RequestProcessor(
finalResultKey = "out",
convertParams={
@Integrate.ConvertParam(inParam="data.id",outParam="out.id")
},
authenticationProcessorNamespace = TestAuthFunction.FUN_NAMESPACE,
authenticationProcessorFun = TestAuthFunction.FUN
)
public EipResult<SuperMap> callQueryByData(TestOpenApiModel data) {
return null;
}
@Function
@Integrate(config = TestEipConfig.class)
@Integrate.Advanced(path = "/openapi/pamirs/error?tenant=pamirs")
@Integrate.RequestProcessor(
finalResultKey = "out",
convertParams={
@Integrate.ConvertParam(inParam="data.id",outParam="out.id")
},
authenticationProcessorNamespace = TestAuthFunction.FUN_NAMESPACE,
authenticationProcessorFun = TestAuthFunction.FUN
)
public EipResult<SuperMap> callQueryByIdError(TestOpenApiModel data) {
return null;
}
@Function
@Integrate(config = TestEipConfig.class)
@Integrate.Advanced(path = "/openapi/get/access-token?tenant=pamirs")
@Integrate.RequestProcessor(
convertParams={
@Integrate.ConvertParam(inParam="appkey",outParam= IEipContext.HEADER_PARAMS_KEY+".appkey"),
@Integrate.ConvertParam(inParam="appSecret",outParam=IEipContext.HEADER_PARAMS_KEY+".appSecret")
}
)
@Integrate.ResponseProcessor(
convertParams={
@Integrate.ConvertParam(inParam="access_token",outParam="accessToken"),
}
)
public EipResult<SuperMap> fetchOinoneAccessToken(String appkey,String appSecret) {
return null;
}
a. 拿到直接放到请求头中
b. 拿不到调用对方接口获取accessToken(这里对方接口也就是我们自己的开放平台的接口)获取accessToken
package pro.shushi.pamirs.demo.core.service;
import org.apache.camel.ExtendedExchange;
import org.apache.commons.lang3.StringUtils;
import org.springframework.data.redis.core.RedisTemplate;
import org.springframework.stereotype.Component;
import pro.shushi.pamirs.core.common.SuperMap;
import pro.shushi.pamirs.demo.api.model.TestEipConfig;
import pro.shushi.pamirs.demo.api.service.TestIntegrateService;
import pro.shushi.pamirs.eip.api.IEipAuthenticationProcessor;
import pro.shushi.pamirs.eip.api.IEipContext;
import pro.shushi.pamirs.eip.api.entity.EipResult;
import pro.shushi.pamirs.meta.annotation.Fun;
import pro.shushi.pamirs.meta.annotation.Function;
import pro.shushi.pamirs.meta.common.spring.BeanDefinitionUtils;
import java.util.concurrent.TimeUnit;
@Fun(TestAuthFunction.FUN_NAMESPACE)
@Component
public class TestAuthFunction implements IEipAuthenticationProcessor<SuperMap> {
public static final String FUN_NAMESPACE ="demo.TestAuthFunction";
public static final String FUN ="testAuthentication";
@Function
@Function.fun(FUN)
public Boolean testAuthentication(IEipContext<SuperMap> context,ExtendedExchange exchange) {
return authentication(context,exchange);
}
@Override
public boolean authentication(IEipContext<SuperMap> context, ExtendedExchange exchange) {
//获取第三方配置
TestEipConfig testEipConfig = new TestEipConfig().singletonModel();
TestIntegrateService testIntegrateService = BeanDefinitionUtils.getBean(TestIntegrateService.class);
RedisTemplate redisTemplate = (RedisTemplate)BeanDefinitionUtils.getBean("redisTemplate");
String accessToken = (String)redisTemplate.opsForValue().get(testEipConfig.getAppKey());
if(StringUtils.isNotBlank(accessToken)){
context.putInterfaceContextValue(IEipContext.HEADER_PARAMS_KEY+".accessToken",accessToken);
}else {
//调用获取accessToken接口
EipResult<SuperMap> eipResult = testIntegrateService.fetchOinoneAccessToken(testEipConfig.getAppKey(), testEipConfig.getAppSecret());
if (eipResult.getSuccess()) {
accessToken = String.valueOf(eipResult.getContext().getInterfaceContextValue("accessToken"));
if (StringUtils.isBlank(accessToken)) {
return Boolean.FALSE;
}
context.putInterfaceContextValue(IEipContext.HEADER_PARAMS_KEY + ".accessToken", accessToken);
//oinone的accessToken默认失效时间为15分钟
redisTemplate.opsForValue().set(testEipConfig.getAppKey(), accessToken,13*60, TimeUnit.SECONDS);
} else {
return Boolean.FALSE;
}
}
return Boolean.TRUE;
}
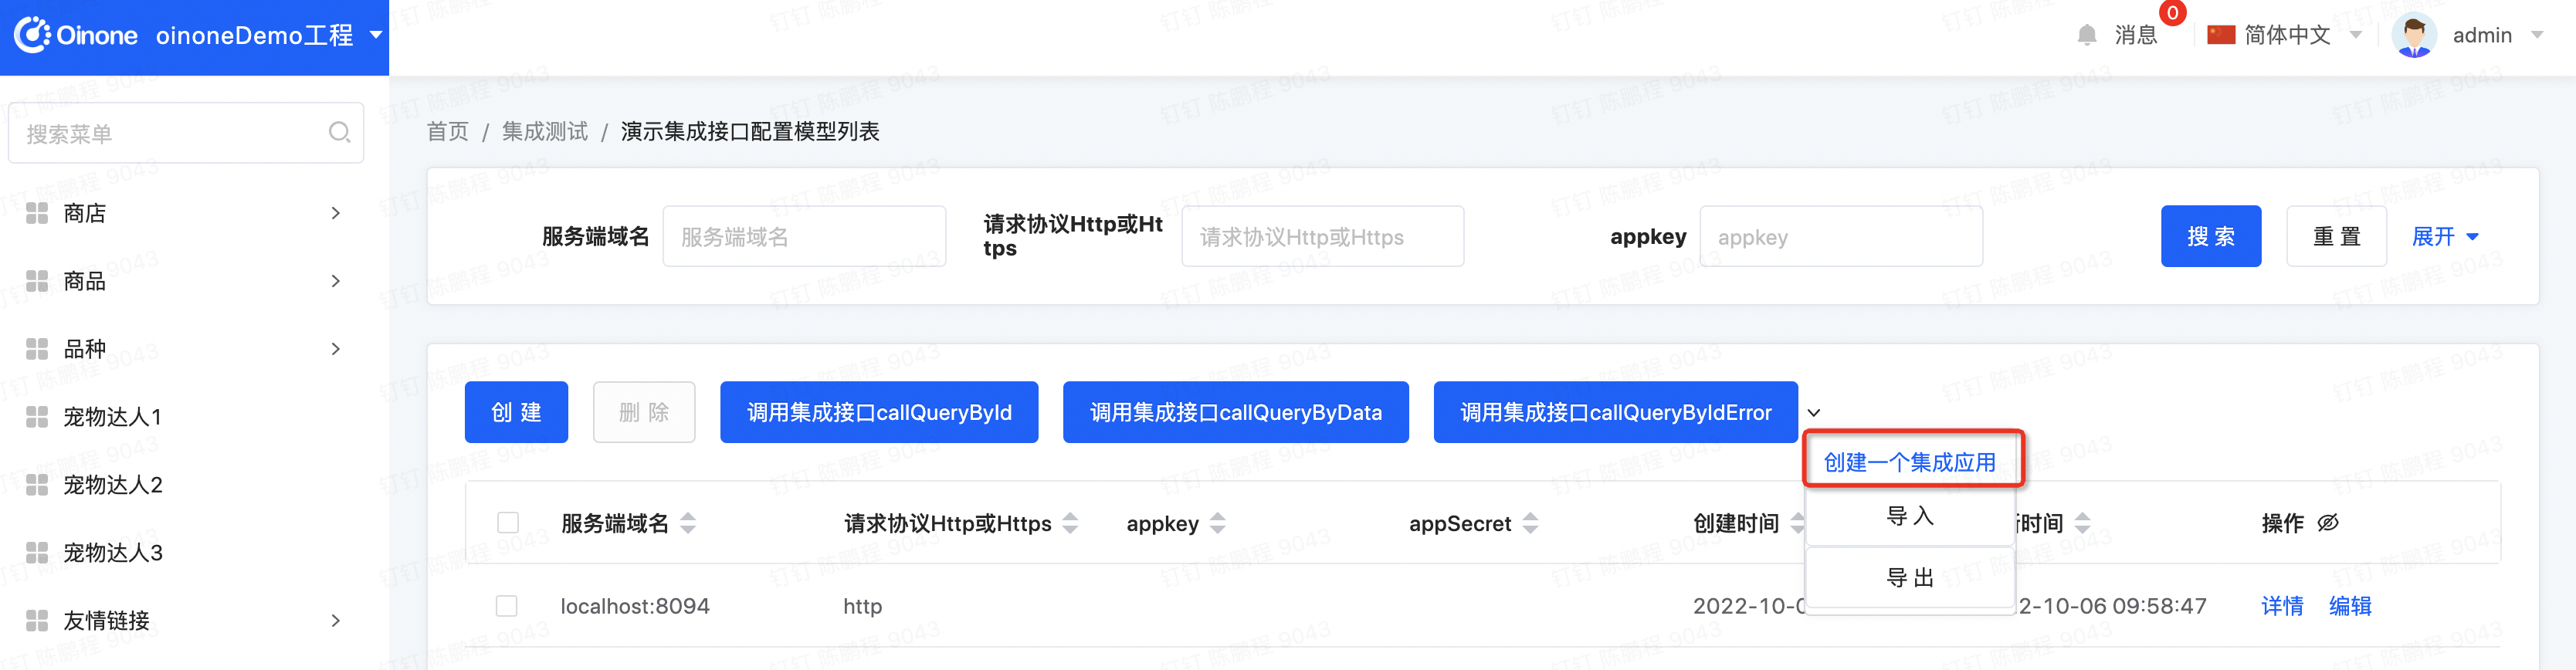
}Step4_4 修改TestEipAction
借用TestEipConfig 模型的列表页提供一个新增EipApplication的入口
……引用依赖类
@Model.model(TestEipConfig.MODEL_MODEL)
@Component
@Slf4j
public class TestEipAction {
    ……其他代码

    @Action(displayName = "创建一个集成应用",contextType = ActionContextTypeEnum.CONTEXT_FREE)
    public TestEipConfig createEipApplication(TestEipConfig data){

        EipApplication eipApplication = new EipApplication().setName("测试的集成应用").queryOne();
        if(eipApplication ==null){
            eipApplication = new EipApplication().setName("测试的集成应用");
            eipApplication.create();
        }else {
            eipApplication.updateById();
        }
        return data;
    }
}
Step5 重启看效果
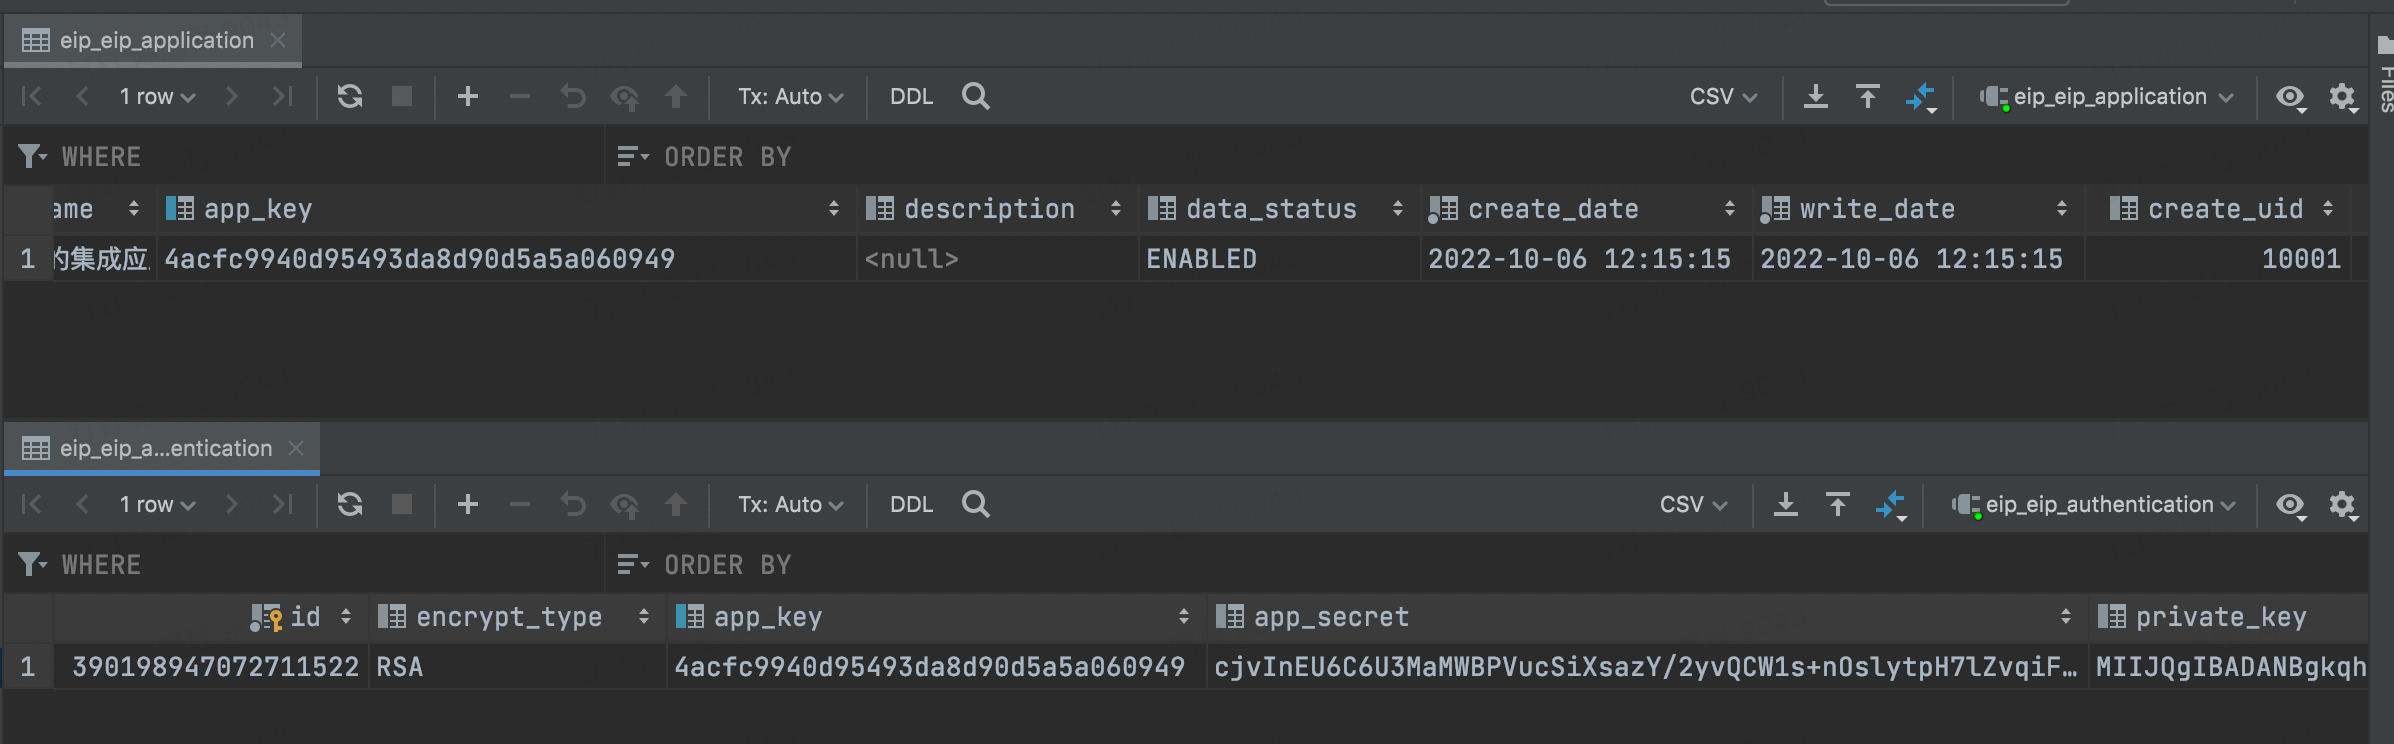
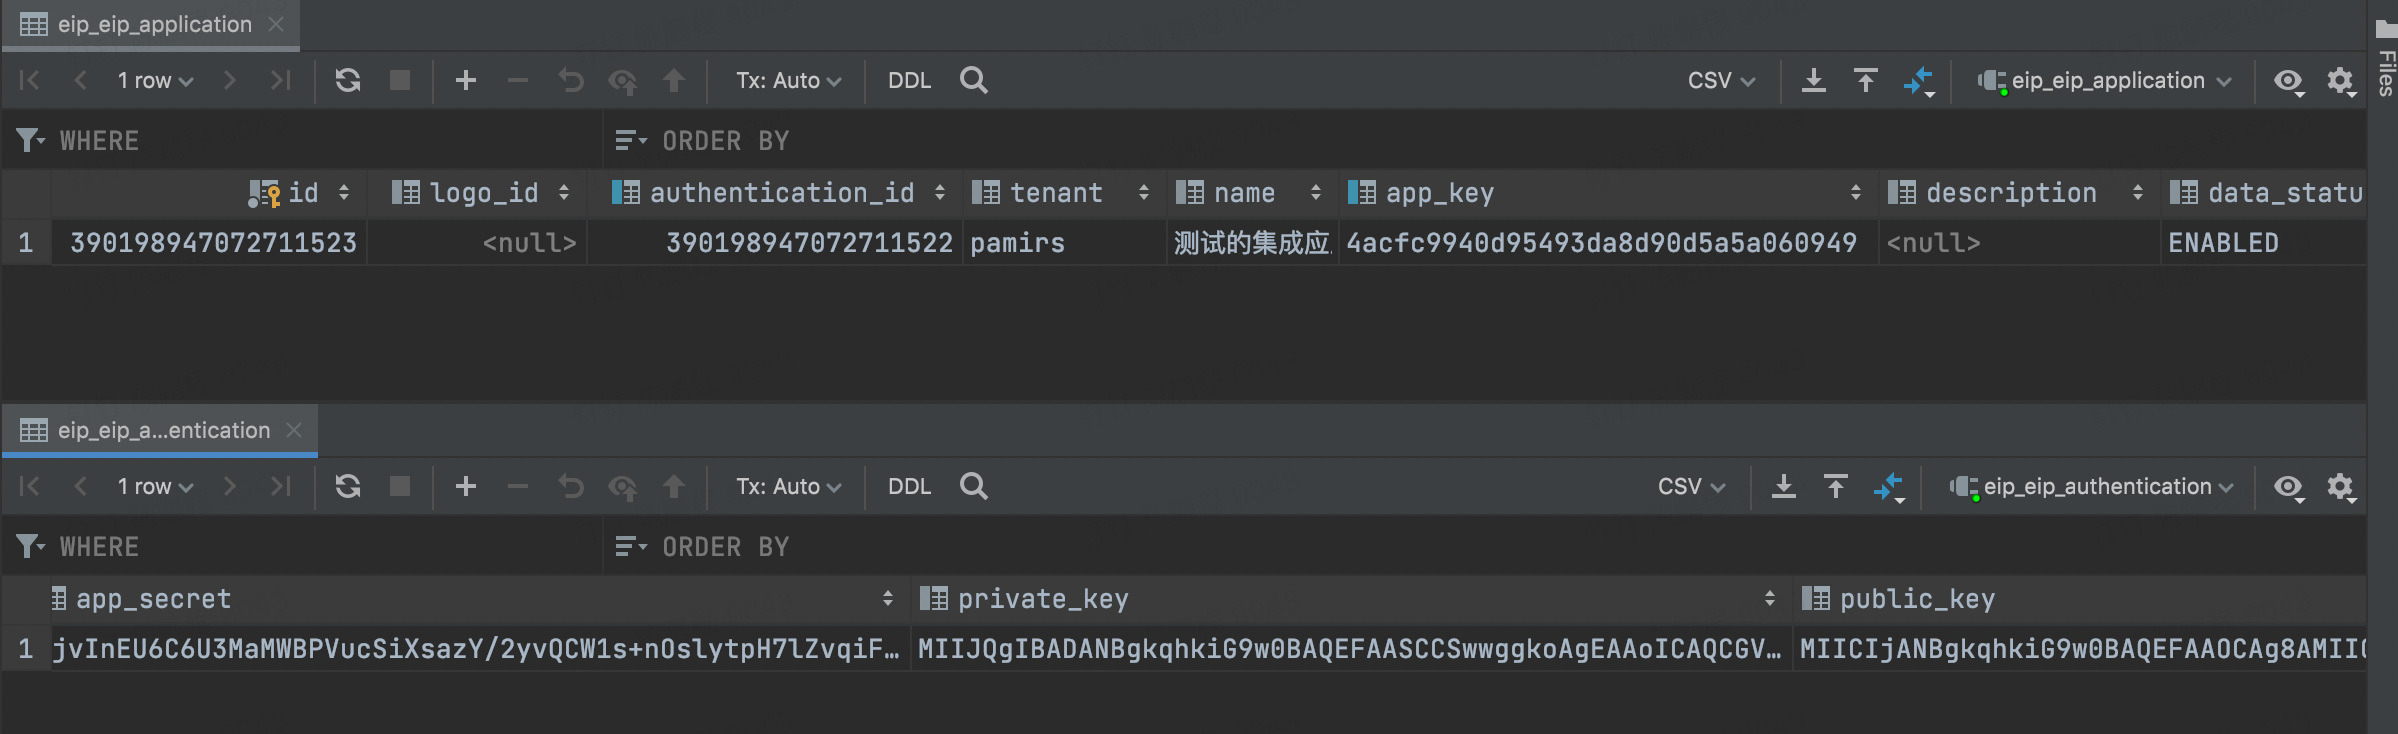
- 点击【集成测试】菜单,点击【创建一个集成应用】按钮,数据库查看创建出来的EipApplication记录和EipAuthentication记录
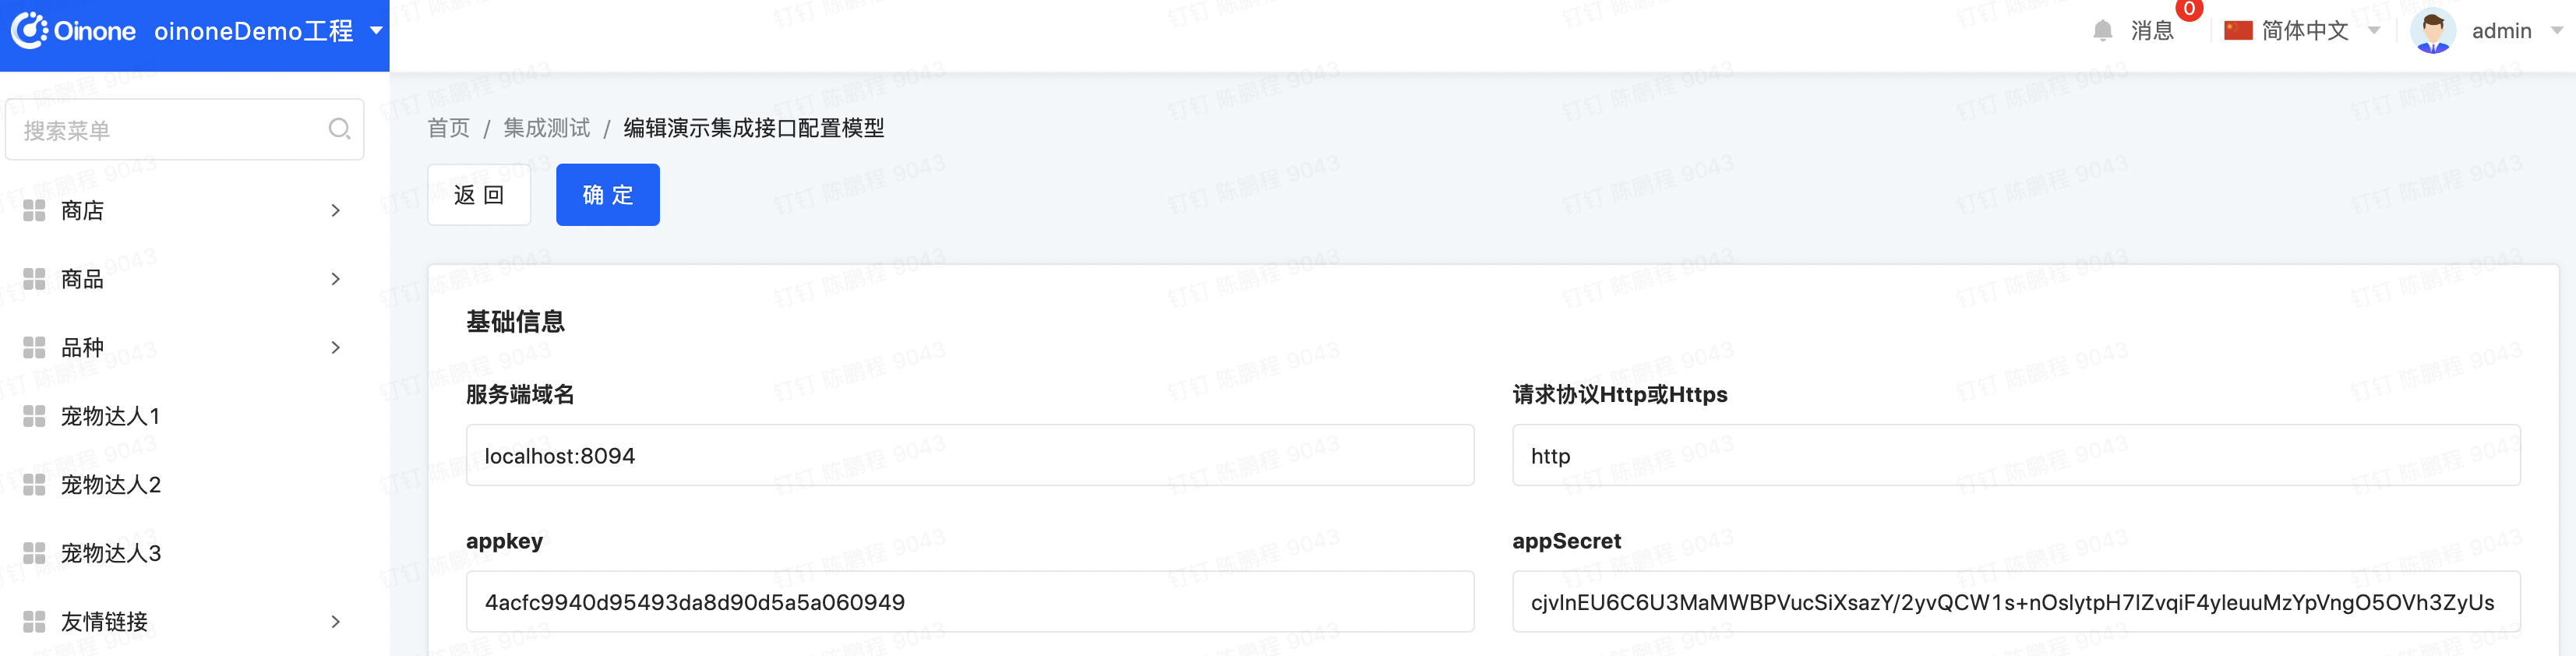
- 点击【集成测试】菜单,编辑记录,填写appkey和appSecret
- 点击【集成测试】菜单,依次点击恢复原有的效果,只有【调用集成接口callQueryByIdError】报错其他不再报错了,也可以进入集成接口模块的日志菜单查看请求日志
自定义安全策略(AccessToken+加密)
例子采用DEFAULT_AUTHENTICATION_PROCESSOR_FUN安全策略,根据EipApplication配置的加密类型进行加解密处理的认证。安全模式:accessToken+加密
当开放接口采用DEFAULT_AUTHENTICATION_PROCESSOR_FUN的策略,需要外部调用方请求参数为{result:"加密后的请求体内容"}的结构,result的值为加密后的请求体内容。
Step1 更改开放接口认证方式
认证方式换成DEFAULT_AUTHENTICATION_PROCESSOR_FUN,@Open.Advanced(authenticationProcessorFun= EipFunctionConstant.DEFAULT_AUTHENTICATION_PROCESSOR_FUN)
小伙伴们可以把@Open.Advanced(authenticationProcessorFun)的配置挪到TestEipConfig中去,这样就不用为每个接口配置了,自己动手吧。
//…… 包引用
@Fun(TestOpenApiModelService.FUN_NAMESPACE)
@Component
public class TestOpenApiModelServiceImpl implements TestOpenApiModelService {

//…… 其他代码

    @Function
    @Open
    @Open.Advanced(
            authenticationProcessorFun= EipFunctionConstant.DEFAULT_AUTHENTICATION_PROCESSOR_FUN,
            authenticationProcessorNamespace = EipFunctionConstant.FUNCTION_NAMESPACE
    )
    public OpenEipResult<TestOpenApiResponse> queryById4Open(IEipContext<SuperMap> context , ExtendedExchange exchange) {
       //…… 其他代码
    }

    @Function
    @Open(path = "error")
    @Open.Advanced(
            httpMethod = "post",
            authenticationProcessorFun= EipFunctionConstant.DEFAULT_AUTHENTICATION_PROCESSOR_FUN,
            authenticationProcessorNamespace = EipFunctionConstant.FUNCTION_NAMESPACE
    )
    public OpenEipResult<TestOpenApiResponse> queryById4OpenError(IEipContext<SuperMap> context , ExtendedExchange exchange) {
        throw PamirsException.construct(EipExpEnumerate.SYSTEM_ERROR).appendMsg("测试异常").errThrow();
    }

}
Step2 重启看效果
期待效果,因为开放接口修改了安全相关校验,集成接口这边并没有调整,所以都会抛错

Step3 为集成接口定义新的auth处理类
Step3_1 修改 TestEipConfig
增加两个字段encryptType和publicKey,这里加密类型为RSA,我们为集成接口申请的EipApplication没有指定加密类型,默认RSA。oinone的开放接口总共支持两种:RSA、AES
    @Field(displayName = "encryptType")
    private EncryptTypeEnum encryptType;

    @Field(displayName = "publicKey")
    @Field.String(size = 4096)
    private String publicKey;
Step3_2 新建TestInOutConvertFunction
新建TestInOutConvertFunction实现IEipInOutConverter接口
package pro.shushi.pamirs.demo.core.service;

import com.alibaba.fastjson.JSON;
import com.alibaba.fastjson.parser.Feature;
import org.apache.camel.ExtendedExchange;
import org.springframework.stereotype.Component;
import pro.shushi.pamirs.core.common.EncryptHelper;
import pro.shushi.pamirs.demo.api.model.TestEipConfig;
import pro.shushi.pamirs.eip.api.IEipInOutConverter;
import pro.shushi.pamirs.meta.annotation.Fun;
import pro.shushi.pamirs.meta.annotation.Function;
import pro.shushi.pamirs.meta.util.JsonUtils;

import javax.crypto.BadPaddingException;
import javax.crypto.IllegalBlockSizeException;
import javax.crypto.NoSuchPaddingException;
import java.io.InputStream;
import java.security.InvalidKeyException;
import java.security.NoSuchAlgorithmException;
import java.security.spec.InvalidKeySpecException;

@Fun(TestInOutConvertFunction.FUN_NAMESPACE)
@Component
public class TestInOutConvertFunction implements IEipInOutConverter {

    public static final String FUN_NAMESPACE ="demo.third.TestInOutConvertFunction";
    public static final String FUN ="exchangeObject";

    @Function
    @Function.fun(FUN)
    @Override
    public Object exchangeObject(ExtendedExchange exchange, Object inObject) throws Exception {
        //获取第三方配置
        TestEipConfig testEipConfig = new TestEipConfig().singletonModel();
        //数据加密
        String data;
        if (inObject instanceof InputStream) {
            data = (String) JSON.parseObject((InputStream)inObject, String.class, new Feature[0]);
        } else if (inObject instanceof String) {
            data = (String)inObject;
        } else {
            data = JsonUtils.toJSONString(inObject);
        }
        switch (testEipConfig.getEncryptType()) {
            case RSA:
                try {
                    data = EncryptHelper.encryptByKey(EncryptHelper.getPublicKey(testEipConfig.getEncryptType().value(), testEipConfig.getPublicKey()), data);
                } catch (NoSuchPaddingException | NoSuchAlgorithmException | InvalidKeyException | BadPaddingException | IllegalBlockSizeException | InvalidKeySpecException e) {
                    e.printStackTrace();
                    data = null;
                }
                break;
            case AES:
                try {
                    data = EncryptHelper.encryptByKey(EncryptHelper.getSecretKeySpec(testEipConfig.getEncryptType().value(), testEipConfig.getPublicKey()), data);
                } catch (NoSuchPaddingException | NoSuchAlgorithmException | InvalidKeyException | BadPaddingException | IllegalBlockSizeException e) {
                    e.printStackTrace();
                    data = null;
                }
                break;
            default:
                throw new IllegalStateException("Unexpected value: " + testEipConfig.getEncryptType());
        }
        //放到指定的路径中,因为集成接口的finalResultKey为"out",这样刚好构建{result:""}的请求结构,根据不同公司不一样
        return "{result:\""+data+"\"}";
    }
}
Step3_3 修改TestIntegrateServiceImpl
为集成方法增加inOutConverter的注解
@Override
@Function
@Integrate(config = TestEipConfig.class)
@Integrate.Advanced(path = "/openapi/pamirs/queryById4Open?tenant=pamirs")
@Integrate.RequestProcessor(
        finalResultKey = "out",
        convertParams={
                @Integrate.ConvertParam(inParam="id",outParam="out.id")
        },
        authenticationProcessorNamespace = TestAuthFunction.FUN_NAMESPACE,
        authenticationProcessorFun =  TestAuthFunction.FUN,
        inOutConverterFun = TestInOutConvertFunction.FUN,
        inOutConverterNamespace = TestInOutConvertFunction.FUN_NAMESPACE
)
public EipResult<SuperMap> callQueryById(String id) {
    return null;
}

@Override
@Function
@Integrate(config = TestEipConfig.class)
@Integrate.Advanced(path = "/openapi/pamirs/queryById4Open?tenant=pamirs")
@Integrate.RequestProcessor(
        finalResultKey = "out",
        convertParams={
                @Integrate.ConvertParam(inParam="data.id",outParam="out.id")
        },
        authenticationProcessorNamespace = TestAuthFunction.FUN_NAMESPACE,
        authenticationProcessorFun =  TestAuthFunction.FUN,
        inOutConverterFun = TestInOutConvertFunction.FUN,
        inOutConverterNamespace = TestInOutConvertFunction.FUN_NAMESPACE
)
public EipResult<SuperMap> callQueryByData(TestOpenApiModel data) {
    return null;
}

@Function
@Integrate(config = TestEipConfig.class)
@Integrate.Advanced(path = "/openapi/pamirs/error?tenant=pamirs")
@Integrate.RequestProcessor(
        finalResultKey = "out",
        convertParams={
                @Integrate.ConvertParam(inParam="data.id",outParam="out.id")
        },
        authenticationProcessorNamespace = TestAuthFunction.FUN_NAMESPACE,
        authenticationProcessorFun =  TestAuthFunction.FUN,
        inOutConverterFun = TestInOutConvertFunction.FUN,
        inOutConverterNamespace = TestInOutConvertFunction.FUN_NAMESPACE
)
public EipResult<SuperMap> callQueryByIdError(TestOpenApiModel data) {
    return null;
}
Step4 重启看效果
- 点击【集成测试】菜单,点击【创建一个集成应用】按钮,数据库查看创建出来的EipApplication记录和EipAuthentication记录,为记录填写publicKey
- 再次点击【集成测试】菜单,依次点击恢复原有的效果,只有【调用集成接口callQueryByIdError】报错其他不再报错了,也可以进入集成接口模块的日志菜单查看请求日志
自定义安全策略(AccessToken+签名)
例子采用DEFAULT_MD5_SIGNATURE_AUTHENTICATION_PROCESSOR_FUN
安全策略,安全模式:accessToken+签名
签名支持:md5和hmac
签名方式和签名摘要:请求方指定,在请求体中设置signatureMethod、signature
Step1 更改开放接口认证方式
认证方式换成DEFAULT_MD5_SIGNATURE_AUTHENTICATION_PROCESSOR_FUN,@Open.Advanced(authenticationProcessorFun= EipFunctionConstant.DEFAULT_MD5_SIGNATURE_AUTHENTICATION_PROCESSOR_FUN)
//…… 包引用

@Fun(TestOpenApiModelService.FUN_NAMESPACE)
@Component
public class TestOpenApiModelServiceImpl implements TestOpenApiModelService {
//…… 其他代码

    @Function
    @Open
    @Open.Advanced(
        authenticationProcessorFun= EipFunctionConstant.DEFAULT_MD5_SIGNATURE_AUTHENTICATION_PROCESSOR_FUN,
        authenticationProcessorNamespace = EipFunctionConstant.FUNCTION_NAMESPACE
    )
    public OpenEipResult<TestOpenApiResponse> queryById4Open(IEipContext<SuperMap> context , ExtendedExchange exchange) {
        //…… 其他代码
    }

    @Function
    @Open(config = TestEipConfig.class,path = "error")
    @Open.Advanced(
        httpMethod = "post",
        authenticationProcessorFun= EipFunctionConstant.DEFAULT_MD5_SIGNATURE_AUTHENTICATION_PROCESSOR_FUN,
        authenticationProcessorNamespace = EipFunctionConstant.FUNCTION_NAMESPACE
    )
    public OpenEipResult<TestOpenApiResponse> queryById4OpenError(IEipContext<SuperMap> context , ExtendedExchange exchange) {
        throw PamirsException.construct(EipExpEnumerate.SYSTEM_ERROR).appendMsg("测试异常").errThrow();
    }

}
Step2 重启看效果
期待效果,因为开放接口修改了安全相关校验,集成接口这边并没有调整,所以都会抛错
Step3 为集成接口定义新的auth处理类
Step3_1 新建SignUtil
新建SignUtil签名工具类
package pro.shushi.pamirs.demo.core.util;

import org.apache.commons.lang3.StringUtils;

import javax.crypto.Mac;
import javax.crypto.SecretKey;
import javax.crypto.spec.SecretKeySpec;
import java.io.IOException;
import java.nio.charset.StandardCharsets;
import java.security.GeneralSecurityException;
import java.security.MessageDigest;
import java.security.NoSuchAlgorithmException;
import java.util.Arrays;
import java.util.Map;

public class SignUtil {

    public static String signTopRequest(Map<String, String> params, String secret, String signMethod) throws IOException {
        // 第一步:检查参数是否已经排序
        String[] keys = params.keySet().toArray(new String[0]);
        Arrays.sort(keys);

        // 第二步:把所有参数名和参数值串在一起
        StringBuilder query = new StringBuilder();
        if ("md5".equals(signMethod)) { //签名的摘要算法,可选值为:hmac,md5,hmac-sha256
            query.append(secret);
        }
        for (String key : keys) {
            String value = params.get(key);
            if (StringUtils.isAllBlank(new CharSequence[]{key, value})) {
                query.append(key).append(value);
            }
        }

        // 第三步:使用MD5/HMAC加密
        byte[] bytes;
        if ("hmac".equals(signMethod)) {
            bytes = encryptHMAC(query.toString(), secret);
        } else {
            query.append(secret);
            bytes = encryptMD5(query.toString());
        }

        // 第四步:把二进制转化为大写的十六进制(正确签名应该为32大写字符串,此方法需要时使用)
        return byte2hex(bytes);
    }

    public static byte[] encryptHMAC(String data, String secret) throws IOException {
        byte[] bytes = null;
        try {
            SecretKey secretKey = new SecretKeySpec(secret.getBytes(StandardCharsets.UTF_8), "HmacMD5");
            Mac mac = Mac.getInstance(secretKey.getAlgorithm());
            mac.init(secretKey);
            bytes = mac.doFinal(data.getBytes(StandardCharsets.UTF_8));
        } catch (GeneralSecurityException gse) {
            throw new IOException(gse.toString());
        }
        return bytes;
    }

    private static byte[] encryptMD5(String data) throws IOException {
        return encryptMD5(data.getBytes(StandardCharsets.UTF_8));
    }

    private static byte[] encryptMD5(byte[] data) throws IOException {
        try {
            MessageDigest md = MessageDigest.getInstance("MD5");
            return md.digest(data);
        } catch (NoSuchAlgorithmException var3) {
            throw new IOException(var3.toString(), var3);
        }
    }

    public static String byte2hex(byte[] bytes) {
        StringBuilder sign = new StringBuilder();
        for (int i = 0; i < bytes.length; i++) {
            String hex = Integer.toHexString(bytes[i] & 0xFF);
            if (hex.length() == 1) {
                sign.append("0");
            }
            sign.append(hex.toUpperCase());
        }
        return sign.toString();
    }
}
Step3_2 新建TestMd5InOutConvertFunction
-
跟加密一样,必须在所有内容都处理完成后进行处理,要不然参数个数对不上的。
-
例子中新增一种设置Header的方法,exchange.getMessage().setHeader前面,在前面我们学习AccessToken的时候用的方法是:context.putInterfaceContextValue(IEipContext.HEADER_PARAMS_KEY+".accessToken"
package pro.shushi.pamirs.demo.core.service;
import org.apache.camel.ExtendedExchange;
import org.apache.commons.collections4.MapUtils;
import org.springframework.stereotype.Component;
import pro.shushi.pamirs.demo.api.model.TestEipConfig;
import pro.shushi.pamirs.demo.core.util.SignUtil;
import pro.shushi.pamirs.eip.api.IEipInOutConverter;
import pro.shushi.pamirs.eip.api.converter.DefaultInOutConverter;
import pro.shushi.pamirs.meta.annotation.Fun;
import pro.shushi.pamirs.meta.annotation.Function;
import java.io.IOException;
import java.util.HashMap;
import java.util.Map;
@Fun(TestMd5InOutConvertFunction.FUN_NAMESPACE)
@Component
public class TestMd5InOutConvertFunction extends DefaultInOutConverter implements IEipInOutConverter {
public static final String FUN_NAMESPACE ="demo.third.TestMd5InOutConvertFunction";
public static final String FUN ="exchangeObject";

@Function
@Function.fun(FUN)
public Object exchangeObject(ExtendedExchange exchange, Object inObject) throws Exception {
    if (inObject instanceof Map) {
        Map<String, Object> map = (Map)inObject;
        if (MapUtils.isNotEmpty(map)) {

            TestEipConfig testEipConfig = new TestEipConfig().singletonModel();
            String signatureMethod ="md5";
            Map<String, String> params = new HashMap(map.size());
            for(Map.Entry<String ,Object> entry: map.entrySet()) {
                String key = entry.getKey();
                Object value = entry.getValue();
                params.put(key, String.valueOf(value));
            }
            try {
                String signature = SignUtil.signTopRequest(params, testEipConfig.getAppKey(), signatureMethod);
                exchange.getMessage().setHeader("signatureMethod",signatureMethod);
                exchange.getMessage().setHeader("signature",signature);
            } catch (IOException e) {
                e.printStackTrace();
            }
        }
    }
    return super.exchangeObject(exchange, inObject);
}
}
### Step3_3 修改TestIntegrateServiceImpl

更换inOutConverter的注解为TestMd5InOutConvertFunction
```JAVA
@Override
@Function
@Integrate(config = TestEipConfig.class)
@Integrate.Advanced(path = "/openapi/pamirs/queryById4Open?tenant=pamirs")
@Integrate.RequestProcessor(
        finalResultKey = "out",
        convertParams={
                @Integrate.ConvertParam(inParam="id",outParam="out.id")
        },
        authenticationProcessorNamespace = TestAuthFunction.FUN_NAMESPACE,
        authenticationProcessorFun =  TestAuthFunction.FUN,
        inOutConverterFun = TestMd5InOutConvertFunction.FUN,
        inOutConverterNamespace = TestMd5InOutConvertFunction.FUN_NAMESPACE
)
public EipResult<SuperMap> callQueryById(String id) {
    return null;
}

@Override
@Function
@Integrate(config = TestEipConfig.class)
@Integrate.Advanced(path = "/openapi/pamirs/queryById4Open?tenant=pamirs")
@Integrate.RequestProcessor(
        finalResultKey = "out",
        convertParams={
                @Integrate.ConvertParam(inParam="data.id",outParam="out.id")
        },
        authenticationProcessorNamespace = TestAuthFunction.FUN_NAMESPACE,
        authenticationProcessorFun =  TestAuthFunction.FUN,
        inOutConverterFun = TestMd5InOutConvertFunction.FUN,
        inOutConverterNamespace = TestMd5InOutConvertFunction.FUN_NAMESPACE
)
public EipResult<SuperMap> callQueryByData(TestOpenApiModel data) {
    return null;
}

@Function
@Integrate(config = TestEipConfig.class)
@Integrate.Advanced(path = "/openapi/pamirs/error?tenant=pamirs")
@Integrate.RequestProcessor(
        finalResultKey = "out",
        convertParams={
                @Integrate.ConvertParam(inParam="data.id",outParam="out.id")
        },
        authenticationProcessorNamespace = TestAuthFunction.FUN_NAMESPACE,
        authenticationProcessorFun =  TestAuthFunction.FUN,
        inOutConverterFun = TestMd5InOutConvertFunction.FUN,
        inOutConverterNamespace = TestMd5InOutConvertFunction.FUN_NAMESPACE

)
public EipResult<SuperMap> callQueryByIdError(TestOpenApiModel data) {
    return null;
}
Step4 重启看效果
点击【集成测试】菜单,依次点击恢复原有的效果,只有【调用集成接口callQueryByIdError】报错其他不再报错了,也可以进入集成接口模块的日志菜单查看请求日志
自定义序列化方式
Step1 新增一个xml的开放接口
为TestOpenApiModelServiceImpl新增一个方法queryById4ReturnXml,使用@Open注解,路径配置为xml。同时记得重启second应用,发布这个openApi
@Function
@Open(path = "xml")
@Open.Advanced(
        httpMethod = "post",
        authenticationProcessorFun= EipFunctionConstant.DEFAULT_MD5_SIGNATURE_AUTHENTICATION_PROCESSOR_FUN,
        authenticationProcessorNamespace = EipFunctionConstant.FUNCTION_NAMESPACE
)
public String queryById4ReturnXml(IEipContext<SuperMap> context , ExtendedExchange exchange) {
    return "<result><id>12</id><success>true</success></result>";
}
Step2 Demo工程引入dom4j的依赖包
在总工程中修改pom.xml增加对dom4j的依赖管理
<dependency>
    <groupId>dom4j</groupId>
    <artifactId>dom4j</artifactId>
    <version>1.1</version>
</dependency>
在pamirs-demo-core工程中修改pom.xml增加对dom4j的依赖
<dependency>
    <groupId>dom4j</groupId>
    <artifactId>dom4j</artifactId>
</dependency>
Step3 自定义序列化函数TestSerializableFunction
新建TestSerializableFunction实现 IEipSerializable<SuperMap>接口
package pro.shushi.pamirs.demo.core.service;

import com.alibaba.fastjson.JSONArray;
import com.google.common.collect.Lists;
import org.apache.commons.lang3.StringUtils;
import org.springframework.stereotype.Component;
import pro.shushi.pamirs.core.common.SuperMap;
import pro.shushi.pamirs.eip.api.IEipSerializable;
import pro.shushi.pamirs.meta.annotation.Fun;
import pro.shushi.pamirs.meta.annotation.Function;
import org.dom4j.Document;
import org.dom4j.DocumentHelper;
import org.dom4j.Element;

import java.io.BufferedReader;
import java.io.IOException;
import java.io.InputStream;
import java.io.InputStreamReader;
import java.util.List;

@Fun(TestSerializableFunction.FUN_NAMESPACE)
@Component
public class TestSerializableFunction implements IEipSerializable<SuperMap> {

    public static final String FUN_NAMESPACE ="demo.third.TestSerializableFunction";
    public static final String FUN ="serializable";

    @Override
    @Function.Advanced(displayName = "自定义xml序列化方式")
    @Function.fun(FUN)
    public SuperMap serializable(Object inObject) {
        if (inObject == null) {
            return new SuperMap();
        } else {
            SuperMap result;
            if (inObject instanceof String) {
                String inObjectString = (String)inObject;
                if (StringUtils.isNotBlank(inObjectString)) {
                    result = this.stringToSuperMap(inObjectString);
                } else {
                    result = new SuperMap();
                }
            } else if (inObject instanceof InputStream) {
                result = this.inputStreamToString((InputStream)inObject);
            } else if (inObject instanceof SuperMap) {
                result = (SuperMap) inObject;
            }
            else{
                result = new SuperMap();
            }
            return result;
        }
    }

    protected SuperMap inputStreamToString(InputStream inputStream) {
        StringBuilder sb = new StringBuilder();
        String line;
        try (BufferedReader bufferedReader = new BufferedReader(new InputStreamReader(inputStream))) {
            while ((line = bufferedReader.readLine()) != null) {
                sb.append(line);
            }
            return serializable(sb.toString());
        } catch (IOException e) {
            return new SuperMap();
        }
    }

    protected SuperMap stringToSuperMap(String s) {
        SuperMap result = new SuperMap();
        try {
            Document document = DocumentHelper.parseText(s);
            Element root = document.getRootElement();
            iterateNodes(root, result);
            return result;
        } catch (Exception e) {
            e.printStackTrace();
        }
        return result;
    }

    public static void iterateNodes(Element node, SuperMap superMap){
        //获取当前元素的名称
        String nodeName = node.getName();
        if(superMap.containsKey(nodeName)){
            //该元素在同级下有多个
            Object object = superMap.getIteration(nodeName);
            List<Object> list = Lists.newArrayList();
            if(object instanceof JSONArray){
                list = (List) object;
            }else {
                list = Lists.newArrayList();
                list.add(object);
            }
            //获取该元素下所有子元素
            List<Element> listElement = node.elements();
            if(listElement.isEmpty()){
                //该元素无子元素,获取元素的值
                String nodeValue = node.getTextTrim();
                list.add(nodeValue);
                superMap.putIteration(nodeName, list);
                return;
            }
            //有子元素
            SuperMap subMap = new SuperMap();
            //遍历所有子元素
            for(Element e:listElement){
                //递归
                iterateNodes(e, subMap);
            }
            list.add(subMap);
            subMap.putIteration(nodeName, list);
            return;
        }
        List<Element> listElement = node.elements();
        if(listElement.isEmpty()){
            //该元素无子元素,获取元素的值
            String nodeValue = node.getTextTrim();
            superMap.putIteration(nodeName, nodeValue);
            return;
        }
        //有子节点,新建一个JSONObject来存储该节点下子节点的值
        SuperMap subMap = new SuperMap();
        //遍历所有一级子节点
        for(Element e:listElement){
            //递归
            iterateNodes(e, subMap);
        }
        superMap.putIteration(nodeName, subMap);
    }

}
Step4 新增一个异常判定类
新增TestXmlExceptionPredictFunction异常判定类,因为原来的异常判断类配置在了TestEipConfig,所以所有方法都会默认使用TestEipConfig类上定义的异常判断类。
package pro.shushi.pamirs.demo.core.service;

import pro.shushi.pamirs.core.common.SuperMap;
import pro.shushi.pamirs.eip.api.IEipContext;
import pro.shushi.pamirs.eip.api.IEipExceptionPredict;
import pro.shushi.pamirs.meta.annotation.Fun;
import pro.shushi.pamirs.meta.annotation.Function;

@Fun(TestXmlExceptionPredictFunction.FUN_NAMESPACE)
public class TestXmlExceptionPredictFunction implements IEipExceptionPredict<SuperMap> {

    public static final String FUN_NAMESPACE ="demo.TestXmlExceptionPredictFunction";
    public static final String FUN ="testFunction";

    @Override
    public boolean test(IEipContext<SuperMap> context) {
        return Boolean.FALSE;
    }

    @Function
    @Function.fun(FUN)
    public Boolean testFunction(IEipContext<SuperMap> context) {
        return test(context);
    }
}
Step5 修改TestIntegrateService和TestIntegrateServiceImpl
TestIntegrateService增加方法定义
@Function
EipResult<SuperMap> callQueryReturnXml(TestOpenApiModel data) ;
TestIntegrateServiceImpl实现callQueryReturnXml 并定义为集成接口,同时配置自定义序列化函数
……引用依赖类

@Fun(TestIntegrateService.FUN_NAMESPACE)
@Component
public class TestIntegrateServiceImpl implements TestIntegrateService {
        ……其他代码

    @Function
    @Integrate(config = TestEipConfig.class)
    @Integrate.Advanced(
            path = "/openapi/pamirs/xml?tenant=pamirs",
            httpMethod = "post"
    )
    @Integrate.RequestProcessor(
            finalResultKey = "out",
            convertParams={
                    @Integrate.ConvertParam(inParam="data.id",outParam="out.id")
            },
            authenticationProcessorNamespace = TestAuthFunction.FUN_NAMESPACE,
            authenticationProcessorFun =  TestAuthFunction.FUN,
            inOutConverterFun = TestMd5InOutConvertFunction.FUN,
            inOutConverterNamespace = TestMd5InOutConvertFunction.FUN_NAMESPACE

    )
    @Integrate.ResponseProcessor(
            finalResultKey = "result",
            serializableFun = TestSerializableFunction.FUN,
            serializableNamespace = TestSerializableFunction.FUN_NAMESPACE
    )
    @Integrate.ExceptionProcessor(
            errorCode ="success",
            exceptionPredictFun = TestXmlExceptionPredictFunction.FUN,
            exceptionPredictNamespace = TestXmlExceptionPredictFunction.FUN_NAMESPACE
    )
    public EipResult<SuperMap> callQueryReturnXml(TestOpenApiModel data) {
        return null;
    }

}
Step6 增加测试入口
修改TestEipAction 类增加一个callQueryByXml的Action定义,调用testIntegrateService集成接口的callQueryReturnXml方法
@Action(displayName = "调用集成接口callQueryReturnXml",contextType = ActionContextTypeEnum.CONTEXT_FREE)
public TestEipConfig callQueryByXml(TestEipConfig data){
    EipResult<SuperMap> eipResult = testIntegrateService.callQueryReturnXml((TestOpenApiModel)new TestOpenApiModel().setName("cpc").setId(111L));
    if(!eipResult.getSuccess()){
        throw PamirsException.construct(EipExpEnumerate.SYSTEM_ERROR).appendMsg("调用集成接口callQueryReturnXml 失败").errThrow();
    }
    PamirsSession.getMessageHub().error(JsonUtils.toJSONString(eipResult));
    return data;
}
Step7 重启看效果
Eip注解说明
开放接口注解
Open
├── name 显示名称
├── config 配置类
├── path 路径
├── Advanced 更多配置
│ ├── httpMethod 请求方法,默认:post
│ ├── inOutConverterFun 输入输出转换器函数名称
│ ├── inOutConverterNamespace 输入输出转换器函数命名空间
│ ├── authenticationProcessorFun 认证处理器函数名称
│ ├── authenticationProcessorNamespace 认证处理器函数命名空间
│ ├── serializableFun 序列化函数名称
│ ├── serializableNamespace 序列化函数命名空间
│ ├── deserializationFun 反序列化函数名称
│ └── deserializationNamespace 反序列化函数命名空间
集成接口注解
Integrate
├── name 显示名称
├── config 配置类
├── Advanced 更多配置
│ ├── host 请求域名+端口
│ ├── path 请求路径 以“/”开头
│ ├── schema 请求协议 http或者https
│ └── httpMethod 请求方法,默认post
├── ExceptionProcessor 异常配置
│ ├── exceptionPredictFun 异常判定函数名
│ ├── exceptionPredictNamespace 异常判定函数命名空间
│ ├── errorMsg 异常判定Msg的键值
│ └── errorCode 异常判定errorCode的键值
├── RequestProcessor 请求处理配置
│ ├── finalResultKey 请求的最终结果键值
│ ├── inOutConverterFun 输入输出转换器函数名称
│ ├── inOutConverterNamespace 输入输出转换器函数命名空间
│ ├── paramConverterCallbackFun 参数转换回调函数名称
│ ├── paramConverterCallbackNamespace 参数转换回调函数命名空间
│ ├── authenticationProcessorFun 认证处理器函数名称
│ ├── authenticationProcessorNamespace 认证处理器函数命名空间
│ ├── serializableFun 序列化函数名称
│ ├── serializableNamespace 序列化函数命名空间
│ ├── deserializationFun 反序列化函数名称
│ ├── deserializationNamespace 反序列化函数命名空间
│ └── convertParams 参数转化集合
│ └── ConvertParam 参数转化
│ ├── inParam 输入参数的键值
│ └── outParam输出参数的键值
├── ResponseProcessor 请求处理配置
│ ├── finalResultKey 响应的最终结果键值
│ ├── inOutConverterFun 输入输出转换器函数名称
│ ├── inOutConverterNamespace 输入输出转换器函数命名空间
│ ├── paramConverterCallbackFun 参数转换回调函数名称
│ ├── paramConverterCallbackNamespace 参数转换回调函数命名空间
│ ├── authenticationProcessorFun 认证处理器函数名称
│ ├── authenticationProcessorNamespace 认证处理器函数命名空间
│ ├── serializableFun 序列化函数名称
│ ├── serializableNamespace 序列化函数命名空间
│ ├── deserializationFun 反序列化函数名称
│ ├── deserializationNamespace 反序列化函数命名空间
│ └── convertParams 参数转化集合
│ └── ConvertParam 参数转化
│ ├── inParam 输入参数的键值
│ └── outParam 输出参数的键值
Eip处理函数说明
| Eip处理函数 | 作用 | 需实现接口 | 说明 |
|---|---|---|---|
| inOutConverter | 输入输出转换器函数 | IEipInOutConverter | inOutConverter 核心处理请求体的构造或响应体的构造 |
| paramConverter | 参数转换回调函数 | IEipParamConverter | 如果自定义paramConverter,会让默认ConvertParam配置的(inParam,outParam)转化失效了,需要自行处理 |
| authenticationProcessor | 认证处理器函数 | IEipAuthenticationProcessor<SuperMap> | |
| serializable | 序列化函数 | IEipSerializable<SuperMap> | 序列化方法将任意对象转换为上下文承载对象 |
| deserialization | 反序列化函数 | IEipDeserialization<SuperMap> | 目前这个意义不大,因为如果设置了finalResultKey,就会不走反序列化。现在都是通过inoutconverter处理的。 |
| exceptionProcessor | 异常判定函数 | IEipExceptionPredict<SuperMap> |
paramConverter的特殊转换
| paramConverter的特殊转换 | ||
|---|---|---|
| URL_QUERY_PARAMS_KEY | IEipContext.URL_QUERY_PARAMS_KEY.xxx是请求参数,会拼接在url的问号后面 | convertParams={@Integrate.ConvertParam(inParam="id",outParam=IEipContext.URL_QUERY_PARAMS_KEY+".id") } |
| HEADER_PARAMS_KEY | IEipContext.HEADER_PARAMS_KEY.xxx是http请求头参数 | convertParams={@Integrate.ConvertParam(inParam="id",outParam=IEipContext.HEADER_PARAMS_KEY+".id") } |
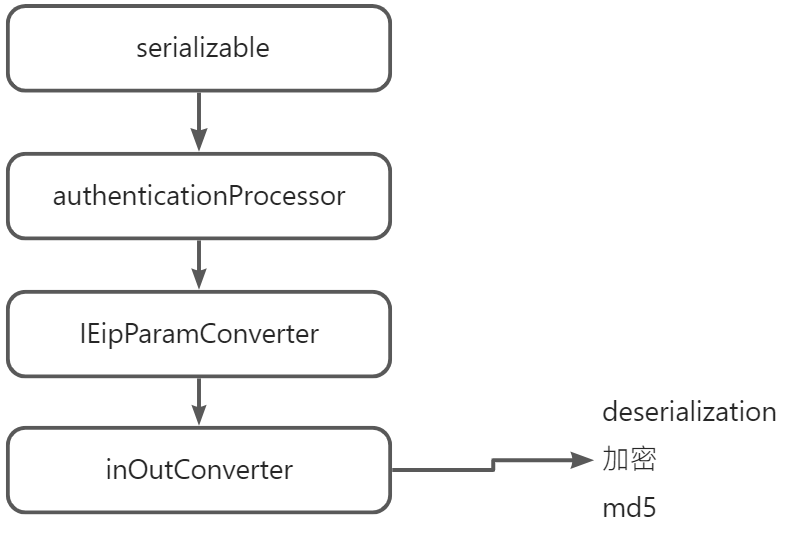
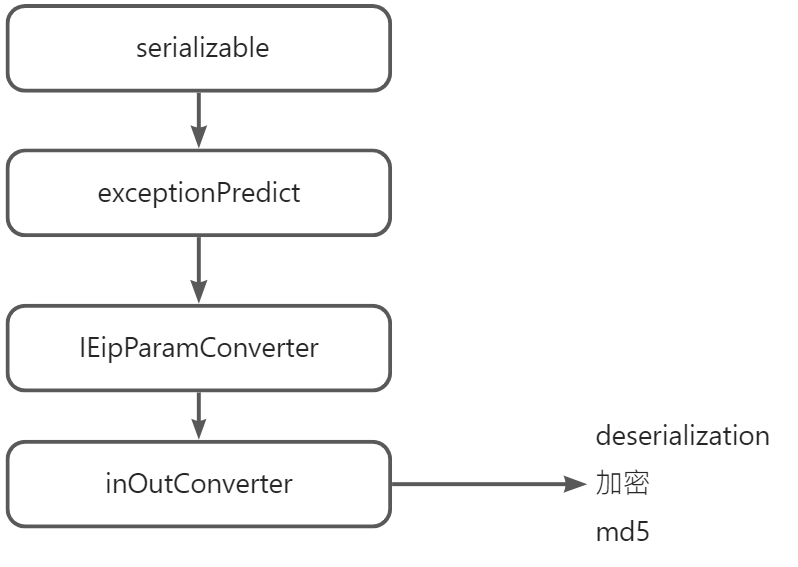
调用流程
请求调用流程
响应调用流程
Oinone社区 作者:史, 昂原创文章,如若转载,请注明出处:https://doc.oinone.top/oio4/9326.html
访问Oinone官网:https://www.oinone.top获取数式Oinone低代码应用平台体验