开发者

1.开发者

1.1 Webhook

通过webhook流程节点可以向第三方系统发送请求。

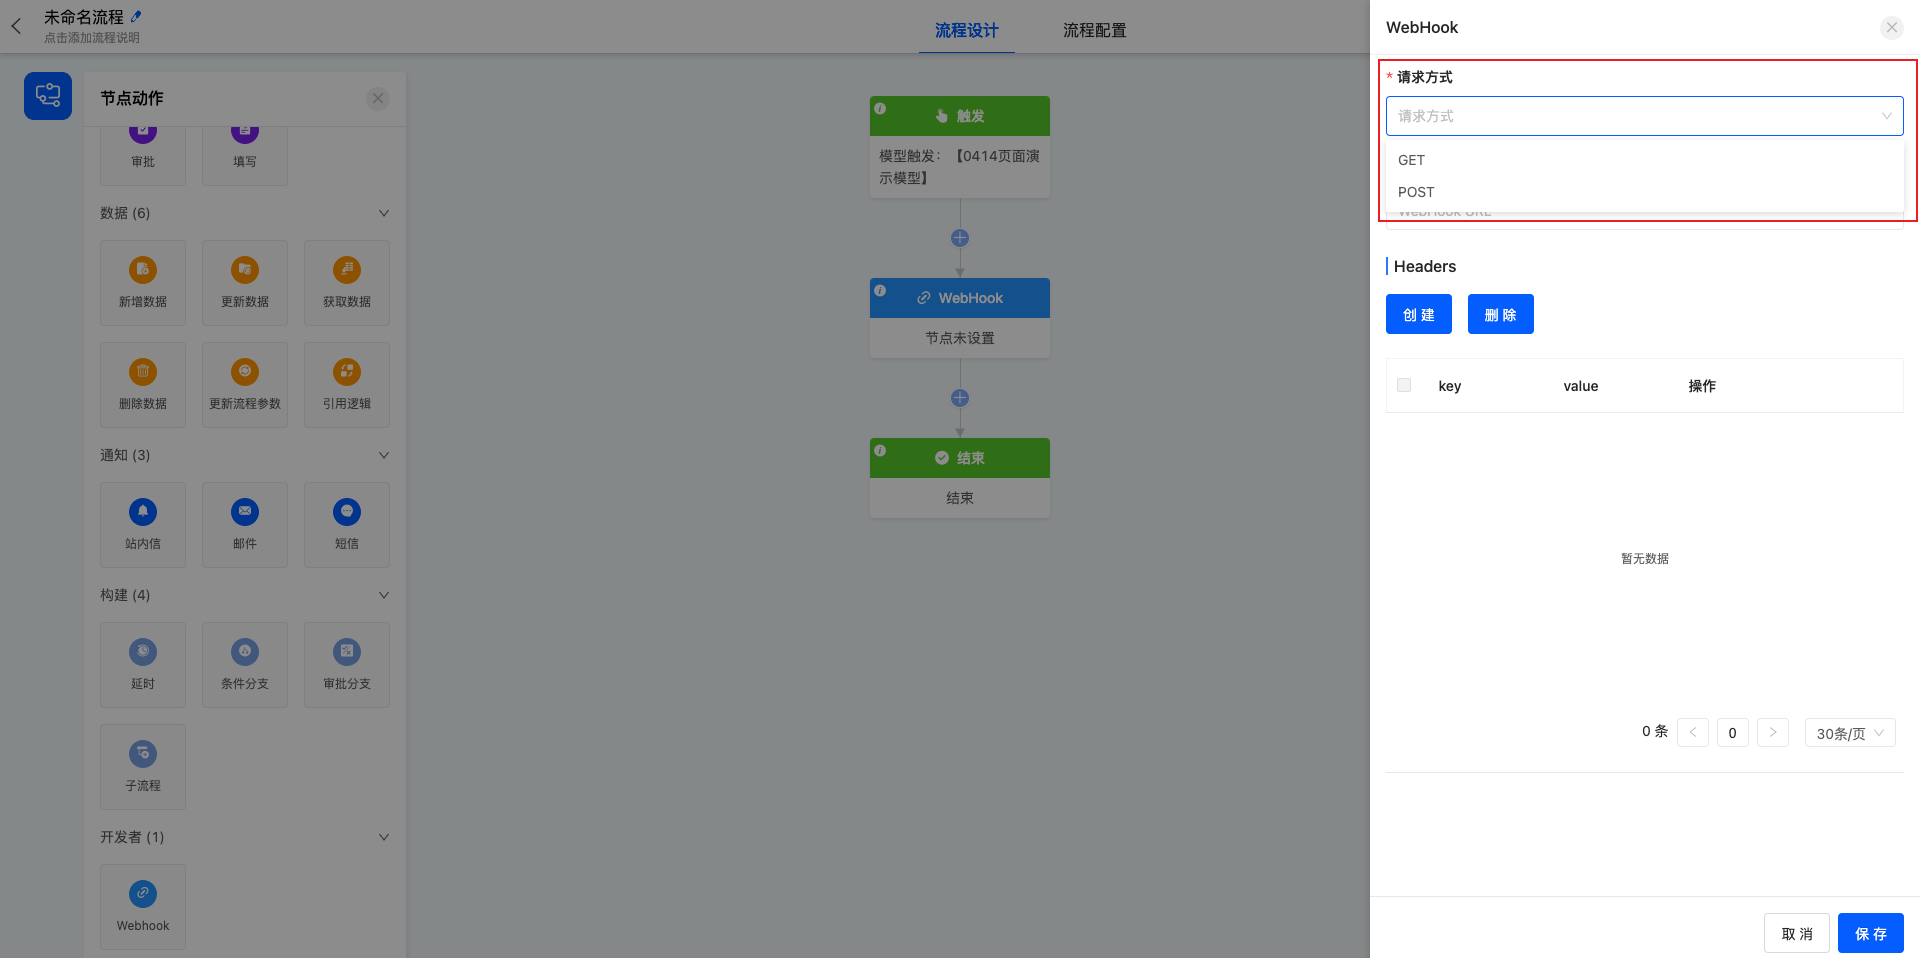
1.1.1 请求方式

支持GET、POST两种请求方式。

开发者

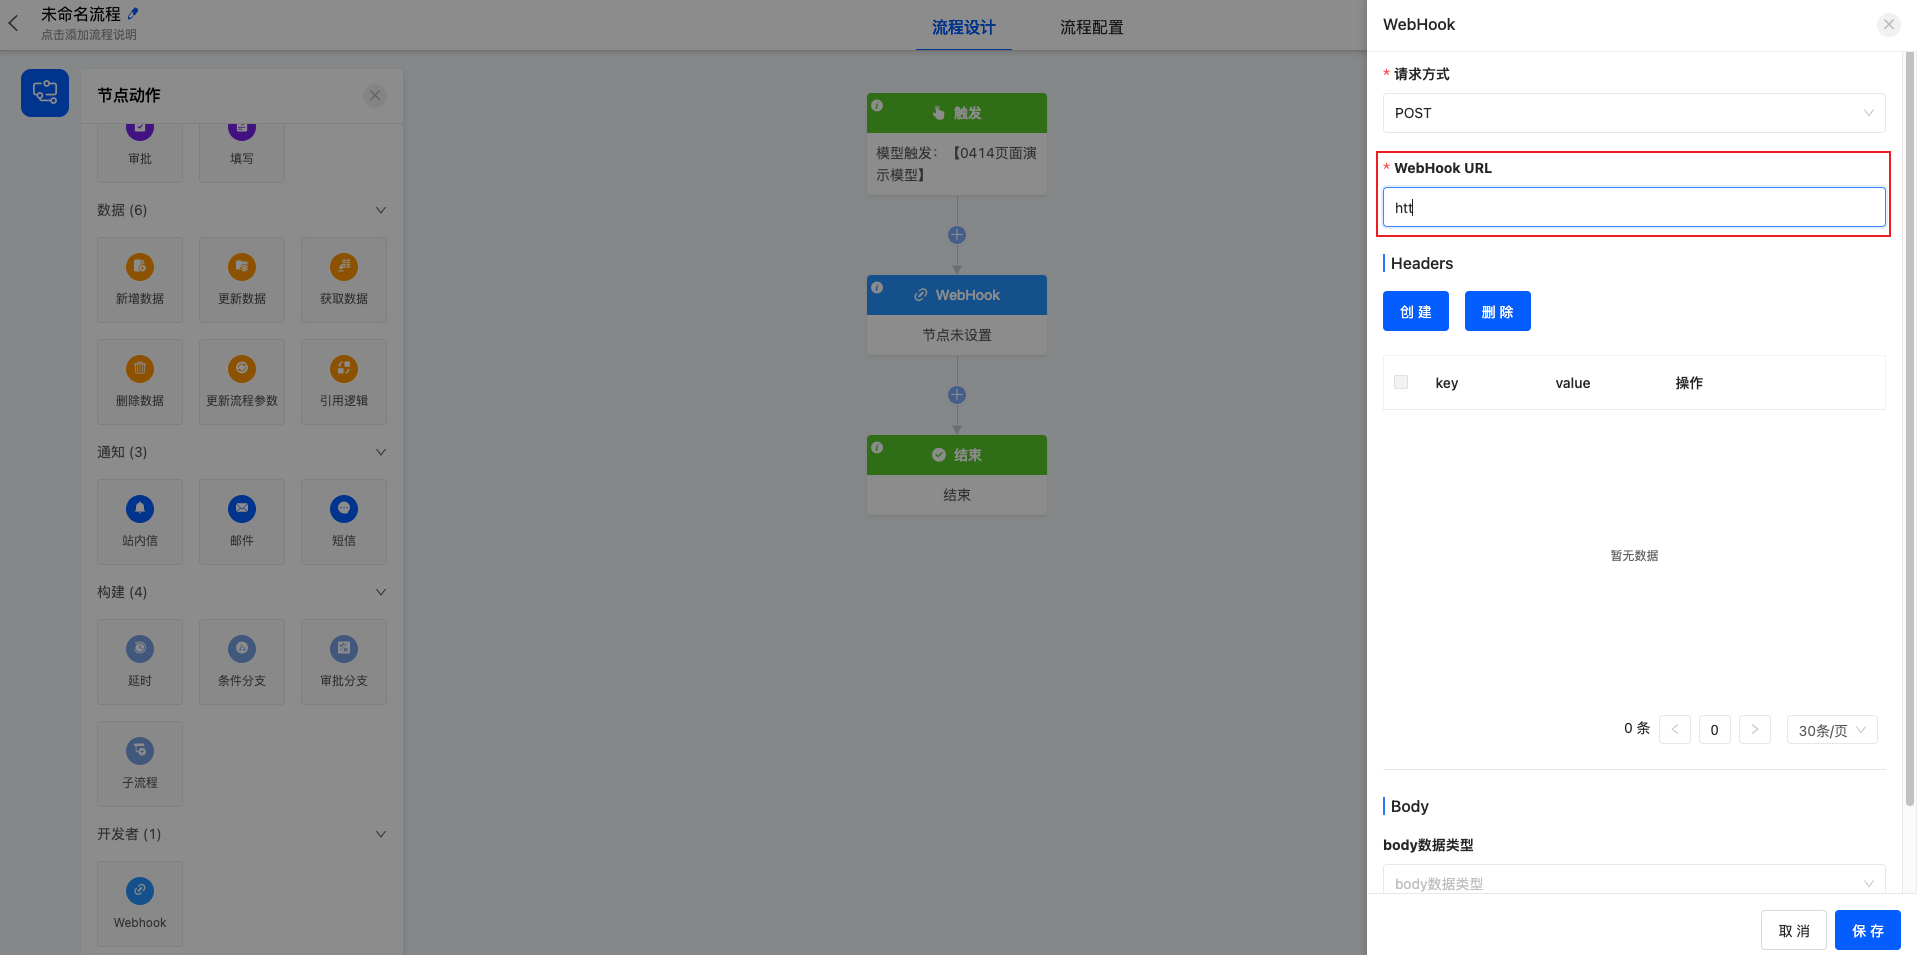
1.1.2 URL

在Webhook URL中填写发送请求的HTTP地址。

开发者

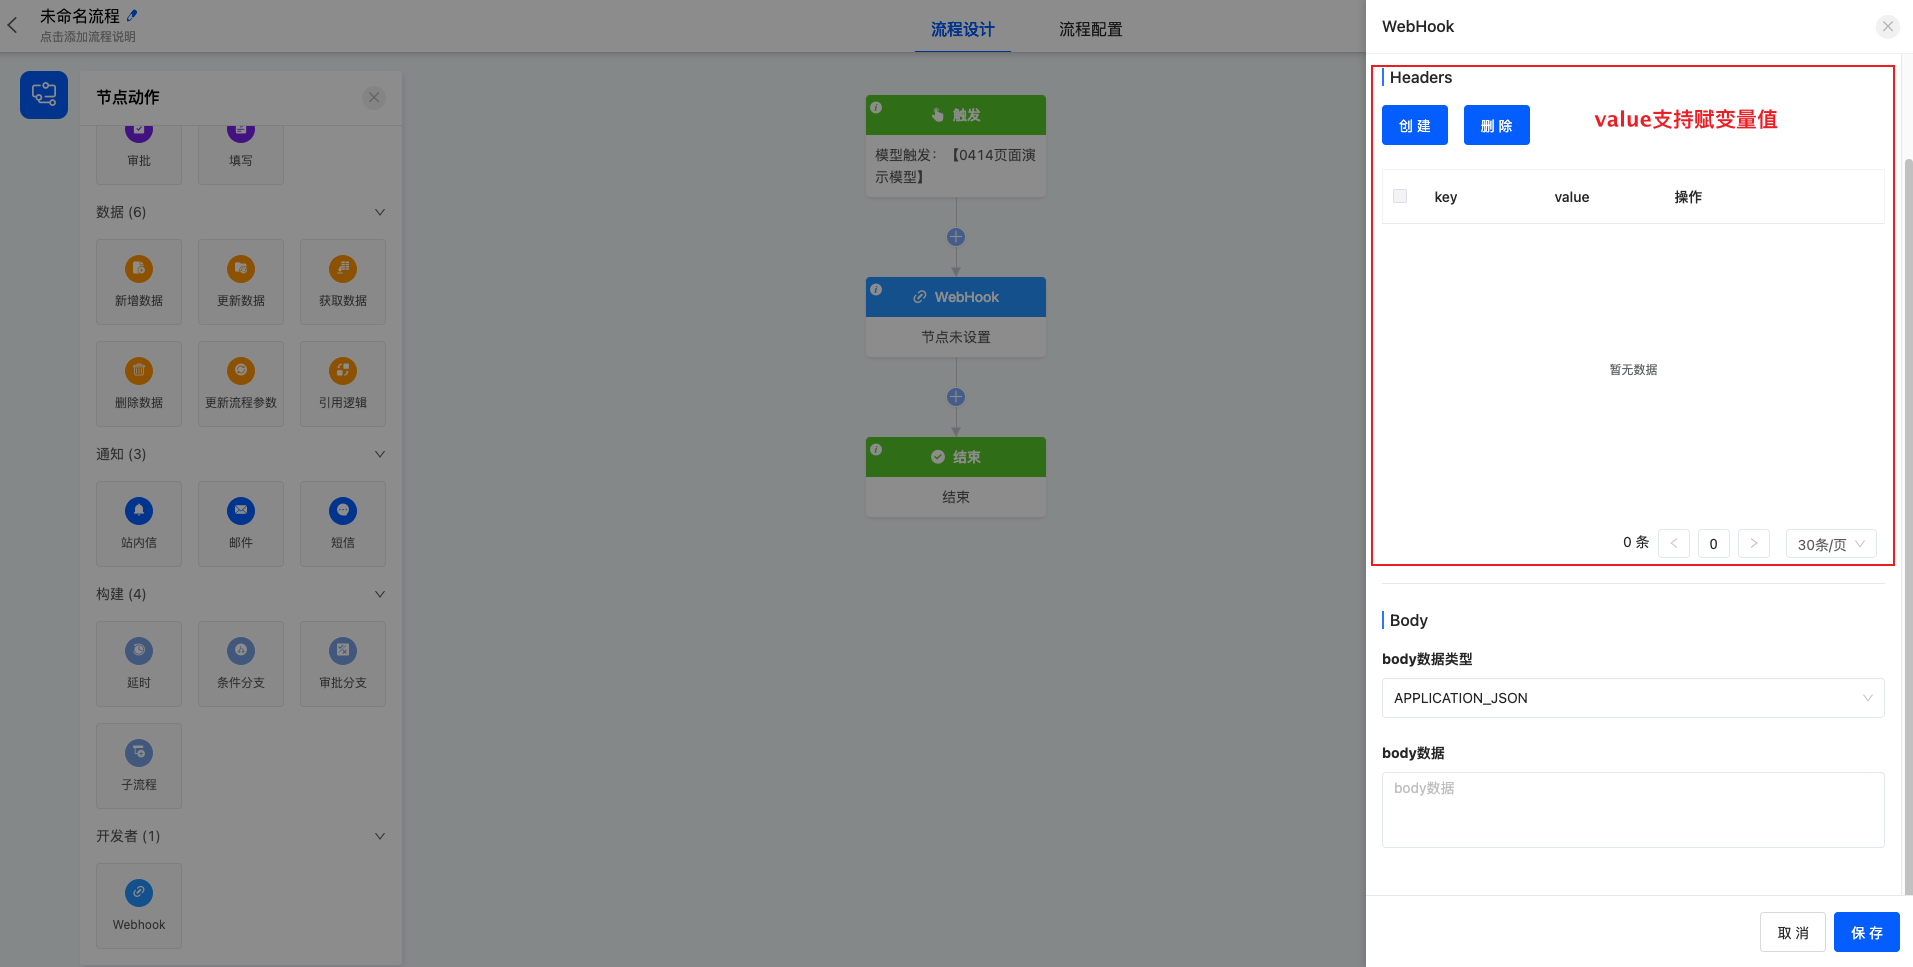
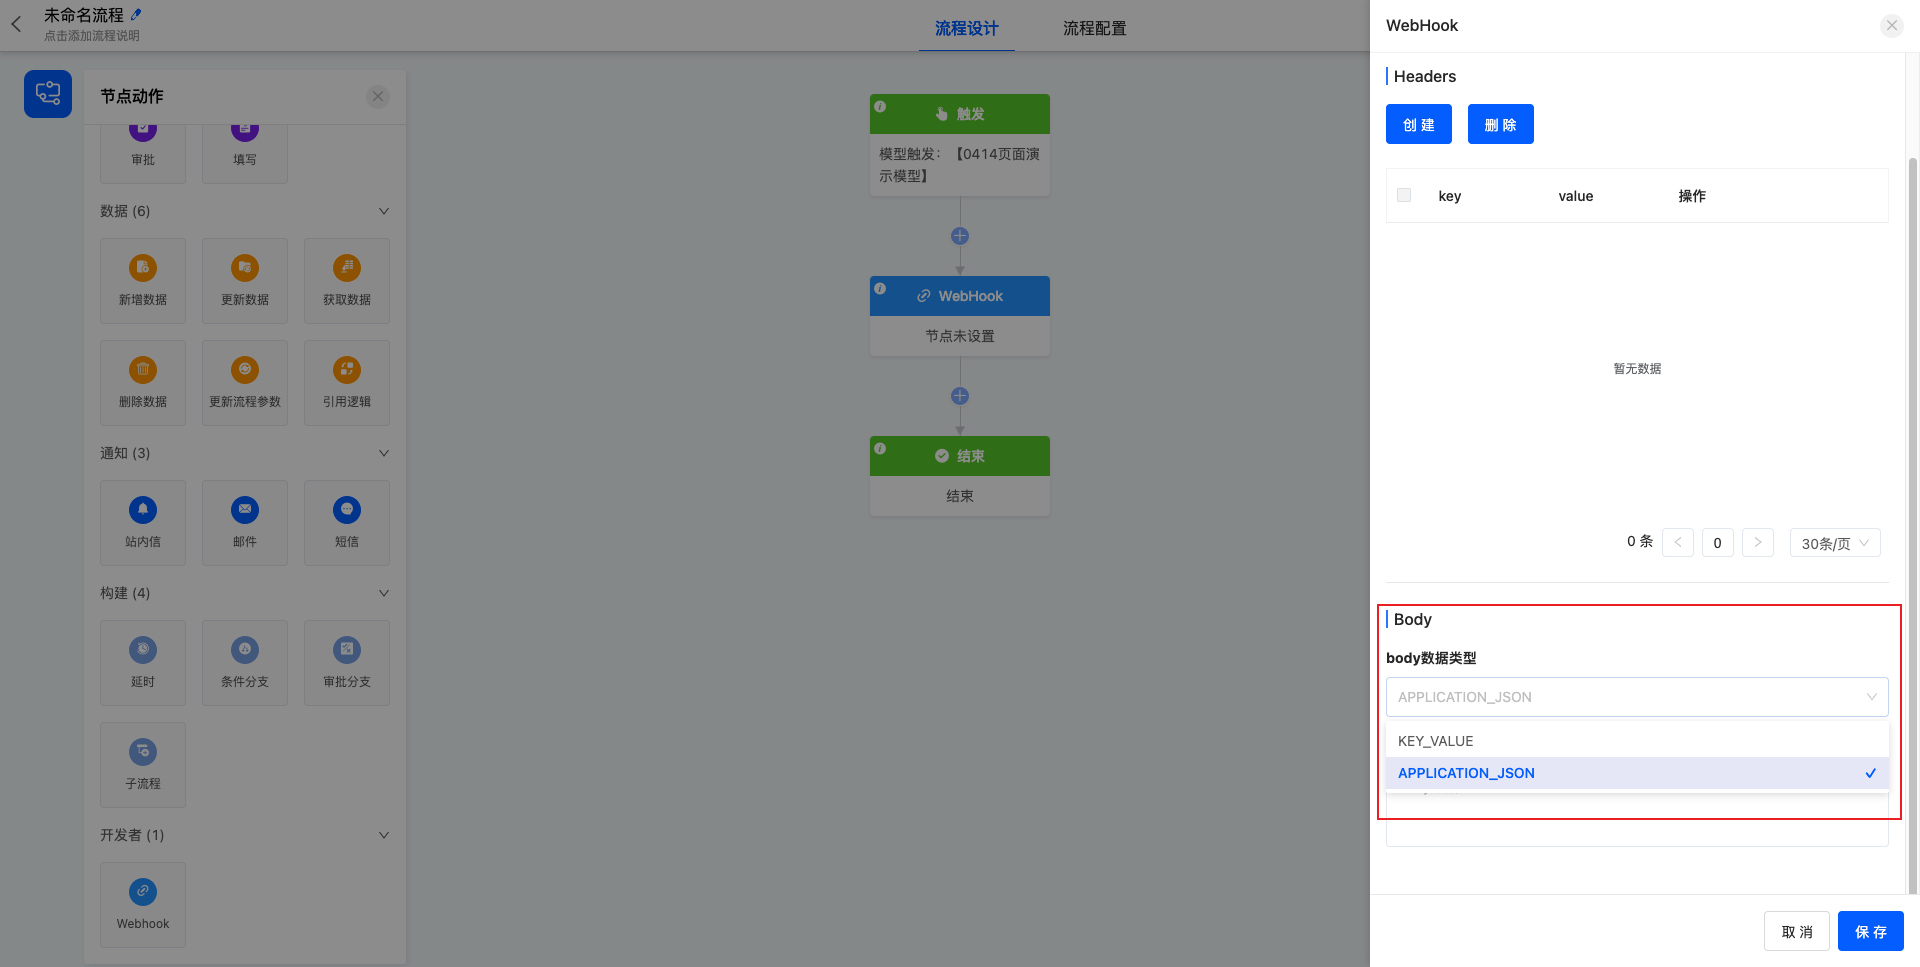
1.1.3 Headers&Body

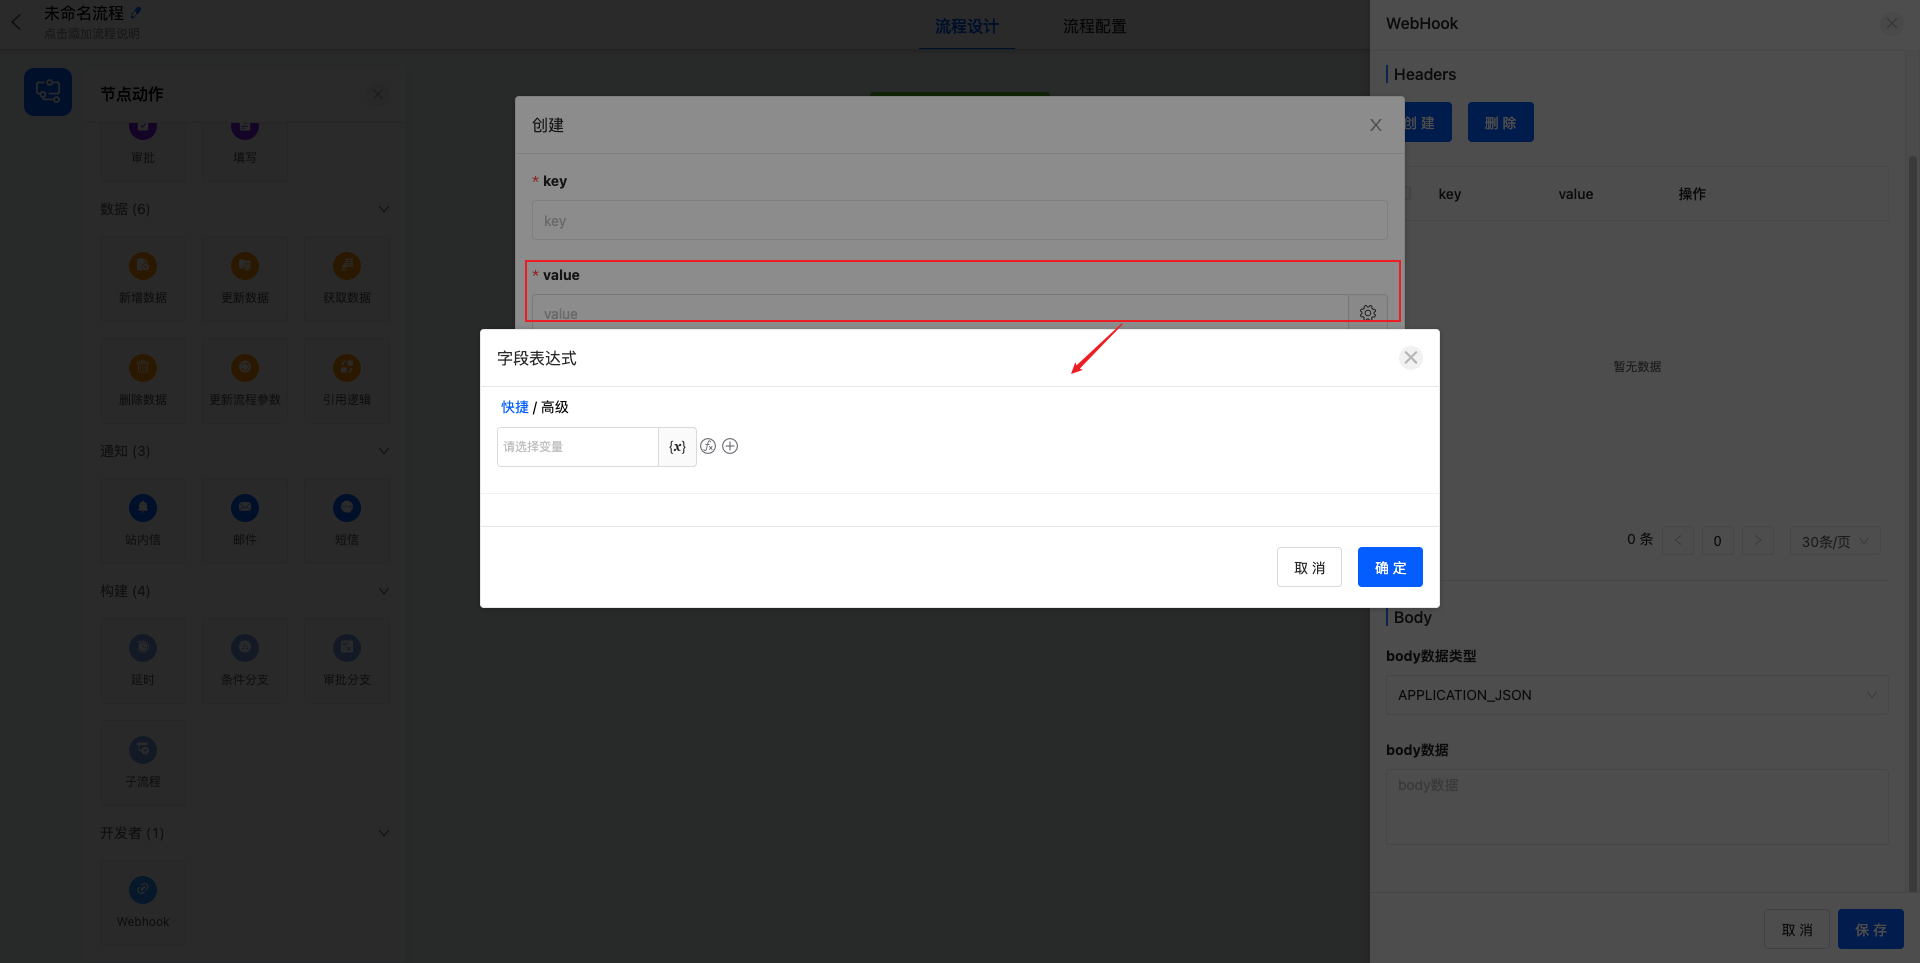
Headers的value支持通过表达式配置变量

开发者

开发者

Body的数据类型支持KEY_VALUE和APPLICATION_JSON两种。

开发者

Oinone社区 作者:史, 昂原创文章,如若转载,请注明出处:https://doc.oinone.top/oio4/9419.html

访问Oinone官网:https://www.oinone.top获取数式Oinone低代码应用平台体验

Like (0)
史, 昂's avatar史, 昂数式管理员
Previous 2024年6月20日 am9:49
Next 2024年6月20日

相关推荐

  • 3.3.7 字段之序列化方式

    本文核心是带大家全面了解oinone的序列方式,包括支持的序列化类型、注意点、如果新增客户化序列化方式以及字段默认值的反序列化。 一、数据存储的序列化 (举例) 使用@Field注解的serialize属性来配置非字符串类型属性的序列化与反序列化方式,最终会以序列化后的字符串持久化到存储中。 ### Step1 新建PetItemDetail模型、并为PetItem添加两个字段 PetItemDetail继承TransientModel,增加两个字段,分别为备注和备注人 package pro.shushi.pamirs.demo.api.tmodel; import pro.shushi.pamirs.meta.annotation.Field; import pro.shushi.pamirs.meta.annotation.Model; import pro.shushi.pamirs.meta.base.TransientModel; import pro.shushi.pamirs.user.api.model.PamirsUser; @Model.model(PetItemDetail.MODEL_MODEL) @Model(displayName = "商品详情",summary = "商品详情",labelFields = {"remark"}) public class PetItemDetail extends TransientModel { public static final String MODEL_MODEL="demo.PetItemDetail"; @Field.String(min = "2",max = "20") @Field(displayName = "备注",required = true) private String remark; @Field(displayName = "备注人",required = true) private PamirsUser user; } 图3-3-7-1 PetItemDetail继承TransientModel 修改PetItem,增加两个字段petItemDetails类型为List和tags类型为List,并设置为不同的序列化方式,petItemDetails为JSON(缺省就是JSON,可不配),tags为COMMA。同时设置 @Field.Advanced(columnDefinition = varchar(1024)),防止序列化后存储过长 package pro.shushi.pamirs.demo.api.model; import pro.shushi.pamirs.demo.api.tmodel.PetItemDetail; import pro.shushi.pamirs.meta.annotation.Field; import pro.shushi.pamirs.meta.annotation.Model; import pro.shushi.pamirs.meta.enmu.NullableBoolEnum; import java.math.BigDecimal; import java.util.List; @Model.model(PetItem.MODEL_MODEL) @Model(displayName = "宠物商品",summary="宠物商品",labelFields = {"itemName"}) public class PetItem extends AbstractDemoCodeModel{ public static final String MODEL_MODEL="demo.PetItem"; @Field(displayName = "商品名称",required = true) private String itemName; @Field(displayName = "商品价格",required = true) private BigDecimal price; @Field(displayName = "店铺",required = true) @Field.Relation(relationFields = {"shopId"},referenceFields = {"id"}) private PetShop shop; @Field(displayName = "店铺Id",invisible = true) private Long shopId; @Field(displayName = "品种") @Field.many2one @Field.Relation(relationFields = {"typeId"},referenceFields = {"id"}) private PetType type; @Field(displayName = "品种类型",invisible = true) private Long typeId; @Field(displayName = "详情", serialize = Field.serialize.JSON, store = NullableBoolEnum.TRUE) @Field.Advanced(columnDefinition = "varchar(1024)") private List<PetItemDetail> petItemDetails; @Field(displayName = "商品标签",serialize = Field.serialize.COMMA,store = NullableBoolEnum.TRUE,multi = true) @Field.Advanced(columnDefinition = "varchar(1024)") private…

    2024年5月23日
    1.5K00
  • 3.5.5 设计器的结合(改)

    在页面开发的时候,直接通过前端组件和视图xml进行开发虽然开放性是很大的、但我们经常会忘记视图的配置属性,同时用xml配置的页面因为缺少设计数据,导致无法直接在设计器中复制,自定义页面得从头设计。今天就带大家一起来学习如何结合无代码设计器来完成页面开发,并把设计后的页面元数据装载为标准产品的一部分。 1 安装Docker 如果没有Docker的话,请自行到官网下载:https://www.docker.com/get-started/ 2 下载Docker 镜像,并导入镜像 Step2.1 镜像下载 v.4.6.28.3-allinone-full 版本说明 前后端以及中间件一体 镜像地址 docker pull harbor.oinone.top/oinone/designer:4.6.28.3-allinone-full 下载结构包 oinone-op-ds-all-full.zip(17 KB) v.4.6.28.3-allinone-mini 版本说明 前后端一体支持外部中间件 镜像地址 docker pull harbor.oinone.top/oinone/designer:4.6.28.3-allinone-mini 下载结构包 oinone-op-ds-all-mini.zip(14 KB) v.4.7.9-allinone-full 版本说明 前后端以及中间件一体 镜像地址 docker pull harbor.oinone.top/oinone/designer:4.7.9-allinone-full 下载结构包 oinone-op-ds-all-full.zip(17 KB) v.4.7.9-allinone-mini 版本说明 前后端一体支持外部中间件 镜像地址 docker pull harbor.oinone.top/oinone/designer:4.7.9-allinone-mini 下载结构包 oinone-op-ds-all-mini.zip(14 KB) Step2.1.2 镜像下载用户与密码 需要商业版镜像需要加入Oinone商业版本伙伴专属群,向Oinone技术支持获取用户名与密码,镜像会定时更新并通知大家。 #注意:docker镜像拉取的账号密码请联系数式技术 docker login –username=用户名 harbor.oinone.top docker pull docker pull harbor.oinone.top/oinone/designer:4.6.28.3-allinone-full Step2.1.3 镜像和版本选择 目前有2个版本可供选择,包含中间件以及不包含中间件2个版本,下载结构包以后注意修改startup.sh和startup.cmd中对应镜像地址的版本号。 Step2.1.4 本地结构说明 下载结构包并解压 config是放application.yml的目录,可以在application.yml配置需要启动的自有模块同时修改对应其他中间件配置项 lib是放自有模块的jar包以及其对应的依赖包比如:pamirs-demo-api-1.0.0-SNAPSHOT.jar和pamirs-demo-core-1.0.0-SNAPSHOT.jar nginx:前端运行的nginx站点配置文件 mq:消息配置,再使用低无一体时需要指定mq的broker的IP run:容器运行中间件的脚本,可以对个别中间件是否启动进行设置,(注释掉运行脚本,容器启动时就不会启动该中间件) logs是运行时系统日志目录 Step2.2 修改startup.sh中的路径 Step2.2.1 linux环境修改参数 在文件中找到如下 configDir=/opt/docker/oinone-op-ds-all-full version=4.6.28.3 IP=192.168.0.121 修改configDir的路径(下载oinone-op-ds-xx.zip解压后的路径) 修改对应的镜像版本号 修改对应的IP为docker宿主机IP #!/bin/bash configDir=/opt/docker/oinone-op-ds-all-full version=4.6.28.3 IP=192.168.0.121 docker run -d –name designer-allinone \ -e DUBBO_IP_TO_REGISTRY=$IP \ -e DUBBO_PORT_TO_REGISTRY=20880 \ -p 8099:8091 \ -p 3307:3306 \ -p 2182:2181 \ -p 6378:6379 \ -p 19876:9876 \ -p 10991:10991 \ -p 15555:15555 \ -p 20880:20880 \ -p 88:80 \ -v $configDir/config/:/opt/pamirs/ext \ -v $configDir/nginx:/opt/pamirs/nginx/vhost \ -v $configDir/logs:/opt/pamirs/logs \ -v $configDir/mq/broker.conf:/opt/mq/conf/broker.conf \ -v $configDir/run/run.sh:/opt/pamirs/run/run.sh \ -v $configDir/lib:/opt/pamirs/outlib harbor.oinone.top/oinone/designer:$version-allinone-full Step2.2.3 window环境修改参数 在文件中找到如下 set configDir=/d/shushi/docker/oinone-op-ds-all-full set version=4.6.28.3 set IP=192.168.0.121 修改configDir的路径((下载oinone-op-ds-xx.zip解压后的路径) 修改对应的镜像版本号 修改对应的IP为docker宿主机IP @echo off set configDir=/d/shushi/docker/oinone-op-ds-all-full set version=4.6.28.3 set IP=192.168.0.121 docker run -d –name designer-allinone ^ -e DUBBO_IP_TO_REGISTRY=%IP% ^ -e DUBBO_PORT_TO_REGISTRY=20880 ^ -p 8099:8091…

    2024年5月23日
    1.5K00
  • 4.2.6 框架之网络请求-拦截器

    在整个http的链路中,异常错误对前端来说尤为重要,他作用在很多不同的场景,通用的比如500, 502等; 一个好的软件通常需要在不同的错误场景中做不同的事情。当用户cookie失效时,希望能自动跳转到登录页;当用户权限发生变更时,希望能跳转到一个友好的提示页;那么如何满足这些个性化的诉求呢?接下来让我们一起了解oinone前端网络请求-拦截器。 一、入口 在src目录下main.ts中可以看到VueOioProvider,这是系统功能提供者的注册入口 图4-2-6-1 VueOioProvider import interceptor from './middleware/network-interceptor'; VueOioProvider( { http: { callback: interceptor } }, [] ); 图4-2-6-2 拦截器的申明入口 二、middleware 在项目初始化时使用CLI构建初始化前端工程,在src/middleware有拦截器的默认实现: 图4-2-6-3 在src/middleware有拦截器的默认实现 三、interceptor interceptor在请求返回后触发,interceptor有两个回调函数,error和next error参数 graphQLErrors 处理业务异常 networkError 处理网络异常 next extensions 后端返回扩展参数 const interceptor: RequestHandler = (operation, forward) => { return forward(operation).subscribe({ error: ({ graphQLErrors, networkError }) => { console.log(graphQLErrors, networkError); // 默认实现 => interceptor error }, next: ({ extensions }) => { console.log(extensions); // 默认实现 => interceptor next }, }); }; 图4-2-6-4 后端返回扩展参数 四、interceptor error // 定义错误提示等级 const DEFAULT_MESSAGE_LEVEL = ILevel.ERROR; // 错误提示等级 对应提示的报错 const MESSAGE_LEVEL_MAP = { [ILevel.ERROR]: [ILevel.ERROR], [ILevel.WARN]: [ILevel.ERROR, ILevel.WARN], [ILevel.INFO]: [ILevel.ERROR, ILevel.WARN, ILevel.INFO], [ILevel.SUCCESS]: [ILevel.ERROR, ILevel.WARN, ILevel.INFO, ILevel.SUCCESS], [ILevel.DEBUG]: [ILevel.ERROR, ILevel.WARN, ILevel.INFO, ILevel.SUCCESS, ILevel.DEBUG] }; // 错误提示通用函数 const notificationMsg = (type: string = 'error', tip: string = '错误', desc: string = '') => { notification[type]({ message: tip, description: desc }); }; // 根据错误等级 返回错误提示和类型 const getMsgInfoByLevel = (level: ILevel) => { let notificationType = 'info'; let notificationText = translate('kunlun.common.info'); switch (level) { case ILevel.DEBUG: notificationType = 'info'; notificationText = translate('kunlun.common.debug'); break; case ILevel.INFO: notificationType = 'info'; notificationText = translate('kunlun.common.info'); break;…

    2024年5月23日
    1.6K00
  • 3.5.2.2 构建View的Template

    我们在很多时候需要自定义模型的管理页面,而不是直接使用默认页面,比如字段的展示与隐藏,Action是否在这个页面上出现,搜索条件自定义等等,那么本章节带您一起学习如何自定义View的Template。 自定义View的Template 在使用默认layout的情况下,我们来做几个自定义视图Template,并把文件放到指定目录下。 图3-5-2-14 自定义View的Template 第一个Tabel Step1 自定义PetTalent的列表 我们先通过数据库查看默认页面定义,找到base_view表,过滤条件设置为model =\’demo.PetTalent\’,我们就看到该模型下对应的所有view,这些是系统根据该模型的ViewAction对应生成的默认视图,找到类型为【表格(type = TABLE)】的记录,查看template字段。 图3-5-2-15 base_view表查看template字段 <view name="tableView" cols="1" type="TABLE" enableSequence="false"> <template slot="actions" autoFill="true"/> <template slot="rowActions" autoFill="true"/> <template slot="fields"> <field invisible="true" data="id" label="ID" readonly="true"/> <field data="name" label="达人"/> <field data="dataStatus" label="数据状态"> <options> <option name="DRAFT" displayName="草稿" value="DRAFT" state="ACTIVE"/> <option name="NOT_ENABLED" displayName="未启用" value="NOT_ENABLED" state="ACTIVE"/> <option name="ENABLED" displayName="已启用" value="ENABLED" state="ACTIVE"/> <option name="DISABLED" displayName="已禁用" value="DISABLED" state="ACTIVE"/> </options> </field> <field data="createDate" label="创建时间" readonly="true"/> <field data="writeDate" label="更新时间" readonly="true"/> <field data="createUid" label="创建人id"/> <field data="writeUid" label="更新人id"/> </template> <template slot="search" autoFill="true" cols="4"/> </view> 图3-5-2-16 base_view表查看template字段 对比view的template定义与页面差异,从页面上看跟view的定义少了,创建人id和更新人id。因为这两个字段元数据定义里invisible属性。 a. 当XML里面没有配置,则用元数据覆盖了。 b. 当XML里面配置了,则不会用元数据覆盖了。 在下一步中我们只要view的DSL中给这两个字段加上invisible="false"就可以展示出来了 图3-5-2-17 查看列表展示 图3-5-2-18 invisible属性 新建pet_talent_table.xml文件放到对应的pamirs/views/demo_core/template目录下,内容如下 a. 对比默认视图,在自定义视图时需要额外增加属性model="demo.PetTalent" b. name设置为"tableView",系统重启后会替换掉base_view表中model为"demo.PetTalent",name为"tableView",type为"TABLE"的数据记录。 ⅰ. name不同的但type相同,且viewAction没有指定时,根据优先级priority进行选择。小伙伴可以尝试修改name="tableView1",并设置priority为1,默认生成的优先级为10,越小越优先。 ccreateUid和writeUid字段,增加invisible="false"的属性定义 <view name="tableView" model="demo.PetTalent" cols="1" type="TABLE" enableSequence="false"> <template slot="actions" autoFill="true"/> <template slot="rowActions" autoFill="true"/> <template slot="fields"> <field invisible="true" data="id" label="ID" readonly="true"/> <field data="name" label="达人"/> <field data="dataStatus" label="数据状态"> <options> <option name="DRAFT" displayName="草稿" value="DRAFT" state="ACTIVE"/> <option name="NOT_ENABLED" displayName="未启用" value="NOT_ENABLED" state="ACTIVE"/> <option name="ENABLED" displayName="已启用" value="ENABLED" state="ACTIVE"/> <option name="DISABLED" displayName="已禁用" value="DISABLED" state="ACTIVE"/> </options> </field> <field data="createDate" label="创建时间" readonly="true"/> <field data="writeDate" label="更新时间" readonly="true"/> <field data="createUid" label="创建人id" invisible="false"/> <field data="writeUid" label="更新人id" invisible="false"/> </template> <template slot="search" autoFill="true" cols="4"/> </view> 图3-5-2-19 增加invisible=”false”的属性定义 Step2 重启应用看效果 图3-5-2-20 示例效果 第一个Form Step1 自定义PetTalent的编辑页…

    2024年5月23日
    1.6K00
  • 3.3.5 模型编码生成器

    在我们日常开发中经常要一些单据生成指定格式的编码,而且现在分布式环境下要考虑的事情会特别多。oinone提供了简易的编码生成能力 一、编码生成器 可以在模型或者字段上配置编码自动生成规则。在进行数据存储时,如果配置了编码自动生成规则的字段值为空,则系统将根据规则自动生成编码。编码自动生成功能是通过序列生成器来支持的。可以在序列生成器生成的序列编码基础上再进行组合配置的功能编码生成最终的编码。序列生成器可以配置初始序列,步长,日期格式,长度。 模型序列生成器(举例) 使用模型编码生成器,需要继承CodeModel或者有Code字段,那么使用Model.Code注解即可。 Step1 为PetShop增加一个@Model.Code注解,并增加一个店铺编码(Code)字段 package pro.shushi.pamirs.demo.api.model; import pro.shushi.pamirs.meta.annotation.Field; import pro.shushi.pamirs.meta.annotation.Model; import java.sql.Time; @Model.model(PetShop.MODEL_MODEL) @Model(displayName = "宠物店铺",summary="宠物店铺",labelFields = {"shopName"}) @Model.Code(sequence = "DATE_ORDERLY_SEQ",prefix = "P",size=6,step=1,initial = 10000,format = "yyyyMMdd") public class PetShop extends AbstractDemoIdModel { public static final String MODEL_MODEL="demo.PetShop"; @Field(displayName = "店铺编码") private String code; @Field(displayName = "店铺名称",required = true) private String shopName; @Field(displayName = "开店时间",required = true) private Time openTime; @Field(displayName = "闭店时间",required = true) private Time closeTime; } 图3-3-5-1 为PetShop增加一个@Model.Code注解 Step2 重启查看效果 进入店铺新增页面新增一个oinone宠物店铺003 图3-3-5-2 示例操作效果图 查看店铺列表页面,新增的记录中店铺编码一列,已经按Model.Code注解要求地生成了 图3-3-5-3 示例操作效果图 Step3 小结 在我们日常开发中经常要一些单据生成指定格式的编码,而且现在分布式环境下要考虑的事情会特别多。oinone提供了简易的编码生成能力,大家可以根据编码注解说明,自行对PetShop模型进行不同配置,来学习编码生成器的知识 字段序列生成器 字段编码生成器,在对应的字段上增加,并使用Field.Sequence注解即可 Step1 为PetShop增加一个字段codeTwo并增加@Field.Sequence注解 package pro.shushi.pamirs.demo.api.model; import pro.shushi.pamirs.meta.annotation.Field; import pro.shushi.pamirs.meta.annotation.Model; import java.sql.Time; @Model.model(PetShop.MODEL_MODEL) @Model(displayName = "宠物店铺",summary="宠物店铺",labelFields = {"shopName"}) @Model.Code(sequence = "DATE_ORDERLY_SEQ",prefix = "P",size=6,step=1,initial = 10000,format = "yyyyMMdd") public class PetShop extends AbstractDemoIdModel { public static final String MODEL_MODEL="demo.PetShop"; @Field(displayName = "店铺编码") private String code; @Field(displayName = "店铺编码2") @Field.Sequence(sequence = "DATE_ORDERLY_SEQ",prefix = "C",size=6,step=1,initial = 10000,format = "yyyyMMdd") private String codeTwo; @Field(displayName = "店铺名称",required = true) private String shopName; @Field(displayName = "开店时间",required = true) private Time openTime; @Field(displayName = "闭店时间",required = true) private Time closeTime; } 图3-3-5-4 为PetShop增加一个字段codeTwo Step2 重启查看效果 进入店铺新增页面新增一个oinone宠物店铺004 图3-3-5-5 示例操作效果图 查看店铺列表页面,新增的记录中店铺编码2一列,已经按Field.Sequence注解要求地生成了 图3-3-5-6 示例操作效果图 二、编码注解说明,模型更多其他注解详见4.1.6【模型之元数据详解】…

    2024年5月23日
    2.2K00

Leave a Reply

Please Login to Comment