
在开发过程中,为了满足业务场景、增加灵活性,前端自定义请求不可避免。下面将会从——自定义 mask、自定义表格(表单等)、自定义字段三个实际场景的角度,介绍自定义请求。这篇文章把请求都写在了 ts 中,这样便于继承重写,如果不习惯 ts 的写法,把请求写在 vue 里也是可以的。
1. 自定义 mask
mask 组件通常会有一个特点:在不同页面不同模型或不同应用下都展示,与业务模型无关,且往往只需要请求一次。同时可能有精确控制请求体大小的需求,这就很适合采取手写 GraphQL 的方式。
例如,我要重写顶部 mask 中的用户组件,展示用户信息。这个请求就只需请求一次,而且不需要复用,就很适合手写 GraphQL。
这里继承平台的用户组件,然后在代码中写死 GraphQL 发起请求。但是 GraphQL 语句怎么拼呢?我们可以去默认页面,打开浏览器控制台,找到相应的请求,把 GraphQL 语句复制出来,这里复制下默认的用户请求。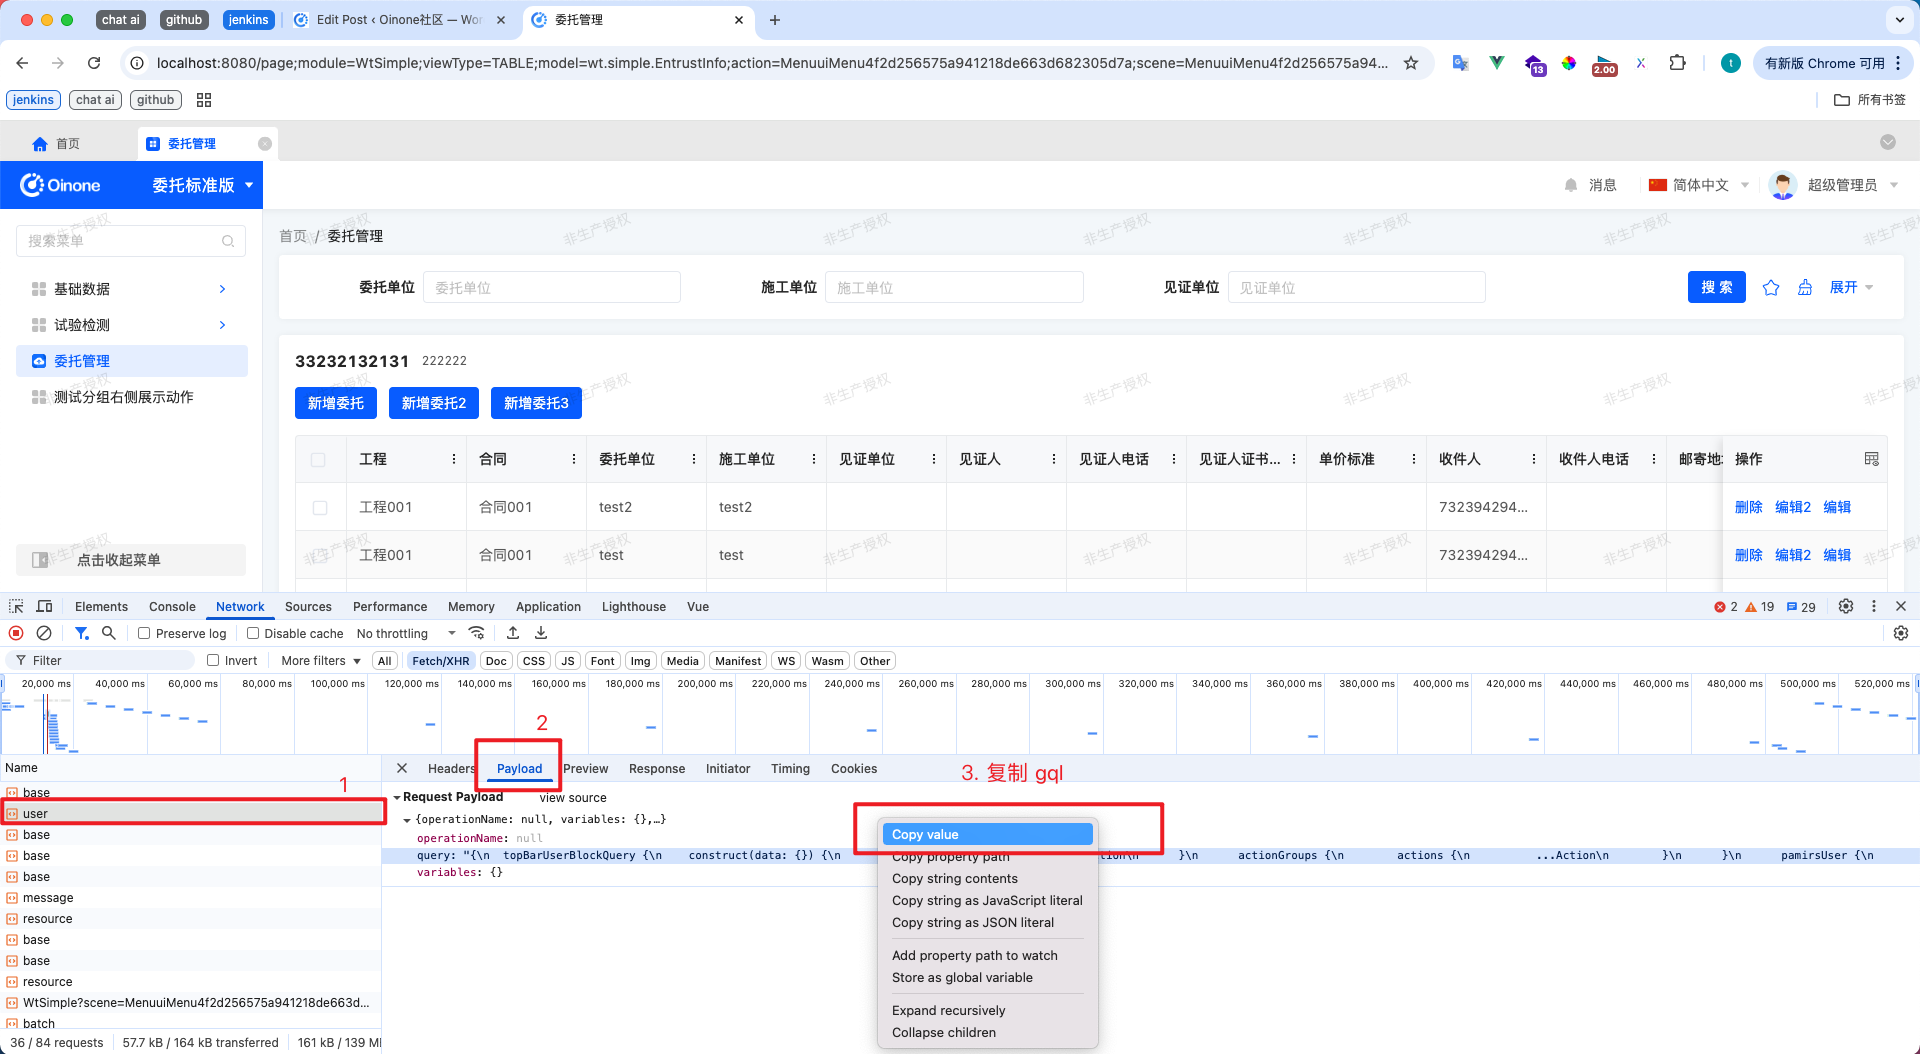

http.query 参数的构造、相应结果的获取都能从请求中得到。可以看到我这里精简了请求,只取了用户名。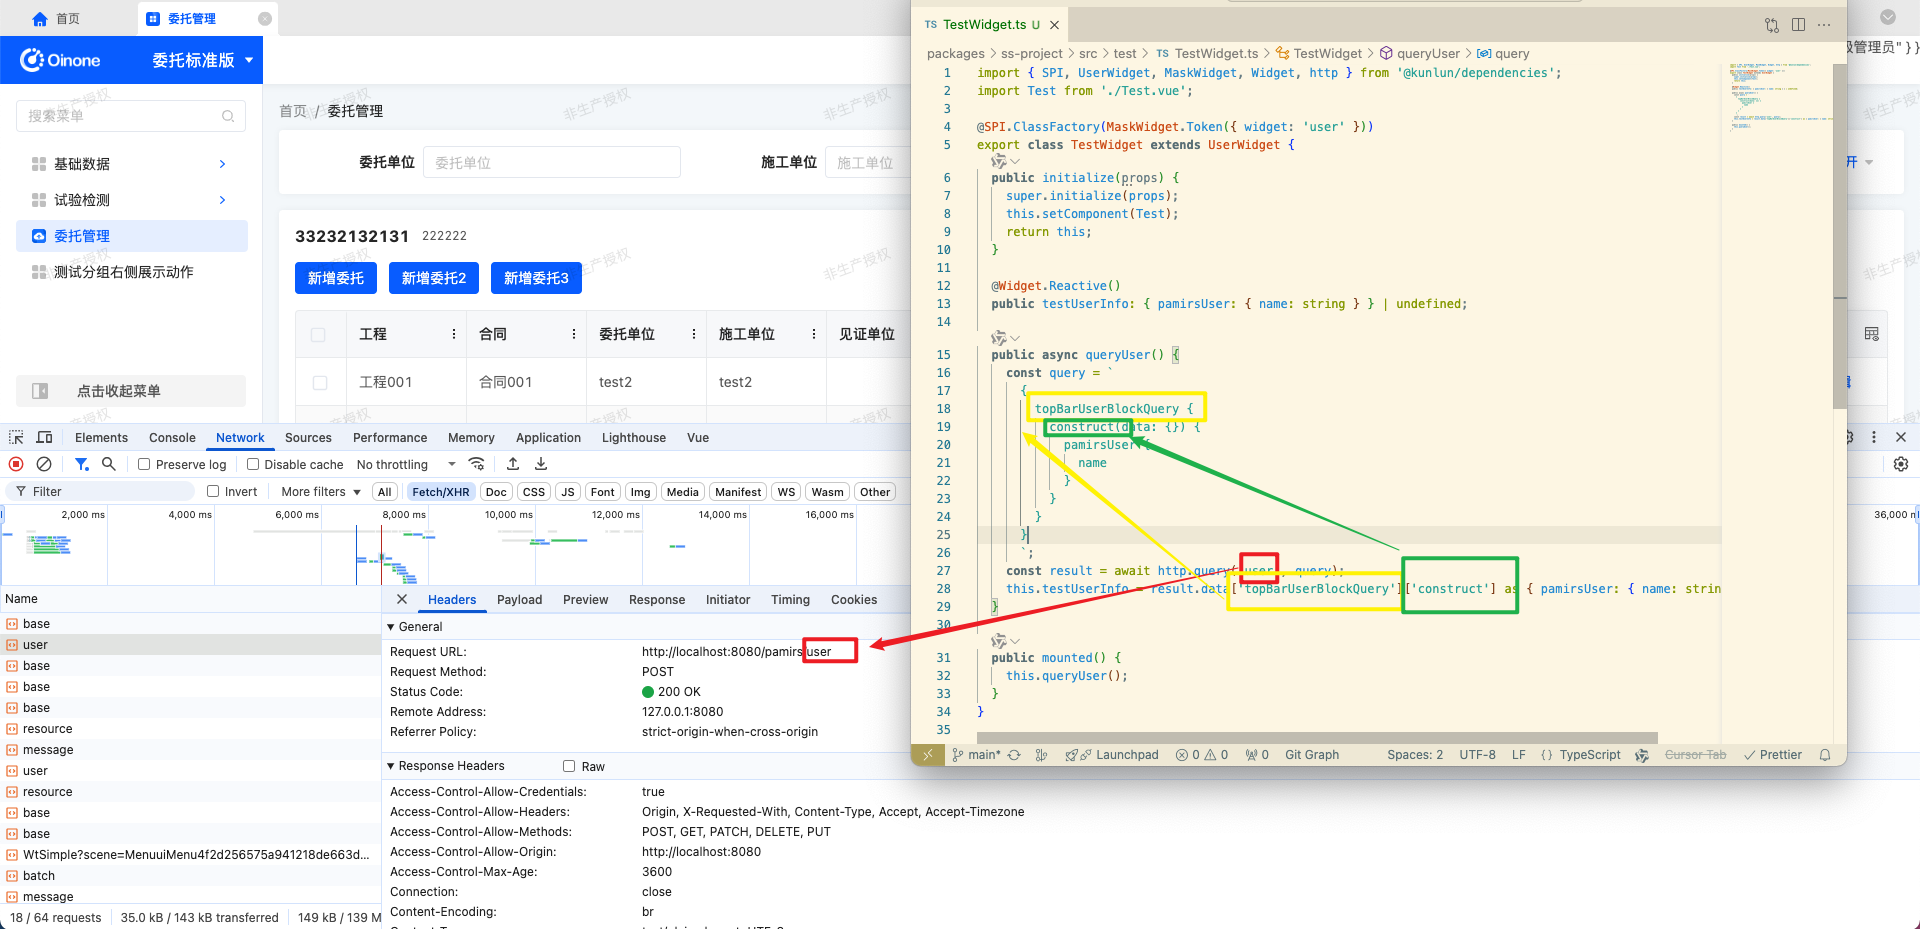
TS
import { SPI, UserWidget, MaskWidget, Widget, http } from '@kunlun/dependencies';
import Test from './Test.vue';

@SPI.ClassFactory(MaskWidget.Token({ widget: 'user' }))
export class TestWidget extends UserWidget {
  public initialize(props) {
    super.initialize(props);
    this.setComponent(Test);
    return this;
  }

  // 添加响应式注解,这样能在 vue 中接受到 ts 中的变量
  @Widget.Reactive()
  public testUserInfo: { pamirsUser: { name: string } } | undefined;

  public async queryUser() {
    const query = `
      {
        topBarUserBlockQuery {
          construct(data: {}) {
            pamirsUser {
              name
            }
          }
        }
      }
      `;
    const result = await http.query('user', query);
    this.testUserInfo = result.data['topBarUserBlockQuery']['construct'] as { pamirsUser: { name: string } };
  }

  public mounted() {
    this.queryUser();
  }
}
VUE
<template>
  <div class="Test">
    {{ testUserInfo }}
  </div>
</template>

<script lang="ts">
import { defineComponent } from 'vue';
export default defineComponent({
  name: 'Test',
  props: ['testUserInfo']
});
</script>
效果如下: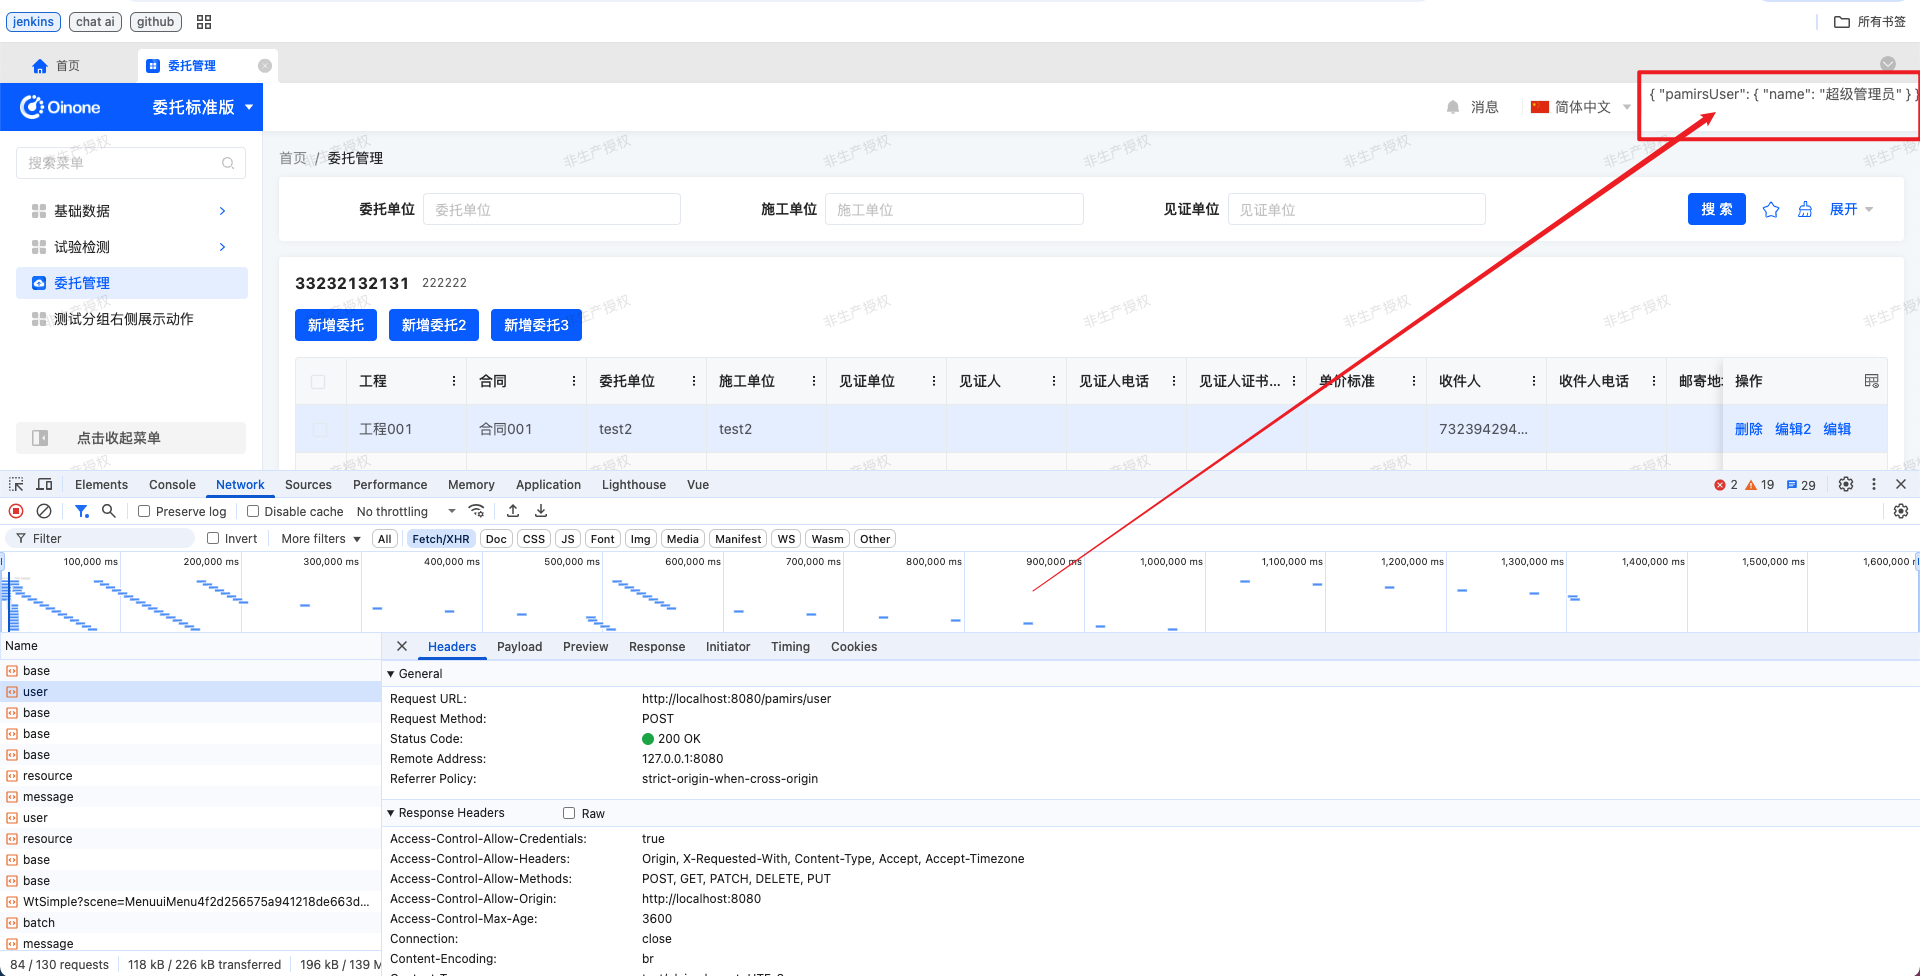
2. 自定义表格(表单)等视图元素组件
2-1. 自定义表格
2-1-1. 自定义表格自动获取数据
Oinone 提供了前端组件的默认实现。所以生成默认页面的时候,请求数据都是通的,可以看到表格、表单、表单里的字段等组件数据都是能回填的。
所以这里继承平台的表格组件,就有了平台表格自动获取数据的能力。
TS
import { BaseElementWidget, SPI, TABLE_WIDGET, TableWidget, ViewType } from '@kunlun/dependencies';
import Test from './Test.vue';

@SPI.ClassFactory(
  BaseElementWidget.Token({
    viewType: ViewType.Table,
    widget: ['table', TABLE_WIDGET]
  })
)
export class TestWidget extends TableWidget {
  public initialize(props) {
    super.initialize(props);
    this.setComponent(Test);
    return this;
  }
}
在 vue 中用 props 接一下 dataSource,就能获取数据
<template>
  <div class="Test">
    {{ dataSource }}
  </div>
</template>

<script lang="ts">
import { defineComponent } from 'vue';
export default defineComponent({
  name: 'Test',
  props: ['dataSource']
});
</script>
效果如下:
2-1-2. 自定义表格重写 fetchData,发起自定义请求
TS
import {
  ActiveRecord,
  BaseElementWidget,
  Condition,
  customQueryPage,
  SPI,
  TABLE_WIDGET,
  TableWidget,
  ViewType
} from '@kunlun/dependencies';
import Test from './Test.vue';

@SPI.ClassFactory(
  BaseElementWidget.Token({
    viewType: ViewType.Table,
    widget: ['table', TABLE_WIDGET]
  })
)
export class TestWidget extends TableWidget {
  public initialize(props) {
    super.initialize(props);
    this.setComponent(Test);
    return this;
  }

  /**
   * 获取数据
   */
  public async fetchData(condition?: Condition): Promise<ActiveRecord[]> {
    // load 方法会激活 spin 转圈组件
    return await this.load(async () => {
      const pagination = this.generatorPagination();
      // 生成表格的查询条件,会把搜索里的条件拼上
      // const finalCondition = this.generatorCondition(condition);
      // 这里也可以手拼,模糊匹配名称带 'a' 的记录
      const finalCondition = new Condition('name').like('a');

      /**
       * this.model.model 是模型的编码
       * 'queryPage' 是模型中定义的查询方法名,可以和后端约定,甚至配置。这里使用默认的 queryPage
       * 第三个参数是查询条件,可以携带分页参数等信息
       * 第四个参数是请求字段,可以配置请求字段,默认是所有字段,可以配置成需要的字段,可以减少请求字段,提高性能
       * 第五个参数是返回字段,默认是所有字段
       *  */
      const result = await customQueryPage(
        this.model.model,
        'queryPage',
        {
          pageSize: pagination.pageSize,
          currentPage: pagination.current,
          condition: finalCondition
        },
        // 拿到当时视图中的字段
        this.rootRuntimeContext.getRequestFields(),
        this.rootRuntimeContext.getRequestFields()
      );

      pagination.total = result.totalElements;
      pagination.totalPageSize = result.totalPages;

      // 这里 return 出去的值会赋给 dataSource,同2-1-1,在 vue 的 props 里接一下就能使用
      return result.content;
    });
  }
}
vue 同 2-1-1 中的 vue,用 props 接一下 dataSource,就能获取数据。
2-2. 自定义表单
2-2-1. 自定义表单自动获取数据
这里继承平台的表单组件,就有了平台表单自动获取数据的能力
TS
import { BaseElementWidget, SPI, FORM_WIDGET, FormWidget, ViewType } from '@kunlun/dependencies';
import Test from './Test.vue';

@SPI.ClassFactory(
  BaseElementWidget.Token({
    viewType: ViewType.Form,
    widget: ['form', FORM_WIDGET]
  })
)
export class TestWidget extends FormWidget {
  public initialize(props) {
    super.initialize(props);
    this.setComponent(Test);
    return this;
  }
}
在 vue 中用 props 接一下 formData,就能获取数据
<template>
  <div class="Test">
    {{ formData }}
  </div>
</template>

<script lang="ts">
import { defineComponent } from 'vue';
export default defineComponent({
  name: 'Test',
  props: ['formData']
});
</script>
效果如下:
2-2-2. 自定义表单重写 fetchData,发起自定义请求
TS
import {
  BaseElementWidget,
  SPI,
  FORM_WIDGET,
  FormWidget,
  ViewType,
  ActiveRecord,
  Condition,
  queryOne,
  constructOne,
  IModel,
  customQuery
} from '@kunlun/dependencies';
import Test from './Test.vue';

@SPI.ClassFactory(
  BaseElementWidget.Token({
    viewType: ViewType.Form,
    widget: ['form', FORM_WIDGET]
  })
)
export class TestWidget extends FormWidget {
  public initialize(props) {
    super.initialize(props);
    this.setComponent(Test);
    return this;
  }

  /**
   * 获取数据
   * 这里只考虑单条数据,非内联表单页的情况
   */
  public async fetchData(condition?: Condition): Promise<ActiveRecord> {
    return await this.load(async () => {
      let result;

     // 拿到当前视图的字段
      const requestFields = this.rootRuntimeContext.getRequestFields();
      // 获取 url 中的 id
      const id = this.urlParameters.id;
      // 有 id 根据 id 查数据
      if (id) {
        /**
         * 可以调封装好的 queryOne 方法
         * 传入模型编码,请求参数,请求字段
         *  */
        result = await queryOne(this.model.model, { id }, requestFields);
        // 如果不调 queryOne,也可以自定义传入方法名
        // result = await customQuery(this.model.model, 'xxxMethodName', { id }, requestFields, requestFields);
      }
      // 没 id 初始化构造一条数据
      else {
        result = await constructOne({
          modelModel: this.model.model,
          model: this.model as unknown as IModel,
          record: { name: 'xxx' },
          fields: requestFields,
          variables: {
            anyKey: 'anyValue'
          },
          context: {}
        });
      }

      // 这里 return 出去的值会赋给 formData,同2-2-1,在 vue 的 props 里接一下就能使用
      return result;
    });
  }
}
vue 同 2-2-1 中的 vue,用 props 接一下 formData,就能获取数据。
3. 自定义字段
3-1 自定义普通字段
3-1-1 自定义普通字段自动获取数据
字段的数据默认是依靠表单或表格组件请求的,可以通过 value 快捷地拿到字段值,这里以单行文本字段为例。
TS
import { SPI, ViewType, FormFieldWidget, BaseFieldWidget, ModelFieldType } from '@kunlun/dependencies';
import Test from './Test.vue';

@SPI.ClassFactory(
  BaseFieldWidget.Token({
    viewType: [ViewType.Form, ViewType.Search],
    ttype: ModelFieldType.String
  })
)
export class TestWidget extends FormFieldWidget {
  public initialize(props) {
    super.initialize(props);
    this.setComponent(Test);
    return this;
  }
}
在 vue 中用 props 接一下 value,就能获取数据
<template>
  <div class="Test" style="color: red">
    {{ value }}
  </div>
</template>

<script lang="ts">
import { defineComponent } from 'vue';
export default defineComponent({
  name: 'Test',
  props: ['value']
});
</script>
效果如下:
3-1-2 自定义普通字段发起请求
我们可能会遇到这么一种场景:当字段的值修改后,需要调用后端的函数,修改表单的值。同样以单行文本字段为例。
TS
import {
  SPI,
  ViewType,
  FormFieldWidget,
  BaseFieldWidget,
  ModelFieldType,
  Widget,
  customQuery,
  ObjectUtils
} from '@kunlun/dependencies';
import Test from './Test.vue';

@SPI.ClassFactory(
  BaseFieldWidget.Token({
    viewType: [ViewType.Form, ViewType.Search],
    ttype: ModelFieldType.String
  })
)
export class TestWidget extends FormFieldWidget {
  public initialize(props) {
    super.initialize(props);
    this.setComponent(Test);
    return this;
  }

  // 请求的方法名,可配置
  public get methodName() {
    return this.getDsl().methodName || 'construct';
  }

  @Widget.Method()
  public async onCalculate() {
    // 拿到表单的数据
    const formData = this.formData || {};
    // 拿到当前视图的字段
    const requestFields = this.rootViewRuntimeContext.runtimeContext.getRequestFields();

    /**
     * 调用自定义方法
     * @param modelModel 模型的编码
     * @param method 方法名称
     * @param record 请求数据,这里把整个表单数据都带上
     * @param requestFields 请求字段,默认是所有字段,可以配置成需要的字段,以减少请求体积,提高性能
     * @param responseFields 第五个参数是返回字段,默认是所有字段
     */
    const result = await customQuery(this.model.model, this.methodName, formData, requestFields, requestFields);

    // 合并返回的数据到表单
    if (result) {
      ObjectUtils.shallowMerge(formData, result as Object);
    }

    // 重新加载表单数据
    this.reloadFormData$.subject.next(true);
  }
}
在 vue 中用 props 接一下 value,就能获取数据
<template>
  <div class="Test">
    <a-input class="oio-input oio-input-number" v-model:value="realValue" @change="onChange" />
    <a-button class="oio-button" type="primary" @click="onCalculate">请求</a-button>
  </div>
</template>

<script lang="ts">
import { defineComponent, ref, watch } from 'vue';

export default defineComponent({
  name: 'Test',
  props: ['value', 'change', 'onCalculate'],
  setup(props) {
    const realValue = ref<string>(props.value);
    watch(
      () => props.value,
      (newValue) => {
        realValue.value = newValue;
      }
    );

    const onChange = () => {
      props.change?.(realValue.value);
    };

    return {
      realValue,
      onChange
    };
  }
});
</script>

<style lang="scss">
.Test {
  display: flex;
  align-items: center;
  gap: 16px;

  .ant-input {
    flex: auto;
  }
}
</style>
3-2 自定义关系字段
3-2-1 自定义关系字段自动获取数据
字段的数据默认是依靠表单或表格组件请求的,可以通过 value 快捷地拿到字段值,这里以多对一字段为例。
TS
import { SPI, ViewType, FormFieldWidget, BaseFieldWidget, ModelFieldType } from '@kunlun/dependencies';
import Test from './Test.vue';

@SPI.ClassFactory(
  BaseFieldWidget.Token({
    viewType: [ViewType.Form, ViewType.Search],
    ttype: ModelFieldType.ManyToOne
  })
)
export class TestWidget extends FormFieldWidget {
  public initialize(props) {
    super.initialize(props);
    this.setComponent(Test);
    return this;
  }
}
在 vue 中用 props 接一下 value,就能获取数据
<template>
  <div class="Test" style="color: red">
    {{ value }}
  </div>
</template>

<script lang="ts">
import { defineComponent } from 'vue';
export default defineComponent({
  name: 'Test',
  props: ['value']
});
</script>
3-2-2 自定义关系字段手写 GraphQL 获取数据
手写 GraphQL 的方式,优点是符合 RESTful 请求的直觉,方便理解,能精确控制请求体大小。但缺点也很明显,写得代码又多,又不通用,一旦换一个模型,请求体又得重新改造,也很容易拼错。
这里以实现通用的弹窗添加的多对一组件为例,介绍手写 GraphQL 的请求方式。当我们给一个多对一字段添加数据时,可能不是下拉框的交互,而是打开弹窗,点击数据并提交。平台并没有提供这样的组件,那么这个字段就需要自定义,打开弹窗,并且请求弹窗里的数据。
TS
import {
  SPI,
  Widget,
  FormFieldWidget,
  ActiveRecords,
  ModelFieldType,
  RuntimeRelationField,
  ViewType,
  http,
  Condition,
  DEFAULT_TRUE_CONDITION
} from '@kunlun/dependencies';
import Test from './Test.vue';

@SPI.ClassFactory(
  FormFieldWidget.Token({
    viewType: [ViewType.Form, ViewType.Search],
    ttype: ModelFieldType.ManyToOne
  })
)
export class TestWidget extends FormFieldWidget {
  public initialize(props) {
    super.initialize(props);
    this.setComponent(Test);
    return this;
  }

  // 弹窗表格展示的字段
  public get searchDialogModelFields() {
    // 关系字段关联的字段
    return (this.field as RuntimeRelationField)?.referencesModel.modelFields;
  }

  // 转化成 antd table 的 columns 能展示的结构
  @Widget.Reactive()
  public get columns() {
    return (
      this.searchDialogModelFields?.map((field: any) => {
        return {
          key: field.data,
          dataIndex: field.data,
          title: field.label
        };
      }) || []
    );
  }

  // 弹窗输入框搜索的字段编码,逗号分隔
  @Widget.Reactive()
  public get searchFieldCode() {
    return this.getDsl().searchFieldCode || 'name';
  }

  // 弹窗表格数据查询方法名
  public get queryPageFunction() {
    return (
      // 界面设计器配置的查询方法名
      this.getDsl().queryPageFunction ||
      // 默认查询方法名
      'queryPage'
    );
  }

  // 弹窗表格总页数
  @Widget.Reactive()
  protected totalPages = 10000;

  // 弹窗表格数据
  @Widget.Reactive()
  public searchDialogData: ActiveRecords | undefined;

  // 发起查询弹窗表格数据
  @Widget.Method()
  public async querySearchDialogData(currentPage: number, pageSize: number, searchValue: string) {
    // 根据配置的弹窗输入框搜索的字段编码,构建查询条件
    let condition = new Condition(DEFAULT_TRUE_CONDITION);
    if (searchValue) {
      this.searchFieldCode.split(',').forEach((fieldCode) => {
        // like 模糊匹配
        condition.and(new Condition(fieldCode).like(searchValue));
      });
    }

    // 手拼 gql
    const query = `
      {
        resourceCountryQuery {
          queryPage(
            page: {currentPage: ${currentPage}, size: ${pageSize}}
            queryWrapper: {rsql: "${condition?.toString()}"}
          ) {
            content {
              code
              name
              id
            }
            totalPages
            totalElements
          }
        }
      }
      `;
    const r = await http.query('resource', query);
    const result = r.data['resourceCountryQuery']['queryPage'];

    this.totalPages = result.totalPages as number;
    this.searchDialogData = result.content as ActiveRecords;
  }
}
VUE
<template>
  <div class="test-filed-wrapper">
    {{ value }}

    <a-button class="oio-button" @click="opendialog"> 打开弹窗 </a-button>
    <a-modal wrap-class-name="test-dialog" v-model:visible="data.dialogTableVisible" :title="data.title" width="100%">
      <a-input-search
        v-model:value="data.input3"
        placeholder="请输入"
        @search="inputSearchButtonClick"
        style="width: 20%"
      />

      <a-table :dataSource="searchDialogData" :columns="columns" :pagination="false" bordered :customRow="customRow" />

      <oio-pagination
        v-model:current-page="data.currentPage4"
        v-model:page-size="data.pageSize4"
        :total="totalPages"
        @change="handleChange"
      />
    </a-modal>
  </div>
</template>

<script lang="ts">
import { OioPagination } from '@kunlun/vue-ui-antd';
import { defineComponent, reactive } from 'vue';

export default defineComponent({
  inheritAttrs: false,
  name: 'Test',
  components: {
    OioPagination
  },
  props: ['value', 'searchDialogData', 'columns', 'totalPages', 'querySearchDialogData', 'change'],
  setup(props) {
    const data = reactive({
      dialogTableVisible: false,
      input3: '',
      title: '名称',
      currentPage4: 1,
      pageSize4: 15
    });

    const customRow = (record: any, index: number) => {
      return {
        onclick: (event: Event) => {
          data.dialogTableVisible = false;
          console.log(record, index);
          props.change?.(record);
        }
      };
    };

    const opendialog = () => {
      if (!props.searchDialogData) {
        props.querySearchDialogData?.(data.currentPage4, data.pageSize4, data.input3);
      }
      data.dialogTableVisible = true;
    };

    const handleChange = (currentPage: number, pageSize: number) => {
      props.querySearchDialogData?.(data.currentPage4, data.pageSize4, data.input3);
    };

    const inputSearchButtonClick = () => {
      props.querySearchDialogData?.(data.currentPage4, data.pageSize4, data.input3);
    };

    return {
      data,
      opendialog,
      handleChange,
      customRow,
      inputSearchButtonClick
    };
  }
});
</script>

<style lang="scss">
.test-filed-wrapper {
  display: flex;
  align-items: center;
  gap: 6px;
}

.test-dialog {
  .ant-modal-body {
    padding: 20px;
    display: flex;
    flex-direction: column;
    row-gap: 16px;
  }
}
</style>
3-2-3 自定义关系字段调平台 api 获取数据
调用平台封装的请求 api 可以解决手写 GraphQL 带来的问题。这种方法适合对于平台基类还不熟悉的情况,我们不清楚基类有没有提供对应的能力,所以把请求相关的功能全量自定义了。如果对于平台已经很熟悉了,可以参考 3-2-4。
平台请求相关的api用法详见 https://doc.oinone.top/frontend/17638.html
这里同样以实现通用的弹窗添加的多对一组件为例,介绍下 customQueryPage 的用法,其它 api也是类似的。
TS
import {
  SPI,
  Widget,
  FormFieldWidget,
  ActiveRecords,
  ModelFieldType,
  RuntimeRelationField,
  ViewType,
  buildSelectSearchCondition,
  customQueryPage,
  IModelField
} from '@kunlun/dependencies';
import Test from './Test.vue';

@SPI.ClassFactory(
  FormFieldWidget.Token({
    viewType: [ViewType.Form, ViewType.Search],
    ttype: [ModelFieldType.ManyToOne]
  })
)
export class TestWidget extends FormFieldWidget {
  public initialize(props) {
    super.initialize(props);
    this.setComponent(Test);
    return this;
  }

  // 弹窗表格所属的模型
  public get searchDialogModel() {
    // 关系字段关联的模型
    return (this.field as RuntimeRelationField)?.references;
  }

  // 弹窗表格展示的字段
  public get searchDialogModelFields() {
    // 关系字段关联的字段
    return (this.field as RuntimeRelationField)?.referencesModel.modelFields;
  }

  // 转化成 antd table 的 columns 能展示的结构
  @Widget.Reactive()
  public get columns() {
    return (
      this.searchDialogModelFields?.map((field: any) => {
        return {
          key: field.data,
          dataIndex: field.data,
          title: field.label
        };
      }) || []
    );
  }

  // 弹窗输入框搜索的字段编码,逗号分隔
  @Widget.Reactive()
  public get searchFieldCode() {
    return this.getDsl().searchFieldCode || 'name';
  }

  // 弹窗表格数据查询方法名
  public get queryPageFunction() {
    return (
      // 界面设计器配置的查询方法名
      this.getDsl().queryPageFunction ||
      // 默认查询方法名
      'queryPage'
    );
  }

  // 弹窗表格总页数
  @Widget.Reactive()
  protected totalPages = 10000;

  // 弹窗表格数据
  @Widget.Reactive()
  public searchDialogData: ActiveRecords | undefined;

  // 发起查询弹窗表格数据
  @Widget.Method()
  public async querySearchDialogData(currentPage: number, pageSize: number, searchValue: string) {
    if (this.searchDialogModel) {
      const condition = buildSelectSearchCondition(
        (this.field as RuntimeRelationField).referencesModel,
        this.searchFieldCode,
        searchValue
      );
      // 这样把模型和方法写死,效果就相当于手写 GraphQL,不能通用了
      // const result = await customQueryPage(
      //   "resource.ResourceCountry",
      //   "queryPage",
      //   {
      //     currentPage,
      //     pageSize,
      //     condition
      //   },
      //   this.searchDialogModelFields as unknown as IModelField[],
      //   this.searchDialogModelFields as unknown as IModelField[]
      // );
      const result = await customQueryPage(
        this.searchDialogModel,
        this.queryPageFunction,
        {
          currentPage,
          pageSize,
          condition
        },
        this.searchDialogModelFields as unknown as IModelField[],
        this.searchDialogModelFields as unknown as IModelField[]
      );
      this.totalPages = result.totalPages;
      this.searchDialogData = result.content;
    }
  }
}
vue 同 3-2-2 的 vue
可以看到资源应用 -> 省菜单 -> 创建表单 -> 国家/地区 字段被替换了,效果如下:
3-2-4 自定义关系字段调基类方法获取数据
这种方法适用于对于平台组件很熟悉的情况,知道什么基类提供了对应的能力,并继承它,重写几个参数,调用基类的方法就好。
同样以实现通用的弹窗添加的多对一组件为例,方法 3-2-3 继承的是 FormFieldWidget,把分页、搜索查询、都重写了一遍。其实没必要这么麻烦,我们可以抽象一下,弹窗打开选数据和下拉打开选数据,实际上只有交互上的区别,而没有数据请求上的区别,所以我们完全可以继承平台默认的多对一下拉 FormM2OSelectFieldWidget ,所有的请求、分页都已经做好了,只需要调一下api拿到就行。
TS
import { SPI, Widget, FormFieldWidget, ModelFieldType, ViewType, FormM2OSelectFieldWidget } from '@kunlun/dependencies';
import Test from './Test.vue';

@SPI.ClassFactory(
  FormFieldWidget.Token({
    viewType: [ViewType.Form, ViewType.Search],
    ttype: [ModelFieldType.ManyToOne]
  })
)
export class TestWidget extends FormM2OSelectFieldWidget {
  public initialize(props) {
    super.initialize(props);
    this.setComponent(Test);
    return this;
  }

  // 转化成 antd table 的 columns 能展示的结构
  @Widget.Reactive()
  public get columns() {
    return (
      this.field.referencesModel.modelFields?.map((field) => {
        return {
          key: field.data,
          dataIndex: field.data,
          title: field.label
        };
      }) || []
    );
  }

  // 弹窗表格总页数,这里重写为响应式的
  @Widget.Reactive()
  protected totalPages = 10000;

  // 弹窗表格数据,这里重写为响应式的
  @Widget.Reactive()
  protected dataList: Record<string, unknown>[] = [];

  // 发起查询弹窗表格数据
  @Widget.Method()
  public async querySearchDialogData(currentPage: number, pageSize: number, searchValue: string) {
    this.currentPage = currentPage;
    this.pageSize = pageSize;
    this.searchValue = searchValue;

    // 只需调用基类的加载数据方法
    await this.initLoadOptions();
  }
}
VUE
<template>
  <div class="test-filed-wrapper">
    {{ value }}

    <a-button class="oio-button" @click="opendialog"> 打开弹窗 </a-button>
    <a-modal wrap-class-name="test-dialog" v-model:visible="data.dialogTableVisible" :title="data.title" width="100%">
      <a-input-search
        v-model:value="data.input"
        placeholder="请输入"
        @search="inputSearchButtonClick"
        style="width: 20%"
      />

      <a-table :dataSource="dataList" :columns="columns" :pagination="false" bordered :customRow="customRow" />

      <oio-pagination
        v-model:current-page="data.currentPage"
        v-model:page-size="data.pageSize"
        :total="totalPages"
        @change="handleChange"
      />
    </a-modal>
  </div>
</template>

<script lang="ts">
import { OioPagination } from '@kunlun/vue-ui-antd';
import { defineComponent, reactive } from 'vue';

export default defineComponent({
  inheritAttrs: false,
  name: 'Test',
  components: {
    OioPagination
  },
  props: ['value', 'dataList', 'columns', 'totalPages', 'querySearchDialogData', 'change'],
  setup(props) {
    const data = reactive({
      dialogTableVisible: false,
      input: '',
      title: '名称',
      currentPage: 1,
      pageSize: 15
    });

    const customRow = (record: any, index: number) => {
      return {
        key: record.id || index,
        onClick: (event: Event) => {
          data.dialogTableVisible = false;
          console.log(record, index);
          props.change?.(record);
        }
      };
    };

    const opendialog = () => {
      if (!props.dataList || !props.dataList.length) {
        props.querySearchDialogData?.(data.currentPage, data.pageSize, data.input);
      }
      data.dialogTableVisible = true;
    };

    const handleChange = (currentPage: number, pageSize: number) => {
      props.querySearchDialogData?.(data.currentPage, data.pageSize, data.input);
    };

    const inputSearchButtonClick = () => {
      data.currentPage = 1;
      props.querySearchDialogData?.(data.currentPage, data.pageSize, data.input);
    };

    return {
      data,
      opendialog,
      handleChange,
      customRow,
      inputSearchButtonClick
    };
  }
});
</script>

<style lang="scss">
.test-filed-wrapper {
  display: flex;
  align-items: center;
  gap: 6px;
}

.test-dialog {
  .ant-modal-body {
    padding: 20px;
    display: flex;
    flex-direction: column;
    row-gap: 16px;
  }
}
</style>
可以看到不仅代码逻辑变少了,还拥有了更多的能力,例如弹窗表格数据和别的字段联动。
再次去资源应用 -> 省菜单 -> 创建表单 -> 国家/地区 字段,替换效果和方法3一致:
Oinone社区 作者:银时原创文章,如若转载,请注明出处:https://doc.oinone.top/frontend/20940.html
访问Oinone官网:https://www.oinone.top获取数式Oinone低代码应用平台体验