管理后台如何新增Iframe嵌入其他系统的界面: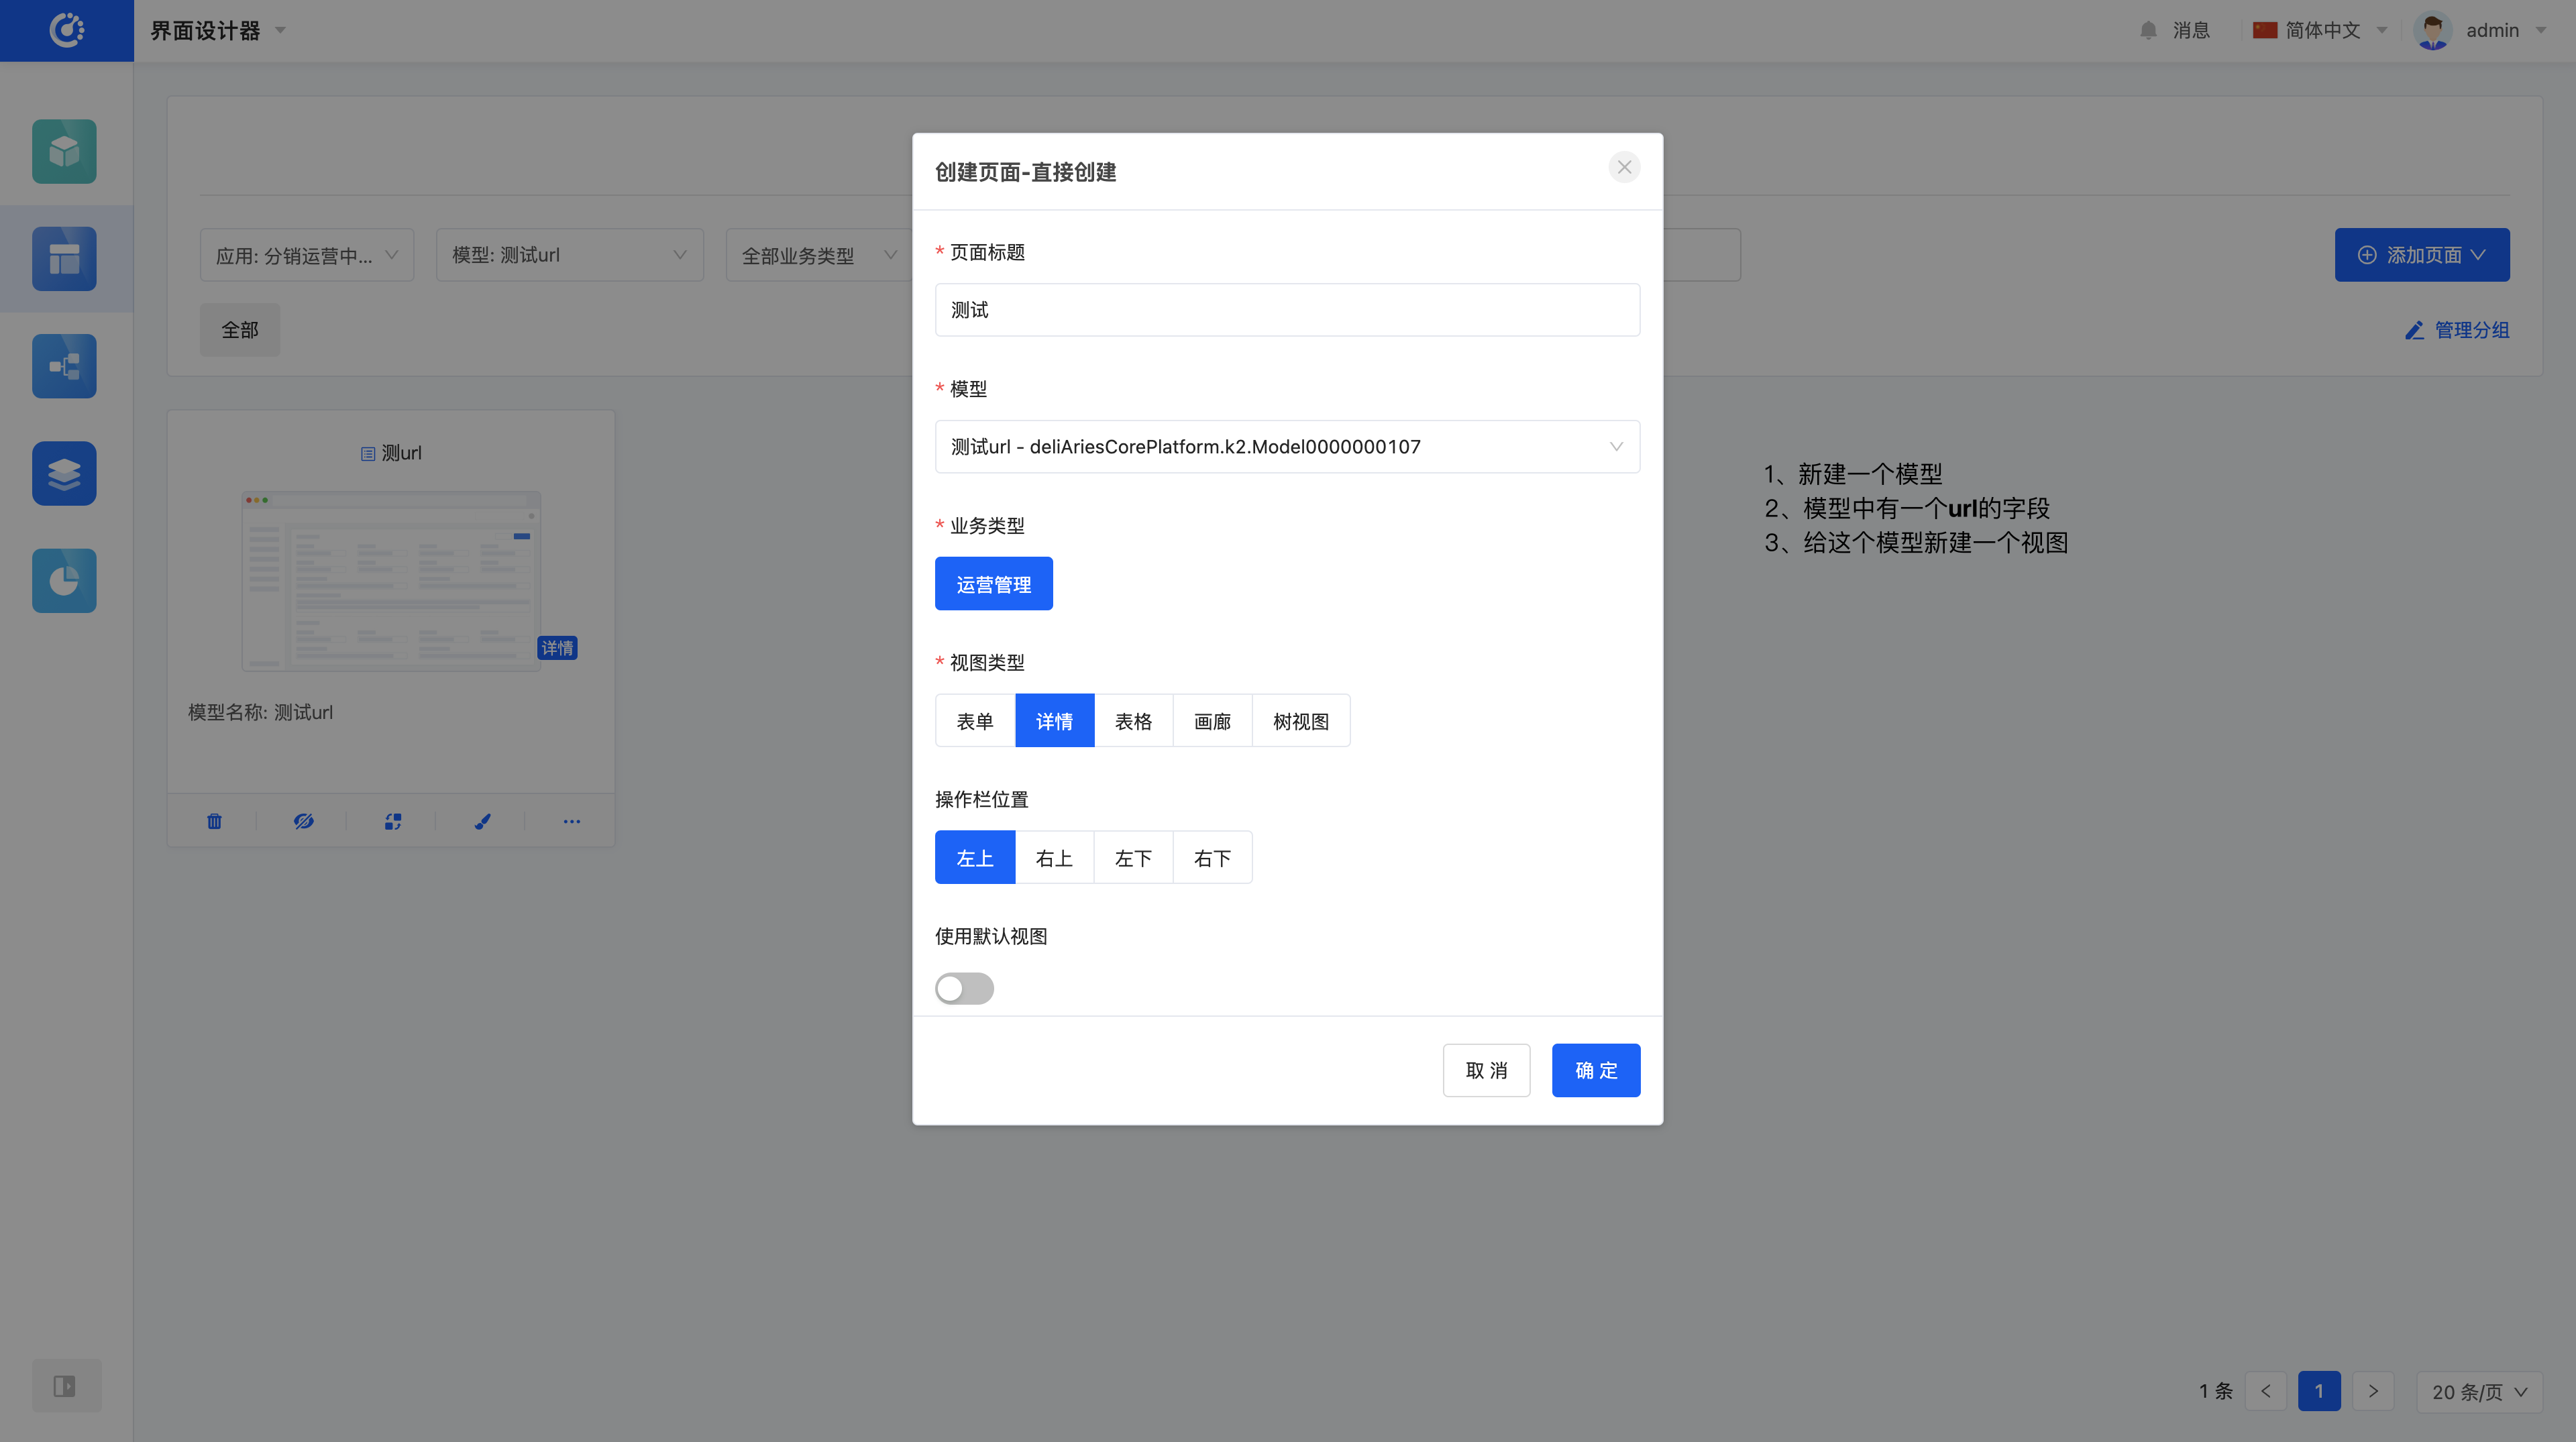

1、新建一个模型。模型中有放【url】的字段
2、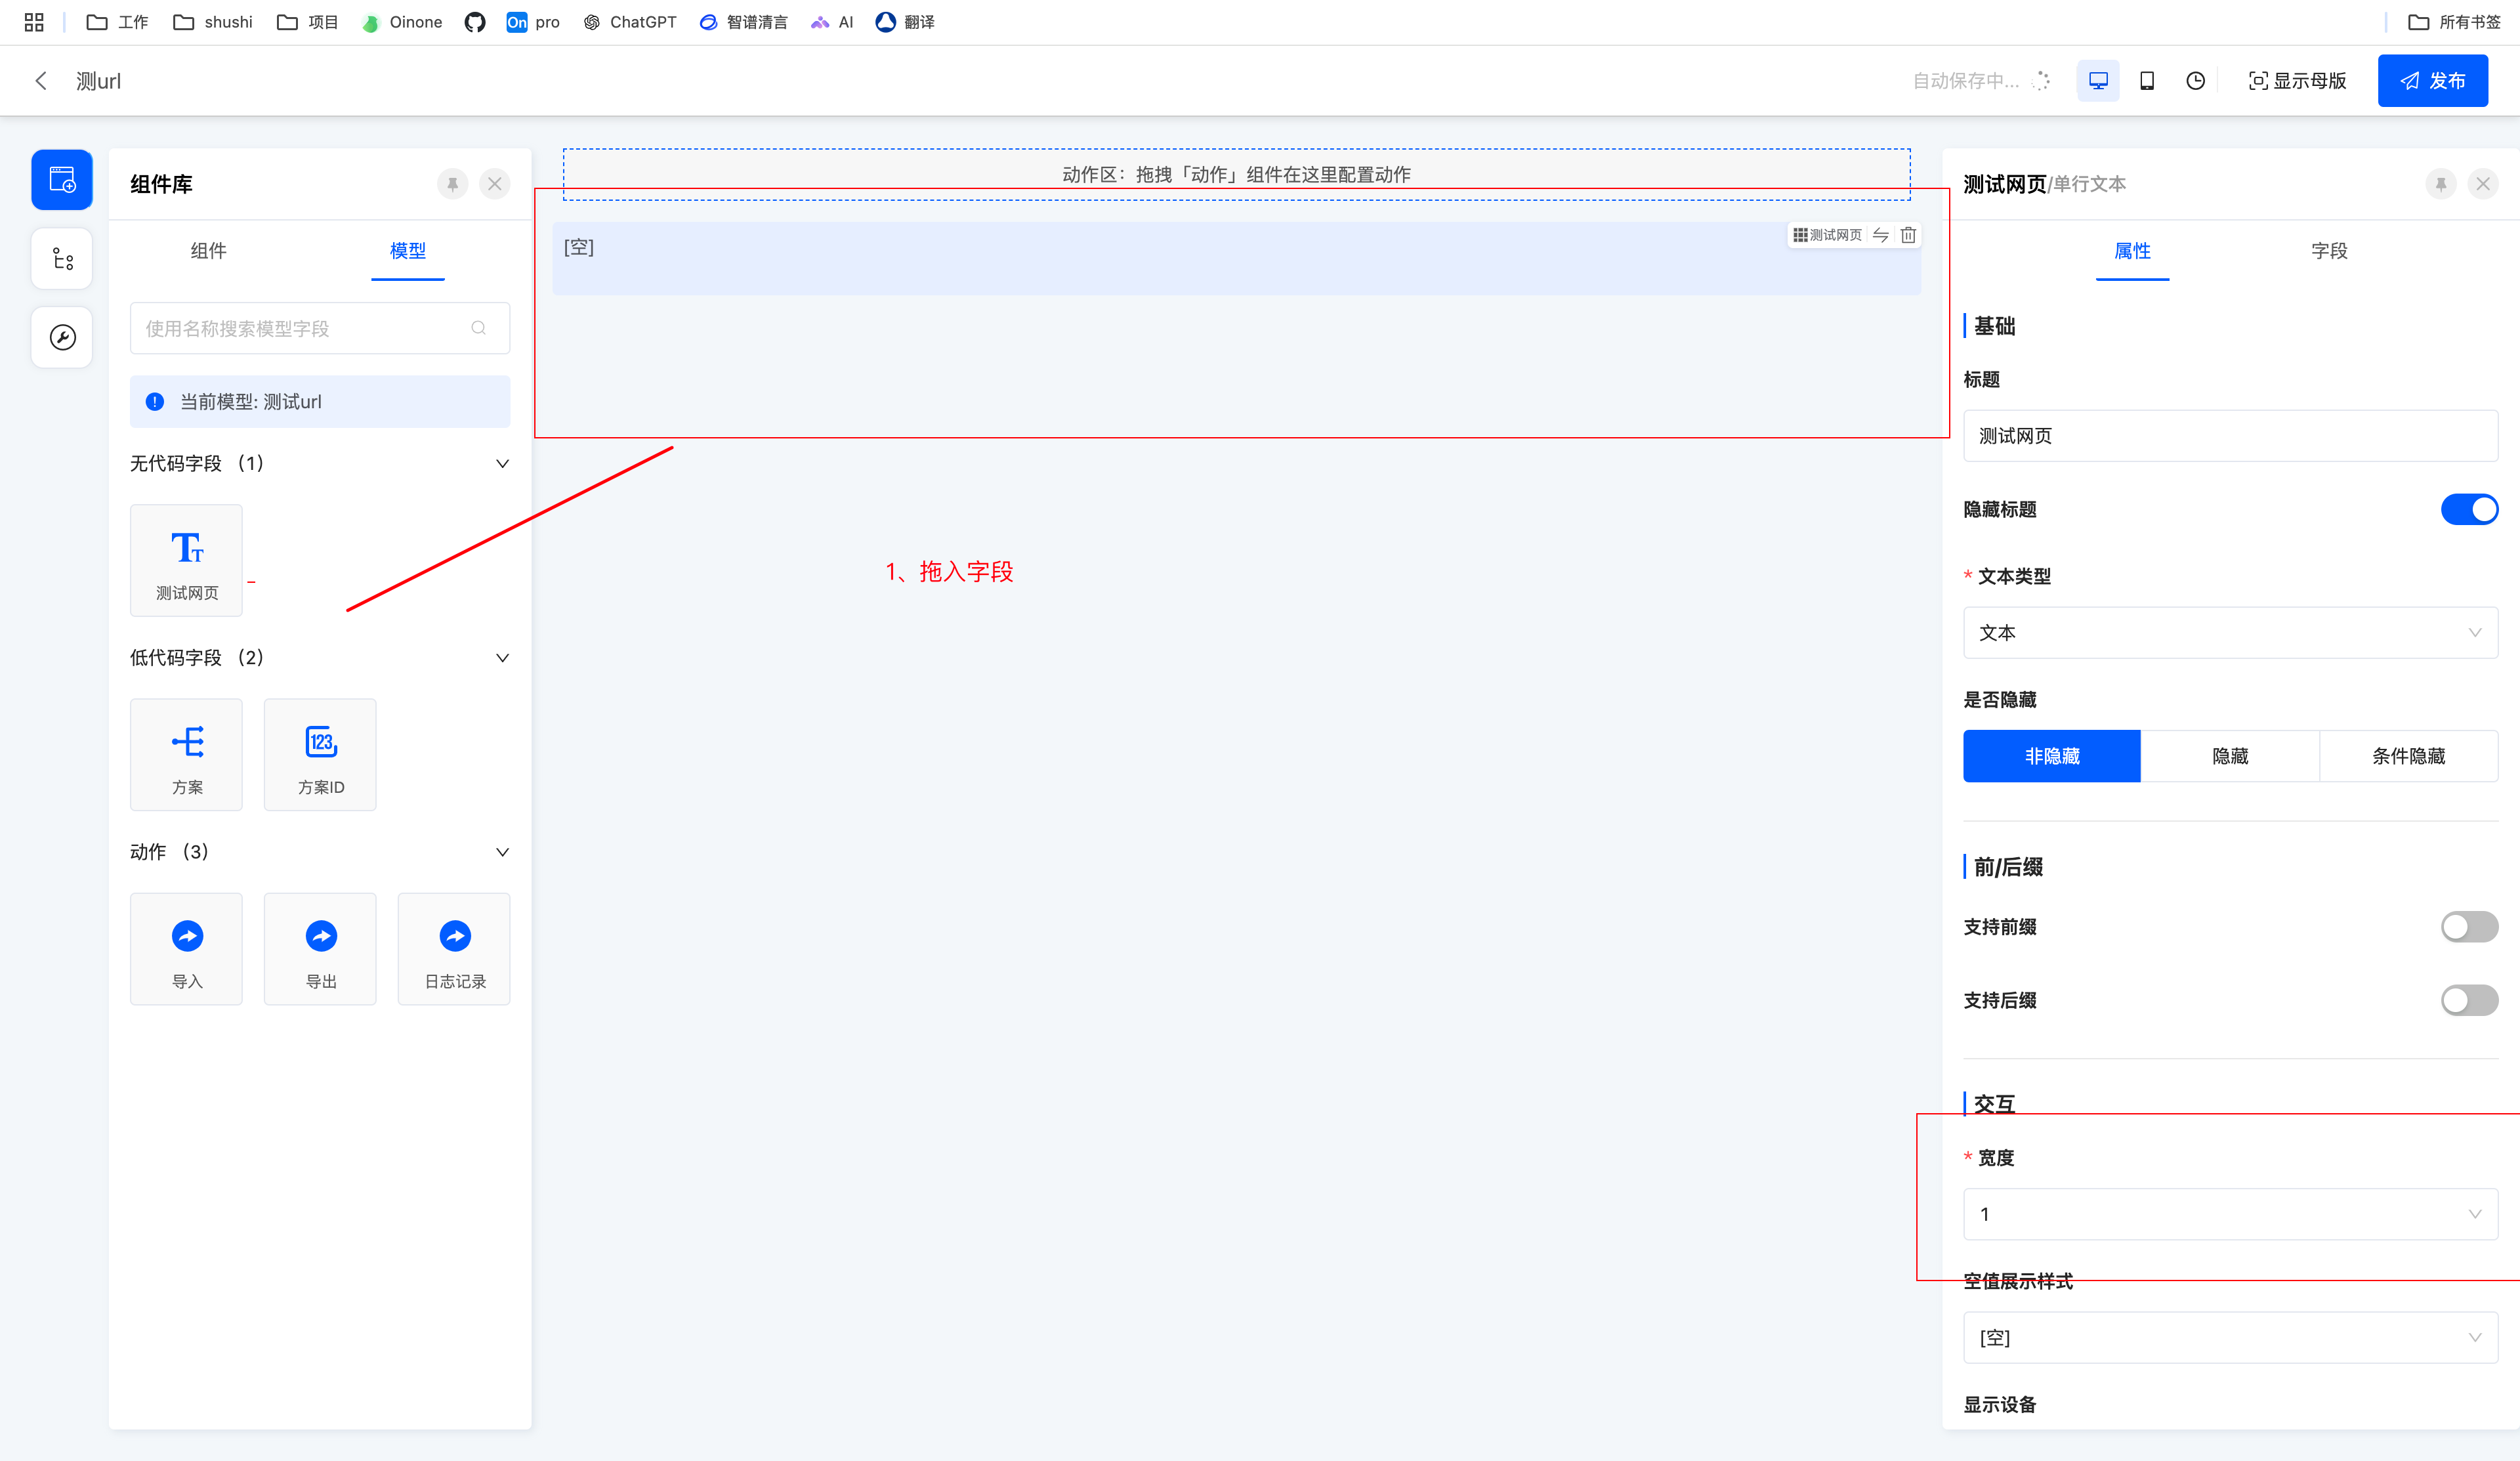
3、切换组件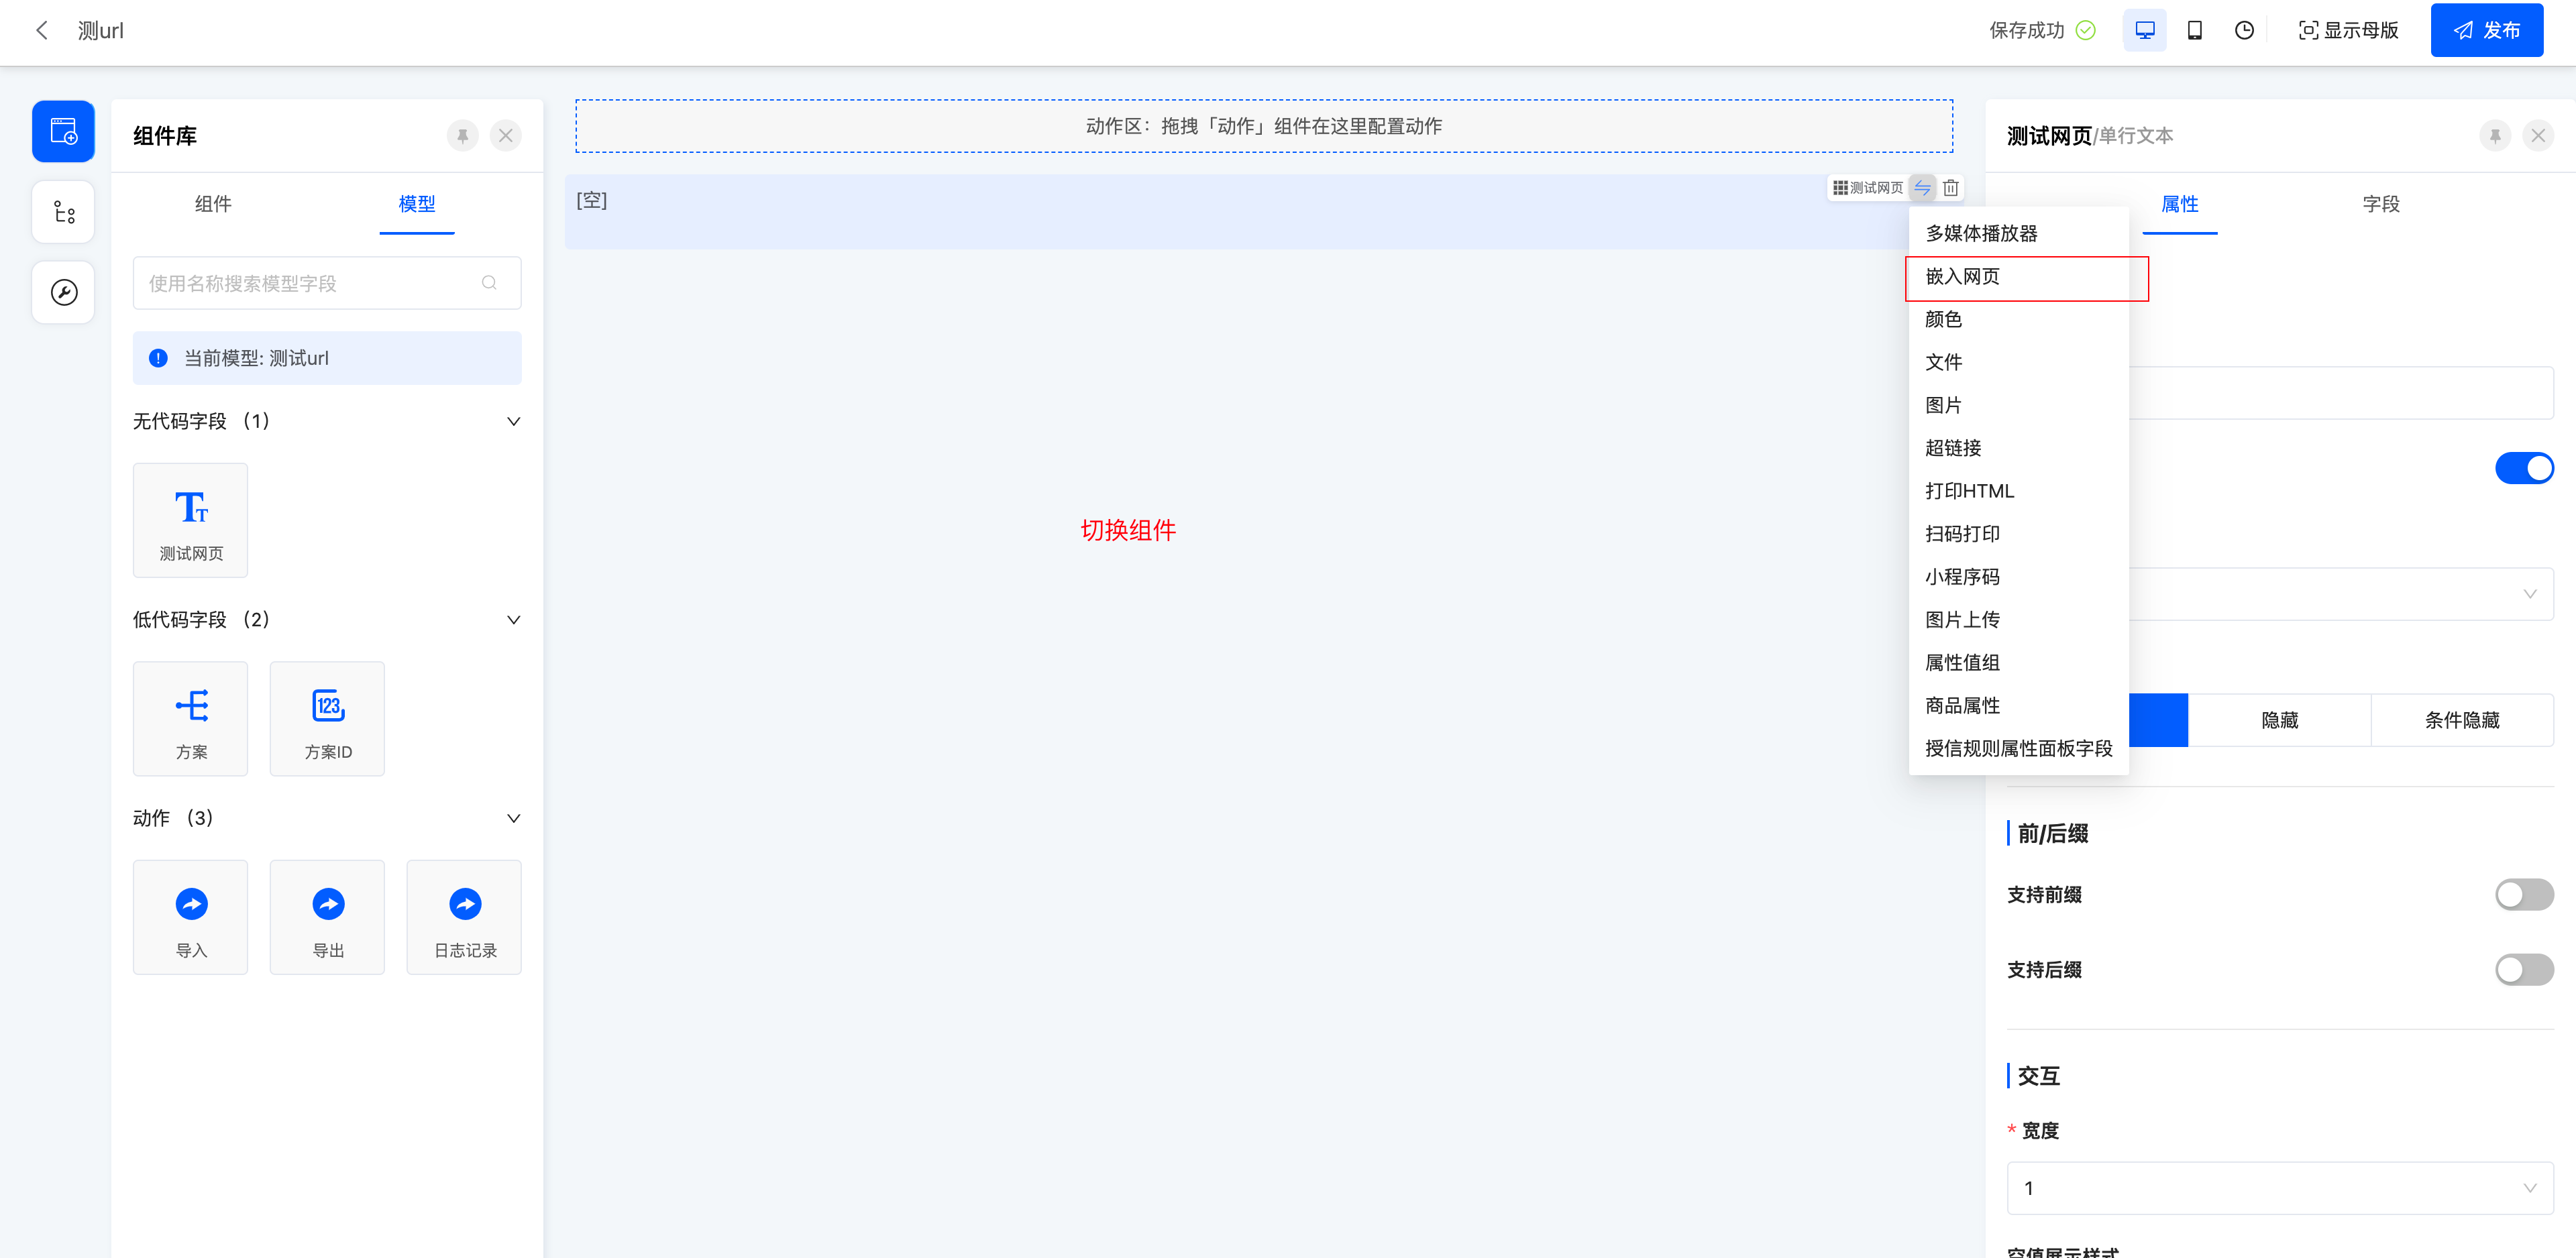
4、点击发布
5、测试环境验证下,后端那个字段返回嵌入的【url】就可以展示这个url的内容了
6、最后效果如下: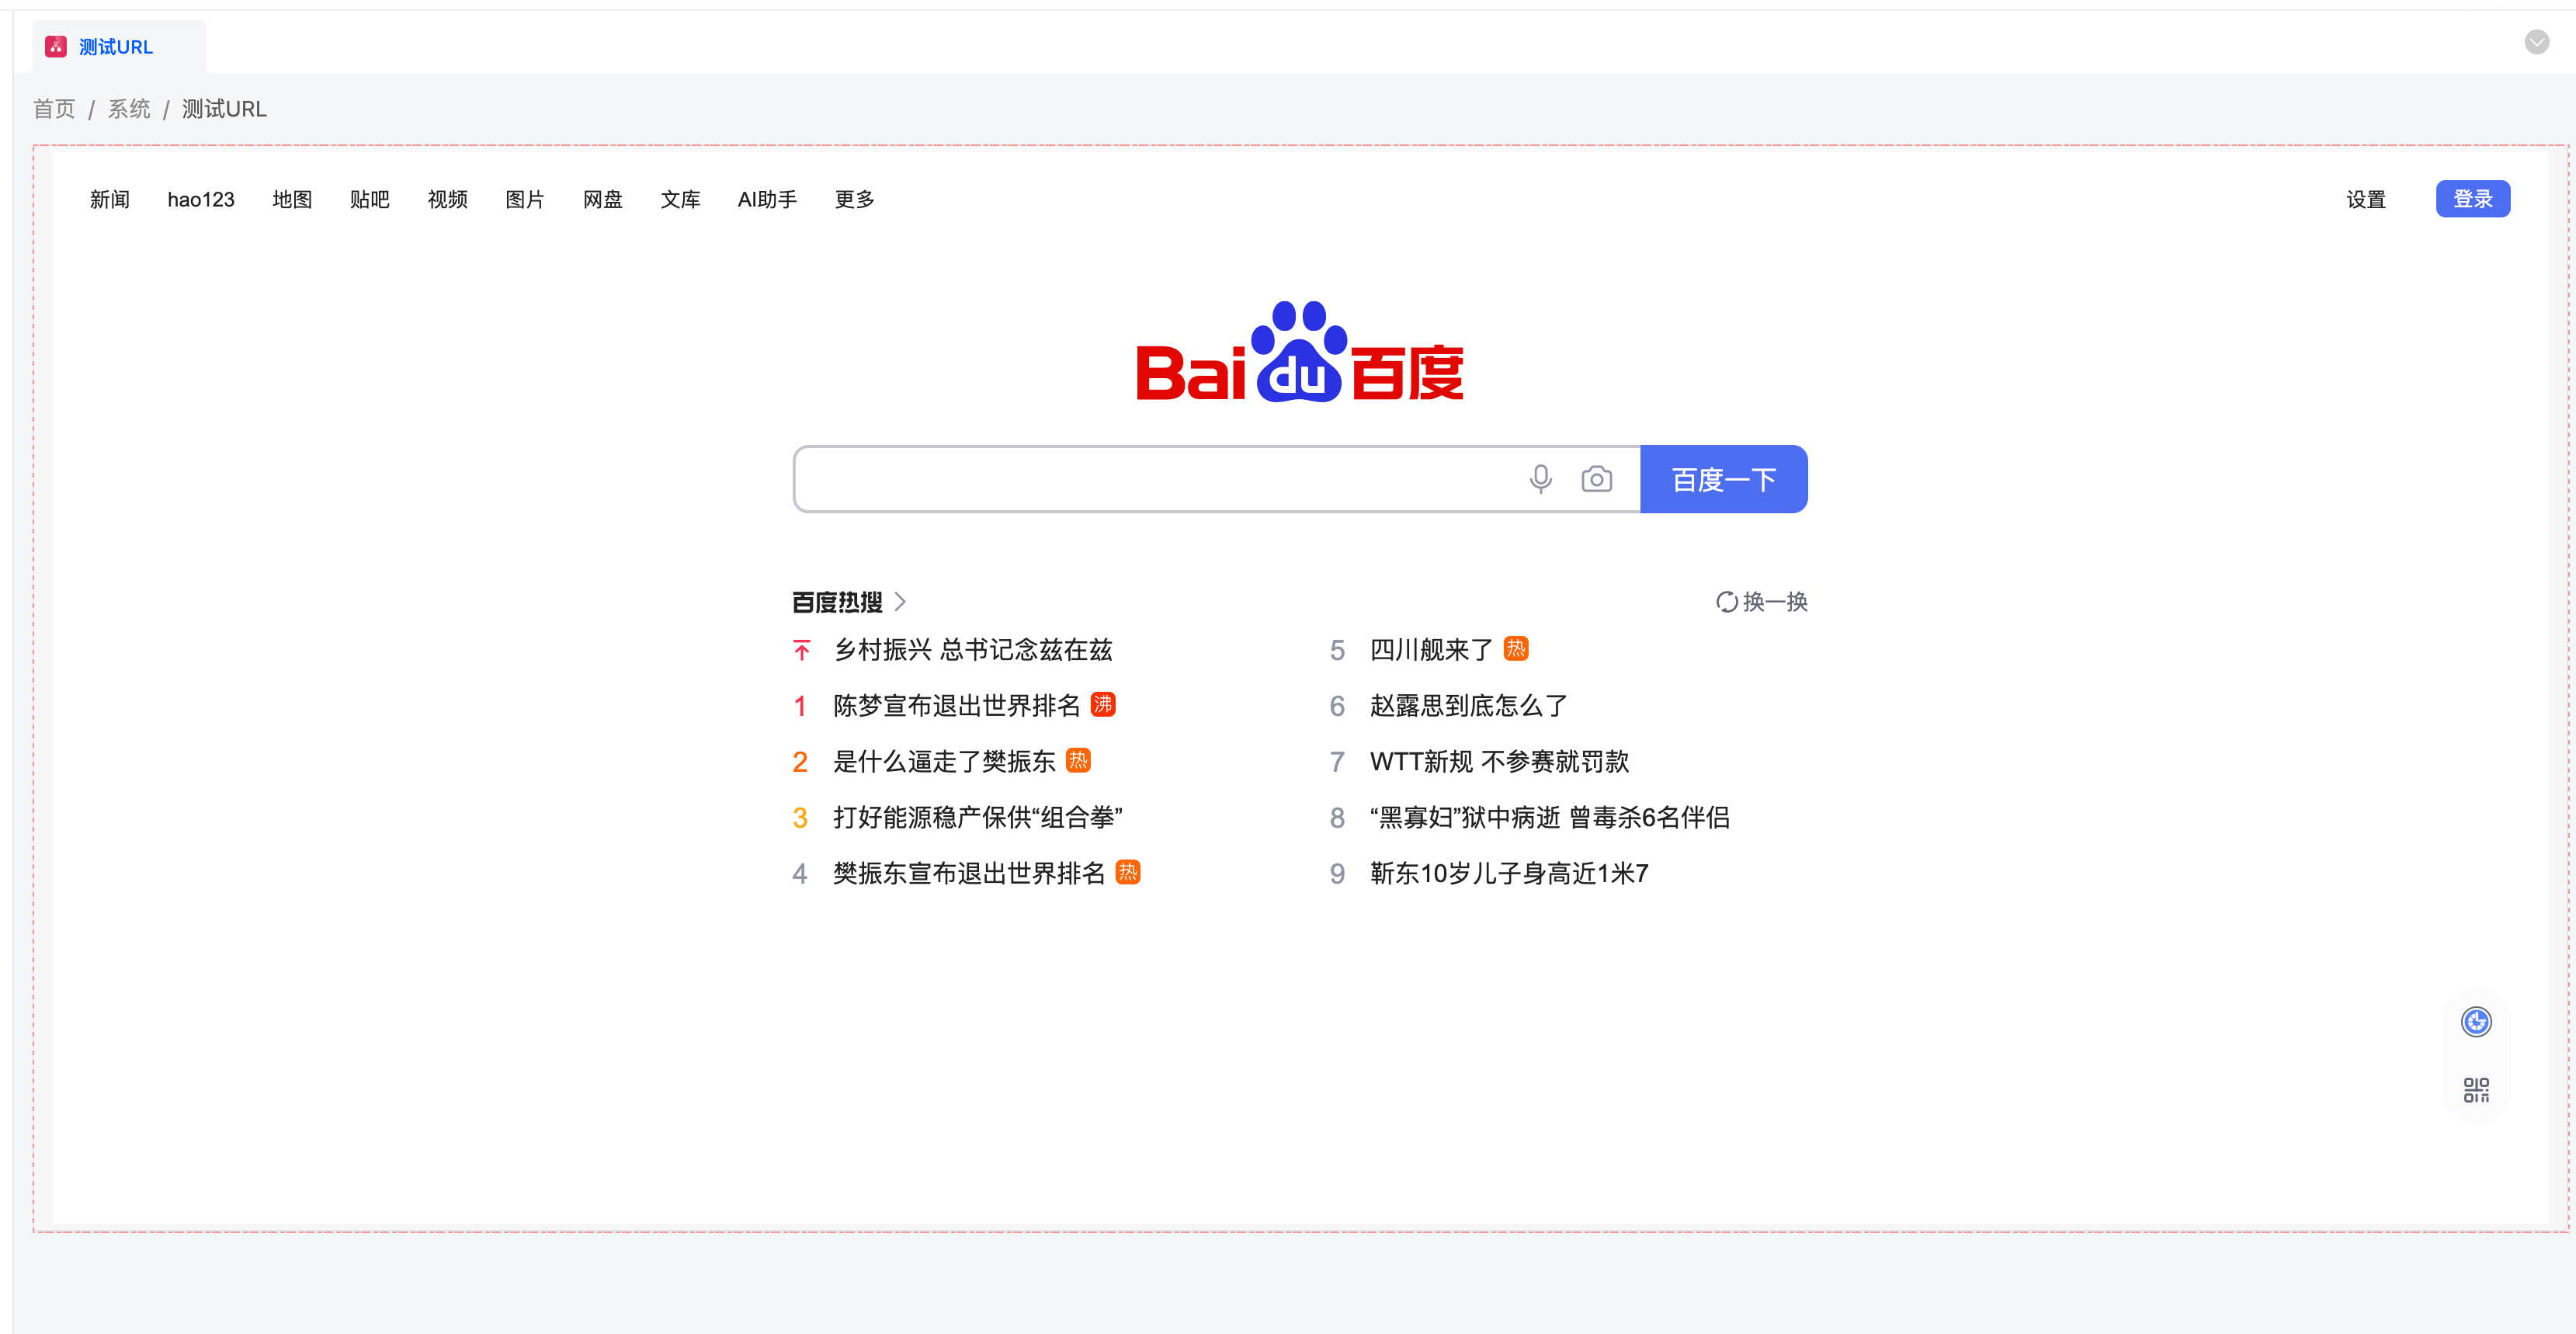
Oinone社区 作者:冯, 天宇原创文章,如若转载,请注明出处:https://doc.oinone.top/other/20111.html
访问Oinone官网:https://www.oinone.top获取数式Oinone低代码应用平台体验

管理后台如何新增Iframe嵌入其他系统的界面:
1、新建一个模型。模型中有放【url】的字段
2、
3、切换组件
4、点击发布
5、测试环境验证下,后端那个字段返回嵌入的【url】就可以展示这个url的内容了
6、最后效果如下:
Oinone社区 作者:冯, 天宇原创文章,如若转载,请注明出处:https://doc.oinone.top/other/20111.html
访问Oinone官网:https://www.oinone.top获取数式Oinone低代码应用平台体验
需求 将审批同意时填写的审批意见以及图片回填到审批表单中。(填写节点同理) 实现方式一 通过审批后置函数操作流程参数的数据,并将流程参数数据回写到流程中。 流程设计 流程参数中自定义需要传递的字段。 审批节点设计审批后置函数,后置函数由后端定义。 添加更新数据节点,选择需要更新的业务表单字段,并在表达式中选择流程参数中自定义的字段。我这里更新审批意见和图片两个字段。 后置函数定义: /** * 审批后数据处理 * * @param approvalNode 审批节点 * @param context 上下文 * @param dataJson 审批提交数据 * @param result 审批结果 */ @Function(name = "approvalDataProcessFun", openLevel = API) @Function.Advanced(type = FunctionTypeEnum.QUERY, displayName = "审批后数据处理", category = FunctionCategoryEnum.CUSTOM_DESIGNER) public void approvalDataProcessFun(ApprovalNode approvalNode, WorkflowContext context, String dataJson, Boolean result) { List<WorkflowUserTask> workflowUserTasks = Models.origin().queryListByWrapper(Pops.<WorkflowUserTask>lambdaQuery() .from(WorkflowUserTask.MODEL_MODEL) .eq(WorkflowUserTask::getTaskId, context.getLastTaskInstanceId()) ); // 获取审批意见等放入流程参数 for (WorkflowUserTask userTask : workflowUserTasks) { String remark = userTask.getRemark(); List<String> pics = userTask.getPics(); List<PamirsFile> attachments = userTask.getAttachments(); Map<String, Object> paramMap = (Map<String, Object>) context.getContext().getOrDefault(ParamNode.PARAM_PREFIX, new HashMap<String, Object>()); paramMap.put("remark", remark); paramMap.put("pics", pics); } } 实现方式二 通过审批动作(WorkflowUserTaskAction )扩展点实现 1、扩展点的定义 package pro.shushi.pamirs.work.core.extpoint; import pro.shushi.pamirs.meta.annotation.Ext; import pro.shushi.pamirs.meta.annotation.ExtPoint; import pro.shushi.pamirs.workflow.app.api.model.WorkflowUserTask; // @see:pro.shushi.pamirs.workflow.app.core.action.WorkflowUserTaskAction /** * Oinone所有的函数都提供了默认的前置扩展点、重载扩展点和后置扩展点, * 其技术名称的规则是所扩展函数的函数编码fun加上“Before”、“Override”和“After”后缀 * * 根据实际情况保留扩展点的接口和实现(可增加、可删减) */ @Ext(WorkflowUserTask.class) public interface WorkflowUserTaskDealExtPoint { // 实际需要几个扩展点根据业务情况自行 增加 和 删除 @ExtPoint(displayName = "审批同意后") WorkflowUserTask approveAgreeAfter(WorkflowUserTask workflowUserTask); @ExtPoint(displayName = "审批撤销后") WorkflowUserTask recallAfter(WorkflowUserTask workflowUserTask); @ExtPoint(displayName = "审批转审后") WorkflowUserTask approveTrangerAfter(WorkflowUserTask workflowUserTask); @ExtPoint(displayName = "审批转审前") WorkflowUserTask approveFallbackBefore(WorkflowUserTask workflowUserTask); @ExtPoint(displayName = "审批拒绝后") WorkflowUserTask approveRejustAfter(WorkflowUserTask workflowUserTask); @ExtPoint(displayName = "审批转审后") WorkflowUserTask approveFallbackAfter(WorkflowUserTask workflowUserTask); // ………… } 2、扩展点的实现 package pro.shushi.pamirs.work.core.extpoint; import org.springframework.stereotype.Component; import pro.shushi.pamirs.meta.annotation.Ext; import…
准备工作 环境准备-1h安装基础环境,需要Node和PNPM如果已经安装检查对应版本,体验阶段建议版本保持一致 克隆一个空工程-0.5h全新工程 注意事项-0.5h静态资源解压,如果还没有对应的后端服务。可以使用:https://demo.oinone.top(Oinone演示环境),账号密码:admin/admin 前端基础 1.1.1了解组件-3h– 组件如何开发– 组件如何复用– 组件如何嵌套 1.1.2 更近一步-5h– 构建更复杂的工作台– 如何发起后端请求– 构建一个通用的图表组件 1.1.3 深入了解概念-5h– 通用概念、名词解释– 页面渲染原理– 组件执行原理 1.1.4业务实战-实现通用的甘特图组件-8h– 怎么与第三方结合– 如何在开源组件上接入Oinone, 并复用 1.1.5 业务实战-实现通用的画廊组件-6h–如何更近一步复用–基础学习结束 前端进阶 2.1.1代码和无代码如何结合-4h– 了解无代码如何使用和基础概念 2.1.2使用无代码搭建增删改查-8h– 了解无代码如何使用和基础概念 最后一步 当您实现玩基础和进阶的所有的效果,Oinone的整体使用您已经大致掌握了,接下来您可以找一个当前业务的场景来实现它把!
在模型里面建一个非存储字段,用来传输工作流用户任务待办ID。。 界面设计器把这个字段拖到列表页里,并在跳转动作上配置上下文参数,把任务待办id传到表单页里。 重写教师模型的queryPage,通过业务数据id查询出每条业务数据的工作流用户任务待办id返回给前端。 @Function.Advanced(displayName = "查询教师列表", type = FunctionTypeEnum.QUERY, category = FunctionCategoryEnum.QUERY_PAGE, managed = true) @Function(openLevel = {FunctionOpenEnum.LOCAL, FunctionOpenEnum.REMOTE, FunctionOpenEnum.API}) public Pagination<Teacher> queryPage(Pagination<Teacher> page, IWrapper<Teacher> queryWrapper) { Pagination<Teacher> teacherPagination = new Teacher().queryPage(page, queryWrapper); List<Teacher> content = teacherPagination.getContent(); if (CollectionUtils.isEmpty(content)) { return teacherPagination; } List<Long> teacherIds = content.stream().map(Teacher::getId).collect(Collectors.toList()); List<WorkflowUserTask> workflowUserTasks = Models.data().queryListByWrapper(Pops.<WorkflowUserTask>lambdaQuery() .from(WorkflowUserTask.MODEL_MODEL) .in(WorkflowUserTask::getNodeDataBizId, teacherIds) .orderByDesc(WorkflowUserTask::getCreateDate) ); if (CollectionUtils.isEmpty(workflowUserTasks)) { return teacherPagination; } Map<Long/*业务id*/, WorkflowUserTask> userTaskMap = workflowUserTasks.stream().collect(Collectors.toMap( WorkflowUserTask::getNodeDataBizId, a -> a, (old, n) -> old) ); for (Teacher teacher : content) { if (userTaskMap.containsKey(teacher.getId())) { teacher.setWorkflowUserTaskId(userTaskMap.get(teacher.getId()).getId()); } } return teacherPagination; } 查看效果,任务待办id成功传到表单里面。
模块 内容 目标 doc 链接 模型设计器 模型 1.熟悉模型管理和字段管理 模型 数据字典 熟悉数据字典的创建 数据字典 数据编码 了解数据编码的操作创建 数据编码 界面设计器 了解页面 了解界面设计器中的页面 页面 页面设计 增删改查 【界面设计器】模型增删改查基础 页面设计 左树右表 【界面设计器】左树右表 页面设计 树形表格 【界面设计器】树形表格 页面设计 树下拉 【界面设计器】树下拉/级联 页面设计 自定义组件基础 【界面设计器】自定义字段组件基础 页面设计 熟悉页面设计的操作 页面设计 自定义组件 熟悉如何使用自定义组件 自定义组件 流程设计器 流程组成 了解流程的组成 流程 流程设计 熟悉流程设计内容 流程设计 熟悉流程的触发节点 流程触发 熟悉流程的节点动作与设计使用 节点动作 低代码与无代码结合 示例讲解 Outsourcing相关 低无一体的开发方式、设计数据的导入导出等
介绍 平台提供的默认打印功能没有支持非存储数据的导出。我们可以自定义打印导出功能,以满足业务中个性化的需求。 实现思路 重写打印任务模型,添加业务数据字段 自定义打印动作,前端将导出数据放到业务数据字段中 使用导出数据扩展点机制修改导出数据 代码示例 继承平台的打印任务模型,加上需要业务数据字段,这个字段用于传输需要打印的表单数据,但是需要自定义打印的表单往往不止一个,所以需要定义为通用的Object字段。 @Model.model(TransientPdfPrintTask.MODEL_MODEL) @Model(displayName = "传输模型Pdf打印任务") public class TransientPdfPrintTask extends PdfPrintTask { public static final String MODEL_MODEL="demo.TransientPdfPrintTask"; @Field(displayName = "业务数据") private Object businessData; } 自定义打印动作 @Model.model(TransientPdfPrintTask.MODEL_MODEL) @Component public class TransientPdfPrintTaskAction extends AbstractPdfPrintTaskAction<TransientPdfPrintTask> { @Resource private PdfFileService pdfFileService; @Action(displayName = "打印", contextType = ActionContextTypeEnum.CONTEXT_FREE, bindingType = {ViewTypeEnum.TABLE}) @Override public TransientPdfPrintTask createPrintTask(TransientPdfPrintTask data) { return super.createPrintTask(data); } @Override protected void doExport(TransientPdfPrintTask exportTask, PdfDefinitionContext context) { pdfFileService.doExportSync(exportTask, context); } @Function.Advanced(type = FunctionTypeEnum.QUERY) @Function(openLevel = FunctionOpenEnum.API) public TransientPdfPrintTask construct(TransientPdfPrintTask data) { String model = FetchUtil.fetchVariables(PdfConstants.MODEL); data.construct(); data.setModel(model); return data; } } 本篇文章只介绍同步打印,如果异步需要修改doExport方法。 编写导出的数据处理逻辑 @Ext(PdfPrintTask.class) public class PrintExportExt extends AbstractPdfExportFetchDataExtPointImpl implements PdfExportFetchDataExtPoint { // 这里使用扩展点表达式匹配需要打印的非存储模型,只有表达式为true才会走这段逻辑。 @Override @ExtPoint.Implement(expression = "context.model==\"" + ProductPricingClientTransient.MODEL_MODEL + "\"") public List<Object> fetchExportData(PdfPrintTask exportTask, PdfDefinitionContext context) { List<Object> result = new ArrayList<>(); List<Object> dataList = new ArrayList<>(); TransientPdfPrintTask transientPdfPrintTask = new TransientPdfPrintTask(); transientPdfPrintTask.set_d(exportTask.get_d()); dataList.add(transientPdfPrintTask.getBusinessData()); result.add(dataList); return result; } } 前端自定义打印按钮,将数据提交给业务数据字段,并使用同步导出打印。