前端 快速查询并替换默认组件

可以借助vue的调试工具快速找到对应的组件,请参考这篇文章 使用vue调试工具快速找到对应的组件
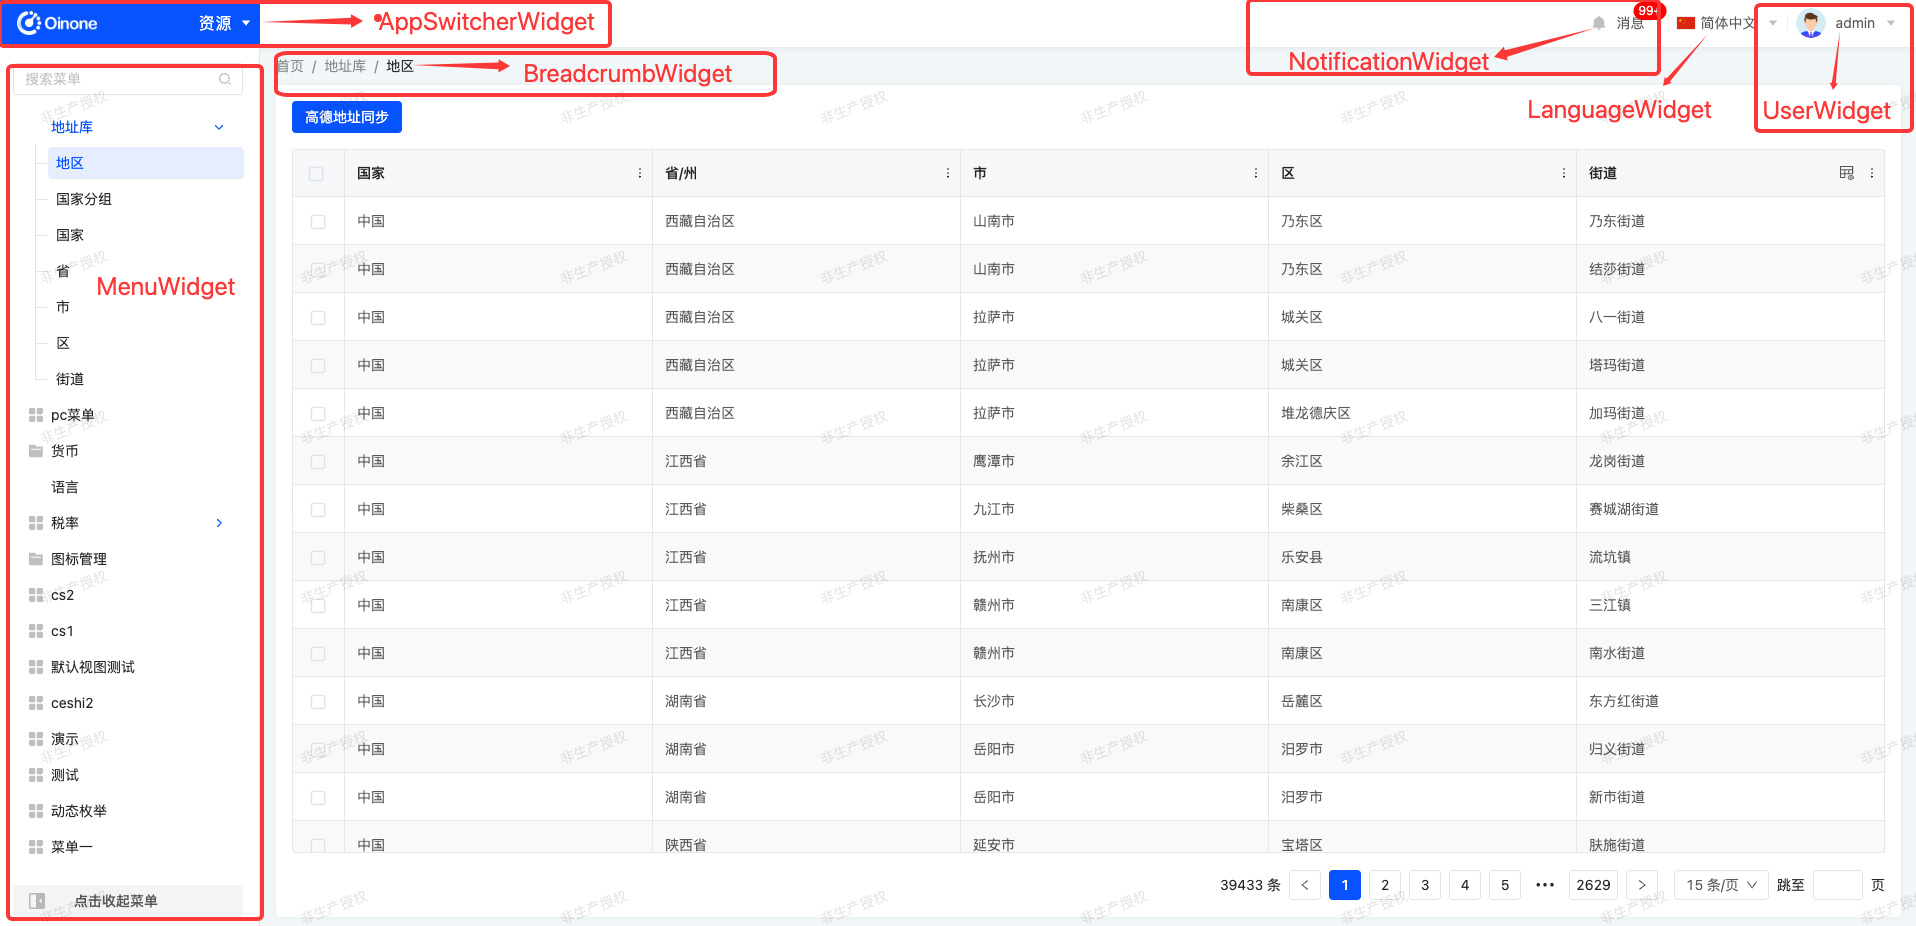
Mask默认组件

前端 快速查询并替换默认组件

重写Mask组件

重写AppSwitcherWidget
import Com from './com.vue'
/**
* SPI注册条件保持根 AppSwitcherWidget 一致,即可覆盖
*/
@SPI.ClassFactory(
  MaskWidget.Token({
    widget: 'app-switcher'
  })
)
export class CustomAppSwitcherWidget extends AppSwitcherWidget {
  /**
  * 如果需要重写vue组件,那么可以通过重写initialize方法来实现,如果是修改数据或者逻辑,那么可以删除这个函数
  */
  public initialize(props: any) {
    super.initialize(props);
    this.setComponent(Com)
    return this
  }
}
重写 MenuWidget
import Com from './com.vue'

/**
* SPI注册条件保持根 MenuWidget 一致,即可覆盖
*/
@SPI.ClassFactory(MaskWidget.Token({ widget: 'nav-menu' }))
export class CustomMenuWidget extends MenuWidget {
  /**
  * 如果需要重写vue组件,那么可以通过重写initialize方法来实现,如果是修改数据或者逻辑,那么可以删除这个函数
  */
  public initialize(props: any) {
    super.initialize(props);
    this.setComponent(Com)
    return this
  }
}
重写 NotificationWidget
import Com from './com.vue'

/**
* SPI注册条件保持根 NotificationWidget 一致,即可覆盖
*/
@SPI.ClassFactory(MaskWidget.Token({ widget: 'notification' }))
export class CustomNotificationWidget extends NotificationWidget {
  /**
  * 如果需要重写vue组件,那么可以通过重写initialize方法来实现,如果是修改数据或者逻辑,那么可以删除这个函数
  */
  public initialize(props: any) {
    super.initialize(props);
    this.setComponent(Com)
    return this
  }
}
重写 LanguageWidget
import Com from './com.vue'

/**
* SPI注册条件保持根 LanguageWidget 一致,即可覆盖
*/
@SPI.ClassFactory(MaskWidget.Token({ widget: 'language' }))
export class CustomLanguageWidget extends LanguageWidget {
  /**
  * 如果需要重写vue组件,那么可以通过重写initialize方法来实现,如果是修改数据或者逻辑,那么可以删除这个函数
  */
  public initialize(props: any) {
    super.initialize(props);
    this.setComponent(Com)
    return this
  }
}
重写 UserWidget
import Com from './com.vue'

/**
* SPI注册条件保持根 UserWidget 一致,即可覆盖
*/
@SPI.ClassFactory(MaskWidget.Token({ widget: 'user' }))
export class CustomUserWidget extends UserWidget {
  /**
  * 如果需要重写vue组件,那么可以通过重写initialize方法来实现,如果是修改数据或者逻辑,那么可以删除这个函数
  */
  public initialize(props: any) {
    super.initialize(props);
    this.setComponent(Com)
    return this
  }
}
重写 BreadcrumbWidget
import Com from './com.vue'

/**
* SPI注册条件保持根 BreadcrumbWidget 一致,即可覆盖
*/
@SPI.ClassFactory(MaskWidget.Token({ widget: 'breadcrumb' }))
export class CustomBreadcrumbWidget extends BreadcrumbWidget {
  /**
  * 如果需要重写vue组件,那么可以通过重写initialize方法来实现,如果是修改数据或者逻辑,那么可以删除这个函数
  */
  public initialize(props: any) {
    super.initialize(props);
    this.setComponent(Com)
    return this
  }

视图默认组件

重写 TableWidget(表格视图)

参考文章https://doc.oinone.top/frontend/18386.html

重写 FormWidget(表单视图)

参考文章https://doc.oinone.top/frontend/18386.html

重写 DetailWidget(详情视图)

参考文章https://doc.oinone.top/frontend/18386.html

重写 SearchWidget(搜索区域视图)

参考文章https://doc.oinone.top/frontend/18386.html

重写 GalleryWidget(画廊视图)

参考文章https://doc.oinone.top/frontend/18386.html

字段默认组件

重写字段组件

参考文章https://doc.oinone.top/frontend/18386.html

动作默认组件

前端 快速查询并替换默认组件

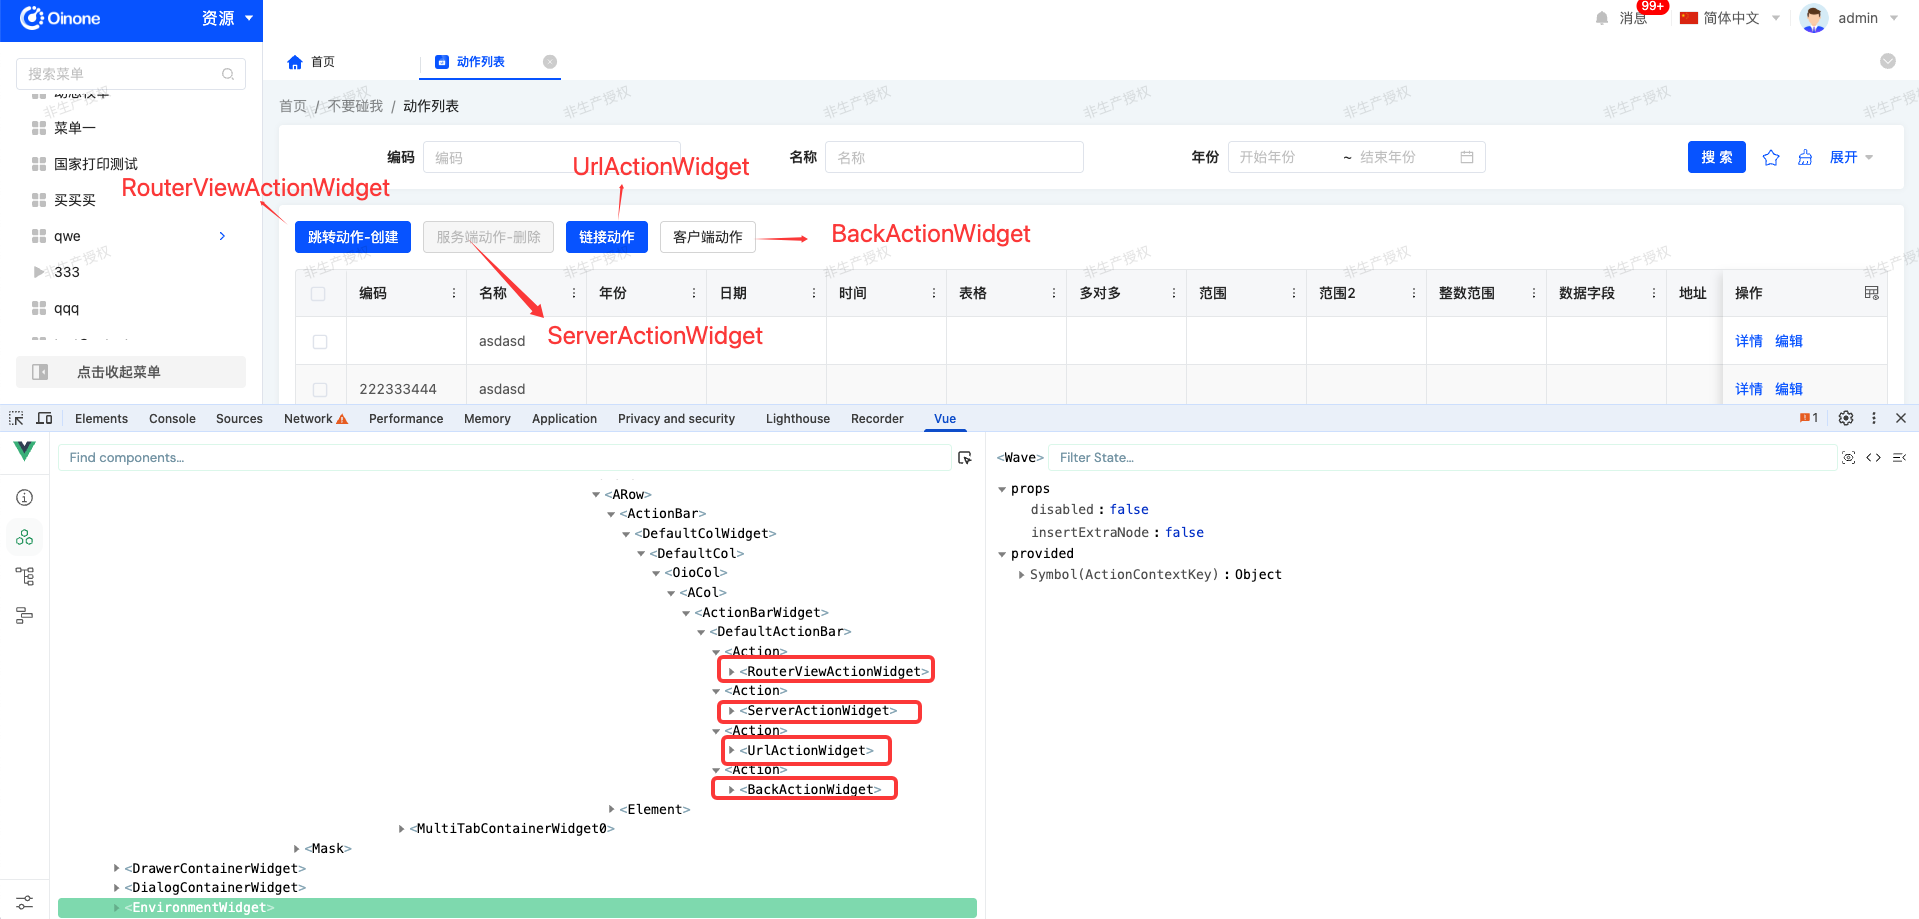
重写 RouterViewActionWidget(路由跳转新视图)
@SPI.ClassFactory(
  ActionWidget.Token({
    actionType: ActionType.View,
    target: ViewActionTarget.Router,
    model: '当前模型编码', // 改成当前动作对应的模型编码(action.model)
    name: '名称' // 当前动作的名称 (action.name)
  })
)
export class CustomRouterViewActionWidget extends RouterViewActionWidget {
  protected async clickAction() {
    return super.clickAction()
  }
}
重写 DialogViewActionWidget(弹窗打开视图)
@SPI.ClassFactory(
  ActionWidget.Token({
    actionType: ActionType.View,
    target: ViewActionTarget.Dialog,
    model: '当前模型编码', // 改成当前动作对应的模型编码(action.model)
    name: '名称' // 当前动作的名称 (action.name)
  })
)
export class CustomDialogViewActionWidget extends DialogViewActionWidget {
  protected async clickAction() {
    return super.clickAction()
  }
}
重写 ServerActionWidget (服务端动作)
@SPI.ClassFactory(
  ActionWidget.Token({
    actionType: ActionType.Server,
    model: '当前模型编码', // 改成当前动作对应的模型编码(action.model)
    name: '名称' // 当前动作的名称 (action.name)
  })
)
export class CustomServerActionWidget extends ServerActionWidget {
  protected async clickAction() {
    return super.clickAction()
  }
}
重写 UrlActionWidget (链接动作)
@SPI.ClassFactory(
  ActionWidget.Token({
    actionType: ActionType.URL,
    model: '当前模型编码', // 改成当前动作对应的模型编码(action.model)
    name: '名称' // 当前动作的名称 (action.name)
  })
)
export class CustomUrlActionWidget extends UrlActionWidget {
  protected async clickAction() {
    return super.clickAction()
  }
重写 客户端动作
@SPI.ClassFactory(
  ActionWidget.Token({
    model: 'resource.k2.Model0000011045', // 改成当前动作对应的模型编码(action.model)
    name: ModelDefaultActionName.$$internal_GotoListTableRouter // name需要取当前动作里面的 fun 属性(action.fun)
  })
)
export class CustomBackActionWidget extends BackActionWidget {
  protected async clickAction() {
    return super.clickAction();
  }
}

Oinone社区 作者:汤乾华原创文章,如若转载,请注明出处:https://doc.oinone.top/other/21531.html

访问Oinone官网:https://www.oinone.top获取数式Oinone低代码应用平台体验

(0)
汤乾华的头像汤乾华数式员工
上一篇 2025年8月13日 pm5:46
下一篇 2025年8月21日 pm2:13

相关推荐

  • 如何实现业务表格跳转页面设计器设计器页面

    后端实现 代理继承界面设计器视图模型 @Model.model(MyView.MODEL_MODEL) @Model(displayName = "视图代理") @Model.Advanced(type = ModelTypeEnum.PROXY) public class MyView extends UiDesignerViewProxy { public static final String MODEL_MODEL = "hr.simple.MyView"; @Field.Integer @Field(displayName = "页面布局ID") private Long uiDesignerViewLayoutId; } 重写查询接口,返回页面布局ID,重写创建接口,实现创建页面逻辑。 package pro.shushi.pamirs.top.core.action; import org.apache.commons.collections4.CollectionUtils; import org.springframework.beans.factory.annotation.Autowired; import org.springframework.stereotype.Component; import pro.shushi.pamirs.boot.base.constants.ViewConstants; import pro.shushi.pamirs.boot.base.enmu.ActionTargetEnum; import pro.shushi.pamirs.boot.base.ux.annotation.action.UxAction; import pro.shushi.pamirs.boot.base.ux.annotation.action.UxRoute; import pro.shushi.pamirs.boot.base.ux.annotation.button.UxRouteButton; import pro.shushi.pamirs.framework.connectors.data.sql.Pops; import pro.shushi.pamirs.framework.connectors.data.sql.query.LambdaQueryWrapper; import pro.shushi.pamirs.meta.annotation.Action; import pro.shushi.pamirs.meta.annotation.Function; import pro.shushi.pamirs.meta.annotation.Model; import pro.shushi.pamirs.meta.api.dto.condition.Pagination; import pro.shushi.pamirs.meta.api.dto.wrapper.IWrapper; import pro.shushi.pamirs.meta.api.session.PamirsSession; import pro.shushi.pamirs.meta.constant.FunctionConstants; import pro.shushi.pamirs.meta.enmu.*; import pro.shushi.pamirs.top.api.model.MyView; import pro.shushi.pamirs.ui.designer.api.designe.UiDesignerViewLayoutService; import pro.shushi.pamirs.ui.designer.model.UiDesignerViewLayout; import pro.shushi.pamirs.ui.designer.pmodel.UiDesignerViewLayoutProxy; import java.util.List; import java.util.Map; import java.util.stream.Collectors; /** * @author Yexiu at 20:39 on 2025/3/27 */ @Component @Model.model(MyView.MODEL_MODEL) public class MyViewAction { @Autowired private UiDesignerViewLayoutService uiDesignerViewLayoutService; @Action.Advanced(name = FunctionConstants.create, managed = true) @Action(displayName = "创建", summary = "添加", bindingType = ViewTypeEnum.FORM) @Function(name = FunctionConstants.create) @Function.fun(FunctionConstants.create) public MyView create(MyView data) { UiDesignerViewLayoutProxy uiDesignerViewLayoutProxy = new UiDesignerViewLayoutProxy(); uiDesignerViewLayoutProxy.setBizType(data.getBizType()); uiDesignerViewLayoutProxy.setDesignerActionBarType(data.getDesignerActionBarType()); uiDesignerViewLayoutProxy.setViewType(data.getType()); uiDesignerViewLayoutProxy.setModel(data.getModel()); uiDesignerViewLayoutProxy.setModule(PamirsSession.getServApp()); uiDesignerViewLayoutProxy.setViewTitle(data.getTitle()); uiDesignerViewLayoutProxy.setUsingDefaultView(data.getLoadLayout()); UiDesignerViewLayoutProxy saveUiDesigner = uiDesignerViewLayoutService.create(uiDesignerViewLayoutProxy); data.setDesignerViewId(saveUiDesigner.getId()); return data; } @Function.Advanced(type = FunctionTypeEnum.QUERY, displayName = "查询列表") @Function.fun(FunctionConstants.queryPage) @Function(openLevel = {FunctionOpenEnum.API, FunctionOpenEnum.LOCAL}) public Pagination<MyView> queryPage(Pagination<MyView> page, IWrapper<MyView> queryWrapper) { LambdaQueryWrapper<MyView> wrapper = Pops.<MyView>lambdaQuery().from(MyView.MODEL_MODEL) .eq(MyView::getSys, Boolean.FALSE) .eq(MyView::getSystemSource, SystemSourceEnum.UI); Pagination<MyView> myViewPagination = new MyView().queryPage(page, wrapper); List<MyView> content…

    2025年3月31日
    41000
  • 模版名称如何翻译

    导出翻译项: mutation { excelExportTaskMutation { createExportTask( data: { workbookDefinition: { model: "file.ExcelWorkbookDefinition" name: "excelLocationTemplate" } } ) { name } } } { "path": "/file", "lang": "en-US" } 导入翻译项: mutation { excelImportTaskMutation { createImportTask( data: { workbookDefinition: { model: "file.ExcelWorkbookDefinition" name: "excelLocationTemplate" } file: { url: "https://minio.oinone.top/pamirs/upload/zbh/test/2024/06/03/导出国际化配置模板_1717390304285_1717391684633.xlsx" } } ) { name } } } PS:导入自行修改url进行导入

    2025年2月7日
    59000
  • 外部系统接入SSO-OAuth2(6.3.x 之后版本支持)

    一、概述 统一身份认证系统提供了单点登录功能。本文档详述了统一身份认证系统单点登录接口,介绍了应用系统对接统一身份认证系统的过程和方法,用以帮助开发人员将应用系统接入统一身份认证系统。 本文档支持的协议:OAuth2 二、统一认证集成规范 2.1 SSO登录场景 序号 场景 预期结果 确认 1 登录跳转,在未登录的条件下,直接访问业务系统 跳转到单点登录界面 是 2 登录跳转,在已登录的条件下,直接访问业务系统 直接进入业务系统 是 3 正常登录,先登录认证,然后访问业务系统 直接进入业务系统 是 4 正常登出,在单点登录系统登出 访问业务系统要重新登录 是 5 正常登出,在业务系统登出 单点登录系统同步登出 是 2.2 认证流程 OAuth2 登录和认证流程 后端验证 token 后,创建本地会话(如 JSESSIONID 或自定义 Cookie); 后续应用请求靠本地会话维持登录状态,不再依赖原始 token; 本地会话有过期时间(如 30 分钟无操作过期); 三、认证服务接口 3.1 SSO服务端认证 浏览器登录 分类 说明 请求地址(开发环境) http://${host}:${port}/pamirs/sso/auth?client_id={client_id}&redirect_uri={redirect_uri}&state={state} 请求地址(测试环境) http://${host}:${port}/pamirs/sso/auth?client_id={client_id}&redirect_uri={redirect_uri}&state={state} 请求方式 GET 请求参数 redirect_uri:应用系统回调地址client_id:SSO 服务端颁发的应用 IDstate:可选但推荐,用于防止 CSRF 的随机字符串(UUID 随机码) 请求示例 http://${host}:${port}/pamirs/sso/auth?client_id=client123456&redirect_rui=http://app.example.com&state=abc123 响应说明 1. 已登录:重定向到 redirect 地址并携带授权码 code,如 http://app.example.com&state=abc123&code=xxx2. 未登录:重定向到服务器 SSO 登录地址 备注 SSO 登录成功后,会携带授权码并重定向到 redirect 地址 3.2 验证授权码 分类 说明 请求地址(开发环境) http://${host}:${port}/pamirs/sso/oauth2/authorize 请求地址(测试环境) http://${host}:${port}/pamirs/sso/oauth2/authorize 请求方式 POST 请求 Body {"grant_type":"authorization_code","client_id":"xxxx","client_secret":"xxxxx","code":"xxxx"} 请求示例 http://${host}:${port}/pamirs/sso/oauth2/authorize 响应说明 {"code":"0","msg":"成功","data":{"access_token":"xxxxx","expires_in":7200,"refresh_token":"xxxxxx","refresh_token_expiresIn":604800}} 备注 — 3.2 根据token获取用户信息 分类 说明 请求地址(开发环境) http://${host}:${port}/pamirs/sso/oauth2/getUserInfo 请求地址(测试环境) http://${host}:${port}/pamirs/sso/oauth2/getUserInfo 请求方式 POST 请求头 Authorization: Bearer xxxxxxxx 请求 Body {"client_id":"xxxx"} 请求示例 http://${host}:${port}/pamirs/sso/oauth2/getUserInfo 响应 {"code":"0","msg":"成功","data":{"name":"xxxxx","email":"xxxxx","login":"xxxxxx","id":"xxxxxxx"}} 备注 成功返回用户信息;失败返回错误码:1 根据实际情况其他协议的验证接口 3.3 单点登出接口 分类 说明 请求地址(开发环境) http://${host}:${port}/pamirs/sso/oauth2/logout 请求地址(测试环境) http://${host}:${port}/pamirs/sso/oauth2/logout 请求方式 POST 请求头 Authorization: Bearer xxxxxxxx 请求 Body {"client_id":"xxxx"} 请求示例 http://${host}:${port}/pamirs/sso/oauth2/logout 响应头 HTTP/1.1 200;Content-Type: application/html;charset=UTF-8 响应体 登出成功页面 备注 应用系统向 SSO 系统发起登出请求,SSO 收到后会通知所有其它系统登出该用户 四、服务注册 添加以下依赖 <!– sso相关 –> <dependency> <groupId>pro.shushi.pamirs.core</groupId> <artifactId>pamirs-sso-api</artifactId> </dependency> <dependency> <groupId>pro.shushi.pamirs.core</groupId> <artifactId>pamirs-sso-common</artifactId> </dependency> <dependency> <groupId>pro.shushi.pamirs.core</groupId> <artifactId>pamirs-sso-server</artifactId> </dependency> 配置文件 pamirs sso: enabled: true server: loginUrl: http://127.0.0.1:8091/login authType:…

    2026年1月7日
    4000
  • 开放应用中的ip黑白名单

    IP白名单配置 入口:集成应用>开放管理>应用>授权调整>IP白名单配置 IP白名单取请求头中的X-Forwarded-For属性的最后一个值,X-Forwarded-For以英文,分割ip地址。 X-Forwarded-For: clientIP, proxy1IP, proxy2IP, …, proxyNIP 根据 RFC 7239 标准所述,X-Forwarded-For含义如下: clientIP:最左边的 IP,表示最初发起请求的客户端 IP(即真实用户 IP)。 proxyXIP:从左往右依次为中间各级代理服务器的 IP。 最右边的 IP:表示离当前 Web 服务器最近的一层代理服务器(IP白名单拦截的此IP)。 Nginx配置示例 以Nginx为例,为确保X-Forwarded-For拿到的是真实的IP地址,需要增加配置。 proxy_set_header X-Forwarded-For $proxy_add_x_forwarded_for; IP黑名单配置 入口:集成应用>开放管理>应用>黑名单 取值来源:从请求头 X-Real-IP 中提取客户端 IP。 验证逻辑: 若 X-Real-IP 不存在,直接拦截并返回异常提示:未获取到真实IP地址。 检查提取的 IP 是否在阻止列表中。 相关文章 IP黑白名单实现拦截三方用户

    2025年5月15日
    38400
  • Oinone 初级学习路径

    文档说明 文档链接 介绍Oinone前端相关知识点 前端基础学习路径 介绍Oinone后端相关知识点 后端基础学习路径 介绍平台基础组件 平台基础组件 介绍平台设计器常用场景实操 设计器基础学习路径 设计器实操案例示例 7.2 实战训练(积分发放)

    2024年6月15日
    1.0K00

Leave a Reply

登录后才能评论