自定义视图内部渲染动态视图

效果图

自定义视图内部渲染动态视图

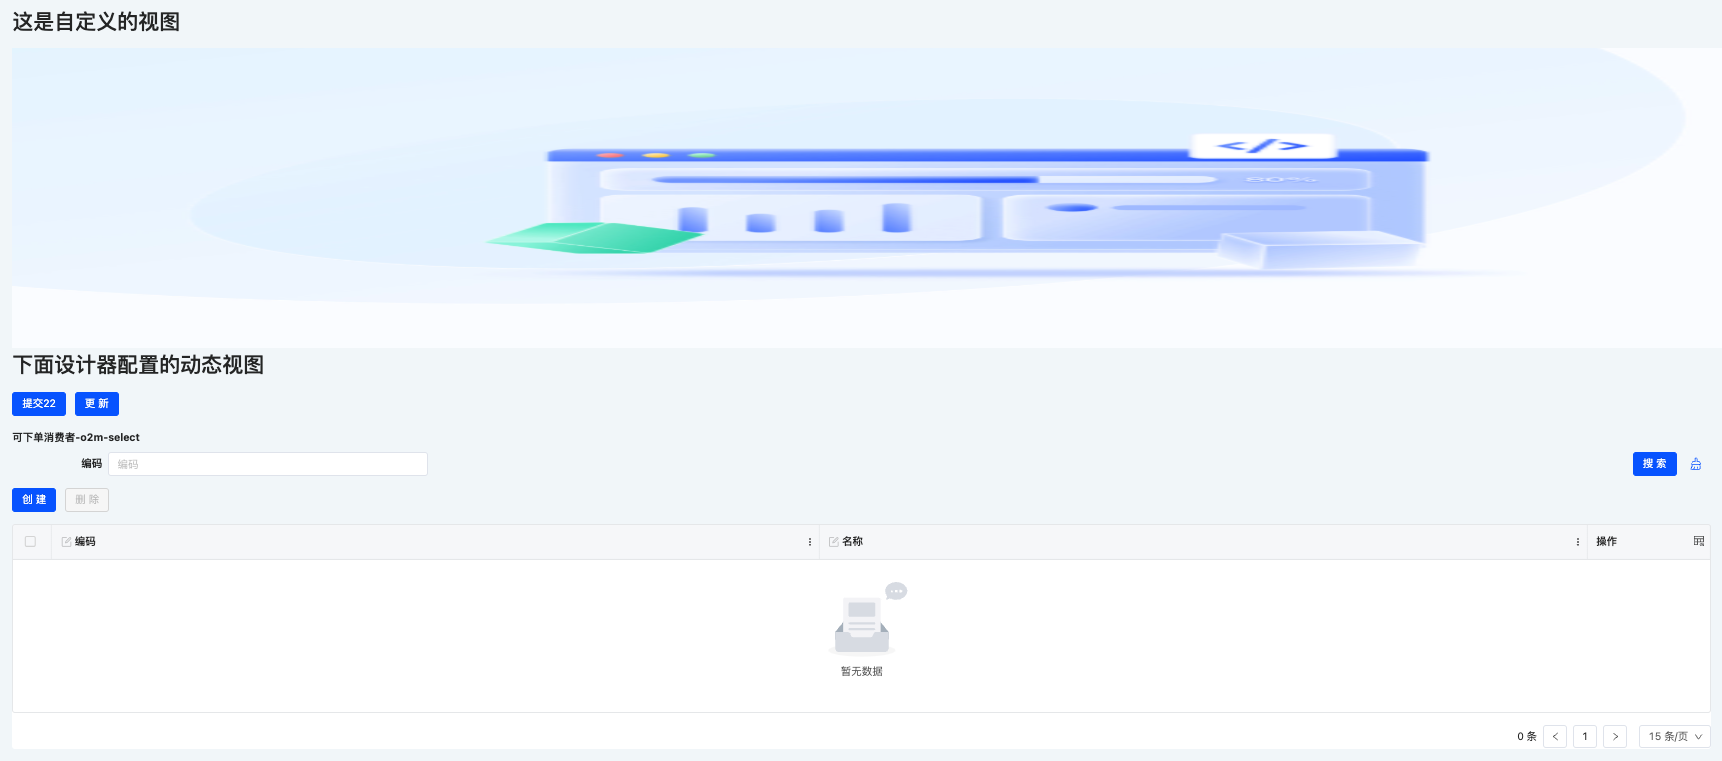
当前图片中,上方是自定义的视图,下方是动态的表单视图

代码

步骤拆分:
1: 通过注册 layout 的方式先自定义视图,把自己的业务逻辑写完
2: 在对应的 vue 文件里面定义一个插槽,用来放置动态的表单视图
3: 在组件挂在的时候,创建动态视图

1: 注册 layout

// registry.ts

import { registerLayout, ViewType } from '@kunlun/dependencies';

registerLayout(
  `<view type="FORM">
    <element widget="actionBar" slot="actionBar" slotSupport="action">
        <xslot name="actions" slotSupport="action" />
    </element>
    <element widget="CustomViewWidget"></element>
</view>`,
  {
    model: '模型编码',
    actionName: '动作名称',
    viewType: ViewType.Form
  }
);

2: vue 里面定义 slot

<!--CustomView.vue -->

<template>
  <div>
    <h1>这是自定义的视图</h1>
    <img
      src="https://pamirs.oss-cn-hangzhou.aliyuncs.com/oinone/static/images/login_bg_left.jpg"
      height="400"
      width="2600"
      alt=""
    />
    <h1>下面设计器配置的动态视图</h1>
    <slot name="dynamicView"></slot>
  </div>
</template>
<script lang="ts">
import { defineComponent } from 'vue';
export default defineComponent({
});
</script>

3: 组件挂载的时候,创建动态视图

// CustomViewWidget.ts

import {
  SPI,
  BaseElementWidget,
  ViewType,
  ViewCache,
  Widget,
  MetadataViewWidget,
  BaseView,
  TableView,
  FormView,
  FormWidget,
  registerLayout,
  DetailView,
  DetailWidget,
  isRelation2MField,
  customQuery,
  FormFieldWidget
} from '@kunlun/dependencies';
import CustomView from './CustomView.vue';
import { delay } from 'lodash-es';

@SPI.ClassFactory(
  BaseElementWidget.Token({
    viewType: ViewType.Form,
    widget: 'CustomViewWidget'
  })
)
export class CustomViewWidgetWidget extends BaseElementWidget {
  public initialize(props) {
    super.initialize(props);
    this.setComponent(CustomView);
    return this;
  }

  /**
   * 定义一个属性,用来存储动态视图
   */
  private metadataViewWidget: MetadataViewWidget | undefined;

  /**
   * 获取动态视图的数据
   */
  @Widget.Method()
  private getWidgetData() {
    const children = this.metadataViewWidget?.getChildrenInstance() as BaseView[];
    const child = children[0];

    if (child) {
      return child instanceof TableView ? child.getCurrentDataSource() : child.getCurrentActiveRecords();
    }

    return null;
  }

  /**
   * 触发表单校验
   */
  @Widget.Method()
  private async executeValidate() {
    const children = this.metadataViewWidget?.getChildrenInstance() as BaseView[];
    const child = children[0];
    if (child && child instanceof FormView) {
      const formWidget = child.getChildrenInstance().find((chi) => chi instanceof FormWidget) as FormWidget;

      // 校验
      const rst = await formWidget?.validator();

      return rst;
    }

    return true;
  }

  /**
   * 加载表单视图中字段表格的数据
   */
    private reloadFormX2MFieldData(widget: BaseView, rootData) {
    const formWidget = widget.getChildrenWidget().find((w) => w instanceof FormWidget) as FormWidget;
    if (formWidget) {
      const x2mWidgets = formWidget.getFieldWidgets(true).filter((v) => isRelation2MField(v.field)) as any[];
      for (const widget of x2mWidgets) {
        widget.mountedProcess?.();
        (widget as FormFieldWidget)?.reloadRootData(rootData);
      }
    }
  }

  /**
   * 加载详情视图中字段表格的数据
   */
  private reloadDetailViewData(widget: DetailView, data: any) {
    const detailWidget = widget.getChildrenWidget().find((w) => w instanceof DetailWidget) as DetailWidget;

    if (detailWidget) {
      // 加载详情页数据
      detailWidget.reloadActiveRecords(data);

      // 获取详情页的2M关系字段组件
      const x2mWidgets = detailWidget.getFieldWidgets(true).filter((v) => isRelation2MField(v.field)) as any[];

      for (const widget of x2mWidgets) {
        if (widget.refreshValueProcess) {
          widget.isDataSourceProvider = true;
          widget.refreshValueProcess?.();
        }
      }
    }
  }

  /**
   * 初始化的时候,创建动态视图
   */
  mounted() {
    this.createFormWidget();
  }

  public async createFormWidget() {
    this.load(async () => {
      // 如果视图已经存在,那么先销毁,防止多次创建
      if (this.metadataViewWidget) {
        this.metadataViewWidget.dispose();
        this.metadataViewWidget = undefined;
      }

      // 根据 模型编码 + 视图名称获取设计器配置的视图
      const view = await ViewCache.get(
        'resource.k2.Model0000000100', // 模型编码
        '创建跟编辑_FORM_uiViewf927f2785d3c4394a6c26898df2e8c87' // 视图名称
      );

      if (view) {
        /**
         * 调用 this.createWidget创建对应的视图
         * 第一个参数是代表的是视图对应的widget
         * 第二个参数是创建好的视图需要放在哪个插槽里面,对应vue文件里面的slot
         *   如果vue文件里面写的是 <slot name="dynamicView"></slot>, 那么这个参数就是 'dynamicView'
         *   如果vue文件里面写的是 <slot name='customName'></slot>, 那么这个参数就是 'customName'
         *
         * 第三个参数是视图需要的属性配置
         */

        this.metadataViewWidget = this.createWidget(MetadataViewWidget, 'dynamicView', {
          metadataHandle: this.metadataHandle,
          rootHandle: this.rootHandle,
          internal: true,
          inline: true,
          automatic: true
        });

        // 初始化上下文
        this.metadataViewWidget.initContextByView(view);

        this.forceUpdate();

        // 视图对应的数据源,这里的数据理论上需要通过调用接口获取
        const data = {} as any;
        // const data = await customQuery('resource.k2.Model0000000100', {argumentName: 'query', name: 'queryOne'}, {id: 123}) as any

        delay(async () => {
          const children = this.metadataViewWidget?.getChildrenInstance() as BaseView[];

         if (children.length) {
            const child = children[0]
            // 如果当前视图是表格
            if (child instanceof TableView) {
              await child.refreshCallChaining?.syncCall();
            }  else if (child instanceof DetailView) {  // 如果当前视图是详情
              this.reloadDetailViewData(child, data);
            } else {
                // 如果当前视图是表单
              child.setViewMode(ViewMode.Create);
              child.setCurrentActiveRecords(data);
              this.reloadFormX2MFieldData(child, data);
            }
          }
        }, 100);
      }
    });
  }
}

Oinone社区 作者:汤乾华原创文章,如若转载,请注明出处:https://doc.oinone.top/api-sdk/20763.html

访问Oinone官网:https://www.oinone.top获取数式Oinone低代码应用平台体验

(0)
汤乾华的头像汤乾华数式员工
上一篇 2025年3月24日 pm4:33
下一篇 2025年3月25日 am10:55

相关推荐

  • Nacos做为注册中心:如何调用其他系统的SpringCloud服务?

    Oinone项目引入Nacos作为注册中心,调用外部的SpringCloud服务 Nacos可以做为注册中心,提供给Dubbo和SpringCloud等微服务框架使用。 目前Oinone的底层使用的是Dubbo进行微服务的默认协议调用,但是我们项目如果存在需要调用其他系统提供的SpringCloud服务,Oinone其实并没有限制大家去这么写代码。 可以参考Nacos或SpringCloud的官方文档,只要不存在Jar包冲突等场景,很多的扩展其实大家都可以使用。 注意!!!Nacos、SpringCloud、SpringCloudAlibaba是有依赖版本严格要求的:点击查看 具体示例: 一、项目中增加依赖 主pom引入兼容的版本: <dependencyManagement> <dependency> <groupId>com.alibaba.cloud</groupId> <artifactId>spring-cloud-alibaba-dependencies</artifactId> <version>2.2.7.RELEASE</version> <!– 目前兼容的版本 –> <type>pom</type> <scope>import</scope> </dependency> </dependencyManagement> 使用模块的pom引入依赖: <dependency> <groupId>com.alibaba.cloud</groupId> <artifactId>spring-cloud-starter-alibaba-nacos-discovery</artifactId> </dependency> <dependency> <groupId>org.springframework.cloud</groupId> <artifactId>spring-cloud-starter-openfeign</artifactId> </dependency> 二、 配置 application.yml spring: cloud: nacos: discovery: server-addr: localhost:8848 username: nacos password: nacos 三、启动类添加注解 @EnableDiscoveryClient @EnableFeignClients public class NacosConsumerApplication { public static void main(String[] args) { SpringApplication.run(NacosConsumerApplication.class, args); } } 四、验证 创建 Feign Client 接口 import org.springframework.cloud.openfeign.FeignClient; import org.springframework.web.bind.annotation.GetMapping; @FeignClient(name = "nacos-demo") // 指定目标服务的名称 public interface ProviderClient { @GetMapping("/hello") String hello(); } 创建 Controller 调用 Feign Client @RestController public class ConsumerController { private final ProviderClient providerClient; public ConsumerController(ProviderClient providerClient) { this.providerClient = providerClient; } @GetMapping("/hello") public String hello() { return providerClient.hello(); } } 在浏览器中访问 http://localhost:8082/hello你应该会看到服务提供者返回的响应。

    2024年6月4日
    1.7K00
  • 「前端」动作API

    概述 在 oinone 前端平台中,提供了四种动作 跳转动作(页面跳转、打开弹窗、抽屉) 服务端动作(调用接口) 客户端动作(返回上一页、关闭弹窗等) 链接动作(打开执行的链接) 快速开始 // 基础使用示例 import { executeViewAction, executeServerAction, executeUrlAction } from '@kunlun/dependencies'; // 示例 1: 基础页面跳转(去创建页面) executeViewAction(action); // 示例 2: 带参数的页面跳转(查询ID为123的数据),去编辑、详情页 executeViewAction(action, undefined, undefined, { id: '123' }); // 示例 3: 页面跳转的参数,用最新的,防止当前页面的参数被带到下一个页面 executeViewAction(action, undefined, undefined, { id: '123' , preserveParameter: true}); // 示例 4: 调用服务端接口 const params = { id: 'xxx', name: 'xxx' }; await executeServerAction(action, params); await executeServerAction(action, params, { maxDepth: 2 }); // 接口数据返回的数据层级是3层 -> 从0开始计算, 默认是2层 // 执行链接动作 executeUrlAction(action); API 详解 executeViewAction 参数名 描述 类型 必填 默认值 — action 视图动作 RuntimeViewAction true router 路由实例 Router false undefined matched 路由匹配参数 Matched false undefined extra 扩展参数 object false {} target 规定在何处打开被链接文档(可参考 a 标签的 target) string false undefined executeServerAction 参数名 描述 类型 必填 默认值 ​action 服务端动作 RuntimeServerAction true param 传递给后端的参数 object true context 配置接口返回的数据层级(默认是两层) {maxDepth: number} false executeUrlAction 参数名 描述 类型 必填 默认值 ​action 链接动作 IURLAction true

    2025年3月21日
    48000
  • 两个环境使用同一套用户,但是隔离用户角色的解决方案

    场景: 两套环境中,如果需要公用同一个用户,但是用户关联的角色不想有关联。每个环境都有一个自己的用户角色,则可以参考本文章做配置。 在启动工程的yml文件中,指定auth.UserRoleRel模型的数据源,设计器和业务工程注意保持一致。 pamirs: framework: data: ds-map: user: pamirs auth: pamirs model-ds-map: "[auth.UserRoleRel]": biz 指定biz数据源指向的数据库,业务环境A和业务环境B都使用biz数据源,但指向的数据库要改为不同的,这样,就会把用户角色关系表放到biz指定的不同数据库下,实现了用户角色隔离。 pamirs: datasource: biz: driverClassName: com.mysql.cj.jdbc.Driver type: com.alibaba.druid.pool.DruidDataSource url: jdbc:mysql://127.0.0.1:3306/demo_biz?useSSL=false&allowPublicKeyRetrieval=true&useServerPrepStmts=true&cachePrepStmts=true&useUnicode=true&characterEncoding=utf8&serverTimezone=Asia/Shanghai&autoReconnect=true&allowMultiQueries=true username: root password: 123456 initialSize: 5 maxActive: 200 minIdle: 5 maxWait: 60000 timeBetweenEvictionRunsMillis: 60000 testWhileIdle: true testOnBorrow: false testOnReturn: false poolPreparedStatements: true asyncInit: true 注意事项: 注意两个环境在新增角色时id不能一致。 这样配置需要自行隔离业务工程的角色 如果配置有错误会碰到一些异常,一下列举了可能的一些异常: 点击登录报错:未找到入口应用或去权限访问: 去数据库找auth_user_role_rel这张表,查看里面有没有admin账号关联的角色,如果没有,自己手动新增一条数据,给admin一个管理员角色。参考下图: 启动时执行删表sql或数据库有多个被删除的UserRoleRel表:_d_user_role_rel 检查ds_map的数据源配置,有业务工程没有正确指定ds_map数据源。比如数据源配置不一致。

    2024年12月5日
    58400
  • 自定义表格支持合并或列、表头分组

    本文将讲解如何通过自定义实现表格支持单元格合并和表头分组。 点击下载对应的代码 在学习该文章之前,你需要先了解: 1: 自定义视图2: 自定义视图、字段只修改 UI,不修改数据和逻辑3: 自定义视图动态渲染界面设计器配置的视图、动作 1. 自定义 widget 创建自定义的 MergeTableWidget,用于支持合并单元格和表头分组。 // MergeTableWidget.ts import { BaseElementWidget, SPI, ViewType, TableWidget, Widget, DslRender } from '@kunlun/dependencies'; import MergeTable from './MergeTable.vue'; @SPI.ClassFactory( BaseElementWidget.Token({ viewType: ViewType.Table, widget: 'MergeTableWidget' }) ) export class MergeTableWidget extends TableWidget { public initialize(props) { super.initialize(props); this.setComponent(MergeTable); return this; } /** * 表格展示字段 */ @Widget.Reactive() public get currentModelFields() { return this.metadataRuntimeContext.model.modelFields.filter((f) => !f.invisible); } /** * 渲染行内动作VNode */ @Widget.Method() protected renderRowActionVNodes() { const table = this.metadataRuntimeContext.viewDsl!; const rowAction = table?.widgets.find((w) => w.slot === 'rowActions'); if (rowAction) { return rowAction.widgets.map((w) => DslRender.render(w)); } return null; } } 2. 创建对应的 Vue 组件 定义一个支持合并单元格与表头分组的 Vue 组件。 <!– MergeTable.vue –> <template> <vxe-table border height="500" :column-config="{ resizable: true }" :merge-cells="mergeCells" :data="showDataSource" @checkbox-change="checkboxChange" @checkbox-all="checkedAllChange" > <vxe-column type="checkbox" width="50"></vxe-column> <!– 渲染界面设计器配置的字段 –> <vxe-column v-for="field in currentModelFields" :key="field.name" :field="field.name" :title="field.label" ></vxe-column> <!– 表头分组 https://vxetable.cn/v4.6/#/table/base/group –> <vxe-colgroup title="更多信息"> <vxe-column field="role" title="Role"></vxe-column> <vxe-colgroup title="详细信息"> <vxe-column field="sex" title="Sex"></vxe-column> <vxe-column field="age" title="Age"></vxe-column> </vxe-colgroup> </vxe-colgroup> <vxe-column title="操作" width="120"> <template #default="{ row, $rowIndex }"> <!– 渲染界面设计器配置的行内动作 –> <row-action-render :renderRowActionVNodes="renderRowActionVNodes" :row="row" :rowIndex="$rowIndex" :parentHandle="currentHandle" ></row-action-render> </template> </vxe-column> </vxe-table> <!– 分页 –> <oio-pagination :pageSizeOptions="pageSizeOptions" :currentPage="pagination.current"…

    2025年1月9日
    1.0K00
  • 左树右表默认选择第一行

    import { BaseElementWidget, Widget, SPI, ViewType, TableSearchTreeWidget } from '@kunlun/dependencies'; @SPI.ClassFactory( BaseElementWidget.Token({ viewType: ViewType.Table, widget: 'tree', model: '改成当前视图的模型' }) ) export class CustomTableSearchTreeWidget extends TableSearchTreeWidget { protected hasExe = false; @Widget.Watch('rootNode.children.length') protected watchRootNode(len) { if (len && !this.hasExe) { this.hasExe = true; const firstChild = this.rootNode?.children?.[0]; if (firstChild) { this.onNodeSelected(firstChild); this.selectedKeys = [firstChild.key]; } } } }

    2024年11月26日
    1.0K00

Leave a Reply

登录后才能评论