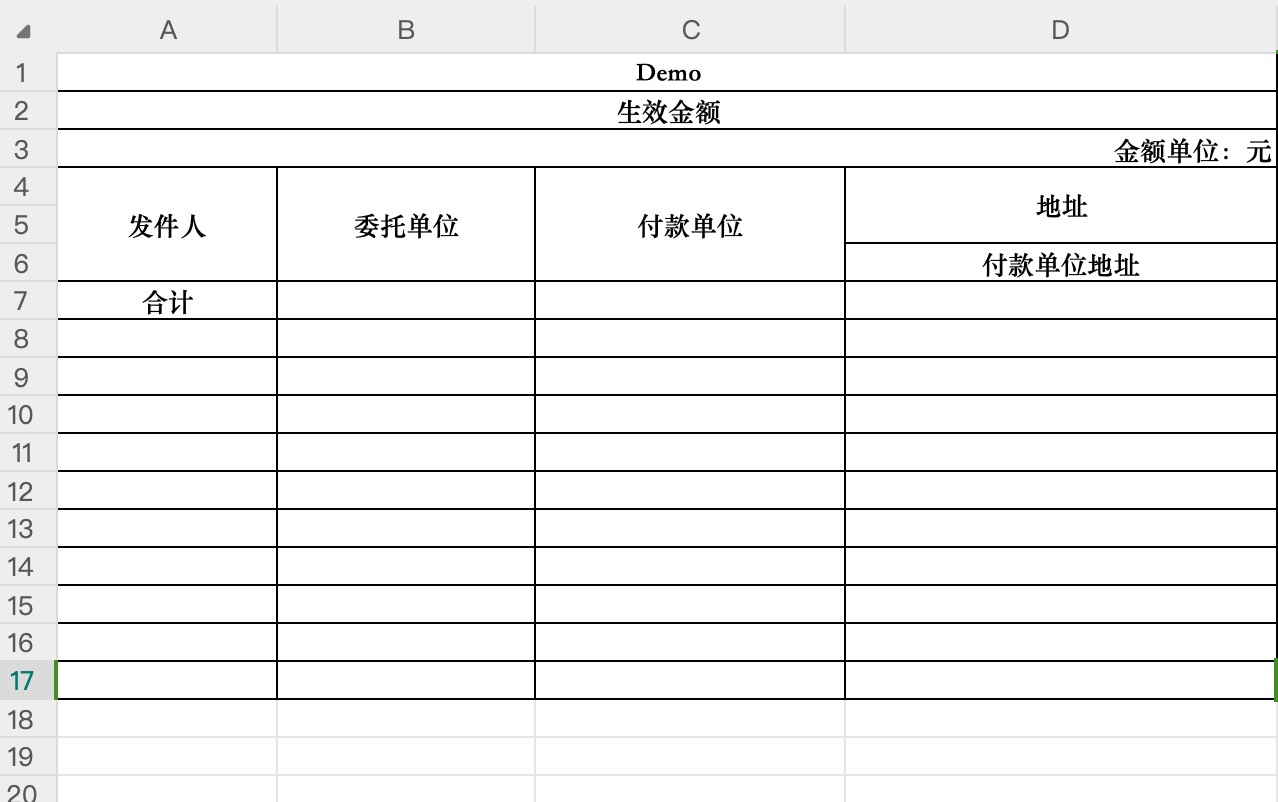
复杂Excel模版定义

模版示例:
复杂Excel模版定义

Demo Excel样例

代码示例:

@Model.model(TestApply.MODEL_MODEL)
@Model(displayName = "测试申请")
public class TestApply extends IdModel {

    public static final String MODEL_MODEL = "top.TestApply";

    @Field.String
    @Field(displayName = "发件人")
    private String addresser;

    @Field.String
    @Field(displayName = "委托单位")
    private String entrustedUnit;

    @Field.String
    @Field(displayName = "付款单位")
    private String payer;

    @Field.String
    @Field(displayName = "付款单位地址")
    private String paymentUnitAdd;
}

模版:

package pro.shushi.pamirs.top.core.temp;

import org.springframework.stereotype.Component;
import pro.shushi.pamirs.file.api.builder.SheetDefinitionBuilder;
import pro.shushi.pamirs.file.api.builder.WorkbookDefinitionBuilder;
import pro.shushi.pamirs.file.api.enmu.ExcelAnalysisTypeEnum;
import pro.shushi.pamirs.file.api.enmu.ExcelDirectionEnum;
import pro.shushi.pamirs.file.api.enmu.ExcelHorizontalAlignmentEnum;
import pro.shushi.pamirs.file.api.model.ExcelWorkbookDefinition;
import pro.shushi.pamirs.file.api.util.ExcelHelper;
import pro.shushi.pamirs.file.api.util.ExcelTemplateInit;
import pro.shushi.pamirs.top.api.model.TestApply;

import java.util.Collections;
import java.util.List;

@Component
public class DemoTemplate implements ExcelTemplateInit {

    public static final String TEMPLATE_NAME = "DemoTemplate";

    @Override
    public List<ExcelWorkbookDefinition> generator() {
        WorkbookDefinitionBuilder builder = WorkbookDefinitionBuilder.newInstance(TestApply.MODEL_MODEL, TEMPLATE_NAME)
                .setDisplayName("测试Demo");

        DemoTemplate.createSheet(builder);

        return Collections.singletonList(builder.build());
    }

    private static void createSheet(WorkbookDefinitionBuilder builder) {
        SheetDefinitionBuilder sheetBuilder = builder.createSheet().setName("测试Demo");

        buildBasicInfo(sheetBuilder);

    }

    private static void buildBasicInfo(SheetDefinitionBuilder builder) {
        //A1:D8:表示表头占的单元格数,范围必须大于实际表头行
        BlockDefinitionBuilder mergeRange = builder.createBlock(TestApply.MODEL_MODEL, ExcelAnalysisTypeEnum.FIXED_HEADER, ExcelDirectionEnum.HORIZONTAL, "A1:D8")
                //预设行
                .setPresetNumber(10)
                //合并哪几个单元格
                .createMergeRange("A1:D1")
                .createMergeRange("A2:D2")
                .createMergeRange("A3:D3")
                .createMergeRange("A4:A6")
                .createMergeRange("B4:B6")
                .createMergeRange("C4:C6")
                .createMergeRange("D4:D5");

                //createHeader创建行,createCell创建单元格,setField指定解析字段,setIsConfig指定为true标记该行是需要解析的值
                mergeRange.createHeader().setStyleBuilder(ExcelHelper.createDefaultStyle()).setIsConfig(Boolean.TRUE)
                .createCell().setField("addresser").setStyleBuilder(ExcelHelper.createDefaultStyle().setWidth(6000)).and()
                .createCell().setField("entrustedUnit").and()
                .createCell().setField("payer").and()
                .createCell().setField("paymentUnitAdd").and()
                .and()

                .createHeader().setStyleBuilder(ExcelHelper.createDefaultStyle(typeface -> typeface.setBold(Boolean.TRUE)).setHorizontalAlignment(ExcelHorizontalAlignmentEnum.CENTER))
                .createCell().setValue("Demo").and()
                .createCell().and()
                .createCell().and()
                .createCell().and()
                .and()

                //由于该行合并为一个单元格,所以其他可以不设置value
                .createHeader().setStyleBuilder(ExcelHelper.createDefaultStyle(typeface -> typeface.setBold(Boolean.TRUE)).setHorizontalAlignment(ExcelHorizontalAlignmentEnum.CENTER))
                .createCell().setValue("生效金额").and()
                .createCell().and()
                .createCell().and()
                .createCell().and()
                .and()

                .createHeader().setStyleBuilder(ExcelHelper.createDefaultStyle(typeface -> typeface.setBold(Boolean.TRUE)).setHorizontalAlignment(ExcelHorizontalAlignmentEnum.RIGHT))
                .createCell().setValue("金额单位:元").and()
                .createCell().and()
                .createCell().and()
                .createCell().and()
                .and()

                //easyExcel解析不了空行,所以这里写上值。由于上面使用createMergeRange把单元格合并了,并且D列有分割,这里填上每个单元格的值,把合并的单元格填为一样的。
                .createHeader().setStyleBuilder(ExcelHelper.createDefaultStyle(typeface -> typeface.setBold(Boolean.TRUE)).setHorizontalAlignment(ExcelHorizontalAlignmentEnum.CENTER))
                .createCell().setValue("发件人").and()
                .createCell().setValue("委托单位").and()
                .createCell().setValue("付款单位").and()
                .createCell().setValue("地址").and()
                .and()
                .createHeader().setStyleBuilder(ExcelHelper.createDefaultStyle(typeface -> typeface.setBold(Boolean.TRUE)).setHorizontalAlignment(ExcelHorizontalAlignmentEnum.CENTER))
                .createCell().setValue("发件人").and()
                .createCell().setValue("委托单位").and()
                .createCell().setValue("付款单位").and()
                .createCell().setValue("付款单位地址").and()
                .and()

                .createHeader().setStyleBuilder(ExcelHelper.createDefaultStyle(typeface -> typeface.setBold(Boolean.TRUE)).setHorizontalAlignment(ExcelHorizontalAlignmentEnum.CENTER))
                .createCell().setValue("合计").and()
                .createCell().and()
                .createCell().and()
                .createCell();
    }

}

注意:链式调用不可以太长,如果太长可以使用参数接一下,否则在编译时可能会导致栈溢出。

Oinone社区 作者:yexiu原创文章,如若转载,请注明出处:https://doc.oinone.top/dai-ma-shi-jian/19462.html

访问Oinone官网:https://www.oinone.top获取数式Oinone低代码应用平台体验

(1)
yexiu的头像yexiu数式员工
上一篇 2024年11月14日 am10:11
下一篇 2024年11月19日 pm10:23

相关推荐

  • 查询时自定义排序字段和排序规则

    指定字段排序 平台默认排序字段,参考IdModel,按创建时间和ID倒序(ordering = "createDate DESC, id DESC") 方法1:模型指定排序 模型定义增加排序字段。@Model.Advanced(ordering = "xxxxx DESC, yyyy DESC") @Model.model(PetShop.MODEL_MODEL) @Model(displayName = "宠物店铺",summary="宠物店铺",labelFields ={"shopName"}) @Model.Code(sequence = "DATE_ORDERLY_SEQ",prefix = "P",size=6,step=1,initial = 10000,format = "yyyyMMdd") @Model.Advanced(ordering = "createDate DESC") public class PetShop extends AbstractDemoIdModel { public static final String MODEL_MODEL="demo.PetShop"; // ………… } 方法2:Page查询中可以自定排序规则 API参考 pro.shushi.pamirs.meta.api.dto.condition.Pagination#orderBy public <G, R> Pagination<T> orderBy(SortDirectionEnum direction, Getter<G, R> getter) { if (null == getSort()) { setSort(new Sort()); } getSort().addOrder(direction, getter); return this; } 具体示例 @Function.Advanced(type= FunctionTypeEnum.QUERY) @Function.fun(FunctionConstants.queryPage) @Function(openLevel = {FunctionOpenEnum.API}) public Pagination<PetShop> queryPage(Pagination<PetShop> page, IWrapper<PetShop> queryWrapper){ page.orderBy(SortDirectionEnum.DESC, PetShop::getCreateDate); page = new PetShop().queryPage(page, queryWrapper); return page; } 方法3:查询的wapper中指定 API参考:pro.shushi.pamirs.framework.connectors.data.sql.AbstractWrapper#orderBy @Override public Children orderBy(boolean condition, boolean isAsc, R… columns) { if (ArrayUtils.isEmpty(columns)) { return typedThis; } SqlKeyword mode = isAsc ? ASC : DESC; for (R column : columns) { doIt(condition, ORDER_BY, columnToString(column), mode); } return typedThis; } 具体示例 public List<PetShop> queryList(String name) { List<PetShop> petShops = Models.origin().queryListByWrapper( Pops.<PetShop>lambdaQuery().from(PetShop.MODEL_MODEL) .orderBy(true, true, PetShop::getCreateDate) .orderBy(true, true, PetShop::getId) .like(PetShop::getShopName, name)); return petShops; } 设置查询不排序 方法1:关闭平台默认排序字段,设置模型的ordering,改成:ordering = "1=1" 模型定义增加排序字段。@Model.Advanced(ordering = "1=1") @Model.model(PetShop.MODEL_MODEL) @Model(displayName = "宠物店铺",summary="宠物店铺",labelFields ={"shopName"}) @Model.Code(sequence = "DATE_ORDERLY_SEQ",prefix = "P",size=6,step=1,initial = 10000,format = "yyyyMMdd") @Model.Advanced(ordering =…

    2024年5月25日
    1.5K00
  • 自定义表格支持合并或列、表头分组

    本文将讲解如何通过自定义实现表格支持单元格合并和表头分组。 点击下载对应的代码 在学习该文章之前,你需要先了解: 1: 自定义视图2: 自定义视图、字段只修改 UI,不修改数据和逻辑3: 自定义视图动态渲染界面设计器配置的视图、动作 1. 自定义 widget 创建自定义的 MergeTableWidget,用于支持合并单元格和表头分组。 // MergeTableWidget.ts import { BaseElementWidget, SPI, ViewType, TableWidget, Widget, DslRender } from '@kunlun/dependencies'; import MergeTable from './MergeTable.vue'; @SPI.ClassFactory( BaseElementWidget.Token({ viewType: ViewType.Table, widget: 'MergeTableWidget' }) ) export class MergeTableWidget extends TableWidget { public initialize(props) { super.initialize(props); this.setComponent(MergeTable); return this; } /** * 表格展示字段 */ @Widget.Reactive() public get currentModelFields() { return this.metadataRuntimeContext.model.modelFields.filter((f) => !f.invisible); } /** * 渲染行内动作VNode */ @Widget.Method() protected renderRowActionVNodes() { const table = this.metadataRuntimeContext.viewDsl!; const rowAction = table?.widgets.find((w) => w.slot === 'rowActions'); if (rowAction) { return rowAction.widgets.map((w) => DslRender.render(w)); } return null; } } 2. 创建对应的 Vue 组件 定义一个支持合并单元格与表头分组的 Vue 组件。 <!– MergeTable.vue –> <template> <vxe-table border height="500" :column-config="{ resizable: true }" :merge-cells="mergeCells" :data="showDataSource" @checkbox-change="checkboxChange" @checkbox-all="checkedAllChange" > <vxe-column type="checkbox" width="50"></vxe-column> <!– 渲染界面设计器配置的字段 –> <vxe-column v-for="field in currentModelFields" :key="field.name" :field="field.name" :title="field.label" ></vxe-column> <!– 表头分组 https://vxetable.cn/v4.6/#/table/base/group –> <vxe-colgroup title="更多信息"> <vxe-column field="role" title="Role"></vxe-column> <vxe-colgroup title="详细信息"> <vxe-column field="sex" title="Sex"></vxe-column> <vxe-column field="age" title="Age"></vxe-column> </vxe-colgroup> </vxe-colgroup> <vxe-column title="操作" width="120"> <template #default="{ row, $rowIndex }"> <!– 渲染界面设计器配置的行内动作 –> <row-action-render :renderRowActionVNodes="renderRowActionVNodes" :row="row" :rowIndex="$rowIndex" :parentHandle="currentHandle" ></row-action-render> </template> </vxe-column> </vxe-table> <!– 分页 –> <oio-pagination :pageSizeOptions="pageSizeOptions" :currentPage="pagination.current"…

    2025年1月9日
    1.1K00
  • 如何在代码中使用自增ID和获取序列

    在使用继承IDModel或CodeModel时,id和code是系统默认自动生成, 默认值规则:ID–>分布式ID; CODE–>根据定义的SequenceConfig规则自动生成。 在特定情况下需要落库前先生成ID或者Code,这些场景下可参照如下代码示例 一、使用自增ID 单个字段设置方式 // 主键字段,可以使用mysql的自增能力 @Field.Integer @Field.PrimaryKey(keyGenerator = KeyGeneratorEnum.AUTO_INCREMENT) @Field.Advanced(batchStrategy = FieldStrategyEnum.NEVER) @Field(displayName = "id", summary = "Id字段,⾃增") private Long id; @Field.Integer @Field(displayName = "自增版本") @Field.Sequence(sequence = "SEQ", initial = 1) private Long version; 全局设置方式 该方式会作用到每一个存储模型的id字段,在application.yml配置文件中修改id的生成规则,查找配置项关键字key-generator,默认为DISTRIBUTION(分布式id),可修改为 AUTO_INCREMENT(自增id) 二、手动方式获取序列 获取方式示例1 /** * 在特定场景下需要手动生成Id或者code时,可参照这个示例 */ public void manualSetIdCode(){ DemoItem demoItem = new DemoItem(); //手动生成ID和code Object idObj = Spider.getDefaultExtension(IdGenerator.class).generate(PamirsTableInfo.fetchKeyGenerator(DemoItem.MODEL_MODEL)); demoItem.setId(TypeUtils.createLong(idObj)); Object codeObj = CommonApiFactory.getSequenceGenerator().generate("SEQ",DemoItem.MODEL_MODEL); String code = TypeUtils.stringValueOf(codeObj); demoItem.setCode(code); //…… } 获取方式示例2 1、在系统启动的时候初始化SequenceConfig package pro.shushi.pamirs.demo.core.init; import org.springframework.stereotype.Component; import pro.shushi.pamirs.boot.common.api.command.AppLifecycleCommand; import pro.shushi.pamirs.boot.common.extend.MetaDataEditor; import pro.shushi.pamirs.core.common.InitializationUtil; import pro.shushi.pamirs.demo.api.DemoModule; import pro.shushi.pamirs.demo.core.constant.SeqConstants; import pro.shushi.pamirs.meta.annotation.fun.extern.Slf4j; import pro.shushi.pamirs.meta.api.dto.meta.Meta; import pro.shushi.pamirs.meta.enmu.SequenceEnum; import java.util.Map; /** * DemoMetadataEditor */ @Slf4j @Component public class DemoMetadataEditor implements MetaDataEditor { @Override public void edit(AppLifecycleCommand command, Map<String, Meta> metaMap) { InitializationUtil util = InitializationUtil.get(metaMap, DemoModule.MODULE_MODULE, DemoModule.MODULE_NAME); if (util == null) { log.error("获取初始化序列失败"); return; } bizSequence(util); } private void bizSequence(InitializationUtil util) { util.createSequenceConfig("申请单编码生成", SeqConstants.NABEL_SAMPLE_APPLY_SEQ, SequenceEnum.ORDERLY_SEQ, 8) .setStep(1) .setInitial(80000000L) .setIsRandomStep(false); util.createSequenceConfig("订单编码生成", SeqConstants.NABEL_SAMPLE_ORDER_SEQ_YP, SequenceEnum.ORDERLY_SEQ, 8) .setPrefix("YP") .setStep(1) .setInitial(80000000L) .setIsRandomStep(false); } } 2、在代码中使用序列 public static String getSaleOrderCode() { Object sequence = CommonApiFactory.getSequenceGenerator().generate(SequenceEnum.ORDERLY_SEQ.value(), SeqConstants.NABEL_SAMPLE_STRUCTURE_SEQ); return TypeUtils.stringValueOf(sequence); } public static String getApplyOrderCode(String prefix) { Object sequence = CommonApiFactory.getSequenceGenerator().generate(SequenceEnum.ORDERLY_SEQ.value(), SeqConstants.NABEL_SAMPLE_APPLY_SEQ); return…

    2024年5月25日
    1.6K00
  • 如何使用位运算的数据字典

    场景举例 日常有很多项目,数据库中都有表示“多选状态标识”的字段。在这里用我们项目中的一个例子进行说明一下: 示例一: 表示某个商家是否支持多种会员卡打折(如有金卡、银卡、其他卡等),项目中的以往的做法是:在每条商家记录中为每种会员卡建立一个标志位字段。如图: 用多字段来表示“多选标识”存在一定的缺点:首先这种设置方式很明显不符合数据库设计第一范式,增加了数据冗余和存储空间。再者,当业务发生变化时,不利于灵活调整。比如,增加了一种新的会员卡类型时,需要在数据表中增加一个新的字段,以适应需求的变化。  – 改进设计:标签位flag设计二进制的“位”本来就有表示状态的作用。可以用各个位来分别表示不同种类的会员卡打折支持:这样,“MEMBERCARD”字段仍采用整型。当某个商家支持金卡打折时,则保存“1(0001)”,支持银卡时,则保存“2(0010)”,两种都支持,则保存“3(0011)”。其他类似。表结构如图: 我们在编写SQL语句时,只需要通过“位”的与运算,就能简单的查询出想要数据。通过这样的处理方式既节省存储空间,查询时又简单方便。 //查询支持金卡打折的商家信息:   select * from factory where MEMBERCARD & b'0001'; // 或者:   select * from factory where MEMBERCARD & 1;    // 查询支持银卡打折的商家信息:   select * from factory where MEMBERCARD & b'0010'; // 或者:   select * from factory where MEMBERCARD & 2; 二进制( 位运算)枚举 可以通过@Dict注解设置数据字典的bit属性或者实现BitEnum接口来标识该枚举值为2的次幂。二进制枚举最大的区别在于值的序列化和反序列化方式是不一样的。 位运算的枚举定义示例 import pro.shushi.pamirs.meta.annotation.Dict; import pro.shushi.pamirs.meta.common.enmu.BitEnum; @Dict(dictionary = ClientTypeEnum.DICTIONARY, displayName = "客户端类型枚举", summary = "客户端类型枚举") public enum ClientTypeEnum implements BitEnum { PC(1L, "PC端", "PC端"), MOBILE(1L << 1, "移动端", "移动端"), ; public static final String DICTIONARY = "base.ClientTypeEnum"; private final Long value; private final String displayName; private final String help; ClientTypeEnum(Long value, String displayName, String help) { this.value = value; this.displayName = displayName; this.help = help; } @Override public Long value() { return value; } @Override public String displayName() { return displayName; } @Override public String help() { return help; } } 使用方法示例 API: addTo 和 removeFrom List<ClientTypeEnum> clientTypes = module.getClientTypes(); // addTo ClientTypeEnum.PC.addTo(clientTypes); // removeFrom ClientTypeEnum.PC.removeFrom(clientTypes); 在查询条件中的使用 List<Menu> moduleMenus = new Menu().queryListByWrapper(menuPage, LoaderUtils.authQuery(wrapper).eq(Menu::getClientTypes, ClientTypeEnum.PC));

    2023年11月24日
    1.4K00
  • 如何跳过固定path路径下面所有的按钮权限

    场景: 业务上需要跳过弹窗打开里面的所有按钮权限。 实践: 实现AuthFilterService权限接口。 package pro.shushi.pamirs.top.api.spi; import org.apache.commons.lang3.StringUtils; import org.springframework.core.annotation.Order; import org.springframework.stereotype.Component; import pro.shushi.pamirs.auth.api.spi.AuthFilterService; import pro.shushi.pamirs.boot.web.session.AccessResourceInfoSession; import pro.shushi.pamirs.meta.common.spi.SPI; /** * @author Yexiu at 09:04 on 2024/9/27 */ @Order(88) @Component @SPI.Service public class CustomAuthFilterService implements AuthFilterService { public static final String skipPath = "/top_demo/uiMenuc6238c29bca44250a041691565056a63/ACTION#top.Teacher#uiView2b60cc6daa334c7280cb78207d41addc"; @Override public Boolean isAccessAction(String model, String name) { String path = AccessResourceInfoSession.getInfo().getOriginPath(); if (StringUtils.isNotEmpty(path) && path.startsWith(skipPath)) { //返回true就代表通过验证 return true; } return null; } @Override public Boolean isAccessAction(String path) { if (StringUtils.isNotEmpty(path) && path.startsWith(skipPath)) { //返回true就代表通过验证 return true; } return null; } } 可以看到弹窗下面的按钮都不需要权限控制了。

    2025年3月11日
    66200

Leave a Reply

登录后才能评论