
背景
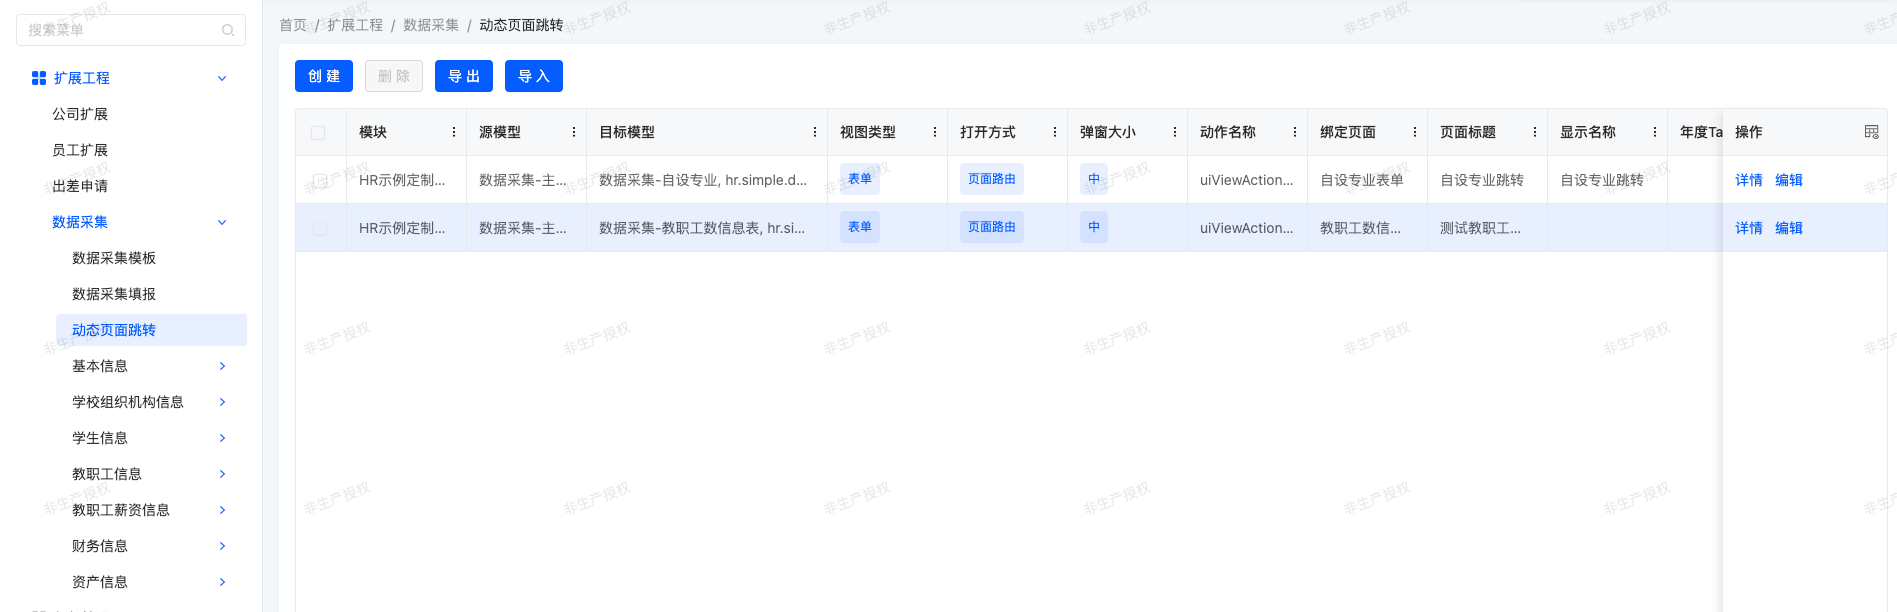
实际项目中,存在这样的场景:同一列表中的数据是泛化的数据集合,即数据来源于不同的模型;行操作需要根据来源去向不同的目标页。 如下图,「提报」操作需根据「报表类型」去向不同的表单。
并支持目标弹窗标题和弹框大小的配置。
解决思路
每行记录需要跳转到不同的模型不同视图,增加一个配置页面用于维护源模型和目标模型的调整动作关系; 返回数据的时候,同时返回自定义的动作。


前端自定义实现如上面图例中的「填报」,从返回数据中获取ViewAction并做对应的跳转。
具体步骤
[后端] 建立模型和视图的关系设置的模型
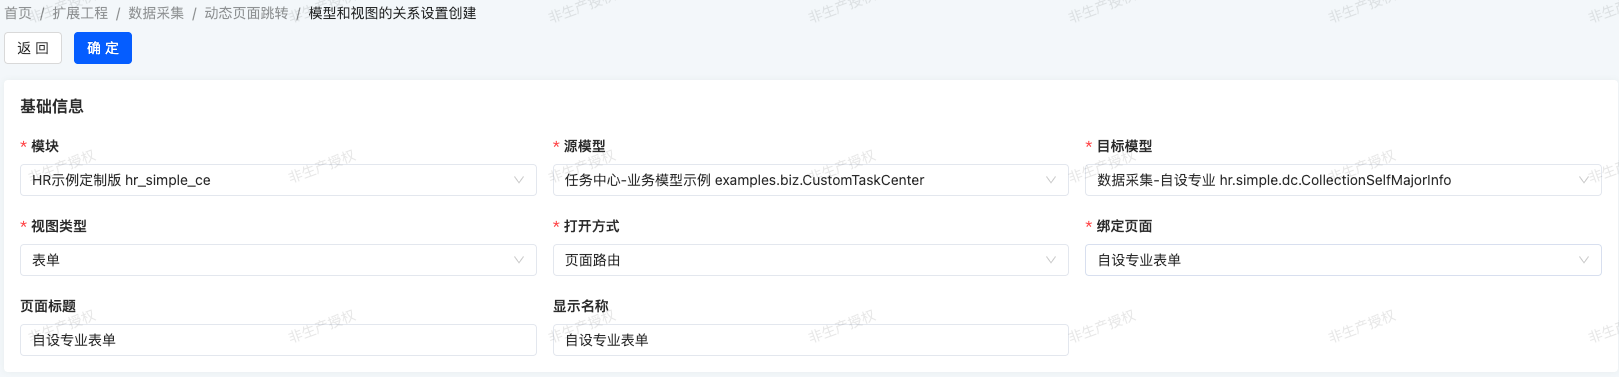
1、创建 模型和视图的关系设置的模型,用于配置列表模型和各记录即目标模型的视图关系
import pro.shushi.oinone.examples.simple.api.proxy.system.SimpleModel;
import pro.shushi.oinone.examples.simple.api.proxy.system.SimpleModule;
import pro.shushi.pamirs.boot.base.enmu.ActionTargetEnum;
import pro.shushi.pamirs.boot.base.model.View;
import pro.shushi.pamirs.meta.annotation.Field;
import pro.shushi.pamirs.meta.annotation.Model;
import pro.shushi.pamirs.meta.base.IdModel;
import pro.shushi.pamirs.meta.enmu.ViewTypeEnum;

/**
 * 模型和视图的关系设置
 * ModelRelViewSetting
 */
@Model.model(ModelRelViewSetting.MODEL_MODEL)
@Model(displayName = "模型和视图的关系设置", summary = "模型和视图的关系设置")
@Model.Advanced(unique = {"oModel,model,target,viewType,viewName"})
public class ModelRelViewSetting extends IdModel {

    public static final String MODEL_MODEL = "examples.custom.ModelRelViewSetting";

    @Field.many2one
    @Field(displayName = "模块")
    @Field.Relation(relationFields = {"module"}, referenceFields = {"module"})
    private SimpleModule moduleDef;

    @Field.String
    @Field(displayName = "模块编码", invisible = true)
    private String module;

    @Field.many2one
    @Field(displayName = "源模型")
    @Field.Relation(relationFields = {"oModel"}, referenceFields = {"model"})
    private SimpleModel originModel;

    @Field.String
    @Field(displayName = "源模型编码", invisible = true)
    private String oModel;

    @Field.many2one
    @Field(displayName = "目标模型")
    @Field.Relation(relationFields = {"model"}, referenceFields = {"model"})
    private SimpleModel targetModel;

    @Field.String
    @Field(displayName = "目标模型编码", invisible = true)
    private String model;

    @Field.Enum
    @Field(displayName = "视图类型")
    private ViewTypeEnum viewType;

    @Field.Enum
    @Field(displayName = "打开方式", required = true)
    private ActionTargetEnum target;

    @Field.String
    @Field(displayName = "动作名称", invisible = true)
    private String name;

    @Field.many2one
    @Field.Relation(relationFields = {"model", "viewName"}, referenceFields = {"model", "name"}, domain = "systemSource=='UI'")
    @Field(displayName = "绑定页面", summary = "绑定页面")
    private View view;

    @Field.String
    @Field(displayName = "视图/页面", invisible = true)
    private String viewName;

    @Field.String
    @Field(displayName = "页面标题")
    private String title;

    @Field.String
    @Field(displayName = "显示名称")
    private String displayName;

}
注意:未避免对系统模块和模型的影响ModelRelViewSetting.java中引用的模块和模型使用项目中代理处理的对象。
1)示例中心模型SimpleModel
import pro.shushi.pamirs.meta.annotation.Model;
import pro.shushi.pamirs.meta.domain.model.ModelDefinition;
import pro.shushi.pamirs.meta.enmu.ModelTypeEnum;

@Base
@Model.model(SimpleModel.MODEL_MODEL)
@Model(displayName = "示例中心模型", labelFields = "displayName")
@Model.Advanced(type = ModelTypeEnum.PROXY)
public class SimpleModel extends ModelDefinition {

    public static final String MODEL_MODEL = "examples.system.SimpleModel";

}
2)示例中心模块SimpleModule
import pro.shushi.pamirs.meta.annotation.Model;
import pro.shushi.pamirs.meta.annotation.sys.Base;
import pro.shushi.pamirs.meta.domain.module.ModuleDefinition;
import pro.shushi.pamirs.meta.enmu.ModelTypeEnum;

@Base
@Model.model(SimpleModule.MODEL_MODEL)
@Model(displayName = "示例中心模块", labelFields = "displayName")
@Model.Advanced(type = ModelTypeEnum.PROXY)
public class SimpleModule extends ModuleDefinition {

    public static final String MODEL_MODEL = "examples.system.SimpleModule";

}
3)动态页面菜单
@UxMenus
public class DemoMenus implements ViewActionConstants {

    @UxMenu("动态页面配置")
    @UxRoute(ModelRelViewSetting.MODEL_MODEL)
    class ModelRelViewSettingMenu {
    }
}
2、模型和视图的关系设置动作重新,创建按钮元数据等
import org.apache.commons.collections4.CollectionUtils;
import org.springframework.stereotype.Component;
import org.springframework.transaction.annotation.Transactional;
import pro.shushi.oinone.examples.simple.api.model.custom.config.ModelRelViewSetting;
import pro.shushi.oinone.examples.simple.core.action.helper.ModelDataHelper;
import pro.shushi.oinone.examples.simple.core.util.UUIDUtils;
import pro.shushi.pamirs.boot.base.enmu.ActionTypeEnum;
import pro.shushi.pamirs.boot.base.model.ViewAction;
import pro.shushi.pamirs.boot.base.ux.cache.api.ActionCacheApi;
import pro.shushi.pamirs.boot.base.ux.cache.api.ModelActionsCacheApi;
import pro.shushi.pamirs.meta.annotation.Action;
import pro.shushi.pamirs.meta.annotation.Function;
import pro.shushi.pamirs.meta.annotation.Model;
import pro.shushi.pamirs.meta.annotation.fun.extern.Slf4j;
import pro.shushi.pamirs.meta.api.session.PamirsSession;
import pro.shushi.pamirs.meta.constant.FunctionConstants;
import pro.shushi.pamirs.meta.domain.ModelData;
import pro.shushi.pamirs.meta.domain.module.ModuleDefinition;
import pro.shushi.pamirs.meta.enmu.ActionContextTypeEnum;
import pro.shushi.pamirs.meta.enmu.FunctionTypeEnum;
import pro.shushi.pamirs.meta.enmu.SystemSourceEnum;
import pro.shushi.pamirs.meta.enmu.ViewTypeEnum;

import java.util.ArrayList;
import java.util.Collections;
import java.util.List;

@Slf4j
@Component
@Model.model(ModelRelViewSetting.MODEL_MODEL)
public class ModelRelViewSettingAction {

    @Transactional
    @Action.Advanced(name = FunctionConstants.create, managed = true, invisible = "!IS_BLANK(activeRecord.id)")
    @Action(displayName = "确定", summary = "创建", bindingType = ViewTypeEnum.FORM)
    @Function(name = FunctionConstants.create)
    @Function.fun(FunctionConstants.create)
    public ModelRelViewSetting create(ModelRelViewSetting data) {

        ViewAction viewAction = buildAction(data);
        viewAction.construct();
        viewAction.create();

        data.setName(viewAction.getName());
        data.create();

        //写入modelData/刷新缓存 等
        actionMetaAddHandler(viewAction);

        return data;
    }

    @Transactional
    @Action.Advanced(name = FunctionConstants.update, managed = true, invisible = "IS_BLANK(activeRecord.id)")
    @Action(displayName = "更新", summary = "修改", bindingType = ViewTypeEnum.FORM)
    @Function(name = FunctionConstants.update)
    @Function.fun(FunctionConstants.update)
    public ModelRelViewSetting update(ModelRelViewSetting data) {

        ViewAction viewAction = buildAction(data);
        viewAction.updateById();
        data.updateById();

        //写入modelData/刷新缓存 等
        actionMetaAddHandler(viewAction);

        return data;
    }

    @Function.Advanced(type = FunctionTypeEnum.DELETE)
    @Function.fun(FunctionConstants.deleteWithFieldBatch)
    @Function(name = FunctionConstants.delete)
    @Action(displayName = "删除", contextType = ActionContextTypeEnum.SINGLE_AND_BATCH)
    public List<ModelRelViewSetting> delete(List<ModelRelViewSetting> dataList) {
        dataList.forEach(data -> {
            data.deleteById();

            ViewAction viewAction = new ViewAction().setModel(data.getOModel()).setName(data.getName());
            viewAction.deleteById();

            actionMetaDelHandler(viewAction);
        });

        return dataList;
    }

    private static ViewAction buildAction(ModelRelViewSetting data) {
        ViewAction viewAction = null;
        if (data.getId()==null) {
            viewAction = new ViewAction();
            viewAction.setName(UUIDUtils.generateUniqueKey("uiView"));
            viewAction.setActionType(ActionTypeEnum.VIEW);
            viewAction.setPriority(999);
            viewAction.setSys(false);
            viewAction.setSystemSource(SystemSourceEnum.UI);
            viewAction.setContextType(ActionContextTypeEnum.SINGLE);
            viewAction.setBindingType(Collections.singletonList(ViewTypeEnum.TABLE));
        } else {
            viewAction = new ViewAction().setModel(data.getModel()).setName(data.getName()).queryOne();
            if (viewAction == null){
                data = data.queryById();
                viewAction = new ViewAction().setModel(data.getOModel()).setName(data.getName()).queryOne();
            }
        }
        viewAction.setTitle(data.getTitle());
        viewAction.setDisplayName(data.getDisplayName());
        viewAction.setLabel(data.getDisplayName());
        viewAction.setResModel(data.getModel());
        viewAction.setModule(data.getModule());
        ModuleDefinition moduleDef = PamirsSession.getContext().getModule(data.getModule());
        viewAction.setModuleDefinition(moduleDef);
        if (moduleDef!=null) {
            viewAction.setModuleName(moduleDef.getName());
        }
        viewAction.setViewType(data.getViewType());
        viewAction.setTarget(data.getTarget());
        viewAction.setResView(data.getView());
        viewAction.setResViewName(data.getViewName());
        //viewAction.setOptionViewTypes();
        //viewAction.setOptionViewList();
        viewAction.setModelDefinition(data.getTargetModel());
        viewAction.setModel(data.getModel());
        //viewAction.setBindingView();
        //viewAction.setBindingViewName(data.getViewName());
        return viewAction;
    }

    public void actionMetaAddHandler(pro.shushi.pamirs.boot.base.model.Action action) {
        //处理元数据注册
        ModelData modelData = ModelDataHelper.convert(action);
        modelData.construct();
        modelData.createOrUpdate();

        if (log.isInfoEnabled()) {
            log.info("开始写入动作缓存,id:{},model:{},name:{}", action.getId(), action.getModel(), action.getName());
        }

        pro.shushi.pamirs.boot.base.model.Action finalAction = action;
        PamirsSession.getContext().putExtendCacheEntity(ActionCacheApi.class, (cacheApi) -> {
            cacheApi.put(finalAction.getSign(), finalAction);
        });

        PamirsSession.getContext().putExtendCacheEntity(ModelActionsCacheApi.class, (cacheApi) -> {
            String model = finalAction.getModel();
            //新建一个列表,全部处理完毕后再覆盖
            List<pro.shushi.pamirs.boot.base.model.Action> cacheActions = cacheApi.get(model);
            List<pro.shushi.pamirs.boot.base.model.Action> modelActions = new ArrayList<>();
            if (CollectionUtils.isNotEmpty(cacheActions)) {
                modelActions.addAll(cacheActions);
            }
            modelActions.stream().filter(i -> finalAction.getSign().equals(i.getSign())).findFirst().ifPresent(modelActions::remove);
            modelActions.add(finalAction);

            cacheApi.put(model, modelActions);
        });
    }

    public void actionMetaDelHandler(pro.shushi.pamirs.boot.base.model.Action action) {
        //处理元数据注册
        ModelData modelData = ModelDataHelper.convert(action);
        modelData.deleteByUnique();

        if (log.isInfoEnabled()) {
            log.info("开始删除动作缓存,id:{},model:{},name:{}", action.getId(), action.getModel(), action.getName());
        }

        pro.shushi.pamirs.boot.base.model.Action finalAction = action;
        PamirsSession.getContext().putExtendCacheEntity(ActionCacheApi.class, (cacheApi) -> {
            cacheApi.remove(finalAction.getModel(), finalAction.getName());
        });

        PamirsSession.getContext().putExtendCacheEntity(ModelActionsCacheApi.class, (cacheApi) -> {
            String model = finalAction.getModel();
            //新建一个列表,全部处理完毕后再覆盖
            List<pro.shushi.pamirs.boot.base.model.Action> cacheActions = cacheApi.get(model);
            List<pro.shushi.pamirs.boot.base.model.Action> modelActions = new ArrayList<>();
            if (CollectionUtils.isNotEmpty(cacheActions)) {
                modelActions.addAll(cacheActions);
            }
            modelActions.stream().filter(i -> finalAction.getSign().equals(i.getSign())).findFirst().ifPresent(modelActions::remove);
            modelActions.remove(finalAction);

            cacheApi.put(model, modelActions);
        });
    }

}
至此,已经写好模型跳转另一个模型的配置逻辑了。下面使用可视化的方式绑定
模型和视图的关系设置的模型数据操作
点击创建,添加源模型跳转目标模型的逻辑
[后端] 行操作对应的模型增强
1、行操作对应的模型增加目标模型和上下文扩展
import pro.shushi.oinone.examples.simple.api.model.custom.config.ModelRelViewSetting;
import pro.shushi.pamirs.meta.annotation.Field;
import pro.shushi.pamirs.meta.annotation.Model;
import pro.shushi.pamirs.meta.base.IdModel;
import pro.shushi.pamirs.meta.enmu.NullableBoolEnum;

import java.util.List;

/**
 * @Author: shushi
 * @Description:
 */
@Model.model(CustomTaskCenter.MODEL_MODEL)
@Model(displayName = "任务中心")
public class CustomTaskCenter extends IdModel {

    public static final String MODEL_MODEL = "examples.biz.CustomTaskCenter";

    // 其他业务字段(忽略)

    //////////////////////////////////////////////////////
    // 页面自定义跳转使用
    @Field.String(size = 50)
    @Field(displayName = "目标模型", summary = "自定义动作的目标模型")
    private String targetModel;

    @Field.one2many
    @Field.Relation(store = false)
    @Field(displayName = "上下文扩展字段", store = NullableBoolEnum.FALSE, invisible = true)
    private List<ModelRelViewSetting> customViewAction;

}
2、行操作对应的模型重写queryPage,获取行记录的上下文扩展
import org.apache.commons.collections4.CollectionUtils;
import org.springframework.stereotype.Component;
import pro.shushi.oinone.examples.simple.api.model.custom.biz.CustomTaskCenter;
import pro.shushi.oinone.examples.simple.api.model.custom.config.ModelRelViewSetting;
import pro.shushi.pamirs.framework.connectors.data.sql.Pops;
import pro.shushi.pamirs.framework.connectors.data.sql.query.QueryWrapper;
import pro.shushi.pamirs.meta.annotation.Function;
import pro.shushi.pamirs.meta.annotation.Model;
import pro.shushi.pamirs.meta.annotation.fun.extern.Slf4j;
import pro.shushi.pamirs.meta.api.dto.condition.Pagination;
import pro.shushi.pamirs.meta.common.util.ListUtils;
import pro.shushi.pamirs.meta.constant.FunctionConstants;
import pro.shushi.pamirs.meta.enmu.FunctionOpenEnum;
import pro.shushi.pamirs.meta.enmu.FunctionTypeEnum;

import java.util.List;
import java.util.Map;
import java.util.stream.Collectors;

@Slf4j
@Component
@Model.model(CustomTaskCenter.MODEL_MODEL)
public class CustomTaskCenterAction {

    @Function.Advanced(type = FunctionTypeEnum.QUERY)
    @Function.fun(FunctionConstants.queryPage)
    @Function(openLevel = {FunctionOpenEnum.API})
    public Pagination<CustomTaskCenter> queryPage(Pagination<CustomTaskCenter> page, QueryWrapper<CustomTaskCenter> queryWrapper) {
        page = new CustomTaskCenter().queryPage(page, queryWrapper);
        if (CollectionUtils.isNotEmpty(page.getContent())) {
            computeCustomViewAction(page.getContent());
        }

        return page;
    }

    private void computeCustomViewAction(List<CustomTaskCenter> taskCenters) {
        List<String> models = ListUtils.transform(taskCenters, CustomTaskCenter::getTargetModel);
        List<ModelRelViewSetting> customViewActions = new ModelRelViewSetting().queryList(Pops.<ModelRelViewSetting>lambdaQuery().setBatchSize(-1)
                .from(ModelRelViewSetting.MODEL_MODEL).in(ModelRelViewSetting::getModel, models));

        if (CollectionUtils.isEmpty(customViewActions)) {
            return;
        }

        Map<String/**model*/, List<ModelRelViewSetting>> modelRelViewSettingMap = customViewActions.stream().collect(Collectors.groupingBy(ModelRelViewSetting::getModel));
        taskCenters.forEach(business -> {
            List<ModelRelViewSetting> modelRelViewSettingList = modelRelViewSettingMap.get(business.getTargetModel());
            business.setCustomViewAction(modelRelViewSettingList);
        });
    }

}
[界面设计器] 行操作对应列表配置
1、业务数据的列表增加「上下文扩展字段」,并设置隐藏和配置透出字段,参考下面的截图
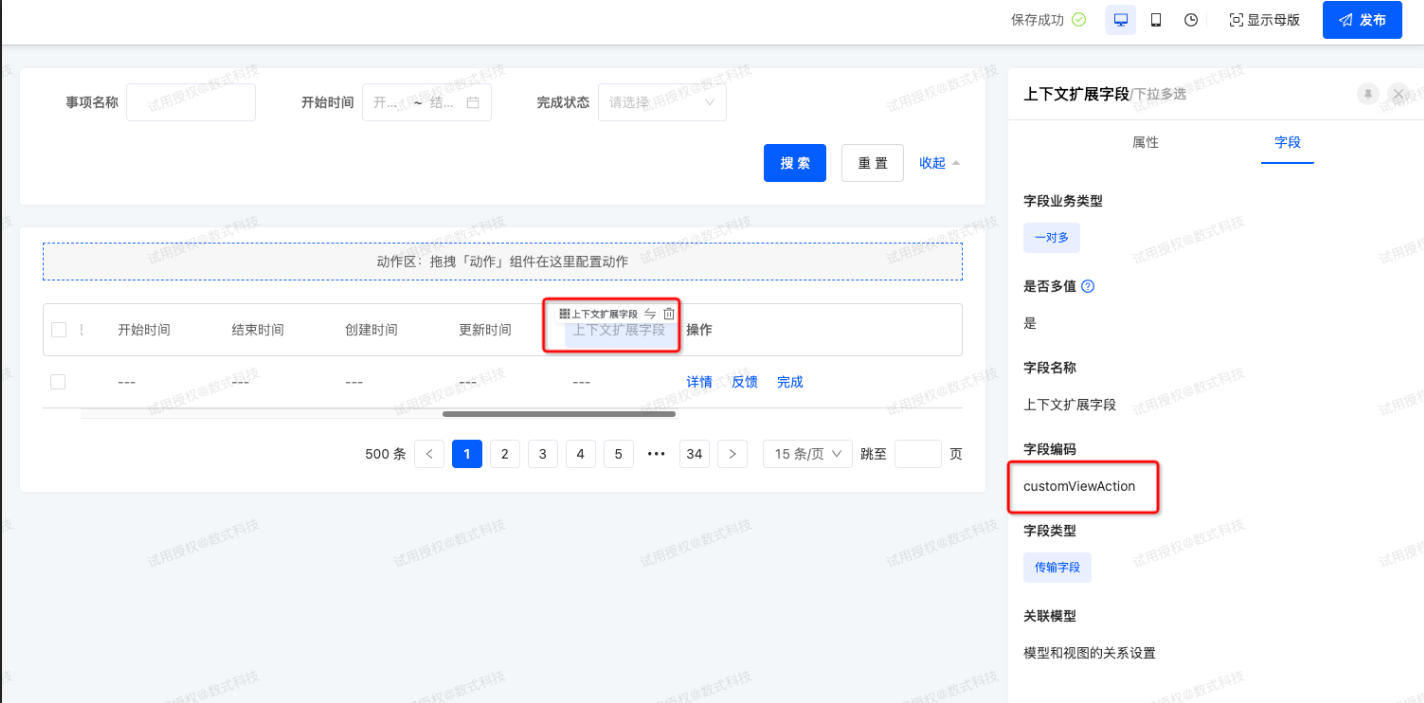
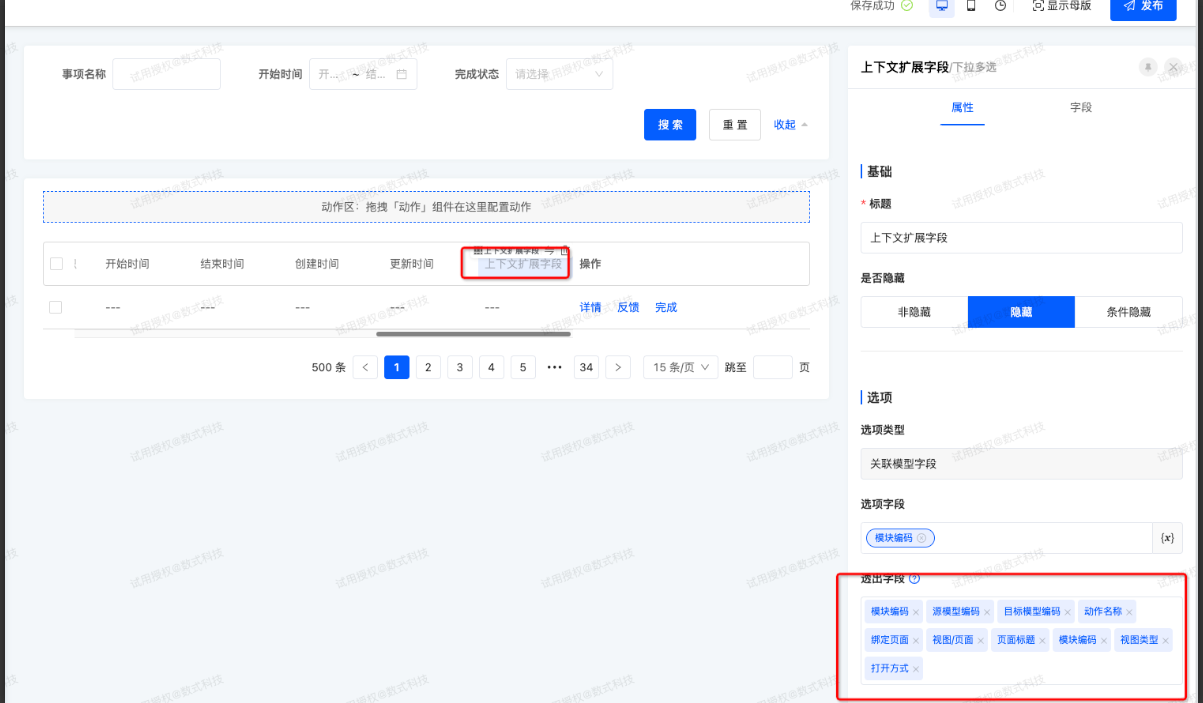
2、配置操作按钮,根据业务情况拖跳转动作如「详情」或者「填报」等,拖拽跳转动作时,开启「保留动作」这样可以填写API名称。
[注意]:设计器跳转动作(需动态路由的)配置的「页面打开方式」 和 模型视图列表中的「页面打开方式」必须一致,否则会报错:未配置弹窗视图
[权限] 自定义动作权限扩展和配置
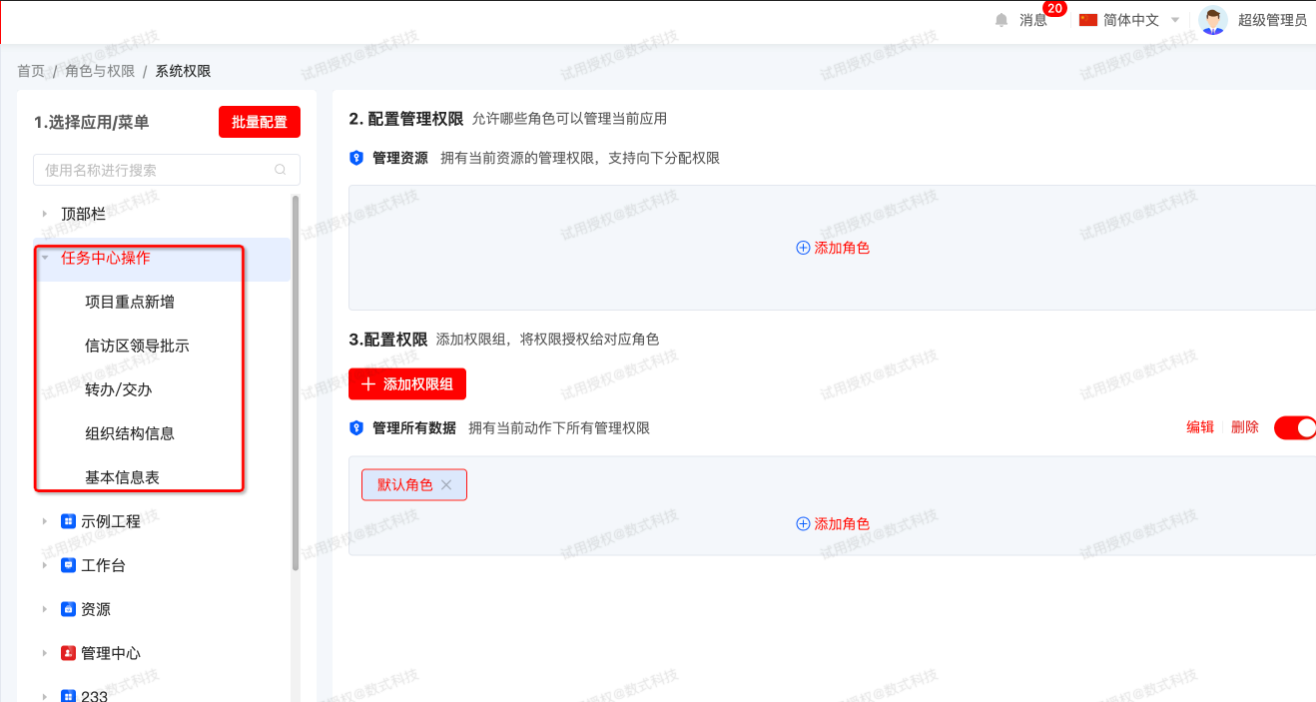
1、权限扩展,自定义动作的权限解析到权限树上
import org.apache.commons.collections4.CollectionUtils;
import org.springframework.core.annotation.Order;
import org.springframework.stereotype.Component;
import pro.shushi.oinone.examples.simple.api.model.custom.config.ModelRelViewSetting;
import pro.shushi.pamirs.auth.api.entity.node.ActionPermissionNode;
import pro.shushi.pamirs.auth.api.entity.node.PermissionNode;
import pro.shushi.pamirs.auth.api.extend.PermissionNodeLoadExtendApi;
import pro.shushi.pamirs.auth.api.helper.AuthNodeHelper;
import pro.shushi.pamirs.boot.base.enmu.ActionTypeEnum;
import pro.shushi.pamirs.boot.base.model.Action;
import pro.shushi.pamirs.boot.base.model.ViewAction;
import pro.shushi.pamirs.core.common.TranslateUtils;
import pro.shushi.pamirs.core.common.query.QueryActions;
import pro.shushi.pamirs.meta.common.spi.SPI;

import java.util.List;

/**
 * 自定义动作 加载扩展
 *
 * @author shushi
 */
@Component
@Order(80)
@SPI.Service("CustomViewActionPermissionNodeLoadExtend")
public class CustomViewActionPermissionNodeLoadExtend implements PermissionNodeLoadExtendApi {

    @Override
    public void buildRootPermissions(List<PermissionNode> nodes) {
        List<ModelRelViewSetting> settings = new ModelRelViewSetting().queryList();
        if (CollectionUtils.isEmpty(settings)) {
            return;
        }

        QueryActions<ViewAction> queryActions = new QueryActions<>(ActionTypeEnum.VIEW);
        settings.stream().forEach(setting -> {
            queryActions.add(setting.getModel(), setting.getName());
        });
        List<ViewAction> viewActions = queryActions.query();
        if (CollectionUtils.isEmpty(viewActions)) {
            return;
        }

        PermissionNode root = createTopBarNode();
        createActionNodes(viewActions, root);
        if (!root.getNodes().isEmpty()) {
            nodes.add(0, root);
        }
    }

    private void addNode(PermissionNode node, PermissionNode target) {
        if (target == null) {
            return;
        }
        node.getNodes().add(target);
    }

    private PermissionNode createTopBarNode() {
        return AuthNodeHelper.createNode("ExamplesCustomViewAction", TranslateUtils.translateValues("XX动作权限"));
    }

    private ActionPermissionNode createActionNode(Action action, PermissionNode parentNode, ViewAction viewAction) {
        ActionPermissionNode node = AuthNodeHelper.createActionNode(viewAction.getModule(), action, parentNode);
        if (node == null) {
            return null;
        }
        node.setPath("/" +viewAction.getModel() + "/" +viewAction.getName());
        return node;
    }

    private void createActionNodes(List<ViewAction> viewActions, PermissionNode parentNode) {
        for (int i = 0; i < viewActions.size(); i++) {
            ViewAction action = viewActions.get(i);
            addNode(parentNode, createActionNode(action, parentNode, action));
        }
    }

}
上面的权限扩展后自动会将自定义的动作加载到权限树中,后面可以安装正常的权限配置进行
使用步骤
-
添加模型和视图的关系
-
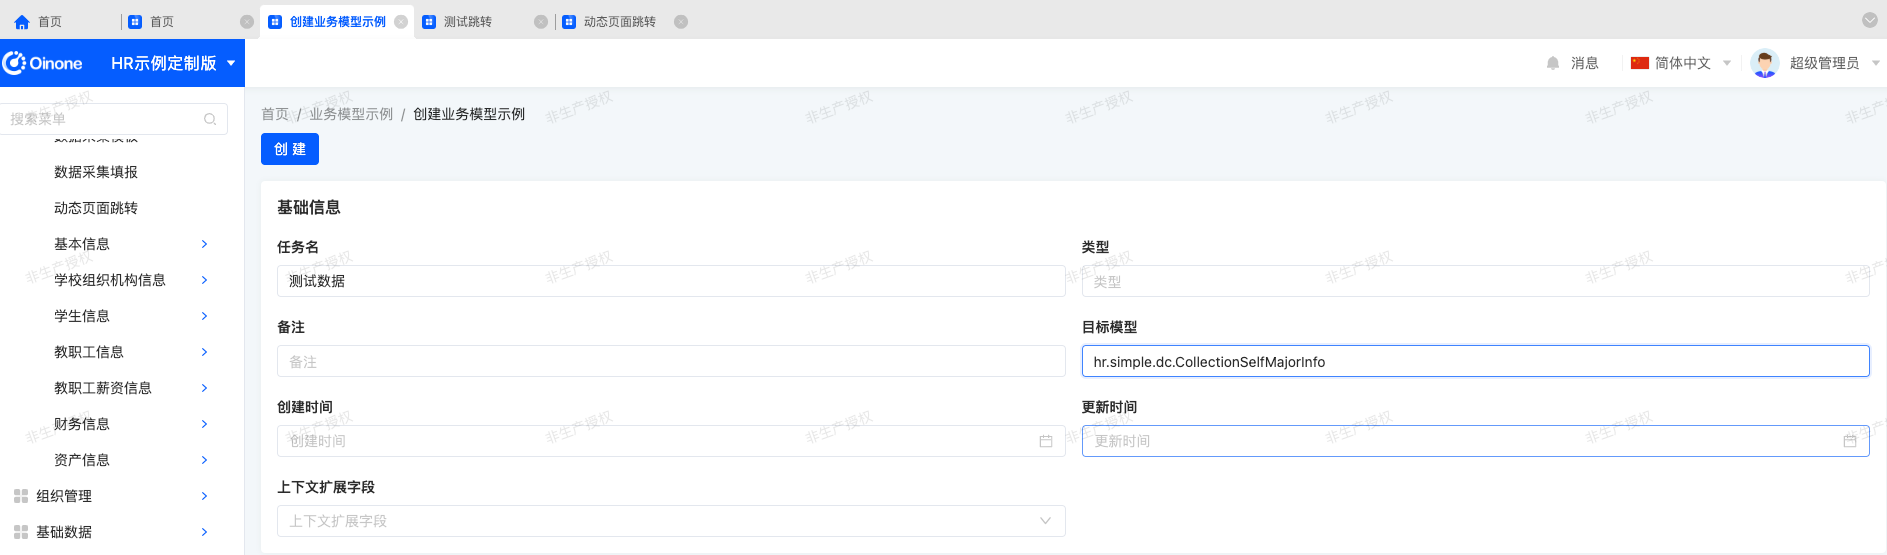
添加一条业务数据,绑定目标模型编码
-
查看页面可以看到上下文参数已经有数据了,查看接口返回可以看到具体的viewAction数据。再配合前端代码实现跳转。

[前端] 前端根据列表模型和API名称自定义动作
import {
    ActionContextType,
    ActionType,
    ActionWidget,
    RouterViewActionWidget,
    RuntimeViewAction,
    SPI,
    ViewType,
    Widget
  } from '@kunlun/dependencies';
  import CustomViewActionVue from './CustomViewAction.vue';

  @SPI.ClassFactory(
    ActionWidget.Token({
      model: 'demo.CooperationCenter', // 需要更换为对应页面model
      name: 'uiViewaee878c066d4490195246f62add8ffff' // 从页面debug中找同名name按钮
    })
  )
  export class VieDynamicActionWidget extends RouterViewActionWidget {
    @Widget.Reactive()
    public get action() {
      // console.log('---1',this.activeRecords?.[0].customViewAction);
      // customViewAction 约定的数据名称
      const list = (this.activeRecords?.[0].customViewAction || []) as RuntimeViewAction[];
      // 上下文参数指定要跳什么类型的页面,默认跳表单
      const viewType = super.action.context?.viewType || ViewType.Form;
      // 从列表里找到指定的动作
      const item =
        list.find((item) => {
          return item.viewType == viewType;
        }) || ({} as RuntimeViewAction);
      return {
        ...item,
        contextType: ActionContextType.Single,
        actionType: ActionType.View,
        sessionPath: `/${item.model}/${item.name}`,
        context: { id: this.activeRecords?.[0].id, ...(super.action.context || {}) }
      };
    }
    // 注: 目标页面的加载函数需配置为 queryOne queryOne
  }
Oinone社区 作者:yexiu原创文章,如若转载,请注明出处:https://doc.oinone.top/dai-ma-shi-jian/20495.html
访问Oinone官网:https://www.oinone.top获取数式Oinone低代码应用平台体验
