
非存储字段搜索,适应灵活的搜索场景

1、非存储字段搜索

1.1 描述

通常根据本模型之外的信息作为搜索条件时,通常会把 这些字段放在代理模型上。这类场景我们称之为 非存储字段搜索

1.2 场景一

非存储字段为基本的String。
1.代码定义:非存储字段为基本的包装数据类型

    @Field(displayName = "确认密码", store = NullableBoolEnum.FALSE)
    private String confirmPassword;

2.设计器拖拽:列表中需要有退拽这个字段,字段是否隐藏的逻辑自身业务是否需要决定。
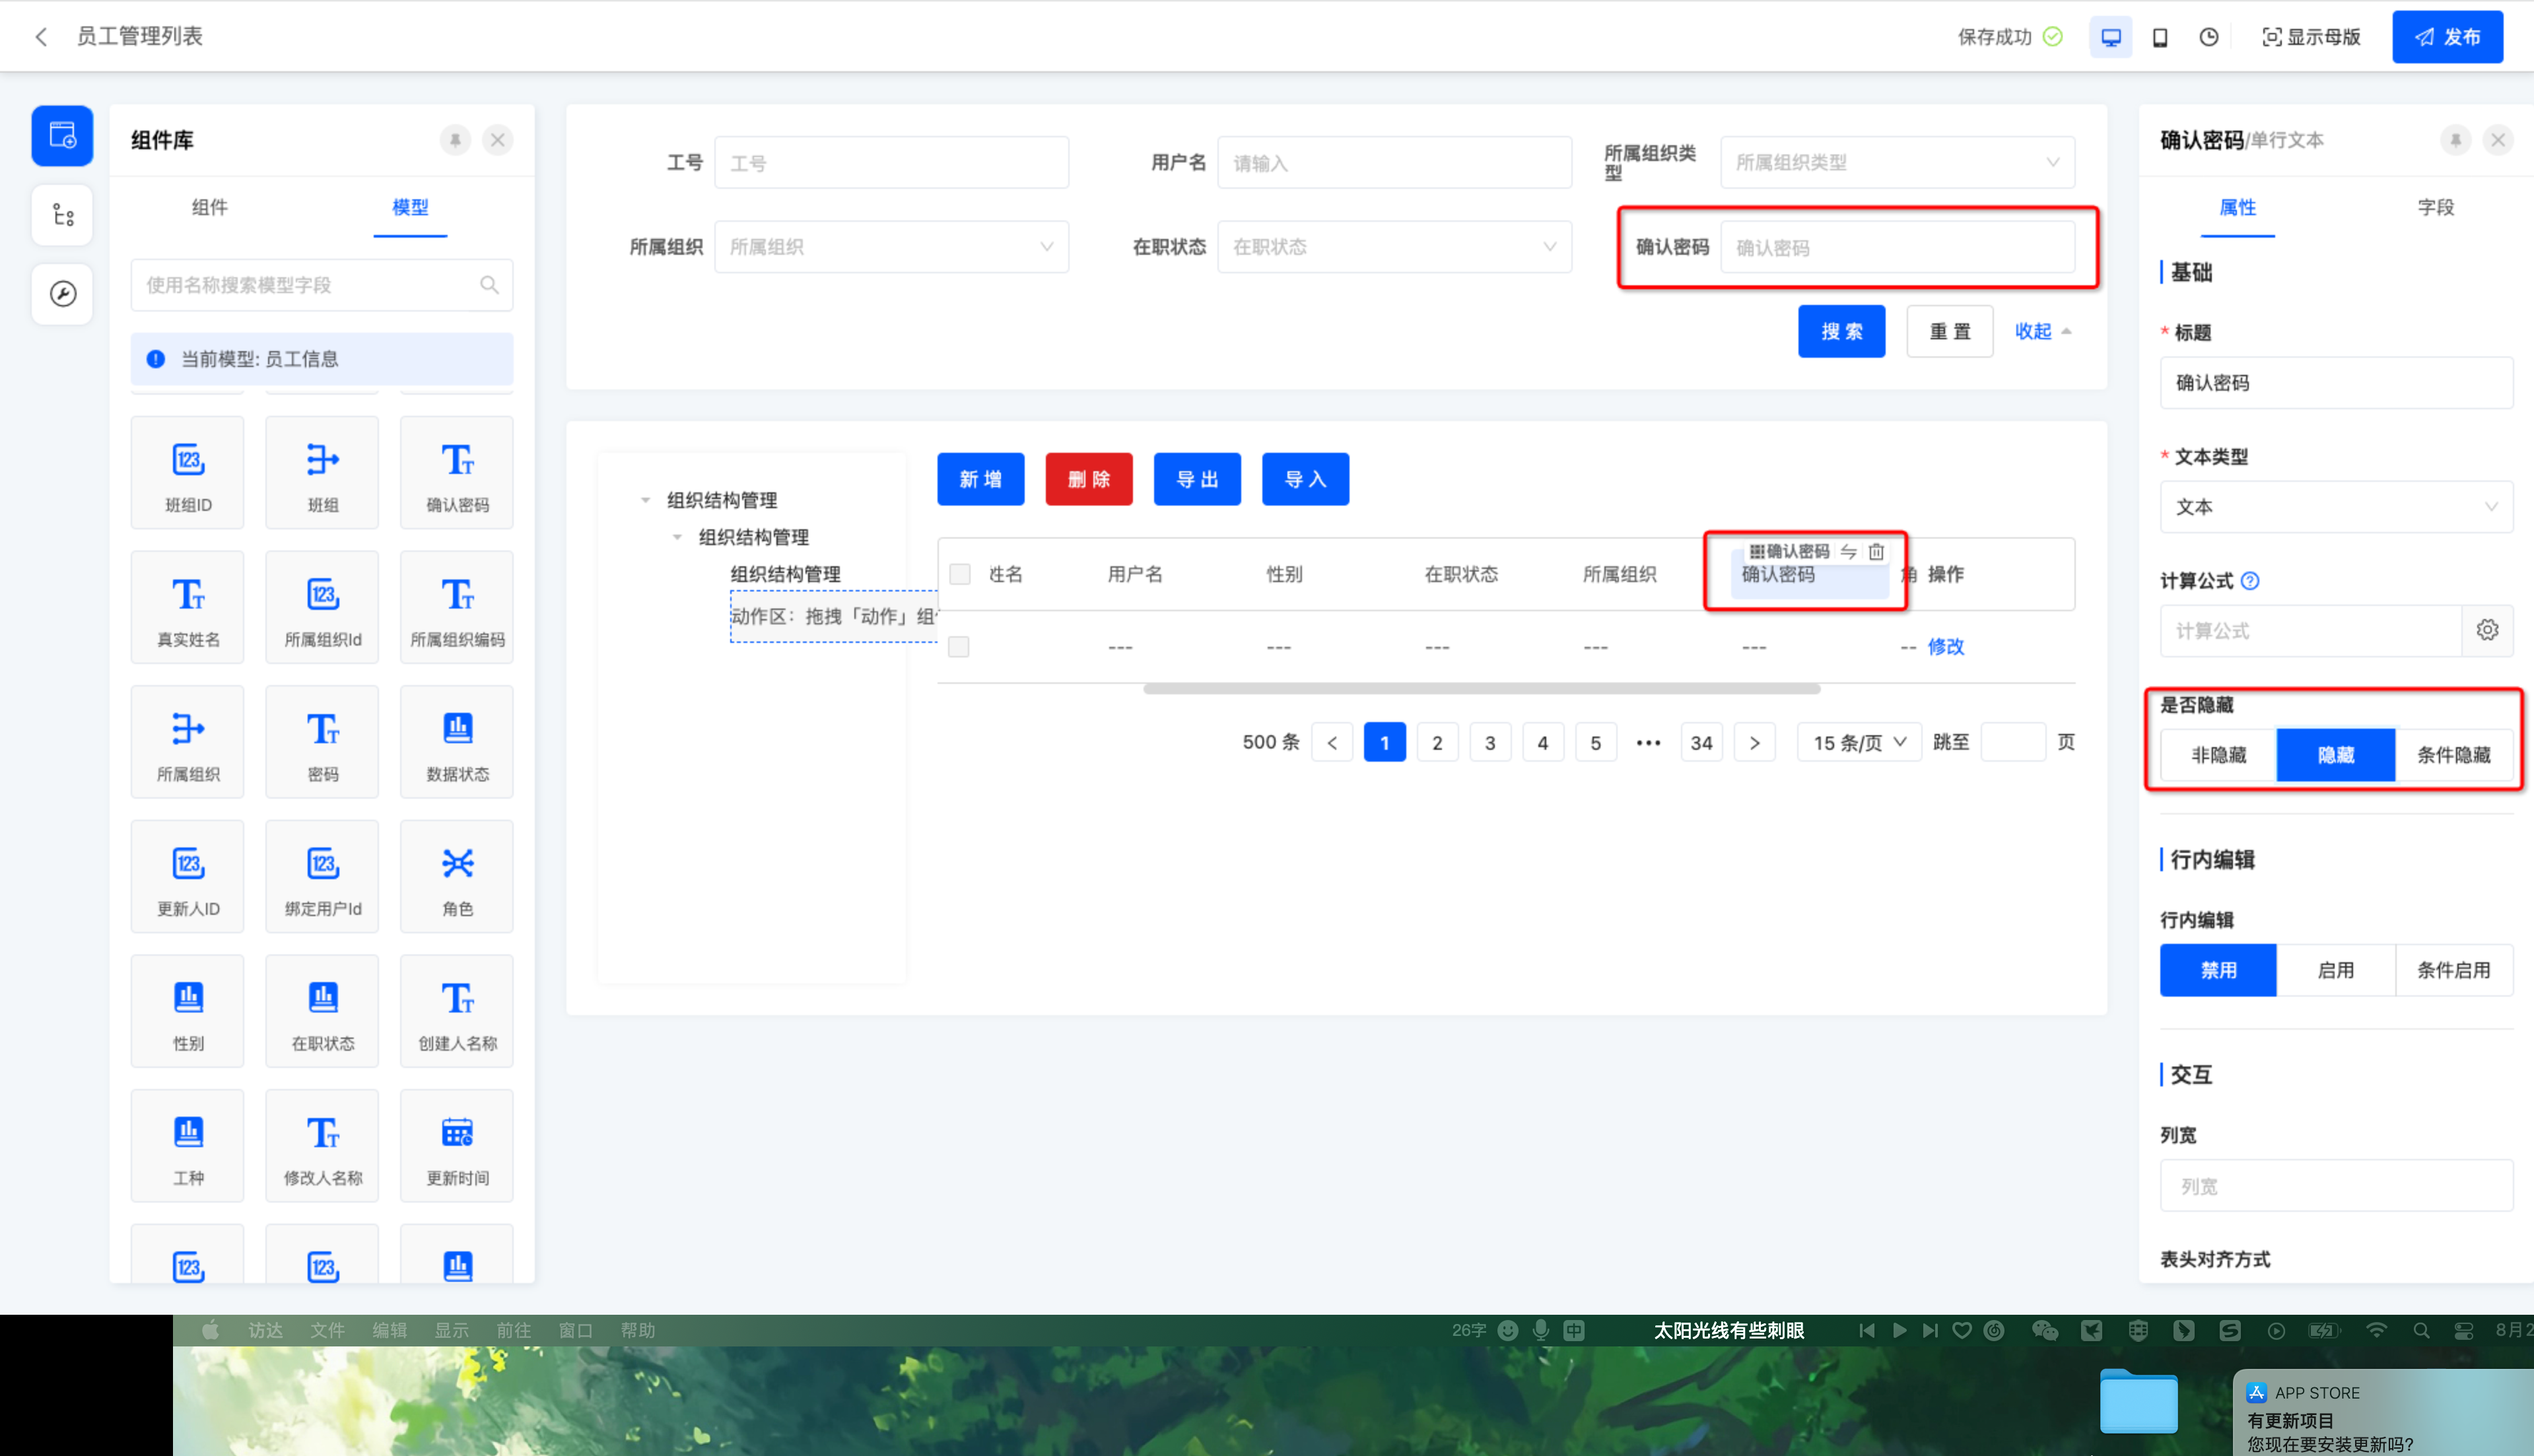
image.png
3.页面通过非存储字段为基本的包装数据类型进行搜索时。会拼在 queryWrapper 的属性queryData中,queryData为Map,key为字段名,value为搜索值。
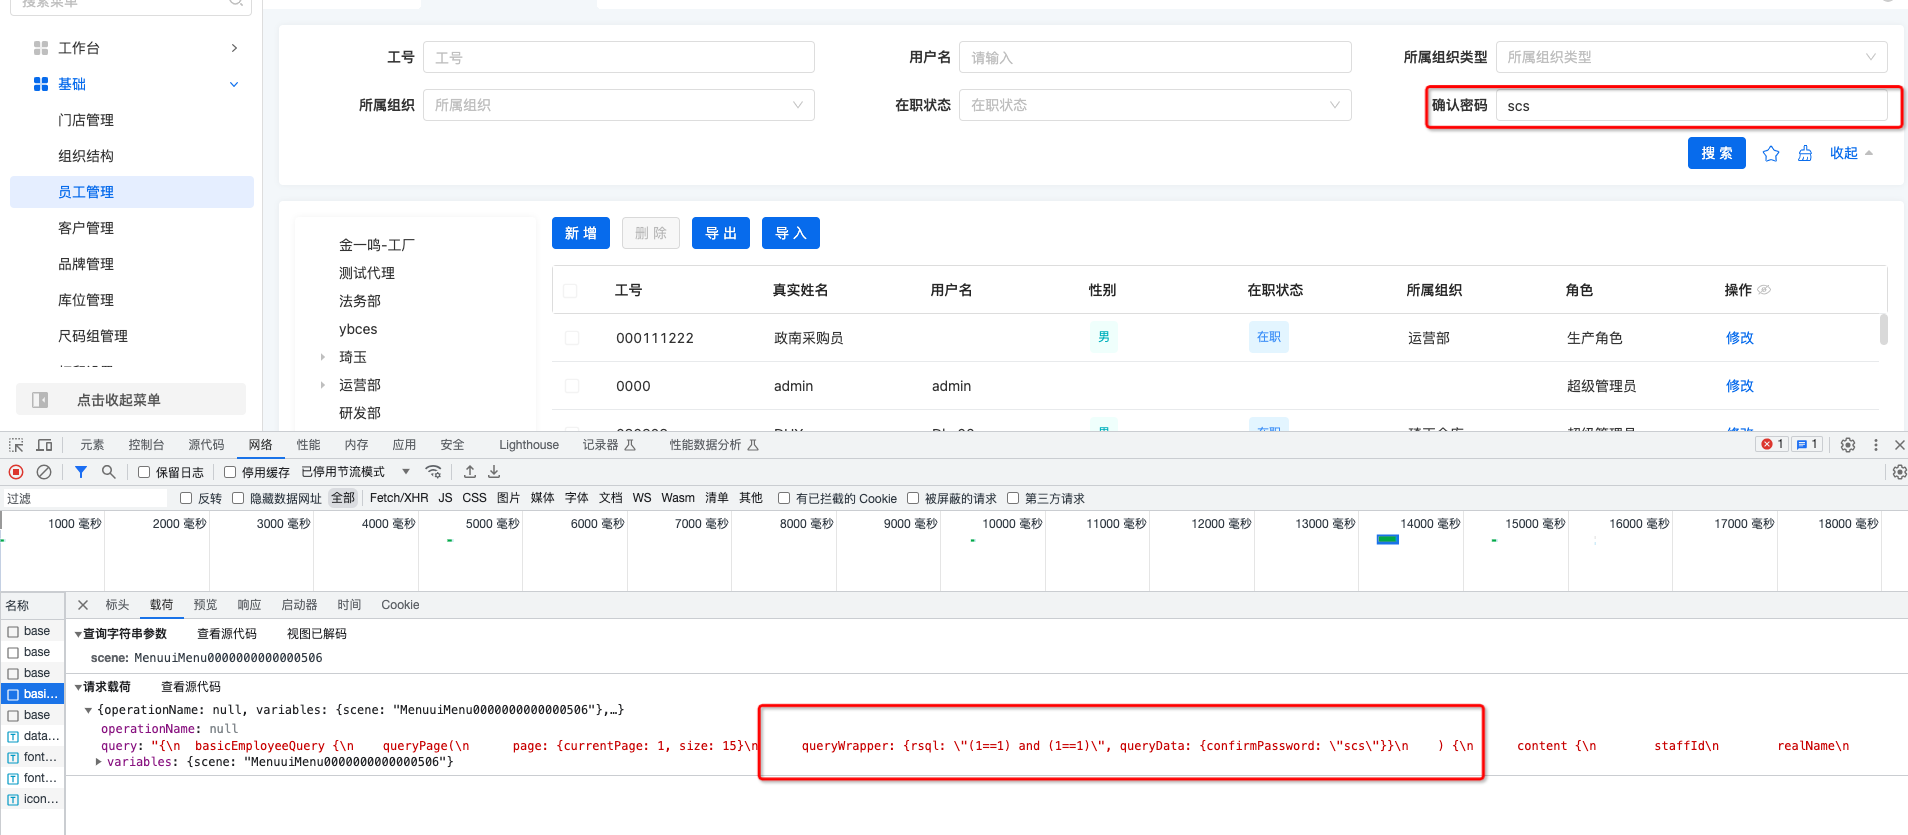
image.png
4.后台逻辑处理代码示例:

        Map<String, Object> queryData = queryWrapper.getQueryData();
        if (null != queryData) {
            Object productIdObj = queryData.get(PRODUCT_ID);
            if (Objects.nonNull(productIdObj)) {
                String productId = productIdObj.toString();
                queryWrapper.lambda().eq(MesProduceOrderProxy::getProductId, productId);
            }
        }

1.3 场景二

非存储字段为非存储对象。

  1. 定义 为非存储的
    @Field(displayName = "款", store = NullableBoolEnum.FALSE)
    @Field.many2one
    @Field.Relation(store = false)
    private MesProduct product;

2.页面在搜索栏拖拽非存储字段作为搜索条件
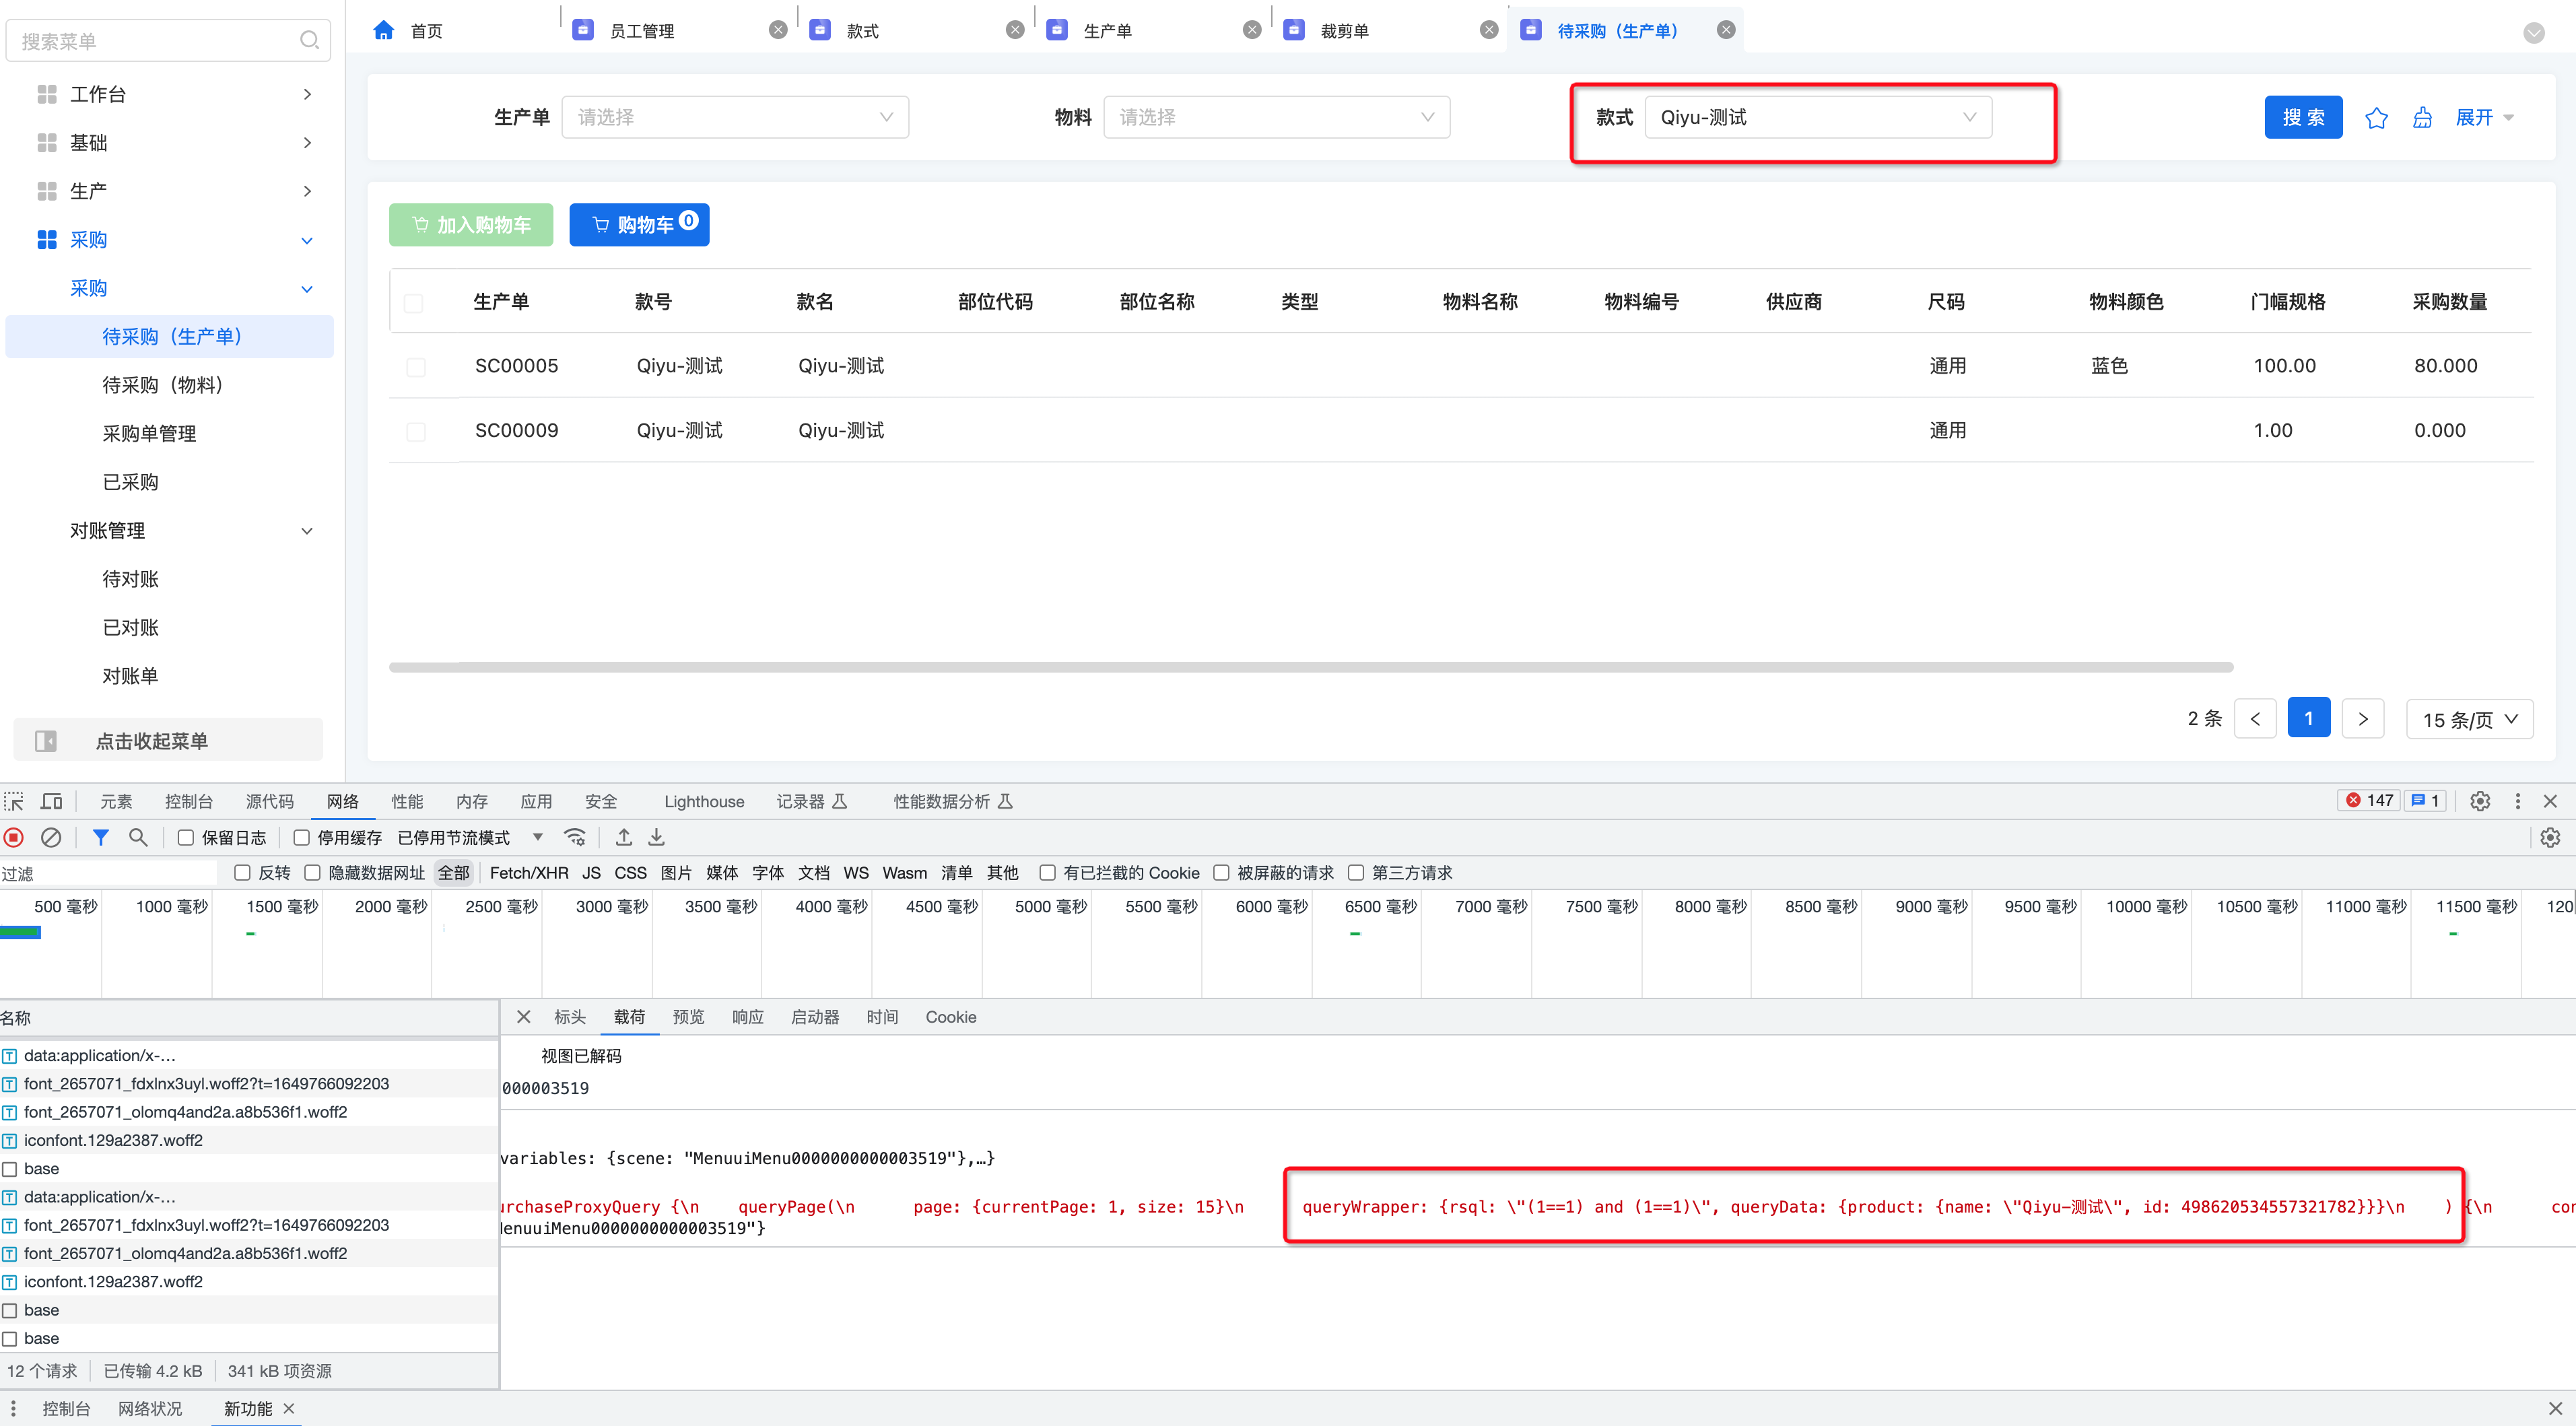
image.png

3.后台逻辑处理代码示例:

      try {
            if (null != queryData && !queryData.isEmpty()) {
                List<Long> detailId = null;
                BasicSupplier supplier = JsonUtils.parseMap2Object((Map<String, Object>) queryData.get(supplierField), BasicSupplier.class);
                MesProduct product = JsonUtils.parseMap2Object((Map<String, Object>) queryData.get(productField), MesProduct.class);
                MesMaterial material = JsonUtils.parseMap2Object((Map<String, Object>) queryData.get(materialField), MesMaterial.class);
                if (supplier != null) {
                    detailId = bomService.queryBomDetailIdBySupplierId(supplier.getId());
                    if (CollectionUtils.isEmpty(detailId)) {
                        detailId.add(-1L);
                    }
                }

                if (product != null) {
                    List<Long> produceOrderId = produceOrderService.queryProductOrderIdByProductIds(product.getId());
                    if (CollectionUtils.isNotEmpty(produceOrderId)) {
                        queryWrapper.lambda().in(MesProduceBomSizes::getProduceOrderId, produceOrderId);
                    }
                }

                if (material != null) {
                    //找出两个bom列表的并集
                    List<Long> materBomDetailId = bomService.queryBomDetailIdByMaterialId(material.getId());
                    if (CollectionUtils.isNotEmpty(detailId)) {
                        detailId = detailId.stream().filter(materBomDetailId::contains).collect(Collectors.toList());
                    } else {
                        detailId = new ArrayList<>();
                        if (CollectionUtils.isEmpty(materBomDetailId)) {
                            detailId.add(-1L);
                        } else {
                            detailId.addAll(materBomDetailId);
                        }
                    }
                }
                if (CollectionUtils.isNotEmpty(detailId)) {
                    queryWrapper.lambda().in(MesProduceBomSizes::getProductBomId, detailId);
                }
            }
        } catch (Exception e) {
            log.error("queryData处理异常", e);
        }

注意: 如果这样定义

    @Field(displayName = "款",store = NullableBoolEnum.FALSE)
    @Field.Relation(relationFields = "produceId", referenceFields = "id",store = false)
    @Field.many2one
    private MesProduct product;

    @Field(displayName = "款Id",store = NullableBoolEnum.FALSE)
    private Long produceId;

搜索时 produceId 选择product 搜索是 produceId 会被拼接在QueryWrapper 的Rsql中

Rsql解析类

pro.shushi.pamirs.framework.gateways.rsql.RSQLHelper

Rsql参考代码

/**
     * Rsql解析 将属性字段值从QueryWrapper中originRsql属性值的Rsql解出来
     * 将原有条件替换成 ’1‘==’1‘
     *
     * @param queryWrapper 查询Wrapper
     * @param fields       需要解析出来的属性字段列表
     * @param valeMap      属性对应值的Map
     * @return 返回生产单Id列表
     */

    public static QueryWrapper convertWrapper(QueryWrapper queryWrapper, List<String> fields, Map<String, Object> valeMap) {
        if (StringUtils.isNotBlank(queryWrapper.getOriginRsql())) {
            String rsql = RSQLHelper.toTargetString(RSQLHelper.parse(queryWrapper.getModel(), queryWrapper.getOriginRsql()), new RSQLNodeConnector() {
                @Override
                public String comparisonConnector(RSQLNodeInfo nodeInfo) {
                    //判断字段为unStore,则进行替换
                    String field = nodeInfo.getField();
                    if (fields.contains(field)) {
                        valeMap.put(field, nodeInfo.getArguments().get(0));
                        RSQLNodeInfo newNode = new RSQLNodeInfo(nodeInfo.getType());
                        //设置查询字段为name
                        newNode.setField("1");
                        newNode.setOperator(RsqlSearchOperation.EQUAL.getOperator());
                        newNode.setArguments(Collections.singletonList("1"));
                        return super.comparisonConnector(newNode);
                    }
                    return super.comparisonConnector(nodeInfo);
                }
            });
            queryWrapper = Pops.f(Pops.query().from(queryWrapper.getModel())).get();
            //把RSQL转换成SQL
            String sql = RsqlParseHelper.parseRsql2Sql(queryWrapper.getModel(), rsql);
            if (StringUtils.isNotBlank(sql)) {
                queryWrapper.apply(sql);
            }
            return queryWrapper;
        }
        return queryWrapper;
    }

Oinone社区 作者:shao原创文章,如若转载,请注明出处:https://doc.oinone.top/dai-ma-shi-jian/5592.html

访问Oinone官网:https://www.oinone.top获取数式Oinone低代码应用平台体验

Like (0)
shao's avatarshao数式管理员
Previous 2024年2月20日 pm6:46
Next 2024年2月20日 pm6:52

相关推荐

  • Nacos做为注册中心:如何调用其他系统的SpringCloud服务?

    Oinone项目引入Nacos作为注册中心,调用外部的SpringCloud服务 Nacos可以做为注册中心,提供给Dubbo和SpringCloud等微服务框架使用。 目前Oinone的底层使用的是Dubbo进行微服务的默认协议调用,但是我们项目如果存在需要调用其他系统提供的SpringCloud服务,Oinone其实并没有限制大家去这么写代码。 可以参考Nacos或SpringCloud的官方文档,只要不存在Jar包冲突等场景,很多的扩展其实大家都可以使用。 注意!!!Nacos、SpringCloud、SpringCloudAlibaba是有依赖版本严格要求的:点击查看 具体示例: 一、项目中增加依赖 主pom引入兼容的版本: <dependencyManagement> <dependency> <groupId>com.alibaba.cloud</groupId> <artifactId>spring-cloud-alibaba-dependencies</artifactId> <version>2.2.7.RELEASE</version> <!– 目前兼容的版本 –> <type>pom</type> <scope>import</scope> </dependency> </dependencyManagement> 使用模块的pom引入依赖: <dependency> <groupId>com.alibaba.cloud</groupId> <artifactId>spring-cloud-starter-alibaba-nacos-discovery</artifactId> </dependency> <dependency> <groupId>org.springframework.cloud</groupId> <artifactId>spring-cloud-starter-openfeign</artifactId> </dependency> 二、 配置 application.yml spring: cloud: nacos: discovery: server-addr: localhost:8848 username: nacos password: nacos 三、启动类添加注解 @EnableDiscoveryClient @EnableFeignClients public class NacosConsumerApplication { public static void main(String[] args) { SpringApplication.run(NacosConsumerApplication.class, args); } } 四、验证 创建 Feign Client 接口 import org.springframework.cloud.openfeign.FeignClient; import org.springframework.web.bind.annotation.GetMapping; @FeignClient(name = "nacos-demo") // 指定目标服务的名称 public interface ProviderClient { @GetMapping("/hello") String hello(); } 创建 Controller 调用 Feign Client @RestController public class ConsumerController { private final ProviderClient providerClient; public ConsumerController(ProviderClient providerClient) { this.providerClient = providerClient; } @GetMapping("/hello") public String hello() { return providerClient.hello(); } } 在浏览器中访问 http://localhost:8082/hello你应该会看到服务提供者返回的响应。

    2024年6月4日
    3.3K00
  • 自定义表格支持合并或列、表头分组

    本文将讲解如何通过自定义实现表格支持单元格合并和表头分组。 点击下载对应的代码 在学习该文章之前,你需要先了解: 1: 自定义视图2: 自定义视图、字段只修改 UI,不修改数据和逻辑3: 自定义视图动态渲染界面设计器配置的视图、动作 1. 自定义 widget 创建自定义的 MergeTableWidget,用于支持合并单元格和表头分组。 // MergeTableWidget.ts import { BaseElementWidget, SPI, ViewType, TableWidget, Widget, DslRender } from '@kunlun/dependencies'; import MergeTable from './MergeTable.vue'; @SPI.ClassFactory( BaseElementWidget.Token({ viewType: ViewType.Table, widget: 'MergeTableWidget' }) ) export class MergeTableWidget extends TableWidget { public initialize(props) { super.initialize(props); this.setComponent(MergeTable); return this; } /** * 表格展示字段 */ @Widget.Reactive() public get currentModelFields() { return this.metadataRuntimeContext.model.modelFields.filter((f) => !f.invisible); } /** * 渲染行内动作VNode */ @Widget.Method() protected renderRowActionVNodes() { const table = this.metadataRuntimeContext.viewDsl!; const rowAction = table?.widgets.find((w) => w.slot === 'rowActions'); if (rowAction) { return rowAction.widgets.map((w) => DslRender.render(w)); } return null; } } 2. 创建对应的 Vue 组件 定义一个支持合并单元格与表头分组的 Vue 组件。 <!– MergeTable.vue –> <template> <vxe-table border height="500" :column-config="{ resizable: true }" :merge-cells="mergeCells" :data="showDataSource" @checkbox-change="checkboxChange" @checkbox-all="checkedAllChange" > <vxe-column type="checkbox" width="50"></vxe-column> <!– 渲染界面设计器配置的字段 –> <vxe-column v-for="field in currentModelFields" :key="field.name" :field="field.name" :title="field.label" ></vxe-column> <!– 表头分组 https://vxetable.cn/v4.6/#/table/base/group –> <vxe-colgroup title="更多信息"> <vxe-column field="role" title="Role"></vxe-column> <vxe-colgroup title="详细信息"> <vxe-column field="sex" title="Sex"></vxe-column> <vxe-column field="age" title="Age"></vxe-column> </vxe-colgroup> </vxe-colgroup> <vxe-column title="操作" width="120"> <template #default="{ row, $rowIndex }"> <!– 渲染界面设计器配置的行内动作 –> <row-action-render :renderRowActionVNodes="renderRowActionVNodes" :row="row" :rowIndex="$rowIndex" :parentHandle="currentHandle" ></row-action-render> </template> </vxe-column> </vxe-table> <!– 分页 –> <oio-pagination :pageSizeOptions="pageSizeOptions" :currentPage="pagination.current"…

    2025年1月9日
    2.7K00
  • 标品实施:从标品构建到定制(扩展)包的开发

    总体描述 Oinone有一个非常重要的特性:通过平台承载标准化产品(标品)。针对不同客户的个性化需求,不再直接修改标准产品代码,而是以扩展包的形式进行扩展和定制化,通过继承和重写标准产品的能力来满足客户需求。 本文讲解述怎么通过标品构建扩展工程的过程。 构建标品 按照Oinone的规范构建标品工程 构建扩展包 在定制模块中指定上游模块 上游依赖模块upstreams,模块定义如下: @Target({ElementType.TYPE}) @Retention(RetentionPolicy.RUNTIME) public @interface Module { // 显示名称 @AliasFor("displayName") String value() default ""; // 依赖模块名列表 String[] dependencies() default ModuleConstants.MODULE_BASE; // 上游模块名列表 String[] upstreams() default {}; …… 扩展模块示例 @Component @Module( name = SecondModule.MODULE_NAME, displayName = "DEMO扩展", version = "1.0.0", // 指定上游模块(标品模块,可以为多个) upstreams = DemoModule.MODULE_MODULE, priority = 1, dependencies = {ModuleConstants.MODULE_BASE, CommonModule.MODULE_MODULE, UserModule.MODULE_MODULE, AuthModule.MODULE_MODULE, BusinessModule.MODULE_MODULE, // 上游模块(标品模块,可以为多个) DemoModule.MODULE_MODULE, } ) @Module.module(SecondModule.MODULE_MODULE) @Module.Advanced(selfBuilt = true, application = true) @UxHomepage(@UxRoute(model = WorkRecord.MODEL_MODEL)) public class SecondModule implements PamirsModule { public static final String MODULE_MODULE = "demo_core_ext"; public static final String MODULE_NAME = "DemoCoreExt"; @Override public String[] packagePrefix() { return new String[]{ "pro.shushi.pamirs.second" }; } } application.yml配置文件 pamirs: boot: modules: ….. – demo_core // 加标准工程 – demo_core_ext maven配置 父工程依赖 <dependencyManagement> <dependencies> ….. <dependency> <groupId>pro.shushi.pamirs.demo</groupId> <artifactId>pamirs-demo-api</artifactId> <version>1.0.0-SNAPSHOT</version> </dependency> <dependency> <groupId>pro.shushi.pamirs.demo</groupId> <artifactId>pamirs-demo-core</artifactId> <version>1.0.0-SNAPSHOT</version> </dependency> ….. </dependencies> </dependencyManagement> api子工程加入依赖 <dependency> <groupId>pro.shushi.pamirs.demo</groupId> <artifactId>pamirs-demo-api</artifactId> </dependency> boot子工程加入依赖 <dependency> <groupId>pro.shushi.pamirs.demo</groupId> <artifactId>pamirs-demo-core</artifactId> </dependency> 数据库设置 base数据库要跟标品工程一致 注意事项 标品工程的第三方依赖,在扩展工程都要有,否则启动会报错 扩展模块功能开发 菜单扩展 1、可以按需隐藏标品的菜单; 2、可以根据扩展包的实际情况增加菜单; 模型扩展 1、扩展包可继承标品已有模型; 新增字段、覆盖字段,不继承 2、扩展包可根据实际情况新增自有模型; 函数扩展 1、扩展包可根据实际情况【覆写】标品中的函数; 2、扩展包可根据实际情况【新增】自有函数; 3、扩展包可通过Hook机制实现业务的个性化; 4、扩展包可根据自身业务情况实现标品中的扩展点; 5、……

    2024年6月1日
    3.1K00
  • 如何扩展行为权限

    注意:5.2.8 以上版本适用 需求 我们的权限控制需要在页面上有交互才可以在管理中心控制该动作权限,在没有页面交互的动作是不能进行授权操作的。所以本文章将介绍如何将页面上没有交互的动作接入到系统权限中管理。 一、扩展系统权限的菜单页面 实现 步骤: 创建授权节点实现权限节点扩展接口:pro.shushi.pamirs.auth.api.extend.load.PermissionNodeLoadExtendApi#buildRootPermissions @Component @Order(88) public class MyTestNodeLoadExtend implements PermissionNodeLoadExtendApi { public static final String MODEL = AuthTest.MODEL_MODEL; public static final String MODULE = TopModule.MODULE_MODULE; public static final String FUN = "dataStatus"; @Override public List<PermissionNode> buildRootPermissions(PermissionLoadContext loadContext, List<PermissionNode> nodes) { //创建授权根节点 PermissionNode root = createMyNode(); List<PermissionNode> newNodes = new ArrayList<>(); //从缓存中读取需要授权的Action Action cacheAction = PamirsSession.getContext().getExtendCache(ActionCacheApi.class).get(MODEL, FUN); if (cacheAction != null) { //将该Action放入权限树 //权限鉴权的path路径是根据【cacheAction.getModel() + cacheAction.getName()】拼接的。和MODULE没有关系,这里MODULE可以自定义。 AuthNodeHelper.addNode(newNodes, root, AuthNodeHelper.createActionNode(MODULE, cacheAction, root)); } nodes.add(0, root); return newNodes; } private PermissionNode createMyNode() { return AuthNodeHelper.createNodeWithTranslate("MyNode", "自定义节点"); } } 在管理中心中我们可以看到代码里创建的授权节点。 给角色分配该动作的权限,调用我们配置的AuthTest模型的dataStatus动作看效果。 二、扩展菜单下的动作权限 实现 步骤: 创建viewAction用于作为权限菜单"permissionExtension"是自定义的viewAction的name,用于下面拼path路径鉴权。因为这里只需要在系统权限那边利用这个viewAction创建出授权节点。所以”权限扩展form“可以随意定义名字,系统会拿默认视图。 @Model.model(AuthTest.MODEL_MODEL) @Component @UxRouteButton( action = @UxAction(name = "permissionExtension", displayName = "权限扩展", label = "权限扩展", contextType = ActionContextTypeEnum.CONTEXT_FREE), value = @UxRoute(model = AuthTest.MODEL_MODEL, viewName = "权限扩展form", openType = ActionTargetEnum.ROUTER)) public class AuthTestAction { @Action(displayName = "启用", contextType = ActionContextTypeEnum.SINGLE) public AuthTest dataStatus(AuthTest data) { data.setOrgName("给个值"); return data; } } 创建授权节点实现权限节点扩展接口:pro.shushi.pamirs.auth.api.extend.load.PermissionNodeLoadExtendApi#buildRootPermissions @Component @Order(88) public class MyTestNodeLoadExtend implements PermissionNodeLoadExtendApi { //创建授权根节点 @Override public List<PermissionNode> buildRootPermissions(PermissionLoadContext loadContext, List<PermissionNode> nodes) { PermissionNode root = AuthNodeHelper.createNodeWithTranslate("CustomNode", "自定义节点"); List<PermissionNode> newNodes = new ArrayList<>(); newNodes.add(root); ViewAction viewAction = new ViewAction().setModel(AuthTest.MODEL_MODEL).setName("permissionExtension").queryOne(); //将该Action放入权限树 //权限鉴权的path路径是根据【viewAction.getModel(),…

    2024年11月1日
    1.5K00
  • 如何跳过固定path路径下面所有的按钮权限

    场景: 业务上需要跳过弹窗打开里面的所有按钮权限。 实践: 实现AuthFilterService权限接口。 package pro.shushi.pamirs.top.api.spi; import org.apache.commons.lang3.StringUtils; import org.springframework.core.annotation.Order; import org.springframework.stereotype.Component; import pro.shushi.pamirs.auth.api.spi.AuthFilterService; import pro.shushi.pamirs.boot.web.session.AccessResourceInfoSession; import pro.shushi.pamirs.meta.common.spi.SPI; /** * @author Yexiu at 09:04 on 2024/9/27 */ @Order(88) @Component @SPI.Service public class CustomAuthFilterService implements AuthFilterService { public static final String skipPath = "/top_demo/uiMenuc6238c29bca44250a041691565056a63/ACTION#top.Teacher#uiView2b60cc6daa334c7280cb78207d41addc"; @Override public Boolean isAccessAction(String model, String name) { String path = AccessResourceInfoSession.getInfo().getOriginPath(); if (StringUtils.isNotEmpty(path) && path.startsWith(skipPath)) { //返回true就代表通过验证 return true; } return null; } @Override public Boolean isAccessAction(String path) { if (StringUtils.isNotEmpty(path) && path.startsWith(skipPath)) { //返回true就代表通过验证 return true; } return null; } } 可以看到弹窗下面的按钮都不需要权限控制了。

    2025年3月11日
    1.3K00

Leave a Reply

Please Login to Comment