动态视图支持权限配置

动态页面在前端自定义之后,目前是没办法通过权限去控制路由页面的权限的,本篇文章将介绍如何解决这个问题。
阅读本篇文章之前,应已经实现自定义页面渲染动态视图。参考文章:自定义视图内部渲染动态视图


实现思路:

  1. 通过自定义页面里设计的组件api名字,获取配置的路由页面名字。
  2. 解析路由页面包含的所有动作,拼接权限节点。
  3. 将路由页面的权限节点,拼到自定义视图所在菜单的权限管理上。

效果,路由页面的动作出现在自定义视图所在的菜单权限节点上
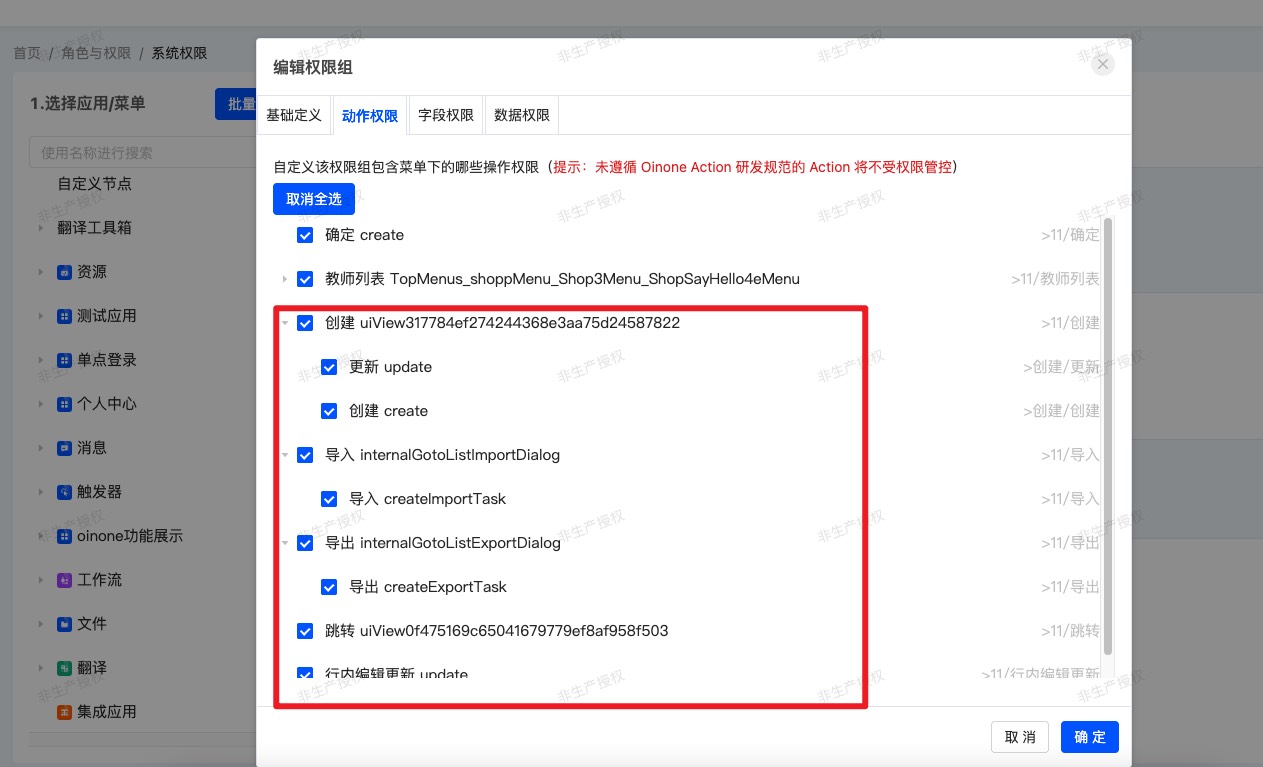
动态视图支持权限配置

代码示例

package pro.shushi.pamirs.top.core.auth;

import org.apache.commons.collections4.CollectionUtils;
import org.springframework.beans.factory.annotation.Autowired;
import org.springframework.core.annotation.Order;
import org.springframework.stereotype.Component;
import pro.shushi.pamirs.auth.api.entity.node.ActionPermissionNode;
import pro.shushi.pamirs.auth.api.entity.node.PermissionNode;
import pro.shushi.pamirs.auth.api.extend.load.PermissionNodeLoadExtendApi;
import pro.shushi.pamirs.auth.api.loader.visitor.AuthCompileContext;
import pro.shushi.pamirs.auth.api.loader.visitor.AuthCompileVisitor;
import pro.shushi.pamirs.auth.api.loader.visitor.DslParser;
import pro.shushi.pamirs.auth.api.pmodel.AuthResourceAuthorization;
import pro.shushi.pamirs.auth.api.utils.AuthAuthorizationHelper;
import pro.shushi.pamirs.boot.base.model.Menu;
import pro.shushi.pamirs.boot.base.model.View;
import pro.shushi.pamirs.boot.base.model.ViewAction;
import pro.shushi.pamirs.boot.base.ux.model.UIView;
import pro.shushi.pamirs.boot.base.ux.model.UIWidget;
import pro.shushi.pamirs.boot.base.ux.model.view.UIField;
import pro.shushi.pamirs.boot.web.loader.path.AccessResourceInfo;
import pro.shushi.pamirs.boot.web.loader.path.ResourcePath;
import pro.shushi.pamirs.boot.web.manager.MetaCacheManager;
import pro.shushi.pamirs.meta.annotation.fun.extern.Slf4j;
import pro.shushi.pamirs.meta.common.spi.SPI;
import pro.shushi.pamirs.top.api.TopModule;

import java.util.ArrayList;
import java.util.List;
import java.util.Map;
import java.util.Optional;

@Component
@Order(88)
@SPI.Service
@Slf4j
public class MyTestNodeLoadExtend implements PermissionNodeLoadExtendApi {

    @Autowired
    protected MetaCacheManager metaCacheManager;

    @Override
    public List<PermissionNode> buildNextPermissions(PermissionNode selected, List<PermissionNode> nodes) {
        // 动态页面所属的菜单name
        List<String> menuNames = new ArrayList<>();
        menuNames.add("uiMenu3c094a75bd88461ba0ad780825069b32");
        // 自定义组件api名称
        List<String> apiNames = new ArrayList<>();
        apiNames.add("dynamicView");

        List<ActionPermissionNode> newNodes = new ArrayList<>();
        for (String menuName : menuNames) {
            List<ActionPermissionNode> actionPermissionNodes = buildActionPermissionNodes(selected, menuName, apiNames);
            if (CollectionUtils.isNotEmpty(actionPermissionNodes)) {
                newNodes.addAll(actionPermissionNodes);
            }
        }
        nodes.addAll(newNodes);
        return nodes;
    }

    private List<ActionPermissionNode> buildActionPermissionNodes(PermissionNode selected, String menuName, List<String> apiNames) {
        String path = ResourcePath.generatorPath(TopModule.MODULE_MODULE, menuName);
        if (!path.equals(selected.getPath())) {
            return null;
        }
        Menu menu = metaCacheManager.fetchCloneMenus(TopModule.MODULE_MODULE).stream()
                .filter(v -> v.getName().equals(menuName))
                .findFirst()
                .orElse(null);
        if (menu == null) {
            return null;
        }
        menu.fieldQuery(Menu::getViewAction);
        View mainView = fetchMainView(menu.getViewAction());
        if (mainView == null) {
            return null;
        }
        UIView parser = new UIView();
        try {
            parser = DslParser.parser(mainView);
        } catch (Throwable e) {
            log.error("compile view error. model: {}, name: {}", mainView.getModel(), mainView.getName(), e);
        }
        List<ActionPermissionNode> dyNodes = new ArrayList<>();
        for (String apiName : apiNames) {
            List<ActionPermissionNode> viewPermissionNode = getViewPermissionNode(selected, parser, menu, apiName);
            if (CollectionUtils.isNotEmpty(viewPermissionNode)) {
                dyNodes.addAll(viewPermissionNode);
            }
        }
        return dyNodes;
    }

    private List<ActionPermissionNode> getViewPermissionNode(PermissionNode selected, UIView parser, Menu menu, String apiName) {

        String viewName = findLabelByApiName(parser.getWidgets(), apiName);
        View view = new View().setName(viewName).queryOne();
        if (view == null) {
            log.info("incorrect view name, viewName: {}", viewName);
            return null;
        }
        Long groupId = selected.getGroupId();
        Map<String, AuthResourceAuthorization> authorizationMap = null;
        if (groupId != null) {
            authorizationMap = AuthAuthorizationHelper.fetchActionAuthorizationMap(groupId);
        }
        return compileByMenu(view, menu, menu.getViewAction(), authorizationMap);
    }

    private View fetchMainView(ViewAction viewAction) {
        String resModel = Optional.ofNullable(viewAction.getResModel()).orElse(viewAction.getModel());
        View resView = viewAction.getResView();
        View mainView;
        if (resView == null || resView.getTemplate() == null) {
            mainView = metaCacheManager.fetchView(resModel, viewAction.getResViewName(), viewAction.getViewType(), false);
        } else {
            mainView = resView;
        }
        return mainView;
    }

    private List<ActionPermissionNode> compileByMenu(View mainView, Menu menu, ViewAction viewAction, Map<String, AuthResourceAuthorization> authorizationMap) {
        AccessResourceInfo info = new AccessResourceInfo();
        info.setModule(menu.getModule());
        info.setModel(viewAction.getModel());
        info.setActionName(viewAction.getName());
        info.setMenu(menu.getName());
        info.setViewAction(viewAction);
        return compile(info, mainView, authorizationMap);
    }

    private List<ActionPermissionNode> compile(AccessResourceInfo info, View mainView, Map<String, AuthResourceAuthorization> authorizationMap) {
        if (log.isDebugEnabled()) {
            log.debug("auth compile view. model: {}, name: {}", mainView.getModel(), mainView.getName());
        }
        AuthCompileContext context = new AuthCompileContext(info, authorizationMap);
        AuthCompileVisitor visitor = new AuthCompileVisitor(context);
        try {
            DslParser.visit(mainView, visitor);
        } catch (Throwable e) {
            log.error("compile view error. model: {}, name: {}", mainView.getModel(), mainView.getName(), e);
        }
        return visitor.getNodes();
    }

    private String findLabelByApiName(List<? extends UIWidget> elements, String apiName) {
        if (elements == null || elements.isEmpty()) {
            return null;
        }
        for (UIWidget element : elements) {
            // 判断是否是指定组件。
            if (element instanceof UIField) {
                UIField field = (UIField) element;
                if (apiName.equals(field.getWidget())) {
                // 这里获取该组件的标题作为视图名字的配置,如业务有不同请自行修改。
                    return field.getLabel();
                }
            }

            List<? extends UIWidget> subElements = element.getWidgets();
            if (subElements != null && !subElements.isEmpty()) {
                String label = findLabelByApiName(subElements, apiName);
                if (label != null) {
                    return label;
                }
            }
        }
        return null;
    }

}

Oinone社区 作者:yexiu原创文章,如若转载,请注明出处:https://doc.oinone.top/dai-ma-shi-jian/21714.html

访问Oinone官网:https://www.oinone.top获取数式Oinone低代码应用平台体验

(0)
yexiu的头像yexiu数式员工
上一篇 2025年9月8日 am10:45
下一篇 2025年9月18日 pm2:51

相关推荐

  • 标品实施:从标品构建到定制(扩展)包的开发

    总体描述 Oinone有一个非常重要的特性:通过平台承载标准化产品(标品)。针对不同客户的个性化需求,不再直接修改标准产品代码,而是以扩展包的形式进行扩展和定制化,通过继承和重写标准产品的能力来满足客户需求。 本文讲解述怎么通过标品构建扩展工程的过程。 构建标品 按照Oinone的规范构建标品工程 构建扩展包 在定制模块中指定上游模块 上游依赖模块upstreams,模块定义如下: @Target({ElementType.TYPE}) @Retention(RetentionPolicy.RUNTIME) public @interface Module { // 显示名称 @AliasFor("displayName") String value() default ""; // 依赖模块名列表 String[] dependencies() default ModuleConstants.MODULE_BASE; // 上游模块名列表 String[] upstreams() default {}; …… 扩展模块示例 @Component @Module( name = SecondModule.MODULE_NAME, displayName = "DEMO扩展", version = "1.0.0", // 指定上游模块(标品模块,可以为多个) upstreams = DemoModule.MODULE_MODULE, priority = 1, dependencies = {ModuleConstants.MODULE_BASE, CommonModule.MODULE_MODULE, UserModule.MODULE_MODULE, AuthModule.MODULE_MODULE, BusinessModule.MODULE_MODULE, // 上游模块(标品模块,可以为多个) DemoModule.MODULE_MODULE, } ) @Module.module(SecondModule.MODULE_MODULE) @Module.Advanced(selfBuilt = true, application = true) @UxHomepage(@UxRoute(model = WorkRecord.MODEL_MODEL)) public class SecondModule implements PamirsModule { public static final String MODULE_MODULE = "demo_core_ext"; public static final String MODULE_NAME = "DemoCoreExt"; @Override public String[] packagePrefix() { return new String[]{ "pro.shushi.pamirs.second" }; } } application.yml配置文件 pamirs: boot: modules: ….. – demo_core // 加标准工程 – demo_core_ext maven配置 父工程依赖 <dependencyManagement> <dependencies> ….. <dependency> <groupId>pro.shushi.pamirs.demo</groupId> <artifactId>pamirs-demo-api</artifactId> <version>1.0.0-SNAPSHOT</version> </dependency> <dependency> <groupId>pro.shushi.pamirs.demo</groupId> <artifactId>pamirs-demo-core</artifactId> <version>1.0.0-SNAPSHOT</version> </dependency> ….. </dependencies> </dependencyManagement> api子工程加入依赖 <dependency> <groupId>pro.shushi.pamirs.demo</groupId> <artifactId>pamirs-demo-api</artifactId> </dependency> boot子工程加入依赖 <dependency> <groupId>pro.shushi.pamirs.demo</groupId> <artifactId>pamirs-demo-core</artifactId> </dependency> 数据库设置 base数据库要跟标品工程一致 注意事项 标品工程的第三方依赖,在扩展工程都要有,否则启动会报错 扩展模块功能开发 菜单扩展 1、可以按需隐藏标品的菜单; 2、可以根据扩展包的实际情况增加菜单; 模型扩展 1、扩展包可继承标品已有模型; 新增字段、覆盖字段,不继承 2、扩展包可根据实际情况新增自有模型; 函数扩展 1、扩展包可根据实际情况【覆写】标品中的函数; 2、扩展包可根据实际情况【新增】自有函数; 3、扩展包可通过Hook机制实现业务的个性化; 4、扩展包可根据自身业务情况实现标品中的扩展点; 5、……

    2024年6月1日
    1.9K00
  • 如何把平台功能菜单加到项目中?

    概述 在使用Oinone低代码平台进行项目开发的过程中,会存在把平台默认提供的菜单加到自己的项目中。这篇文章介绍实现方式,以角色管理为例。 1. 低代码情况 即项目是通过后端代码初始化菜单的方式。 通常在 XXXMenu.java类通过@UxMenu注解的方式,代码片段如下: 此种情况与添加项目本地的菜单无区别,具体代码: @UxMenu(value = "账号管理", icon = "icon-yonghuguanli") class AccountManage { @UxMenu("用户管理") @UxRoute(value = CustomerCompanyUserProxy.MODEL_MODEL, title = "用户管理") class CompanyUserManage { } @UxMenu("角色管理") @UxRoute(value = AuthRole.MODEL_MODEL, module = AdminModule.MODULE_MODULE, title = "角色管理") class RoleManage { } @UxMenu("操作日志") @UxRoute(value = OperationLog.MODEL_MODEL, module = AdminModule.MODULE_MODULE/***菜单所挂载的模块**/) class OperateLog { } } 2. 无代码情况 在界面设计器中,新建菜单–>选择绑定已有页面,进行发布即可。

    2024年4月19日
    1.6K00
  • 推送自定义消息

    项目中添加消息依赖 pro.shushi.pamirs.core pamirs-message-api 调用pro.shushi.pamirs.message.engine.message.MessageSender#sendSystemMail发送系统消息示例: @Action(displayName = "发送消息") public Student sendMessage(Student data){ MessageSender mailSender = (MessageSender) MessageEngine.get(MessageEngineTypeEnum.MAIL_SEND).get(null); String content = "发送自定义消息"; String subject = null; List<Long> userIds = new ArrayList<>(); userIds.add(PamirsSession.getUserId()); PamirsMessage message = new PamirsMessage() .setName(subject) .setSubject(subject) .setBody(content) .setMessageType(MessageTypeEnum.NOTIFICATION); List<PamirsMessage> messages = new ArrayList<>(); messages.add(message); SystemMessage systemMessage = new SystemMessage(); systemMessage.setPartners(userIds.stream().map(i -> (PamirsUser) new PamirsUser().setId(i)).collect(Collectors.toList())) .setType(MessageGroupTypeEnum.SYSTEM_MAIL) .setMessages(messages); mailSender.sendSystemMail(systemMessage); return data; }

    2024年8月19日
    1.1K00
  • 后端:如何自定义表达式实现特殊需求?扩展内置函数表达式

    平台提供了很多的表达式,如果这些表达式不满足场景?那我们应该如何新增表达式去满足项目的需求?目前平台支持的表达式内置函数,参考 1. 扩展表达式的场景 注解@Validation的rule字段支持配置表达式校验如果需要判断入参List类型字段中的某一个参数进行NULL校验,发现平台的内置函数不支持该场景的配置,这里就可以通过平台的机制,对内置函数进行扩展。 常见的一些代码场景,如下: package pro.shushi.pamirs.demo.core.action; ……引用类 @Model.model(PetShopProxy.MODEL_MODEL) @Component public class PetShopProxyAction extends DataStatusBehavior<PetShopProxy> { @Override protected PetShopProxy fetchData(PetShopProxy data) { return data.queryById(); } @Validation(ruleWithTips = { @Validation.Rule(value = "!IS_BLANK(data.code)", error = "编码为必填项"), @Validation.Rule(value = "LEN(data.name) < 128", error = "名称过长,不能超过128位"), }) @Action(displayName = "启用") @Action.Advanced(invisible="!(activeRecord.code !== undefined && !IS_BLANK(activeRecord.code))") public PetShopProxy dataStatusEnable(PetShopProxy data){ data = super.dataStatusEnable(data); data.updateById(); return data; } ……其他代码 } 2. 新建一个自定义表达式的函数 校验入参如果是个集合对象的情况下,单个对象的某个字段如果为空,返回false的函数。 例子:新建一个CustomCollectionFunctions类 package xxx.xxx.xxx; import org.apache.commons.collections4.CollectionUtils; import org.springframework.stereotype.Component; import pro.shushi.pamirs.meta.annotation.Fun; import pro.shushi.pamirs.meta.annotation.Function; import pro.shushi.pamirs.meta.common.constants.NamespaceConstants; import pro.shushi.pamirs.meta.util.FieldUtils; import java.util.List; import static pro.shushi.pamirs.meta.enmu.FunctionCategoryEnum.COLLECTION; import static pro.shushi.pamirs.meta.enmu.FunctionLanguageEnum.JAVA; import static pro.shushi.pamirs.meta.enmu.FunctionOpenEnum.LOCAL; import static pro.shushi.pamirs.meta.enmu.FunctionSceneEnum.EXPRESSION; /** * 自定义内置函数 */ @Fun(NamespaceConstants.expression) @Component public class CustomCollectionFunctions { /** * LIST_FIELD_NULL 就是我们自定义的表达式,不能与已经存在的表达式重复!!! * * @param list * @param field * @return */ @Function.Advanced( displayName = "校验集成的参数是否为null", language = JAVA, builtin = true, category = COLLECTION ) @Function.fun("LIST_FIELD_NULL") @Function(name = "LIST_FIELD_NULL", scene = {EXPRESSION}, openLevel = LOCAL, summary = "函数示例: LIST_FIELD_NULL(list,field),函数说明: 传入一个对象集合,校验集合的字段是否为空" ) public Boolean listFieldNull(List list, String field) { if (null == list) { return false; } if (CollectionUtils.isEmpty(list)) { return false; } for (Object data : list) { Object value =…

    2024年5月30日
    2.2K00
  • 复杂Excel模版定义

    模版示例: Demo Excel样例 代码示例: @Model.model(TestApply.MODEL_MODEL) @Model(displayName = "测试申请") public class TestApply extends IdModel { public static final String MODEL_MODEL = "top.TestApply"; @Field.String @Field(displayName = "发件人") private String addresser; @Field.String @Field(displayName = "委托单位") private String entrustedUnit; @Field.String @Field(displayName = "付款单位") private String payer; @Field.String @Field(displayName = "付款单位地址") private String paymentUnitAdd; } 模版: package pro.shushi.pamirs.top.core.temp; import org.springframework.stereotype.Component; import pro.shushi.pamirs.file.api.builder.SheetDefinitionBuilder; import pro.shushi.pamirs.file.api.builder.WorkbookDefinitionBuilder; import pro.shushi.pamirs.file.api.enmu.ExcelAnalysisTypeEnum; import pro.shushi.pamirs.file.api.enmu.ExcelDirectionEnum; import pro.shushi.pamirs.file.api.enmu.ExcelHorizontalAlignmentEnum; import pro.shushi.pamirs.file.api.model.ExcelWorkbookDefinition; import pro.shushi.pamirs.file.api.util.ExcelHelper; import pro.shushi.pamirs.file.api.util.ExcelTemplateInit; import pro.shushi.pamirs.top.api.model.TestApply; import java.util.Collections; import java.util.List; @Component public class DemoTemplate implements ExcelTemplateInit { public static final String TEMPLATE_NAME = "DemoTemplate"; @Override public List<ExcelWorkbookDefinition> generator() { WorkbookDefinitionBuilder builder = WorkbookDefinitionBuilder.newInstance(TestApply.MODEL_MODEL, TEMPLATE_NAME) .setDisplayName("测试Demo"); DemoTemplate.createSheet(builder); return Collections.singletonList(builder.build()); } private static void createSheet(WorkbookDefinitionBuilder builder) { SheetDefinitionBuilder sheetBuilder = builder.createSheet().setName("测试Demo"); buildBasicInfo(sheetBuilder); } private static void buildBasicInfo(SheetDefinitionBuilder builder) { //A1:D8:表示表头占的单元格数,范围必须大于实际表头行 BlockDefinitionBuilder mergeRange = builder.createBlock(TestApply.MODEL_MODEL, ExcelAnalysisTypeEnum.FIXED_HEADER, ExcelDirectionEnum.HORIZONTAL, "A1:D8") //预设行 .setPresetNumber(10) //合并哪几个单元格 .createMergeRange("A1:D1") .createMergeRange("A2:D2") .createMergeRange("A3:D3") .createMergeRange("A4:A6") .createMergeRange("B4:B6") .createMergeRange("C4:C6") .createMergeRange("D4:D5"); //createHeader创建行,createCell创建单元格,setField指定解析字段,setIsConfig指定为true标记该行是需要解析的值 mergeRange.createHeader().setStyleBuilder(ExcelHelper.createDefaultStyle()).setIsConfig(Boolean.TRUE) .createCell().setField("addresser").setStyleBuilder(ExcelHelper.createDefaultStyle().setWidth(6000)).and() .createCell().setField("entrustedUnit").and() .createCell().setField("payer").and() .createCell().setField("paymentUnitAdd").and() .and() .createHeader().setStyleBuilder(ExcelHelper.createDefaultStyle(typeface -> typeface.setBold(Boolean.TRUE)).setHorizontalAlignment(ExcelHorizontalAlignmentEnum.CENTER)) .createCell().setValue("Demo").and() .createCell().and() .createCell().and() .createCell().and() .and() //由于该行合并为一个单元格,所以其他可以不设置value .createHeader().setStyleBuilder(ExcelHelper.createDefaultStyle(typeface -> typeface.setBold(Boolean.TRUE)).setHorizontalAlignment(ExcelHorizontalAlignmentEnum.CENTER)) .createCell().setValue("生效金额").and() .createCell().and() .createCell().and() .createCell().and() .and() .createHeader().setStyleBuilder(ExcelHelper.createDefaultStyle(typeface -> typeface.setBold(Boolean.TRUE)).setHorizontalAlignment(ExcelHorizontalAlignmentEnum.RIGHT)) .createCell().setValue("金额单位:元").and() .createCell().and() .createCell().and() .createCell().and() .and() //easyExcel解析不了空行,所以这里写上值。由于上面使用createMergeRange把单元格合并了,并且D列有分割,这里填上每个单元格的值,把合并的单元格填为一样的。 .createHeader().setStyleBuilder(ExcelHelper.createDefaultStyle(typeface -> typeface.setBold(Boolean.TRUE)).setHorizontalAlignment(ExcelHorizontalAlignmentEnum.CENTER)) .createCell().setValue("发件人").and() .createCell().setValue("委托单位").and()…

    2024年11月18日
    2.1K00

Leave a Reply

登录后才能评论