如何在代码中使用自增ID和获取序列

在使用继承IDModel或CodeModel时,id和code是系统默认自动生成, 默认值规则:ID-->分布式ID; CODE-->根据定义的SequenceConfig规则自动生成。

在特定情况下需要落库前先生成ID或者Code,这些场景下可参照如下代码示例

一、使用自增ID

单个字段设置方式

// 主键字段,可以使用mysql的自增能力
@Field.Integer
@Field.PrimaryKey(keyGenerator = KeyGeneratorEnum.AUTO_INCREMENT)
@Field.Advanced(batchStrategy = FieldStrategyEnum.NEVER)
@Field(displayName = "id", summary = "Id字段,⾃增")
private Long id;

@Field.Integer
@Field(displayName = "自增版本")
@Field.Sequence(sequence = "SEQ", initial = 1)
private Long version;

全局设置方式

该方式会作用到每一个存储模型的id字段,在application.yml配置文件中修改id的生成规则,查找配置项关键字key-generator,默认为DISTRIBUTION(分布式id),可修改为 AUTO_INCREMENT(自增id)
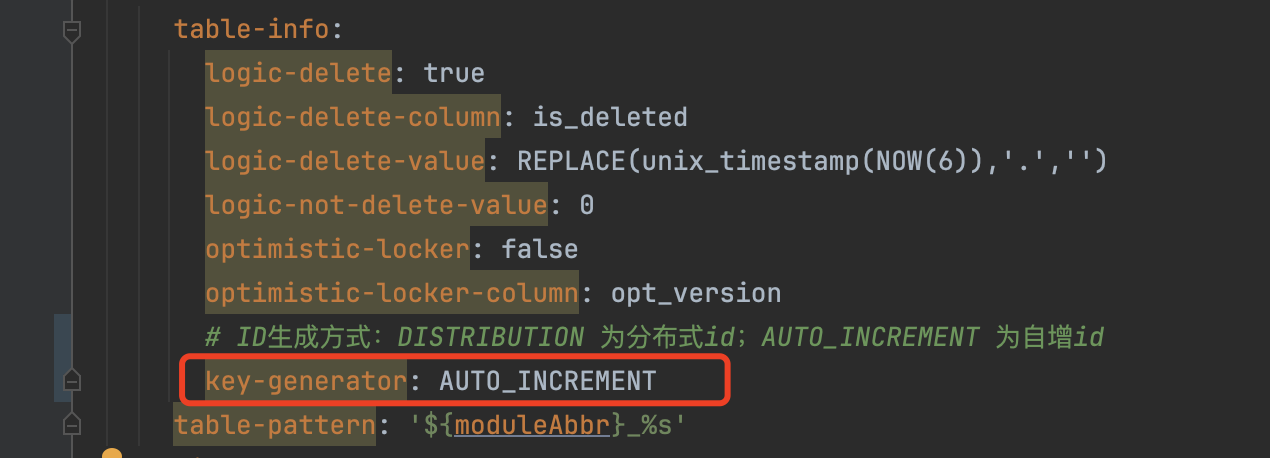
如何在代码中使用自增ID和获取序列

二、手动方式获取序列

获取方式示例1

   /**
     * 在特定场景下需要手动生成Id或者code时,可参照这个示例
     */
    public void manualSetIdCode(){
        DemoItem demoItem = new DemoItem();
        //手动生成ID和code
        Object idObj =  Spider.getDefaultExtension(IdGenerator.class).generate(PamirsTableInfo.fetchKeyGenerator(DemoItem.MODEL_MODEL));
        demoItem.setId(TypeUtils.createLong(idObj));
        Object codeObj = CommonApiFactory.getSequenceGenerator().generate("SEQ",DemoItem.MODEL_MODEL);
        String code = TypeUtils.stringValueOf(codeObj);
        demoItem.setCode(code);
        //……
    }

获取方式示例2

1、在系统启动的时候初始化SequenceConfig

package pro.shushi.pamirs.demo.core.init;

import org.springframework.stereotype.Component;
import pro.shushi.pamirs.boot.common.api.command.AppLifecycleCommand;
import pro.shushi.pamirs.boot.common.extend.MetaDataEditor;
import pro.shushi.pamirs.core.common.InitializationUtil;
import pro.shushi.pamirs.demo.api.DemoModule;
import pro.shushi.pamirs.demo.core.constant.SeqConstants;
import pro.shushi.pamirs.meta.annotation.fun.extern.Slf4j;
import pro.shushi.pamirs.meta.api.dto.meta.Meta;
import pro.shushi.pamirs.meta.enmu.SequenceEnum;

import java.util.Map;

/**
 * DemoMetadataEditor
 */
@Slf4j
@Component
public class DemoMetadataEditor implements MetaDataEditor {

    @Override
    public void edit(AppLifecycleCommand command, Map<String, Meta> metaMap) {
        InitializationUtil util = InitializationUtil.get(metaMap, DemoModule.MODULE_MODULE, DemoModule.MODULE_NAME);
        if (util == null) {
            log.error("获取初始化序列失败");
            return;
        }

        bizSequence(util);
    }

    private void bizSequence(InitializationUtil util) {
        util.createSequenceConfig("申请单编码生成", SeqConstants.NABEL_SAMPLE_APPLY_SEQ, SequenceEnum.ORDERLY_SEQ, 8)
                .setStep(1)
                .setInitial(80000000L)
                .setIsRandomStep(false);

        util.createSequenceConfig("订单编码生成", SeqConstants.NABEL_SAMPLE_ORDER_SEQ_YP, SequenceEnum.ORDERLY_SEQ, 8)
                .setPrefix("YP")
                .setStep(1)
                .setInitial(80000000L)
                .setIsRandomStep(false);
    }
}

2、在代码中使用序列

    public static String getSaleOrderCode() {
        Object sequence = CommonApiFactory.getSequenceGenerator().generate(SequenceEnum.ORDERLY_SEQ.value(),
                SeqConstants.NABEL_SAMPLE_STRUCTURE_SEQ);
        return TypeUtils.stringValueOf(sequence);
    }

    public static String getApplyOrderCode(String prefix) {
        Object sequence = CommonApiFactory.getSequenceGenerator().generate(SequenceEnum.ORDERLY_SEQ.value(),
                SeqConstants.NABEL_SAMPLE_APPLY_SEQ);
        return SeqConstants.NABEL_SAMPLE_APPLY_PREFIX + prefix + TypeUtils.stringValueOf(sequence);
    }

Oinone社区 作者:望闲原创文章,如若转载,请注明出处:https://doc.oinone.top/backend/11457.html

访问Oinone官网:https://www.oinone.top获取数式Oinone低代码应用平台体验

Like (0)
望闲's avatar望闲数式管理员
Previous 2024年5月25日 pm5:20
Next 2024年5月25日 pm7:22

相关推荐

  • IWrapper、QueryWrapper和LambdaQueryWrapper使用

    条件更新updateByWrapper 通常我们在更新的时候new一个对象出来在去更新,减少更新的字段 Integer update = new DemoUser().updateByWrapper(new DemoUser().setFirstLogin(Boolean.FALSE), Pops.<DemoUser>lambdaUpdate().from(DemoUser.MODEL_MODEL).eq(IdModel::getId, userId) 使用基础模型的updateById方法更新指定字段的方法: new 一下update对象出来,更新这个对象。 WorkflowUserTask userTaskUp = new WorkflowUserTask(); userTaskUp.setId(userTask.getId()); userTaskUp.setNodeContext(json); userTaskUp.updateById(); 条件删除updateByWrapper public List<T> delete(List<T> data) { List<Long> petTypeIdList = new ArrayList(); for(T item:data){ petTypeIdList.add(item.getId()); } Models.data().deleteByWrapper(Pops.<PetType>lambdaQuery().from(PetType.MODEL_MODEL).in(PetType::getId,petTypeIdList)); return data; } 构造条件查询数据 示例1: LambdaQueryWrapper拼接查询条件 private void queryPetShops() { LambdaQueryWrapper<PetShop> query = Pops.<PetShop>lambdaQuery(); query.from(PetShop.MODEL_MODEL); query.setSortable(Boolean.FALSE); query.orderBy(true, true, PetShop::getId); List<PetShop> petShops2 = new PetShop().queryList(query); System.out.printf(petShops2.size() + ""); } 示例2: IWrapper拼接查询条件 private void queryPetShops() { IWrapper<PetShop> wrapper = Pops.<PetShop>lambdaQuery() .from(PetShop.MODEL_MODEL).eq(PetShop::getId,1L); List<PetShop> petShops4 = new PetShop().queryList(wrapper); System.out.printf(petShops4.size() + ""); } 示例3: QueryWrapper拼接查询条件 private void queryPetShops() { //使用Lambda获取字段名,防止后面改字段名漏改 String nameField = LambdaUtil.fetchFieldName(PetTalent::getName); //使用Lambda获取Clumon名,防止后面改字段名漏改 String nameColumn = PStringUtils.fieldName2Column(nameField); QueryWrapper<PetShop> wrapper2 = new QueryWrapper<PetShop>().from(PetShop.MODEL_MODEL) .eq(nameColumn, "test"); List<PetShop> petShops5 = new PetShop().queryList(wrapper2); System.out.printf(petShops5.size() + ""); } IWrapper转为LambdaQueryWrapper @Function.Advanced(type= FunctionTypeEnum.QUERY) @Function.fun(FunctionConstants.queryPage) @Function(openLevel = {FunctionOpenEnum.API}) public Pagination<PetShopProxy> queryPage(Pagination<PetShopProxy> page, IWrapper<PetShopProxy> queryWrapper) { LambdaQueryWrapper<PetShopProxy> wrapper = ((QueryWrapper<PetShopProxy>) queryWrapper).lambda(); // 非存储字段从QueryData中获取 Map<String, Object> queryData = queryWrapper.getQueryData(); if (null != queryData && !queryData.isEmpty()) { String codes = (String) queryData.get("codes"); if (org.apache.commons.lang3.StringUtils.isNotBlank(codes)) { wrapper.in(PetShopProxy::getCode, codes.split(",")); } } return new PetShopProxy().queryPage(page, wrapper); }

    2024年5月25日
    2.5K00
  • 如何扩展自有的文件存储系统

    介绍 数式Oinone默认提供了阿里云、腾讯云、华为云、又拍云、Minio和本地文件存储这几种文件存储系统,如果我们有其他的文件存储系统需要对接,或者是扩展现有的文件系统,可以通过SPI继承AbstractFileClient注册新的文件存储系统。 代码示例 这里以扩展自有的本地文件系统为例 继承了内置的本地文件存储LocalFileClient,将其中上传文件的方法重写 package pro.shushi.pamirs.demo.core.file; import org.springframework.stereotype.Component; import org.springframework.web.bind.annotation.RequestMapping; import org.springframework.web.bind.annotation.RequestMethod; import org.springframework.web.bind.annotation.ResponseBody; import org.springframework.web.bind.annotation.RestController; import org.springframework.web.multipart.MultipartFile; import org.springframework.web.multipart.support.StandardMultipartHttpServletRequest; import pro.shushi.pamirs.framework.connectors.cdn.client.LocalFileClient; import pro.shushi.pamirs.meta.annotation.fun.extern.Slf4j; import pro.shushi.pamirs.meta.common.spi.SPI; import javax.servlet.http.HttpServletRequest; @Slf4j @Component // 注册新的文件存储系统类型 @SPI.Service(DemoLocalFileClient.TYPE) @RestController @RequestMapping("/demo_file") public class DemoLocalFileClient extends LocalFileClient { public static final String TYPE = "DEMO_LOCAL"; @Override public CdnFileForm getFormData(String fileName) { CdnConfig cdnConfig = getCdnConfig(); CdnFileForm fileForm = new CdnFileForm(); String uniqueFileName = Spider.getDefaultExtension(CdnFileNameApi.class).getNewFilename(fileName); String fileKey = getFileKey(cdnConfig.getMainDir(), uniqueFileName); //前端获取uploadUrl,上传文件到该地址 fileForm.setUploadUrl(cdnConfig.getUploadUrl() + "/demo_file/upload"); //上传后,前端将downloadUrl返回给后端 fileForm.setDownloadUrl(getDownloadUrl(fileKey)); fileForm.setFileName(uniqueFileName); Map<String, Object> formDataJson = new HashMap<>(); formDataJson.put("uniqueFileName", uniqueFileName); formDataJson.put("key", fileKey); fileForm.setFormDataJson(JSON.toJSONString(formDataJson)); return fileForm; } @ResponseBody @RequestMapping(value = "/upload", produces = "multipart/form-data;charset=UTF-8",method = RequestMethod.POST) public String uploadFileToLocal(HttpServletRequest request) { MultipartFile file = ((StandardMultipartHttpServletRequest) request).getFile("file"); // 例如可以根据file文件类型判断哪些文件是否可以上传 return super.uploadFileToLocal(request); } } 在application.yml内配置 cdn: oss: name: 本地文件系统 # 这里的type与代码中定义的文件存储系统类型对应 type: DEMO_LOCAL bucket: pamirs uploadUrl: http://127.0.0.1:8190 downloadUrl: http://127.0.0.1:6800 validTime: 3600000 timeout: 600000 active: true referer: localFolderUrl: /Users/demo/workspace/static

    2024年10月24日
    98100
  • 读写分离

    总体介绍 Oinone的读写分离方案是基于Sharding-JDBC的整合方案,要先具备一些Sharding-JDBC的知识。 [Sharding-JDBC] 读写分离依赖于主从复制来同步数据,从库复制数据后,才能通过读写分离策略将读请求分发到从库,实现读写操作的分流,请根据业务需求自行实现主从配置。 配置读写策略 配置 top_demo 模块走读写分离的逻辑数据源 pamirsSharding。 配置数据源。 为 pamirsSharding 配置数据源以及 sharding 规则。 指定需要被sharding-jdbc接管的模块 指定top_demo模块给 Sharding-JDBC 接管,接管逻辑数据源名为 pamirsSharding pamirs: framework: data: ds-map: base: base top_demo: pamirsSharding 配置数据源 pamirs: datasource: pamirsMaster: driverClassName: com.mysql.cj.jdbc.Driver type: com.alibaba.druid.pool.DruidDataSource url: jdbc:mysql://127.0.0.1:3306/61_pamirs_mydemo_master?useSSL=false&allowPublicKeyRetrieval=true&useServerPrepStmts=true&cachePrepStmts=true&useUnicode=true&characterEncoding=utf8&serverTimezone=Asia/Shanghai&autoReconnect=true&allowMultiQueries=true username: root password: ma123456 initialSize: 5 maxActive: 200 minIdle: 5 maxWait: 60000 timeBetweenEvictionRunsMillis: 60000 testWhileIdle: true testOnBorrow: false testOnReturn: false poolPreparedStatements: true asyncInit: true pamirsSlaver: # 从库数据源配置 driverClassName: com.mysql.cj.jdbc.Driver type: com.alibaba.druid.pool.DruidDataSource url: jdbc:mysql://127.0.0.1:3306/61_pamirs_mydemo_slaver?useSSL=false&allowPublicKeyRetrieval=true&useServerPrepStmts=true&cachePrepStmts=true&useUnicode=true&characterEncoding=utf8&serverTimezone=Asia/Shanghai&autoReconnect=true&allowMultiQueries=true username: root password: ma123456 initialSize: 5 maxActive: 200 minIdle: 5 maxWait: 60000 timeBetweenEvictionRunsMillis: 60000 testWhileIdle: true testOnBorrow: false testOnReturn: false poolPreparedStatements: true asyncInit: true 配置读写数据源及规则 pamirs: sharding: define: data-sources: pamirsSharding: pamirsMaster # 为逻辑数据源pamirsSharding指向主数据源pamirsMaster。 models: "[trigger.PamirsSchedule]": tables: 0..13 rule: pamirsSharding: actual-ds: # 指定逻辑数据源pamirsSharding代理的数据源为pamirsMaster、pamirsSlaver – pamirsMaster – pamirsSlaver # 以下配置跟sharding-jdbc配置一致 replicaQueryRules: – data-sources: pamirsSharding: primaryDataSourceName: pamirsMaster # 写库数据源 replicaDataSourceNames: – pamirsSlaver # 读库数据源 loadBalancerName: round_robin load-balancers: round_robin: type: ROUND_ROBIN # 读写规则

    2025年5月22日
    76600
  • Maven Setting 配置详解

    常用标签概览 servers/server:配置私有仓库用户名和密码进行认证,以 id 进行关联。 mirrors/mirror:配置镜像仓库拉取时的地址源和额外配置。 profiles/profile:配置多个可能使用的镜像仓库。 activeProfiles/activeProfile:配置默认激活的 profile,以 id 进行关联。 Oinone 私有仓库配置 以下配置可以在使用 Oinone 私有仓库的同时,也可以正常使用 aliyun 镜像源。 <servers> <server> <id>shushi</id> <username>${username}</username> <password>${password}</password> </server> </servers> <mirrors> <mirror> <id>shushi</id> <mirrorOf>shushi</mirrorOf> <url>http://ss.nexus.ixtx.fun/repository/public</url> <!– 忽略 https 认证,maven 版本过高时需要配置 –> <blocked>false</blocked> </mirror> </mirrors> <profiles> <profile> <id>shushi</id> <repositories> <repository> <!– 对应 server.id –> <id>shushi</id> <url>http://ss.nexus.ixtx.fun/repository/public</url> <releases> <enabled>true</enabled> </releases> <snapshots> <enabled>true</enabled> </snapshots> </repository> </repositories> <pluginRepositories> <pluginRepository> <!– 对应 server.id –> <id>shushi</id> <url>http://ss.nexus.ixtx.fun/repository/snapshots</url> <releases> <enabled>false</enabled> </releases> <snapshots> <enabled>true</enabled> </snapshots> </pluginRepository> </pluginRepositories> </profile> <profile> <id>aliyun</id> <repositories> <repository> <id>aliyun</id> <url>https://maven.aliyun.com/repository/public</url> <releases> <enabled>true</enabled> </releases> <snapshots> <enabled>false</enabled> </snapshots> </repository> </repositories> <pluginRepositories> <pluginRepository> <id>aliyun</id> <url>https://maven.aliyun.com/repository/public</url> <releases> <enabled>true</enabled> </releases> <snapshots> <enabled>false</enabled> </snapshots> </pluginRepository> </pluginRepositories> </profile> </profiles> <activeProfiles> <!– 使用 shushi 私有仓库 –> <activeProfile>shushi</activeProfile> <!– 使用 aliyun 镜像仓库 –> <activeProfile>aliyun</activeProfile> </activeProfiles> 常见问题 使用 mvn 时无法拉取 Oinone 最新版镜像,提示找不到对应的包 原因:在 Oinone 开源后,oinone-pamirs 内核相关包都被部署到 maven 中央仓库,但由于其他镜像仓库的同步存在延时,在未正确同步的其他镜像源拉取时会出现找不到对应的包相关异常。 解决方案:检查 mirrors 中是否配置了 aliyun 镜像源,如果配置了,使用上述 Oinone 私有仓库配置重新配置后,再进行拉取。这一问题是由于 mirrors 配置不当,拦截了所有从 maven 中央仓库拉取的地址替换为了 aliyun 镜像源导致的。

    2025年11月10日
    73600
  • 如何重写获取首页的方法

    介绍 用户登录成功后或者访问网页不带任何路由参数的时候前端会请求全局的首页的视图动作viewAction配置,然后跳转到该视图动作viewAction 方案 我们可以通过在该方法的后置hook自定义获取首页的逻辑,下面以按角色跳转不同首页的需求示例 package pro.shushi.pamirs.demo.core.hook; import org.apache.commons.collections4.CollectionUtils; import org.springframework.stereotype.Component; import pro.shushi.pamirs.auth.api.model.AuthRole; import pro.shushi.pamirs.boot.base.enmu.BaseExpEnumerate; import pro.shushi.pamirs.boot.base.model.ViewAction; import pro.shushi.pamirs.boot.web.loader.PageLoadAction; import pro.shushi.pamirs.demo.api.model.DemoItemCategory; import pro.shushi.pamirs.demo.api.model.DemoItemLabel; import pro.shushi.pamirs.meta.annotation.Hook; import pro.shushi.pamirs.meta.api.CommonApiFactory; import pro.shushi.pamirs.meta.api.core.faas.HookAfter; import pro.shushi.pamirs.meta.api.dto.fun.Function; import pro.shushi.pamirs.meta.api.session.PamirsSession; import pro.shushi.pamirs.meta.common.exception.PamirsException; import pro.shushi.pamirs.user.api.model.PamirsUser; import java.util.List; import java.util.stream.Collectors; @Component public class DemoHomepageHook implements HookAfter { private static final String TEST_ROLE_CODE_01 = "ROLE_1211"; private static final String TEST_ROLE_CODE_02 = "ROLE_1211_1"; @Override @Hook(module = {"base"}, model = {ViewAction.MODEL_MODEL}, fun = {"homepage"}) public Object run(Function function, Object ret) { if (ret == null) { return null; } ViewAction viewAction = getViewActionByCurrentRole(); if (viewAction != null) { ViewAction retNew = CommonApiFactory.getApi(PageLoadAction.class).load(viewAction); ViewAction viewActionRet = (ViewAction) ((Object[]) ret)[0]; viewActionRet.set_d(retNew.get_d()); } return ret; } protected ViewAction getViewActionByCurrentRole() { try { PamirsUser user = new PamirsUser(); user.setId(PamirsSession.getUserId()); user.fieldQuery(PamirsUser::getRoles); List<AuthRole> roles = user.getRoles(); if (CollectionUtils.isNotEmpty(roles)) { List<String> roleCodes = roles.stream().map(AuthRole::getCode).collect(Collectors.toList()); if (roleCodes.contains(TEST_ROLE_CODE_01)) { return new ViewAction().setModel(DemoItemCategory.MODEL_MODEL).setName("DemoMenus_ItemPMenu_DemoItemAndCateMenu_DemoItemCategoryMenu").queryOne(); } else if (roleCodes.contains(TEST_ROLE_CODE_02)) { return new ViewAction().setModel(DemoItemLabel.MODEL_MODEL).setName("DemoMenus_ItemPMenu_DemoItemAndCateMenu_DemoItemLabelMenu").queryOne(); } } } catch (PamirsException exception) { if (PamirsSession.getUserId() == null) { throw PamirsException.construct(BaseExpEnumerate.BASE_USER_NOT_LOGIN_ERROR, exception.getCause()).errThrow(); } else { throw exception; } } return null; } }

    2024年7月6日
    2.7K00

Leave a Reply

Please Login to Comment