
Oinone开发的业务应用部署与升级

应用部署

中间件及资源要求

用Oinone开发的业务工程后端本质是一个Springboot工程,其部署方式与其他Springboot工程类似;

中间件及版本

中间件 版本 说明
Java(jdk) 1.8 1.8_221+,低于这个版本需要覆盖JCE
Reids 4.x、5.x
Nginx 版本无特殊要求
MySQL 5.7.x, 8.0.x 推荐8.0.x
zk 3.4.x, 3.5.x
RocketMQ 4.x,推荐4.7+ 按需安装

硬件资源建议

这里列出的资源列表仅是建议值;实际情况需根据业务数据量和用户访问量进行综合评估。

  • 总体说明:线上部署时数据库强烈建议使用云资源 或者 公司提供的公共资源,并配置完整的数据备份策略(线上环境数据备份很重要)
  • 推荐指标:考虑系统余量(内存峰值使用率<=85%,硬盘三年的使用量<=80%)
  • Oinone业务应用部署,所需要的中间件与用标准的SpringBoot工程相比,并无多大的区别(对Redis性能要求稍等高点,其他的中间件参考项目部署的资源就可以)。下面列举出来的资源是预估值,实际项目可以根据访问量等做对应的调整。
组件 CPU核数 内存 硬盘 实例数 说明
Nginx - - 5G 1 静态资源
zk 2c 1.5G+ 20G 1/3 建议集群版安装
Redis 2c 8G+ 20G 1 可自己搭建,也可用云上资源
MySQL 4c 8G+ 300G+ 1 使用已有资源/云资源, 建议使用云资源
OSS 2c 4G - 1. 使用云上资源或搭建MINIO
Oinone业务应用 4c 8G 50G 部署包数 * 2+

项目初期业务访问量不大的情况下,高可用的场景初期可以使用 2台 4c16G的机器; 不考虑高可用的情况 1台 4c16G机器;强烈建议线上使用高可用的部署策略

后端部署

设计器页面数据导出

若项目中没有用到界面设计器设计器页面,则忽略该步骤。

1、项目中有用到界面设计器设计器页面,首先需要把设计页面导出
1.1 通过接口的方式执行导出, 并把调用页面导出的结果JSON数据保存下来;

  • 先执行登录

    mutation {
    pamirsUserTransientMutation {
        login(user: { login: "admin", password: "admin" }) {
            needRedirect
            broken
            errorMsg
            errorCode
            errorField
        }
    }
    }
  • 执行界面数据导出,请求示例:

    mutation {
    uiDesignerExportReqMutation {
        export(
            data: { module: "demo_core", fileName: "demo_meta", moduleBasics: false }
        ) {
            jsonUrl
        }
    }
    }
  • 更多导出方式(如:按菜单导出、按页面导出),参考: https://doc.oinone.top/designer/uidesigner/7294.html

1.2 在应用中心执行导出
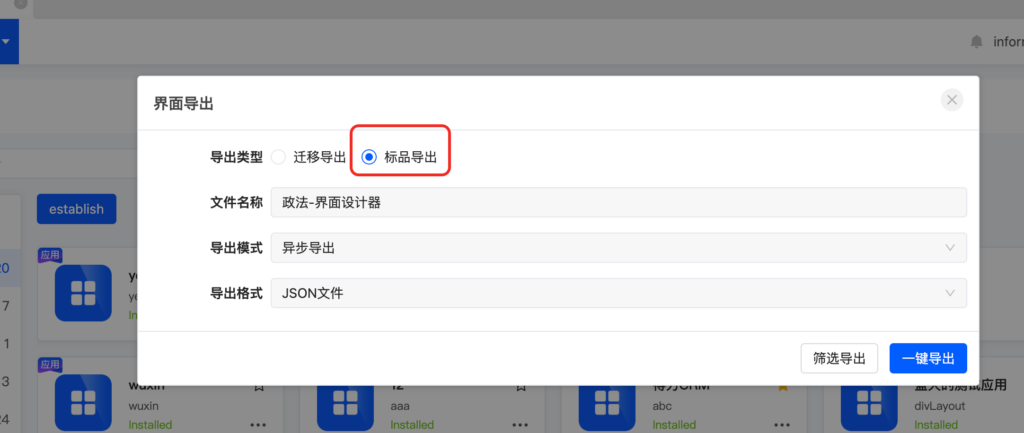
Oinone开发的业务应用部署与升级
导出成功后,在应用环境的设计导出中找到导入记录,把到处结果的JSON文件保存下来;

目标环境有设计器

数据数据在应用中心可视化的方式进行设计数据的导入和导出

业务工程中导入设计页面数据

后端工程中把界面设计器的页面数据导入,若无通过界面设计器设计页面时忽略

  • 把上面导出的页面数据(JSON文件)放入到resources目录下,如防止的位置:resources/install/hr_demo_ui.json

  • 业务工程中导入示例代码

package pro.shushi.pamirs.hr.core.init;

import org.springframework.beans.factory.annotation.Autowired;
import org.springframework.context.ApplicationContext;
import org.springframework.core.annotation.Order;
import org.springframework.stereotype.Component;
import pro.shushi.pamirs.boot.common.api.command.AppLifecycleCommand;
import pro.shushi.pamirs.boot.common.extend.MetaDataEditor;
import pro.shushi.pamirs.core.common.InitializationUtil;
import pro.shushi.pamirs.hr.api.HrSimpleModule;
import pro.shushi.pamirs.meta.annotation.fun.extern.Slf4j;
import pro.shushi.pamirs.meta.api.dto.meta.Meta;
import pro.shushi.pamirs.metadata.manager.core.helper.DesignerInstallHelper;
import pro.shushi.pamirs.metadata.manager.core.helper.WidgetInstallHelper;

import java.util.Map;

@Slf4j
@Order(Integer.MAX_VALUE-1)
@Component
public class DemoAppMetaInstall implements MetaDataEditor {
    @Autowired
    private ApplicationContext applicationContext;

    @Override
    public void edit(AppLifecycleCommand command, Map<String, Meta> metaMap) {
        //关闭导入
        if (!doImport()) {
            return;
        }
        log.info("[设计器业务元数据导⼊]");
        InitializationUtil bizInitializationUtil = InitializationUtil.get(metaMap, HrSimpleModule.MODULE_MODULE/***改成⾃⼰的Module*/,
                HrSimpleModule.MODULE_NAME/***改成⾃⼰的Module*/);
        DesignerInstallHelper.mateInitialization(bizInitializationUtil, "install/hr_demo_ui.json");
        log.info("[⾃定义组件元数据导⼊]");
        // 写法1: 将组件元数据导⼊到⻚⾯设计器. 只有在安装设计器的服务中执⾏才有效果
        WidgetInstallHelper.mateInitialization(metaMap, "install/hr_demo_ui.json");
    }

    private boolean doImport() {
        // ⾃定义导⼊判断. 避免⽤于设计的开发环境执⾏导⼊逻辑
        // 开发环境即设计器页面的源环境不要安装
        // 开发环境即设计器页面的源环境不要安装
        /**
        String[] envs = applicationContext.getEnvironment().getActiveProfiles();
        List<String> envList = Lists.newArrayList(envs);
        return CollectionUtils.isNotEmpty(envList) && (envList.contains("prod"));
         **/
        return Boolean.FALSE;
    }
}

后端打包部署

1、后端工程是标准的Springboot工程,部署方式也是类似

2、部署方式

  • 可通过 java -jar 的方式部署
  • 可通过 Docker方式部署
  • 可打成 war包部署在tomcat或者国产化的TongWeb上

3、后端工程也接入到自动化部署工具中,如Jenkins中;

前端部署

前端本质上就是一个VUE工程,对应的部署方式跟通用的用VUE写的前端工程类似。部署的步骤:

1、打包,在前端boot工程下(如:ss-boot)执行打包命令:pnpm run build

2、将打包好的dist包上传到服务器上,用nginx启动即可

3、用nginx启动情况下,nginx的配置如下:

server {
    # 根据实际详情修改
    listen 8090;
    # 根据实际详情修改
    server_name 127.0.0.1;

    location / {
        # 根据实际详情修改(前端dist文件对应的路径)
        root /Users/wangxian/nginx/html/mis/v3/dist;
        try_files $uri $uri/ /index.html;
        index  index.html index.htm;
    }

    location /pamirs {
        # 根据实际详情修改(后端接口地址)
        proxy_pass http://127.0.0.1:8191;
        proxy_set_header X-Real-IP $remote_addr;
        proxy_set_header X-Forwarded-For $proxy_add_x_forwarded_for;
    }
}

4、配置修改保存后,执行启动或者重启生效

应用升级

后端升级

1、从版本更新日志:https://doc.oinone.top/version/16232.html 中获取对应的版本信息;更新日志中的后端版本包信息 获取后端版本信息;通常只用关注oinone-bom的版本号

<!-- 平台基础 -->
<oinone.version>5.7.4.6</oinone.version>

2、后端工程修改主POM中的oinone.version,修改后重新执行maven的更新即可

前端升级

1、从版本更新日志:https://doc.oinone.top/version/16232.html 中获取对应的版本信息。更新日志中的前端版本包信息 获取前端版本信息;

2、升级步骤
修改package.json中依赖oinone的包的版本号,并重新安装。

  • 将ss-admin-widget、ss-boot、ss-oinone、ss-project(或者更多自定义扩展的工程)中的package.json中@kunlun前缀的包,修改为要升级的版本。

3、后在最外层的包ss-front-modules执行pnpm run clean清除依赖,pnpm install重新安装依赖

设计器升级

1、从版本更新日志:https://doc.oinone.top/version/16232.html 中获取对应的版本信息。更新日志中的镜像说明和 镜像拉取 获取镜像信息;

2、在服务器找到Docker启动的结构包,通常是oinone-op-ds-all-full或者 oinone-op-ds-all-mini,修改startup.sh中的镜像版号,示例代码如下:

#!/bin/bash
configDir=$(pwd)
version=5.2.21.4
IP=192.168.0.121
docker run -d --name designer-allinone \
-e DUBBO_IP_TO_REGISTRY=$IP \
-e DUBBO_PORT_TO_REGISTRY=20880 \
-p 8099:8091 \
-p 88:80 \
-p 15555:15555 \
-p 20880:20880 \
-v $configDir/config/:/opt/pamirs/ext \
-v $configDir/nginx:/opt/pamirs/nginx/vhost \
-v $configDir/logs:/opt/pamirs/logs \
-v $configDir/lib:/opt/pamirs/outlib harbor.oinone.top/oinone/oinone-designer-mini-v5.2:$version

3、设计器的yml文件,结构包中的 config/application.yml; 绝大多数情况升级不需要修改application.yml;只有在极少的情况下可能需要改application.yml,比如:新增加了模块。此时在设计器的版本更新日志中会有明确说明;

4、实际项目中,设计器所链接的中间件都要求外置到容器外部,即部署oinone-op-ds-all-mini版本;

5、如果包镜像名已经存在,还需要删除掉老版本的镜像;

6、执行startup.sh

Oinone社区 作者:望闲原创文章,如若转载,请注明出处:https://doc.oinone.top/install/20693.html

访问Oinone官网:https://www.oinone.top获取数式Oinone低代码应用平台体验

Like (0)
望闲's avatar望闲数式管理员
Previous 2025年3月17日 am11:58
Next 2025年3月19日 am10:54

相关推荐

  • 如何排查启动依赖错误的问题

    场景 启动的时候可能会出现以下错误提示 启动模块中包含jar包或者数据库中不存在的模块 启动模块中包含不存在的模块 启动模块互斥模块中包含已安装模块 排查项 确保启动工程的application.yml中的启动模块pamirs.boot.modules配置项内的模块在pom.xml内依赖了对应模块的jar包 确保出问题的模块的定义文件内的包扫描前缀packagePrefix方法内的路径定义正确,该路径可以是多个,但是一定要包含模块下所有子工程的路径,包括但不限于api子工程、core工程等,另外该路径也不能和其他模块的配置有重复、交集、包含关系(例如:a模块是 aa.bb.cc, b模块是aa.bb,这样b模块的路径就包含了a模块的) 启动类里spring自带的@ComponentScan.basePackages注解项需要包含所有依赖模块的路径 无代码应用创建的时候,配置了依赖模块。但这个依赖没有被本地安装,该模块就会出问题,要么删除该依赖,要么在代码里添加该依赖。

    2024年7月18日
    2.3K00
  • 低代码示例工程oinone-example启动说明

    运行低代码后端示例工程 1. 前置准备 1.1. 解压(部署.zip),找到后端工程oinone-example 1.2.下载idea以及安装平台的idea插件 1.2.1 jdk安装(已安装请忽略) 如本机环境没有安装jdk8(jdk1.8.221+),需先安装:mac:https://doc.oinone.top/oio4/9225.htmlwindow:https://doc.oinone.top/oio4/9226.html 1.2.2 idea的插件安装教程: mac:https://doc.oinone.top/oio4/9225.htmlwindows:https://doc.oinone.top/oio4/9226.html 1.2.3 maven下载安装(已安装请忽略) mvn下载地址,推荐安装3.6.3https://archive.apache.org/dist/maven/maven-3/3.6.3/binaries/mac:https://doc.oinone.top/oio4/9225.htmlwindows:https://doc.oinone.top/oio4/9226.html 2. 修改bootstrap.yml中运行环境配置 修改其中zk的IP:192.168.0.121->改成docker安装的宿主机IP默认profiles设置是dev,注意对应生效的yml文件为applicaiton-dev.yml spring: profiles: active: dev application: name: pamirs-project cloud: service-registry: auto-registration: enabled: false pamirs: default: environment-check: true tenant-check: true — spring: profiles: dev cloud: service-registry: auto-registration: enabled: false config: enabled: false uri: http://127.0.0.1:7001 label: master profile: dev nacos: server-addr: http://127.0.0.1:8848 discovery: enabled: false namespace: prefix: application file-extension: yml config: enabled: false namespace: prefix: application file-extension: yml dubbo: application: name: pamirs-project version: 1.0.0 registry: address: zookeeper://192.168.0.121:2182 protocol: name: dubbo port: 20880 serialization: pamirs consumer: timeout: 5000 provider: timeout: 5000 scan: base-packages: pro.shushi cloud: subscribed-services: 3. 修改application-dev.yml中对应中间件的IP和端口 3.1 redis 修改对应redis的IP端口以及密码 spring: redis: database: 0 host: 192.168.0.121 #改成docker安装的宿主机IP port: 6378 timeout: 5000 password: Abc@1234 3.2 mysql 如自行安装mysql,直接改成mysql的IP和账号信息如直接使用docker提供的mysql,则修改对应的IP为docker安装的宿主机IP biz: driverClassName: com.mysql.cj.jdbc.Driver type: com.alibaba.druid.pool.DruidDataSource url: jdbc:mysql://192.168.0.121:3307/demo_biz?useSSL=false&allowPublicKeyRetrieval=true&useServerPrepStmts=true&cachePrepStmts=true&useUnicode=true&characterEncoding=utf8&serverTimezone=Asia/Shanghai&autoReconnect=true&allowMultiQueries=true username: root password: Abc@1234 initialSize: 5 maxActive: 200 minIdle: 5 maxWait: 60000 timeBetweenEvictionRunsMillis: 60000 testWhileIdle: true testOnBorrow: false testOnReturn: false poolPreparedStatements: true asyncInit: true pamirs: driverClassName: com.mysql.cj.jdbc.Driver type: com.alibaba.druid.pool.DruidDataSource url: jdbc:mysql://192.168.0.121:3307/demo_pamirs?useSSL=false&allowPublicKeyRetrieval=true&useServerPrepStmts=true&cachePrepStmts=true&useUnicode=true&characterEncoding=utf8&serverTimezone=Asia/Shanghai&autoReconnect=true&allowMultiQueries=true username: root password: Abc@1234 initialSize: 5 maxActive: 200 minIdle: 5 maxWait: 60000 timeBetweenEvictionRunsMillis: 60000 testWhileIdle: true testOnBorrow: false testOnReturn: false poolPreparedStatements:…

    2023年11月11日
    4.6K00
  • Oinone License 许可证使用常见问题

    如何获取许可证? 联系数式运维人员获取许可证。(以下内容全部使用表示许可证文件路径) subject:授权主体名称 license.lic:许可证文件 不同许可证类别有什么不同? 许可证类型 LicenseType 限制功能 适用环境 研发授权 DEVELOP 1.每次安装时效1天,超时后无法正常访问设计器相关功能2.限制CPU和主板序列号或限制许可证使用人数3.不能用于容器启动4.有页面水印 开发环境(开发人员本地启动业务工程时使用该授权) 伙伴授权 TRIAL 1.无安装时效限制2.无部署环境限制3.有页面水印 非生产环境(测试环境、预发环境等使用该授权) 客户授权 BUSINESS 1.无安装时效限制2.仅能部署一套生产环境3.无页面水印 生产环境 PS: 一套环境是指共用Base库的所有JVM称为一套环境。 如何配置许可证? 在yaml中配置许可证 单个许可证配置 pamirs: license: subject: <subject> path: <license.lic> 多个许可证配置 pamirs: license: subject: <subject> path: – <license1.lic> – <license2.lic> pamirs.license.path可以是相对路径、绝对路径以及URL路径。 在Program Arguments中配置许可证 java -jar -Psubject=<subject> -Plicense=<license1.lic> -Plicense=<license1.lic> <boot.jar> 如何在开发中安装许可证? 将许可证放入后端运行时工作目录中即可。(一般为idea项目根目录) 如何在物理机生产环境安装许可证? 将许可证放入与jar包平级目录中即可。 如何在docker环境中安装许可证? 在docker运行时目录添加挂载卷映射,并在yaml中配置对应的路径即可。 如何获取CPU序列号和主板序列号 在Linux环境中使用dmidecode命令 # 获取CPU序列号 dmidecode -s system-serial-number # CPU序列号 7*****1 # 获取主板序列号 dmidecode -s baseboard-serial-number # 主板序列号 ..CN*******V01Y7. # 获取系统UUID dmidecode -s system-uuid # 系统UUID 4c4xxxxx-xxxx-xxxx-xxxx-xxxxxxxx5831 在Mac环境中使用system_profiler命令 # 获取CPU序列号 system_profiler SPHardwareDataType | grep 'Serial Number' | awk -F ':' '{print $2}' # CPU序列号 C02******03Y # 获取主板序列号 system_profiler SPHardwareDataType | grep 'Hardware UUID' | awk -F ':' '{print $2}' # 主板序列号 1AAxxxxx-xxxx-xxxx-xxxx-xxxxxxxxF0FC 在Windows环境中使用wmic命令 # 获取CPU序列号 wmic cpu get processorid # CPU序列号 BFExxxxxxxxxx6A3 # 获取主板序列号 wmic baseboard get serialnumber # 主板序列号 PFxxxxBY # 获取系统UUID wmic csproduct get uuid # 系统UUID D0Exxxxx-xxxx-xxxx-xxxx-xxxxxxxx78B8 在Linux环境出现dmidecode命令执行失败该如何处理? 1. 命令未找到,可使用如下方式尝试安装 # debian (eg: Ubuntu) apt-get install dmidecode # rpm (eg: Fedora/CentOS/RedHat) yum install dmidecode 2. 无权限执行命令,尝试切换当前执行用户或为当前用户提高执行权限 在docker环境出现证书安装失败该如何处理? 1. 由于docke环境非物理环境,不支持CPU序列号和主板序列号校验,尝试更换许可证。 2. 检查许可证在镜像中的位置是否与配置文件中一致。 许可证安装失败该如何处理? 1. 日志出现License installation failed.信息 PS:对JDK版本依赖的问题已在5.0.0版本以上得到完整解决,此问题仅会出现在低版本的平台版本中。 请检查jdk版本是否高于1.8_221以上。 如无法升级jdk版本的环境下,请点击下载 jce_policy-8.zip 并按照如下步骤进行操作:…

    2024年6月19日
    5.6K00
  • 【MSSQL】后端部署使用MSSQL数据库(SQLServer)

    MSSQL数据库配置 驱动配置 Maven配置(2017版本可用) <mssql.version>9.4.0.jre8</mssql.version> <dependency> <groupId>com.microsoft.sqlserver</groupId> <artifactId>mssql-jdbc</artifactId> <version>${mssql.version}</version> </dependency> 离线驱动下载 mssql-jdbc-7.4.1.jre8.jarmssql-jdbc-9.4.0.jre8.jarmssql-jdbc-12.2.0.jre8.jar JDBC连接配置 pamirs: datasource: base: type: com.alibaba.druid.pool.DruidDataSource driverClassName: com.microsoft.sqlserver.jdbc.SQLServerDriver url: jdbc:sqlserver://127.0.0.1:1433;DatabaseName=base username: xxxxxx password: xxxxxx initialSize: 5 maxActive: 200 minIdle: 5 maxWait: 60000 timeBetweenEvictionRunsMillis: 60000 testWhileIdle: true testOnBorrow: false testOnReturn: false poolPreparedStatements: true asyncInit: true 连接url配置 暂无官方资料 url格式 jdbc:sqlserver://${host}:${port};DatabaseName=${database} 在jdbc连接配置时,${database}必须配置,不可缺省。 其他连接参数如需配置,可自行查阅相关资料进行调优。 方言配置 pamirs方言配置 pamirs: dialect: ds: base: type: MSSQL version: 2017 major-version: 2017 pamirs: type: MSSQL version: 2017 major-version: 2017 数据库版本 type version majorVersion 2017 MSSQL 2017 2017 PS:由于方言开发环境为2017版本,其他类似版本原则上不会出现太大差异,如出现其他版本无法正常支持的,可在文档下方留言。 schedule方言配置 pamirs: event: enabled: true schedule: enabled: true dialect: type: MSSQL version: 2017 major-version: 2017 type version majorVersion MSSQL 2017 2017 PS:由于schedule的方言在多个版本中并无明显差异,目前仅提供一种方言配置。 其他配置 逻辑删除的值配置 pamirs: mapper: global: table-info: logic-delete-value: CAST(DATEDIFF(S, CAST('1970-01-01 00:00:00' AS DATETIME), GETUTCDATE()) AS BIGINT) * 1000000 + DATEPART(NS, SYSUTCDATETIME()) / 100 MSSQL数据库用户初始化及授权 — init root user (user name can be modified by oneself) CREATE LOGIN [root] WITH PASSWORD = 'password'; — if using mssql database, this authorization is required. ALTER SERVER ROLE [sysadmin] ADD MEMBER [root];

    2024年10月18日
    1.5K00
  • 【HighGo】后端部署使用HighGo数据库

    HighGo数据库配置 驱动配置 jdbc仓库 https://mvnrepository.com/artifact/com.highgo/HgdbJdbc Maven配置(6.0.1版本可用) <highgo.version>6.0.1.jre8</highgo.version> <dependency> <groupId>com.highgo</groupId> <artifactId>HgdbJdbc</artifactId> <version>${highgo.version}</version> </dependency> JDBC连接配置 pamirs: datasource: base: type: com.alibaba.druid.pool.DruidDataSource driverClassName: com.highgo.jdbc.Driver url: jdbc:highgo://127.0.0.1:5866/oio_base?currentSchema=base,utl_file username: xxxxxx password: xxxxxx initialSize: 5 maxActive: 200 minIdle: 5 maxWait: 60000 timeBetweenEvictionRunsMillis: 60000 testWhileIdle: true testOnBorrow: false testOnReturn: false poolPreparedStatements: true asyncInit: true 连接url配置 官方文档 https://www.highgo.com/document/zh-cn/application/jdbc.html url格式 jdbc:highgo://ip:端口号/数据库名?currentSchema=schema1,schema2 在jdbc连接配置时,${database}和${schema}必须完整配置,不可缺省。 jdbc指定schema时可以在currentSchema后指定多个schema,中间用,分隔,第一个schema为业务库表存放的主schema。 highgo数据库6.0版本里每个数据库默认会带一个utl_file的schema,该模式与文件访问功能有关,需要带在jdbc的schema中,但不能放在第一个。 其他连接参数如需配置,可自行查阅相关资料进行调优。 方言配置 pamirs方言配置 pamirs: dialect: ds: base: type: HighGoDB version: 6 major-version: 6.0.1 biz_data: type: HighGoDB version: 6 major-version: 6.0.1 数据库版本 type version majorVersion 6.0.x HighGo 6 6.0.1 PS:由于方言开发环境为6.0.1版本,其他类似版本(6.0.x)原则上不会出现太大差异,如出现其他版本无法正常支持的,可在文档下方留言。 schedule方言配置 pamirs: event: enabled: true schedule: enabled: true dialect: type: HighGoDB version: 6 major-version: 6.0.1 其他配置 逻辑删除的值配置 pamirs: mapper: global: table-info: logic-delete-value: (EXTRACT(epoch FROM CURRENT_TIMESTAMP) * 1000000 + EXTRACT(MICROSECONDS FROM CURRENT_TIMESTAMP))::bigint Highgo数据库用户初始化及授权 — init oio_base user (user name can be modified by oneself) CREATE USER oio_base WITH PASSWORD 'Test@12345678'; — if using automatic database and schema creation, this is very important. ALTER USER oio_base CREATEDB; SELECT * FROM pg_roles; — if using highgo database, this authorization is required. GRANT CREATE ON DATABASE highgo TO oio_base;

    2025年7月10日
    93600

Leave a Reply

Please Login to Comment