字段类型之关系描述的特殊场景(常量关联)

场景概述

【字段类型之关系与引用】一文中已经描述了各种关系字段的常规写法,还有一些特殊场景如:关系映射中存在常量,或者M2M中间表是大于两个字段构成。

场景描述

1、PetTalent模型增加talentType字段
2、PetItem与PetTalent的多对多关系增加talentType(达人类型),
3、PetItemRelPetTalent中间表维护petItemId、petTalentId以及talentType,PetDogItem和PetCatItem分别重写petTalents字段,关系中增加常量描述。示意图如下:
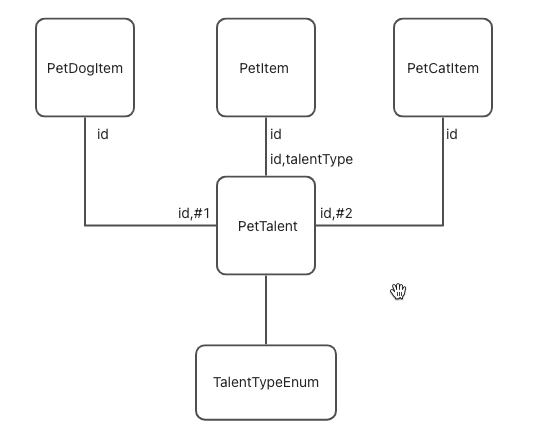
字段类型之关系描述的特殊场景(常量关联)

实际操作步骤

Step1 新增 TalentTypeEnum

package pro.shushi.pamirs.demo.api.enumeration;

import pro.shushi.pamirs.meta.annotation.Dict;
import pro.shushi.pamirs.meta.common.enmu.BaseEnum;

@Dict(dictionary = TalentTypeEnum.DICTIONARY,displayName = "达人类型")
public class TalentTypeEnum extends BaseEnum<TalentTypeEnum,Integer> {

    public static final String DICTIONARY ="demo.TalentTypeEnum";

    public final static TalentTypeEnum DOG =create("DOG",1,"狗达人","狗达人");
    public final static TalentTypeEnum CAT =create("CAT",2,"猫达人","猫达人");
}

Step2 PetTalent模型增加talentType字段

package pro.shushi.pamirs.demo.api.model;

import pro.shushi.pamirs.demo.api.enumeration.TalentTypeEnum;
import pro.shushi.pamirs.meta.annotation.Field;
import pro.shushi.pamirs.meta.annotation.Model;

@Model.model(PetTalent.MODEL_MODEL)
@Model(displayName = "宠物达人",summary="宠物达人",labelFields ={"name"})
public class PetTalent extends AbstractDemoIdModel{
    public static final String MODEL_MODEL="demo.PetTalent";

    @Field(displayName = "达人")
    private String name;

    @Field(displayName = "达人类型")
    private TalentTypeEnum talentType;
}

Step3 修改PetItem的petTalents字段,在关系描述中增加talentType(达人类型)

    @Field.many2many(relationFields = {"petItemId"},referenceFields = {"petTalentId","talentType"},through = PetItemRelPetTalent.MODEL_MODEL )
    @Field.Relation(relationFields = {"id"}, referenceFields = {"id","talentType"})
    @Field(displayName = "推荐达人",summary = "推荐该商品的达人们")
    private List<PetTalent> petTalents;

Step4 PetDogItem增加petTalents字段,重写父类PetItem的关系描述

  1. talentType配置为常量,填入枚举的值
  2. 增加domain描述用户页面选择的时候自动过滤出特定类型的达人,RSQL用枚举的name
    @Field(displayName = "推荐达人")
    @Field.many2many(
            through = "PetItemRelPetTalent",
            relationFields = {"petItemId"},
            referenceFields = {"petTalentId","talentType"}
    )
    @Field.Relation(relationFields = {"id"}, referenceFields = {"id", "#1#"}, domain = " talentType == DOG")
    private List<PetTalent> petTalents;

Step5 PetCatItem增加petTalents字段,重写父类PetItem的关系描述

  1. talentType配置为常量,填入枚举的值
  2. 增加domain描述用户页面选择的时候自动过滤出特定类型的达人,RSQL用枚举的name
    @Field(displayName = "推荐达人")
    @Field.many2many(
            through = "PetItemRelPetTalent",
            relationFields = {"petItemId"},
            referenceFields = {"petTalentId","talentType"}
    )
    @Field.Relation(relationFields = {"id"}, referenceFields = {"id", "#2#"}, domain = " talentType == CAT")
    private List<PetTalent> petTalents;

Step6 PetCatItem增加petTalents字段,many2one关系示例

  1. talentType配置为常量,填入枚举的值
  2. 增加domain描述用户页面选择的时候自动过滤出特定类型的达人,RSQL用枚举的name

    @Model.model(PetPet.MODEL_MODEL)
    @Model(displayName = "宠物宠物", summary = "宠物宠物")
    public class PetPet extends IdModel {
    
    public static final String MODEL_MODEL = "demo.PetPet";
    
    @Field.many2one
    @Field(displayName = "品种")
    @Field.Relation(relationFields = {"typeId", "#CAT#"}, referenceFields = {"id", "kind"}, domain = "kind=='CAT'")
    private PetType type;
    
    @Field(displayName = "品种ID", invisible = true)
    private Long typeId;
    
    @Field(displayName = "原产地")
    private String provenance;

Oinone社区 作者:望闲原创文章,如若转载,请注明出处:https://doc.oinone.top/backend/11463.html

访问Oinone官网:https://www.oinone.top获取数式Oinone低代码应用平台体验

(0)
望闲的头像望闲数式管理员
上一篇 2024年5月25日 pm5:59
下一篇 2024年5月25日 pm7:50

相关推荐

  • 动态视图支持权限配置

    动态页面在前端自定义之后,目前是没办法通过权限去控制路由页面的权限的,本篇文章将介绍如何解决这个问题。阅读本篇文章之前,应已经实现自定义页面渲染动态视图。参考文章:自定义视图内部渲染动态视图 实现思路: 通过自定义页面里设计的组件api名字,获取配置的路由页面名字。 解析路由页面包含的所有动作,拼接权限节点。 将路由页面的权限节点,拼到自定义视图所在菜单的权限管理上。 效果,路由页面的动作出现在自定义视图所在的菜单权限节点上 代码示例 package pro.shushi.pamirs.top.core.auth; import org.apache.commons.collections4.CollectionUtils; import org.springframework.beans.factory.annotation.Autowired; import org.springframework.core.annotation.Order; import org.springframework.stereotype.Component; import pro.shushi.pamirs.auth.api.entity.node.ActionPermissionNode; import pro.shushi.pamirs.auth.api.entity.node.PermissionNode; import pro.shushi.pamirs.auth.api.extend.load.PermissionNodeLoadExtendApi; import pro.shushi.pamirs.auth.api.loader.visitor.AuthCompileContext; import pro.shushi.pamirs.auth.api.loader.visitor.AuthCompileVisitor; import pro.shushi.pamirs.auth.api.loader.visitor.DslParser; import pro.shushi.pamirs.auth.api.pmodel.AuthResourceAuthorization; import pro.shushi.pamirs.auth.api.utils.AuthAuthorizationHelper; import pro.shushi.pamirs.boot.base.model.Menu; import pro.shushi.pamirs.boot.base.model.View; import pro.shushi.pamirs.boot.base.model.ViewAction; import pro.shushi.pamirs.boot.base.ux.model.UIView; import pro.shushi.pamirs.boot.base.ux.model.UIWidget; import pro.shushi.pamirs.boot.base.ux.model.view.UIField; import pro.shushi.pamirs.boot.web.loader.path.AccessResourceInfo; import pro.shushi.pamirs.boot.web.loader.path.ResourcePath; import pro.shushi.pamirs.boot.web.manager.MetaCacheManager; import pro.shushi.pamirs.meta.annotation.fun.extern.Slf4j; import pro.shushi.pamirs.meta.common.spi.SPI; import pro.shushi.pamirs.top.api.TopModule; import java.util.ArrayList; import java.util.List; import java.util.Map; import java.util.Optional; @Component @Order(88) @SPI.Service @Slf4j public class MyTestNodeLoadExtend implements PermissionNodeLoadExtendApi { @Autowired protected MetaCacheManager metaCacheManager; @Override public List<PermissionNode> buildNextPermissions(PermissionNode selected, List<PermissionNode> nodes) { // 动态页面所属的菜单name List<String> menuNames = new ArrayList<>(); menuNames.add("uiMenu3c094a75bd88461ba0ad780825069b32"); // 自定义组件api名称 List<String> apiNames = new ArrayList<>(); apiNames.add("dynamicView"); List<ActionPermissionNode> newNodes = new ArrayList<>(); for (String menuName : menuNames) { List<ActionPermissionNode> actionPermissionNodes = buildActionPermissionNodes(selected, menuName, apiNames); if (CollectionUtils.isNotEmpty(actionPermissionNodes)) { newNodes.addAll(actionPermissionNodes); } } nodes.addAll(newNodes); return nodes; } private List<ActionPermissionNode> buildActionPermissionNodes(PermissionNode selected, String menuName, List<String> apiNames) { String path = ResourcePath.generatorPath(TopModule.MODULE_MODULE, menuName); if (!path.equals(selected.getPath())) { return null; } Menu menu = metaCacheManager.fetchCloneMenus(TopModule.MODULE_MODULE).stream() .filter(v -> v.getName().equals(menuName)) .findFirst() .orElse(null); if (menu == null) { return null; } menu.fieldQuery(Menu::getViewAction); View mainView = fetchMainView(menu.getViewAction()); if (mainView == null) { return null; }…

    2025年9月10日
    94900
  • EIP开放接口使用MD5验签发起请求(v5.x)

    验签工具类 PS:该验签方法仅在pamirs-core的5.0.16版本以上可正常使用 public class EipSignUtils { public static final String SIGN_METHOD_MD5 = "md5"; private static final String SIGN_METHOD_HMAC = "hmac"; private static final String SECRET_KEY_ALGORITHM = "HmacMD5"; private static final String MESSAGE_DIGEST_MD5 = "MD5"; public static String signTopRequest(Map<String, String> params, String secret, String signMethod) throws IOException { // 第一步:检查参数是否已经排序 String[] keys = params.keySet().toArray(new String[0]); Arrays.sort(keys); // 第二步:把所有参数名和参数值串在一起 StringBuilder query = new StringBuilder(); if (SIGN_METHOD_MD5.equals(signMethod)) { query.append(secret); } for (String key : keys) { String value = params.get(key); if (StringUtils.isNoneBlank(key, value)) { query.append(key).append(value); } } // 第三步:使用MD5/HMAC加密 byte[] bytes; if (SIGN_METHOD_HMAC.equals(signMethod)) { bytes = encryptHMAC(query.toString(), secret); } else { query.append(secret); bytes = encryptMD5(query.toString()); } // 第四步:把二进制转化为大写的十六进制(正确签名应该为32大写字符串,此方法需要时使用) return byte2hex(bytes); } private static byte[] encryptHMAC(String data, String secret) throws IOException { byte[] bytes; try { SecretKey secretKey = new SecretKeySpec(secret.getBytes(StandardCharsets.UTF_8), SECRET_KEY_ALGORITHM); Mac mac = Mac.getInstance(secretKey.getAlgorithm()); mac.init(secretKey); bytes = mac.doFinal(data.getBytes(StandardCharsets.UTF_8)); } catch (GeneralSecurityException e) { throw new IOException(e.toString(), e); } return bytes; } private static byte[] encryptMD5(String data) throws IOException { return encryptMD5(data.getBytes(StandardCharsets.UTF_8)); } private static byte[] encryptMD5(byte[] data) throws IOException { try { MessageDigest md = MessageDigest.getInstance(MESSAGE_DIGEST_MD5); return md.digest(data); } catch (NoSuchAlgorithmException e)…

    2024年6月29日
    1.6K00
  • 工作流引入流程概览与流程监控

    流程概览依赖说明 使用 流程概览 功能前,需要在项目中引入 pamirs-workflow-datavi-core、 pamirs-data-visualization-core依赖,并启动datavi模块: <dependency> <groupId>pro.shushi.pamirs.workflow</groupId> <artifactId>pamirs-workflow-datavi-core</artifactId> </dependency> <dependency> <groupId>pro.shushi.pamirs.data.visualization</groupId> <artifactId>pamirs-data-visualization-core</artifactId> </dependency> 警告: 在 oinone 平台启用「流程概览」能力时,应用启动模块一旦引入 pamirs-workflow-api/core,必须同时引入 pamirs-workflow-datavi-api/core。在多启动模块架构下,严禁出现仅部分启动模块引入 pamirs-workflow-core 而未引入 pamirs-workflow-datavi-core 的情况,否则将导致流程概览相关元数据计算异常,出现删表等情况。 流程概览配置项 流程概览页面内置缓存机制,可通过配置项调整缓存刷新周期及图表展示的数据条数: pamirs: workflow: dashboard: cache-time: 10 # 流程概览缓存刷新时间(单位:分钟),默认 10 分钟 page-size: 10 # 流程运行分析中 4 个图表的展示数量,默认查询前 10 条数据 统计指标说明 引入 pamirs-workflow-datavi-core 依赖后,系统会按照以下规则进行数据同步: 当日数据同步:每小时同步一次当日数据; 昨日数据同步:次日凌晨同步前一日数据。 由于在引入依赖后才会开始执行数据同步,统计指标页提供了「同步」按钮,可用于对历史数据进行补采。即使不执行历史同步,也不会影响核心业务流程,仅会影响统计数据和图表的展示效果。 统计指标数据主要用于 支撑 流程概览 和 流程监控 中的统计图表展示; 为数据分析与可视化提供基础数据。 上述统计数据对工作流的审批、流转等核心业务无任何影响。如有需要,也可以基于流程监控的数据,配合数据可视化设计器,自定义构建符合业务需求的展示页面。

    2025年11月17日
    37300
  • 【PostgreSQL】后端部署使用PostgreSQL数据库

    PostgreSQL数据库配置 驱动配置 Maven配置(14.3版本可用) <postgresql.version>42.6.0</postgresql.version> <dependency> <groupId>org.postgresql</groupId> <artifactId>postgresql</artifactId> <version>${postgresql.version}</version> </dependency> 离线驱动下载 postgresql-42.2.18.jarpostgresql-42.6.0.jarpostgresql-42.7.3.jar JDBC连接配置 pamirs: datasource: base: type: com.alibaba.druid.pool.DruidDataSource driverClassName: org.postgresql.Driver url: jdbc:postgresql://127.0.0.1:5432/pamirs?currentSchema=base username: xxxxxx password: xxxxxx 连接url配置 暂无官方资料 url格式 jdbc:postgresql://${host}:${port}/${database}?currentSchema=${schema} 在jdbc连接配置时,${database}和${schema}必须完整配置,不可缺省。 其他连接参数如需配置,可自行查阅相关资料进行调优。 方言配置 pamirs方言配置 pamirs: dialect: ds: base: type: PostgreSQL version: 14 major-version: 14.3 pamirs: type: PostgreSQL version: 14 major-version: 14.3 数据库版本 type version majorVersion 14.x PostgreSQL 14 14.3 PS:由于方言开发环境为14.3版本,其他类似版本(14.x)原则上不会出现太大差异,如出现其他版本无法正常支持的,可在文档下方留言。 schedule方言配置 pamirs: event: enabled: true schedule: enabled: true dialect: type: PostgreSQL version: 14 major-version: 14.3 type version majorVersion PostgreSQL 14 14.3 PS:由于schedule的方言在多个版本中并无明显差异,目前仅提供一种方言配置。 其他配置 逻辑删除的值配置 pamirs: mapper: global: table-info: logic-delete-value: (EXTRACT(epoch FROM CURRENT_TIMESTAMP) * 1000000 + EXTRACT(MICROSECONDS FROM CURRENT_TIMESTAMP))::bigint PostgreSQL数据库用户初始化及授权 — init root user (user name can be modified by oneself) CREATE USER root WITH PASSWORD 'password'; — if using automatic database and schema creation, this is very important. ALTER USER root CREATEDB; SELECT * FROM pg_roles; — if using postgres database, this authorization is required. GRANT CREATE ON DATABASE postgres TO root;

    2023年11月1日
    1.4K00
  • 如何改变调度策略,让Schedule独立执行线程

    schedule里,相同的taskType跑多个业务任务,如果其中一个任务大量重试占满了调度线程,会影响别的业务任务及时被执行,如下面截图中,taskType用的是平台内置的常量,这个常量会被其他任务也使用,如果当前任务出现了异常占用了这个taskType的所有线程,那么这个taskType下面的其他任务就会被阻塞延后执行。应该给需要业务及时性的任务单独建立自定义的taskType,这样每个taskType的线程就是独立的,A任务异常不会影响B任务的执行。 1、后台创建task type相关的类,继承BaseScheduleNoTransactionTask,要加springbean的注解,参考:task type建议使用类名 2、提交任务的时候,设置tasktype为步骤1的TaskType 3、控制台新增策略和任务bean名称为步骤1的spring beanName,任务名称 $xxx,右边的占位符内容为yml里面配置的ownSign字段任务的名称也是步骤1的 spring beanName 4、配置完成后,控制台启动任务,就可以测试了

    2024年2月20日
    1.0K00

Leave a Reply

登录后才能评论