
通过源码分析,从页面发起请求,如果通过graphQL传输到具体action的链路,并且在这之间做了哪些隐式处理
分析源码版本5.1.x
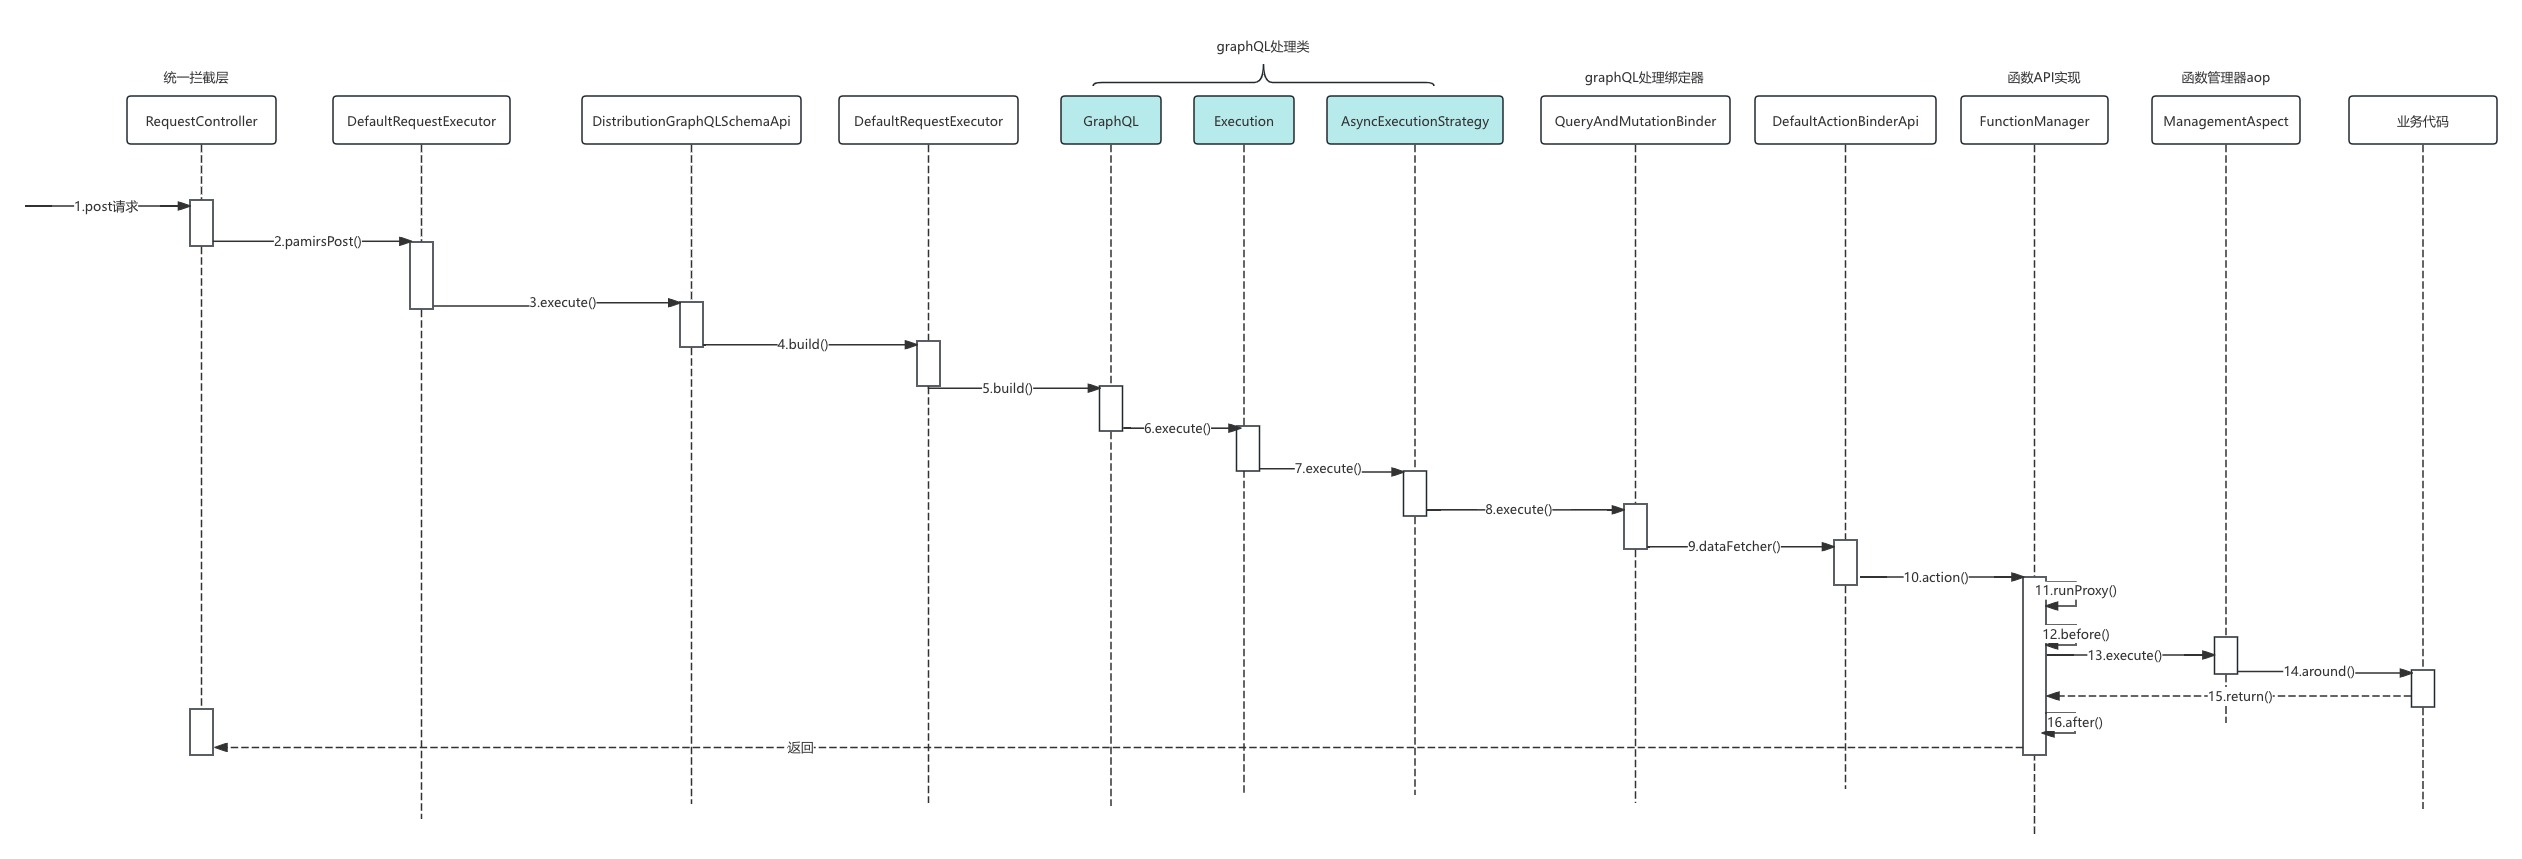
请求流程大致如下:
- 拦截所有指定的请求
- 组装成graphQL请求信息
- 调用graphQL执行
- 通过hook拦截先执行
- RsqlDecodeHook:rsql解密
- UserHook: 获取用户信息, 通过cookies获取用户ID,再查表获取用户信息,放到本地Local线程里
- RoleHook: 角色Hook
- FunctionPermissionHook: 函数权限Hook ,跳过权限拦截的实现放在这一层,对应的配置
pamirs: auth: fun-filter: - namespace: user.PamirsUserTransient fun: login #登录 - namespace: top.PetShop fun: action - DataPermissionHook: 数据权限hook
- PlaceHolderHook:占位符转化替换hook
- RsqlParseHook: 解释Rsql hook
- SingletonModelUpdateHookBefore
- 执行post具体内容
- 通过hook拦截后执行
- QueryPageHook4TreeAfter: 树形Parent查询优化
- FieldPermissionHook: 字段权限Hook
- UserQueryPageHookAfter
- UserQueryOneHookAfter
- 封装执行结果信息返回
时序图

核心源码解析
拦截所有指定的请求 /pamirs/模块名
RequestController
    @RequestMapping(
            value = "/pamirs/{moduleName:^[a-zA-Z][a-zA-Z0-9_]+[a-zA-Z0-9]$}",
            method = RequestMethod.POST
    )
    public String pamirsPost(@PathVariable("moduleName") String moduleName,
                             @RequestBody PamirsClientRequestParam gql,
                             HttpServletRequest request,
                             HttpServletResponse response) {
                             }
DefaultRequestExecutor 构建graph请求信息,并调用graph请求
() -> execute(GraphQL::execute, param), param
private <T> T execute(BiFunction<GraphQL, ExecutionInput, T> executor, PamirsRequestParam param) {
    // 获取GraphQL请求信息,包含grapsh schema
    GraphQL graphQL = buildGraphQL(param);
...
    ExecutionInput executionInput = ExecutionInput.newExecutionInput()
                .query(param.getQuery())
                .variables(param.getVariables().getVariables())
                .dataLoaderRegistry(Spider.getDefaultExtension(DataLoaderRegistryApi.class).dataLoader())
                .build();
...
// 调用 GraphQL的方法execute 执行
    T result = executor.apply(graphQL, executionInput);
...
    return result;
    }
QueryAndMutationBinder 绑定graphQL读取写入操作
public static DataFetcher<?> dataFetcher(Function function, ModelConfig modelConfig) {
        if (isAsync()) {
            if (FunctionTypeEnum.QUERY.in(function.getType())) {
                return AsyncDataFetcher.async(dataFetchingEnvironment -> dataFetcherAction(function, modelConfig, dataFetchingEnvironment), ExecutorServiceApi.getExecutorService());
            } else {
                return dataFetchingEnvironment -> dataFetcherAction(function, modelConfig, dataFetchingEnvironment);
            }
        } else {
            return dataFetchingEnvironment -> dataFetcherAction(function, modelConfig, dataFetchingEnvironment);
        }
    }

    private static Object dataFetcherAction(Function function, ModelConfig modelConfig, DataFetchingEnvironment environment) {
        try {
            SessionExtendUtils.tagMainRequest();
            // 使用共享的请求和响应对象
            return Spider.getDefaultExtension(ActionBinderApi.class)
                    .action(modelConfig, function, FunctionTypeEnum.QUERY.in(function.getType()), environment);
        } finally {
            PamirsSession.clearMainSession();
        }
    }
FunctionManager 执行具体方法,会执行前后hook
public Object runProxy(java.util.function.Function<Object[], Object> consumer, Function function, Object... args) {
        SessionMetaBit directive = Objects.requireNonNull(PamirsSession.directive());
        if (directive.isFromClient() || directive.isBuiltAction()) {
            directive.disableFromClient();
            boolean isHook = directive.isHook();
            boolean isDoExtPoint = directive.isDoExtPoint();
            if (isHook) {
                // 执行权限,用户相关的hook
        hookApi.before(function.getNamespace(), function.getFun(), args);
            }
            // 执行业务方法
            Object result = Tx.build(function.getNamespace(), function.getFun()).execute((transactionStatus) -> {
                Object txResult;
                // 植入预制结果集
                String supplier = "ctxHack" + function.getNamespace() + function.getFun();
                Object supplierObj = Optional.ofNullable(PamirsSession.getRequestVariables())
                        .map(PamirsRequestVariables::getVariables)
                        .map(_variables -> _variables.get(supplier))
                        .orElse(null);
                if (null != supplierObj) {
                    try {
                        txResult = ((Supplier<?>) supplierObj).get();
                    } finally {
                        Optional.ofNullable(PamirsSession.getRequestVariables())
                                .map(PamirsRequestVariables::getVariables)
                                .ifPresent(_variables -> _variables.remove(supplier));
                    }
                } else if (isDoExtPoint) {
                    Object[] tArgs = ArrayUtils.toArray(builtinExtPointExecutor.before(function, args));
                    txResult = builtinExtPointExecutor.override(function, consumer, tArgs);
                    builtinExtPointExecutor.callback(function, args);
                    txResult = builtinExtPointExecutor.after(function, txResult);
                } else {
                    txResult = consumer.apply(args);
                }
                return txResult;
            });
            if (isHook) {
                // 执行
                hookApi.after(function.getNamespace(), function.getFun(), result);
            }
            return result;
        } else {
            return Tx.build(function.getNamespace(), function.getFun())
                    .execute((transactionStatus) -> consumer.apply(args));
        }
    }
默认hook 逻辑
- RsqlDecodeHook:rsql解密
- UserHook:获取用户信息, 通过cookies获取用户ID,再查表获取用户信息,放到本地Local线程里
- RoleHook: 角色Hook
- FunctionPermissionHook: 函数权限Hook,跳过权限拦截
- DataPermissionHook: 数据权限hook
- PlaceHolderHook:占位符转化替换hook
- RsqlParseHook: 解释Rsql hook
- SingletonModelUpdateHookBefore
- QueryPageHook4TreeAfter: 树形Parent查询优化
- FieldPermissionHook: 字段权限Hook
- UserQueryPageHookAfter
- UserQueryOneHookAfter
Oinone社区 作者:oinone原创文章,如若转载,请注明出处:https://doc.oinone.top/backend/16247.html
访问Oinone官网:https://www.oinone.top获取数式Oinone低代码应用平台体验