Oinone请求调用链路

Oinone请求调用链路

请求格式与简单流程

在Oinone中请求数据存储在请求体中,以GQL的方式进行表示,也就是GQL格式的请求。

当我们发送一个GQL格式的请求,后端会对GQL进行解析,确定想要执行的方法,并对这个方法执行过程中所用到的模型进行构建,最后返回响应。

  • 请求
# 请求路径 pamirs/base
http://127.0.0.1:8090/pamirs/base

# 请求体内容
query{  
  petShopProxyBQuery{  
    sayHello(shop:{shopName:"cpc"}){
        shopName
    }
  }   
} 
  • 解析
# 简单理解
query 操作类型
petShopProxyBQuery 模块名称 + Query
sayHello 方法 fun
sayHello() 可以传入参数,参数名为 shop
shopName 需要得到的值
  • 响应
# data中的内容
"data": {
    "petShopQuery": {
        "hello": {
                "shopName": "cpc"
        }
    }
}

具体流程

Oinone是基于SpringBoot的,在Controller中处理请求

会接收所有以 /pamirs 开始的POST请求,/pamirs/后携带的是模块名

@RequestMapping(
        value = "/pamirs/{moduleName:^[a-zA-Z][a-zA-Z0-9_]+[a-zA-Z0-9]$}",
        method = RequestMethod.POST
)
public String pamirsPost(@PathVariable("moduleName") String moduleName,
                         @RequestBody PamirsClientRequestParam gql,
                         HttpServletRequest request,
                         HttpServletResponse response) {
        ........
}

整体脉络

Oinone请求调用链路
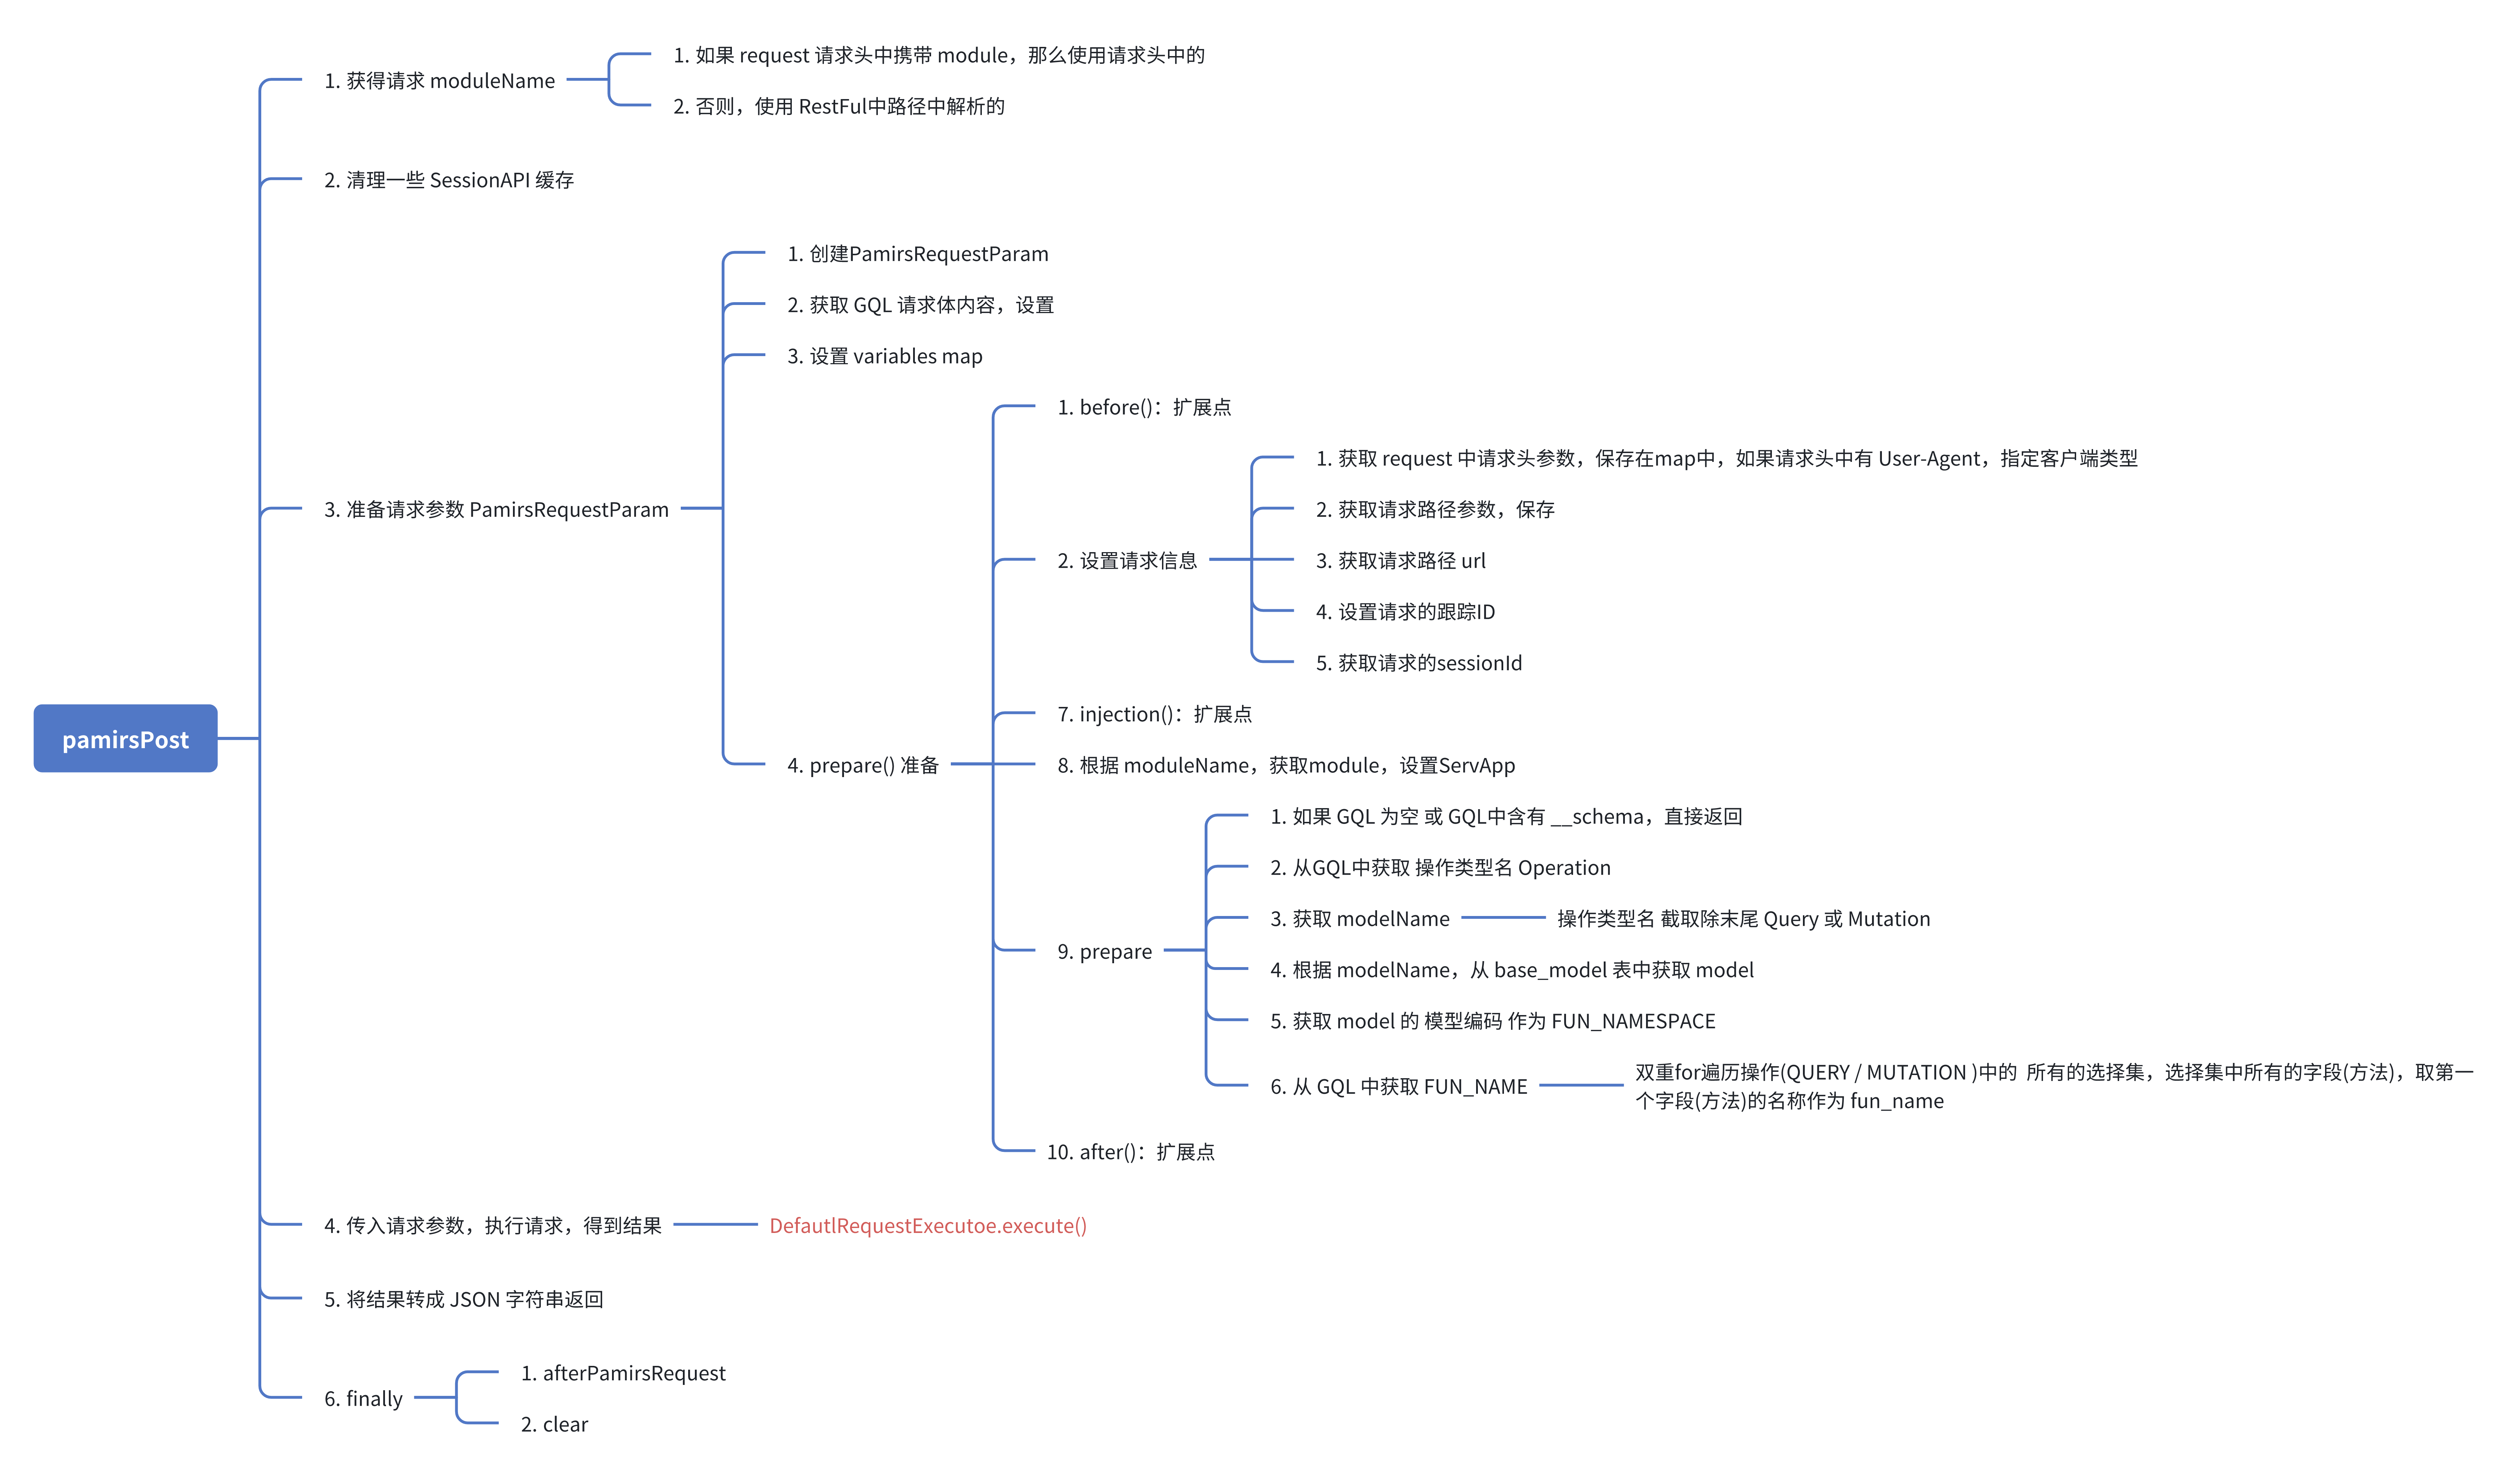
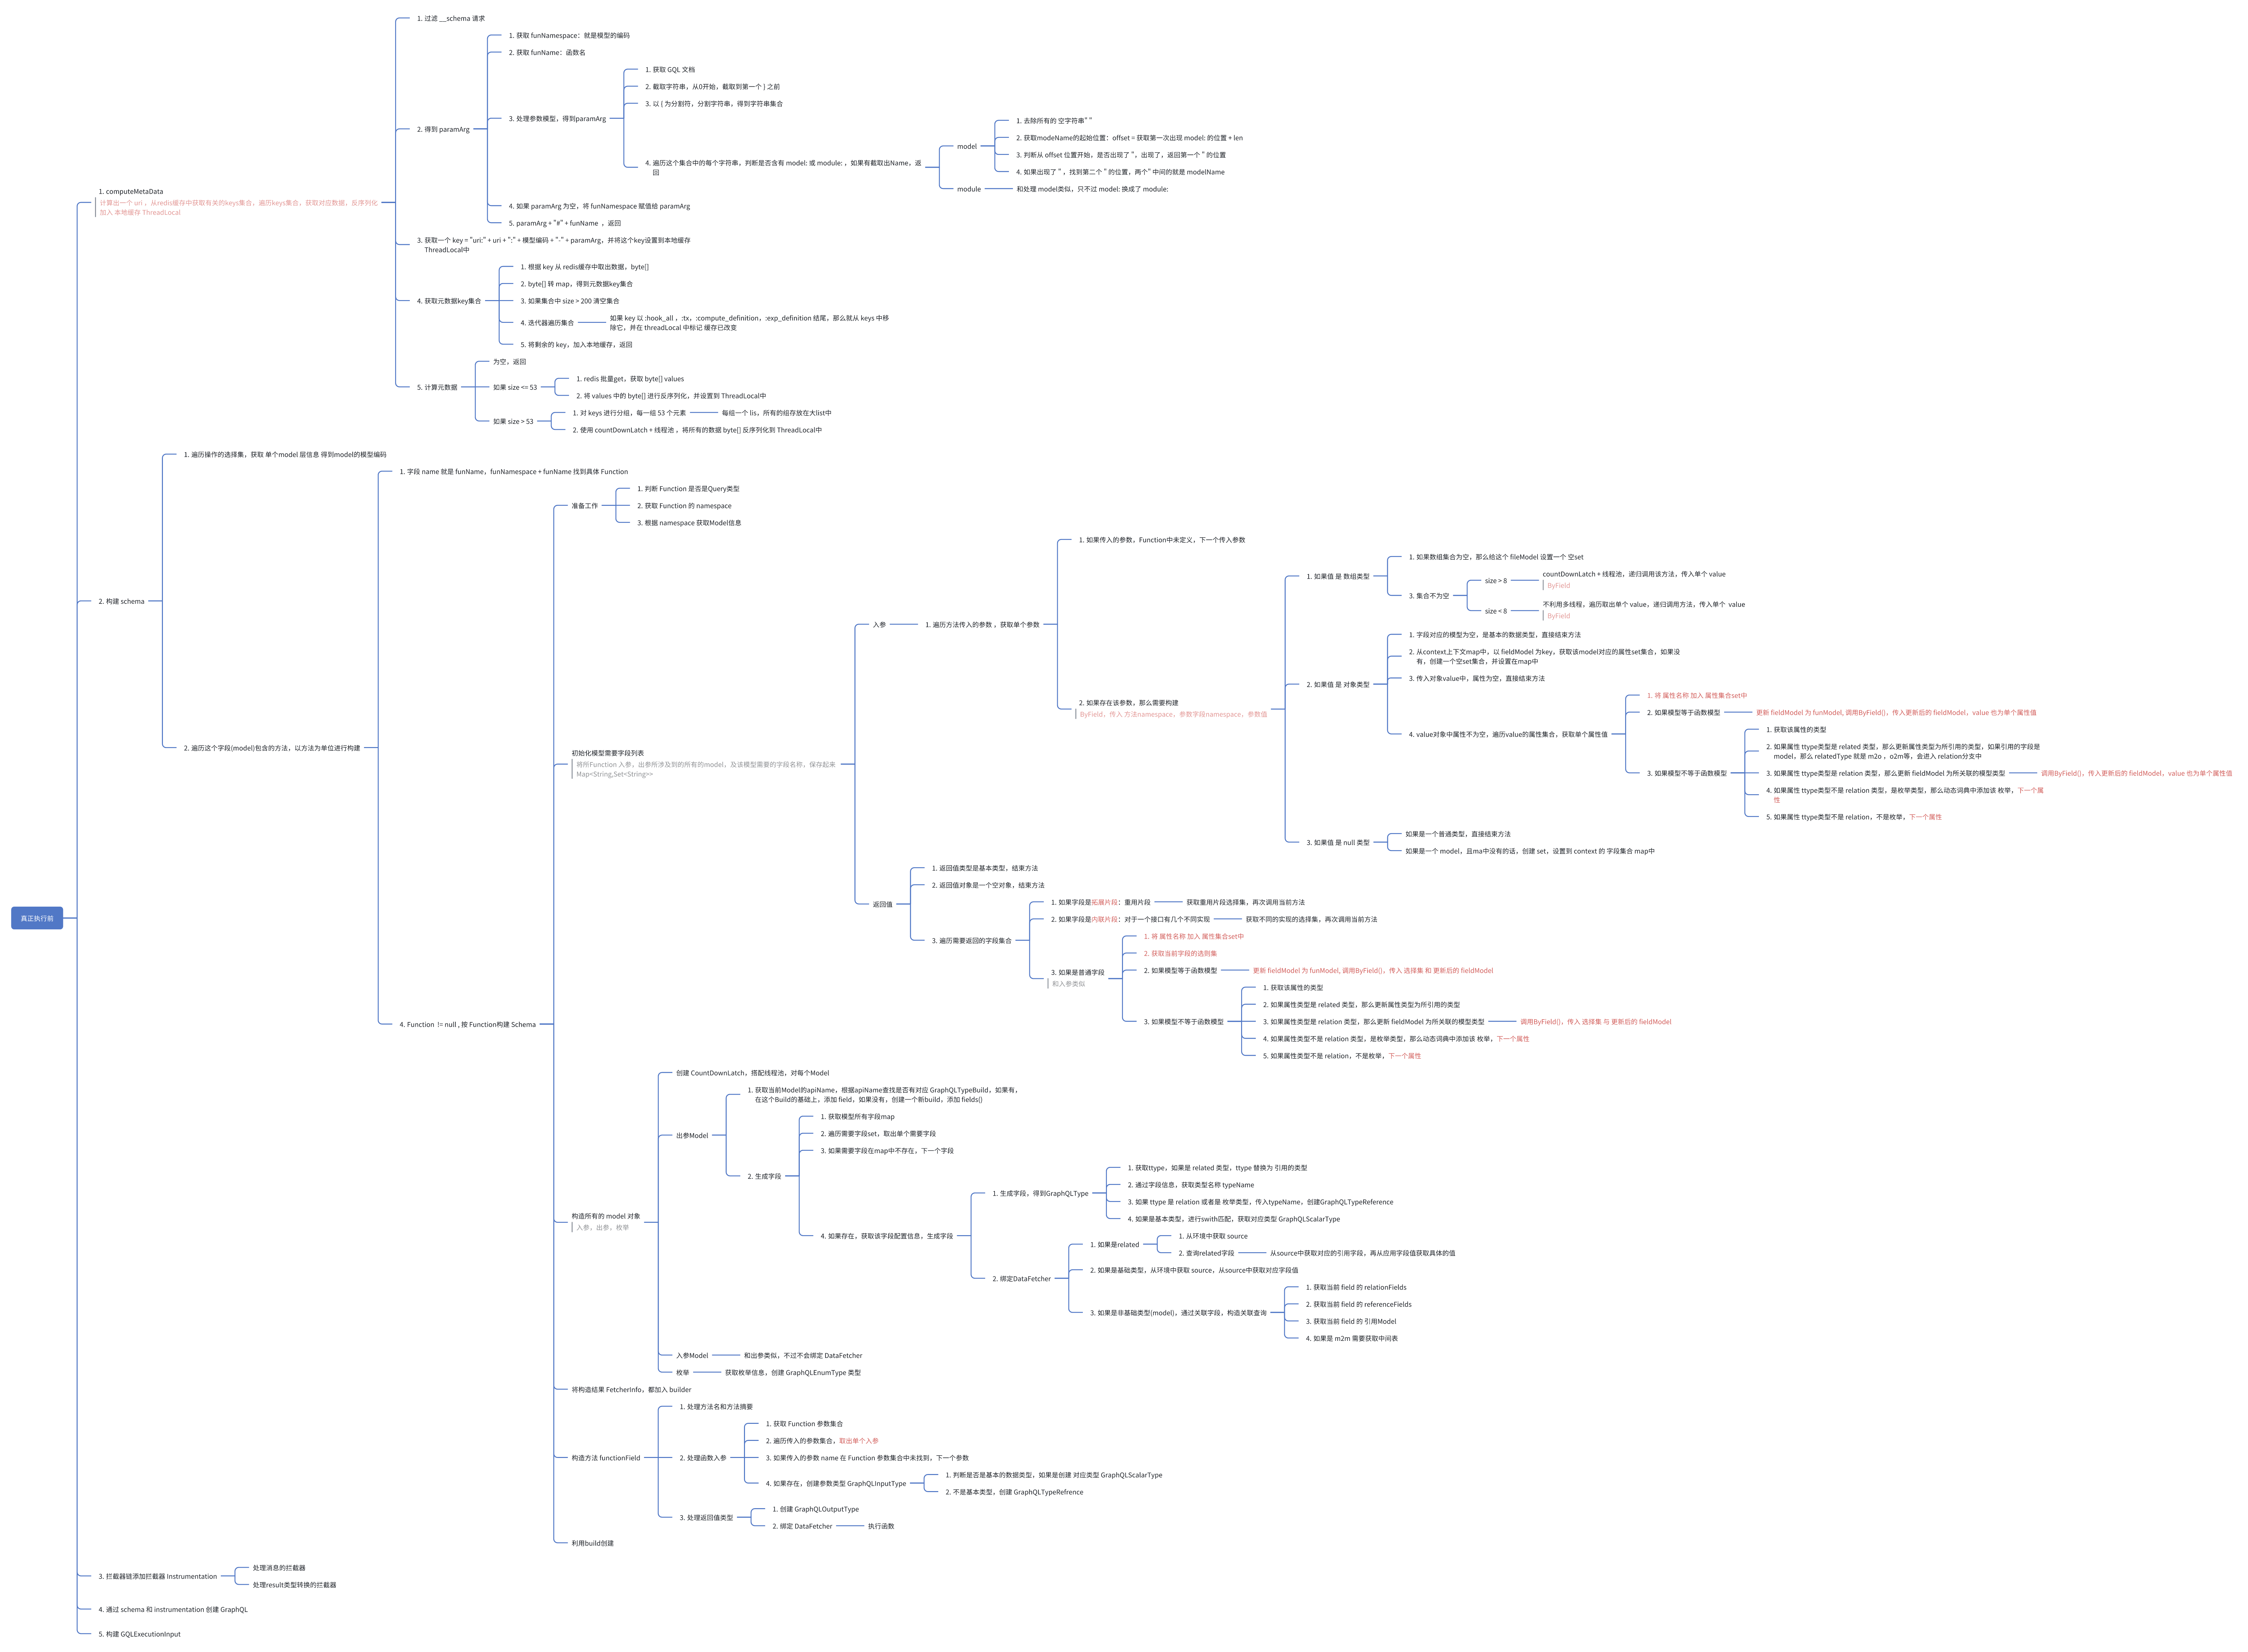
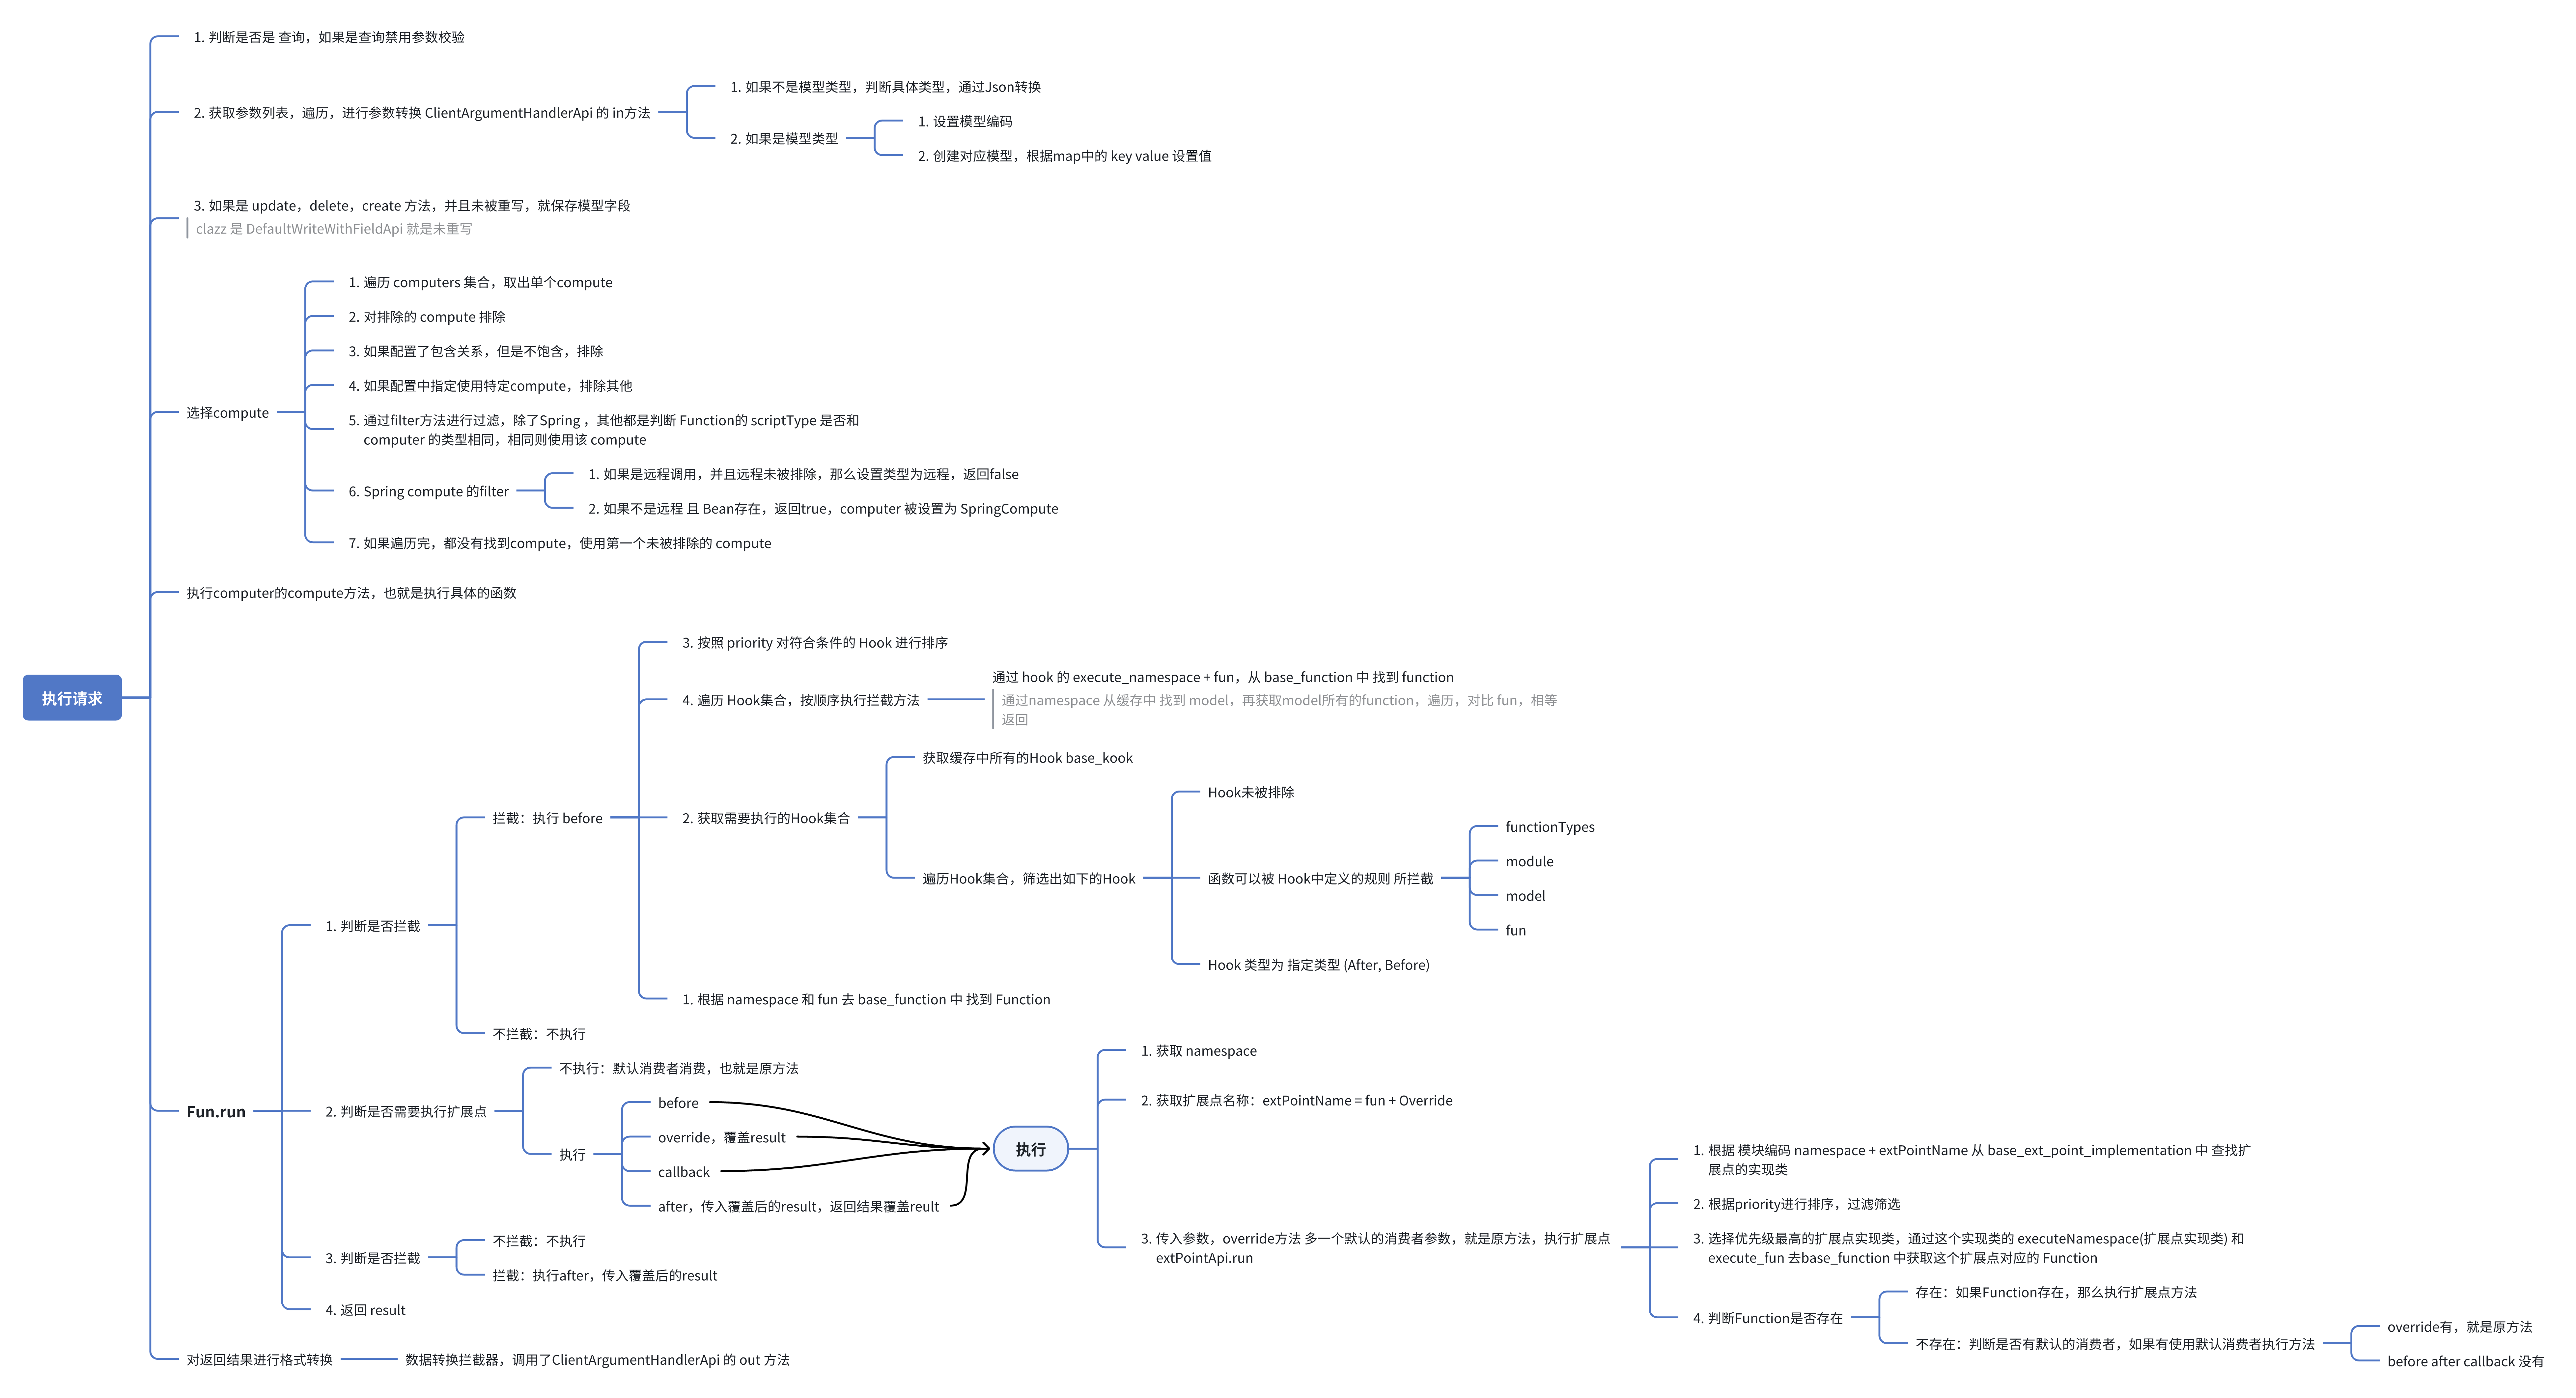
第四步执行中有两大重要的步骤,一步是动态构建GQL,一步是执行请求。

动态构建GQL

Oinone请求调用链路

请求执行

Oinone请求调用链路

Oinone社区 作者:oinone原创文章,如若转载,请注明出处:https://doc.oinone.top/backend/19664.html

访问Oinone官网:https://www.oinone.top获取数式Oinone低代码应用平台体验

(1)
oinone的头像oinone
上一篇 2024年11月27日 pm11:31
下一篇 2024年12月2日 pm7:50

相关推荐

  • 如何发送邮箱、手机短信以及设置

    1.邮件发送 1.1 邮件服务设置 1.1.1 方法一:通过yaml文件配置 pamirs: email: smtp: smtpHost: smtp.exmail.qq.com smtpUser: xxx@xxx.com smtpPassword: xxxxxx smtpPort: 465 smtpSecurity: SSL #邮件模块可后续后台自行添加 templates: – name: 邮箱注册邮件 title: '${code}是你此次注册的验证码' body: '<div>Hi ${realname},</div><div>你正在使用验证码注册。</div>' 1.1.2 方法二:工程启动加入初始化设置方法 /** * 初始化邮件模板 */ private void initEmailTemplate(){ EmailSenderSource emailSenderSource = new EmailSenderSource(); emailSenderSource.setName("邮件发送服务"); emailSenderSource.setType(MessageEngineTypeEnum.EMAIL_SEND); //优先级 emailSenderSource.setSequence(10); //发送账号 emailSenderSource.setSmtpUser("xxx@xxx.com"); //发送密码 emailSenderSource.setSmtpPassword("xxxxxx"); //发送服务器地址和端口 emailSenderSource.setSmtpHost("smtp.exmail.qq.com"); emailSenderSource.setSmtpPort(465); //" None: SMTP 对话用明文完成。" + //" TLS (STARTTLS): SMTP对话的开始时要求TLS 加密 (建议)" + //" SSL/TLS: SMTP对话通过专用端口用 SSL/TLS 加密 (默认是: 465)") emailSenderSource.setSmtpSecurity(EmailSendSecurityEnum.SSL); emailSenderSource.setActive(true); emailSenderSource.createOrUpdate(); List<EmailTemplate> templates = new ArrayList<>(); templates.add(new EmailTemplate().setName("重置密码邮件模板").setTitle("请确认你的密码修改请求").setBody("<div>Hi ${realname},</div><div>你正在使用验证码注册。</div>").setModel(PamirsUser.MODEL_MODEL).setEmailSenderSource(emailSenderSource)); new EmailTemplate().createOrUpdateBatch(templates); } 1.2 调用邮件发送组件发送邮件 /** * 代码中使用消息组件发送Email */ public void sendEmailByTemplate(){ try { EmailSender emailSender = (EmailSender) MessageEngine.get(MessageEngineTypeEnum.EMAIL_SEND).get(null);; EmailTemplate template = new EmailTemplate().setName("邮件模版名称").queryOne(); //标题:${name} //内容:${fieldInt}次数 String sendTo = "xxx@xxx.com"; String copyTo = "yyy@yyy.com"; Map<String, Object> objectData = new HashMap<>(); objectData.put("name","张三"); objectData.put("fieldInt",999); Boolean aBoolean = emailSender.send(template, objectData, sendTo, copyTo); if (null == aBoolean || !aBoolean) { log.error("发送邮件失败"); } } catch (Exception e) { log.error("发送确认邮件失败:,异常:{}", e); } } 2.发送短信 2.1 短信通道设置 2.1.1 方法一:通过yaml文件配置 pamirs: sms: aliyun: signatureMethod: HMAC-SHA1 endpoint: https://dysmsapi.aliyuncs.com version: '2017-05-25' accessKeyId: xxxxxxxxxxxxx signatureVersion: '1.0' accessKeySecret: xxxxxxxxxxxx regionId: cn-hangzhou timeZone: GMT signName: xxxxxx 2.1.2 方法二:工程启动加入初始化设置方法 private void…

    后端 2023年11月6日
    1.5K00
  • 如何重写获取首页的方法

    介绍 用户登录成功后或者访问网页不带任何路由参数的时候前端会请求全局的首页的视图动作viewAction配置,然后跳转到该视图动作viewAction 方案 我们可以通过在该方法的后置hook自定义获取首页的逻辑,下面以按角色跳转不同首页的需求示例 package pro.shushi.pamirs.demo.core.hook; import org.apache.commons.collections4.CollectionUtils; import org.springframework.stereotype.Component; import pro.shushi.pamirs.auth.api.model.AuthRole; import pro.shushi.pamirs.boot.base.enmu.BaseExpEnumerate; import pro.shushi.pamirs.boot.base.model.ViewAction; import pro.shushi.pamirs.boot.web.loader.PageLoadAction; import pro.shushi.pamirs.demo.api.model.DemoItemCategory; import pro.shushi.pamirs.demo.api.model.DemoItemLabel; import pro.shushi.pamirs.meta.annotation.Hook; import pro.shushi.pamirs.meta.api.CommonApiFactory; import pro.shushi.pamirs.meta.api.core.faas.HookAfter; import pro.shushi.pamirs.meta.api.dto.fun.Function; import pro.shushi.pamirs.meta.api.session.PamirsSession; import pro.shushi.pamirs.meta.common.exception.PamirsException; import pro.shushi.pamirs.user.api.model.PamirsUser; import java.util.List; import java.util.stream.Collectors; @Component public class DemoHomepageHook implements HookAfter { private static final String TEST_ROLE_CODE_01 = "ROLE_1211"; private static final String TEST_ROLE_CODE_02 = "ROLE_1211_1"; @Override @Hook(module = {"base"}, model = {ViewAction.MODEL_MODEL}, fun = {"homepage"}) public Object run(Function function, Object ret) { if (ret == null) { return null; } ViewAction viewAction = getViewActionByCurrentRole(); if (viewAction != null) { ViewAction retNew = CommonApiFactory.getApi(PageLoadAction.class).load(viewAction); ViewAction viewActionRet = (ViewAction) ((Object[]) ret)[0]; viewActionRet.set_d(retNew.get_d()); } return ret; } protected ViewAction getViewActionByCurrentRole() { try { PamirsUser user = new PamirsUser(); user.setId(PamirsSession.getUserId()); user.fieldQuery(PamirsUser::getRoles); List<AuthRole> roles = user.getRoles(); if (CollectionUtils.isNotEmpty(roles)) { List<String> roleCodes = roles.stream().map(AuthRole::getCode).collect(Collectors.toList()); if (roleCodes.contains(TEST_ROLE_CODE_01)) { return new ViewAction().setModel(DemoItemCategory.MODEL_MODEL).setName("DemoMenus_ItemPMenu_DemoItemAndCateMenu_DemoItemCategoryMenu").queryOne(); } else if (roleCodes.contains(TEST_ROLE_CODE_02)) { return new ViewAction().setModel(DemoItemLabel.MODEL_MODEL).setName("DemoMenus_ItemPMenu_DemoItemAndCateMenu_DemoItemLabelMenu").queryOne(); } } } catch (PamirsException exception) { if (PamirsSession.getUserId() == null) { throw PamirsException.construct(BaseExpEnumerate.BASE_USER_NOT_LOGIN_ERROR, exception.getCause()).errThrow(); } else { throw exception; } } return null; } }

    2024年7月6日
    2.4K00
  • 流程设计流程结束通知SPI接口

    1.实现SPI接口 import pro.shushi.pamirs.meta.common.spi.SPI; import pro.shushi.pamirs.meta.common.spi.factory.SpringServiceLoaderFactory; import pro.shushi.pamirs.workflow.app.api.entity.WorkflowContext; import pro.shushi.pamirs.workflow.app.api.model.WorkflowInstance; @SPI(factory = SpringServiceLoaderFactory.class) public interface WorkflowEndNoticeApi { void execute(WorkflowContext context, WorkflowInstance instance); } 自定义通知逻辑 /** * 自定义扩展流程结束时扩展点 */ @Order(999) @Component @SPI.Service public class MyWorkflowEndNoticeApi implements WorkflowEndNoticeApi { @Override public void execute(WorkflowContext context, WorkflowInstance instance) { Long dataBizId = instance.getDataBizId(); //todo自定义逻辑 } }

    2023年12月26日
    1.2K00
  • 项目中排除掉特定的Hook和扩展点

    总体介绍 在共库共Redis的情况下,某些场景存在需要过滤掉特定Hook和扩展点(extpoint)的情况。本文介绍排除掉的配置方法 1. Oinone如何排除特定的Hook 配置: pamirs: framework: hook: excludes: – 排除的扩展点列表 示例: pamirs: framework: hook: excludes: – pro.shushi.pamirs.timezone.hook.TimezoneHookBefore – pro.shushi.pamirs.timezone.hook.TimezoneHookAfter – pro.shushi.pamirs.timezone.hook.TimezoneSessionInitHook – pro.shushi.pamirs.translate.hook.TranslateAfterHook 2. Oinone如何排除特定的扩展点 配置 pamirs: framework: extpoint: excludes: – 排除的扩展点列表 示例: pamirs: framework: extpoint: excludes: – pro.shushi.pamirs.demo.core.extpoint.PetCatTypeExtPoint

    2024年5月13日
    1.2K00

Leave a Reply

登录后才能评论