
前提
源码分析版本是 5.1.x版本
概要
在服务启动时,获取注解REMOTE的函数,通过dubbo的泛化调用发布。在调用函数时,通过dubbo泛化调用获取结果。
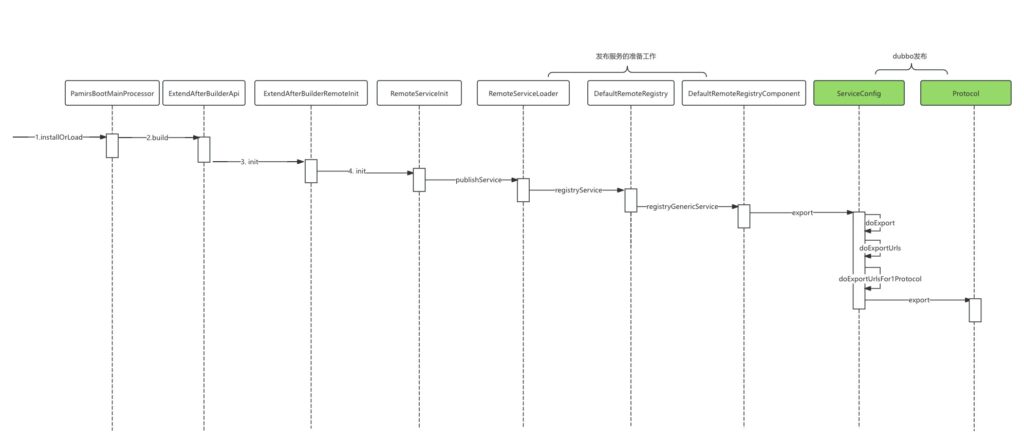
注册服务者
- 在spring 启动方法installOrLoad中初始化
- 寻找定义REMOTE的方法
- 组装dubbo的服务配置
- 组装服务对象实现引用,内容如下,用于注册
- 调用前置处理
- 放信息到SessionApi
- 函数调用链追踪,放到本地TransmittableThreadLocal
- 从redis中获取到的数据进行反序列化并存在到本地的线程里
- Trace信息,放一份在sessionApi中 和ThreadLocal
- 调用函数执行
- 返回数据转成特定格式
- 调用前置处理
- 通过线程组调用dubbo的ServiceConfig.export 服务发布
时序图

源码分析
根据条件判断,确定向dubbo进行服务发布
RemoteServiceLoader
public void publishService(List<FunctionDefinition> functionList,Map<String,Runnable> isPublished) {
        // 因为泛化接口只能控制到namespace,控制粒度不能到fun级别,这里进行去重处理
        Map<String, Function> genericNamespaceMap = new HashMap<>();
        for (FunctionDefinition functionDefinition : functionList) {
            Function function = new Function(functionDefinition)

            try {
               //定义REMOTE, 才给予远程调用
                if (FunctionOpenEnum.REMOTE.in(function.getOpen()) && !ClassUtils.isInterface(function.getClazz())) {
                    genericNamespaceMap.putIfAbsent(RegistryUtils.getRegistryInterface(function), function);
                }
            } catch (PamirsException e) {
            }
        }
        // 发布远程服务
        for (String namespace : genericNamespaceMap.keySet()) {
            Function function = genericNamespaceMap.get(namespace);
            if(isPublished.get(RegistryUtils.getRegistryInterface(function)) == null){
                // 发布,注册远程函数服务,底层使用dubbo的泛化调用
                Runnable registryTask = () -> remoteRegistry.registryService(function);
                isPublished.put(RegistryUtils.getRegistryInterface(function),registryTask);
            }else{

            }
        }
    }
构造ServiceConfig方法,设置成泛化调用,进行发布export()
DefaultRemoteRegistryComponent
     public void registryGenericService(String interfaceName, List<MethodConfig> methods,
                                       String group, String version, Integer timeout, Integer retries) {
        ....
        try {
            ServiceConfig<GenericService> service = new ServiceConfig<>();
            // 服务接口名
            service.setInterface(interfaceName);
            // 服务对象实现引用
            service.setRef(genericService(interfaceName));
            if (null != methods) {
                service.setMethods(methods);
            }
            // 声明为泛化接口
            service.setGeneric(Boolean.TRUE.toString());
            // 基础元数据
            constructService(group, version, timeout, retries, service);
            service.export();
        } catch (Exception e) {
           .....
        }
    }

// 服务对象实现引用
private GenericService genericService(String interfaceName) {
        return (method, parameterTypes, args) -> {
            PamirsSession.clear();
            Function function = Objects.requireNonNull(PamirsSession.getContext()).getFunction(RegistryUtils.getFunctionNamespace(method), RegistryUtils.getFunctionFun(method));
            if (log.isDebugEnabled()) {
                log.debug("interfaceName: " + interfaceName + ", isDataManage: " + function.isDataManager());
            }
            try {
                //前置处理:服务提供者,对请求参数进行对象化拆解,并对请求携带的上下文进行处理
                // 放信息到SessionApi
                // 函数调用链追踪,放到本地TransmittableThreadLocal
                // CommonMetaDataCacheApi.computeMetaData() 从redis中获取到的数据进行反序列化并存在到本地的TL中
                // DataAuditApi.computeDataAuditSession() Trace信息,放一份在sessionApi中 和ThreadLocal中
                Object[] args1 = Spider.getDefaultExtension(RemoteRequestArgApi.class).providerHandle(function.getNamespace(), function.getFun(), args, function.getArguments());

                Object result = FunEngine.get().exclude(ScriptType.REMOTE).run(function, args1);

                //后置处理:服务提供者,对结果进行对象化封装、携带请求上下文进行处理
                return Spider.getDefaultExtension(RemoteResponseApi.class).providerHandle(function, method, result);
            } catch (Throwable e) {
                return Spider.getDefaultExtension(RemoteResponseApi.class).providerExceptionHandle(function, method, e);
            } finally {
                PamirsSession.clear();
            }
        };
    }
注册消费者
- 函数处理调用
- 注册服务消费者
- 从ReferenceConfigCache获取泛化
- 调用dubbo泛化调用接口
- 获取返回信息
- 获取用户id,放入PamirsSession
- 如果开启debug模式
- 存入DEBUG_THREAD_LOCAL本地线程
- 返回格式
- IWrapper
- Pagination
- Result
时序图
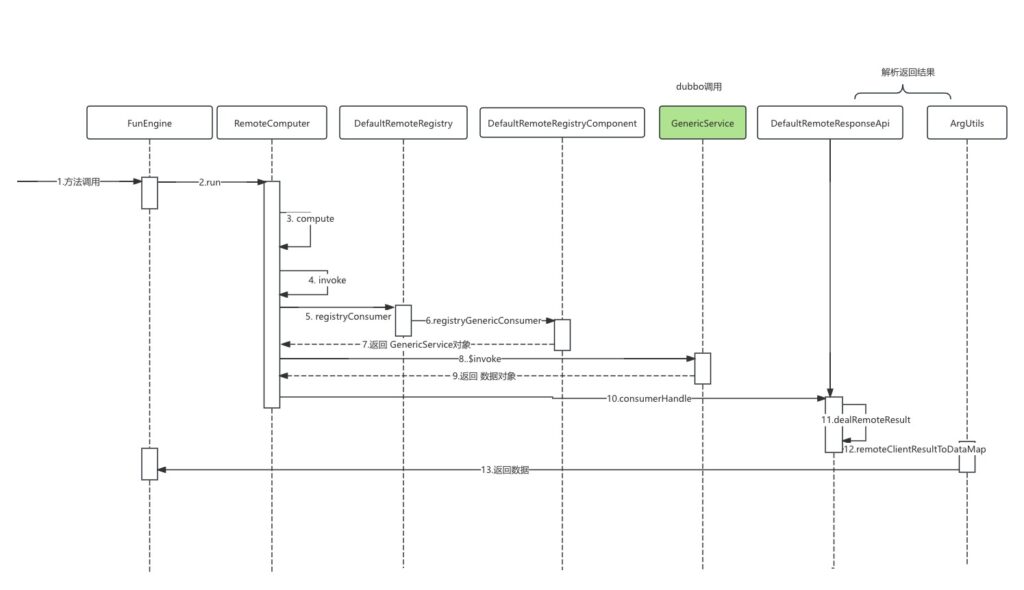
源码分析
泛化调用dobbo接口,并解析返回对象
RemoteComputer
public Object compute(Function function, Object... args) {

        .....
        List<Arg> functionArguments = function.getArguments();
        String methodName = RegistryUtils.getGenericServiceMethodName(function);
        String[] argTypes = FunctionUtils.fetchArgTypes(functionArguments);
        //前置处理:服务消费者,对请求参数进行对象化封装、携带请求上下文进行处理
        Object[] arguments = getRemoteRequestApi().consumerHandle(function.getNamespace(),function.getFun(), args, functionArguments);
        // 泛化调用
        Object result = invoke(function, methodName, argTypes, arguments);
        .....
        //后置处理:服务消费者,对返回结果进行对象化拆解,并对结果携带的上下文进行处理
        // 数据转成IWrapper/Pagination/Result
        return getRemoteResponseApi().consumerHandle(function, result);
}

// 配置请求信息,通过$invoke 实际调用
private Object invoke(Function function, String methodName, String[] argTypes, Object[] arguments) {
        Object result;
        String configCdOwnSign = getSessionFillOwnSignApi().getConfigCdOwnSign();
        if (StringUtils.isBlank(configCdOwnSign)) {
.....
        } else {
            try {
            // 获取服务,由于是泛化调用,所以获取的一定是GenericService类型
                GenericService remoteClient = CommonApiFactory.getApi(RemoteRegistry.class).registryOriginConsumer(function);
         // 第一个参数是需要调用的方法名
         // 第二个参数是需要调用的方法的参数类型数组,为String数组,里面存入参数的全类名。
         // 第三个参数是需要调用的方法的参数数组,为Object数组,里面存入需要的参数
                result = remoteClient.$invoke(methodName, argTypes, arguments);
            } catch (RpcException e) {
                ....            }
        }
        return result;
    }
从缓存中获取泛化
DefaultRemoteRegistryComponent
    public GenericService registryGenericConsumer(String interfaceName, List<MethodConfig> methods,
                                                  String group, String version, Integer timeout, Integer retries) {
        ....
        // 创建服务引用配置
        ReferenceConfig<GenericService> reference = new ReferenceConfig<>();
        reference.setInterface(interfaceName);
        // 设置为泛化调用
        reference.setGeneric(Boolean.TRUE.toString());
        if (null != methods) {
            reference.setMethods(methods);
        }
        constructReference(group, version, timeout, retries, reference);
        return ReferenceConfigCache.getCache().get(reference);
    }
名词解释
泛化调用是指在调用方没有服务方提供的API(SDK)的情况下,对服务方进行调用,并且可以正常拿到调用结果
泛化调用(客户端泛化)
实现泛化实现(服务端泛化)
Oinone社区 作者:oinone原创文章,如若转载,请注明出处:https://doc.oinone.top/backend/17027.html
访问Oinone官网:https://www.oinone.top获取数式Oinone低代码应用平台体验