项目中工作流引入和流程触发

目录

1. 使用工作流需要依赖的包和设置
2. 触发方式
2.1 自动触发方式
2.2 触发方式

1.使用工作流需要依赖的包和设置

1.1 工作流需要依赖的模块

需在pom.xml中增加workflow、sql-record和trigger相关模块的依赖

  • workflow:工作流运行核心模块
  • sql-record:监听流程发布以后对应模型的增删改监听
  • trigger:异步任务调度模块
<dependency>
    <groupId>pro.shushi.pamirs.workflow</groupId>
    <artifactId>pamirs-workflow-api</artifactId>
</dependency>
<dependency>
    <groupId>pro.shushi.pamirs.workflow</groupId>
    <artifactId>pamirs-workflow-core</artifactId>
</dependency>

<dependency>
    <groupId>pro.shushi.pamirs.core</groupId>
    <artifactId>pamirs-sql-record-core</artifactId>
</dependency>

<dependency>
    <groupId>pro.shushi.pamirs.core</groupId>
    <artifactId>pamirs-trigger-core</artifactId>
</dependency>
<dependency>
    <groupId>pro.shushi.pamirs.core</groupId>
    <artifactId>pamirs-trigger-bridge-tbschedule</artifactId>
</dependency>

在application.yml中增加对应模块的依赖以及sql-record路径以及其他相关设置

pamirs:
...

  record:
    sql:
      #改成自己路径
      store: /opt/pamirs/logs
...

  boot:
    init: true
    sync: true
    modules:
...
      - sql_record
      - trigger
      - workflow
...

  sharding:
    define:
      data-sources:
        ds:
          pamirs
      models:
        "[trigger.PamirsSchedule]":
          tables: 0..13

  event:
    enabled: true
    schedule:
      enabled: true
      # ownSign区分不同应用
      ownSign: demo
    rocket-mq:
      # enabled 为 false情况不用配置
      namesrv-addr: 192.168.6.2:19876
    trigger:
      auto-trigger: true

2.触发方式

2.1自动触发方式

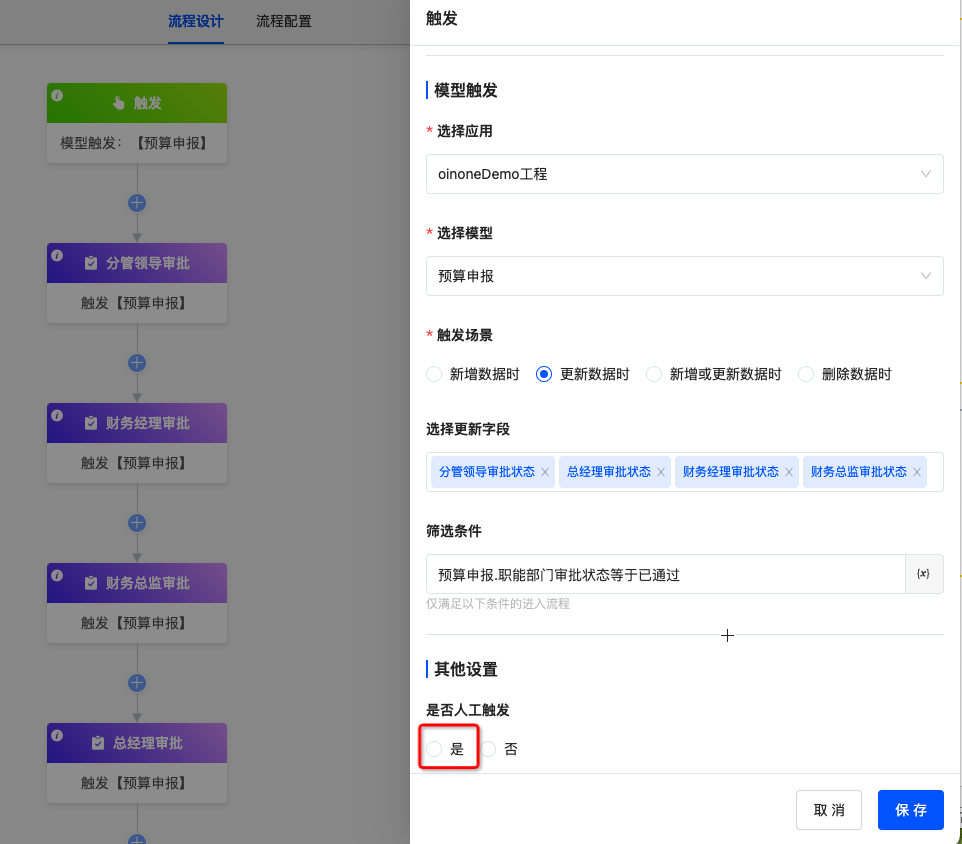
在流程设计器中设置触发方式,如果设置了代码触发方式则不会自动触发

2.2代码调用方式触发

2.2.1.再流程设计器中触发设置中,设置为是否人工触发设置为是
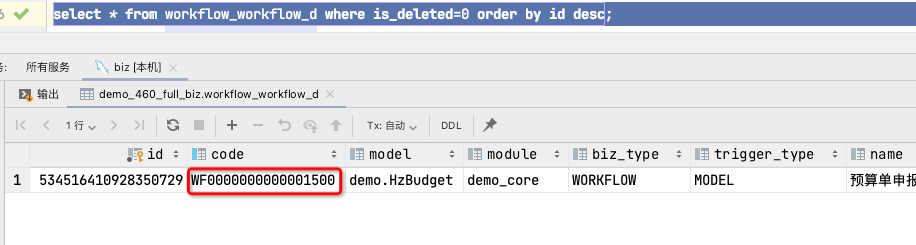
数式Oinone低代码-代码方式调用触发工作流

2.2.2.查询数据库获取该流程的编码

数式Oinone低代码-代码方式调用触发工作流

2.2.3.在代码中调用

/**
     * 触发⼯作流实例
     */
    private Boolean startWorkflow(WorkflowD workflowD, IdModel modelData) {
        WorkflowDefinition workflowDefinition = new WorkflowDefinition().queryOneByWrapper(
                Pops.<WorkflowDefinition>lambdaQuery()
                        .from(WorkflowDefinition.MODEL_MODEL)
                        .eq(WorkflowDefinition::getWorkflowCode, workflowD.getCode())
                        .eq(WorkflowDefinition::getActive, 1)
        );
        if (null == workflowDefinition) {
            // 流程没有运⾏实例
            return Boolean.FALSE;
        }
        String model = Models.api().getModel(modelData);

        //⼯作流上下⽂
        WorkflowDataContext wdc = new WorkflowDataContext();
        wdc.setDataType(WorkflowVariationTypeEnum.ADD);
        wdc.setModel(model);
        wdc.setWorkflowDefinitionDefinition(workflowDefinition.parseContent());
        wdc.setWorkflowDefinition(workflowDefinition);
        wdc.setWorkflowDefinitionId(workflowDefinition.getId());
        IdModel copyData = KryoUtils.get().copy(modelData);
        // ⼿动触发创建的动作流,将操作⼈设置为当前⽤户,作为流程的发起⼈
        copyData.setCreateUid(PamirsSession.getUserId());
        copyData.setWriteUid(PamirsSession.getUserId());
        String jsonData = JsonUtils.toJSONString(copyData.get_d());
        //触发⼯作流 新增时触发-onCreateManual 更新时触发-onUpdateManual
        Fun.run(WorkflowModelTriggerFunction.FUN_NAMESPACE, "onCreateManual", wdc, msgId, jsonData);
        return Boolean.TRUE;
    }

Oinone社区 作者:数式-海波原创文章,如若转载,请注明出处:https://doc.oinone.top/backend/4361.html

访问Oinone官网:https://www.oinone.top获取数式Oinone低代码应用平台体验

(3)
数式-海波的头像数式-海波数式管理员
上一篇 2023年11月7日 am11:35
下一篇 2023年11月7日 pm2:28

相关推荐

  • 自定义数据权限拦截处理

    业务场景 公司给员工对哪些模块有访问权限,这个时候就需要在员工访问模块表的时候做数据过滤, 解决方案 我们可以通过平台提供的数据过滤占位符解决这个问题,新建一条数据行权限,过滤语句条件是占位符,再编写占位符的解析逻辑 1.初始化权限基础数据 package pro.shushi.pamirs.demo.core.init; import com.google.common.collect.Lists; import org.springframework.core.annotation.Order; import org.springframework.stereotype.Component; import pro.shushi.pamirs.auth.api.constants.AuthConstants; import pro.shushi.pamirs.auth.api.enmu.AuthGroupTypeEnum; import pro.shushi.pamirs.auth.api.enmu.PermissionDataSourceEnum; import pro.shushi.pamirs.auth.api.enmu.PermissionTypeEnum; import pro.shushi.pamirs.auth.api.model.AuthGroup; import pro.shushi.pamirs.auth.api.model.AuthRole; import pro.shushi.pamirs.auth.api.model.ResourcePermission; import pro.shushi.pamirs.boot.base.model.UeModule; import pro.shushi.pamirs.boot.common.api.command.AppLifecycleCommand; import pro.shushi.pamirs.boot.common.api.init.InstallDataInit; import pro.shushi.pamirs.boot.common.api.init.UpgradeDataInit; import pro.shushi.pamirs.demo.api.DemoModule; import pro.shushi.pamirs.demo.core.placeholder.EmployeeModulePlaceholder; import pro.shushi.pamirs.framework.common.utils.ObjectUtils; import pro.shushi.pamirs.meta.annotation.fun.extern.Slf4j; import pro.shushi.pamirs.meta.domain.module.ModuleDefinition; import java.util.Collections; import java.util.List; @Slf4j @Component @Order(0) public class DemoModuleBizInit implements InstallDataInit, UpgradeDataInit { @Override public List<String> modules() { return Collections.singletonList(DemoModule.MODULE_MODULE); } @Override public int priority() { return 0; } @Override public boolean init(AppLifecycleCommand command, String version) { this.initAuth(); return true; } @Override public boolean upgrade(AppLifecycleCommand command, String version, String existVersion) { this.initAuth(); return true; } private void initAuth() { AuthGroup authGroup = new AuthGroup(); authGroup.setName("测试权限组") .setDisplayName("测试权限组") .setType(AuthGroupTypeEnum.RUNTIME) .setActive(true); authGroup.createOrUpdate(); AuthRole authRole = new AuthRole(); authRole.setCode("TEST_ROLE_1") .setName("测试角色") .setRoleTypeCode(AuthConstants.ROLE_SYSTEM_TYPE_CODE) .setPermissionDataSource(PermissionDataSourceEnum.CUSTOM) .setActive(true); authRole.createOrUpdate(); authRole.setGroups(Lists.newArrayList(authGroup)); authRole.fieldSave(AuthRole::getGroups); ResourcePermission authPermission = new ResourcePermission(); authPermission.setName("测试模块权限过滤") .setDomainExp(EmployeeModulePlaceholder.PLACEHOLDER) .setModel(ModuleDefinition.MODEL_MODEL) .setPermRead(true) .setPermRun(true) .setPermissionType(PermissionTypeEnum.ROW) .setPermissionDataSource(PermissionDataSourceEnum.CUSTOM) .setCanShow(true) .setActive(true); ResourcePermission authPermission2 = ObjectUtils.clone(authPermission); authPermission2.setName("测试ue模块权限过滤").setModel(UeModule.MODEL_MODEL); authGroup.setPermissions(Lists.newArrayList(authPermission, authPermission2)); authGroup.fieldSave(AuthGroup::getPermissions); } } 这里演示的module表比较特殊,需要同时设置ModuleDefinition和UeModule这2个模型做数据过滤 2.编写占位符拦截替换逻辑 package pro.shushi.pamirs.demo.core.placeholder; import org.springframework.stereotype.Component; import pro.shushi.pamirs.user.api.AbstractPlaceHolderParser; @Component public class EmployeeModulePlaceholder extends AbstractPlaceHolderParser { public static final String PLACEHOLDER = "${employeeModulePlaceholder}"; protected String value() { // TODO…

    2023年11月24日
    97400
  • 【MSSQL】后端部署使用MSSQL数据库(SQLServer)

    MSSQL数据库配置 驱动配置 Maven配置(2017版本可用) <mssql.version>9.4.0.jre8</mssql.version> <dependency> <groupId>com.microsoft.sqlserver</groupId> <artifactId>mssql-jdbc</artifactId> <version>${mssql.version}</version> </dependency> 离线驱动下载 mssql-jdbc-7.4.1.jre8.jarmssql-jdbc-9.4.0.jre8.jarmssql-jdbc-12.2.0.jre8.jar JDBC连接配置 pamirs: datasource: base: type: com.alibaba.druid.pool.DruidDataSource driverClassName: com.microsoft.sqlserver.jdbc.SQLServerDriver url: jdbc:sqlserver://127.0.0.1:1433;DatabaseName=base username: xxxxxx password: xxxxxx initialSize: 5 maxActive: 200 minIdle: 5 maxWait: 60000 timeBetweenEvictionRunsMillis: 60000 testWhileIdle: true testOnBorrow: false testOnReturn: false poolPreparedStatements: true asyncInit: true 连接url配置 暂无官方资料 url格式 jdbc:sqlserver://${host}:${port};DatabaseName=${database} 在jdbc连接配置时,${database}必须配置,不可缺省。 其他连接参数如需配置,可自行查阅相关资料进行调优。 方言配置 pamirs方言配置 pamirs: dialect: ds: base: type: MSSQL version: 2017 major-version: 2017 pamirs: type: MSSQL version: 2017 major-version: 2017 数据库版本 type version majorVersion 2017 MSSQL 2017 2017 PS:由于方言开发环境为2017版本,其他类似版本原则上不会出现太大差异,如出现其他版本无法正常支持的,可在文档下方留言。 schedule方言配置 pamirs: event: enabled: true schedule: enabled: true dialect: type: MSSQL version: 2017 major-version: 2017 type version majorVersion MSSQL 2017 2017 PS:由于schedule的方言在多个版本中并无明显差异,目前仅提供一种方言配置。 其他配置 逻辑删除的值配置 pamirs: mapper: global: table-info: logic-delete-value: CAST(DATEDIFF(S, CAST('1970-01-01 00:00:00' AS DATETIME), GETUTCDATE()) AS BIGINT) * 1000000 + DATEPART(NS, SYSUTCDATETIME()) / 100 MSSQL数据库用户初始化及授权 — init root user (user name can be modified by oneself) CREATE LOGIN [root] WITH PASSWORD = 'password'; — if using mssql database, this authorization is required. ALTER SERVER ROLE [sysadmin] ADD MEMBER [root];

    2024年10月18日
    93700
  • 自定义createorupdate方法时,关联模型数据怎么保存?

    需要自己手动增加保存关联模型数据的逻辑。 多对一、一对一以及一对多 可直接用fieldSave进行保存即可 //如 data.fieldSave(PamirsEmployee::getPositions); 多对多 需要对数据进行处理,前端提交过来的数据,进行判断,是新增还是修改,或者删除

    2023年11月1日
    1.1K00
  • Oinone远程调用链路源码分析

    前提 源码分析版本是 5.1.x版本 概要 在服务启动时,获取注解REMOTE的函数,通过dubbo的泛化调用发布。在调用函数时,通过dubbo泛化调用获取结果。 注册服务者 在spring 启动方法installOrLoad中初始化 寻找定义REMOTE的方法 组装dubbo的服务配置 组装服务对象实现引用,内容如下,用于注册 调用前置处理 放信息到SessionApi 函数调用链追踪,放到本地TransmittableThreadLocal 从redis中获取到的数据进行反序列化并存在到本地的线程里 Trace信息,放一份在sessionApi中 和ThreadLocal 调用函数执行 返回数据转成特定格式 通过线程组调用dubbo的ServiceConfig.export 服务发布 时序图 源码分析 根据条件判断,确定向dubbo进行服务发布RemoteServiceLoader public void publishService(List<FunctionDefinition> functionList,Map<String,Runnable> isPublished) { // 因为泛化接口只能控制到namespace,控制粒度不能到fun级别,这里进行去重处理 Map<String, Function> genericNamespaceMap = new HashMap<>(); for (FunctionDefinition functionDefinition : functionList) { Function function = new Function(functionDefinition) try { //定义REMOTE, 才给予远程调用 if (FunctionOpenEnum.REMOTE.in(function.getOpen()) && !ClassUtils.isInterface(function.getClazz())) { genericNamespaceMap.putIfAbsent(RegistryUtils.getRegistryInterface(function), function); } } catch (PamirsException e) { } } // 发布远程服务 for (String namespace : genericNamespaceMap.keySet()) { Function function = genericNamespaceMap.get(namespace); if(isPublished.get(RegistryUtils.getRegistryInterface(function)) == null){ // 发布,注册远程函数服务,底层使用dubbo的泛化调用 Runnable registryTask = () -> remoteRegistry.registryService(function); isPublished.put(RegistryUtils.getRegistryInterface(function),registryTask); }else{ } } } 构造ServiceConfig方法,设置成泛化调用,进行发布export()DefaultRemoteRegistryComponent public void registryGenericService(String interfaceName, List<MethodConfig> methods, String group, String version, Integer timeout, Integer retries) { …. try { ServiceConfig<GenericService> service = new ServiceConfig<>(); // 服务接口名 service.setInterface(interfaceName); // 服务对象实现引用 service.setRef(genericService(interfaceName)); if (null != methods) { service.setMethods(methods); } // 声明为泛化接口 service.setGeneric(Boolean.TRUE.toString()); // 基础元数据 constructService(group, version, timeout, retries, service); service.export(); } catch (Exception e) { ….. } } // 服务对象实现引用 private GenericService genericService(String interfaceName) { return (method, parameterTypes, args) -> { PamirsSession.clear(); Function function = Objects.requireNonNull(PamirsSession.getContext()).getFunction(RegistryUtils.getFunctionNamespace(method), RegistryUtils.getFunctionFun(method)); if (log.isDebugEnabled()) { log.debug("interfaceName: " + interfaceName + ",…

    2024年9月4日
    1.2K00
  • 如何使用位运算的数据字典

    场景举例 日常有很多项目,数据库中都有表示“多选状态标识”的字段。在这里用我们项目中的一个例子进行说明一下: 示例一: 表示某个商家是否支持多种会员卡打折(如有金卡、银卡、其他卡等),项目中的以往的做法是:在每条商家记录中为每种会员卡建立一个标志位字段。如图: 用多字段来表示“多选标识”存在一定的缺点:首先这种设置方式很明显不符合数据库设计第一范式,增加了数据冗余和存储空间。再者,当业务发生变化时,不利于灵活调整。比如,增加了一种新的会员卡类型时,需要在数据表中增加一个新的字段,以适应需求的变化。  – 改进设计:标签位flag设计二进制的“位”本来就有表示状态的作用。可以用各个位来分别表示不同种类的会员卡打折支持:这样,“MEMBERCARD”字段仍采用整型。当某个商家支持金卡打折时,则保存“1(0001)”,支持银卡时,则保存“2(0010)”,两种都支持,则保存“3(0011)”。其他类似。表结构如图: 我们在编写SQL语句时,只需要通过“位”的与运算,就能简单的查询出想要数据。通过这样的处理方式既节省存储空间,查询时又简单方便。 //查询支持金卡打折的商家信息:   select * from factory where MEMBERCARD & b'0001'; // 或者:   select * from factory where MEMBERCARD & 1;    // 查询支持银卡打折的商家信息:   select * from factory where MEMBERCARD & b'0010'; // 或者:   select * from factory where MEMBERCARD & 2; 二进制( 位运算)枚举 可以通过@Dict注解设置数据字典的bit属性或者实现BitEnum接口来标识该枚举值为2的次幂。二进制枚举最大的区别在于值的序列化和反序列化方式是不一样的。 位运算的枚举定义示例 import pro.shushi.pamirs.meta.annotation.Dict; import pro.shushi.pamirs.meta.common.enmu.BitEnum; @Dict(dictionary = ClientTypeEnum.DICTIONARY, displayName = "客户端类型枚举", summary = "客户端类型枚举") public enum ClientTypeEnum implements BitEnum { PC(1L, "PC端", "PC端"), MOBILE(1L << 1, "移动端", "移动端"), ; public static final String DICTIONARY = "base.ClientTypeEnum"; private final Long value; private final String displayName; private final String help; ClientTypeEnum(Long value, String displayName, String help) { this.value = value; this.displayName = displayName; this.help = help; } @Override public Long value() { return value; } @Override public String displayName() { return displayName; } @Override public String help() { return help; } } 使用方法示例 API: addTo 和 removeFrom List<ClientTypeEnum> clientTypes = module.getClientTypes(); // addTo ClientTypeEnum.PC.addTo(clientTypes); // removeFrom ClientTypeEnum.PC.removeFrom(clientTypes); 在查询条件中的使用 List<Menu> moduleMenus = new Menu().queryListByWrapper(menuPage, LoaderUtils.authQuery(wrapper).eq(Menu::getClientTypes, ClientTypeEnum.PC));

    2023年11月24日
    1.4K00

Leave a Reply

登录后才能评论