
在实际项目中,客户网络环境不能访问外网即纯内网部署。此时需要将所有的静态资源都放在客户内部的CDN上,该篇详细说明实现步骤。
实现步骤
1、把图片等静态资源上传到本地CDN上(如MINIO、Nginx等),图片等静态资源找 数式支持人员 提供;
- 【注意】:MINIO情况,放置图片等静态资源的桶权限需设置为
公共读;
2、项目中YAML的OSS配置,使用本地CDN、并指定使用的本地CDN图标的标识appLogoUseCdn: true, OSS配置参考如下:
-
本地CDN使用MINIO(仅示例需根据实际情况修改)
cdn: oss: name: MINIO type: MINIO # MINIO的配置根据实际情况修改 bucket: pamirs(您的bucket) # 上传和下载地址根据实际情况修改 uploadUrl: http://39.103.145.77:9000 downloadUrl: http://39.103.145.77:9000 accessKeyId: 您的accessKeyId accessKeySecret: 您的accessKeySecret # mainDir对用CDN的图片目录,根据项目情况自行修改 mainDir: upload/demo/ validTime: 3600000 timeout: 600000 active: true referer: # 使用客户自己的CDN的图片,否则系统默认的从数式的CDN中获取 appLogoUseCdn: true -
或本地CDN使用Nginx(仅示例需根据实际情况修改)
cdn:
oss:
name: 本地文件NG系统
type: LOCAL
bucket:
# uploadUrl 这个是Oinone后端服务地址和端口
uploadUrl: http://192.168.0.129:8099
# downloadUrl前端地址,即直接映射在nginx的静态资源的路径和端口
downloadUrl: http://192.168.0.129:9999
validTime: 3600000
timeout: 600000
active: true
referer:
# 本地Nginx静态资源目录
localFolderUrl: /opt/pamirs/static
# 使用客户自己的CDN的图片,否则系统默认的从数式的CDN中获取
appLogoUseCdn: true
3、前端工程
3.1 前端源码工程,在.evn中把 STATIC_IMG地址进行修改;http(https)、IP和端口改成与CDN对应的配置,URL中/oinone/static/images是固定的;例如:

- 本地CDN使用MINIO(仅示例需根据实际情况修改)
STATIC_IMG: 'http://39.103.145.77:9000/pamirs(这里替换为OSS中的bucket)/oinone/static/images' - 或本地CDN使用Nginx(仅示例需根据实际情况修改)
STATIC_IMG: 'http://192.168.0.129:9999/static/oinone/static/images'
3.2 对于已经打包好的前端资源
对于已打包好的前端资源即无法修改.evn的情况;需在前端资源的根目录,新建config/manifest.js. 如果已存在则不需要新建,同时原来的内容也不需要删除(追加即可),需增加的配置: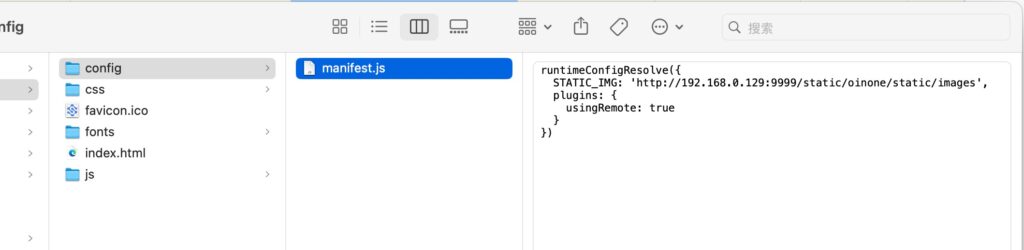
- 本地CDN使用MINIO(仅示例需根据实际情况修改)
runtimeConfigResolve({ STATIC_IMG: 'http://39.103.145.77:9000/pamirs(这里替换为OSS中的bucket)/oinone/static/images', plugins: { usingRemote: true } }) - 或本地CDN使用Nginx(仅示例需根据实际情况修改)
runtimeConfigResolve({
STATIC_IMG: 'http://192.168.0.129:9999/static/oinone/static/images',
plugins: {
usingRemote: true
}
})
Oinone社区 作者:望闲原创文章,如若转载,请注明出处:https://doc.oinone.top/dai-ma-shi-jian/20385.html
访问Oinone官网:https://www.oinone.top获取数式Oinone低代码应用平台体验