如何通过业务数据拿到工作流用户任务待办

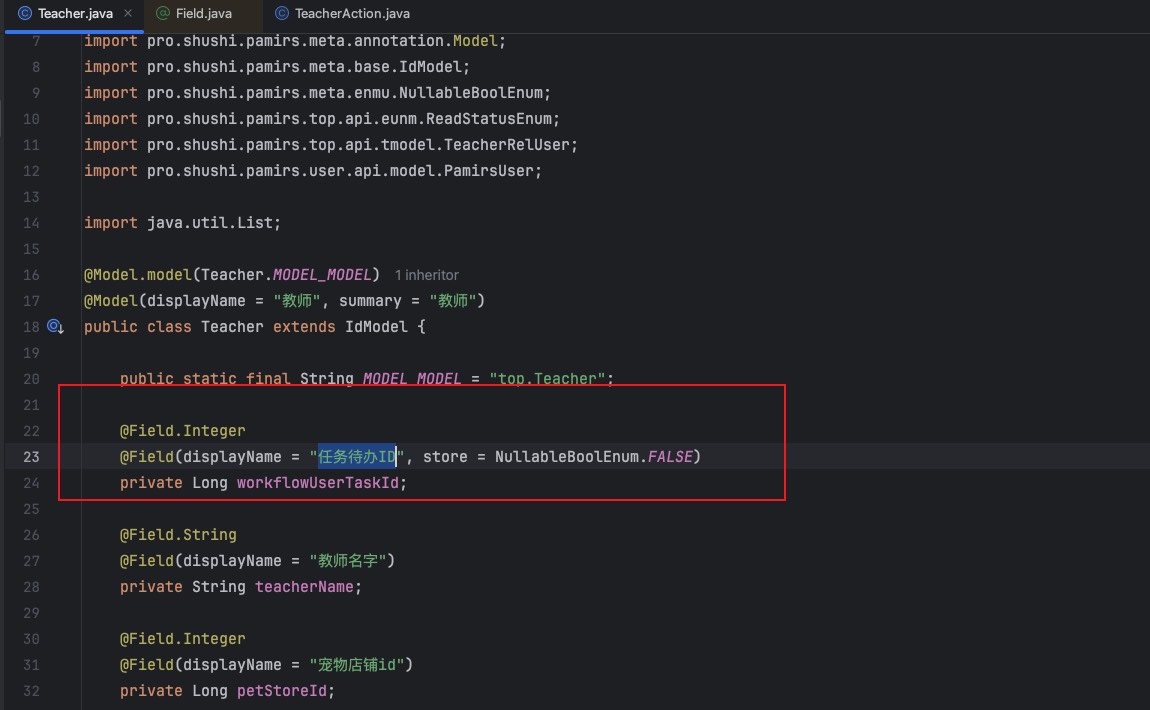
  1. 在模型里面建一个非存储字段,用来传输工作流用户任务待办ID。
    如何通过业务数据拿到工作流用户任务待办

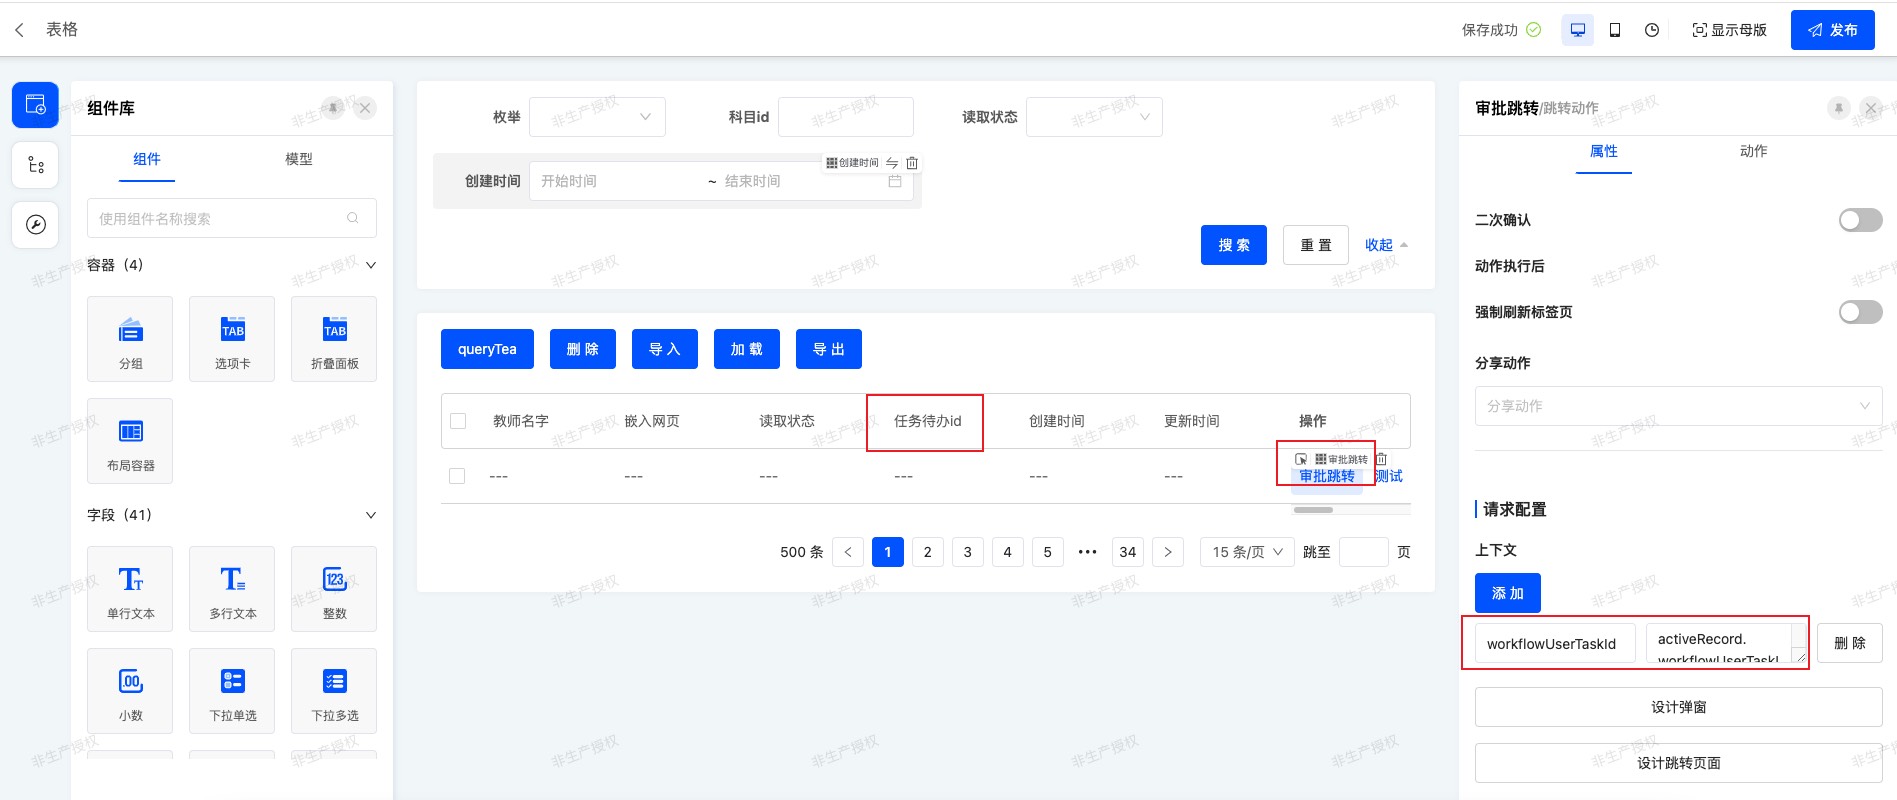
  2. 界面设计器把这个字段拖到列表页里,并在跳转动作上配置上下文参数,把任务待办id传到表单页里。
    如何通过业务数据拿到工作流用户任务待办

  3. 重写教师模型的queryPage,通过业务数据id查询出每条业务数据的工作流用户任务待办id返回给前端。

    @Function.Advanced(displayName = "查询教师列表", type = FunctionTypeEnum.QUERY, category = FunctionCategoryEnum.QUERY_PAGE, managed = true)
    @Function(openLevel = {FunctionOpenEnum.LOCAL, FunctionOpenEnum.REMOTE, FunctionOpenEnum.API})
    public Pagination<Teacher> queryPage(Pagination<Teacher> page, IWrapper<Teacher> queryWrapper) {
        Pagination<Teacher> teacherPagination = new Teacher().queryPage(page, queryWrapper);
        List<Teacher> content = teacherPagination.getContent();
        if (CollectionUtils.isEmpty(content)) {
            return teacherPagination;
        }
        List<Long> teacherIds = content.stream().map(Teacher::getId).collect(Collectors.toList());
        List<WorkflowUserTask> workflowUserTasks = Models.data().queryListByWrapper(Pops.<WorkflowUserTask>lambdaQuery()
                .from(WorkflowUserTask.MODEL_MODEL)
                .in(WorkflowUserTask::getNodeDataBizId, teacherIds)
                .orderByDesc(WorkflowUserTask::getCreateDate)
        );
        if (CollectionUtils.isEmpty(workflowUserTasks)) {
            return teacherPagination;
        }
        Map<Long/*业务id*/, WorkflowUserTask> userTaskMap = workflowUserTasks.stream().collect(Collectors.toMap(
                WorkflowUserTask::getNodeDataBizId, a -> a, (old, n) -> old)
        );
    
        for (Teacher teacher : content) {
            if (userTaskMap.containsKey(teacher.getId())) {
                teacher.setWorkflowUserTaskId(userTaskMap.get(teacher.getId()).getId());
            }
        }
        return teacherPagination;
    }
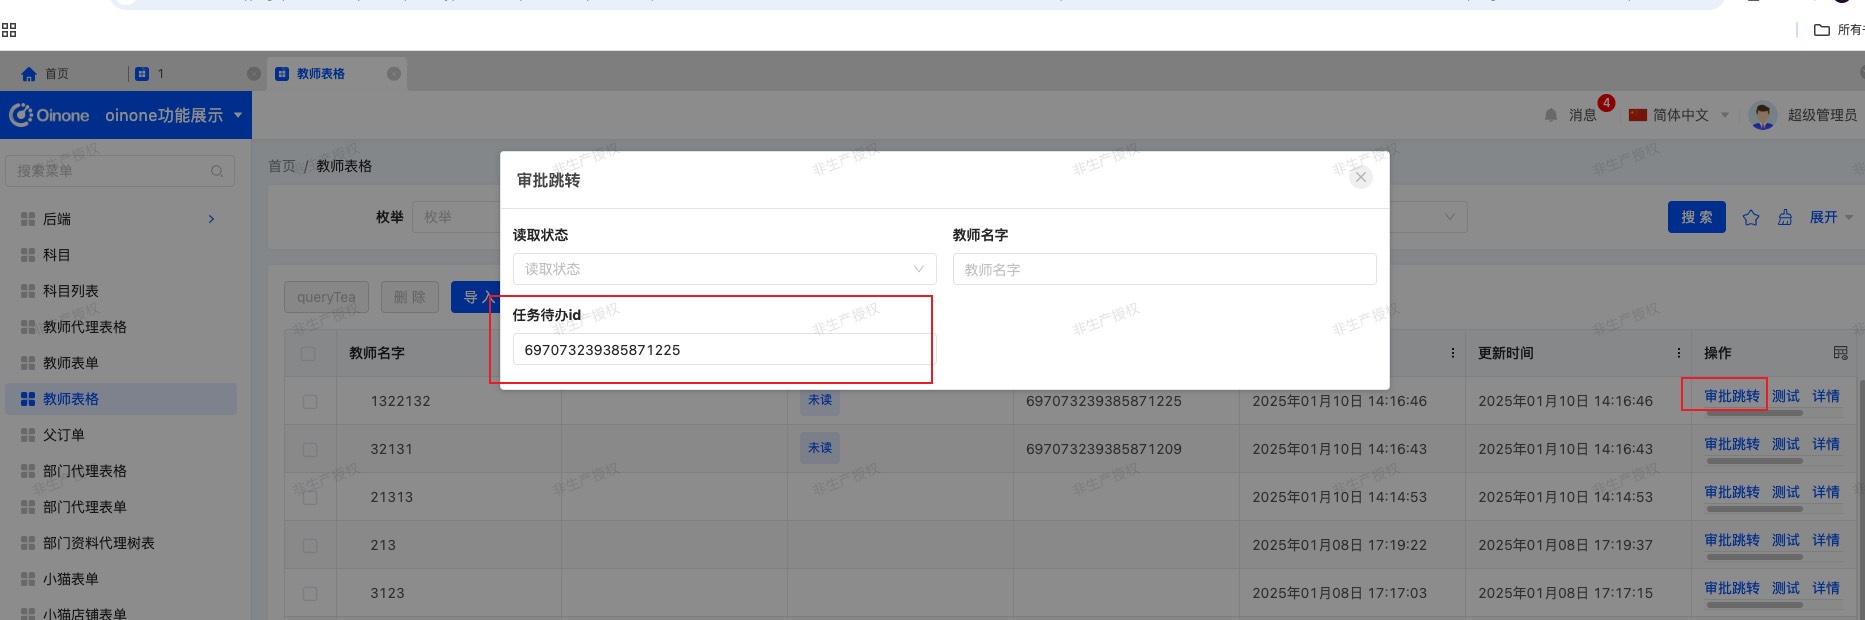
  4. 查看效果,任务待办id成功传到表单里面。
    如何通过业务数据拿到工作流用户任务待办

Oinone社区 作者:yexiu原创文章,如若转载,请注明出处:https://doc.oinone.top/other/20288.html

访问Oinone官网:https://www.oinone.top获取数式Oinone低代码应用平台体验

(0)
yexiu的头像yexiu数式员工
上一篇 2025年1月9日 pm8:38
下一篇 2025年1月16日 pm10:23

相关推荐

  • 新人引导文档

    类型 文档链接 入门参考必看 7天入门到精通 Oinone 初级学习路径 Oinone 初级学习路径 平台部署启动 无代码docker启动说明 低代码启动说明 前端环境和启动前端工程 无代码设计器启动方式 后端无代码设计器Jar包启动方法 平台部署及依赖说明 Oinone平台部署及依赖说明(v5.0) 问题排查方法 问题排查工具使用手册 前后端研发帮助文档 前端文档 后端文档 项目开发实践要点 【前端】项目开发前端知识要点地图 【后端】项目开发后端知识要点地图 版本升级说明 版本更新日志 工具包 【附件一】下载说明 许可证使用说明 pamirs-license 许可证使用常见问题 更多文档新人引导建议,可以下方评论

    2024年7月15日
    1.5K00
  • 前端 快速查询并替换默认组件

    可以借助vue的调试工具快速找到对应的组件,请参考这篇文章 使用vue调试工具快速找到对应的组件 Mask默认组件 重写Mask组件 重写AppSwitcherWidget import Com from './com.vue' /** * SPI注册条件保持根 AppSwitcherWidget 一致,即可覆盖 */ @SPI.ClassFactory( MaskWidget.Token({ widget: 'app-switcher' }) ) export class CustomAppSwitcherWidget extends AppSwitcherWidget { /** * 如果需要重写vue组件,那么可以通过重写initialize方法来实现,如果是修改数据或者逻辑,那么可以删除这个函数 */ public initialize(props: any) { super.initialize(props); this.setComponent(Com) return this } } 重写 MenuWidget import Com from './com.vue' /** * SPI注册条件保持根 MenuWidget 一致,即可覆盖 */ @SPI.ClassFactory(MaskWidget.Token({ widget: 'nav-menu' })) export class CustomMenuWidget extends MenuWidget { /** * 如果需要重写vue组件,那么可以通过重写initialize方法来实现,如果是修改数据或者逻辑,那么可以删除这个函数 */ public initialize(props: any) { super.initialize(props); this.setComponent(Com) return this } } 重写 NotificationWidget import Com from './com.vue' /** * SPI注册条件保持根 NotificationWidget 一致,即可覆盖 */ @SPI.ClassFactory(MaskWidget.Token({ widget: 'notification' })) export class CustomNotificationWidget extends NotificationWidget { /** * 如果需要重写vue组件,那么可以通过重写initialize方法来实现,如果是修改数据或者逻辑,那么可以删除这个函数 */ public initialize(props: any) { super.initialize(props); this.setComponent(Com) return this } } 重写 LanguageWidget import Com from './com.vue' /** * SPI注册条件保持根 LanguageWidget 一致,即可覆盖 */ @SPI.ClassFactory(MaskWidget.Token({ widget: 'language' })) export class CustomLanguageWidget extends LanguageWidget { /** * 如果需要重写vue组件,那么可以通过重写initialize方法来实现,如果是修改数据或者逻辑,那么可以删除这个函数 */ public initialize(props: any) { super.initialize(props); this.setComponent(Com) return this } } 重写 UserWidget import Com from './com.vue' /** * SPI注册条件保持根 UserWidget 一致,即可覆盖 */ @SPI.ClassFactory(MaskWidget.Token({ widget: 'user' })) export class CustomUserWidget extends UserWidget { /** * 如果需要重写vue组件,那么可以通过重写initialize方法来实现,如果是修改数据或者逻辑,那么可以删除这个函数 */ public initialize(props: any) { super.initialize(props);…

    2025年8月14日
    61000
  • 如何实现业务表格跳转页面设计器设计器页面

    后端实现 代理继承界面设计器视图模型 @Model.model(MyView.MODEL_MODEL) @Model(displayName = "视图代理") @Model.Advanced(type = ModelTypeEnum.PROXY) public class MyView extends UiDesignerViewProxy { public static final String MODEL_MODEL = "hr.simple.MyView"; @Field.Integer @Field(displayName = "页面布局ID") private Long uiDesignerViewLayoutId; } 重写查询接口,返回页面布局ID,重写创建接口,实现创建页面逻辑。 package pro.shushi.pamirs.top.core.action; import org.apache.commons.collections4.CollectionUtils; import org.springframework.beans.factory.annotation.Autowired; import org.springframework.stereotype.Component; import pro.shushi.pamirs.boot.base.constants.ViewConstants; import pro.shushi.pamirs.boot.base.enmu.ActionTargetEnum; import pro.shushi.pamirs.boot.base.ux.annotation.action.UxAction; import pro.shushi.pamirs.boot.base.ux.annotation.action.UxRoute; import pro.shushi.pamirs.boot.base.ux.annotation.button.UxRouteButton; import pro.shushi.pamirs.framework.connectors.data.sql.Pops; import pro.shushi.pamirs.framework.connectors.data.sql.query.LambdaQueryWrapper; import pro.shushi.pamirs.meta.annotation.Action; import pro.shushi.pamirs.meta.annotation.Function; import pro.shushi.pamirs.meta.annotation.Model; import pro.shushi.pamirs.meta.api.dto.condition.Pagination; import pro.shushi.pamirs.meta.api.dto.wrapper.IWrapper; import pro.shushi.pamirs.meta.api.session.PamirsSession; import pro.shushi.pamirs.meta.constant.FunctionConstants; import pro.shushi.pamirs.meta.enmu.*; import pro.shushi.pamirs.top.api.model.MyView; import pro.shushi.pamirs.ui.designer.api.designe.UiDesignerViewLayoutService; import pro.shushi.pamirs.ui.designer.model.UiDesignerViewLayout; import pro.shushi.pamirs.ui.designer.pmodel.UiDesignerViewLayoutProxy; import java.util.List; import java.util.Map; import java.util.stream.Collectors; /** * @author Yexiu at 20:39 on 2025/3/27 */ @Component @Model.model(MyView.MODEL_MODEL) public class MyViewAction { @Autowired private UiDesignerViewLayoutService uiDesignerViewLayoutService; @Action.Advanced(name = FunctionConstants.create, managed = true) @Action(displayName = "创建", summary = "添加", bindingType = ViewTypeEnum.FORM) @Function(name = FunctionConstants.create) @Function.fun(FunctionConstants.create) public MyView create(MyView data) { UiDesignerViewLayoutProxy uiDesignerViewLayoutProxy = new UiDesignerViewLayoutProxy(); uiDesignerViewLayoutProxy.setBizType(data.getBizType()); uiDesignerViewLayoutProxy.setDesignerActionBarType(data.getDesignerActionBarType()); uiDesignerViewLayoutProxy.setViewType(data.getType()); uiDesignerViewLayoutProxy.setModel(data.getModel()); uiDesignerViewLayoutProxy.setModule(PamirsSession.getServApp()); uiDesignerViewLayoutProxy.setViewTitle(data.getTitle()); uiDesignerViewLayoutProxy.setUsingDefaultView(data.getLoadLayout()); UiDesignerViewLayoutProxy saveUiDesigner = uiDesignerViewLayoutService.create(uiDesignerViewLayoutProxy); data.setDesignerViewId(saveUiDesigner.getId()); return data; } @Function.Advanced(type = FunctionTypeEnum.QUERY, displayName = "查询列表") @Function.fun(FunctionConstants.queryPage) @Function(openLevel = {FunctionOpenEnum.API, FunctionOpenEnum.LOCAL}) public Pagination<MyView> queryPage(Pagination<MyView> page, IWrapper<MyView> queryWrapper) { LambdaQueryWrapper<MyView> wrapper = Pops.<MyView>lambdaQuery().from(MyView.MODEL_MODEL) .eq(MyView::getSys, Boolean.FALSE) .eq(MyView::getSystemSource, SystemSourceEnum.UI); Pagination<MyView> myViewPagination = new MyView().queryPage(page, wrapper); List<MyView> content…

    2025年3月31日
    42800
  • 外部系统接入SSO-OAuth2(6.3.x 之后版本支持)

    一、概述 统一身份认证系统提供了单点登录功能。本文档详述了统一身份认证系统单点登录接口,介绍了应用系统对接统一身份认证系统的过程和方法,用以帮助开发人员将应用系统接入统一身份认证系统。 本文档支持的协议:OAuth2 二、统一认证集成规范 2.1 SSO登录场景 序号 场景 预期结果 确认 1 登录跳转,在未登录的条件下,直接访问业务系统 跳转到单点登录界面 是 2 登录跳转,在已登录的条件下,直接访问业务系统 直接进入业务系统 是 3 正常登录,先登录认证,然后访问业务系统 直接进入业务系统 是 4 正常登出,在单点登录系统登出 访问业务系统要重新登录 是 5 正常登出,在业务系统登出 单点登录系统同步登出 是 2.2 认证流程 OAuth2 登录和认证流程 后端验证 token 后,创建本地会话(如 JSESSIONID 或自定义 Cookie); 后续应用请求靠本地会话维持登录状态,不再依赖原始 token; 本地会话有过期时间(如 30 分钟无操作过期); 三、认证服务接口 3.1 SSO服务端认证 浏览器登录 分类 说明 请求地址(开发环境) http://${host}:${port}/pamirs/sso/auth?client_id={client_id}&redirect_uri={redirect_uri}&state={state} 请求地址(测试环境) http://${host}:${port}/pamirs/sso/auth?client_id={client_id}&redirect_uri={redirect_uri}&state={state} 请求方式 GET 请求参数 redirect_uri:应用系统回调地址client_id:SSO 服务端颁发的应用 IDstate:可选但推荐,用于防止 CSRF 的随机字符串(UUID 随机码) 请求示例 http://${host}:${port}/pamirs/sso/auth?client_id=client123456&redirect_rui=http://app.example.com&state=abc123 响应说明 1. 已登录:重定向到 redirect 地址并携带授权码 code,如 http://app.example.com&state=abc123&code=xxx2. 未登录:重定向到服务器 SSO 登录地址 备注 SSO 登录成功后,会携带授权码并重定向到 redirect 地址 3.2 验证授权码 分类 说明 请求地址(开发环境) http://${host}:${port}/pamirs/sso/oauth2/authorize 请求地址(测试环境) http://${host}:${port}/pamirs/sso/oauth2/authorize 请求方式 POST 请求 Body {"grant_type":"authorization_code","client_id":"xxxx","client_secret":"xxxxx","code":"xxxx"} 请求示例 http://${host}:${port}/pamirs/sso/oauth2/authorize 响应说明 {"code":"0","msg":"成功","data":{"access_token":"xxxxx","expires_in":7200,"refresh_token":"xxxxxx","refresh_token_expiresIn":604800}} 备注 — 3.2 根据token获取用户信息 分类 说明 请求地址(开发环境) http://${host}:${port}/pamirs/sso/oauth2/getUserInfo 请求地址(测试环境) http://${host}:${port}/pamirs/sso/oauth2/getUserInfo 请求方式 POST 请求头 Authorization: Bearer xxxxxxxx 请求 Body {"client_id":"xxxx"} 请求示例 http://${host}:${port}/pamirs/sso/oauth2/getUserInfo 响应 {"code":"0","msg":"成功","data":{"name":"xxxxx","email":"xxxxx","login":"xxxxxx","id":"xxxxxxx"}} 备注 成功返回用户信息;失败返回错误码:1 根据实际情况其他协议的验证接口 3.3 单点登出接口 分类 说明 请求地址(开发环境) http://${host}:${port}/pamirs/sso/oauth2/logout 请求地址(测试环境) http://${host}:${port}/pamirs/sso/oauth2/logout 请求方式 POST 请求头 Authorization: Bearer xxxxxxxx 请求 Body {"client_id":"xxxx"} 请求示例 http://${host}:${port}/pamirs/sso/oauth2/logout 响应头 HTTP/1.1 200;Content-Type: application/html;charset=UTF-8 响应体 登出成功页面 备注 应用系统向 SSO 系统发起登出请求,SSO 收到后会通知所有其它系统登出该用户 四、服务注册 添加以下依赖 <!– sso相关 –> <dependency> <groupId>pro.shushi.pamirs.core</groupId> <artifactId>pamirs-sso-api</artifactId> </dependency> <dependency> <groupId>pro.shushi.pamirs.core</groupId> <artifactId>pamirs-sso-common</artifactId> </dependency> <dependency> <groupId>pro.shushi.pamirs.core</groupId> <artifactId>pamirs-sso-server</artifactId> </dependency> 配置文件 pamirs sso: enabled: true server: loginUrl: http://127.0.0.1:8091/login authType:…

    2026年1月7日
    10100
  • Oinone 初级学习路径

    文档说明 文档链接 介绍Oinone前端相关知识点 前端基础学习路径 介绍Oinone后端相关知识点 后端基础学习路径 介绍平台基础组件 平台基础组件 介绍平台设计器常用场景实操 设计器基础学习路径 设计器实操案例示例 7.2 实战训练(积分发放)

    2024年6月15日
    1.1K00

Leave a Reply

登录后才能评论