
使用扩展点实现用户中心菜单替换
1. 工程中引起pamirs-user-api
<dependency>
    <groupId>pro.shushi.pamirs.core</groupId>
    <artifactId>pamirs-user-api</artifactId>
</dependency>
2. 实现TopBarUserBlockAction的后置扩展
- 实现HookAfter后置扩展接口
@Hook(model = {TopBarUserBlock.MODEL_MODEL}, fun = {"construct"})添加Hook注解注明是TopBarUserBlock模型的construct函数的后置扩展。
增加用户中心菜单
@Component
@Order(1)
@SPI.Service
public class MyTopBarActionExt implements TopBarActionExtendApi {

    public void edit(List<TopBarAction> list) {
        list.add(new TopBarAction("top_demo", "top.Teacher", "uiView9a0caf1d574a42c9847a057a0c4a4ad1", ActionTypeEnum.VIEW, 1)
                .setDisplayName("商品管理")
                .setIcon("oinone-gongzuotai")
        );
    }

}
实现效果
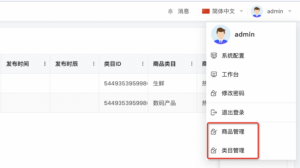

替换原有的用户中心菜单
-
替换原有的菜单跳转
@Component public class DemoTopBarUserBlockDataHookAfter implements HookAfter { @Override @Hook(model = {TopBarUserBlock.MODEL_MODEL}, fun = {"construct"}) public Object run(Function function, Object ret) { if (ret == null) { return null; } TopBarUserBlock result = null; if (ret instanceof Object[]) { Object[] rets = (Object[]) ((Object[]) ret); if (rets.length == 1) { result = (TopBarUserBlock) rets[0]; //例:替换用户中心:修改密码菜单 //使用name和model查询出模型的ViewAction替换修改密码ViewAction ViewAction demoViewAction = PamirsSession.getContext().getExtendCache(ActionCacheApi.class).get(Dog.MODEL_MODEL, "changePassword"); //设置菜单的icon Map<String, Object> attributes = Optional.ofNullable(demoViewAction.getAttributes()).orElse(new HashMap<>()); attributes.put("icon", "oinone-xiugaimima"); demoViewAction.setAttributes(attributes); //UserViewAction第0个是修改密码ViewAction,使用自定义的ViewAction就可以实现替换 result.getUserViewAction().set(0, demoViewAction); } } else { result = (TopBarUserBlock) ret; } return result; } } -
使用@UxRouteButton方式新增ViewAction,更多新增Action方式详见:Action的类型
@Model.model(Dog.MODEL_MODEL)
@Component
@UxRouteButton(
    action = @UxAction(name = "changePassword", displayName = "修改密码"),
    value = @UxRoute(model = Dog.MODEL_MODEL, openType = ActionTargetEnum.DIALOG))
public class DogAction {
}
替换原有的个人设置头像跳转
-
修改点击头像绑定的跳转逻辑
@Order(10) @Component @SPI.Service public class DemoTopBarUserBlockDataApi implements TopBarUserBlockDataApi { @Override public TopBarUserBlock extendData(TopBarUserBlock data) { //例如增加一个菜单, PamirsDemo.MODEL_MODEL: 模型。 MenuuiMenu31f22466735a4abe8e0544b428ed88ac:viewAction的name。 Action demoViewAction = PamirsSession.getContext().getExtendCache(ActionCacheApi.class).get(PamirsDemo.MODEL_MODEL, "MenuuiMenu31f22466735a4abe8e0544b428ed88ac"); if (demoViewAction != null){ AccessResourceInfo info = PageLoadHelper.generatorAccessResourceInfo(TopModule.MODULE_MODULE, demoViewAction); AccessResourceInfoSession.setInfo(info); String path = ResourcePath.generatorPath(demoViewAction.getModel(), demoViewAction.getName()); demoViewAction.setSessionPath(path); data.setUserAvatarAction(demoViewAction); } return data; } } -
添加权限节点,用于控制权限。
@Component @Order(88) @SPI.Service public class MyTestNodeLoadExtend implements PermissionNodeLoadExtendApi { @Override public List<PermissionNode> buildRootPermissions(PermissionLoadContext loadContext, List<PermissionNode> nodes) { PermissionNode root = AuthNodeHelper.createNodeWithTranslate("CustomNode", "自定义节点"); List<PermissionNode> newNodes = new ArrayList<>(); newNodes.add(root); Action demoViewAction = PamirsSession.getContext().getExtendCache(ActionCacheApi.class).get(PamirsDemo.MODEL_MODEL, "MenuuiMenu31f22466735a4abe8e0544b428ed88ac"); if (demoViewAction != null) { //将该Action放入权限树 //权限鉴权的path路径是根据【cacheAction.getModel() + cacheAction.getName()】拼接的。和MODULE没有关系,这里MODULE可以自定义。 AuthNodeHelper.addNode(newNodes, root, AuthNodeHelper.createActionNode(TopModule.MODULE_MODULE, demoViewAction, root)); } nodes.add(0, root); return newNodes; } } - 管理中心控制个人设置头像权限

Oinone社区 作者:yexiu原创文章,如若转载,请注明出处:https://doc.oinone.top/backend/14399.html
访问Oinone官网:https://www.oinone.top获取数式Oinone低代码应用平台体验