自定义RSQL占位符(placeholder)及在权限中使用

1 自定义RSQL占位符常用场景

  • 统一的数据权限配置
  • 查询表达式的上下文变量扩展

2 自定义RSQL的模板

/**
 * 演示Placeholder占位符基本定义
 *
 * @author Adamancy Zhang at 13:53 on 2024-03-24
 */
@Component
public class DemoPlaceHolder extends AbstractPlaceHolderParser {

    private static final String PLACEHOLDER_KEY = "${thisPlaceholder}";

    /**
     * 占位符
     *
     * @return placeholder
     */
    @Override
    public String namespace() {
        return PLACEHOLDER_KEY;
    }

    /**
     * 占位符替换值
     *
     * @return the placeholder replace to the value
     */
    @Override
    protected String value() {
        return PamirsSession.getUserId().toString();
    }

    /**
     * 优先级
     *
     * @return execution order of placeholders, ascending order.
     */
    @Override
    public Integer priority() {
        return 0;
    }

    /**
     * 是否激活
     *
     * @return the placeholder is activated
     */
    @Override
    public Boolean active() {
        return true;
    }
}

注意事项

  • 在一些旧版本中,priorityactive可能不起作用,为保证升级时不受影响,请保证该属性配置正确。

  • PLACEHOLDER_KEY变量表示自定义占位符使用的关键字,需按照所需业务场景的具体功能并根据上下文语义正确定义。

  • 为保证占位符可以被正确替换并执行,所有占位符都不应该出现重复,尤其是不能与系统内置的重复。

3 占位符使用时的优先级问题

多个占位符在进行替换时,会根据优先级按升序顺序执行,如需要指定替换顺序,可使用SpringOrder注解对其进行排序。

import org.springframework.core.annotation.Order;

@Order(0)

4 Oinone平台内置的占位符

占位符 数据类型 含义 备注
${currentUser} String 当前用户ID 未登录时无法使用
${currentRoles} Set<String> 当前用户的角色ID集合 未登录时无法使用

5 如何覆盖平台内置的占位符?

通过指定占位符的优先级,并定义相同的namespace可优先替换。

6 如何定义会话级别的上下文变量?

在上述模板中,我们使用的是Oinone平台内置的上下文变量进行演示,通常情况下,我们需要根据实际业务场景增加上下文变量,以此来实现所需功能。

下面,我们将根据当前用户获取当前员工ID定义该上下文变量进行演示。

/**
 * 员工Session
 *
 * @author Adamancy Zhang at 14:33 on 2024-03-24
 */
@Component
public class EmployeeSession implements HookBefore {

    private static final String SESSION_KEY = "CUSTOM_EMPLOYEE_ID";

    @Autowired
    private DemoEmployeeService demoEmployeeService;

    public static String getEmployeeId() {
        return PamirsSession.getTransmittableExtend().get(SESSION_KEY);
    }

    @Override
    @Hook(priority = 1)
    public Object run(Function function, Object... args) {
        Long userId = PamirsSession.getUserId();
        if (userId == null) {
            return function;
        }
        if (StringUtils.isBlank(EmployeeSession.getEmployeeId())) {
            PamirsSession.getTransmittableExtend().put(SESSION_KEY, getCurrentEmployeeId());
        }
        return function;
    }

    private String getCurrentEmployeeId() {
        String employeeId = getEmployeeIdByCache();
        if (employeeId == null) {
            employeeId = demoEmployeeService.getCurrentEmployeeId();
        }
        return employeeId;
    }

    private String getEmployeeIdByCache() {
        // do something.
        return null;
    }
}

注意事项

  • 使用HookBefore在请求发起时向上下文中设置employeeId,使用EmployeeSession.getEmployeeId()获取即可。

  • HookBefore的优先级设置为priority = 1,需要该Hook在平台内置的UserHook之后执行,以确保PamirsSession.getUserId()中的值已经被正确设置。

  • DemoEmployeeService服务应使用平台@Fun@Function注解进行实现,以确保该Session可在分布式环境中正确运行。

  • getEmployeeIdByCache方法需自行实现,在运行时使用缓存可有效提高性能。

7 将员工Sessionplaceholder中使用

DemoPlaceHolder改写,使用${currentEmployeeId}获取员工Session中保存的employeeId

/**
 * 演示Placeholder占位符使用员工Session
 *
 * @author Adamancy Zhang at 15:02 on 2024-03-24
 */
@Component
public class DemoPlaceHolder extends AbstractPlaceHolderParser {

    private static final String PLACEHOLDER_KEY = "${currentEmployeeId}";

    /**
     * 占位符
     *
     * @return placeholder
     */
    @Override
    public String namespace() {
        return PLACEHOLDER_KEY;
    }

    /**
     * 占位符替换值
     *
     * @return the placeholder replace to the value
     */
    @Override
    protected String value() {
        return EmployeeSession.getEmployeeId();
    }

    /**
     * 优先级
     *
     * @return execution order of placeholders, ascending order.
     */
    @Override
    public Integer priority() {
        return 0;
    }

    /**
     * 是否激活
     *
     * @return the placeholder is activated
     */
    @Override
    public Boolean active() {
        return true;
    }
}

至此,我们已完成了一个员工ID占位符。

8 在权限配置时使用该占位符作为过滤条件

下面,我们将模拟一个简单业务场景,详细介绍该占位符如何在业务中使用。

8.1 场景描述

当前系统中包含部门员工两个模型,模型的基本定义如下所示:

部门

/**
 * 演示部门
 *
 * @author Adamancy Zhang at 15:18 on 2024-03-24
 */
@Model.model(DemoDepartment.MODEL_MODEL)
@Model(displayName = "演示部门", labelFields = "name")
public class DemoDepartment extends IdModel {

    private static final long serialVersionUID = -300189841334506668L;

    public static final String MODEL_MODEL = "demo.DemoDepartment";

    @Field(displayName = "部门名称")
    private String name;

    @Field(displayName = "管理员")
    private DemoEmployee manager;

}

员工

/**
 * 演示员工
 *
 * @author Adamancy Zhang at 15:17 on 2024-03-24
 */
@Model.model(DemoEmployee.MODEL_MODEL)
@Model.Advanced(unique = {"bindingUserId"})
@Model(displayName = "演示员工", labelFields = "name")
public class DemoEmployee extends IdModel {

    private static final long serialVersionUID = -6237083162460091500L;

    public static final String MODEL_MODEL = "demo.DemoEmployee";

    @Field(displayName = "员工名称")
    private String name;

    @Field.Relation(relationFields = {"bindingUserId"}, referenceFields = {"id"})
    @Field(displayName = "绑定用户")
    private PamirsUser bindingUser;

    @Field(displayName = "绑定用户ID")
    private Long bindingUserId;

}

我们要求当前登录用户仅能查看其作为管理员的所在部门,因此,我们需要使用managerId == ${currentEmployeeId}这一过滤条件,在权限中进行配置并使其生效。

此处忽略数据准备过程,仅展示关键页面的配置及最终效果。
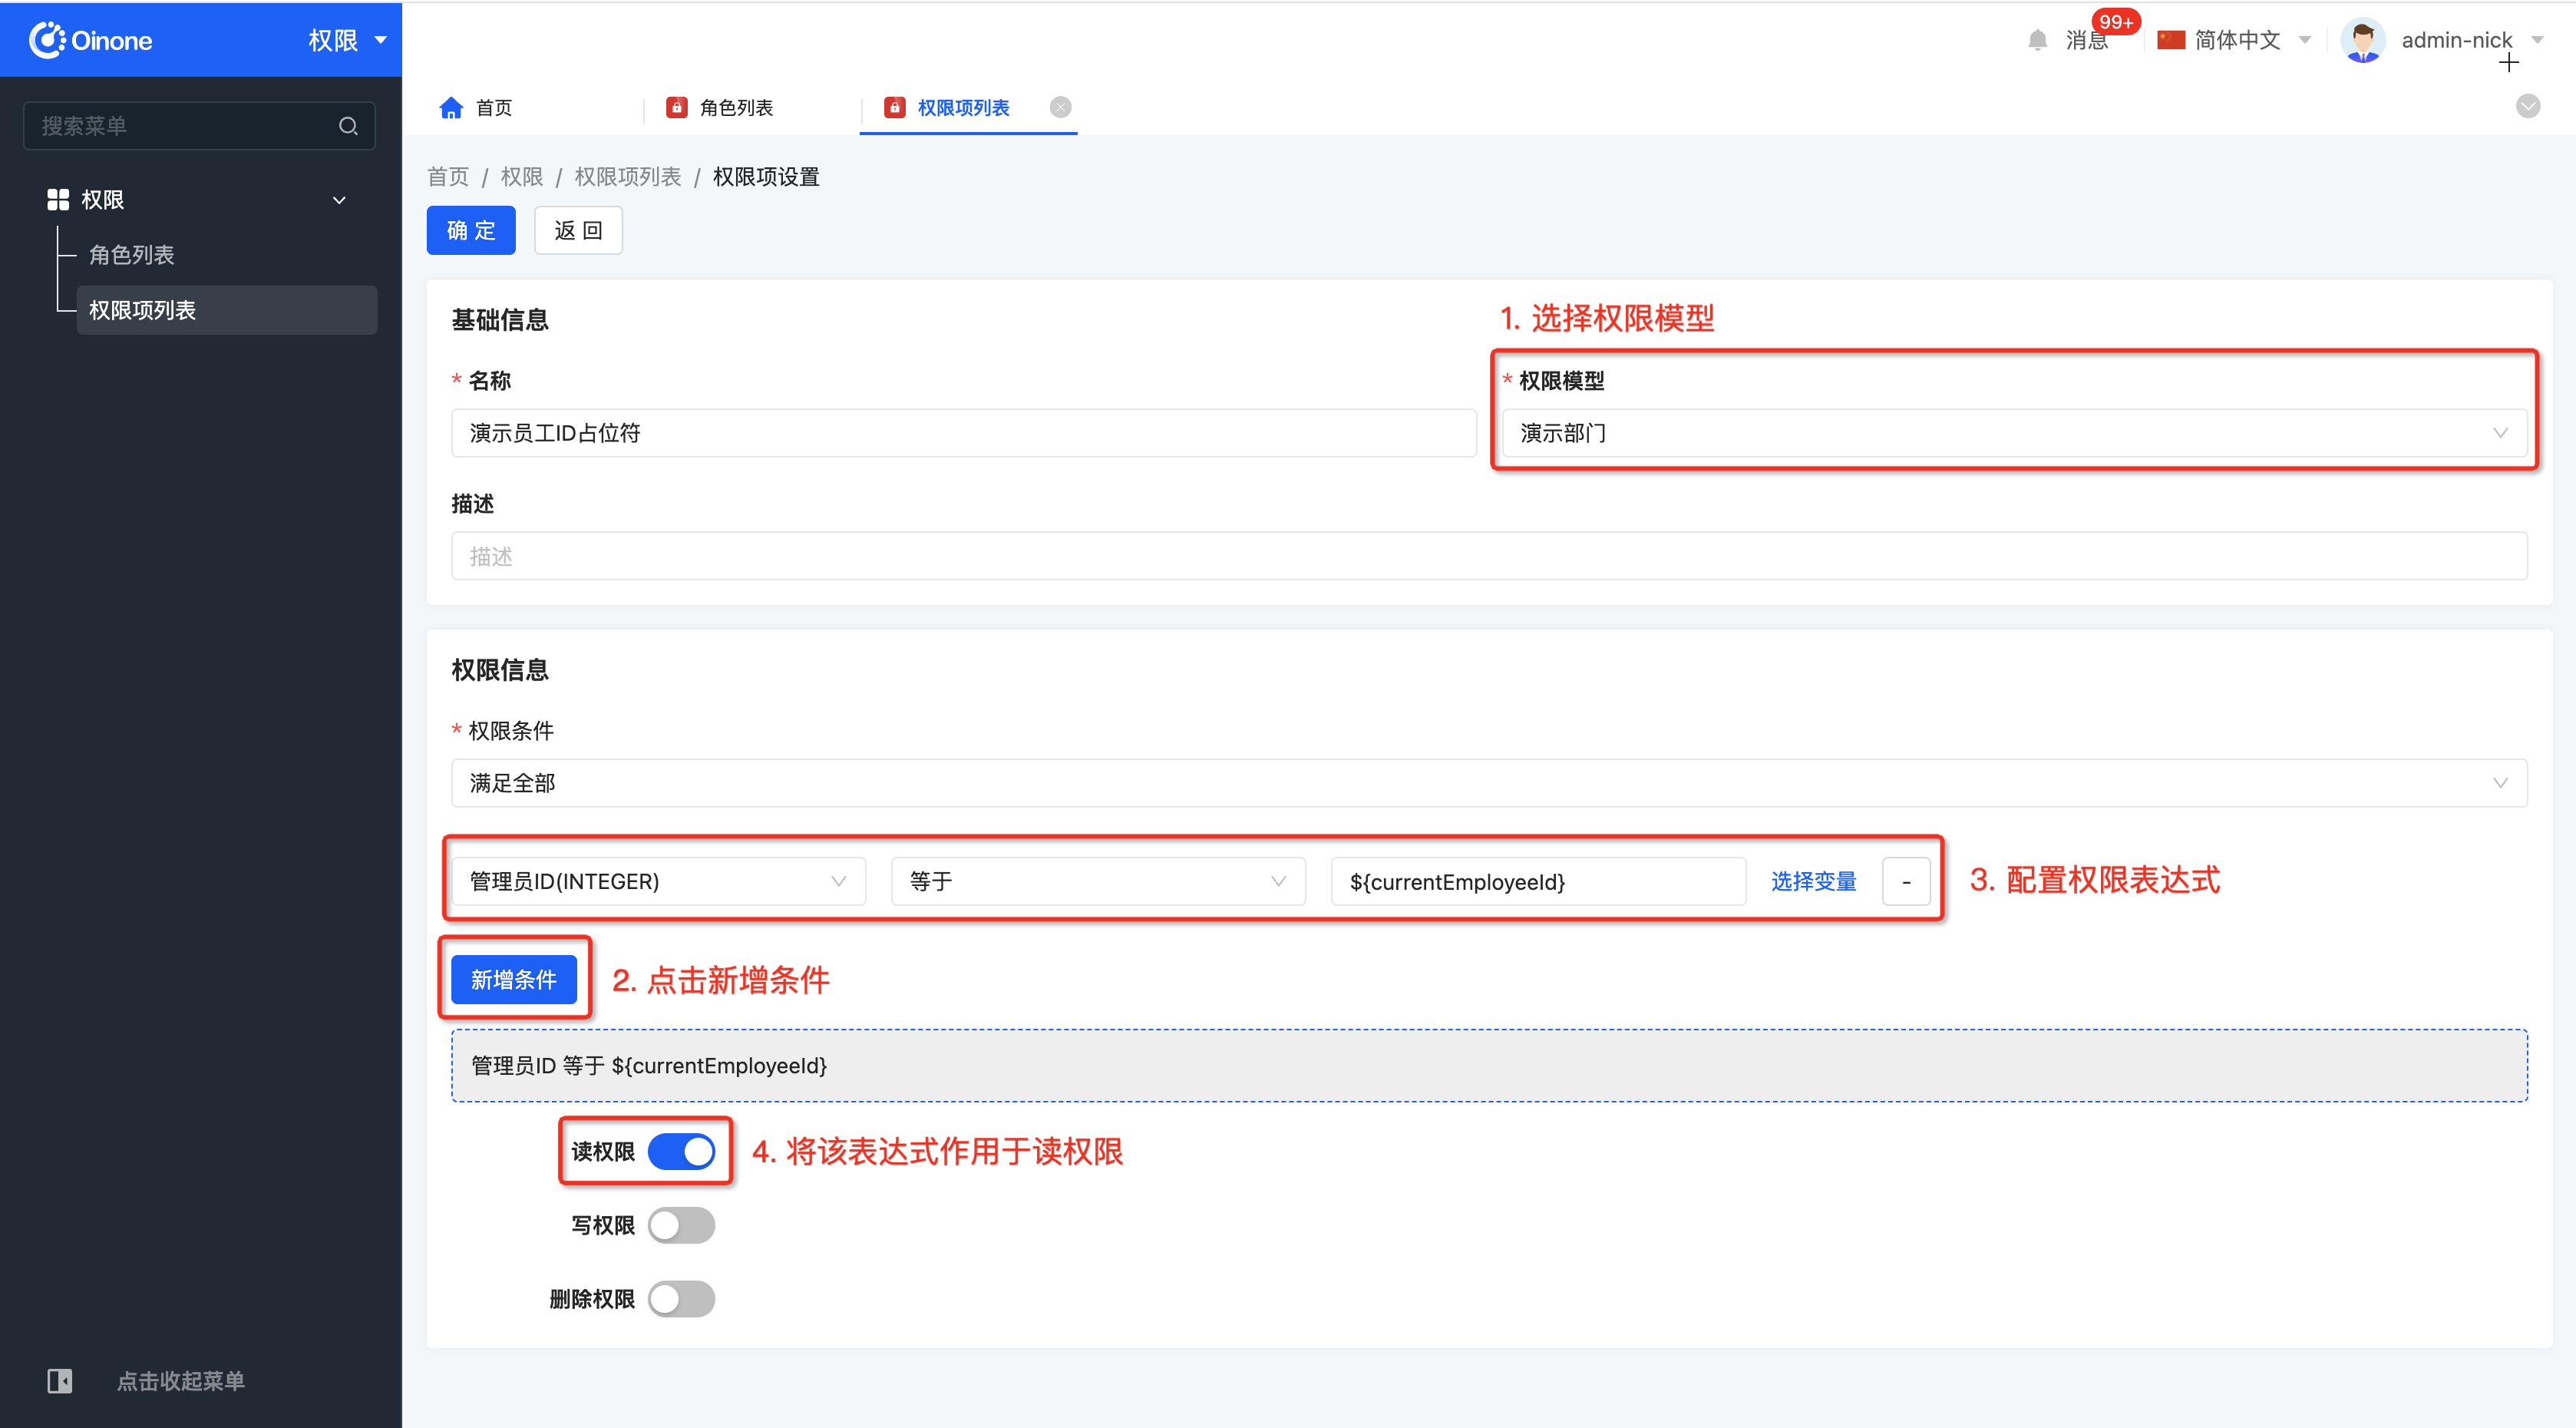
8.2 权限项配置

从应用中切换至权限模块,并选择权限项列表,创建一个数据权限项,并按照下图内容进行配置。
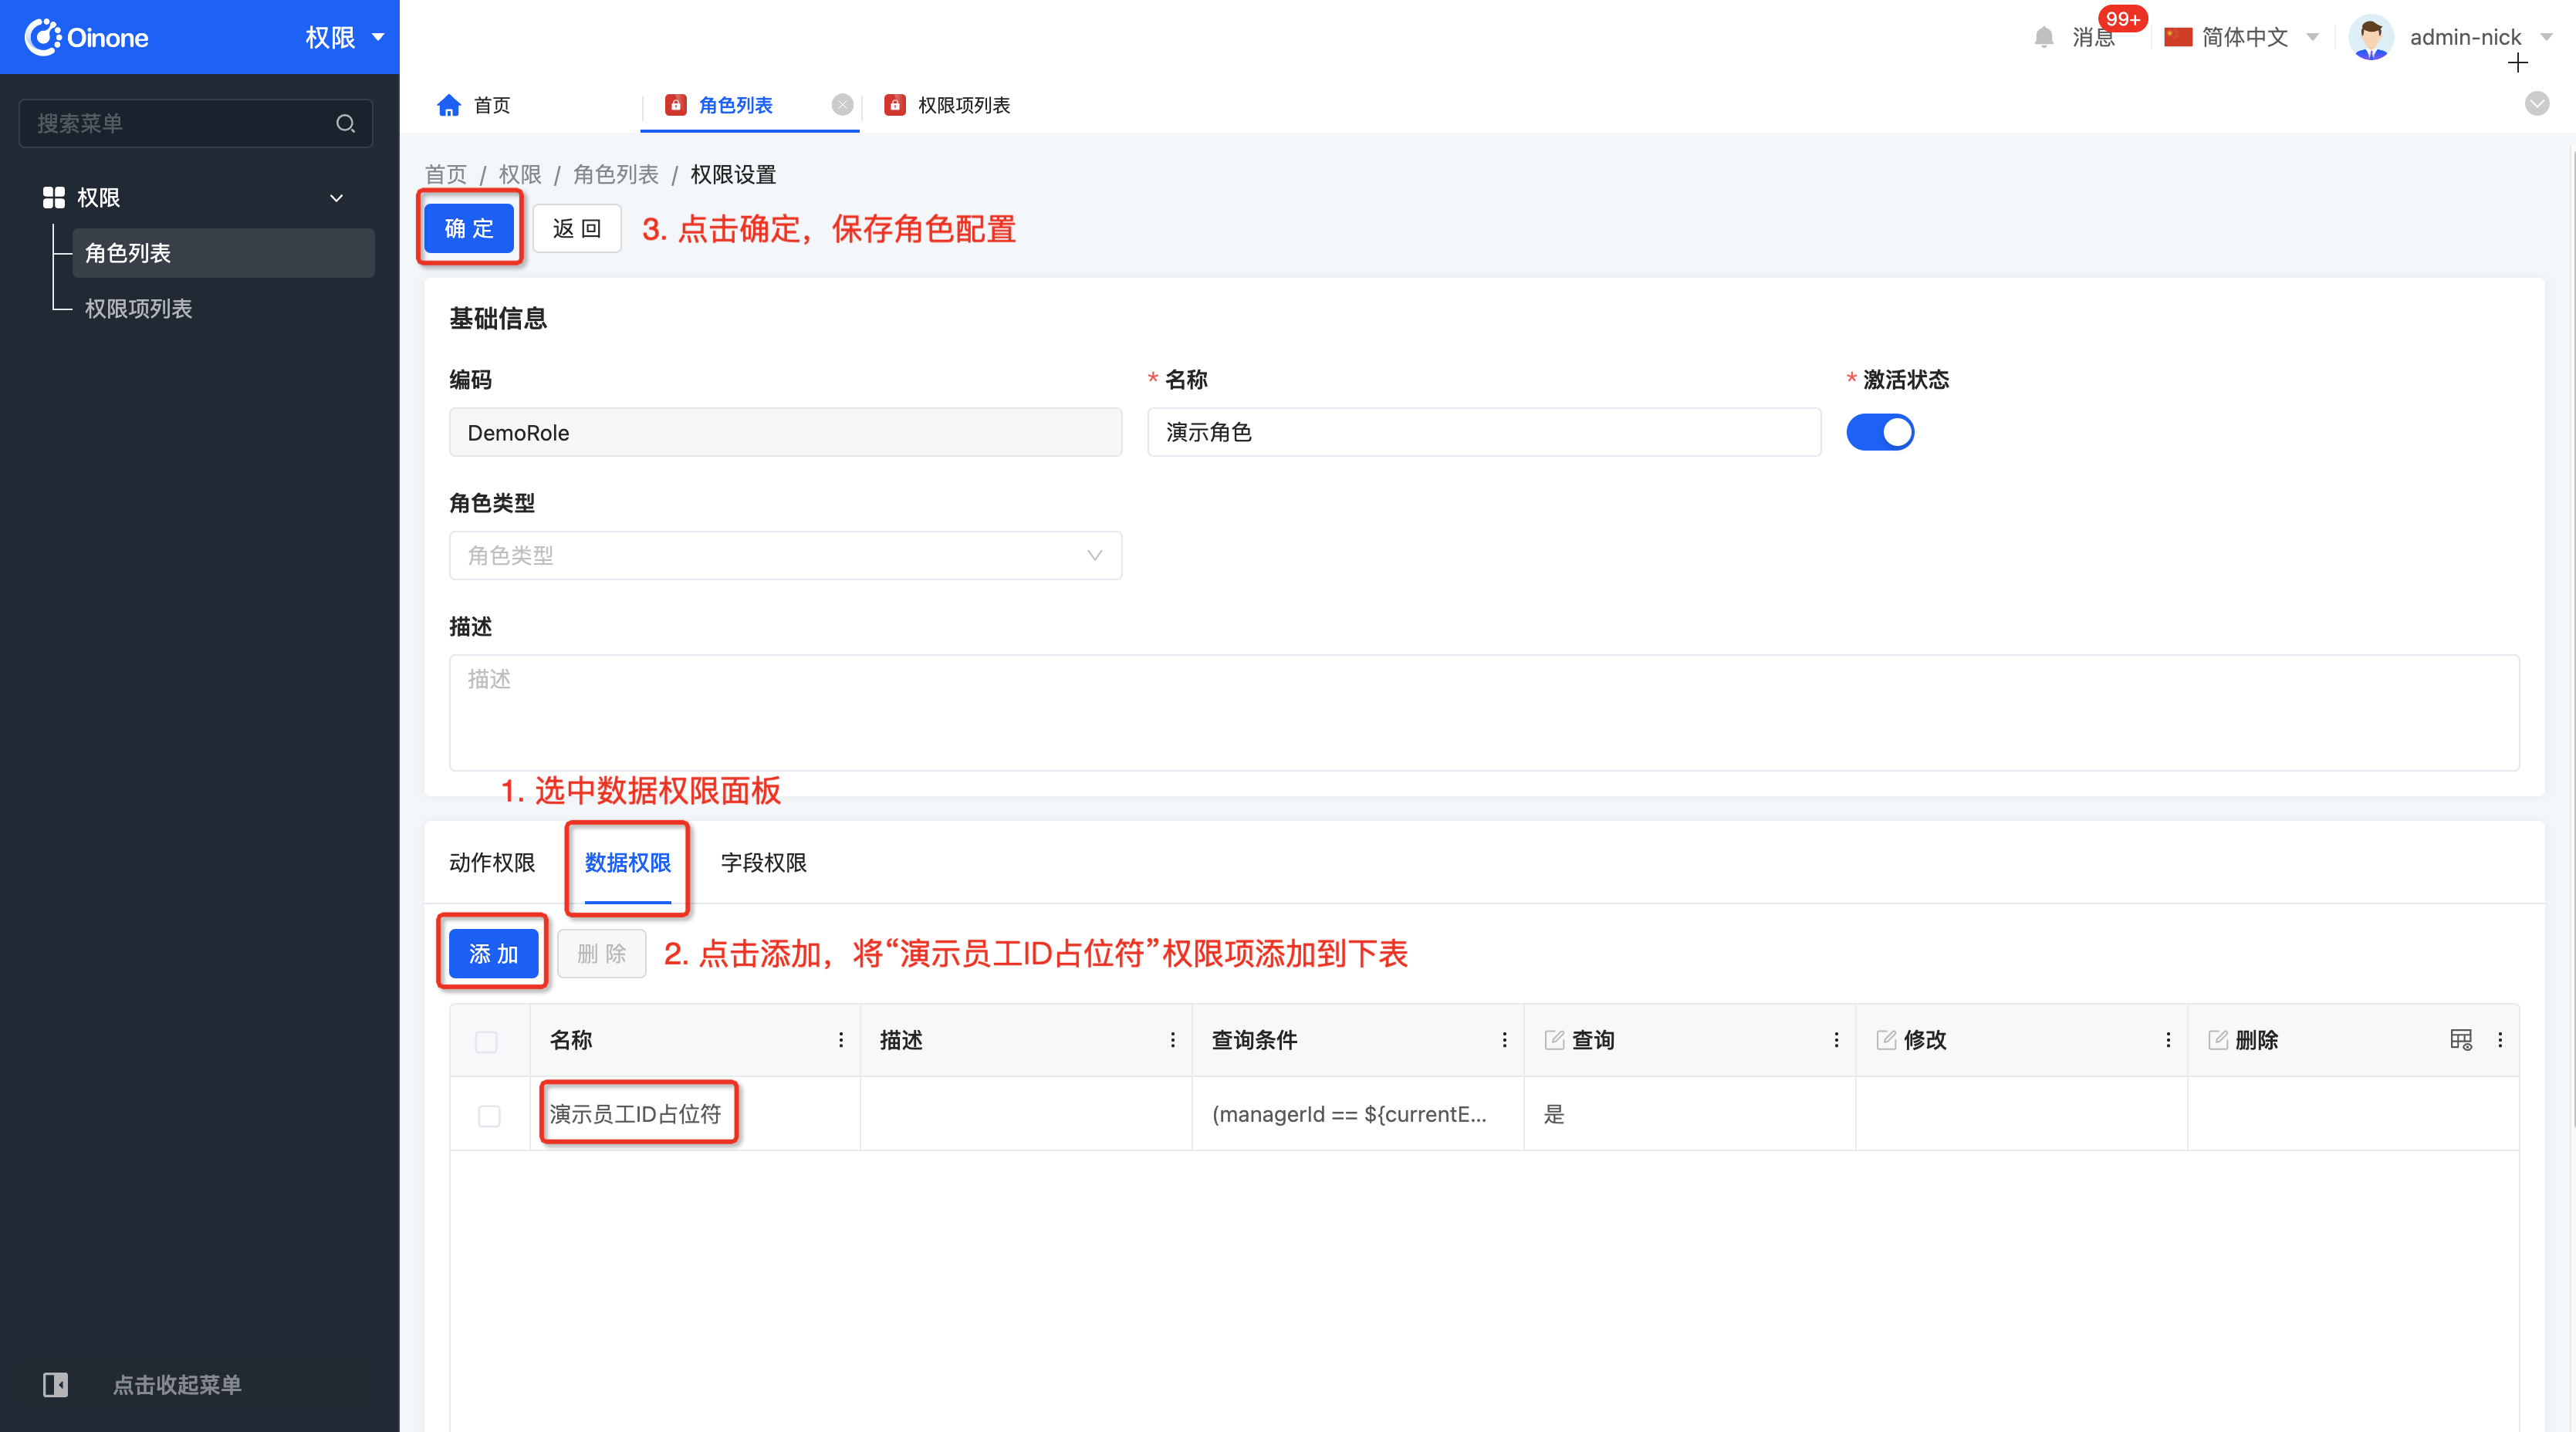
权限项配置

8.3 角色权限配置

选择角色列表,并选择角色表格中指定角色的权限配置按钮,进入权限配置页面,并按照下图内容进行配置。

PS:这里省略了动作权限相关配置,配置的权限应保证该角色可以正确进入演示部门页面查看效果。

角色权限配置

8.4 为用户绑定指定角色(如已绑定可忽略该步骤)

从应用中切换至用户中心模块,选择指定用户,绑定指定角色。
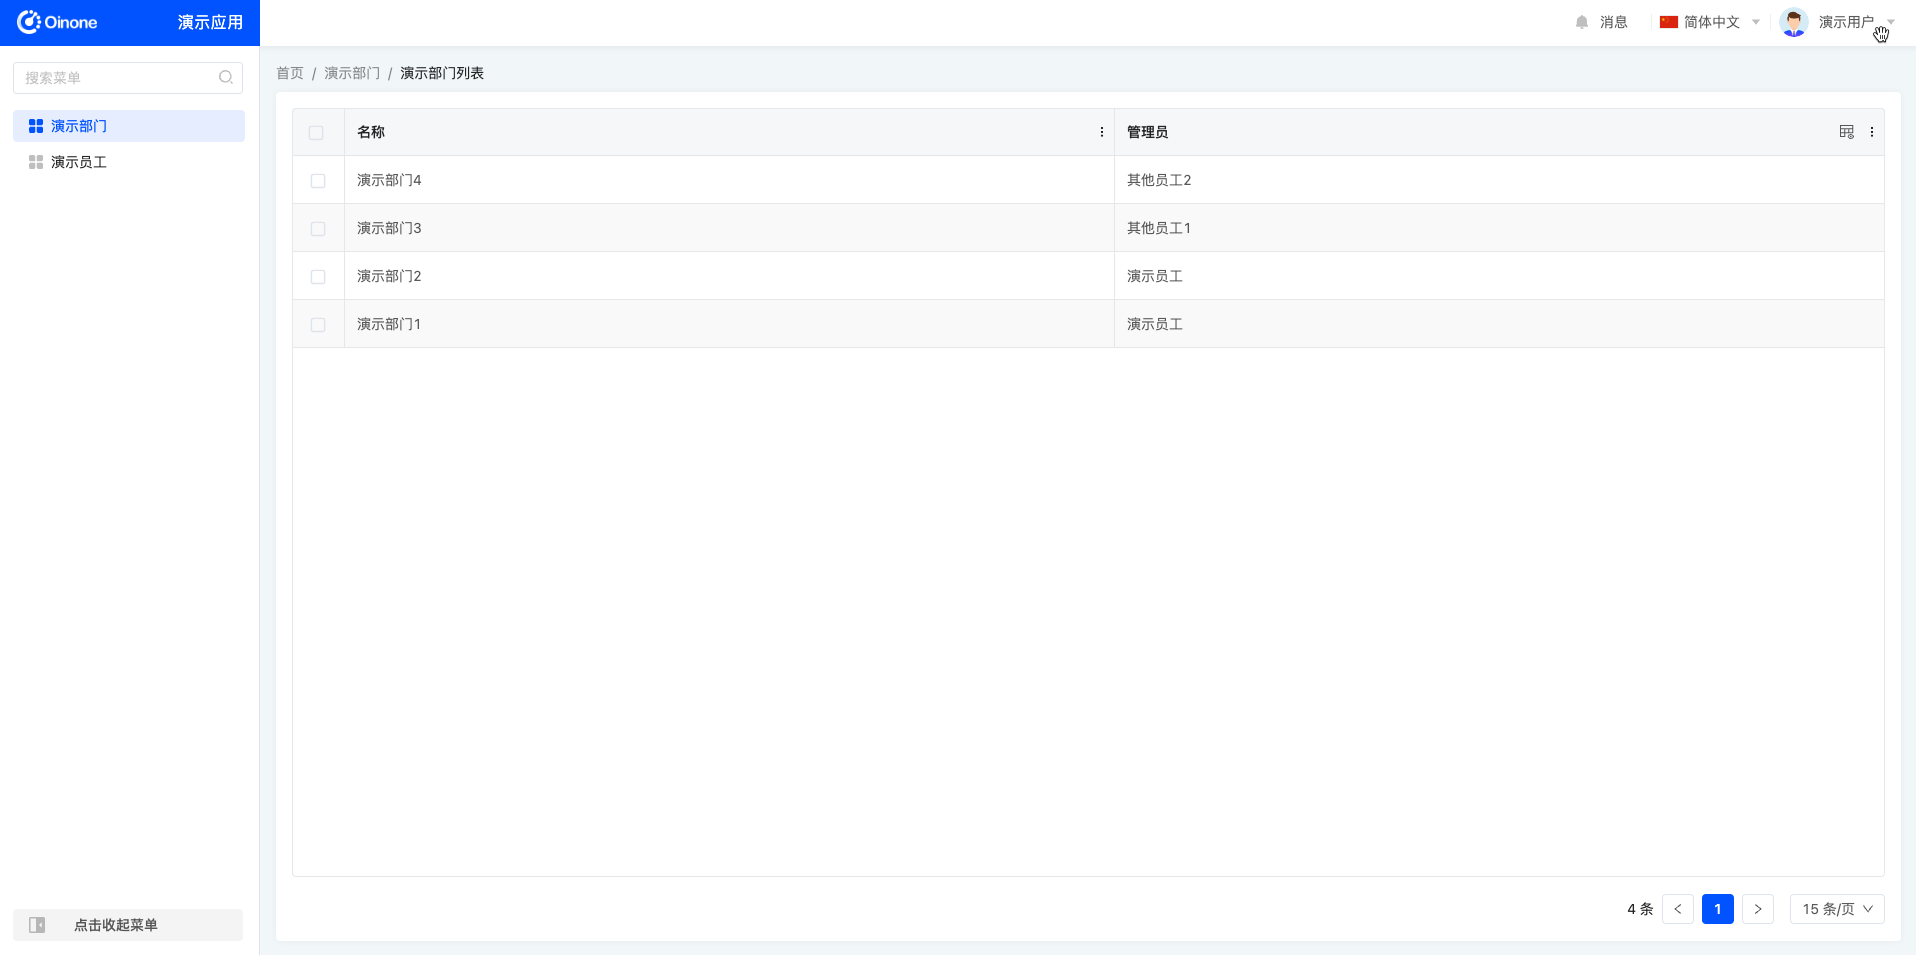
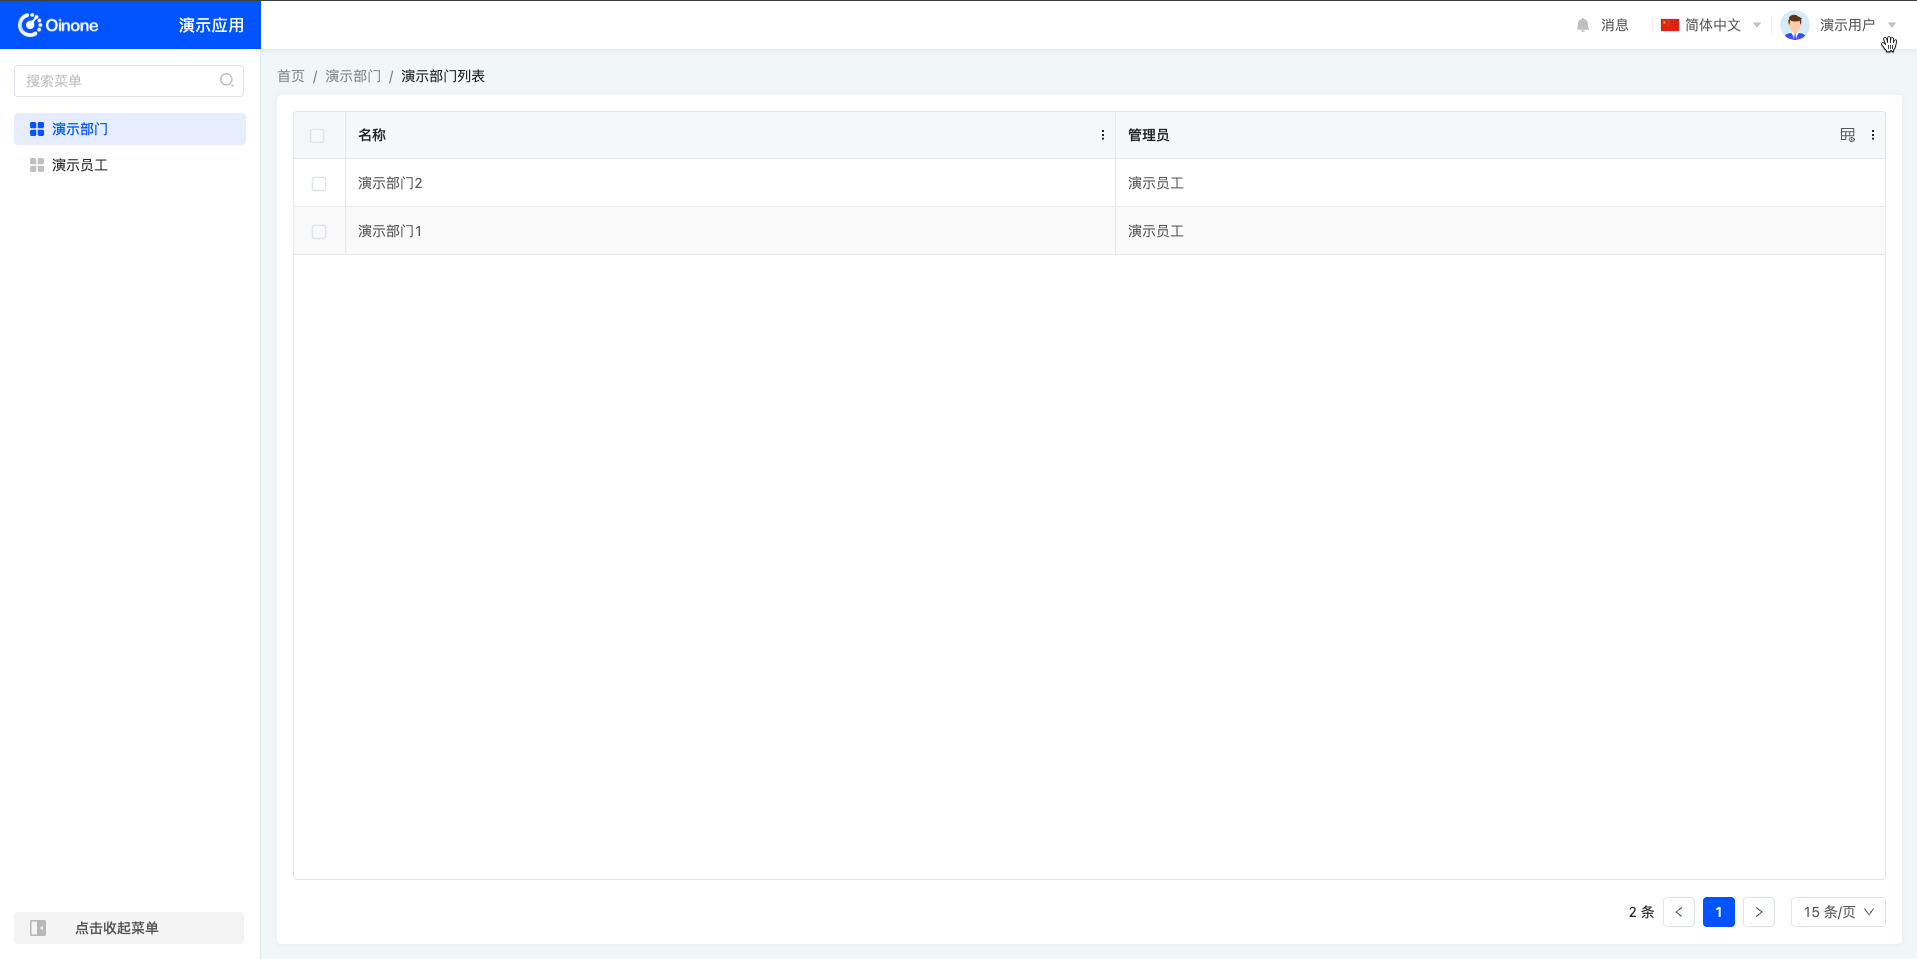
8.5 在演示部门页面查看权限配置效果

未配置权限页面效果

未配置权限页面效果

权限配置后页面效果

权限配置后页面效果

本文来自投稿,不代表Oinone社区立场,如若转载,请注明出处:https://doc.oinone.top/backend/6393.html

(1)
张博昊的头像张博昊数式管理员
上一篇 2024年3月20日 pm3:03
下一篇 2024年3月24日 pm1:45

相关推荐

  • Oinone离线部署设计器镜像

    概述 Oinone平台为合作伙伴提供了多种部署方式,这篇文章将介绍如何在私有云环境部署Oinone平台Docker镜像。 本文以5.2.20.1版本为例进行介绍,使用amd64架构的体验镜像进行部署。具体版本号以数式提供的为准 部署环境要求 包含全部中间件及设计器服务的环境要求 CPU:8 vCPU 内存(RAM):16G以上 硬盘(HDD/SSD):60G以上 仅设计器服务的环境要求 CPU:8 vCPU 内存(RAM):8G以上 硬盘(HDD/SSD):40G以上 部署准备 一台安装了Docker环境的服务器(私有云环境);以下简称部署环境; 一台安装了Docker环境的电脑(可访问公网);以下简称本地环境; 部署清单 下面列举了文章中在本地环境操作结束后的全部文件: 设计器镜像:oinone-designer-full-v5-5.2.20.1-amd64.tar 离线部署结构包:oinone-designer-full-standard-offline.zip Oinone许可证:****-trial.lic(实际文件名以Oinone颁发的许可证为准) 第三方数据库驱动包(非MySQL数据库必须) PS:如需一次性拷贝所有部署文件到部署环境,可以将文档步骤在本地环境执行后,一次性将所有文件进行传输。 在部署环境创建部署目录 mkdir -p /home/admin/oinone-designer-full mkdir -p /home/admin/oinone-designer-full/images 检查部署环境服务器架构 确认部署环境是amd64还是arm64架构,若本文提供的查看方式无法正确执行,可自行搜索相关内容进行查看。 使用uname命令查看 uname -a PS:此步骤非常重要,如果部署环境的服务器架构与本地环境的服务器架构不一致,将导致镜像无法正确启动。 在本地环境准备镜像 在Oinone发布版本一览中选择最新版本的发布日志,找到需要部署的镜像版本。 登录Oinone镜像仓库(若已登录,可忽略此步骤) docker login https://harbor.oinone.top # input username # input password 获取Oinone平台镜像 docker pull harbor.oinone.top/oinone/oinone-designer-full-v5.2:5.2.20.1-amd64 保存镜像到.tar文件 docker save -o oinone-designer-full-v5-5.2.20.1-amd64.tar oinone-designer-full-v5.2:5.2.20.1-amd64 若报错`Error response from daemon: reference does not exist`脚本改成下面这个: docker save -o oinone-designer-full-v5-5.2.20.1-amd64.tar harbor.oinone.top/oinone/oinone-designer-full-v5.2:5.2.20.1-amd64 # docker save [OPTIONS] IMAGE [IMAGE…] 上传.tar到部署环境 scp ./oinone-designer-full-v5-5.2.20.1-amd64.tar admin@127.0.0.1:/home/admin/oinone-full/images/ PS:若无法使用scp方式上传,可根据部署环境的具体情况将镜像文件上传至部署环境的部署目录。 在部署环境加载镜像 加载镜像文件到Docker中 cd /home/admin/oinone-full/images docker load -i oinone-designer-full-v5-5.2.20.1-amd64.tar 查看镜像是否正确加载 docker images 查看输出内容,对比REPOSITORY、TAG、IMAGE ID与本地环境完全一致即可。 设计器服务部署 为了方便起见,服务器操作文件显得不太方便,因此,我们可以在本地环境将部署脚本准备妥善后,传输到部署环境进行部署结构包(oinone-designer-full-standard-offline.)需上传到要部署的服务器中,后面的操作均在这个目中进行 下载离线部署结构包(以数式发出的为准) oinone-designer-full-standard-offline.zip 将Pamirs许可证移动到config目录下,并重命名为****-trial.lic(实际文件名以Oinone颁发的许可证为准) mv ****-trial.lic config/****-trial.lic 加载非MySQL数据库驱动(按需) 将驱动jar文件移动到lib目录下即可。 以KDB8数据库驱动kingbase8-8.6.0.jar为例 mv kingbase8-8.6.0.jar lib/ PS:lib目录为非设计器内置包的外部加载目录(外部库),可以添加任何jar包集成到设计器中。 修改脚本中的配置 修改启动脚本startup.sh 修改对应的镜像版本号, 将IP从192.168.0.121改成宿主机IP configDir=$(pwd) version=5.1.16 IP=192.168.0.121 修改mq/broker.conf 修改其中brokerIP1的IP从192.168.0.121改成宿主机IP brokerClusterName = DefaultCluster namesrvAddr=127.0.0.1:9876 brokerIP1=192.168.0.121 brokerName = broker-a brokerId = 0 deleteWhen = 04 fileReservedTime = 48 brokerRole = ASYNC_MASTER flushDiskType = ASYNC_FLUSH autoCreateTopicEnable=true listenPort=10991 transactionCheckInterval=1000 #存储使用率阀值,当使用率超过阀值时,将拒绝发送消息请求 diskMaxUsedSpaceRatio=98 #磁盘空间警戒阈值,超过这个值则停止接受消息,默认值90 diskSpaceWarningLevelRatio=99 #强制删除文件阈值,默认85 diskSpaceCleanForciblyRatio=97 执行startup.sh脚本启动 sh startup.sh 访问服务 使用http://127.0.0.1:88访问服务

    2024年11月1日
    1.1K00
  • 工作流用户待办过滤站内信

    工作流用户待办过滤站内信 全局过滤 启动工程application.yml中配置: pamirs: workflow: notify: false 个性化过滤 实现pro.shushi.pamirs.workflow.app.api.service.WorkflowMailFilterApi接口 返回true表示需要发送站内信 返回false表示不需要发送站内信 示例: import org.apache.commons.lang3.StringUtils; import pro.shushi.pamirs.message.model.PamirsMessage; import pro.shushi.pamirs.meta.annotation.Fun; import pro.shushi.pamirs.meta.annotation.Function; import pro.shushi.pamirs.user.api.model.PamirsUser; import pro.shushi.pamirs.workflow.app.api.model.WorkflowUserTask; import pro.shushi.pamirs.workflow.app.api.service.WorkflowMailFilterApi; /** * MyWorkflowMailFilterImpl * * @author yakir on 2025/02/24 16:28. */ @Fun(WorkflowMailFilterApi.FUN_NAMESPACE) public class MyWorkflowMailFilterImpl implements WorkflowMailFilterApi { @Override @Function public Boolean filter(WorkflowUserTask workflowUserTask, PamirsUser user, PamirsMessage message) { // 按用户待办过滤 workflowUserTask if (10000L == workflowUserTask.getInitiatorUid()){ return true; } // 按用户过滤 user if (1000L == user.getId()){ return true; } // 按站内信消息过滤 message if (StringUtils.contains(message.getBody(), "你好")) { return true; } return false; } }

    2025年2月24日
    1.1K00
  • 如何选择适合的模型类型?

    介绍 通过Oinone 7天从入门到精通的模型的类型章节我们可以知道模型有抽象模型、存储模型、代理模型、传输模型这四种。但是在在定义模型的时候我们可能不知道该如何选择类型,下面结合业务场景为大家讲解几种模型的典型使用场景。 抽象模型 抽象模型往往是提供公共能力和字段的模型,它本身不会直接用于构建协议和基础设施(如表结构等)。 场景:猫、鸟都继承自动物这个抽象模型 package pro.shushi.pamirs.demo.api.model; import pro.shushi.pamirs.meta.annotation.Field; import pro.shushi.pamirs.meta.annotation.Model; import pro.shushi.pamirs.meta.annotation.sys.Base; import pro.shushi.pamirs.meta.base.IdModel; import pro.shushi.pamirs.meta.enmu.ModelTypeEnum; @Base @Model.model(AbstractAnimal.MODEL_MODEL) @Model.Advanced(type = ModelTypeEnum.ABSTRACT) @Model(displayName = "动物") public abstract class AbstractAnimal extends IdModel { public static final String MODEL_MODEL = "demo.AbstractAnimal"; @Field.String @Field(displayName = "名称") private String name; @Field.String @Field(displayName = "颜色") private String color; } package pro.shushi.pamirs.demo.api.model; import pro.shushi.pamirs.meta.annotation.Field; import pro.shushi.pamirs.meta.annotation.Model; @Model.model(Cat.MODEL_MODEL) @Model(displayName = "猫") public class Cat extends AbstractAnimal { private static final long serialVersionUID = -5104390780952634397L; public static final String MODEL_MODEL = "demo.Cat"; @Field.Integer @Field(displayName = "尾巴长度") private Integer tailLength; } package pro.shushi.pamirs.demo.api.model; import pro.shushi.pamirs.meta.annotation.Field; import pro.shushi.pamirs.meta.annotation.Model; @Model.model(Bird.MODEL_MODEL) @Model(displayName = "鸟") public class Bird extends AbstractAnimal { private static final long serialVersionUID = -5144390780952634397L; public static final String MODEL_MODEL = "demo.Bird"; @Field.Integer @Field(displayName = "翼展宽度") private Integer wingSpanWidth; } 存储模型 存储模型用于定义数据表结构和数据的增删改查(数据管理器)功能,是直接与连接器进行交互的数据容器。 场景:存储模型对应传统开发模式中的数据表,上面例子中的Cat和Birdd都属于传输模型,由于模型定义的注解@Model.Advanced(type = ModelTypeEnum.STORE)默认值就是存储模型,所以一般不用手动指定 代理模型 代理模型是用于代理存储模型的数据管理器能力,同时又可以扩展出非存储数据信息的交互功能的模型。 场景一:隔离数据权限 场景二:增强列表的搜索项 场景三:导入导出的时候增加其他特殊信息 场景四:重写下拉组件的查询逻辑做数据过滤 传输模型 传输模型不会在数据库生成的表,只是作为数据的传输使用,跟传统开发模式中的DTO有一点相似。 场景一:批量处理数据 场景二:处理一些跟数据表无关的操作,如:清理指定业务的缓存、查看一些系统监控信息,可以根据业务信息建立对应的传输模型,在传输模型上创建action动作 场景三:通过传输模型完成复杂页面数据传输

    2024年4月7日
    1.5K00
  • 函数之异步执行

    总体介绍 异步任务是非常常见的一种开发模式,它在分布式的开发模式中有很多应用场景如: 高并发场景中,我们一般采用把长流程切短,用异步方式去掉可以异步的非关键功能,缩小主流程响应时间,提升用户体验 异构系统的集成调用,通过异步任务完成解耦与自动重试 分布式系统最终一致性的可选方案 本文将介绍oinone是如何结合Spring+TbSchedule来完成异步任务 构建第一个异步任务 新建PetShopService和PetShopServiceImpl 1、 新建PetShopService定义updatePetShops方法 package pro.shushi.pamirs.demo.api.service; import pro.shushi.pamirs.demo.api.model.PetShop; import pro.shushi.pamirs.meta.annotation.Fun; import pro.shushi.pamirs.meta.annotation.Function; import java.util.List; @Fun(PetShopService.FUN_NAMESPACE) public interface PetShopService { String FUN_NAMESPACE = "demo.PetShop.PetShopService"; @Function void updatePetShops(List<PetShop> petShops); } 2、PetShopServiceImpl实现PetShopService接口并在updatePetShops增加@XAsync注解 package pro.shushi.pamirs.demo.core.service; import org.springframework.stereotype.Component; import pro.shushi.pamirs.demo.api.model.PetShop; import pro.shushi.pamirs.demo.api.service.PetShopService; import pro.shushi.pamirs.meta.annotation.Fun; import pro.shushi.pamirs.meta.annotation.Function; import pro.shushi.pamirs.trigger.annotation.XAsync; import java.util.List; @Fun(PetShopService.FUN_NAMESPACE) @Component public class PetShopServiceImpl implements PetShopService { @Override @Function @XAsync(displayName = "异步批量更新宠物商店",limitRetryNumber = 3,nextRetryTimeValue = 60) public void updatePetShops(List<PetShop> petShops) { new PetShop().updateBatch(petShops); } } a. displayName = "异步批量更新宠物商店",定义异步任务展示名称b. limitRetryNumber = 3,定义任务失败重试次数,,默认:-1不断重试c. nextRetryTimeValue = 60,定义任务失败重试的时间数,默认:3d. nextRetryTimeUnit,定义任务失败重试的时间单位,默认:TimeUnitEnum.SECONDe. delayTime,定义任务延迟执行的时间数,默认:0f. delayTimeUnit,定义任务延迟执行的时间单位,默认:TimeUnitEnum.SECOND 修改PetShopBatchUpdateAction调用异步任务 引入PetShopService 修改conform方法,调用petShopService.updatePetShops方法 package pro.shushi.pamirs.demo.core.action; @Model.model(PetShopBatchUpdate.MODEL_MODEL) @Component public class PetShopBatchUpdateAction { @Autowired private PetShopService petShopService; @Action(displayName = "确定",bindingType = ViewTypeEnum.FORM,contextType = ActionContextTypeEnum.SINGLE) public PetShopBatchUpdate conform(PetShopBatchUpdate data){ List<PetShop> shops = ArgUtils.convert(PetShopProxy.MODEL_MODEL, PetShop.MODEL_MODEL,proxyList); // 调用异步任务 petShopService.updatePetShops(shops); }); return data; } } 不同应用如何隔离执行单元 在schedule跟模块部署一起的时候,多模块独立boot的情况下,需要做必要的配置。如果schedule独立部署则没有必要,因为全部走远程,不存在类找不到的问题 通过配置pamirs.zookeeper.rootPath,确保两组机器都能覆盖所有任务分片,这样不会漏数据 通过pamirs.event.schedule.ownSign来隔离。确保两组机器只取各自产生的数据,这样不会重复执行数据 pamirs: zookeeper: zkConnectString: 127.0.0.1:2181 zkSessionTimeout: 60000 rootPath: /demo event: enabled: true schedule: enabled: true ownSign: demo rocket-mq: namesrv-addr: 127.0.0.1:9876

    2024年5月25日
    1.3K00
  • 框架之MessageHub(信息提示)

    框架之信息概述 后端除了可以返回错误信息以外,还可以返回调试、告警、成功、信息等级别的信息给前端。但是默认情况下前端只提示错误信息,可以通过前端的统一配置放开提示级别,有点类似后端的日志级别。 框架之MessageHub 在oinone平台中,我们怎么做到友好的错误提示呢?接下来介绍我们的MessageHub,它为自定义错误提示提供无限的可能。 何时使用 错误提示是用户体验中特别重要的组成部分,大部分的错误体现在整页级别,字段级别,按钮级别。友好的错误提示应该是怎么样的呢?我们假设他是这样的 与用户操作精密契合 当字段输入异常时,错误展示在错误框底部 按钮触发服务时异常,错误展示在按钮底部 区分不同的类型 错误 成功 警告 提示 调试 简洁易懂的错误信息 不同信息类型的举例 package pro.shushi.pamirs.demo.core.action; import org.springframework.stereotype.Component; import pro.shushi.pamirs.demo.api.model.PetCatItem; import pro.shushi.pamirs.demo.api.model.PetType; import pro.shushi.pamirs.meta.annotation.Action; import pro.shushi.pamirs.meta.annotation.Model; import pro.shushi.pamirs.meta.api.dto.common.Message; import pro.shushi.pamirs.meta.api.session.PamirsSession; import pro.shushi.pamirs.meta.enmu.ActionContextTypeEnum; import pro.shushi.pamirs.meta.enmu.InformationLevelEnum; import pro.shushi.pamirs.meta.enmu.ViewTypeEnum; @Model.model(PetType.MODEL_MODEL) @Component public class PetTypeAction { @Action(displayName = "消息",bindingType = ViewTypeEnum.TABLE,contextType = ActionContextTypeEnum.CONTEXT_FREE) public PetType message(PetType data){ PamirsSession.getMessageHub().info("info1"); PamirsSession.getMessageHub().info("info2"); PamirsSession.getMessageHub().error("error1"); PamirsSession.getMessageHub().error("error2"); PamirsSession.getMessageHub().msg(new Message().msg("success1").setLevel(InformationLevelEnum.SUCCESS)); PamirsSession.getMessageHub().msg(new Message().msg("success2").setLevel(InformationLevelEnum.SUCCESS)); PamirsSession.getMessageHub().msg(new Message().msg("debug1").setLevel(InformationLevelEnum.DEBUG)); PamirsSession.getMessageHub().msg(new Message().msg("debug2").setLevel(InformationLevelEnum.DEBUG)); PamirsSession.getMessageHub().msg(new Message().msg("warn1").setLevel(InformationLevelEnum.WARN)); PamirsSession.getMessageHub().msg(new Message().msg("warn2").setLevel(InformationLevelEnum.WARN)); return data; } } 查询运行返回和效果 1)系统提示的返回结果 2)系统提示示例效果

    2024年5月14日
    1.4K00

Leave a Reply

登录后才能评论