如何替换页面中的静态资源为私有存储

介绍

为了让我们可以快速体验到oinone的产品,oinone的工程内默认提供了一个阿里云oss的存储空间来存放一些静态资源,如网站在浏览器标签栏的图标、登录页的logo、站内页面的logo、默认头像、背景图等,但是在实际业务中我们需要把其中部分静态资源更换为自有品牌或者客户品牌定制的静态资源。

解决方案

oinone提供了一套可以替换掉默认静态资源的方案

  1. 获取静态资源文件的压缩包static.zip
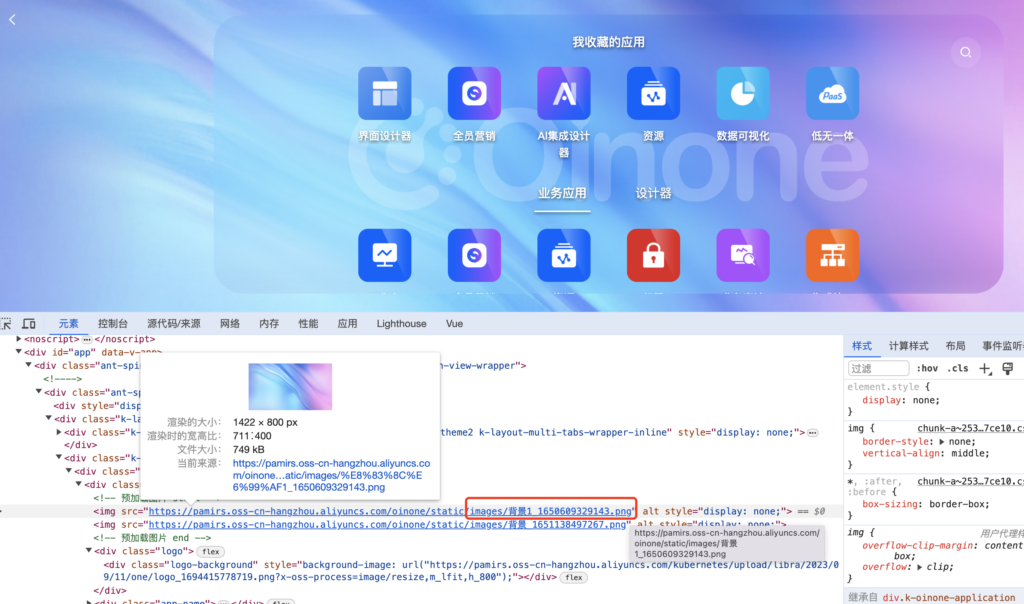
  2. 解压到到运维指定的目录下,这里以/project/static为例,前端通过浏览器开发工具查看到需要替换的图片路径,在static目录下找到对应路径的文件,替换为自有文件
    如何替换页面中的静态资源为私有存储
  3. 配置nginx的文件系统(使用阿里云oss、minio等云存储方案的可以忽略该步骤)
    server {
        listen       8899;
        location /static {
            alias /project/static;
            add_header Content-Disposition attachment;
            add_header Content-Type application/octet-stream;
        }
    }
  4. 前端启动工程中的.env文件中增加如下配置(ss-boot)
    STATIC_IMG=http://访问地址/static/images
  5. 生产模式重新打包 或 开发模式重新运行就可以看到效果

Oinone社区 作者:nation原创文章,如若转载,请注明出处:https://doc.oinone.top/install/6379.html

访问Oinone官网:https://www.oinone.top获取数式Oinone低代码应用平台体验

(0)
nation的头像nation数式员工
上一篇 2024年3月15日 pm8:48
下一篇 2024年3月24日 pm1:43

相关推荐

  • Oinone License 许可证使用常见问题

    如何获取许可证? 联系数式运维人员获取许可证。(以下内容全部使用表示许可证文件路径) subject:授权主体名称 license.lic:许可证文件 不同许可证类别有什么不同? 许可证类型 LicenseType 限制功能 适用环境 研发授权 DEVELOP 1.每次安装时效1天,超时后无法正常访问设计器相关功能2.限制CPU和主板序列号或限制许可证使用人数3.不能用于容器启动4.有页面水印 开发环境(开发人员本地启动业务工程时使用该授权) 伙伴授权 TRIAL 1.无安装时效限制2.无部署环境限制3.有页面水印 非生产环境(测试环境、预发环境等使用该授权) 客户授权 BUSINESS 1.无安装时效限制2.仅能部署一套生产环境3.无页面水印 生产环境 PS: 一套环境是指共用Base库的所有JVM称为一套环境。 如何配置许可证? 在yaml中配置许可证 单个许可证配置 pamirs: license: subject: <subject> path: <license.lic> 多个许可证配置 pamirs: license: subject: <subject> path: – <license1.lic> – <license2.lic> pamirs.license.path可以是相对路径、绝对路径以及URL路径。 在Program Arguments中配置许可证 java -jar -Psubject=<subject> -Plicense=<license1.lic> -Plicense=<license1.lic> <boot.jar> 如何在开发中安装许可证? 将许可证放入后端运行时工作目录中即可。(一般为idea项目根目录) 如何在物理机生产环境安装许可证? 将许可证放入与jar包平级目录中即可。 如何在docker环境中安装许可证? 在docker运行时目录添加挂载卷映射,并在yaml中配置对应的路径即可。 如何获取CPU序列号和主板序列号 在Linux环境中使用dmidecode命令 # 获取CPU序列号 dmidecode -s system-serial-number # CPU序列号 7*****1 # 获取主板序列号 dmidecode -s baseboard-serial-number # 主板序列号 ..CN*******V01Y7. # 获取系统UUID dmidecode -s system-uuid # 系统UUID 4c4xxxxx-xxxx-xxxx-xxxx-xxxxxxxx5831 在Mac环境中使用system_profiler命令 # 获取CPU序列号 system_profiler SPHardwareDataType | grep 'Serial Number' | awk -F ':' '{print $2}' # CPU序列号 C02******03Y # 获取主板序列号 system_profiler SPHardwareDataType | grep 'Hardware UUID' | awk -F ':' '{print $2}' # 主板序列号 1AAxxxxx-xxxx-xxxx-xxxx-xxxxxxxxF0FC 在Windows环境中使用wmic命令 # 获取CPU序列号 wmic cpu get processorid # CPU序列号 BFExxxxxxxxxx6A3 # 获取主板序列号 wmic baseboard get serialnumber # 主板序列号 PFxxxxBY # 获取系统UUID wmic csproduct get uuid # 系统UUID D0Exxxxx-xxxx-xxxx-xxxx-xxxxxxxx78B8 在Linux环境出现dmidecode命令执行失败该如何处理? 1. 命令未找到,可使用如下方式尝试安装 # debian (eg: Ubuntu) apt-get install dmidecode # rpm (eg: Fedora/CentOS/RedHat) yum install dmidecode 2. 无权限执行命令,尝试切换当前执行用户或为当前用户提高执行权限 在docker环境出现证书安装失败该如何处理? 1. 由于docke环境非物理环境,不支持CPU序列号和主板序列号校验,尝试更换许可证。 2. 检查许可证在镜像中的位置是否与配置文件中一致。 许可证安装失败该如何处理? 1. 日志出现License installation failed.信息 PS:对JDK版本依赖的问题已在5.0.0版本以上得到完整解决,此问题仅会出现在低版本的平台版本中。 请检查jdk版本是否高于1.8_221以上。 如无法升级jdk版本的环境下,请点击下载 jce_policy-8.zip 并按照如下步骤进行操作:…

    2024年6月19日
    2.5K00
  • 如何解决界面设计器保存提示:元数据不存在或已删除

    现象 界面设计器设计页面的时候,从左侧边栏模型下拖入了一个字段到页面,保存的时候提示:元数据不存在或已删除 原因 共base库不共元数据缓存redis导致的,不共redis的情况下,每次本地新增或修改元数据(如:字段、方法)启动后会同步本地redis,再去线上启动的时候,由于元数据已经在本地写入到了base库,所以该次启动不会触发redis差量更新 解决方案 通过将boot工程application.yml以下配置,让redis全量刷新元数据缓存 pamirs: distribution: session: allMetaRefresh: true 扩展 这个方法只能解决新增或修改元数据,如果出现了删除元数据的话,改为true也不行,清空或者手动删除问题redis的key都可以

    2024年7月21日
    81400
  • 低代码示例工程oinone-example启动说明

    运行低代码后端示例工程 1. 前置准备 1.1. 解压(部署.zip),找到后端工程oinone-example 1.2.下载idea以及安装平台的idea插件 1.2.1 jdk安装(已安装请忽略) 如本机环境没有安装jdk8(jdk1.8.221+),需先安装:mac:https://doc.oinone.top/oio4/9225.htmlwindow:https://doc.oinone.top/oio4/9226.html 1.2.2 idea的插件安装教程: mac:https://doc.oinone.top/oio4/9225.htmlwindows:https://doc.oinone.top/oio4/9226.html 1.2.3 maven下载安装(已安装请忽略) mvn下载地址,推荐安装3.6.3https://archive.apache.org/dist/maven/maven-3/3.6.3/binaries/mac:https://doc.oinone.top/oio4/9225.htmlwindows:https://doc.oinone.top/oio4/9226.html 2. 修改bootstrap.yml中运行环境配置 修改其中zk的IP:192.168.0.121->改成docker安装的宿主机IP默认profiles设置是dev,注意对应生效的yml文件为applicaiton-dev.yml spring: profiles: active: dev application: name: pamirs-project cloud: service-registry: auto-registration: enabled: false pamirs: default: environment-check: true tenant-check: true — spring: profiles: dev cloud: service-registry: auto-registration: enabled: false config: enabled: false uri: http://127.0.0.1:7001 label: master profile: dev nacos: server-addr: http://127.0.0.1:8848 discovery: enabled: false namespace: prefix: application file-extension: yml config: enabled: false namespace: prefix: application file-extension: yml dubbo: application: name: pamirs-project version: 1.0.0 registry: address: zookeeper://192.168.0.121:2182 protocol: name: dubbo port: 20880 serialization: pamirs consumer: timeout: 5000 provider: timeout: 5000 scan: base-packages: pro.shushi cloud: subscribed-services: 3. 修改application-dev.yml中对应中间件的IP和端口 3.1 redis 修改对应redis的IP端口以及密码 spring: redis: database: 0 host: 192.168.0.121 #改成docker安装的宿主机IP port: 6378 timeout: 5000 password: Abc@1234 3.2 mysql 如自行安装mysql,直接改成mysql的IP和账号信息如直接使用docker提供的mysql,则修改对应的IP为docker安装的宿主机IP biz: driverClassName: com.mysql.cj.jdbc.Driver type: com.alibaba.druid.pool.DruidDataSource url: jdbc:mysql://192.168.0.121:3307/demo_biz?useSSL=false&allowPublicKeyRetrieval=true&useServerPrepStmts=true&cachePrepStmts=true&useUnicode=true&characterEncoding=utf8&serverTimezone=Asia/Shanghai&autoReconnect=true&allowMultiQueries=true username: root password: Abc@1234 initialSize: 5 maxActive: 200 minIdle: 5 maxWait: 60000 timeBetweenEvictionRunsMillis: 60000 testWhileIdle: true testOnBorrow: false testOnReturn: false poolPreparedStatements: true asyncInit: true pamirs: driverClassName: com.mysql.cj.jdbc.Driver type: com.alibaba.druid.pool.DruidDataSource url: jdbc:mysql://192.168.0.121:3307/demo_pamirs?useSSL=false&allowPublicKeyRetrieval=true&useServerPrepStmts=true&cachePrepStmts=true&useUnicode=true&characterEncoding=utf8&serverTimezone=Asia/Shanghai&autoReconnect=true&allowMultiQueries=true username: root password: Abc@1234 initialSize: 5 maxActive: 200 minIdle: 5 maxWait: 60000 timeBetweenEvictionRunsMillis: 60000 testWhileIdle: true testOnBorrow: false testOnReturn: false poolPreparedStatements:…

    2023年11月11日
    2.2K00
  • 无代码docker启动说明

    1. 安装docker 1.1 Linux内核系统 1.1.1 检查防火墙(以CentOS7为例) 查看防火墙是否开启 systemctl status firewalld 如防火墙处于开启状态,有2种处理方式,选择其中一种,开发环境如内网环境建议选择处理方案1 处理方案1:停止防火墙 systemctl stop firewalld 处理方案2:开放docker镜像内置中间件透出的端口 88:web访问端口 8099:后端Java服务端口 19876:rocketmq的namesrv端口: 6378:缓存redis的端口 3307:数据库mysql的端口 2182:zookeeper的端口 20880:dubbo的通信端口 15555:预留Java的debug端口 10991:rocketmq的broker端口 查看防火墙已经开放的端口 firewall-cmd –list-ports # 防火墙新增开放端口示例: firewall-cmd –permanent –zone=public –add-port=88/tcp #新增以后生效需要重新加载防火墙 systemctl reload firewalld #查看端口是否开放成功 firewall-cmd –list-ports 也可以从外部使用telnet命令检查端口是否开放成功,如telnet 192.168.0.121 3307 1.1.2 官方安装地址:https://docs.docker.com/engine/install/centos/ #删除原有版本 yum remove docker \ docker-client \ docker-client-latest \ docker-common \ docker-latest \ docker-latest-logrotate \ docker-logrotate \ docker-engine yum install -y yum-utils yum-config-manager –add-repo https://download.docker.com/linux/centos/docker-ce.repo 如果docker这个源异常可以用阿里云的源 #yum-config-manager –add-repo http://mirrors.aliyun.com/docker-ce/linux/centos/docker-ce.repo yum install docker-ce docker-ce-cli containerd.io docker-buildx-plugin docker-compose-plugin #启动docker systemctl start docker #查看是否安装成功 docker -v 1.1.3 可使用一键安装脚本 wget https://pamirs.oss-cn-hangzhou.aliyuncs.com/docker/quick-install.sh sh quick-install.sh 1.2 无公网环境Linux系统 需要根据指定的版本以及内核架构来生成对应docker以及镜像包 1.3 window环境 https://docs.docker.com/desktop/install/windows-install/ 2. 解压提供的部署.zip 部署.zip包含: settings-3.6.3.xml:拉取平台jar的maven仓库settings,对应maven版本3.6.x settings-3.8.x.xml:拉取平台jar的maven仓库settings,对应maven版本3.8.x pamirs-demo:后端示例工程 oinone-op-ds-all-full:包含所有中间件及前后端工程,用于启动docker脚本 oinone-op-ds-all-mini:仅包含前后端工程,用于启动docker脚本 license:平台证书 docker和mvn账号信息.md 3. 对应版本的docker镜像拉取 镜像地址 镜像概述 harbor.oinone.top/oinone/designer:4.8.2.4-allinone-full 包含所有中间件及前后端工程 harbor.oinone.top/oinone/designer:4.8.2.4-allinone-mini 仅包含前后端工程 👆🏻上面镜像地址中的4.7.9是示例版本号,具体安装时根据数式提供的为准。 #注意:docker镜像拉取的账号密码在部署.zip里面 docker login –username=用户名 harbor.oinone.top docker pull harbor.oinone.top/oinone/designer:xxx 4. 修改startup.sh中的路径 4.1 linux环境修改参数 在文件中找到如下configDir=/opt/docker/oinone-op-ds-all-fullversion=4.8.2.4IP=192.168.0.121 修改configDir的路径(下载oinone-op-ds-xx.zip解压后的路径) 修改对应的镜像版本号 修改对应的IP为docker宿主机IP 4.2 window环境修改参数 在文件中找到如下set configDir=/d/shushi/docker/oinone-op-ds-all-fullset version=4.8.2.4set IP=192.168.0.121 修改configDir的路径((下载oinone-op-ds-xx.zip解压后的路径) 修改对应的镜像版本号 修改对应的IP为docker宿主机IP 5. (用oinone-op-ds-all-full版本可跳过)修改conf/application.yml 对应中间件的配置:指定对应IP和端口或密码,把其中192.168.0.121改为宿主机IP zookeeper mysql rocket-mq redis 阿里云oss配置 6. 修改mq/broker.conf(**注意:使用allinone-full包含中间件版本) 修改其中brokerIP1的IP从192.168.0.121改成宿主机IP brokerClusterName = DefaultCluster namesrvAddr=127.0.0.1:9876 brokerIP1=192.168.0.121 brokerName = broker-a brokerId = 0 deleteWhen = 04 fileReservedTime = 48 brokerRole = ASYNC_MASTER flushDiskType = ASYNC_FLUSH autoCreateTopicEnable=true…

    2023年11月6日
    1.1K00
  • 【PostgreSQL】后端部署使用PostgreSQL数据库

    PostgreSQL数据库配置 驱动配置 Maven配置(14.3版本可用) <postgresql.version>42.6.0</postgresql.version> <dependency> <groupId>org.postgresql</groupId> <artifactId>postgresql</artifactId> <version>${postgresql.version}</version> </dependency> 离线驱动下载 postgresql-42.2.18.jarpostgresql-42.6.0.jarpostgresql-42.7.3.jar JDBC连接配置 pamirs: datasource: base: type: com.alibaba.druid.pool.DruidDataSource driverClassName: org.postgresql.Driver url: jdbc:postgresql://127.0.0.1:5432/pamirs?currentSchema=base username: xxxxxx password: xxxxxx initialSize: 5 maxActive: 200 minIdle: 5 maxWait: 60000 timeBetweenEvictionRunsMillis: 60000 testWhileIdle: true testOnBorrow: false testOnReturn: false poolPreparedStatements: true asyncInit: true 连接url配置 暂无官方资料 url格式 jdbc:postgresql://${host}:${port}/${database}?currentSchema=${schema} 在jdbc连接配置时,${database}和${schema}必须完整配置,不可缺省。 其他连接参数如需配置,可自行查阅相关资料进行调优。 方言配置 pamirs方言配置 pamirs: dialect: ds: base: type: PostgreSQL version: 14 major-version: 14.3 pamirs: type: PostgreSQL version: 14 major-version: 14.3 数据库版本 type version majorVersion 14.x PostgreSQL 14 14.3 PS:由于方言开发环境为14.3版本,其他类似版本(14.x)原则上不会出现太大差异,如出现其他版本无法正常支持的,可在文档下方留言。 schedule方言配置 pamirs: event: enabled: true schedule: enabled: true dialect: type: PostgreSQL version: 14 major-version: 14.3 type version majorVersion PostgreSQL 14 14.3 PS:由于schedule的方言在多个版本中并无明显差异,目前仅提供一种方言配置。 其他配置 逻辑删除的值配置 pamirs: mapper: global: table-info: logic-delete-value: (EXTRACT(epoch FROM CURRENT_TIMESTAMP) * 1000000 + EXTRACT(MICROSECONDS FROM CURRENT_TIMESTAMP))::bigint PostgreSQL数据库用户初始化及授权 — init root user (user name can be modified by oneself) CREATE USER root WITH PASSWORD 'password'; — if using automatic database and schema creation, this is very important. ALTER USER root CREATEDB; SELECT * FROM pg_roles; — if using postgres database, this authorization is required. GRANT CREATE ON DATABASE postgres TO root;

    2023年11月1日
    69700

Leave a Reply

登录后才能评论