无代码docker启动说明

1. 安装docker

1.1 Linux内核系统

1.1.1 检查防火墙(以CentOS7为例)

查看防火墙是否开启

systemctl status firewalld

如防火墙处于开启状态,有2种处理方式,选择其中一种,开发环境如内网环境建议选择处理方案1

处理方案1:停止防火墙

systemctl stop firewalld

处理方案2:开放docker镜像内置中间件透出的端口

  • 88:web访问端口
  • 8099:后端Java服务端口
  • 19876:rocketmq的namesrv端口:
  • 6378:缓存redis的端口
  • 3307:数据库mysql的端口
  • 2182:zookeeper的端口
  • 20880:dubbo的通信端口
  • 15555:预留Java的debug端口
  • 10991:rocketmq的broker端口
    查看防火墙已经开放的端口

    firewall-cmd --list-ports

    # 防火墙新增开放端口示例:
    firewall-cmd --permanent --zone=public --add-port=88/tcp
    #新增以后生效需要重新加载防火墙
    systemctl reload firewalld
    #查看端口是否开放成功
    firewall-cmd --list-ports
    也可以从外部使用telnet命令检查端口是否开放成功,如telnet 192.168.0.121 3307

    1.1.2 官方安装地址:https://docs.docker.com/engine/install/centos/

    #删除原有版本
    yum remove docker \
            docker-client \
            docker-client-latest \
            docker-common \
            docker-latest \
            docker-latest-logrotate \
            docker-logrotate \
            docker-engine
    yum install -y yum-utils
    yum-config-manager --add-repo https://download.docker.com/linux/centos/docker-ce.repo
    如果docker这个源异常可以用阿里云的源 
    #yum-config-manager --add-repo http://mirrors.aliyun.com/docker-ce/linux/centos/docker-ce.repo
    yum install docker-ce docker-ce-cli containerd.io docker-buildx-plugin docker-compose-plugin
    #启动docker
    systemctl start docker
    #查看是否安装成功
    docker -v

    1.1.3 可使用一键安装脚本

    wget https://pamirs.oss-cn-hangzhou.aliyuncs.com/docker/quick-install.sh
    sh quick-install.sh

    1.2 无公网环境Linux系统

    需要根据指定的版本以及内核架构来生成对应docker以及镜像包

    1.3 window环境

    https://docs.docker.com/desktop/install/windows-install/

2. 解压提供的部署.zip

部署.zip包含:

  • settings-3.6.3.xml:拉取平台jar的maven仓库settings,对应maven版本3.6.x
  • settings-3.8.x.xml:拉取平台jar的maven仓库settings,对应maven版本3.8.x
  • pamirs-demo:后端示例工程
  • oinone-op-ds-all-full:包含所有中间件及前后端工程,用于启动docker脚本
  • oinone-op-ds-all-mini:仅包含前后端工程,用于启动docker脚本
  • license:平台证书
  • docker和mvn账号信息.md

3. 对应版本的docker镜像拉取

镜像地址 镜像概述
harbor.oinone.top/oinone/designer:4.8.2.4-allinone-full 包含所有中间件及前后端工程
harbor.oinone.top/oinone/designer:4.8.2.4-allinone-mini 仅包含前后端工程

👆🏻上面镜像地址中的4.7.9是示例版本号,具体安装时根据数式提供的为准。

#注意:docker镜像拉取的账号密码在部署.zip里面
docker login --username=用户名 harbor.oinone.top
docker pull harbor.oinone.top/oinone/designer:xxx

4. 修改startup.sh中的路径

4.1 linux环境修改参数

在文件中找到如下
configDir=/opt/docker/oinone-op-ds-all-full
version=4.8.2.4
IP=192.168.0.121

  • 修改configDir的路径(下载oinone-op-ds-xx.zip解压后的路径)
  • 修改对应的镜像版本号
  • 修改对应的IP为docker宿主机IP

4.2 window环境修改参数

在文件中找到如下
set configDir=/d/shushi/docker/oinone-op-ds-all-full
set version=4.8.2.4
set IP=192.168.0.121

  • 修改configDir的路径((下载oinone-op-ds-xx.zip解压后的路径)
  • 修改对应的镜像版本号
  • 修改对应的IP为docker宿主机IP

5. (用oinone-op-ds-all-full版本可跳过)修改conf/application.yml

  • 对应中间件的配置:指定对应IP和端口或密码,把其中192.168.0.121改为宿主机IP
    • zookeeper
    • mysql
    • rocket-mq
    • redis
    • 阿里云oss配置

6. 修改mq/broker.conf(**注意:使用allinone-full包含中间件版本)

修改其中brokerIP1的IP从192.168.0.121改成宿主机IP

brokerClusterName = DefaultCluster
namesrvAddr=127.0.0.1:9876
brokerIP1=192.168.0.121
brokerName = broker-a
brokerId = 0
deleteWhen = 04
fileReservedTime = 48
brokerRole = ASYNC_MASTER
flushDiskType = ASYNC_FLUSH
autoCreateTopicEnable=true
listenPort=10991
transactionCheckInterval=1000
#存储使用率阀值,当使用率超过阀值时,将拒绝发送消息请求
diskMaxUsedSpaceRatio=98
#磁盘空间警戒阈值,超过这个值则停止接受消息,默认值90
diskSpaceWarningLevelRatio=99
#强制删除文件阈值,默认85
diskSpaceCleanForciblyRatio=97

7. 启动Docker

7.1 linux环境启动

  • 在终端执行 sh startup.sh

7.2 window环境启动

  • 用PowerShell 执行 .\startup.cmd

7.3 查看日志,检查是否启动成功

在logs目录下可看到生成的日志文件,第一次启动时间会相对长一些,等看到日志文件中输出 启动耗时 。。。等字样,代表启动成功
无代码docker启动说明
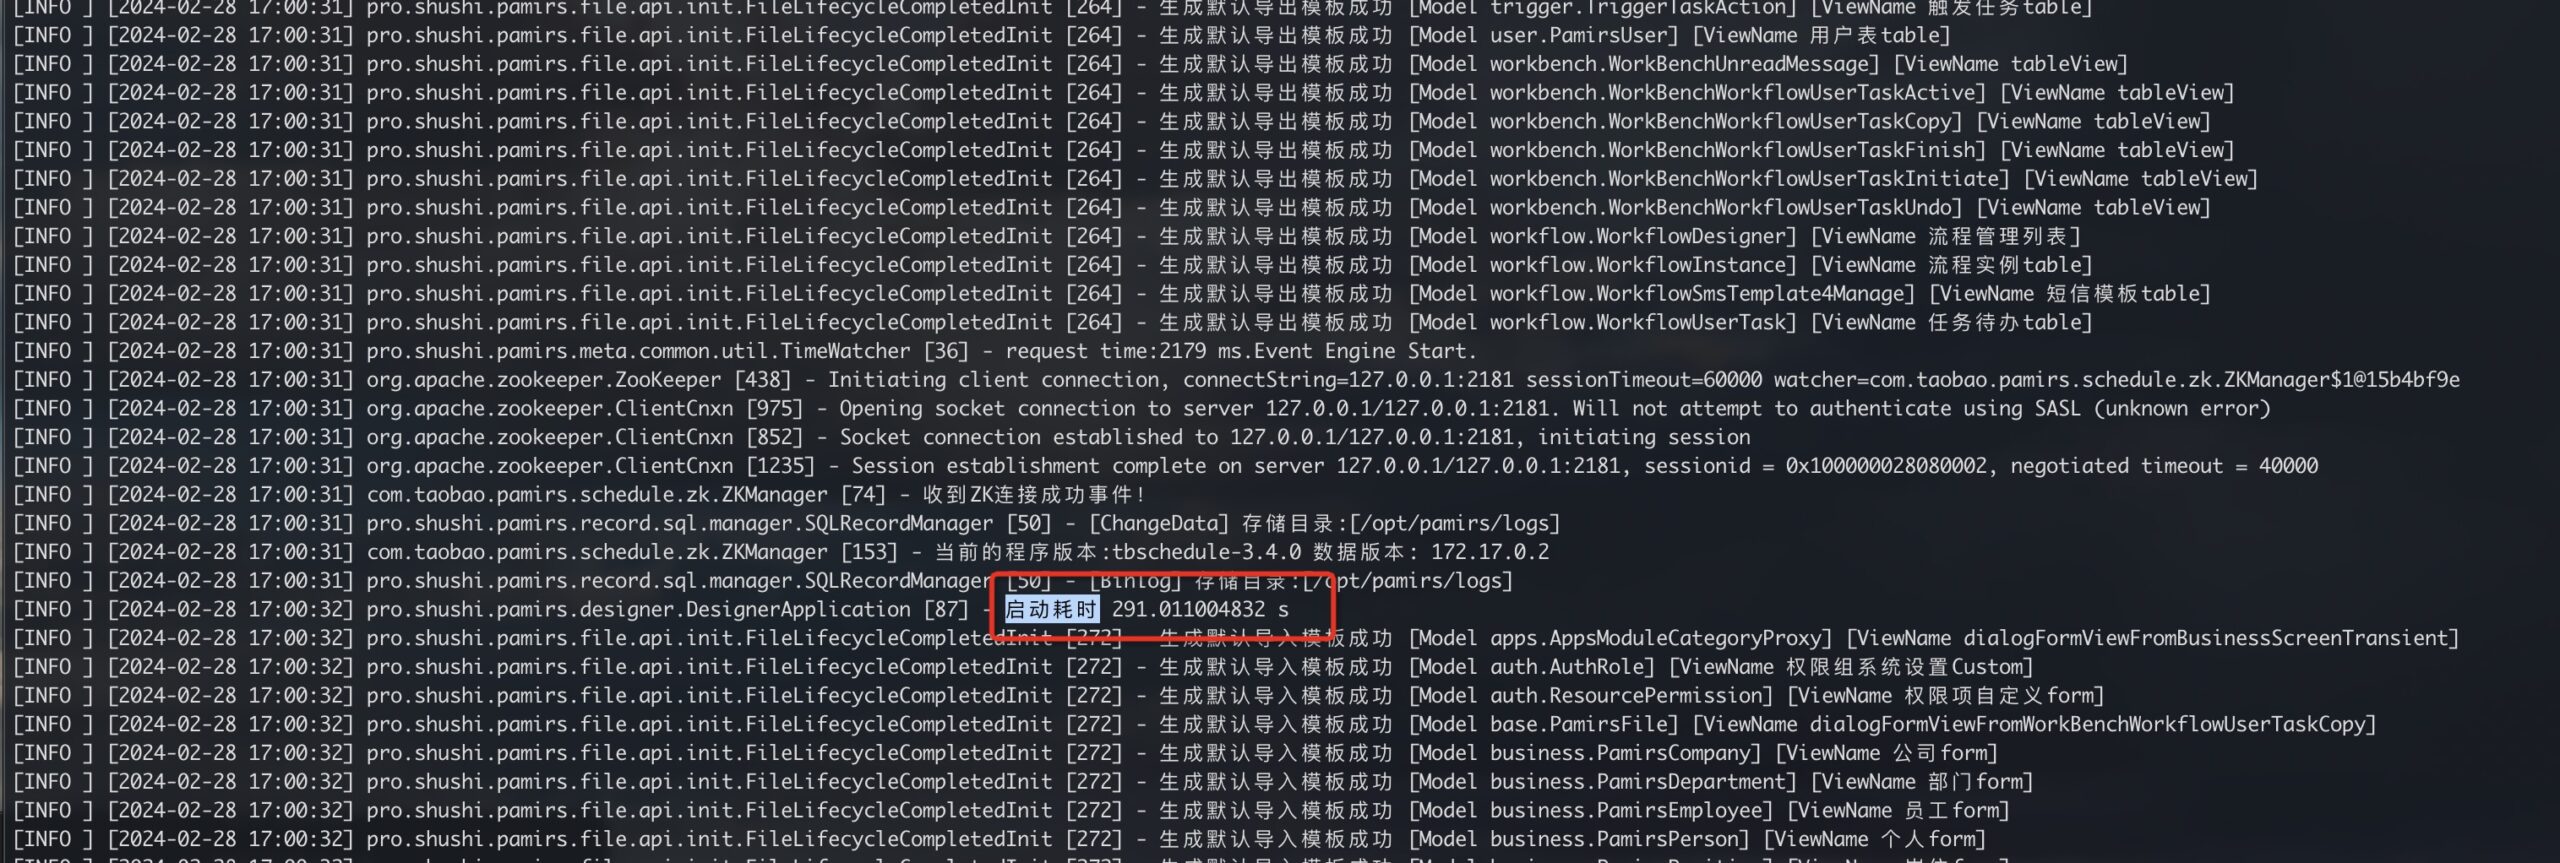
此时可以访问http://宿主机IP:88 默认登录账号密码为admin

Oinone社区 作者:数式-海波原创文章,如若转载,请注明出处:https://doc.oinone.top/install/4137.html

访问Oinone官网:https://www.oinone.top获取数式Oinone低代码应用平台体验

(1)
数式-海波的头像数式-海波数式管理员
上一篇 2023年11月6日 pm2:39
下一篇 2023年11月6日

相关推荐

  • 如何添加数据可视化运行时依赖

    前端 package.json中新增依赖 @kunlun/data-designer-open-pc,版本跟@kunlun/dependencies的填一样 src/main.ts内导入依赖 import 'reflect-metadata'; import { VueOioProvider } from '@kunlun/dependencies'; // START 导入代码放在导入@kunlun/dependencies之后 import '@kunlun/data-designer-open-pc'; // END 导入代码放在VueOioProvider()方法执行前 VueOioProvider({ // TODO }); 后端 父pom新增依赖 <properties> <pamirs.data.visualization.version>4.7.8</pamirs.data.visualization.version> </properties> <dependencyManagement> <dependencies> <dependency> <groupId>pro.shushi.pamirs.data.visualization</groupId> <artifactId>pamirs-data-visualization</artifactId> <version>${pamirs.data.visualization.version}</version> <type>pom</type> <scope>import</scope> </dependency> </dependencies> </dependencyManagement> 2.boot启动工程的pom新增依赖 <dependency> <groupId>pro.shushi.pamirs.data.visualization</groupId> <artifactId>pamirs-data-visualization-core</artifactId> </dependency> 3.application.yml配置新增依赖 pamirs: boot: modules: – datavi 注意:datavi 这个模块在业务工程和设计器指定数据源要保持一致。

    2024年5月15日
    79300
  • Oinone License 许可证使用常见问题

    如何获取许可证? 联系数式运维人员获取许可证。(以下内容全部使用表示许可证文件路径) subject:授权主体名称 license.lic:许可证文件 不同许可证类别有什么不同? 许可证类型 LicenseType 限制功能 适用环境 研发授权 DEVELOP 1.每次安装时效1天,超时后无法正常访问设计器相关功能2.限制CPU和主板序列号或限制许可证使用人数3.不能用于容器启动4.有页面水印 开发环境(开发人员本地启动业务工程时使用该授权) 伙伴授权 TRIAL 1.无安装时效限制2.无部署环境限制3.有页面水印 非生产环境(测试环境、预发环境等使用该授权) 客户授权 BUSINESS 1.无安装时效限制2.仅能部署一套生产环境3.无页面水印 生产环境 PS: 一套环境是指共用Base库的所有JVM称为一套环境。 如何配置许可证? 在yaml中配置许可证 单个许可证配置 pamirs: license: subject: <subject> path: <license.lic> 多个许可证配置 pamirs: license: subject: <subject> path: – <license1.lic> – <license2.lic> pamirs.license.path可以是相对路径、绝对路径以及URL路径。 在Program Arguments中配置许可证 java -jar -Psubject=<subject> -Plicense=<license1.lic> -Plicense=<license1.lic> <boot.jar> 如何在开发中安装许可证? 将许可证放入后端运行时工作目录中即可。(一般为idea项目根目录) 如何在物理机生产环境安装许可证? 将许可证放入与jar包平级目录中即可。 如何在docker环境中安装许可证? 在docker运行时目录添加挂载卷映射,并在yaml中配置对应的路径即可。 如何获取CPU序列号和主板序列号 在Linux环境中使用dmidecode命令 # 获取CPU序列号 dmidecode -s system-serial-number # CPU序列号 7*****1 # 获取主板序列号 dmidecode -s baseboard-serial-number # 主板序列号 ..CN*******V01Y7. # 获取系统UUID dmidecode -s system-uuid # 系统UUID 4c4xxxxx-xxxx-xxxx-xxxx-xxxxxxxx5831 在Mac环境中使用system_profiler命令 # 获取CPU序列号 system_profiler SPHardwareDataType | grep 'Serial Number' | awk -F ':' '{print $2}' # CPU序列号 C02******03Y # 获取主板序列号 system_profiler SPHardwareDataType | grep 'Hardware UUID' | awk -F ':' '{print $2}' # 主板序列号 1AAxxxxx-xxxx-xxxx-xxxx-xxxxxxxxF0FC 在Windows环境中使用wmic命令 # 获取CPU序列号 wmic cpu get processorid # CPU序列号 BFExxxxxxxxxx6A3 # 获取主板序列号 wmic baseboard get serialnumber # 主板序列号 PFxxxxBY # 获取系统UUID wmic csproduct get uuid # 系统UUID D0Exxxxx-xxxx-xxxx-xxxx-xxxxxxxx78B8 在Linux环境出现dmidecode命令执行失败该如何处理? 1. 命令未找到,可使用如下方式尝试安装 # debian (eg: Ubuntu) apt-get install dmidecode # rpm (eg: Fedora/CentOS/RedHat) yum install dmidecode 2. 无权限执行命令,尝试切换当前执行用户或为当前用户提高执行权限 在docker环境出现证书安装失败该如何处理? 1. 由于docke环境非物理环境,不支持CPU序列号和主板序列号校验,尝试更换许可证。 2. 检查许可证在镜像中的位置是否与配置文件中一致。 许可证安装失败该如何处理? 1. 日志出现License installation failed.信息 PS:对JDK版本依赖的问题已在5.0.0版本以上得到完整解决,此问题仅会出现在低版本的平台版本中。 请检查jdk版本是否高于1.8_221以上。 如无法升级jdk版本的环境下,请点击下载 jce_policy-8.zip 并按照如下步骤进行操作:…

    2024年6月19日
    3.5K00
  • 低代码示例工程oinone-example启动说明

    运行低代码后端示例工程 1. 前置准备 1.1. 解压(部署.zip),找到后端工程oinone-example 1.2.下载idea以及安装平台的idea插件 1.2.1 jdk安装(已安装请忽略) 如本机环境没有安装jdk8(jdk1.8.221+),需先安装:mac:https://doc.oinone.top/oio4/9225.htmlwindow:https://doc.oinone.top/oio4/9226.html 1.2.2 idea的插件安装教程: mac:https://doc.oinone.top/oio4/9225.htmlwindows:https://doc.oinone.top/oio4/9226.html 1.2.3 maven下载安装(已安装请忽略) mvn下载地址,推荐安装3.6.3https://archive.apache.org/dist/maven/maven-3/3.6.3/binaries/mac:https://doc.oinone.top/oio4/9225.htmlwindows:https://doc.oinone.top/oio4/9226.html 2. 修改bootstrap.yml中运行环境配置 修改其中zk的IP:192.168.0.121->改成docker安装的宿主机IP默认profiles设置是dev,注意对应生效的yml文件为applicaiton-dev.yml spring: profiles: active: dev application: name: pamirs-project cloud: service-registry: auto-registration: enabled: false pamirs: default: environment-check: true tenant-check: true — spring: profiles: dev cloud: service-registry: auto-registration: enabled: false config: enabled: false uri: http://127.0.0.1:7001 label: master profile: dev nacos: server-addr: http://127.0.0.1:8848 discovery: enabled: false namespace: prefix: application file-extension: yml config: enabled: false namespace: prefix: application file-extension: yml dubbo: application: name: pamirs-project version: 1.0.0 registry: address: zookeeper://192.168.0.121:2182 protocol: name: dubbo port: 20880 serialization: pamirs consumer: timeout: 5000 provider: timeout: 5000 scan: base-packages: pro.shushi cloud: subscribed-services: 3. 修改application-dev.yml中对应中间件的IP和端口 3.1 redis 修改对应redis的IP端口以及密码 spring: redis: database: 0 host: 192.168.0.121 #改成docker安装的宿主机IP port: 6378 timeout: 5000 password: Abc@1234 3.2 mysql 如自行安装mysql,直接改成mysql的IP和账号信息如直接使用docker提供的mysql,则修改对应的IP为docker安装的宿主机IP biz: driverClassName: com.mysql.cj.jdbc.Driver type: com.alibaba.druid.pool.DruidDataSource url: jdbc:mysql://192.168.0.121:3307/demo_biz?useSSL=false&allowPublicKeyRetrieval=true&useServerPrepStmts=true&cachePrepStmts=true&useUnicode=true&characterEncoding=utf8&serverTimezone=Asia/Shanghai&autoReconnect=true&allowMultiQueries=true username: root password: Abc@1234 initialSize: 5 maxActive: 200 minIdle: 5 maxWait: 60000 timeBetweenEvictionRunsMillis: 60000 testWhileIdle: true testOnBorrow: false testOnReturn: false poolPreparedStatements: true asyncInit: true pamirs: driverClassName: com.mysql.cj.jdbc.Driver type: com.alibaba.druid.pool.DruidDataSource url: jdbc:mysql://192.168.0.121:3307/demo_pamirs?useSSL=false&allowPublicKeyRetrieval=true&useServerPrepStmts=true&cachePrepStmts=true&useUnicode=true&characterEncoding=utf8&serverTimezone=Asia/Shanghai&autoReconnect=true&allowMultiQueries=true username: root password: Abc@1234 initialSize: 5 maxActive: 200 minIdle: 5 maxWait: 60000 timeBetweenEvictionRunsMillis: 60000 testWhileIdle: true testOnBorrow: false testOnReturn: false poolPreparedStatements:…

    2023年11月11日
    2.9K00
  • 如何替换页面中的静态资源为私有存储

    介绍 为了让我们可以快速体验到oinone的产品,oinone的工程内默认提供了一个阿里云oss的存储空间来存放一些静态资源,如网站在浏览器标签栏的图标、登录页的logo、站内页面的logo、默认头像、背景图等,但是在实际业务中我们需要把其中部分静态资源更换为自有品牌或者客户品牌定制的静态资源。 解决方案 oinone提供了一套可以替换掉默认静态资源的方案 获取静态资源文件的压缩包static.zip 解压到到运维指定的目录下,这里以/project/static为例,前端通过浏览器开发工具查看到需要替换的图片路径,在static目录下找到对应路径的文件,替换为自有文件 配置nginx的文件系统(使用阿里云oss、minio等云存储方案的可以忽略该步骤) server { listen 8899; location /static { alias /project/static; add_header Content-Disposition attachment; add_header Content-Type application/octet-stream; } } 前端启动工程中的.env文件中增加如下配置(ss-boot) STATIC_IMG=http://访问地址/static/images 生产模式重新打包 或 开发模式重新运行就可以看到效果

    2024年3月20日
    1.3K00
  • Docker部署常见问题

    问题1:容器启动出现library initialization failed – unable to allocate file descriptor table – out of memory异常如何处理? 原因 不同操作系统安装Docker后,容器运行环境并不一致,需要对Docker运行参数进行调整。 解决方案 编辑/etc/systemd/system/docker.service文件, 有些系统该文件位置:/lib/systemd/system/docker.service 查看docker的systemd(docker.service)配置位置 systemctl status docker 查看docker的systemd配置位置 将下列参数进行修改 LimitNOFILE=65535 LimitNPROC=65535 LimitCORE=65535 执行以下脚本 systemctl daemon-reload systemctl restart docker 问题2:容器启动出现library initialization failed – unable to allocate file descriptor table – out of memorypanic: signal: aborted (core dumped)异常如何处理? 问题现象 1、 按照【问题1】的设置进行配置后,仍然不生效; 2、 尝试修改宿主机系统内核的ulimits,重启docker仍报错。修改docker.service(文件位置:/etc/systemd/system/docker.service文件, 有些系统该文件位置:/lib/systemd/system/docker.service) 解决方案 查看docker的systemd(docker.service)配置位置【问题1】中的办法 在ExecStart命令后加上创建容器的默认ulimit配置,如下,设置容器启动时的ulimit为65535:65535 –default-ulimit nofile=65535:65535 配置好后: ExecStart=/usr/bin/dockerd -H fd:// –containerd=/run/containerd/containerd.sock –default-ulimit nofile=65535:65535 执行以下脚本 systemctl daemon-reload systemctl restart docker 资料参考:https://blog.csdn.net/weixin_42241322/article/details/137122868 问题3:拉取设计器镜像报错 报错信息,拉取镜像harbor.oinone.top连不上。 docker login –username=schhsw_oinone harbor.oinone.top i Info → A Personal Access Token (PAT) can be used instead. To create a PAT, visit https://app.docker.com/settings Password: time="2025-02-27T11:24:58+08:00" level=info msg="Error logging in to endpoint, trying next endpoint" error="Get \"https://harbor.oinone.top/v2/\": dial tcp 0.0.0.0:443: connect: connection refused" Get "https://harbor.oinone.top/v2/": dial tcp 0.0.0.0:443: connect: connection refused kfpt@kfpt-virtual-machine:~$ sudo -i root@kfpt-virtual-machine:~# docker login –username=schhsw_oinone harbor.oinone.top i Info → A Personal Access Token (PAT) can be used instead. To create a PAT, visit https://app.docker.com/settings Password: Error response from daemon: Get "https://harbor.oinone.top/v2/": dial tcp 0.0.0.0:443: connect: connection refused 排查过程: 排除到后面发现原因是DNS配置的问题,换了一个阿里云的IP就可以了

    2025年3月13日
    84600

Leave a Reply

登录后才能评论