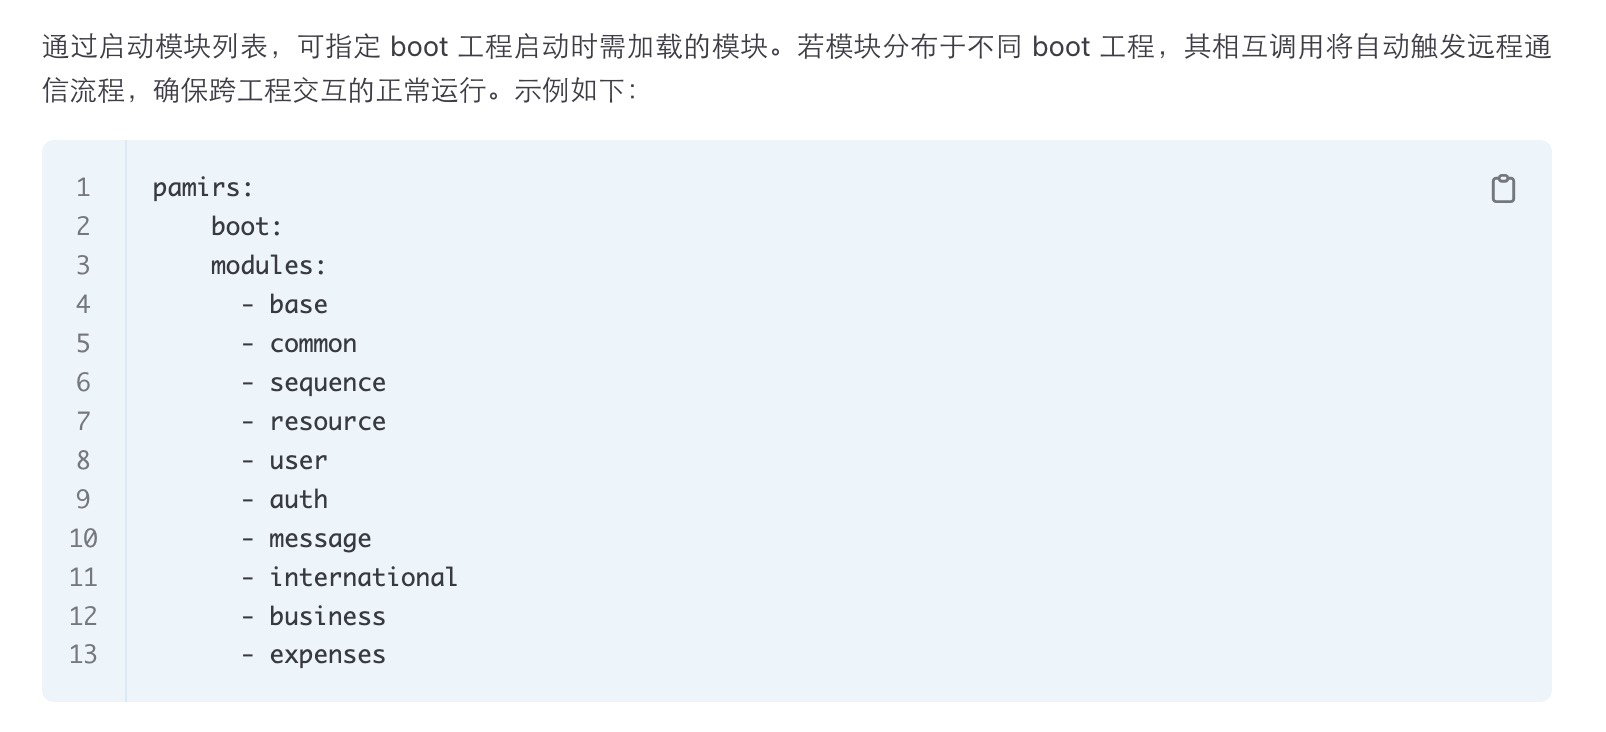
如何排查启动依赖错误的问题

场景

启动的时候可能会出现以下错误提示

  • 启动模块中包含jar包或者数据库中不存在的模块
  • 启动模块中包含不存在的模块
  • 启动模块互斥模块中包含已安装模块

排查项

  1. 确保启动工程的application.yml中的启动模块pamirs.boot.modules配置项内的模块在pom.xml内依赖了对应模块的jar包
    如何排查启动依赖错误的问题

  2. 确保出问题的模块的定义文件内的包扫描前缀packagePrefix方法内的路径定义正确,该路径可以是多个,但是一定要包含模块下所有子工程的路径,包括但不限于api子工程、core工程等,另外该路径也不能和其他模块的配置有重复、交集、包含关系(例如:a模块是 aa.bb.cc, b模块是aa.bb,这样b模块的路径就包含了a模块的)
    如何排查启动依赖错误的问题

  3. 启动类里spring自带的@ComponentScan.basePackages注解项需要包含所有依赖模块的路径
    如何排查启动依赖错误的问题

  4. 无代码应用创建的时候,配置了依赖模块。但这个依赖没有被本地安装,该模块就会出问题,要么删除该依赖,要么在代码里添加该依赖。

Oinone社区 作者:nation原创文章,如若转载,请注明出处:https://doc.oinone.top/install/backendinstall/14824.html

访问Oinone官网:https://www.oinone.top获取数式Oinone低代码应用平台体验

(0)
nation的头像nation数式员工
上一篇 2024年7月17日 pm6:12
下一篇 2024年7月19日 pm12:23

相关推荐

  • Docker部署常见问题

    问题1:容器启动出现library initialization failed – unable to allocate file descriptor table – out of memory异常如何处理? 原因 不同操作系统安装Docker后,容器运行环境并不一致,需要对Docker运行参数进行调整。 解决方案 编辑/etc/systemd/system/docker.service文件, 有些系统该文件位置:/lib/systemd/system/docker.service 查看docker的systemd(docker.service)配置位置 systemctl status docker 查看docker的systemd配置位置 将下列参数进行修改 LimitNOFILE=65535 LimitNPROC=65535 LimitCORE=65535 执行以下脚本 systemctl daemon-reload systemctl restart docker 问题2:容器启动出现library initialization failed – unable to allocate file descriptor table – out of memorypanic: signal: aborted (core dumped)异常如何处理? 问题现象 1、 按照【问题1】的设置进行配置后,仍然不生效; 2、 尝试修改宿主机系统内核的ulimits,重启docker仍报错。修改docker.service(文件位置:/etc/systemd/system/docker.service文件, 有些系统该文件位置:/lib/systemd/system/docker.service) 解决方案 查看docker的systemd(docker.service)配置位置【问题1】中的办法 在ExecStart命令后加上创建容器的默认ulimit配置,如下,设置容器启动时的ulimit为65535:65535 –default-ulimit nofile=65535:65535 配置好后: ExecStart=/usr/bin/dockerd -H fd:// –containerd=/run/containerd/containerd.sock –default-ulimit nofile=65535:65535 执行以下脚本 systemctl daemon-reload systemctl restart docker 资料参考:https://blog.csdn.net/weixin_42241322/article/details/137122868 问题3:拉取设计器镜像报错 报错信息,拉取镜像harbor.oinone.top连不上。 docker login –username=schhsw_oinone harbor.oinone.top i Info → A Personal Access Token (PAT) can be used instead. To create a PAT, visit https://app.docker.com/settings Password: time="2025-02-27T11:24:58+08:00" level=info msg="Error logging in to endpoint, trying next endpoint" error="Get \"https://harbor.oinone.top/v2/\": dial tcp 0.0.0.0:443: connect: connection refused" Get "https://harbor.oinone.top/v2/": dial tcp 0.0.0.0:443: connect: connection refused kfpt@kfpt-virtual-machine:~$ sudo -i root@kfpt-virtual-machine:~# docker login –username=schhsw_oinone harbor.oinone.top i Info → A Personal Access Token (PAT) can be used instead. To create a PAT, visit https://app.docker.com/settings Password: Error response from daemon: Get "https://harbor.oinone.top/v2/": dial tcp 0.0.0.0:443: connect: connection refused 排查过程: 排除到后面发现原因是DNS配置的问题,换了一个阿里云的IP就可以了

    2025年3月13日
    1.1K00
  • 自定义页面问题

    2022年2月10日
    1.2K00
  • 复杂字段类型的导入导出

    复杂字段类型的导入导出 如果想要导出的字段是该模型关联的对象里的一个字段,则需要在创建模版时使用 “对象.字段” 的方式,并在导出时手动设置该字段 例如PamirsEmployee模型中的company,使用company.name创建值 @Field.many2one @Field.Relation(relationFields = {“companyCode”}, referenceFields = {“code”}) @Field(displayName = “所属公司”) private PamirsCompany company; //定义员工导入导出模版 @Component public class EmployeeTemplate implements ExcelTemplateInit { public static final String TEMPLATE_NAME = "employeeTemplate"; @Override public List<ExcelWorkbookDefinition> generator() { //可以返回多个模版,导出的时候页面上由用户选择导出模版 return Collections.singletonList( ExcelHelper.fixedHeader(PetShop.MODEL_MODEL, TEMPLATE_NAME) .createBlock(TEMPLATE_NAME, PetShop.MODEL_MODEL) .setType(ExcelTemplateTypeEnum.EXPORT) //使用company.name获取PamirsCompany里面的name字段 .addColumn("company.name", "所属公司") .build()); } } //手动设置该字段,如2所示 如果想要导出的字段是非存储字段,由于默认只导出存储在数据库里的字段,非存储的字段需要在导出时手动设置 @Slf4j @Component @Ext(ExcelExportTask.class) public class EmpTemplateExportExtPoint extends DefaultExcelExportFetchDataExtPoint { @Override @ExtPoint.Implement(expression = "context.name==\"" + EmployeeTemplate.TEMPLATE_NAME + "\"") public List<Object> fetchExportData(ExcelExportTask exportTask, ExcelDefinitionContext context) { return super.fetchExportData(exportTask, context); } //重写rawQueryList方法,使用listFieldQuery将非存储字段单独设置 @Override protected List<?> rawQueryList(IWrapper<?> wrapper) { List<PamirsEmployee> pamirsEmployeeProxies = (List<PamirsEmployee>) Models.data().queryListByWrapper(wrapper); if (CollectionUtils.isNotEmpty(pamirsEmployeeProxies)) { new PamirsEmployee().listFieldQuery(pamirsEmployeeProxies, PamirsEmployee::getDepartmentList); } return pamirsEmployeeProxies; } } 如果想要导入的字段存在多个,则可以创建一个代理模型,在代理模型里设置一个字段用来接受该多值字段(在Excel里一个单元格内填写多值字段,每个字段用自定义符号(如:" ; ")进行分割),在创建模版时使用该代理类的模版,在导入导出的时候再根据 “;” 截取 @Model.model(PamirsEmployeeProxy.MODEL_MODEL) @Model(displayName = "员工导出代理") @Model.Advanced(type = ModelTypeEnum.PROXY) public class PamirsEmployeeProxy extends PamirsEmployee { private static final long serialVersionUID = -6582160484690807999L; public static final String MODEL_MODEL = "business.PamirsEmployeeProxy"; @Field.String @Field(displayName = "部门编码列表") private String departmentCodeList; } 创建模版时创建代理模型的字段 .addColumn("departmentCodeList", "部门编码列表") 导入:新建一个类,用来作为导入的扩展点,继承AbstractExcelImportDataExtPointImpl @Component @Ext(ExcelImportTask.class) @Slf4j public class EmpTemplateImportExtPoint extends AbstractExcelImportDataExtPointImpl<PamirsEmployeeProxy> { //必须加这个方法,它使用EmployeeTemplate.TEMPLATE_NAME来指定导入模版 @Override @ExtPoint.Implement(expression = "importContext.definitionContext.name==\"" + EmployeeTemplate.TEMPLATE_NAME + "\"") public Boolean importData(ExcelImportContext importContext, PamirsEmployeeProxy data) { //TODO 根据逻辑校验数据 String departmentCodeList = data.getDepartmentCodeList();…

    2024年7月1日
    1.1K00
  • 【HighGo】后端部署使用HighGo数据库

    HighGo数据库配置 驱动配置 jdbc仓库 https://mvnrepository.com/artifact/com.highgo/HgdbJdbc Maven配置(6.0.1版本可用) <highgo.version>6.0.1.jre8</highgo.version> <dependency> <groupId>com.highgo</groupId> <artifactId>HgdbJdbc</artifactId> <version>${highgo.version}</version> </dependency> JDBC连接配置 pamirs: datasource: base: type: com.alibaba.druid.pool.DruidDataSource driverClassName: com.highgo.jdbc.Driver url: jdbc:highgo://127.0.0.1:5866/oio_base?currentSchema=base,utl_file username: xxxxxx password: xxxxxx initialSize: 5 maxActive: 200 minIdle: 5 maxWait: 60000 timeBetweenEvictionRunsMillis: 60000 testWhileIdle: true testOnBorrow: false testOnReturn: false poolPreparedStatements: true asyncInit: true 连接url配置 官方文档 https://www.highgo.com/document/zh-cn/application/jdbc.html url格式 jdbc:highgo://ip:端口号/数据库名?currentSchema=schema1,schema2 在jdbc连接配置时,${database}和${schema}必须完整配置,不可缺省。 jdbc指定schema时可以在currentSchema后指定多个schema,中间用,分隔,第一个schema为业务库表存放的主schema。 highgo数据库6.0版本里每个数据库默认会带一个utl_file的schema,该模式与文件访问功能有关,需要带在jdbc的schema中,但不能放在第一个。 其他连接参数如需配置,可自行查阅相关资料进行调优。 方言配置 pamirs方言配置 pamirs: dialect: ds: base: type: HighGoDB version: 6 major-version: 6.0.1 biz_data: type: HighGoDB version: 6 major-version: 6.0.1 数据库版本 type version majorVersion 6.0.x HighGo 6 6.0.1 PS:由于方言开发环境为6.0.1版本,其他类似版本(6.0.x)原则上不会出现太大差异,如出现其他版本无法正常支持的,可在文档下方留言。 schedule方言配置 pamirs: event: enabled: true schedule: enabled: true dialect: type: HighGoDB version: 6 major-version: 6.0.1 其他配置 逻辑删除的值配置 pamirs: mapper: global: table-info: logic-delete-value: (EXTRACT(epoch FROM CURRENT_TIMESTAMP) * 1000000 + EXTRACT(MICROSECONDS FROM CURRENT_TIMESTAMP))::bigint Highgo数据库用户初始化及授权 — init oio_base user (user name can be modified by oneself) CREATE USER oio_base WITH PASSWORD 'Test@12345678'; — if using automatic database and schema creation, this is very important. ALTER USER oio_base CREATEDB; SELECT * FROM pg_roles; — if using highgo database, this authorization is required. GRANT CREATE ON DATABASE highgo TO oio_base;

    2025年7月10日
    41800
  • 低代码示例工程oinone-example启动说明

    运行低代码后端示例工程 1. 前置准备 1.1. 解压(部署.zip),找到后端工程oinone-example 1.2.下载idea以及安装平台的idea插件 1.2.1 jdk安装(已安装请忽略) 如本机环境没有安装jdk8(jdk1.8.221+),需先安装:mac:https://doc.oinone.top/oio4/9225.htmlwindow:https://doc.oinone.top/oio4/9226.html 1.2.2 idea的插件安装教程: mac:https://doc.oinone.top/oio4/9225.htmlwindows:https://doc.oinone.top/oio4/9226.html 1.2.3 maven下载安装(已安装请忽略) mvn下载地址,推荐安装3.6.3https://archive.apache.org/dist/maven/maven-3/3.6.3/binaries/mac:https://doc.oinone.top/oio4/9225.htmlwindows:https://doc.oinone.top/oio4/9226.html 2. 修改bootstrap.yml中运行环境配置 修改其中zk的IP:192.168.0.121->改成docker安装的宿主机IP默认profiles设置是dev,注意对应生效的yml文件为applicaiton-dev.yml spring: profiles: active: dev application: name: pamirs-project cloud: service-registry: auto-registration: enabled: false pamirs: default: environment-check: true tenant-check: true — spring: profiles: dev cloud: service-registry: auto-registration: enabled: false config: enabled: false uri: http://127.0.0.1:7001 label: master profile: dev nacos: server-addr: http://127.0.0.1:8848 discovery: enabled: false namespace: prefix: application file-extension: yml config: enabled: false namespace: prefix: application file-extension: yml dubbo: application: name: pamirs-project version: 1.0.0 registry: address: zookeeper://192.168.0.121:2182 protocol: name: dubbo port: 20880 serialization: pamirs consumer: timeout: 5000 provider: timeout: 5000 scan: base-packages: pro.shushi cloud: subscribed-services: 3. 修改application-dev.yml中对应中间件的IP和端口 3.1 redis 修改对应redis的IP端口以及密码 spring: redis: database: 0 host: 192.168.0.121 #改成docker安装的宿主机IP port: 6378 timeout: 5000 password: Abc@1234 3.2 mysql 如自行安装mysql,直接改成mysql的IP和账号信息如直接使用docker提供的mysql,则修改对应的IP为docker安装的宿主机IP biz: driverClassName: com.mysql.cj.jdbc.Driver type: com.alibaba.druid.pool.DruidDataSource url: jdbc:mysql://192.168.0.121:3307/demo_biz?useSSL=false&allowPublicKeyRetrieval=true&useServerPrepStmts=true&cachePrepStmts=true&useUnicode=true&characterEncoding=utf8&serverTimezone=Asia/Shanghai&autoReconnect=true&allowMultiQueries=true username: root password: Abc@1234 initialSize: 5 maxActive: 200 minIdle: 5 maxWait: 60000 timeBetweenEvictionRunsMillis: 60000 testWhileIdle: true testOnBorrow: false testOnReturn: false poolPreparedStatements: true asyncInit: true pamirs: driverClassName: com.mysql.cj.jdbc.Driver type: com.alibaba.druid.pool.DruidDataSource url: jdbc:mysql://192.168.0.121:3307/demo_pamirs?useSSL=false&allowPublicKeyRetrieval=true&useServerPrepStmts=true&cachePrepStmts=true&useUnicode=true&characterEncoding=utf8&serverTimezone=Asia/Shanghai&autoReconnect=true&allowMultiQueries=true username: root password: Abc@1234 initialSize: 5 maxActive: 200 minIdle: 5 maxWait: 60000 timeBetweenEvictionRunsMillis: 60000 testWhileIdle: true testOnBorrow: false testOnReturn: false poolPreparedStatements:…

    2023年11月11日
    3.5K00

Leave a Reply

登录后才能评论