低代码示例工程oinone-example启动说明

运行低代码后端示例工程

1. 前置准备

1.1. 解压(部署.zip),找到后端工程oinone-example

1.2.下载idea以及安装平台的idea插件

1.2.1 jdk安装(已安装请忽略)

如本机环境没有安装jdk8(jdk1.8.221+),需先安装:
mac:
https://doc.oinone.top/oio4/9225.html
window:
https://doc.oinone.top/oio4/9226.html

1.2.2 idea的插件安装教程:

mac:
https://doc.oinone.top/oio4/9225.html
windows:
https://doc.oinone.top/oio4/9226.html

1.2.3 maven下载安装(已安装请忽略)

mvn下载地址,推荐安装3.6.3
https://archive.apache.org/dist/maven/maven-3/3.6.3/binaries/
mac:
https://doc.oinone.top/oio4/9225.html
windows:
https://doc.oinone.top/oio4/9226.html

2. 修改bootstrap.yml中运行环境配置

修改其中zk的IP:192.168.0.121->改成docker安装的宿主机IP
默认profiles设置是dev,注意对应生效的yml文件为applicaiton-dev.yml

spring:
  profiles:
    active: dev
  application:
    name: pamirs-project
  cloud:
    service-registry:
      auto-registration:
        enabled: false
pamirs:
  default:
    environment-check: true
    tenant-check: true

---
spring:
  profiles: dev
  cloud:
    service-registry:
      auto-registration:
        enabled: false
    config:
      enabled: false
      uri: http://127.0.0.1:7001
      label: master
      profile: dev
    nacos:
      server-addr: http://127.0.0.1:8848
      discovery:
        enabled: false
        namespace:
        prefix: application
        file-extension: yml
      config:
        enabled: false
        namespace:
        prefix: application
        file-extension: yml
dubbo:
  application:
    name: pamirs-project
    version: 1.0.0
  registry:
    address: zookeeper://192.168.0.121:2182
  protocol:
    name: dubbo
    port: 20880
    serialization: pamirs
  consumer:
    timeout: 5000
  provider:
    timeout: 5000
  scan:
    base-packages: pro.shushi
  cloud:
    subscribed-services: 

3. 修改application-dev.yml中对应中间件的IP和端口

3.1 redis

修改对应redis的IP端口以及密码

spring:
  redis:
    database: 0
    host: 192.168.0.121 #改成docker安装的宿主机IP
    port: 6378
    timeout: 5000
    password: Abc@1234

3.2 mysql

如自行安装mysql,直接改成mysql的IP和账号信息
如直接使用docker提供的mysql,则修改对应的IP为docker安装的宿主机IP

    biz:
      driverClassName: com.mysql.cj.jdbc.Driver
      type: com.alibaba.druid.pool.DruidDataSource
      url: jdbc:mysql://192.168.0.121:3307/demo_biz?useSSL=false&allowPublicKeyRetrieval=true&useServerPrepStmts=true&cachePrepStmts=true&useUnicode=true&characterEncoding=utf8&serverTimezone=Asia/Shanghai&autoReconnect=true&allowMultiQueries=true
      username: root
      password: Abc@1234
      initialSize: 5
      maxActive: 200
      minIdle: 5
      maxWait: 60000
      timeBetweenEvictionRunsMillis: 60000
      testWhileIdle: true
      testOnBorrow: false
      testOnReturn: false
      poolPreparedStatements: true
      asyncInit: true
    pamirs:
      driverClassName: com.mysql.cj.jdbc.Driver
      type: com.alibaba.druid.pool.DruidDataSource
      url: jdbc:mysql://192.168.0.121:3307/demo_pamirs?useSSL=false&allowPublicKeyRetrieval=true&useServerPrepStmts=true&cachePrepStmts=true&useUnicode=true&characterEncoding=utf8&serverTimezone=Asia/Shanghai&autoReconnect=true&allowMultiQueries=true
      username: root
      password: Abc@1234
      initialSize: 5
      maxActive: 200
      minIdle: 5
      maxWait: 60000
      timeBetweenEvictionRunsMillis: 60000
      testWhileIdle: true
      testOnBorrow: false
      testOnReturn: false
      poolPreparedStatements: true
      asyncInit: true
    base:
      driverClassName: com.mysql.cj.jdbc.Driver
      type: com.alibaba.druid.pool.DruidDataSource
      url: jdbc:mysql://192.168.0.121:3307/demo_base?useSSL=false&allowPublicKeyRetrieval=true&useServerPrepStmts=true&cachePrepStmts=true&useUnicode=true&characterEncoding=utf8&serverTimezone=Asia/Shanghai&autoReconnect=true&allowMultiQueries=true
      username: root
      password: Abc@1234
      initialSize: 5
      maxActive: 200
      minIdle: 5
      maxWait: 60000
      timeBetweenEvictionRunsMillis: 60000
      testWhileIdle: true
      testOnBorrow: false
      testOnReturn: false
      poolPreparedStatements: true
      asyncInit: true

3.3 zk

  zookeeper:
    zkConnectString: 192.168.0.121:2182 #改成docker安装的宿主机IP
    zkSessionTimeout: 60000
    rootPath: /demo

3.4 mq

适应于5.0及5.0之后的版本

spring:
  application:
    name: pamirs-designer
  rocketmq:
    name-server: 192.168.0.121:9876 #改成docker安装的宿主机IP

3.5 sql-records监听文件夹路径修改(可不修改,默认为项目目录)

  record:
    sql:
      # 改成自己本地路径,比如d:/sql-records
      store: /opt/pamirs/logs/sql-records

4. IDEA 配置

4.1 设置maven的setting.xml

低代码示例工程oinone-example启动说明

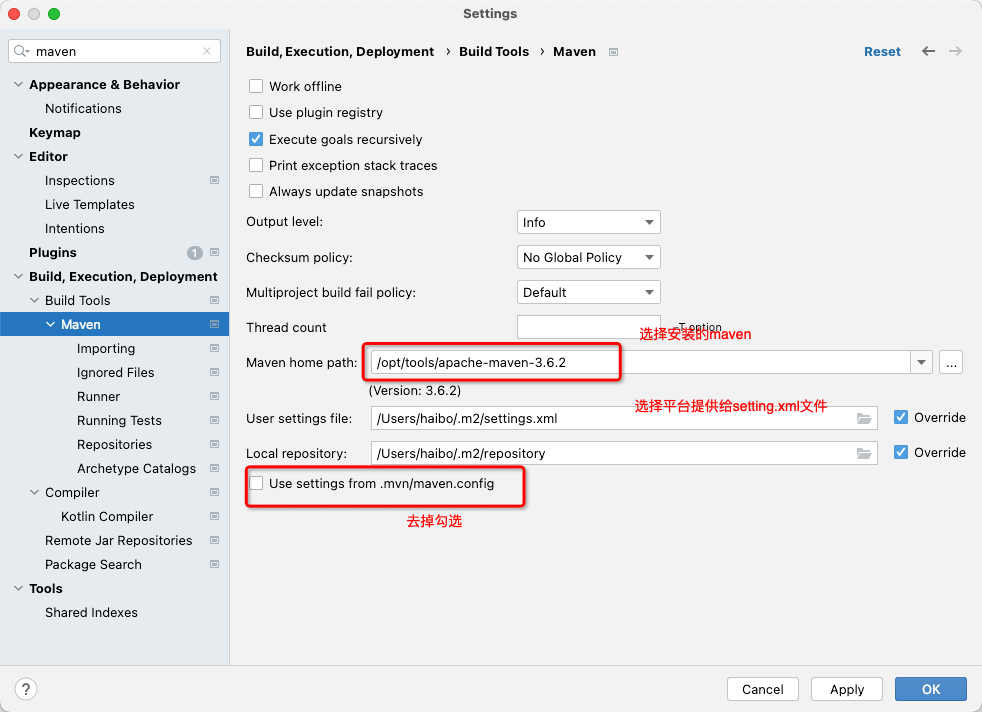
如maven的版本为3.8.x,在 settings.xml 中通过配置 mirror 禁用了不安全的 http 链接,默认情况下必须使用 https 的仓库地址。

想要使用 http 方式,需要禁用 settings.xml 中的如下配置:

    <mirrors>
        <mirror>
            <id>maven-default-http-blocker</id>
            <mirrorOf>external:http:*</mirrorOf>
            <name>Pseudo repository to mirror external repositories initially using HTTP.</name>
            <url>http://0.0.0.0/</url>
            <blocked>true</blocked>
        </mirror>
    </mirrors>

4.2 设置编译参数

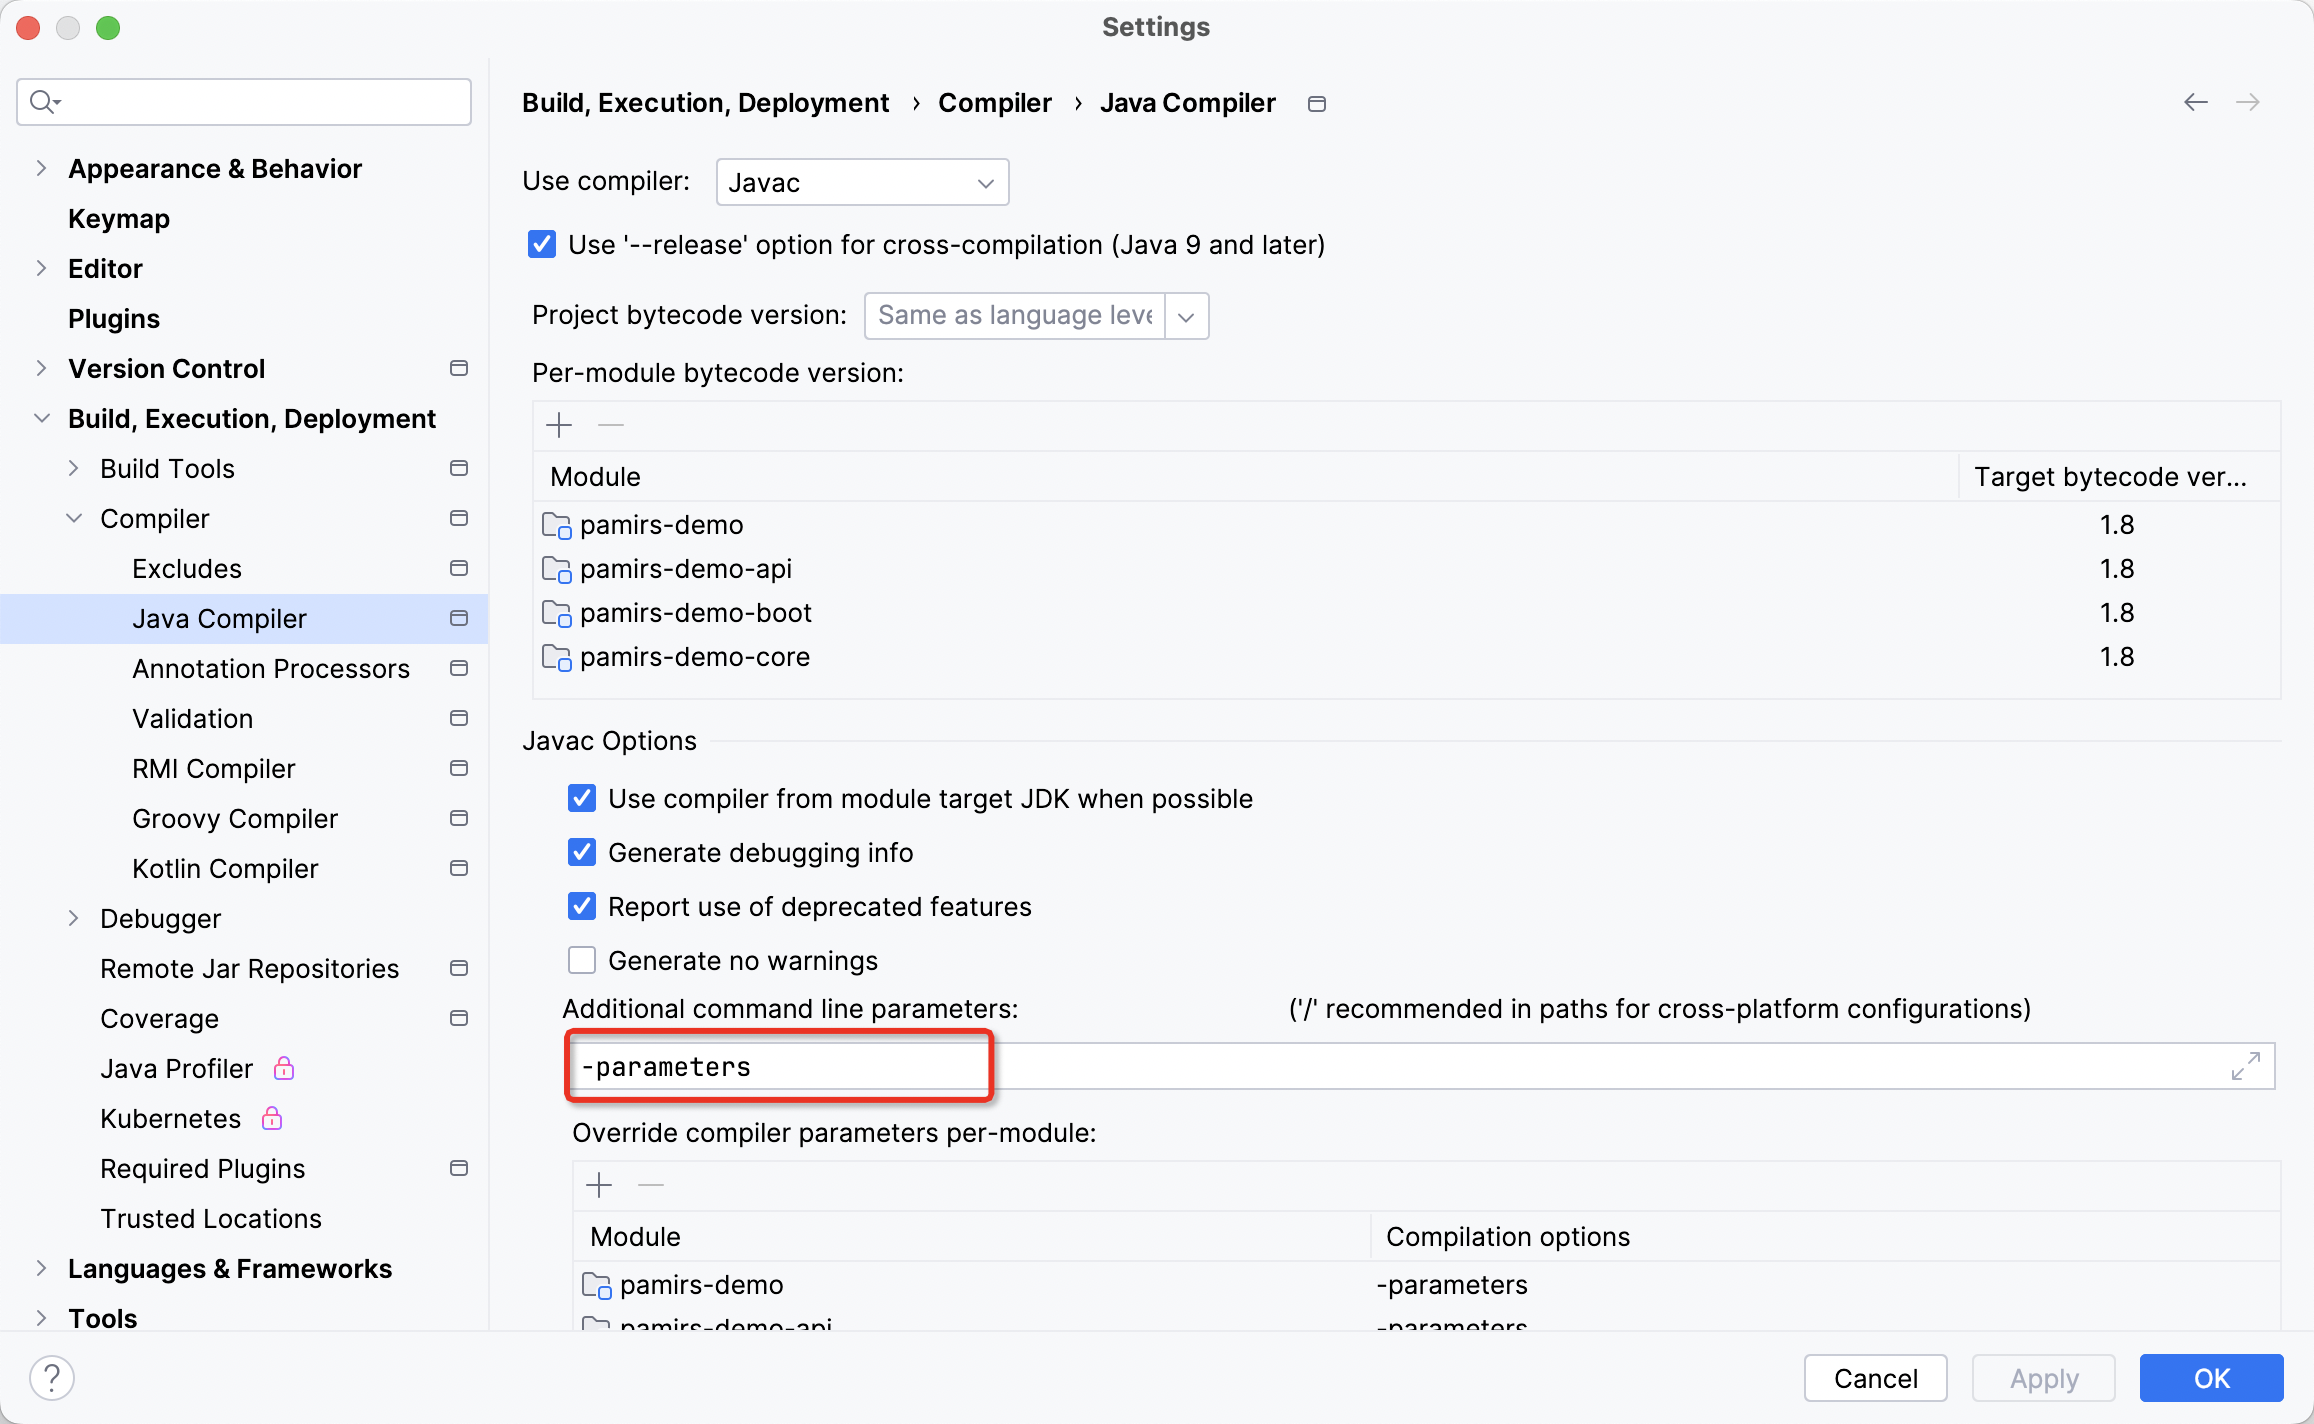
配置Java Complier为 -parameters

低代码示例工程oinone-example启动说明

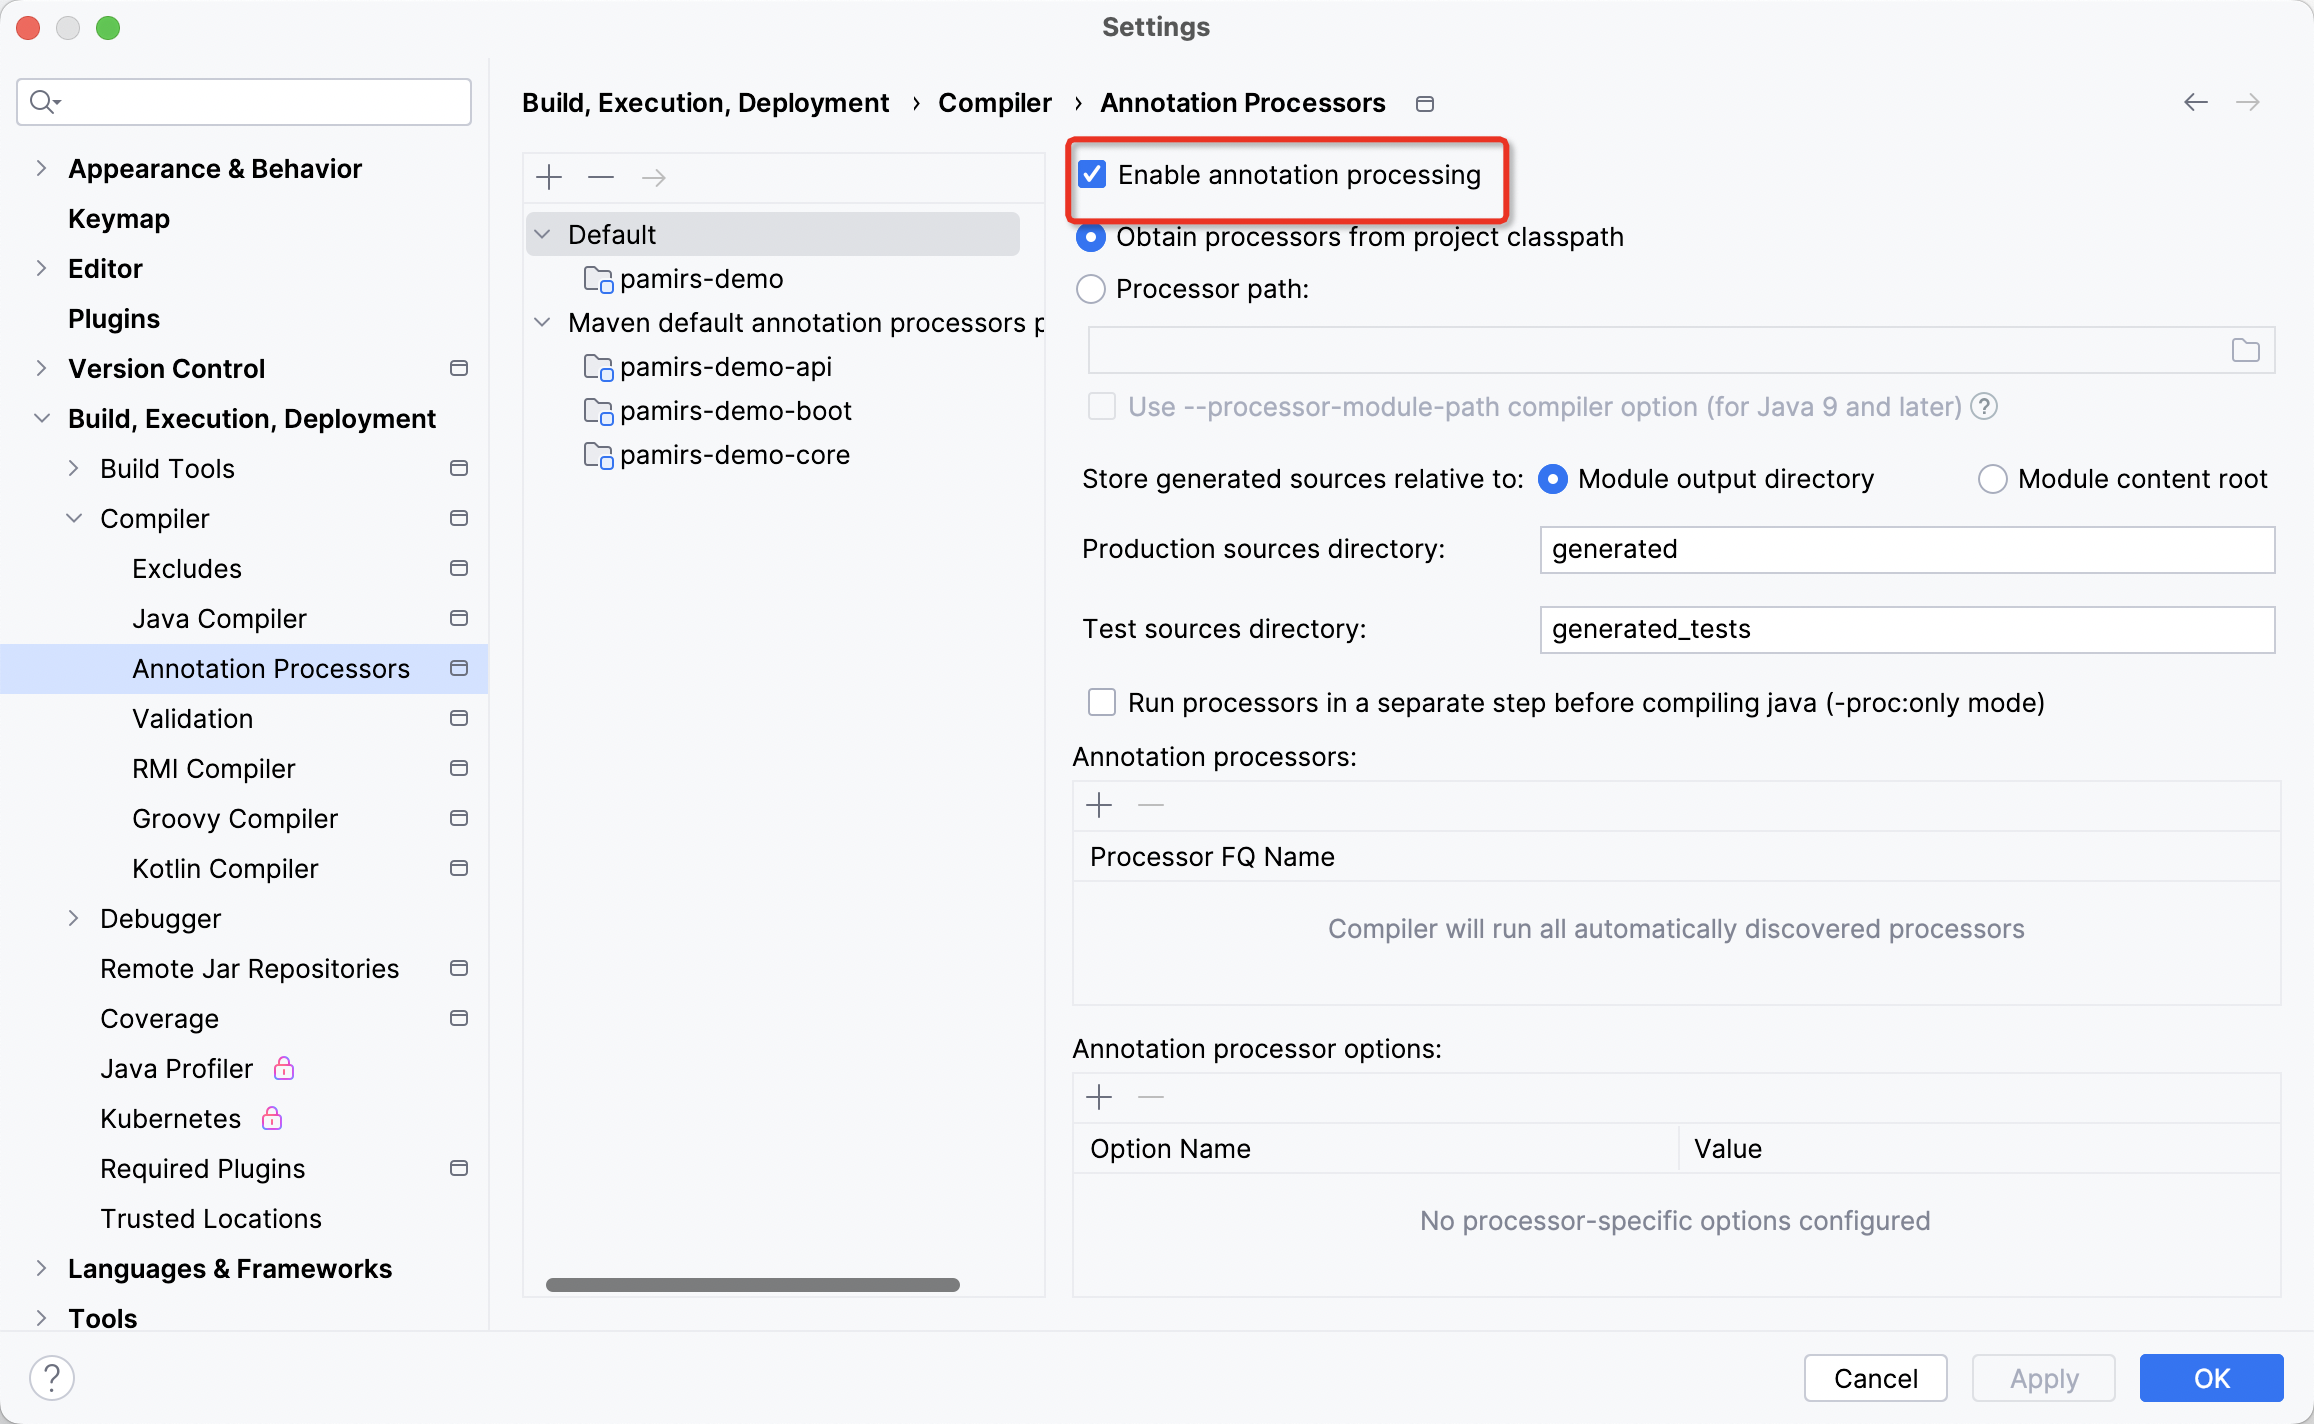
配置Annotation Proccessors勾选Enable nanotation processing

低代码示例工程oinone-example启动说明

4.3

数式Oinone低代码-后端初始化工程启动
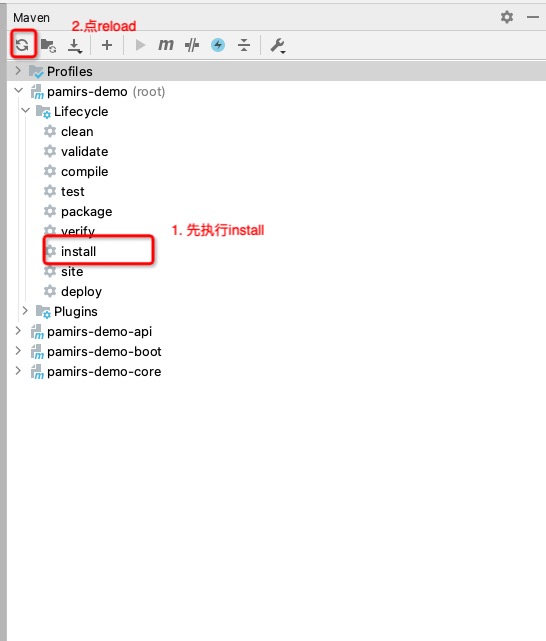
编译maven 拉取包

执行maven install 然后再reload,完成以后点启动成功

低代码示例工程oinone-example启动说明

启动项目

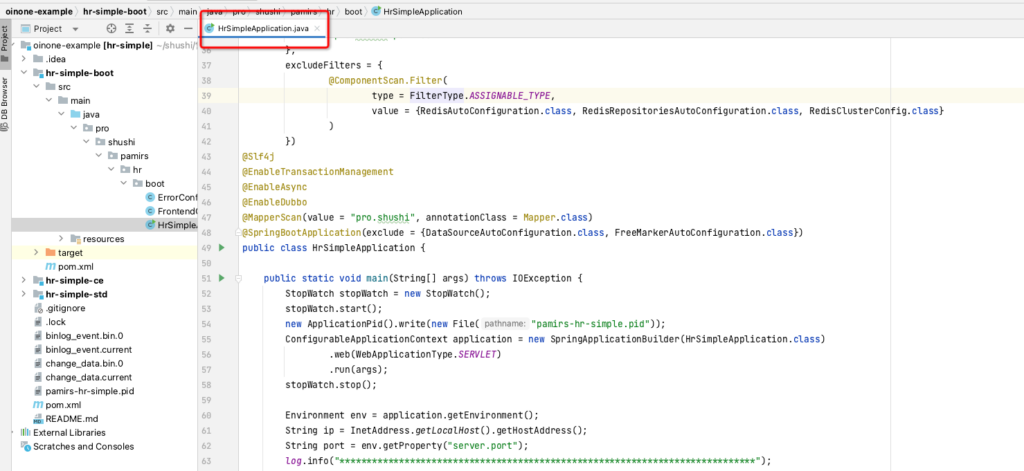
如找不到启动类,可以图中所示找到ProjectApplication在图中位置右键编辑启动类配置

低代码示例工程oinone-example启动说明

5. 启动成功

如出现一下报错,直接点击 【JAR manifest】 即可

低代码示例工程oinone-example启动说明

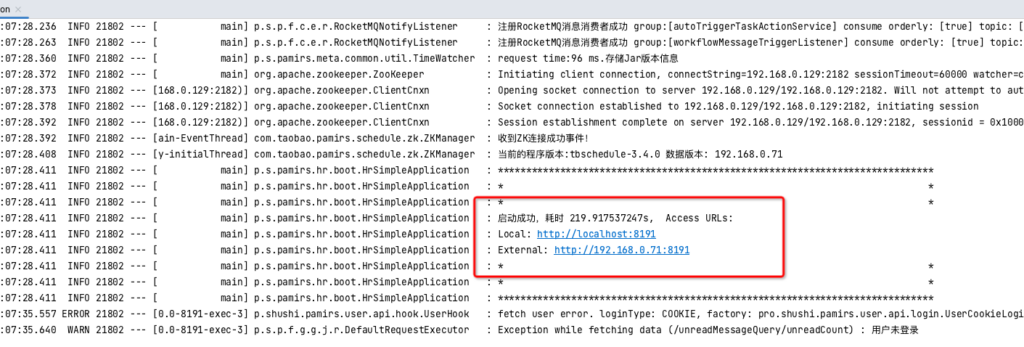
出现如下字样,Oinone后端就启动好了!可以直接点击链接就可以访问了。

低代码示例工程oinone-example启动说明

Oinone社区 作者:数式-海波原创文章,如若转载,请注明出处:https://doc.oinone.top/install/backendinstall/4519.html

访问Oinone官网:https://www.oinone.top获取数式Oinone低代码应用平台体验

(0)
数式-海波的头像数式-海波数式管理员
上一篇 2023年11月10日 am11:10
下一篇 2023年11月13日 pm3:10

相关推荐

  • 【PostgreSQL】后端部署使用PostgreSQL数据库

    PostgreSQL数据库配置 驱动配置 Maven配置(14.3版本可用) <postgresql.version>42.6.0</postgresql.version> <dependency> <groupId>org.postgresql</groupId> <artifactId>postgresql</artifactId> <version>${postgresql.version}</version> </dependency> 离线驱动下载 postgresql-42.2.18.jarpostgresql-42.6.0.jarpostgresql-42.7.3.jar JDBC连接配置 pamirs: datasource: base: type: com.alibaba.druid.pool.DruidDataSource driverClassName: org.postgresql.Driver url: jdbc:postgresql://127.0.0.1:5432/pamirs?currentSchema=base username: xxxxxx password: xxxxxx 连接url配置 暂无官方资料 url格式 jdbc:postgresql://${host}:${port}/${database}?currentSchema=${schema} 在jdbc连接配置时,${database}和${schema}必须完整配置,不可缺省。 其他连接参数如需配置,可自行查阅相关资料进行调优。 方言配置 pamirs方言配置 pamirs: dialect: ds: base: type: PostgreSQL version: 14 major-version: 14.3 pamirs: type: PostgreSQL version: 14 major-version: 14.3 数据库版本 type version majorVersion 14.x PostgreSQL 14 14.3 PS:由于方言开发环境为14.3版本,其他类似版本(14.x)原则上不会出现太大差异,如出现其他版本无法正常支持的,可在文档下方留言。 schedule方言配置 pamirs: event: enabled: true schedule: enabled: true dialect: type: PostgreSQL version: 14 major-version: 14.3 type version majorVersion PostgreSQL 14 14.3 PS:由于schedule的方言在多个版本中并无明显差异,目前仅提供一种方言配置。 其他配置 逻辑删除的值配置 pamirs: mapper: global: table-info: logic-delete-value: (EXTRACT(epoch FROM CURRENT_TIMESTAMP) * 1000000 + EXTRACT(MICROSECONDS FROM CURRENT_TIMESTAMP))::bigint PostgreSQL数据库用户初始化及授权 — init root user (user name can be modified by oneself) CREATE USER root WITH PASSWORD 'password'; — if using automatic database and schema creation, this is very important. ALTER USER root CREATEDB; SELECT * FROM pg_roles; — if using postgres database, this authorization is required. GRANT CREATE ON DATABASE postgres TO root;

    2023年11月1日
    89800
  • Oinone设计器部署参数说明

    概述 Oinone提供两种设计器部署方式,合作伙伴可以自行选择适合自己的部署方式。 Docker配置参数 环境变量 ARG_ENV:指定spring.profiles.active(默认:dev) ARG_LIFECYCLE:指定-Plifecycle(默认:INSTALL) JVM_OPTIONS:jvm参数 PROGRAM_ARGS:程序参数 JVM_OPTIONS和PROGRAM_ARGS参数说明 java [JVM_OPTIONS?] -jar boot.jar [PROGRAM_ARGS?] 端口说明 PS:以下为目前设计器镜像的全部端口,不同类型镜像的端口由于内置服务不同,使用的端口数量不同,但端口号是完全一致的。 80:前端服务端口(设计器访问入口) 8091:后端服务端口 8093:后端EIP服务端口 20880:Dubbo端口 3306:内置MySQL端口 2181:内置Zookeeper端口 6379:内置Redis端口 9876/10991:内置RocketMQ端口 9999:内置本地OSS默认端口 挂载目录说明(挂载虚拟卷) /opt/pamirs为镜像的工作目录,所有挂载目录均在该目录下。 /opt/pamirs/ext:应用配置文件目录;包含application.yml、logback.xml、license.lic等配置文件 /opt/pamirs/nginx/vhost:Nginx配置文件目录 /opt/pamirs/logs:后端服务日志目录 /opt/mq/conf/broker.conf:RocketMQ的broker配置文件 /opt/pamirs/outlib:非设计器内置包的外部加载目录(外部库),可以添加任何jar包集成到设计器中。 /opt/pamirs/dist:前端服务目录 /opt/pamirs/static:前端静态文件目录;LOCAL类型的OSS上传和下载目录; docker run启动常用参数 -e:指定环境变量 -p:指定端口映射 -v:指定挂载目录(挂载虚拟卷) docker run [OPTIONS] IMAGE [COMMAND] [ARG…] docker compose启动常用配置 services: container: image: $IMAGE container_name: $CONTAINER_NAME restart: always # docker run -e environment: KEY1: VALUE1 KEY2: VALUE2 … # docker run -p ports: – $machinePort1:$containerPort1 – $machinePort2:$containerPort2 … # docker run -v volumes: – $machinePath1:$containerPath1 – $machinePath2:$containerPath2 … docker compose常用命令 # 使用docker-compose.yaml启动 docker compose up -d # 使用docker-compose.yaml停止并删除容器 docker compose down -v # 指定配置文件启动 docker compose -f config.yaml up -d # 指定配置文件停止并删除容器 docker compose -f config.yaml down -v JAR包方式启动 下载Oinone专属启动器 oinone-boot-starter.zip 启动命令变化 # 原命令 java -jar boot.jar # 变更后命令 boot-starter java -jar boot.jar PS:更多命令可查看后端无代码设计器Jar包启动方法

    2024年11月4日
    1.1K00
  • 如何解决界面设计器保存提示:元数据不存在或已删除

    现象 界面设计器设计页面的时候,从左侧边栏模型下拖入了一个字段到页面,保存的时候提示:元数据不存在或已删除 原因 共base库不共元数据缓存redis导致的,不共redis的情况下,每次本地新增或修改元数据(如:字段、方法)启动后会同步本地redis,再去线上启动的时候,由于元数据已经在本地写入到了base库,所以该次启动不会触发redis差量更新 解决方案 通过将boot工程application.yml以下配置,让redis全量刷新元数据缓存 pamirs: distribution: session: allMetaRefresh: true 扩展 这个方法只能解决新增或修改元数据,如果出现了删除元数据的话,改为true也不行,清空或者手动删除问题redis的key都可以

    2024年7月21日
    95600
  • 【OceanBase】后端部署使用 OceanBase 数据库(海扬/OB)

    OceanBase 数据库配置 驱动配置 Maven配置(4.2.5.3版本可用) <oceanbase.version>2.4.14</oceanbase.version> <dependency> <groupId>com.oceanbase</groupId> <artifactId>oceanbase-client</artifactId> <version>${oceanbase.version}</version> </dependency> PS: oceanbase 驱动必须使用 2.4.5 版本或以上,低于此版本的驱动无法使用自增ID功能,无法正常启动。点击查看官方JDBC版本发布记录 JDBC连接配置 OceanBase – Oracle 版 pamirs: datasource: base: type: com.alibaba.druid.pool.DruidDataSource driverClassName: com.alipay.oceanbase.jdbc.Driver url: jdbc:oceanbase://10.xxx.xxx.xxx:1001/BASE?useServerPrepStmts=true&useOraclePrepareExecute=true&defaultFetchSize=4096 username: xxxxxx password: xxxxxx validConnectionCheckerClassName: com.alibaba.druid.pool.vendor.OracleValidConnectionChecker validationQuery: SELECT 1 FROM DUAL OceanBase – MySQL 版 pamirs: datasource: base: type: com.alibaba.druid.pool.DruidDataSource driverClassName: com.alipay.oceanbase.jdbc.Driver url: jdbc:oceanbase://10.xxx.xxx.xxx:1001/base username: xxxxxx password: xxxxxx 连接 URL 配置 点击查看官方JDBC连接配置说明 URL 格式(OceanBase – Oracle 版) jdbc:oceanbase://${host}:${port}/${database}?useServerPrepStmts=true&useOraclePrepareExecute=true&defaultFetchSize=4096 在jdbc连接配置时,useServerPrepStmts=true&useOraclePrepareExecute=true 必须配置,否则自增主键无法正常使用。 defaultFetchSize=4096 意味着在使用服务端预处理时,游标每次获取的结果集行数,驱动默认值为 10,在进行大量数据获取时会出现卡顿的现象,因此推荐使用 4096 作为其结果集大小。过大可能会导致 OOM,过小可能还是会出现卡顿,该值需要按实际情况进行配置。 其他连接参数如需配置,可自行查阅相关资料进行调优。 方言配置(OceanBase – Oracle 版) PS:OceanBase – MySQL 版无需配置方言,只需修改数据库连接即可正常使用。 pamirs方言配置 pamirs: dialect: ds: base: type: OceanBase version: 4.2.5.3 major-version: oracle-4.2 pamirs: type: OceanBase version: 4.2.5.3 major-version: oracle-4.2 plus: configuration: jdbc-type-for-null: "NULL" using-model-as-property: true using-statement-handler-dialect: true mapper: batch: collectionCommit default-batch-config: read: 500 write: 100 数据库版本 type version majorVersion 4.2.5.3 OceanBase 4.2.5.3 oracle-4.2 PS:由于方言开发环境为4.2.5.3版本,其他类似版本(4.x)原则上不会出现太大差异,如出现其他版本无法正常支持的,可在文档下方留言。 schedule方言配置 pamirs: event: enabled: true schedule: enabled: true dialect: type: Oracle version: 12.2 major-version: 12c type version majorVersion Oracle 12.2 12c PS:由于 schedule 的方言与 Oracle 数据库并无明显差异,OceanBase 数据库可以直接使用 Oracle 数据库方言。 其他配置(OceanBase – Oracle 版) 逻辑删除的值配置 pamirs: mapper: global: table-info: logic-delete-value: (CAST(SYSTIMESTAMP AS DATE) – TO_DATE('1970-01-01 08:00:00', 'YYYY-MM-DD HH24:MI:SS')) * 8640000000000

    2025年7月21日
    53800
  • nginx如何配置后端服务的负载均衡

    要在Nginx中实现对同一套服务部署两遍并且按比例分配请求,你可以利用Nginx的负载均衡功能。具体做法如下: 步骤 1: 配置 upstream 首先,在Nginx的配置文件(通常是/etc/nginx/nginx.conf或/etc/nginx/sites-available/default,具体路径可能因系统而异)中定义一个upstream块,列出你的两个服务实例。这里假设你的两个服务实例运行在相同的主机上,但监听不同的端口,例如8080和8081。 http { upstream backend { server 192.168.1.100:8091 weight=1; server 192.168.1.101:8091 weight=1; } # … } 在这个例子中,weight=1表示两个服务实例具有相同的权重,Nginx会尽量以1:1的比例分配请求给这两个实例。 步骤 2: 配置 location 或 server 块 接着,在配置文件中找到或添加一个server块,然后在其中的location指令内指定使用刚刚定义的upstream。 server { listen 80; server_name your.domain.com; location / { proxy_pass http://backend; proxy_set_header Host $host; proxy_set_header X-Real-IP $remote_addr; proxy_set_header X-Forwarded-For $proxy_add_x_forwarded_for; } } 这里的proxy_pass http://backend;告诉Nginx将请求转发到名为backend的upstream定义的服务器列表中。 步骤 3: 重启Nginx 最后,保存配置文件并重启Nginx以使更改生效。 sudo nginx -t # 先测试配置是否正确 sudo systemctl restart nginx # 或者 service nginx restart,取决于你的系统 注意事项 确保你的两个服务实例是完全独立且状态同步的,以避免数据不一致或服务故障。 使用weight参数可以调整分配策略,如果你想改变分配比例,可以通过修改weight值来实现。 考虑到高可用性,还可以配置max_fails和fail_timeout等参数来处理失败的后端连接。

    2024年6月5日
    1.2K00

Leave a Reply

登录后才能评论