模型定义在数据库中的映射

模型定义在数据库中的映射

Oinone中通过定义模型来建立数据表,使用注解的方式来使多张表之间的关联。

  1. 数据库字段与模型定义字段映射

    模型定义在数据库中的映射

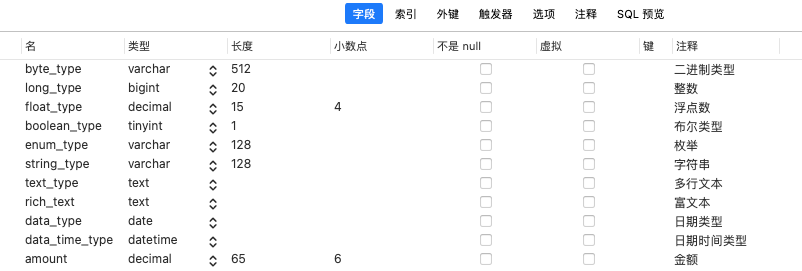
    package pro.shushi.pamirs.top.api.model;
    
    import pro.shushi.pamirs.core.common.enmu.DataStatusEnum;
    import pro.shushi.pamirs.meta.annotation.Field;
    import pro.shushi.pamirs.meta.annotation.Model;
    import pro.shushi.pamirs.meta.base.IdModel;
    import pro.shushi.pamirs.meta.enmu.DateFormatEnum;
    import pro.shushi.pamirs.meta.enmu.DateTypeEnum;
    import pro.shushi.pamirs.meta.enmu.MimeTypeEnum;
    
    import java.math.BigDecimal;
    import java.util.Date;
    
    @Model.model(PamirsDemo.MODEL_MODEL)
    @Model(displayName = "PamirsDemo")
    public class PamirsDemo extends IdModel {
    
       public static final String MODEL_MODEL = "top.PamirsDemo";
    
       @Field.Binary(mime = MimeTypeEnum.html)
       @Field(displayName = "二进制类型")
       private Byte[] byteType;
    
       @Field.Integer
       @Field(displayName = "整数")
       private Long longType;
    
       @Field.Float
       @Field(displayName = "浮点数")
       private BigDecimal floatType;
    
       @Field.Boolean
       @Field(displayName = "布尔类型")
       private Boolean booleanType;
    
       @Field.Enum
       @Field(displayName = "枚举")
       private DataStatusEnum enumType;
    
       @Field.String
       @Field(displayName = "字符串")
       private String stringType;
    
       @Field.Text
       @Field(displayName = "多行文本")
       private String textType;
    
       @Field.Html
       @Field(displayName = "富文本")
       private String richText;
    
       @Field.Date(type = DateTypeEnum.DATE, format = DateFormatEnum.DATE)
       @Field(displayName = "日期类型")
       private Date dataType;
    
       @Field.Date(type = DateTypeEnum.DATETIME, format = DateFormatEnum.DATETIME)
       @Field(displayName = "日期时间类型")
       private Date dataTimeType;
    
       @Field.Money
       @Field(displayName = "金额")
       private BigDecimal amount;
    }
    

    更多字段基础请参考文档字段基础与复合

  2. 多对一的关系映射

    例:设计一张教师表,一张科目表,教师表对科目表属于多对一的关系,在教师表中使用科目id管理关联关系。

    教师表teacher

    模型定义在数据库中的映射

    科目表professional

    模型定义在数据库中的映射


    那么在Oinone的模型定义中,这两张表定义是这样的;

    教师模型

    package pro.shushi.pamirs.top.api.model;
    
    import pro.shushi.pamirs.meta.annotation.Field;
    import pro.shushi.pamirs.meta.annotation.Model;
    import pro.shushi.pamirs.meta.base.IdModel;
    
    @Model.model(Teacher.MODEL_MODEL)
    @Model(displayName = "教师", summary = "教师")
    public class Teacher extends IdModel {
    
       public static final String MODEL_MODEL = "top.Teacher";
    
       @Field.String
       @Field(displayName = "教师名字")
       private String teacherName;
    
       @Field.Integer
       @Field(displayName = "科目id")
       private Long professionalId;
    
       @Field(displayName = "关联科目")
       @Field.many2one
       @Field.Relation(relationFields = {"professionalId"},referenceFields = {"id"})
       private Professional professional;
    }
    

    该模型创建的数据库如下:

    模型定义在数据库中的映射

    科目模型

    package pro.shushi.pamirs.top.api.model;
    
    import pro.shushi.pamirs.meta.annotation.Field;
    import pro.shushi.pamirs.meta.annotation.Model;
    import pro.shushi.pamirs.meta.base.IdModel;
    
    import java.util.List;
    
    @Model.model(Professional.MODEL_MODEL)
    @Model(displayName = "科目", summary = "科目")
    public class Professional extends IdModel {
    
       public static final String MODEL_MODEL = "top.Professional";
    
       @Field.String
       @Field(displayName = "科目名称")
       private String professionalName;
    
    }

    该模型创建的数据库如下:

    模型定义在数据库中的映射

    使用@Field.many2one注解管理教师与科目的多对一关系,在表操作时会自动维护关联关系。如果业务上是一对一的关系,在模型定义中建议使用多对一进行关联。

  3. 一对多的关系映射

    例:设计一张学生表,一张科目表,学生表对科目表属于一对多的关系,在科目表里使用学生ID与学生表进行关联。

    学生表student
    模型定义在数据库中的映射
    科目表professional
    模型定义在数据库中的映射


    那么在Oinone的模型定义中,这两张表定义是这样的;
    学生模型

    package pro.shushi.pamirs.top.api.model;
    import pro.shushi.pamirs.meta.annotation.Field;
    import pro.shushi.pamirs.meta.annotation.Model;
    import pro.shushi.pamirs.meta.base.IdModel;
    @Model.model(Student.MODEL_MODEL)
    @Model(displayName = "学生", summary = "学生")
    public class Student extends IdModel {
    
        public static final String MODEL_MODEL = "top.Student";
    
        @Field(displayName = "学生名字")
        @Field.String
        private String studentName;
    
        @Field(displayName = "学生ID")
        @Field.Integer
        private Long studentId;
    }
    

    该模型创建的数据库如下:
    模型定义在数据库中的映射

    科目模型

     package pro.shushi.pamirs.top.api.model;
    
     import pro.shushi.pamirs.meta.annotation.Field;
     import pro.shushi.pamirs.meta.annotation.Model;
     import pro.shushi.pamirs.meta.base.IdModel;
    
     import java.util.List;
    
     @Model.model(Professional.MODEL_MODEL)
     @Model(displayName = "科目", summary = "科目")
     public class Professional extends IdModel {
    
     public static final String MODEL_MODEL = "top.Professional";
    
         @Field.String
        @Field(displayName = "科目名称")
        private String professionalName;
    
        @Field(displayName = "关联学生")
        @Field.one2many
        @Field.Relation(relationFields = {"id"},referenceFields = {"studentId"})
        private List<Student> studentList;
    }

    在科目模型中建立@Field.one2many来管理学生和科目的关联关系。该模型创建的数据库如下:
    模型定义在数据库中的映射

  4. 多对多关系的关系映射

    例:设计一张教师表,一张学生表,教师表对学生表属于多对多的关系,使用中间表管理教师和学生的关联关系。

    教师表teacher

    模型定义在数据库中的映射

    学生表student

    模型定义在数据库中的映射

    教师学生中间表teacher_rel_student

    模型定义在数据库中的映射


    那么在Oinone的模型定义中,多对多关系是这样定义的;

    教师模型

    package pro.shushi.pamirs.top.api.model;
    
    import pro.shushi.pamirs.meta.annotation.Field;
    import pro.shushi.pamirs.meta.annotation.Model;
    import pro.shushi.pamirs.meta.base.IdModel;
    
    import java.util.List;
    
    @Model.model(Teacher.MODEL_MODEL)
    @Model(displayName = "教师", summary = "教师")
    public class Teacher extends IdModel {
    
       public static final String MODEL_MODEL = "top.Teacher";
    
       @Field.String
       @Field(displayName = "教师名字")
       private String teacherName;
    
       @Field(displayName = "教师关联学生")
       @Field.many2many(through = TeacherRelStudent.MODEL_MODEL, relationFields = {"teacherId"}, referenceFields = {"studentId"})
       @Field.Relation(relationFields = {"id"}, referenceFields = {"id"})
       private List<Student> studentList;
    }

    该模型创建的数据库如下:

    模型定义在数据库中的映射

    学生模型

    package pro.shushi.pamirs.top.api.model;
    
    import pro.shushi.pamirs.meta.annotation.Field;
    import pro.shushi.pamirs.meta.annotation.Model;
    import pro.shushi.pamirs.meta.base.IdModel;
    
    @Model.model(Student.MODEL_MODEL)
    @Model(displayName = "学生", summary = "学生")
    public class Student extends IdModel {
    
       public static final String MODEL_MODEL = "top.Student";
    
       @Field(displayName = "学生名字")
       @Field.String
       private String studentName;
    }

    该模型创建的数据库如下:

    模型定义在数据库中的映射

    教师学生关系模型

    package pro.shushi.pamirs.top.api.model;
    
    import pro.shushi.pamirs.meta.annotation.Field;
    import pro.shushi.pamirs.meta.annotation.Model;
    import pro.shushi.pamirs.meta.base.BaseRelation;
    
    @Model.model(TeacherRelStudent.MODEL_MODEL)
    @Model(displayName = "教师学生关系表", summary = "教师学生关系表")
    public class TeacherRelStudent extends BaseRelation {
    
       public static final String MODEL_MODEL = "top.TeacherRelStudent";
    
       @Field.Integer
       @Field(displayName = "教师ID")
       private Long teacherId;
    
       @Field.Integer
       @Field(displayName = "学生ID")
       private Long studentId;
    }

    该模型创建的数据库如下:

    模型定义在数据库中的映射

    使用@Field.many2many注解以及中间管理关联关系,在表操作时自动维护关联关系。

Oinone社区 作者:yexiu原创文章,如若转载,请注明出处:https://doc.oinone.top/dai-ma-shi-jian/16109.html

访问Oinone官网:https://www.oinone.top获取数式Oinone低代码应用平台体验

(1)
yexiu的头像yexiu数式员工
上一篇 2024年8月16日 pm4:24
下一篇 2024年8月17日 pm3:50

相关推荐

  • 如何使用位运算的数据字典

    场景举例 日常有很多项目,数据库中都有表示“多选状态标识”的字段。在这里用我们项目中的一个例子进行说明一下: 示例一: 表示某个商家是否支持多种会员卡打折(如有金卡、银卡、其他卡等),项目中的以往的做法是:在每条商家记录中为每种会员卡建立一个标志位字段。如图: 用多字段来表示“多选标识”存在一定的缺点:首先这种设置方式很明显不符合数据库设计第一范式,增加了数据冗余和存储空间。再者,当业务发生变化时,不利于灵活调整。比如,增加了一种新的会员卡类型时,需要在数据表中增加一个新的字段,以适应需求的变化。  – 改进设计:标签位flag设计二进制的“位”本来就有表示状态的作用。可以用各个位来分别表示不同种类的会员卡打折支持:这样,“MEMBERCARD”字段仍采用整型。当某个商家支持金卡打折时,则保存“1(0001)”,支持银卡时,则保存“2(0010)”,两种都支持,则保存“3(0011)”。其他类似。表结构如图: 我们在编写SQL语句时,只需要通过“位”的与运算,就能简单的查询出想要数据。通过这样的处理方式既节省存储空间,查询时又简单方便。 //查询支持金卡打折的商家信息:   select * from factory where MEMBERCARD & b'0001'; // 或者:   select * from factory where MEMBERCARD & 1;    // 查询支持银卡打折的商家信息:   select * from factory where MEMBERCARD & b'0010'; // 或者:   select * from factory where MEMBERCARD & 2; 二进制( 位运算)枚举 可以通过@Dict注解设置数据字典的bit属性或者实现BitEnum接口来标识该枚举值为2的次幂。二进制枚举最大的区别在于值的序列化和反序列化方式是不一样的。 位运算的枚举定义示例 import pro.shushi.pamirs.meta.annotation.Dict; import pro.shushi.pamirs.meta.common.enmu.BitEnum; @Dict(dictionary = ClientTypeEnum.DICTIONARY, displayName = "客户端类型枚举", summary = "客户端类型枚举") public enum ClientTypeEnum implements BitEnum { PC(1L, "PC端", "PC端"), MOBILE(1L << 1, "移动端", "移动端"), ; public static final String DICTIONARY = "base.ClientTypeEnum"; private final Long value; private final String displayName; private final String help; ClientTypeEnum(Long value, String displayName, String help) { this.value = value; this.displayName = displayName; this.help = help; } @Override public Long value() { return value; } @Override public String displayName() { return displayName; } @Override public String help() { return help; } } 使用方法示例 API: addTo 和 removeFrom List<ClientTypeEnum> clientTypes = module.getClientTypes(); // addTo ClientTypeEnum.PC.addTo(clientTypes); // removeFrom ClientTypeEnum.PC.removeFrom(clientTypes); 在查询条件中的使用 List<Menu> moduleMenus = new Menu().queryListByWrapper(menuPage, LoaderUtils.authQuery(wrapper).eq(Menu::getClientTypes, ClientTypeEnum.PC));

    2023年11月24日
    1.4K00
  • IWrapper、QueryWrapper和LambdaQueryWrapper使用

    条件更新updateByWrapper 通常我们在更新的时候new一个对象出来在去更新,减少更新的字段 Integer update = new DemoUser().updateByWrapper(new DemoUser().setFirstLogin(Boolean.FALSE), Pops.<DemoUser>lambdaUpdate().from(DemoUser.MODEL_MODEL).eq(IdModel::getId, userId) 使用基础模型的updateById方法更新指定字段的方法: new 一下update对象出来,更新这个对象。 WorkflowUserTask userTaskUp = new WorkflowUserTask(); userTaskUp.setId(userTask.getId()); userTaskUp.setNodeContext(json); userTaskUp.updateById(); 条件删除updateByWrapper public List<T> delete(List<T> data) { List<Long> petTypeIdList = new ArrayList(); for(T item:data){ petTypeIdList.add(item.getId()); } Models.data().deleteByWrapper(Pops.<PetType>lambdaQuery().from(PetType.MODEL_MODEL).in(PetType::getId,petTypeIdList)); return data; } 构造条件查询数据 示例1: LambdaQueryWrapper拼接查询条件 private void queryPetShops() { LambdaQueryWrapper<PetShop> query = Pops.<PetShop>lambdaQuery(); query.from(PetShop.MODEL_MODEL); query.setSortable(Boolean.FALSE); query.orderBy(true, true, PetShop::getId); List<PetShop> petShops2 = new PetShop().queryList(query); System.out.printf(petShops2.size() + ""); } 示例2: IWrapper拼接查询条件 private void queryPetShops() { IWrapper<PetShop> wrapper = Pops.<PetShop>lambdaQuery() .from(PetShop.MODEL_MODEL).eq(PetShop::getId,1L); List<PetShop> petShops4 = new PetShop().queryList(wrapper); System.out.printf(petShops4.size() + ""); } 示例3: QueryWrapper拼接查询条件 private void queryPetShops() { //使用Lambda获取字段名,防止后面改字段名漏改 String nameField = LambdaUtil.fetchFieldName(PetTalent::getName); //使用Lambda获取Clumon名,防止后面改字段名漏改 String nameColumn = PStringUtils.fieldName2Column(nameField); QueryWrapper<PetShop> wrapper2 = new QueryWrapper<PetShop>().from(PetShop.MODEL_MODEL) .eq(nameColumn, "test"); List<PetShop> petShops5 = new PetShop().queryList(wrapper2); System.out.printf(petShops5.size() + ""); } IWrapper转为LambdaQueryWrapper @Function.Advanced(type= FunctionTypeEnum.QUERY) @Function.fun(FunctionConstants.queryPage) @Function(openLevel = {FunctionOpenEnum.API}) public Pagination<PetShopProxy> queryPage(Pagination<PetShopProxy> page, IWrapper<PetShopProxy> queryWrapper) { LambdaQueryWrapper<PetShopProxy> wrapper = ((QueryWrapper<PetShopProxy>) queryWrapper).lambda(); // 非存储字段从QueryData中获取 Map<String, Object> queryData = queryWrapper.getQueryData(); if (null != queryData && !queryData.isEmpty()) { String codes = (String) queryData.get("codes"); if (org.apache.commons.lang3.StringUtils.isNotBlank(codes)) { wrapper.in(PetShopProxy::getCode, codes.split(",")); } } return new PetShopProxy().queryPage(page, wrapper); }

    2024年5月25日
    1.6K00
  • 如何在代码中使用自增ID和获取序列

    在使用继承IDModel或CodeModel时,id和code是系统默认自动生成, 默认值规则:ID–>分布式ID; CODE–>根据定义的SequenceConfig规则自动生成。 在特定情况下需要落库前先生成ID或者Code,这些场景下可参照如下代码示例 一、使用自增ID 单个字段设置方式 // 主键字段,可以使用mysql的自增能力 @Field.Integer @Field.PrimaryKey(keyGenerator = KeyGeneratorEnum.AUTO_INCREMENT) @Field.Advanced(batchStrategy = FieldStrategyEnum.NEVER) @Field(displayName = "id", summary = "Id字段,⾃增") private Long id; @Field.Integer @Field(displayName = "自增版本") @Field.Sequence(sequence = "SEQ", initial = 1) private Long version; 全局设置方式 该方式会作用到每一个存储模型的id字段,在application.yml配置文件中修改id的生成规则,查找配置项关键字key-generator,默认为DISTRIBUTION(分布式id),可修改为 AUTO_INCREMENT(自增id) 二、手动方式获取序列 获取方式示例1 /** * 在特定场景下需要手动生成Id或者code时,可参照这个示例 */ public void manualSetIdCode(){ DemoItem demoItem = new DemoItem(); //手动生成ID和code Object idObj = Spider.getDefaultExtension(IdGenerator.class).generate(PamirsTableInfo.fetchKeyGenerator(DemoItem.MODEL_MODEL)); demoItem.setId(TypeUtils.createLong(idObj)); Object codeObj = CommonApiFactory.getSequenceGenerator().generate("SEQ",DemoItem.MODEL_MODEL); String code = TypeUtils.stringValueOf(codeObj); demoItem.setCode(code); //…… } 获取方式示例2 1、在系统启动的时候初始化SequenceConfig package pro.shushi.pamirs.demo.core.init; import org.springframework.stereotype.Component; import pro.shushi.pamirs.boot.common.api.command.AppLifecycleCommand; import pro.shushi.pamirs.boot.common.extend.MetaDataEditor; import pro.shushi.pamirs.core.common.InitializationUtil; import pro.shushi.pamirs.demo.api.DemoModule; import pro.shushi.pamirs.demo.core.constant.SeqConstants; import pro.shushi.pamirs.meta.annotation.fun.extern.Slf4j; import pro.shushi.pamirs.meta.api.dto.meta.Meta; import pro.shushi.pamirs.meta.enmu.SequenceEnum; import java.util.Map; /** * DemoMetadataEditor */ @Slf4j @Component public class DemoMetadataEditor implements MetaDataEditor { @Override public void edit(AppLifecycleCommand command, Map<String, Meta> metaMap) { InitializationUtil util = InitializationUtil.get(metaMap, DemoModule.MODULE_MODULE, DemoModule.MODULE_NAME); if (util == null) { log.error("获取初始化序列失败"); return; } bizSequence(util); } private void bizSequence(InitializationUtil util) { util.createSequenceConfig("申请单编码生成", SeqConstants.NABEL_SAMPLE_APPLY_SEQ, SequenceEnum.ORDERLY_SEQ, 8) .setStep(1) .setInitial(80000000L) .setIsRandomStep(false); util.createSequenceConfig("订单编码生成", SeqConstants.NABEL_SAMPLE_ORDER_SEQ_YP, SequenceEnum.ORDERLY_SEQ, 8) .setPrefix("YP") .setStep(1) .setInitial(80000000L) .setIsRandomStep(false); } } 2、在代码中使用序列 public static String getSaleOrderCode() { Object sequence = CommonApiFactory.getSequenceGenerator().generate(SequenceEnum.ORDERLY_SEQ.value(), SeqConstants.NABEL_SAMPLE_STRUCTURE_SEQ); return TypeUtils.stringValueOf(sequence); } public static String getApplyOrderCode(String prefix) { Object sequence = CommonApiFactory.getSequenceGenerator().generate(SequenceEnum.ORDERLY_SEQ.value(), SeqConstants.NABEL_SAMPLE_APPLY_SEQ); return…

    2024年5月25日
    1.7K00
  • Excel添加水印功能

    实现ExcelWriteHandlerExtendApi接口从而实现对Excel增加复杂功能的操作。如添加水印。具体实现请自行百度 /** * 根据上下文判断是否执行 * * @param context Excel定义上下文 * @return 是否执行该扩展 */ boolean match(ExcelDefinitionContext context); /** * 构建出一个WriteWorkbook对象,即一个工作簿对象,对应的是一个Excel文件; * * @param builder 可用于设置inMemory=true实现复杂功能(如添加水印) */ default void extendBuilder(ExcelWriterBuilder builder) { } 例:Excel添加水印 本例参考文章:Java使用EasyExcel导出添加水印 实现ExcelWriteHandlerExtendApi接口,并添加@Component注解 添加依赖包 <!– eaysexcel –> <dependency> <groupId>com.alibaba</groupId> <artifactId>easyexcel</artifactId> <version>3.3.2</version> </dependency> <!– poi 添加水印 –> <dependency> <groupId>org.apache.poi</groupId> <artifactId>ooxml-schemas</artifactId> <version>1.4</version> </dependency> <!– 使用了hutool的工具类 –> <dependency> <groupId>cn.hutool</groupId> <artifactId>hutool-all</artifactId> <version>5.8.20</version> </dependency> package pro.shushi.pamirs.top.core.temp; import cn.hutool.core.img.ImgUtil; import com.alibaba.excel.write.builder.ExcelWriterBuilder; import com.alibaba.excel.write.metadata.holder.WriteSheetHolder; import com.alibaba.excel.write.metadata.holder.WriteWorkbookHolder; import org.apache.poi.openxml4j.opc.PackagePartName; import org.apache.poi.openxml4j.opc.PackageRelationship; import org.apache.poi.openxml4j.opc.TargetMode; import org.apache.poi.ss.usermodel.Workbook; import org.apache.poi.xssf.usermodel.XSSFPictureData; import org.apache.poi.xssf.usermodel.XSSFRelation; import org.apache.poi.xssf.usermodel.XSSFSheet; import org.apache.poi.xssf.usermodel.XSSFWorkbook; import org.springframework.stereotype.Component; import pro.shushi.pamirs.file.api.context.ExcelDefinitionContext; import pro.shushi.pamirs.file.api.easyexcel.ExcelWriteHandlerExtendApi; import java.awt.*; import java.awt.image.BufferedImage; @Component public class CustomWaterMarkHandler implements ExcelWriteHandlerExtendApi { private final WaterMark watermark; public CustomWaterMarkHandler() { this.watermark = new WaterMark().setContent("ABC"); } @Override public void extendBuilder(ExcelWriterBuilder builder) { builder.inMemory(true); } @Override public boolean match(ExcelDefinitionContext context) { return DemoTemplate.TEMPLATE_NAME.equals(context.getName()); } @Override public void afterSheetCreate(WriteWorkbookHolder writeWorkbookHolder, WriteSheetHolder writeSheetHolder) { try { BufferedImage bufferedImage = createWatermarkImage(); setWaterMarkToExcel((XSSFWorkbook) writeWorkbookHolder.getWorkbook(), bufferedImage); } catch (Exception e) { throw new RuntimeException("添加水印出错",e); } } private BufferedImage createWatermarkImage() { final Font font = watermark.getFont(); final int width = watermark.getWidth(); final int height = watermark.getHeight(); String[] textArray…

    2024年9月6日
    1.5K00
  • 复杂Excel模版定义

    模版示例: Demo Excel样例 代码示例: @Model.model(TestApply.MODEL_MODEL) @Model(displayName = "测试申请") public class TestApply extends IdModel { public static final String MODEL_MODEL = "top.TestApply"; @Field.String @Field(displayName = "发件人") private String addresser; @Field.String @Field(displayName = "委托单位") private String entrustedUnit; @Field.String @Field(displayName = "付款单位") private String payer; @Field.String @Field(displayName = "付款单位地址") private String paymentUnitAdd; } 模版: package pro.shushi.pamirs.top.core.temp; import org.springframework.stereotype.Component; import pro.shushi.pamirs.file.api.builder.SheetDefinitionBuilder; import pro.shushi.pamirs.file.api.builder.WorkbookDefinitionBuilder; import pro.shushi.pamirs.file.api.enmu.ExcelAnalysisTypeEnum; import pro.shushi.pamirs.file.api.enmu.ExcelDirectionEnum; import pro.shushi.pamirs.file.api.enmu.ExcelHorizontalAlignmentEnum; import pro.shushi.pamirs.file.api.model.ExcelWorkbookDefinition; import pro.shushi.pamirs.file.api.util.ExcelHelper; import pro.shushi.pamirs.file.api.util.ExcelTemplateInit; import pro.shushi.pamirs.top.api.model.TestApply; import java.util.Collections; import java.util.List; @Component public class DemoTemplate implements ExcelTemplateInit { public static final String TEMPLATE_NAME = "DemoTemplate"; @Override public List<ExcelWorkbookDefinition> generator() { WorkbookDefinitionBuilder builder = WorkbookDefinitionBuilder.newInstance(TestApply.MODEL_MODEL, TEMPLATE_NAME) .setDisplayName("测试Demo"); DemoTemplate.createSheet(builder); return Collections.singletonList(builder.build()); } private static void createSheet(WorkbookDefinitionBuilder builder) { SheetDefinitionBuilder sheetBuilder = builder.createSheet().setName("测试Demo"); buildBasicInfo(sheetBuilder); } private static void buildBasicInfo(SheetDefinitionBuilder builder) { //A1:D8:表示表头占的单元格数,范围必须大于实际表头行 BlockDefinitionBuilder mergeRange = builder.createBlock(TestApply.MODEL_MODEL, ExcelAnalysisTypeEnum.FIXED_HEADER, ExcelDirectionEnum.HORIZONTAL, "A1:D8") //预设行 .setPresetNumber(10) //合并哪几个单元格 .createMergeRange("A1:D1") .createMergeRange("A2:D2") .createMergeRange("A3:D3") .createMergeRange("A4:A6") .createMergeRange("B4:B6") .createMergeRange("C4:C6") .createMergeRange("D4:D5"); //createHeader创建行,createCell创建单元格,setField指定解析字段,setIsConfig指定为true标记该行是需要解析的值 mergeRange.createHeader().setStyleBuilder(ExcelHelper.createDefaultStyle()).setIsConfig(Boolean.TRUE) .createCell().setField("addresser").setStyleBuilder(ExcelHelper.createDefaultStyle().setWidth(6000)).and() .createCell().setField("entrustedUnit").and() .createCell().setField("payer").and() .createCell().setField("paymentUnitAdd").and() .and() .createHeader().setStyleBuilder(ExcelHelper.createDefaultStyle(typeface -> typeface.setBold(Boolean.TRUE)).setHorizontalAlignment(ExcelHorizontalAlignmentEnum.CENTER)) .createCell().setValue("Demo").and() .createCell().and() .createCell().and() .createCell().and() .and() //由于该行合并为一个单元格,所以其他可以不设置value .createHeader().setStyleBuilder(ExcelHelper.createDefaultStyle(typeface -> typeface.setBold(Boolean.TRUE)).setHorizontalAlignment(ExcelHorizontalAlignmentEnum.CENTER)) .createCell().setValue("生效金额").and() .createCell().and() .createCell().and() .createCell().and() .and() .createHeader().setStyleBuilder(ExcelHelper.createDefaultStyle(typeface -> typeface.setBold(Boolean.TRUE)).setHorizontalAlignment(ExcelHorizontalAlignmentEnum.RIGHT)) .createCell().setValue("金额单位:元").and() .createCell().and() .createCell().and() .createCell().and() .and() //easyExcel解析不了空行,所以这里写上值。由于上面使用createMergeRange把单元格合并了,并且D列有分割,这里填上每个单元格的值,把合并的单元格填为一样的。 .createHeader().setStyleBuilder(ExcelHelper.createDefaultStyle(typeface -> typeface.setBold(Boolean.TRUE)).setHorizontalAlignment(ExcelHorizontalAlignmentEnum.CENTER)) .createCell().setValue("发件人").and() .createCell().setValue("委托单位").and()…

    2024年11月18日
    2.0K00

Leave a Reply

登录后才能评论