
介绍
在日常的业务中,我们经常需要在多个模型的页面之间跳转,例如从商品的行可以直接点击链接跳转到类目详情,还有查看该订单发起的售后单列表,这里将给大家展示如何在oinone中如何实现这些功能。
方法一、通过界面设计器的无代码能力配置
表格行跳转到表单页/详情页
-
拖入一个跳转动作到表格行,保存动作后,在左侧的动作属性面板底部有个
请求配置,里面的上下文属性就是配置跳转参数的地方,点击添加按钮可以增加一行参数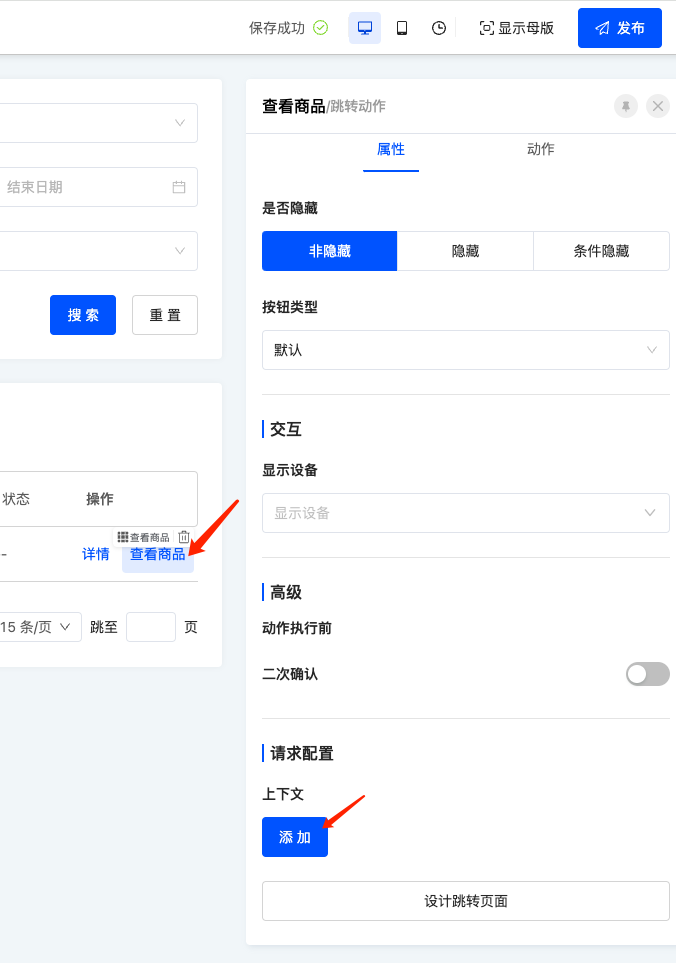

-
点击添加按钮后,可以看到新增了一行,行内有2个输入框,左侧输入框为
目标视图模型的字段,右侧输入框为当前视图模型的表达式
注意 表达式中
activeRecord关键字代表当前行的数据对象
“上下文”相关知识点
- 当前页面的模型和跳转后的页面模型相同的情况下,会字段带上当前行数据的id作为路由参数
上下文是从当前页面跳转到下个页面带的自定义参数上下文会作为跳转后的页面数据加载函数的入参,后端的该函数需要根据该条件查询到数据返回给前端,典型的例子就是编辑页,根据id查询对象的其他字段信息返回- 跳转后页面的数据加载函数可以在动作场景的时候选择加载函数,也可以在页面的加载函数处设置
方法二、通过低代码方式在自定义代码中调用
oinone提供了内置函数executeViewAction实现该功能
import {
  DefaultComparisonOperator,
  executeViewAction,
  QueryExpression,
  RuntimeViewAction,
  ViewActionTarget,
  ViewType
} from '@kunlun/dependencies';

export class JumpActionWidget {

  protected goToObjectView() {
    executeViewAction(
      {
        viewType: ViewType.Form,
        moduleName: 'resource',
        model: 'resource.ResourceCountry',
        name: 'redirectUpdatePage',
        target: ViewActionTarget.Router
      } as RuntimeViewAction,
      undefined,
      undefined,
      {
        // 此处为id参数,目前只有表单和详情页需要
        id: '12223',
        // 此处为上下文参数,context内对象的key是目标页面需要传递的默认值
        context: JSON.stringify({code: 'xxx'}),
        // 此处为跳转后左侧菜单展开选中的配置
        menu: JSON.stringify({"selectedKeys":["国家"],"openKeys":["地址库","地区"]})
      }
    );
  }

  protected goToListView() {
    const searchConditions: QueryExpression[] = [];
    searchConditions.push({
      leftValue: ['countryCode'], // 查询条件的字段
      operator: DefaultComparisonOperator.EQUAL,
      right: 'CN' // 字段的值
    });
    executeViewAction(
      {
        viewType: ViewType.Table,
        moduleName: 'resource',
        model: 'resource.ResourceCity',
        name: 'resource#市',
        target: ViewActionTarget.OpenWindow
      } as RuntimeViewAction,
      undefined,
      undefined,
      {
        // searchConditions相当于domain,不会随页面搜索项重置动作一起被清空
        searchConditions: encodeURIComponent(JSON.stringify(searchConditions)),
        // searchBody的字段会填充搜索区域的字段组件,会随页面搜索项重置动作一起被清空
        searchBody: JSON.stringify({code: 'CN'}),
        menu: JSON.stringify({"selectedKeys":["国家"],"openKeys":["地址库","地区"]})
      }
    );
  }
}
扩展知识点
为什么executeViewAction跳转到的新页面不是入参的moduleName属性对应的模块?
答:跳转后所在的模块优先级为:
- 第一个入参的
resModuleName属性对应的模块 - 执行
executeViewAction时所在的模块 - 第一个入参的
moduleName属性对应的模块
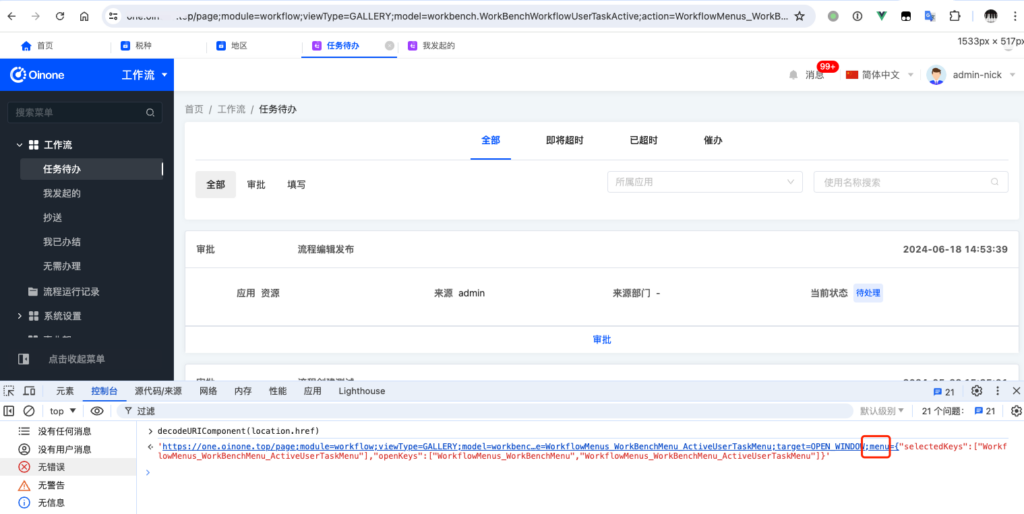
如何快速获取选中菜单的值?
答:先通过页面菜单手动打开页面,然后在浏览器自带调试工具的控制台执行decodeURIComponent(location.href),其中的menu参数就是我们需要的值
Oinone社区 作者:nation原创文章,如若转载,请注明出处:https://doc.oinone.top/frontend/7180.html
访问Oinone官网:https://www.oinone.top获取数式Oinone低代码应用平台体验