如何自定义覆盖内置模块的页面

1.首先通过sql查询找到我们需要的页面,从其中的template字段复制出原视图的配置

通过模型编码modelbase_view查找需要修改的视图

select * from base_view where model='workflow.WorkflowUserTask' and is_deleted = 0;

如何自定义覆盖内置模块的页面

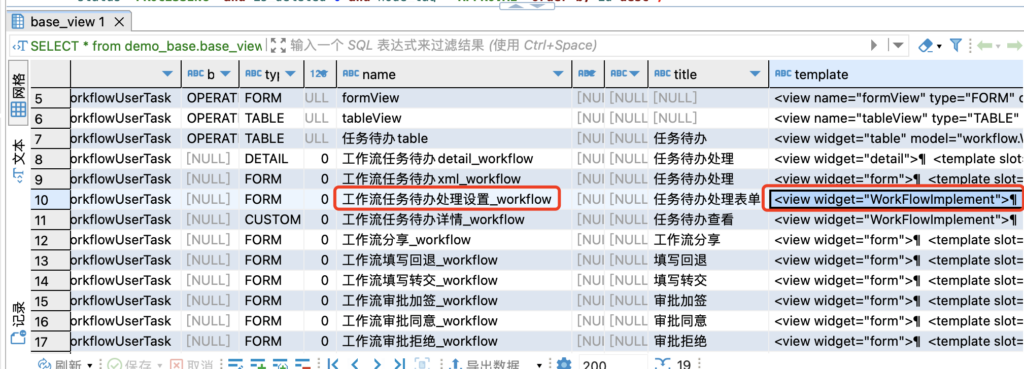
2.将base_view的template内容复制到java的core工程的resources目录下新建一个xml文件,修改里面的动作名称

<view widget="WorkFlowImplement">
  <template slot="actions">
    <action name="$$internal_GotoListTableRouter" priority="1" model="workflow.WorkflowUserTask" tag="contextFreeAction"/>
    <action name="approveStaging" widget="FlowTaskCommonAction" invisible="!(activeRecord.allowStaging)" priority="2" label="新暂存" model="workflow.WorkflowUserTask" displayName="新暂存"/>
    <action name="workflow_agree" invisible="!(activeRecord.allowAgree && activeRecord.status == &apos;ACTIVE&apos;)" priority="3" label="新同意" model="workflow.WorkflowUserTask" load="fetchDetailReadOnly" displayName="新同意" goBack="true" validateForm="true" loadRootData="true"/>
    <action name="workflow_rejust" invisible="!(activeRecord.allowReject && activeRecord.status == &apos;ACTIVE&apos;)" priority="4" label="新拒绝" model="workflow.WorkflowUserTask" displayName="新拒绝" goBack="true" loadRootData="true" tag="contextFreeAction"/>
    <action name="workflow_turnon" invisible="!(activeRecord.taskType == &apos;APPROVE&apos; && activeRecord.allowTransfer && activeRecord.status == &apos;ACTIVE&apos;)" priority="5" label="新转交" model="workflow.WorkflowUserTask" load="fetchDetailReadOnly" displayName="新转交" goBack="true" loadRootData="true" tag="contextFreeAction"/>
    <action name="workflow_addsign" invisible="!(activeRecord.taskType == &apos;APPROVE&apos; && activeRecord.allowAddSign && activeRecord.status == &apos;ACTIVE&apos;)" priority="6" label="新加签" model="workflow.WorkflowUserTask" load="fetchDetailReadOnly" displayName="新加签" goBack="true" loadRootData="true" tag="contextFreeAction"/>
    <action name="workflow_write_fallback" invisible="!(activeRecord.taskType == &apos;WRITE&apos; && activeRecord.allowFallback && activeRecord.status == &apos;ACTIVE&apos;)" priority="7" label="新回退" model="workflow.WorkflowUserTask" displayName="新回退" goBack="true" loadRootData="true" tag="contextFreeAction"/>
    <action name="workflow_sharing" priority="8" label="新分享" model="workflow.WorkflowUserTask" displayName="新分享" goBack="true" loadRootData="true" tag="contextFreeAction"/>
  </template>
  <template slot="fields">
    <field name="remark" widget="TextArea" invisible="activeRecord.taskType != &apos;APPROVE&apos;" priority="8" model="workflow.WorkflowUserTask" data="remark" displayName="意见备注"/>
  </template>
</view>

3.在生命周期的元数据编辑方法内覆盖视图

package pro.shushi.pamirs.demo.core.init;

import org.springframework.core.Ordered;
import org.springframework.core.annotation.Order;
import org.springframework.stereotype.Component;
import pro.shushi.pamirs.boot.common.api.command.AppLifecycleCommand;
import pro.shushi.pamirs.boot.common.extend.MetaDataEditor;
import pro.shushi.pamirs.core.common.InitializationUtil;
import pro.shushi.pamirs.demo.api.DemoModule;
import pro.shushi.pamirs.meta.annotation.fun.extern.Slf4j;
import pro.shushi.pamirs.meta.api.dto.meta.Meta;
import pro.shushi.pamirs.meta.enmu.ViewTypeEnum;
import pro.shushi.pamirs.workflow.app.api.model.WorkflowUserTask;

import java.util.Map;

@Slf4j
@Component
@Order(Ordered.LOWEST_PRECEDENCE)
public class DemoModuleMetaInstall implements MetaDataEditor {

    @Override
    public void edit(AppLifecycleCommand command, Map<String, Meta> metaMap) {
        InitializationUtil util = InitializationUtil.get(metaMap, DemoModule.MODULE_MODULE, DemoModule.MODULE_NAME);
        if (util != null) {
            // 参数按base_view内的数据填写
            util.createView(WorkflowUserTask.MODEL_MODEL, "任务待办处理表单", "工作流任务待办处理设置_workflow", "file:pamirs/workflow_task_todo_form.xml", ViewTypeEnum.FORM, 10, false);
        }
    }
}

Oinone社区 作者:nation原创文章,如若转载,请注明出处:https://doc.oinone.top/backend/14331.html

访问Oinone官网:https://www.oinone.top获取数式Oinone低代码应用平台体验

(0)
nation的头像nation数式员工
上一篇 2024年7月1日 pm7:53
下一篇 2024年7月2日 pm7:42

相关推荐

  • docker status exited(255)

    虚拟机异常退出再启动后,docker run 出现错误: 查看所有容器发现确实存在一个容器,status是 exited(255) docker container ls -all 删除这个容器,命令 docker run 容器id docker rm 56e0  

    2024年11月23日
    88900
  • 如何发送邮箱、手机短信以及设置

    1.邮件发送 1.1 邮件服务设置 1.1.1 方法一:通过yaml文件配置 pamirs: email: smtp: smtpHost: smtp.exmail.qq.com smtpUser: xxx@xxx.com smtpPassword: xxxxxx smtpPort: 465 smtpSecurity: SSL #邮件模块可后续后台自行添加 templates: – name: 邮箱注册邮件 title: '${code}是你此次注册的验证码' body: '<div>Hi ${realname},</div><div>你正在使用验证码注册。</div>' 1.1.2 方法二:工程启动加入初始化设置方法 /** * 初始化邮件模板 */ private void initEmailTemplate(){ EmailSenderSource emailSenderSource = new EmailSenderSource(); emailSenderSource.setName("邮件发送服务"); emailSenderSource.setType(MessageEngineTypeEnum.EMAIL_SEND); //优先级 emailSenderSource.setSequence(10); //发送账号 emailSenderSource.setSmtpUser("xxx@xxx.com"); //发送密码 emailSenderSource.setSmtpPassword("xxxxxx"); //发送服务器地址和端口 emailSenderSource.setSmtpHost("smtp.exmail.qq.com"); emailSenderSource.setSmtpPort(465); //" None: SMTP 对话用明文完成。" + //" TLS (STARTTLS): SMTP对话的开始时要求TLS 加密 (建议)" + //" SSL/TLS: SMTP对话通过专用端口用 SSL/TLS 加密 (默认是: 465)") emailSenderSource.setSmtpSecurity(EmailSendSecurityEnum.SSL); emailSenderSource.setActive(true); emailSenderSource.createOrUpdate(); List<EmailTemplate> templates = new ArrayList<>(); templates.add(new EmailTemplate().setName("重置密码邮件模板").setTitle("请确认你的密码修改请求").setBody("<div>Hi ${realname},</div><div>你正在使用验证码注册。</div>").setModel(PamirsUser.MODEL_MODEL).setEmailSenderSource(emailSenderSource)); new EmailTemplate().createOrUpdateBatch(templates); } 1.2 调用邮件发送组件发送邮件 /** * 代码中使用消息组件发送Email */ public void sendEmailByTemplate(){ try { EmailSender emailSender = (EmailSender) MessageEngine.get(MessageEngineTypeEnum.EMAIL_SEND).get(null);; EmailTemplate template = new EmailTemplate().setName("邮件模版名称").queryOne(); //标题:${name} //内容:${fieldInt}次数 String sendTo = "xxx@xxx.com"; String copyTo = "yyy@yyy.com"; Map<String, Object> objectData = new HashMap<>(); objectData.put("name","张三"); objectData.put("fieldInt",999); Boolean aBoolean = emailSender.send(template, objectData, sendTo, copyTo); if (null == aBoolean || !aBoolean) { log.error("发送邮件失败"); } } catch (Exception e) { log.error("发送确认邮件失败:,异常:{}", e); } } 2.发送短信 2.1 短信通道设置 2.1.1 方法一:通过yaml文件配置 pamirs: sms: aliyun: signatureMethod: HMAC-SHA1 endpoint: https://dysmsapi.aliyuncs.com version: '2017-05-25' accessKeyId: xxxxxxxxxxxxx signatureVersion: '1.0' accessKeySecret: xxxxxxxxxxxx regionId: cn-hangzhou timeZone: GMT signName: xxxxxx 2.1.2 方法二:工程启动加入初始化设置方法 private void…

    后端 2023年11月6日
    1.7K00
  • 【HighGo】后端部署使用HighGo数据库

    HighGo数据库配置 驱动配置 jdbc仓库 https://mvnrepository.com/artifact/com.highgo/HgdbJdbc Maven配置(6.0.1版本可用) <highgo.version>6.0.1.jre8</highgo.version> <dependency> <groupId>com.highgo</groupId> <artifactId>HgdbJdbc</artifactId> <version>${highgo.version}</version> </dependency> JDBC连接配置 pamirs: datasource: base: type: com.alibaba.druid.pool.DruidDataSource driverClassName: com.highgo.jdbc.Driver url: jdbc:highgo://127.0.0.1:5866/oio_base?currentSchema=base,utl_file username: xxxxxx password: xxxxxx initialSize: 5 maxActive: 200 minIdle: 5 maxWait: 60000 timeBetweenEvictionRunsMillis: 60000 testWhileIdle: true testOnBorrow: false testOnReturn: false poolPreparedStatements: true asyncInit: true 连接url配置 官方文档 https://www.highgo.com/document/zh-cn/application/jdbc.html url格式 jdbc:highgo://ip:端口号/数据库名?currentSchema=schema1,schema2 在jdbc连接配置时,${database}和${schema}必须完整配置,不可缺省。 jdbc指定schema时可以在currentSchema后指定多个schema,中间用,分隔,第一个schema为业务库表存放的主schema。 highgo数据库6.0版本里每个数据库默认会带一个utl_file的schema,该模式与文件访问功能有关,需要带在jdbc的schema中,但不能放在第一个。 其他连接参数如需配置,可自行查阅相关资料进行调优。 方言配置 pamirs方言配置 pamirs: dialect: ds: base: type: HighGoDB version: 6 major-version: 6.0.1 biz_data: type: HighGoDB version: 6 major-version: 6.0.1 数据库版本 type version majorVersion 6.0.x HighGo 6 6.0.1 PS:由于方言开发环境为6.0.1版本,其他类似版本(6.0.x)原则上不会出现太大差异,如出现其他版本无法正常支持的,可在文档下方留言。 schedule方言配置 pamirs: event: enabled: true schedule: enabled: true dialect: type: HighGoDB version: 6 major-version: 6.0.1 其他配置 逻辑删除的值配置 pamirs: mapper: global: table-info: logic-delete-value: (EXTRACT(epoch FROM CURRENT_TIMESTAMP) * 1000000 + EXTRACT(MICROSECONDS FROM CURRENT_TIMESTAMP))::bigint Highgo数据库用户初始化及授权 — init oio_base user (user name can be modified by oneself) CREATE USER oio_base WITH PASSWORD 'Test@12345678'; — if using automatic database and schema creation, this is very important. ALTER USER oio_base CREATEDB; SELECT * FROM pg_roles; — if using highgo database, this authorization is required. GRANT CREATE ON DATABASE highgo TO oio_base;

    2025年7月10日
    47600
  • Maven Setting 配置详解

    常用标签概览 servers/server:配置私有仓库用户名和密码进行认证,以 id 进行关联。 mirrors/mirror:配置镜像仓库拉取时的地址源和额外配置。 profiles/profile:配置多个可能使用的镜像仓库。 activeProfiles/activeProfile:配置默认激活的 profile,以 id 进行关联。 Oinone 私有仓库配置 以下配置可以在使用 Oinone 私有仓库的同时,也可以正常使用 aliyun 镜像源。 <servers> <server> <id>shushi</id> <username>${username}</username> <password>${password}</password> </server> </servers> <mirrors> <mirror> <id>shushi</id> <mirrorOf>shushi</mirrorOf> <url>http://ss.nexus.ixtx.fun/repository/public</url> <!– 忽略 https 认证,maven 版本过高时需要配置 –> <blocked>false</blocked> </mirror> </mirrors> <profiles> <profile> <id>shushi</id> <repositories> <repository> <!– 对应 server.id –> <id>shushi</id> <url>http://ss.nexus.ixtx.fun/repository/public</url> <releases> <enabled>true</enabled> </releases> <snapshots> <enabled>true</enabled> </snapshots> </repository> </repositories> <pluginRepositories> <pluginRepository> <!– 对应 server.id –> <id>shushi</id> <url>http://ss.nexus.ixtx.fun/repository/snapshots</url> <releases> <enabled>false</enabled> </releases> <snapshots> <enabled>true</enabled> </snapshots> </pluginRepository> </pluginRepositories> </profile> <profile> <id>aliyun</id> <repositories> <repository> <id>aliyun</id> <url>https://maven.aliyun.com/repository/public</url> <releases> <enabled>true</enabled> </releases> <snapshots> <enabled>false</enabled> </snapshots> </repository> </repositories> <pluginRepositories> <pluginRepository> <id>aliyun</id> <url>https://maven.aliyun.com/repository/public</url> <releases> <enabled>true</enabled> </releases> <snapshots> <enabled>false</enabled> </snapshots> </pluginRepository> </pluginRepositories> </profile> </profiles> <activeProfiles> <!– 使用 shushi 私有仓库 –> <activeProfile>shushi</activeProfile> <!– 使用 aliyun 镜像仓库 –> <activeProfile>aliyun</activeProfile> </activeProfiles> 常见问题 使用 mvn 时无法拉取 Oinone 最新版镜像,提示找不到对应的包 原因:在 Oinone 开源后,oinone-pamirs 内核相关包都被部署到 maven 中央仓库,但由于其他镜像仓库的同步存在延时,在未正确同步的其他镜像源拉取时会出现找不到对应的包相关异常。 解决方案:检查 mirrors 中是否配置了 aliyun 镜像源,如果配置了,使用上述 Oinone 私有仓库配置重新配置后,再进行拉取。这一问题是由于 mirrors 配置不当,拦截了所有从 maven 中央仓库拉取的地址替换为了 aliyun 镜像源导致的。

    2025年11月10日
    58700
  • 重写QueryPage时,增加额外的条件

    在需要对QueryPage增加额外的查询条件,比如DemoItem增加只展示创建人为当前用户的数据 @Function.Advanced(type = FunctionTypeEnum.QUERY, displayName = "查询列表") @Function.fun(FunctionConstants.queryPage) @Function(openLevel = {FunctionOpenEnum.LOCAL, FunctionOpenEnum.REMOTE, FunctionOpenEnum.API}) public Pagination<DemoItem> queryPage(Pagination<DemoItem> page, IWrapper<DemoItem> queryWrapper) { LambdaQueryWrapper<DemoItem> qw = ((QueryWrapper<DemoItem>) queryWrapper).lambda(); qw.eq(DemoItem::getCreateUid, PamirsSession.getUserId()); return demoItemService.queryPage(page, qw); }

    2023年11月1日
    95100

Leave a Reply

登录后才能评论