协同开发支持

协同开发概述

在使用Oinone进行业务开发中,目前开发方式为: 开发各个本地启动项目 与 设计器环境共库共redis的方式进行。

在多个开发人员同时修改一个模型,或者没有及时更新其他同学提交的代码时,存在业务模型创建的数据表字段被删除的情况,协同开发模式正式为解决这个问题而生。

版本支持

4.7.x版本 已经包含分布式支持。

使用步骤

1、业务后端boot工程引入协同开发包

<dependency>
    <groupId>pro.shushi.pamirs.distribution</groupId>
    <artifactId>pamirs-distribution-session-cd</artifactId>
</dependency>

2、yml文件配置ownSign

pamirs:
  distribution:
    session:
      allMetaRefresh: false
      # ownSign根据实际情况修改,一般为研发各自名称
      ownSign: wangxian

配置说明:
allMetaRefresh,全量刷新Redis中的元数据,绝大多数情况下都不需要配置;
1)第一次启动或者Redis的缓存被清空后,会自动进行全量。
2)配置为true表示强制进行全量,一般都不需要配置;
3)【推荐】默认增量的方式(即allMetaRefresh: false)写入redis的数据更少,相应的启动速度也更快
4)【强制】ownSign是环境隔离的设置,同一个项目组不同的开发人员之间,ownSign配置成不同的(即各自配置成各自的,达到互不干扰)

3、业务系统DB和缓存的约束
1)【强制】业务库和设计器Redis共用,包括Redis的前缀,租户和系统隔离键都需要一样(这三个值影响RedisKey的拼接)
2)【强制】base库业务系统与设计器共用;
3) 【强制】公共库即pamirs (资源-resource、用户-user、权限-auth、文件-file等)共用;
4)【强制】「业务库」数据源的别名必须一直,每个开发人员必须配置到自己的本地 或者是远程库库加一个后缀区分;

4、开发同学在各自访问设计器时,URL最后面增加;ownSign=wangxian后回车,ownSign会被保存到浏览器缓存中,后续访问其他的URL访问不需要再次输入;如果需要去掉ownSign的值,则直接把界面上的悬浮窗删掉即可。
协同开发支持
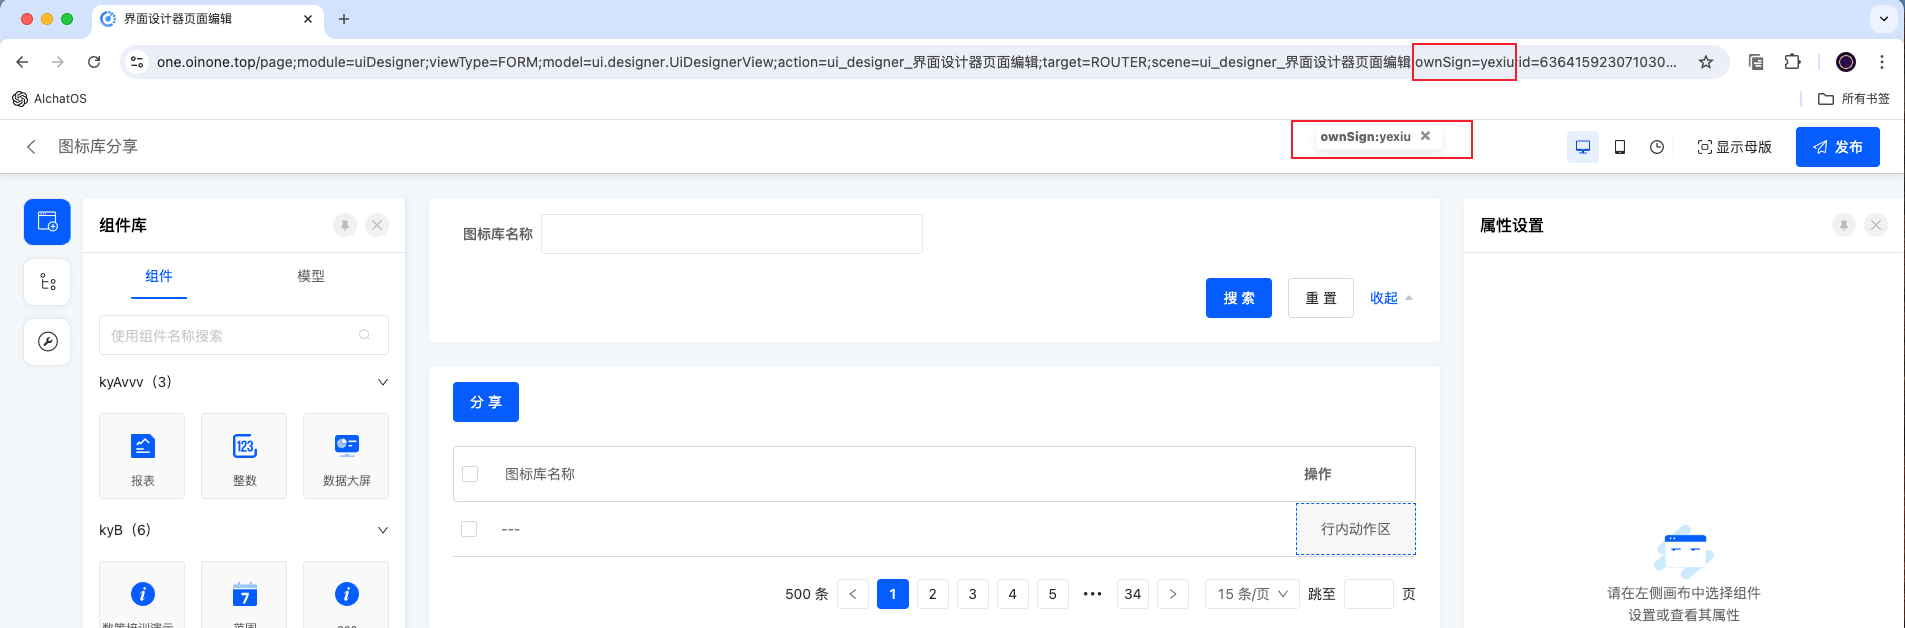
说明:访问设计URL上增加的ownSign需要与开发各自本地项目yml文件中ownSign的值相同。(每个开发人员各自用各自的ownSign)
PS:具体参数配置详见Oinone协同开发使用手册

Oinone社区 作者:望闲原创文章,如若转载,请注明出处:https://doc.oinone.top/backend/4821.html

访问Oinone官网:https://www.oinone.top获取数式Oinone低代码应用平台体验

(0)
望闲的头像望闲数式管理员
上一篇 2023年12月4日 pm8:49
下一篇 2023年12月5日 pm6:17

相关推荐

  • 字段类型之关系描述的特殊场景(常量关联)

    场景概述 【字段类型之关系与引用】一文中已经描述了各种关系字段的常规写法,还有一些特殊场景如:关系映射中存在常量,或者M2M中间表是大于两个字段构成。 场景描述 1、PetTalent模型增加talentType字段2、PetItem与PetTalent的多对多关系增加talentType(达人类型),3、PetItemRelPetTalent中间表维护petItemId、petTalentId以及talentType,PetDogItem和PetCatItem分别重写petTalents字段,关系中增加常量描述。示意图如下: 实际操作步骤 Step1 新增 TalentTypeEnum package pro.shushi.pamirs.demo.api.enumeration; import pro.shushi.pamirs.meta.annotation.Dict; import pro.shushi.pamirs.meta.common.enmu.BaseEnum; @Dict(dictionary = TalentTypeEnum.DICTIONARY,displayName = "达人类型") public class TalentTypeEnum extends BaseEnum<TalentTypeEnum,Integer> { public static final String DICTIONARY ="demo.TalentTypeEnum"; public final static TalentTypeEnum DOG =create("DOG",1,"狗达人","狗达人"); public final static TalentTypeEnum CAT =create("CAT",2,"猫达人","猫达人"); } Step2 PetTalent模型增加talentType字段 package pro.shushi.pamirs.demo.api.model; import pro.shushi.pamirs.demo.api.enumeration.TalentTypeEnum; import pro.shushi.pamirs.meta.annotation.Field; import pro.shushi.pamirs.meta.annotation.Model; @Model.model(PetTalent.MODEL_MODEL) @Model(displayName = "宠物达人",summary="宠物达人",labelFields ={"name"}) public class PetTalent extends AbstractDemoIdModel{ public static final String MODEL_MODEL="demo.PetTalent"; @Field(displayName = "达人") private String name; @Field(displayName = "达人类型") private TalentTypeEnum talentType; } Step3 修改PetItem的petTalents字段,在关系描述中增加talentType(达人类型) @Field.many2many(relationFields = {"petItemId"},referenceFields = {"petTalentId","talentType"},through = PetItemRelPetTalent.MODEL_MODEL ) @Field.Relation(relationFields = {"id"}, referenceFields = {"id","talentType"}) @Field(displayName = "推荐达人",summary = "推荐该商品的达人们") private List<PetTalent> petTalents; Step4 PetDogItem增加petTalents字段,重写父类PetItem的关系描述 talentType配置为常量,填入枚举的值 增加domain描述用户页面选择的时候自动过滤出特定类型的达人,RSQL用枚举的name @Field(displayName = "推荐达人") @Field.many2many( through = "PetItemRelPetTalent", relationFields = {"petItemId"}, referenceFields = {"petTalentId","talentType"} ) @Field.Relation(relationFields = {"id"}, referenceFields = {"id", "#1#"}, domain = " talentType == DOG") private List<PetTalent> petTalents; Step5 PetCatItem增加petTalents字段,重写父类PetItem的关系描述 talentType配置为常量,填入枚举的值 增加domain描述用户页面选择的时候自动过滤出特定类型的达人,RSQL用枚举的name @Field(displayName = "推荐达人") @Field.many2many( through = "PetItemRelPetTalent", relationFields = {"petItemId"}, referenceFields = {"petTalentId","talentType"} ) @Field.Relation(relationFields = {"id"}, referenceFields = {"id", "#2#"}, domain = " talentType == CAT") private List<PetTalent> petTalents; Step6 PetCatItem增加petTalents字段,many2one关系示例 talentType配置为常量,填入枚举的值 增加domain描述用户页面选择的时候自动过滤出特定类型的达人,RSQL用枚举的name @Model.model(PetPet.MODEL_MODEL) @Model(displayName…

    2024年5月25日
    2.0K00
  • 【PostgreSQL】后端部署使用PostgreSQL数据库

    PostgreSQL数据库配置 驱动配置 Maven配置(14.3版本可用) <postgresql.version>42.6.0</postgresql.version> <dependency> <groupId>org.postgresql</groupId> <artifactId>postgresql</artifactId> <version>${postgresql.version}</version> </dependency> 离线驱动下载 postgresql-42.2.18.jarpostgresql-42.6.0.jarpostgresql-42.7.3.jar JDBC连接配置 pamirs: datasource: base: type: com.alibaba.druid.pool.DruidDataSource driverClassName: org.postgresql.Driver url: jdbc:postgresql://127.0.0.1:5432/pamirs?currentSchema=base username: xxxxxx password: xxxxxx 连接url配置 暂无官方资料 url格式 jdbc:postgresql://${host}:${port}/${database}?currentSchema=${schema} 在jdbc连接配置时,${database}和${schema}必须完整配置,不可缺省。 其他连接参数如需配置,可自行查阅相关资料进行调优。 方言配置 pamirs方言配置 pamirs: dialect: ds: base: type: PostgreSQL version: 14 major-version: 14.3 pamirs: type: PostgreSQL version: 14 major-version: 14.3 数据库版本 type version majorVersion 14.x PostgreSQL 14 14.3 PS:由于方言开发环境为14.3版本,其他类似版本(14.x)原则上不会出现太大差异,如出现其他版本无法正常支持的,可在文档下方留言。 schedule方言配置 pamirs: event: enabled: true schedule: enabled: true dialect: type: PostgreSQL version: 14 major-version: 14.3 type version majorVersion PostgreSQL 14 14.3 PS:由于schedule的方言在多个版本中并无明显差异,目前仅提供一种方言配置。 其他配置 逻辑删除的值配置 pamirs: mapper: global: table-info: logic-delete-value: (EXTRACT(epoch FROM CURRENT_TIMESTAMP) * 1000000 + EXTRACT(MICROSECONDS FROM CURRENT_TIMESTAMP))::bigint PostgreSQL数据库用户初始化及授权 — init root user (user name can be modified by oneself) CREATE USER root WITH PASSWORD 'password'; — if using automatic database and schema creation, this is very important. ALTER USER root CREATEDB; SELECT * FROM pg_roles; — if using postgres database, this authorization is required. GRANT CREATE ON DATABASE postgres TO root;

    2023年11月1日
    1.5K00
  • 函数之触发与定时配置和示例

    异步任务总体介绍 函数的触发和定时在很多场景中会用到,也是一个oinone的基础能力。比如我们的流程产品中在定义流程触发时就会让用户选择模型触发还是时间触发,就是用到了函数的触发与定时能力。 触发任务TriggerTaskAction 触发任务的创建,使用sql-record模块监听mysql的binlog事件,通过rocketmq发送变更数据消息,收到MQ消息后,创建TriggerAutoTask。 触发任务的执行,使用TBSchedule拉取触发任务后,执行相应函数。 项目中引入依赖 1、项目的API工程引入依赖pamirs-core-trigger模块 <dependency> <groupId>pro.shushi.pamirs.core</groupId> <artifactId>pamirs-trigger-api</artifactId> </dependency> 2、DemoModule在模块依赖定义中增加@Module(dependencies={TriggerModule.MODULE_MODULE}) @Component @Module( name = DemoModule.MODULE_NAME, displayName = "oinoneDemo工程", version = "1.0.0", dependencies = {ModuleConstants.MODULE_BASE, CommonModule.MODULE_MODULE, UserModule.MODULE_MODULE, TriggerModule.MODULE_MODULE} ) @Module.module(DemoModule.MODULE_MODULE) @Module.Advanced(selfBuilt = true, application = true) @UxHomepage(PetShopProxy.MODEL_MODEL) public class DemoModule implements PamirsModule { ……其他代码 } 3、项目的boot工程引入依赖 <dependency> <groupId>pro.shushi.pamirs.core</groupId> <artifactId>pamirs-trigger-core</artifactId> </dependency> <dependency> <groupId>pro.shushi.pamirs.core</groupId> <artifactId>pamirs-trigger-bridge-tbschedule</artifactId> </dependency> <dependency> <groupId>pro.shushi.pamirs.core</groupId> <artifactId>pamirs-sql-record-core</artifactId> </dependency> yml文件修改(applcation-xxx.yml) a. 修改pamris.event.enabled和pamris.event.schedule.enabled为trueb. pamirs_boot_modules增加启动模块:trigger、sql_record pamirs: record: sql: #改成自己路径 store: /opt/pamirs/logs … event: enabled: true schedule: enabled: true rocket-mq: namesrv-addr: 127.0.0.1:9876 boot: init: true sync: true modules: – base -…… – trigger – sql_record -…… 新建触发任务 新建PetTalentTrigger类,当PetTalent模型的数据记录被新建时触发系统做一些事情 package pro.shushi.pamirs.demo.core.trigger; import pro.shushi.pamirs.demo.api.model.PetTalent; import pro.shushi.pamirs.meta.annotation.Fun; import pro.shushi.pamirs.meta.annotation.Function; import pro.shushi.pamirs.meta.annotation.fun.extern.Slf4j; import pro.shushi.pamirs.trigger.annotation.Trigger; import pro.shushi.pamirs.trigger.enmu.TriggerConditionEnum; @Fun(PetTalent.MODEL_MODEL) @Slf4j public class PetTalentTrigger { @Function @Trigger(displayName = “PetTalent创建时触发”,name = “PetTalent#Trigger#onCreate”,condition = TriggerConditionEnum.ON_CREATE) public PetTalent onCreate(PetTalent data){ log.info(data.getName() + “,被创建”); //可以增加逻辑 return data; } } 定时任务 定时任务是一种非常常见的模式,这里就不介绍概念了,直接进入示例环节 新建PetTalentAutoTask实现ScheduleAction getInterfaceName()需要跟taskAction.setExecuteNamespace定义保持一致,都是函数的命名空间 taskAction.setExecuteFun("execute");跟执行函数名“execute”一致 TaskType需配置为CYCLE_SCHEDULE_NO_TRANSACTION_TASK,把定时任务的schedule线程分开,要不然有一个时间长的任务会导致普通异步或触发任务全部延时。 package pro.shushi.pamirs.demo.core.task; import org.springframework.beans.factory.annotation.Autowired; import org.springframework.stereotype.Component; import pro.shushi.pamirs.core.common.enmu.TimeUnitEnum; import pro.shushi.pamirs.demo.api.model.PetTalent; import pro.shushi.pamirs.meta.annotation.Fun; import pro.shushi.pamirs.meta.annotation.Function; import pro.shushi.pamirs.meta.annotation.fun.extern.Slf4j; import pro.shushi.pamirs.meta.domain.fun.FunctionDefinition; import pro.shushi.pamirs.middleware.schedule.api.ScheduleAction; import pro.shushi.pamirs.middleware.schedule.common.Result; import pro.shushi.pamirs.middleware.schedule.domain.ScheduleItem; import pro.shushi.pamirs.middleware.schedule.eunmeration.TaskType; import pro.shushi.pamirs.trigger.enmu.TriggerTimeAnchorEnum; import pro.shushi.pamirs.trigger.model.ScheduleTaskAction; import pro.shushi.pamirs.trigger.service.ScheduleTaskActionService; @Slf4j @Component @Fun(PetTalent.MODEL_MODEL) public class PetTalentAutoTask implements…

    2024年5月25日
    1.6K00
  • 工作流-流程代办等页面自定义

    1. 审批/填写节点的视图页面 在界面设计器中创建对应模型的表单视图,可根据业务场景需要自定义所需流程待办的审批页面 2. 在审批/填写节点中选择刚创建的视图 在工作流待办数据权限可在节点数据权限中可对字段设置查看、编辑、隐藏

    2024年5月14日
    2.0K00
  • 流程设计流程结束通知SPI接口

    1.实现SPI接口 import pro.shushi.pamirs.meta.common.spi.SPI; import pro.shushi.pamirs.meta.common.spi.factory.SpringServiceLoaderFactory; import pro.shushi.pamirs.workflow.app.api.entity.WorkflowContext; import pro.shushi.pamirs.workflow.app.api.model.WorkflowInstance; @SPI(factory = SpringServiceLoaderFactory.class) public interface WorkflowEndNoticeApi { void execute(WorkflowContext context, WorkflowInstance instance); } 自定义通知逻辑 /** * 自定义扩展流程结束时扩展点 */ @Order(999) @Component @SPI.Service public class MyWorkflowEndNoticeApi implements WorkflowEndNoticeApi { @Override public void execute(WorkflowContext context, WorkflowInstance instance) { Long dataBizId = instance.getDataBizId(); //todo自定义逻辑 } }

    2023年12月26日
    1.5K00

Leave a Reply

登录后才能评论