集成开放-开放接口如何鉴权加密

使用前提

  • 已经阅读过文档【oinone 7天从入门到精通】的6.2章节-集成平台
  • 已经依赖了内置模块集成平台eip
    boot启动工程pom.xml新增jar依赖

    <dependency>
    <groupId>pro.shushi.pamirs.core</groupId>
    <artifactId>pamirs-eip2-core</artifactId>
    </dependency>
    <dependency>
    <groupId>pro.shushi.pamirs.core</groupId>
    <artifactId>pamirs-eip2-view</artifactId>
    </dependency>

    配置文件application.yml新增启动依赖模块

    pamirs:
    boot:
    modules:
      - eip
    eip:
    open-api:
      enabled: true
      route:
        # 开放接口访问IP,开放外网可以配置为0.0.0.0
        host: 127.0.0.1
        # 开放接口访问端口
        port: 8094
        # 认证Token加密的AES密钥
        aes-key: NxDZUddmvdu3QQpd5jIww2skNx6U0w0uOAXj3NUCLu8=

一、新增开放接口示例代码

开放接口类定义

package pro.shushi.pamirs.demo.api.open;

import pro.shushi.pamirs.meta.annotation.Fun;
import pro.shushi.pamirs.meta.annotation.Function;

@Fun(TestOpenApiModelService.FUN_NAMESPACE)
public interface TestOpenApiModelService {

    String FUN_NAMESPACE = "demo.open.TestOpenApiModelService";
    @Function
    TestOpenApiModel queryById(Long id);

}

开放接口实现类

package pro.shushi.pamirs.demo.core.open;

import org.apache.camel.ExtendedExchange;
import org.springframework.stereotype.Component;
import pro.shushi.pamirs.core.common.SuperMap;
import pro.shushi.pamirs.demo.api.open.TestEipConfig;
import pro.shushi.pamirs.demo.api.open.TestOpenApiModel;
import pro.shushi.pamirs.demo.api.open.TestOpenApiModelService;
import pro.shushi.pamirs.demo.api.open.TestOpenApiResponse;
import pro.shushi.pamirs.eip.api.IEipContext;
import pro.shushi.pamirs.eip.api.annotation.Open;
import pro.shushi.pamirs.eip.api.constant.EipFunctionConstant;
import pro.shushi.pamirs.eip.api.enmu.EipExpEnumerate;
import pro.shushi.pamirs.eip.api.entity.openapi.OpenEipResult;
import pro.shushi.pamirs.meta.annotation.Fun;
import pro.shushi.pamirs.meta.annotation.Function;
import pro.shushi.pamirs.meta.common.exception.PamirsException;

import java.util.Optional;

@Fun(TestOpenApiModelService.FUN_NAMESPACE)
@Component
public class TestOpenApiModelServiceImpl implements TestOpenApiModelService {

    @Override
    @Function
    public TestOpenApiModel queryById(Long id) {
        return new TestOpenApiModel().queryById(id);
    }

    @Function
    @Open
    @Open.Advanced(
            authenticationProcessorFun = EipFunctionConstant.DEFAULT_AUTHENTICATION_PROCESSOR_FUN,
            authenticationProcessorNamespace = EipFunctionConstant.FUNCTION_NAMESPACE
    )
    public OpenEipResult<TestOpenApiResponse> queryById4Open(IEipContext<SuperMap> context , ExtendedExchange exchange) {
        String id = Optional.ofNullable(String.valueOf(context.getInterfaceContext().getIteration("id"))).orElse("");
        TestOpenApiModel temp  = queryById(Long.valueOf(id));
        TestOpenApiResponse response = new TestOpenApiResponse();
        if(temp != null ) {
            response.setAge(temp.getAge());
            response.setId(temp.getId());
            response.setName(temp.getName());
        }else{
            response.setAge(1);
            response.setId(1L);
            response.setName("oinone eip test");
        }
        OpenEipResult<TestOpenApiResponse> result = new OpenEipResult<TestOpenApiResponse>(response);
        return result;
    }

    @Function
    @Open(config = TestEipConfig.class,path = "error")
    @Open.Advanced(
            httpMethod = "post",
            authenticationProcessorFun = EipFunctionConstant.DEFAULT_AUTHENTICATION_PROCESSOR_FUN,
            authenticationProcessorNamespace = EipFunctionConstant.FUNCTION_NAMESPACE
    )
    public OpenEipResult<TestOpenApiResponse> queryById4OpenError(IEipContext<SuperMap> context , ExtendedExchange exchange) {
        throw PamirsException.construct(EipExpEnumerate.SYSTEM_ERROR).appendMsg("测试异常").errThrow();
    }
}

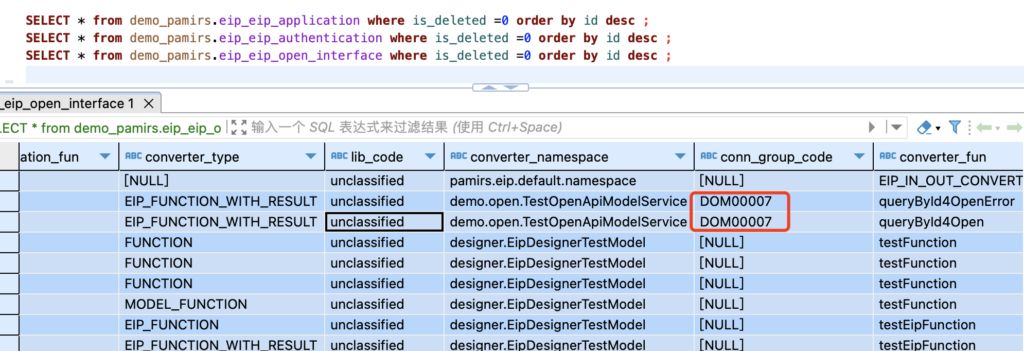
启动工程后去开放接口配置表,将接口的业务域字段conn_group_code设置为其他分类的编码DOM00007

SELECT * from eip_eip_open_interface where is_deleted = 0 order by id desc;
集成开放-开放接口如何鉴权加密

二、为调用方创建应用

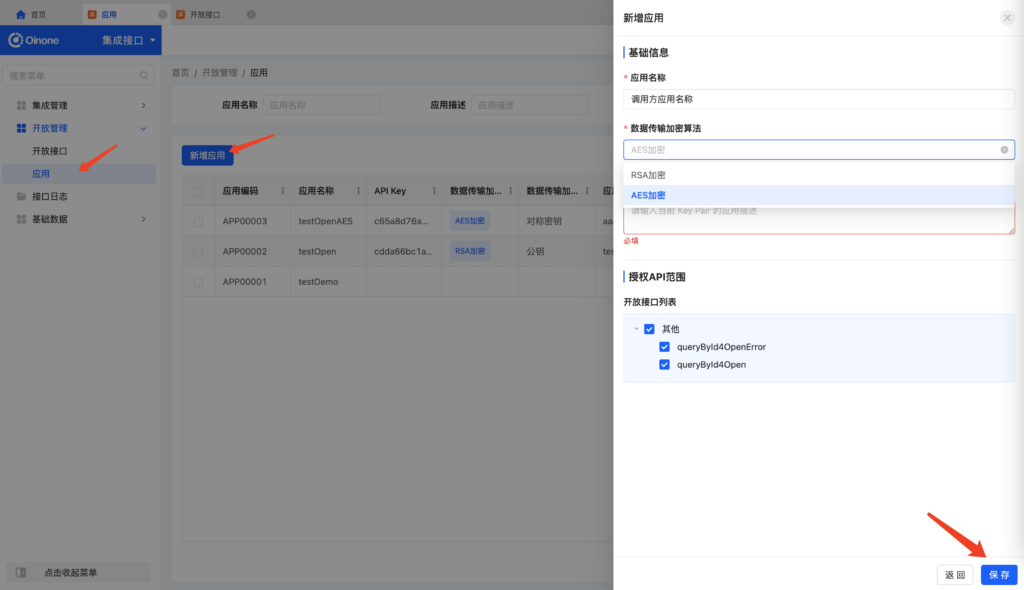
通过集成接口的应用创建,可以选择加密方式和开发接口列表中哪些接口授权该应用开放使用
集成开放-开放接口如何鉴权加密

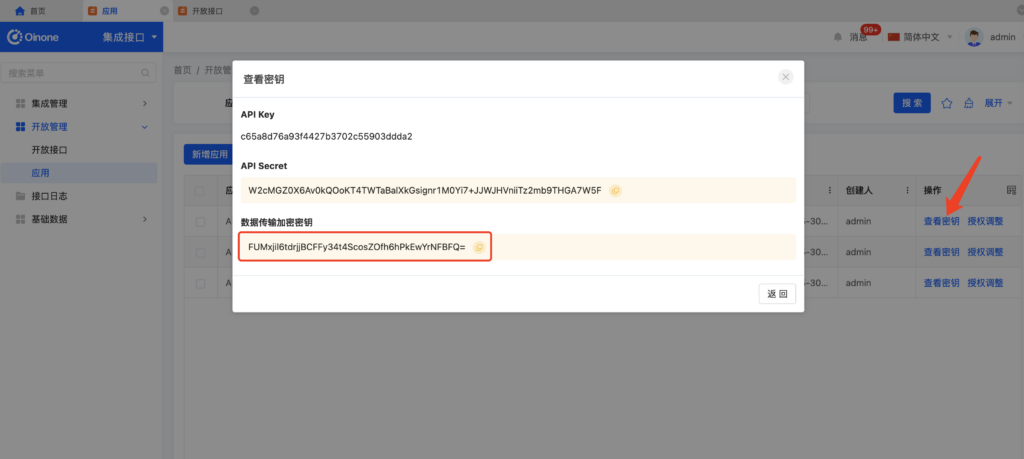
应用创建完成后,可以在表格操作栏通过查看密钥动作查看appKeyappSecret数据传输加密密钥的公钥
集成开放-开放接口如何鉴权加密

三、验证请求

根据appKey和appSecret获取accessToken
curl --location 'http://127.0.0.1:8094/openapi/get/access-token?tenant=pamirs' \
--header 'Content-Type: application/x-www-form-urlencoded' \
--data-urlencode 'appKey=c65a8d76a93f4427b3702c55903ddda2' \
--data-urlencode 'appSecret=W2cMGZ0X6Av0kQOoKT4TWTaBalXkGsignr1M0Yi7+JJWJHVniiTz2mb9THGA7W5F'
调用开放接口

调用方加密请求体工具类

package pro.shushi.pamirs.demo.core.open;

import com.alibaba.fastjson.JSON;
import pro.shushi.pamirs.core.common.EncryptHelper;

import java.io.IOException;
import java.util.HashMap;
import java.util.Map;

/**
 * 加密请求工具类
 */
public class SignRequestUtil {

    /**
     * 加密请求
     * @param params 请求参数
     * @param publicKey 数据传输加密密钥-公钥
     * @param signMethod AES/RSA
     * @return
     */
    public static String AESSignRequest(Map<String, Object> params, String publicKey, String signMethod) {
        String paramStr = JSON.toJSONString(params);
        try {
            String encryptParamStr = EncryptHelper.encryptByKey(EncryptHelper.getSecretKeySpec(signMethod, publicKey), paramStr);
            return "{ result: \"" + encryptParamStr + "\" }";
        } catch (Exception e) {
            throw new RuntimeException(e);
        }
    }

    public static void main(String[] args) throws IOException {
        Map<String, Object> params = new HashMap<>();
        params.put("id", "111");
        String encryptParam = AESSignRequest(params, "FUMxjil6tdrjjBCFFy34t4ScosZOfh6hPkEwYrNFBFQ=", "AES");
        System.out.println(encryptParam);
        // 得到结果 { result: "4hSjNkx9TUDjQI8OGkbiFQ=="}
    }
}
curl --location 'http://127.0.0.1:8094/openapi/pamirs/queryById4Open' \
--header 'accessToken: T1SSd8aiJCFhsTyQepLCzRqcVsDH3wTjg9srXEZTp/S0rUbRAAIwmAX8Dgjbw0MM' \
--header 'Content-Type: application/json' \
--data '{ result: "4hSjNkx9TUDjQI8OGkbiFQ=="}'

Oinone社区 作者:nation原创文章,如若转载,请注明出处:https://doc.oinone.top/kai-fa-shi-jian/14901.html

访问Oinone官网:https://www.oinone.top获取数式Oinone低代码应用平台体验

Like (0)
nation's avatarnation数式员工
Previous 2024年7月25日 am12:23
Next 2024年7月25日 pm2:09

相关推荐

  • Maven Setting 配置详解

    常用标签概览 servers/server:配置私有仓库用户名和密码进行认证,以 id 进行关联。 mirrors/mirror:配置镜像仓库拉取时的地址源和额外配置。 profiles/profile:配置多个可能使用的镜像仓库。 activeProfiles/activeProfile:配置默认激活的 profile,以 id 进行关联。 Oinone 私有仓库配置 以下配置可以在使用 Oinone 私有仓库的同时,也可以正常使用 aliyun 镜像源。 <servers> <server> <id>shushi</id> <username>${username}</username> <password>${password}</password> </server> </servers> <mirrors> <mirror> <id>shushi</id> <mirrorOf>shushi</mirrorOf> <url>http://ss.nexus.ixtx.fun/repository/public</url> <!– 忽略 https 认证,maven 版本过高时需要配置 –> <blocked>false</blocked> </mirror> </mirrors> <profiles> <profile> <id>shushi</id> <repositories> <repository> <!– 对应 server.id –> <id>shushi</id> <url>http://ss.nexus.ixtx.fun/repository/public</url> <releases> <enabled>true</enabled> </releases> <snapshots> <enabled>true</enabled> </snapshots> </repository> </repositories> <pluginRepositories> <pluginRepository> <!– 对应 server.id –> <id>shushi</id> <url>http://ss.nexus.ixtx.fun/repository/snapshots</url> <releases> <enabled>false</enabled> </releases> <snapshots> <enabled>true</enabled> </snapshots> </pluginRepository> </pluginRepositories> </profile> <profile> <id>aliyun</id> <repositories> <repository> <id>aliyun</id> <url>https://maven.aliyun.com/repository/public</url> <releases> <enabled>true</enabled> </releases> <snapshots> <enabled>false</enabled> </snapshots> </repository> </repositories> <pluginRepositories> <pluginRepository> <id>aliyun</id> <url>https://maven.aliyun.com/repository/public</url> <releases> <enabled>true</enabled> </releases> <snapshots> <enabled>false</enabled> </snapshots> </pluginRepository> </pluginRepositories> </profile> </profiles> <activeProfiles> <!– 使用 shushi 私有仓库 –> <activeProfile>shushi</activeProfile> <!– 使用 aliyun 镜像仓库 –> <activeProfile>aliyun</activeProfile> </activeProfiles> 常见问题 使用 mvn 时无法拉取 Oinone 最新版镜像,提示找不到对应的包 原因:在 Oinone 开源后,oinone-pamirs 内核相关包都被部署到 maven 中央仓库,但由于其他镜像仓库的同步存在延时,在未正确同步的其他镜像源拉取时会出现找不到对应的包相关异常。 解决方案:检查 mirrors 中是否配置了 aliyun 镜像源,如果配置了,使用上述 Oinone 私有仓库配置重新配置后,再进行拉取。这一问题是由于 mirrors 配置不当,拦截了所有从 maven 中央仓库拉取的地址替换为了 aliyun 镜像源导致的。

    2025年11月10日
    74500
  • Oinone项目引入Nacos作为注册中心

    Oinone项目引入Nacos作为注册中心 Oinone项目的默认dubbo注册中心为zk, 实际项目中有可能要求用Nacos作注册中心。 Oinone默认引入的nacos-client-1.4.1,低版本不支持认证配置;该客户端版本支持Nacos服务1.x的和2.x的版本 一、项目中增加依赖 项目主pom引入依赖。 <dependency> <groupId>org.apache.dubbo</groupId> <artifactId>dubbo-registry-nacos</artifactId> <version>2.7.22</version> </dependency> 项目的boot工程的pom引入依赖 <dependency> <groupId>org.apache.dubbo</groupId> <artifactId>dubbo-registry-nacos</artifactId> </dependency> 二、配置修改 修改dubbo服务注册到nacos bootstrap.yml文件的配置,或者application.yml文件中修改dubbo的配置 dubbo: application: name: pamirs-demo version: 1.0.0 registry: id: pamirs-demo-registry address: nacos://192.168.0.118:8848 username: nacos # 认证的用户名(根据情况自行修改),未开启认证可以不需要配置username和password password: nacos # 认证的密码(根据情况自行修改),未开启认证可以不需要配置username和password # dubbo使用nacos的注册中心往配置中心写入配置关闭配置 use-as-metadata-center: false use-as-config-center: false config-center: address: nacos://192.168.0.118:8848 username: nacos # 认证的用户名(根据情况自行修改),未开启认证可以不需要配置username和password password: nacos # 认证的密码(根据情况自行修改),未开启认证可以不需要配置username和password metadata-report: failfast: false # 关闭错误上报的功能 address: nacos://192.168.0.118:8848 username: nacos # 认证的用户名(根据情况自行修改),未开启认证可以不需要配置username和password password: nacos # 认证的密码(根据情况自行修改),未开启认证可以不需要配置username和password protocol: name: dubbo port: -1 serialization: pamirs scan: base-packages: pro.shushi cloud: subscribed-services: 其他 Oinone构建分布式项目一些注意点,包括服务远程发布范围、关闭Dubbo元数据上报日志、Nacos作为注册中的配置 Nacos做为注册中心:如何调用其他系统的SpringCloud服务?

    2024年2月28日
    1.8K00
  • Oinone连接外部数据源方案

    场景描述 在实际业务场景中,有是有这样的需求:链接外部数据进行数据的获取;通常的做法:1、【推荐】通过集成平台的数据连接器,链接外部数据源进行数据操作;2、项目代码中链接数据源,即通过程序代码操作外部数据源的数据; 本篇文章只介绍通过程序代码操作外部数据源的方式. 整体方案 Oinone管理外部数据源,即yml中配置外部数据源; 后端通过Mapper的方式进行数据操作(增/删/查/改); 调用Mapper接口的时候,指定到外部数据源; 详细步骤 1、数据源配置(application.yml), 与正常的数据源配置一样 out_ds_name(外部数据源别名): driverClassName: com.mysql.cj.jdbc.Driver type: com.alibaba.druid.pool.DruidDataSource # local环境配置调整 url: jdbc:mysql://ip(host):端口/数据库Schema?useSSL=false&allowPublicKeyRetrieval=true&useServerPrepStmts=true&cachePrepStmts=true&useUnicode=true&characterEncoding=utf8&serverTimezone=Asia/Shanghai&autoReconnect=true&allowMultiQueries=true username: 用户名 password: 命名 initialSize: 5 maxActive: 200 minIdle: 5 maxWait: 60000 timeBetweenEvictionRunsMillis: 60000 testWhileIdle: true testOnBorrow: false testOnReturn: false poolPreparedStatements: true asyncInit: true 2、外部数据源其他配置外部数据源限制创建表结构的执行,可以通过配置指定【不创建DB,不创建数据表】 persistence: global: auto-create-database: true auto-create-table: true ds: out_ds_name(外部数据源别名): # 不创建DB auto-create-database: false # 不创建数据表 auto-create-table: false 3、后端写Mapper SQL Mapper跟使用原生mybaits/mybaits-plus写法一样,无特殊限制; Mapper和SQL写到一起,或者分开两个文件都可以 4、Mapper被Service或者Action调用1)启动的Application中@MapperScan需要扫描到对应的包。2)调用是与普通bean一样(即调用方式跟传统的方式样),唯一的区别就是加上DsHintApi,即指定Mapper所使用的数据源。 @Autowired private ScheduleItemMapper scheduleItemMapper; public saveData(Object data) { ScheduleQuery scheduleQuery = new ScheduleQuery(); //scheduleQuery.setActionName(); try (DsHintApi dsHint = DsHintApi.use(“外部数据源名称”)) { List<ScheduleItem> scheduleItems = scheduleItemMapper.selectListForSerial(scheduleQuery); // 具体业务逻辑 } } 其他参考:如何自定义sql语句:https://doc.oinone.top/backend/4759.html

    2024年5月17日
    2.2K00
  • 如何使用GQL工具正确发起请求

    简介 本文将讲解一下如何正确发起GQL请求和GQL工具使用过程中的常见问题。 参数介绍 请求url和请求方法在浏览器的请求标头里面可以查到,保持一致就可以向服务正常发送请求,但还缺少请求体确定请求哪个接口。 每个请求都包括两部分内容:1. Query 2. Variables右键Query和Variables复制值直接拷贝到工具中就可以正常请求了。 注意:如果使用admin账号登录,请求的时候可以不携带Variables参数,因为admin没有权限控制,如果使用其他用户,就必须携带Variables参数,否则会被权限拦截。

    2024年10月25日
    1.8K00
  • 如何通过 Oineone 平台自定义视图

    在 Oineone 平台上,自定义视图允许用户替换默认提供的页面布局,以使用自定义页面。本文将指导您如何利用 Oineone 提供的 API 来实现这一点。 默认视图介绍 Oineone 平台提供了多种默认视图,包括: 表单视图 表格视图 表格视图 (左树右表) 详情视图 画廊视图 树视图 每种视图都有其标准的 layout。自定义视图实际上是替换这些默认 layout 的过程。 默认的表单视图 layout <view type="FORM"> <element widget="actionBar" slot="actionBar" slotSupport="action"> <xslot name="actions" slotSupport="action" /> </element> <element widget="form" slot="form"> <xslot name="fields" slotSupport="pack,field" /> </element> </view> 内嵌的的表单视图 layout <view type="FORM"> <element widget="form" slot="form"> <xslot name="fields" slotSupport="pack,field" /> </element> </view> 默认的表格 <view type="TABLE"> <pack widget="group"> <view type="SEARCH"> <element widget="search" slot="search" slotSupport="field" /> </view> </pack> <pack widget="group" slot="tableGroup"> <element widget="actionBar" slot="actionBar" slotSupport="action"> <xslot name="actions" slotSupport="action" /> </element> <element widget="table" slot="table" slotSupport="field"> <element widget="expandColumn" slot="expandRow" /> <xslot name="fields" slotSupport="field" /> <element widget="rowActions" slot="rowActions" slotSupport="action" /> </element> </pack> </view> 内嵌的的表格 <view type="TABLE"> <view type="SEARCH"> <element widget="search" slot="search" slotSupport="field" /> </view> <element widget="actionBar" slot="actionBar" slotSupport="action"> <xslot name="actions" slotSupport="action" /> </element> <element widget="table" slot="table"> <element widget="expandColumn" slot="expandRow" /> <xslot name="fields" slotSupport="field" /> <element widget="rowActions" slot="rowActions" /> </element> </view> 左树右表 <view type="table"> <pack title="" widget="group"> <view type="search"> <element slot="search" widget="search"/> </view> </pack> <pack title="" widget="group"> <pack widget="row" wrap="false"> <pack widget="col" width="257"> <pack title="" widget="group"> <pack widget="col"> <element slot="tree" widget="tree"/> </pack> </pack> </pack> <pack mode="full" widget="col"> <pack widget="row"> <element justify="START" slot="actionBar"…

    2024年4月3日
    1.6K00

Leave a Reply

Please Login to Comment